


温馨提示:关于Android的很多内容都已更新换代,但是整体的逻辑框架没有大的改变,所提供的文章仅供大家对于Android有个大体的认识与了解。作者也在不断学习的阶段,希望大家一起进步!
Chapter 06 基本程序单元Activity
在前面介绍的实例中已经应用过Activity,不过那些实例中的所有操作都是在一个Activity中进行的,在实际的应用开发中,经常需要包含多个Activity,而且这些Activity之间可以相互跳转或传递数据,本章将对Activity进行介绍。
6.1 Activity概述
在Android应用中,提供了4大基本组件,分别是Activity、Service、BroadcastReceiver和ContentProvider。其中Activity是Android应用最常见的组件之一,它的中文意思是活动。在Android中,Activity代表手机或者平板电脑中的一屏,它提供了和用户交互的可视化界面。在一个Activity中,可以添加很多组件,这些组件负责具体的功能。
在一个Android应用中,可以有多个Activity,这些Activity组成了Activity栈(Stack),当前活动的Activity位于栈顶,之前的Activity被压入下面,成为非活动Activity,等待是否可以被恢复为活动状态。在Activity的生命周期中,有如下表所示的4个重要状态:
| 状态 | 描述 |
|---|---|
| 运行状态 | 当前的Activity,位于Activity栈顶,用户可见,并且可以获得焦点 |
| 暂停状态 | 失去焦点的Activity,仍然可见,但是在内存低的情况下,不能被系统killed(杀死) |
| 停止状态 | 该Activity被其他Activity所覆盖,不可见,但是它仍然保存所有的状态和信息。当内存低的情况下,它将会被系统killed(杀死) |
| 销毁状态 | 该Activity结束,或Activity所在的虚拟器进程结束 |
在了解Activity的4个重要状态后,再来看下图,下图显示了一个Activity的重要状态,以及祥光的回调方法:
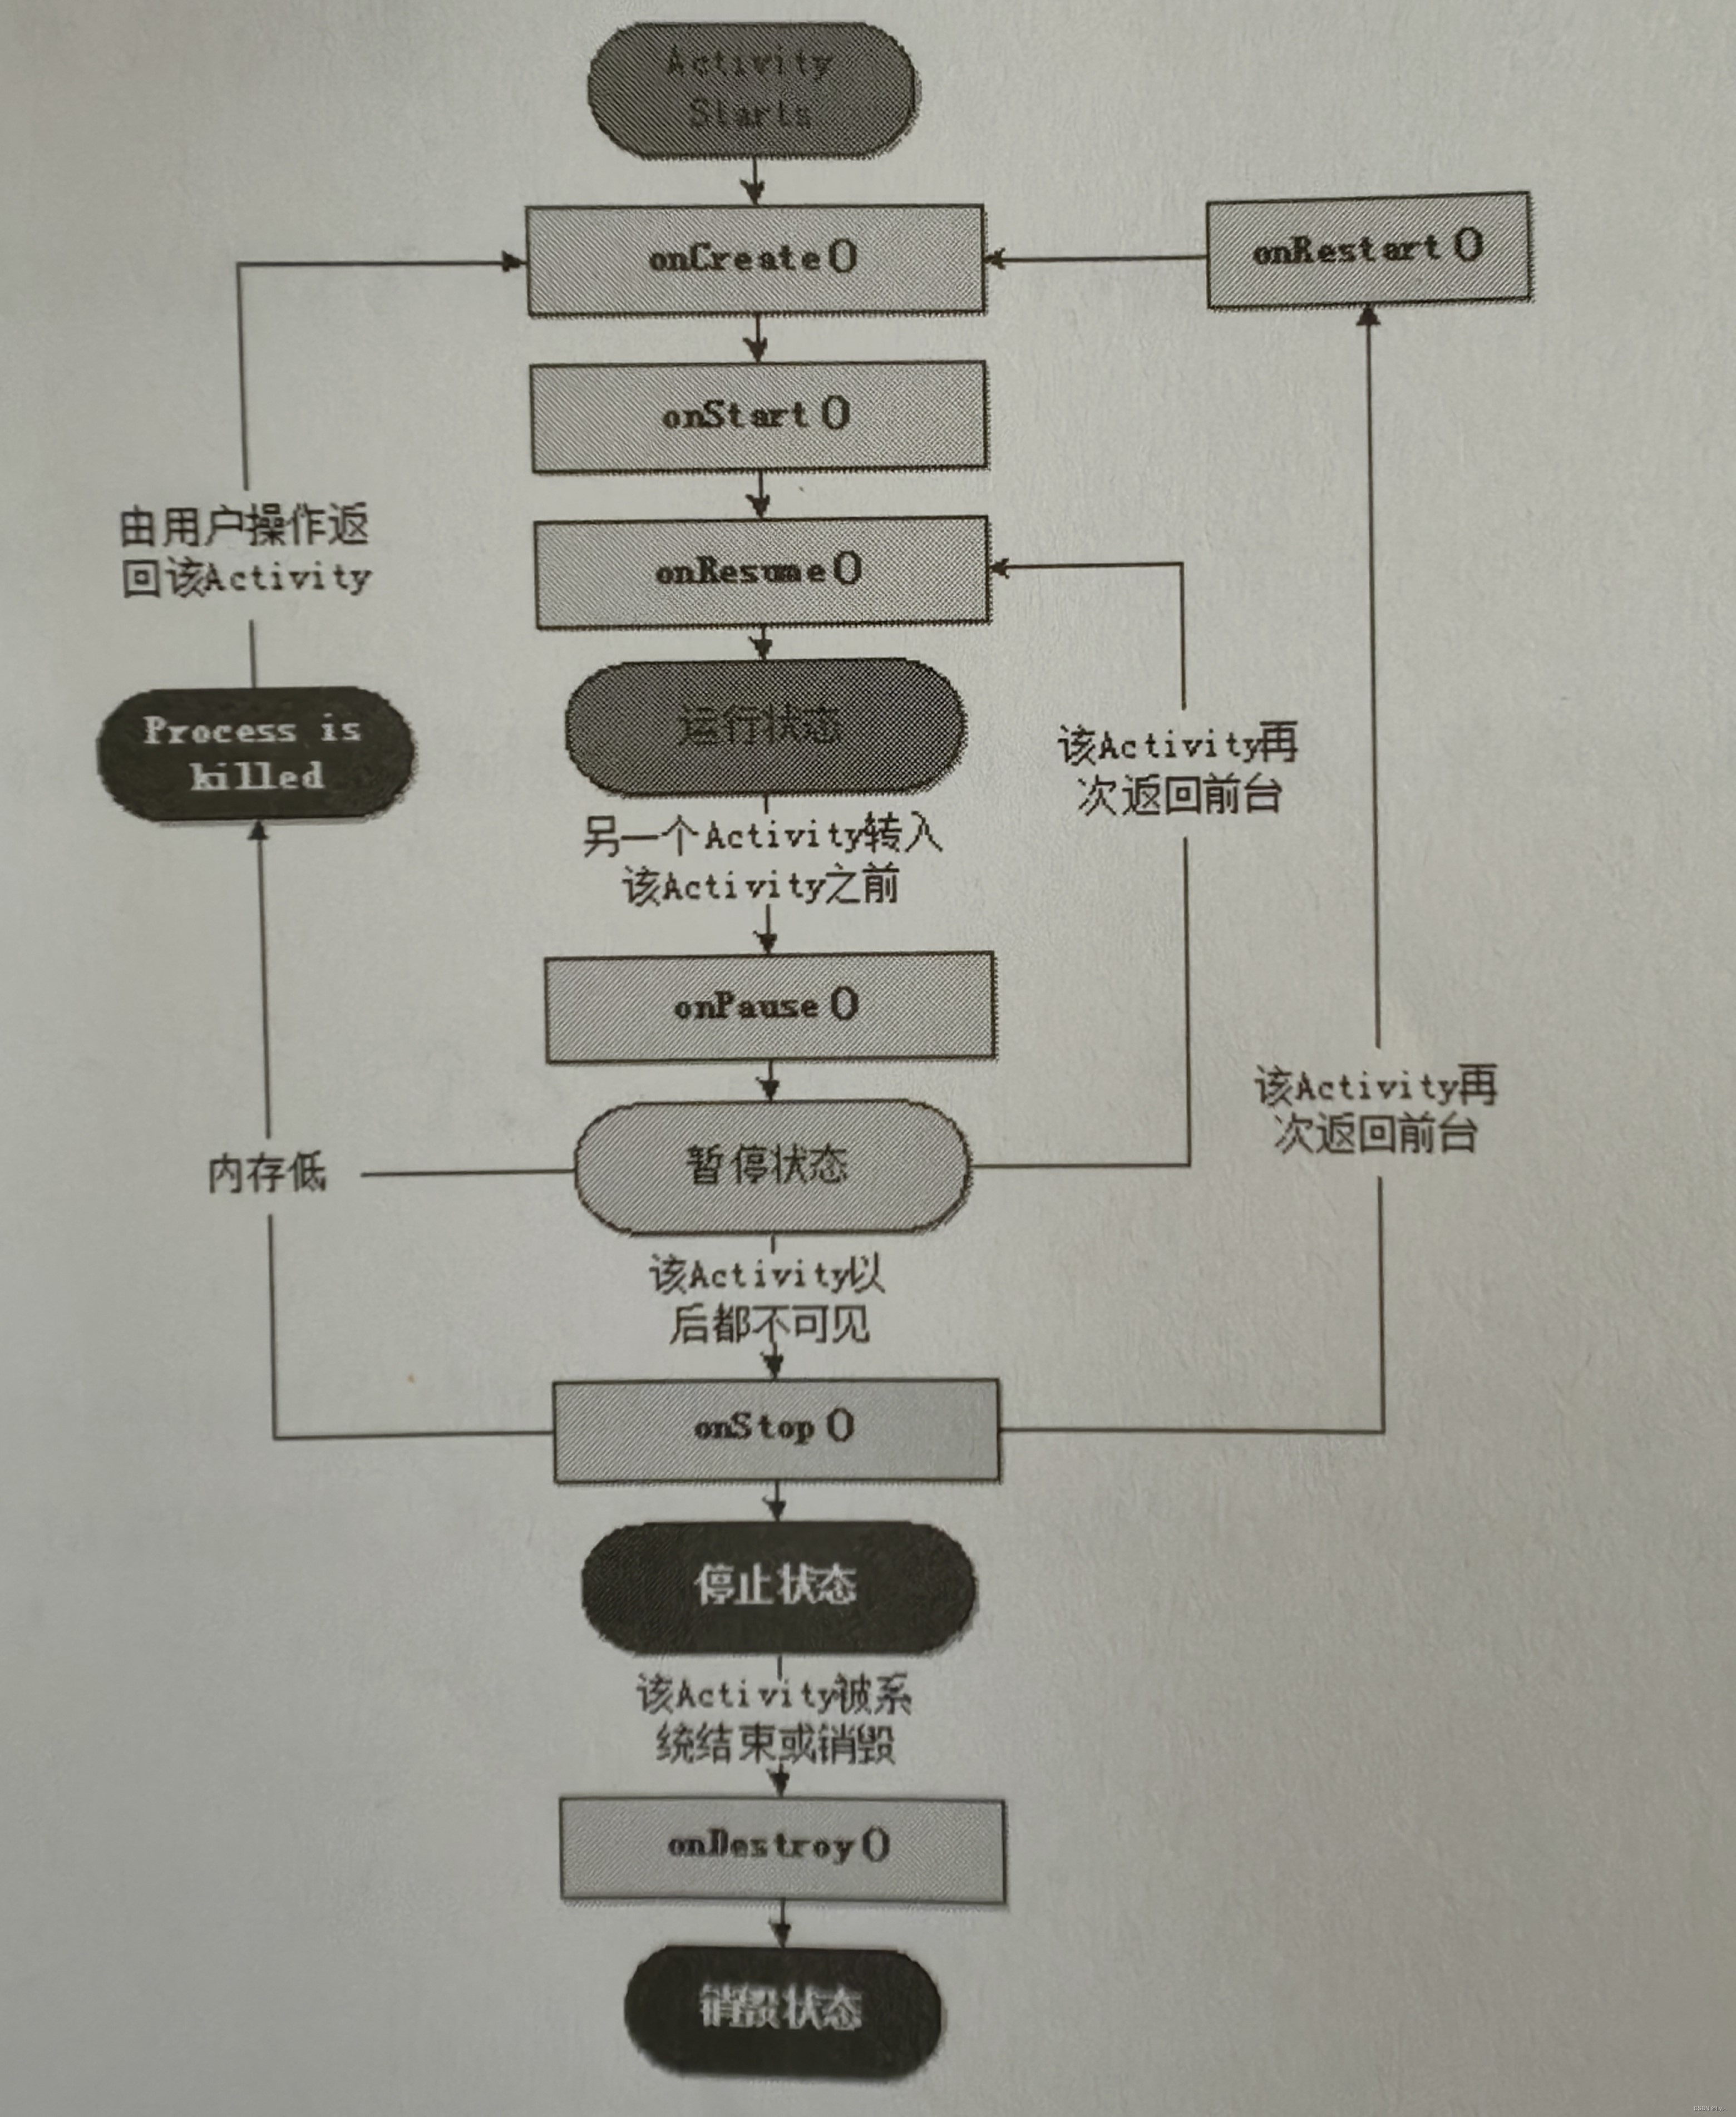
在上图中,矩形方块表示的内容为可以被回调的方法,而有底色的椭圆形则表示Activity的重要状态。从该图可以看出,在一个Activity的生命周期中有一些方法会被系统回调,这些方法的名称及其描述如下表所示:
| 方法名 | 描述 |
|---|---|
| onCreate() | 在创建Activity时被回调。该方法是最常见的方法,在Android Studio中创建Android项目时,会自动创建一个Activity,在该Activity中,默认重写了onCreate(Bundle savedInstanceState)方法,用于对该Activity执行初始化 |
| onSatrt() | 启动Activity时被回调,也就是当一个Activity变为可见时被回调 |
| onResume() | 当Activity由暂停状态恢复为活动状态时调用。调用该方法后,该Activity位于Activity栈的栈顶。 |
| onPause() | 暂停Activity时被回调。该方法需要被非常快速地执行,因为直到该方法执行完毕后,下一个Activity才能被恢复。在该方法中,通常用于持久保存数据。例如,当我们正在玩游戏时,突然来了一个电话,这时就可以在该方法中将游戏状态持久保存起来 |
| onRestart() | 重新启动Activity时被回调,该方法总是在onStart()方法以后执行 |
| onDestroy() | 销毁Activity时被回调 |
说明:在Activity中,可以根据程序的需要来重写相应的方法。其中,onCreate()和onPause()方法时最常用的,经常需要重写这两个方法。
6.2 创建、配置、启动和关闭Activity
在Android中,Activity提供了与用户交互的可视化界面。在使用Activity时,需要先对其进行创建和配置,然后才可以启动或关闭Activity。下面将详细介绍创建、配置、启动和关闭Activity的方法。
6.2.1 创建Activity
创建Activity的基本步骤如下:
(1)创建一个Activity,一般时继承android.app包中的Activity类,不过在不同的应用场景下,也可以继承Activity的子类。例如,在一个Activity中,如果只实现一个列表,就可以放该Activity继承ListActivity;如果只实现选项卡效果,就可以让Activity继承TabActivity。创建一个名为MyActivity的Activity,具体代码如下:
import android.app.Activity;
public class MyActivity extends Activity {
	//...
}
(2)重写需要的回调方法。通常情况下,都需要重写onCreate()方法,并且在该方法中调用setContentView()方法设置要显示的页面。例如,在步骤(1)中创建的Activity中,重写onCreate()方法,并设置要显示的页面为activity_my.xml,具体代码如下:
@Override
public void onCreate(Bundle savedInstanceState) {
	super.onCreate(savedInstanceState);
	setContentView(R.layout.activity_my.xml);
}
另外,使用Android Studio也可以很方便地创建Activity,具体步骤如下:
(1)在Module的包名(如com.example)节点上点击,在弹出的快捷菜单上依次选择New→Activity→Empty View Activity,如下图所示:
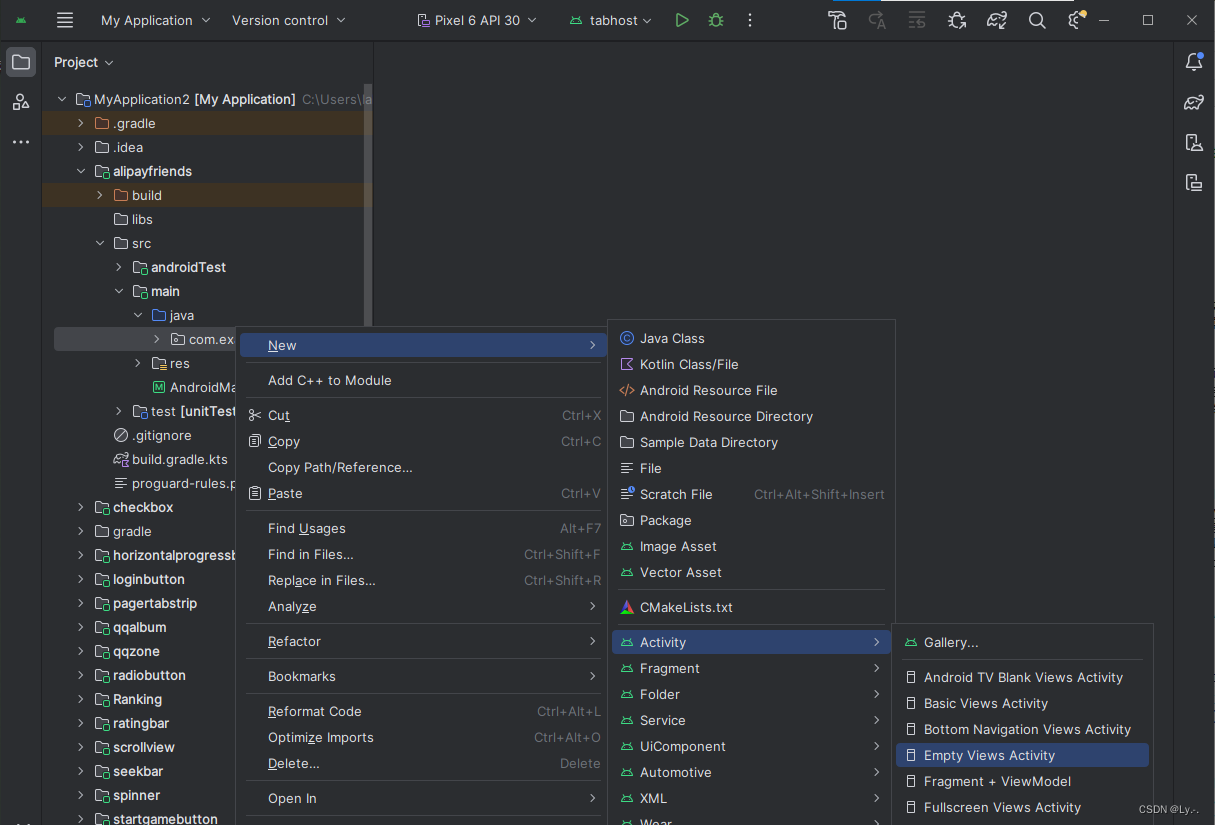
(2)在弹出的对话框中修改Activity的名称,如下图所示:

(3)单击Finish按钮即可创建一个空的Activity,然后就可以在该类中重写需要的回调方法。
6.2.2 配置Activity
使用Android Studio向导创建Activity后,会自动在AndroidMainfest.xml文件中配置该Activity。如果没有在AndroidManifest.xml文件中配置,而又在程序中启动了该Activity,就会抛出异常。
具体的配置方法是在<application></application>标记中添加<activity></activity>标记实现(每个Activity对应一个<activity></activity>标记),<activity>标记的基本格式如下:
<activity
	android:name="实现类"
	android:label="说明性文字"
	android:theme="要应用的主题"
	...
	>
	...
</activity>
从上面的格式可以看出,配置Activity时通常需要指定以下几个属性:
- android:name:指定对应的Activity实现类
- android:label:为该Activity指定标签
- android:theme:设置要应用的主题
说明:如果该Activity类在<manifest>标记的package属性指定的包中,则android:name属性的属性值可以直接写类名,也可以是“.类名”的形式;如果在package属性指定包的子包中,则属性值需要设置为“.子包序列.类型”或者是完整的类名(包括包路径)。
6.2.3 启动和关闭Activity
1. 启动Activity
启动Activity分为以下两种情况:
(1)在一个Android应用中,只有一个Activity时,那么只需要在AndroidMainfest.xml文件中对其进行配置,并且将其设置为程序的入口。这样,当运行该项目时,将自动启动该Activity。
(2)在一个Android的应用中,存在多个Activity时,需要应用startActivity()方法来启动需要的Activity。startActivity()方法的语法格式如下:
public void startActivity(Intent intent)
该方法没有返回值,只有一个Intent类型的入口参数,Intent是Android应用里各组件之间的通信方式,一个Activity通过Intent来表达自己的“意图”。在创建Intent对象时,需要指定想要被启动的Activity。
说明:关于Intent将在下章进行详细介绍。
例如,要启动一个名称为DetailActivity的Activity,可以使用下面的代码:
Intent intent = new Intent(MainActivity.this, DetailActivity.class);
startActivity(intent);
2. 关闭Activity
在Android中,如果想要关闭当前的Activity,可以使用Activity类提供的finish()方法。finish()方法的语法格式如下:
public void finish()
该方法的使用比较简单,既没有入口参数,也没有返回值,只需要在Activity中相应的事件中调用该方法即可。例如,想要在单击按钮时关闭该Activity,可以使用下面的代码:
Button button =  (Button) findViewById(R.id.btn);
button.setOnClickListener(new View.OnClickListener() {
	@Override
	public void onClick(View v) {
		finish();
	}
});
说明:如果当前的Activity不是主活动,那么执行finish()方法后,将返回到调用它的那个Activity;否则将返回主屏幕中。
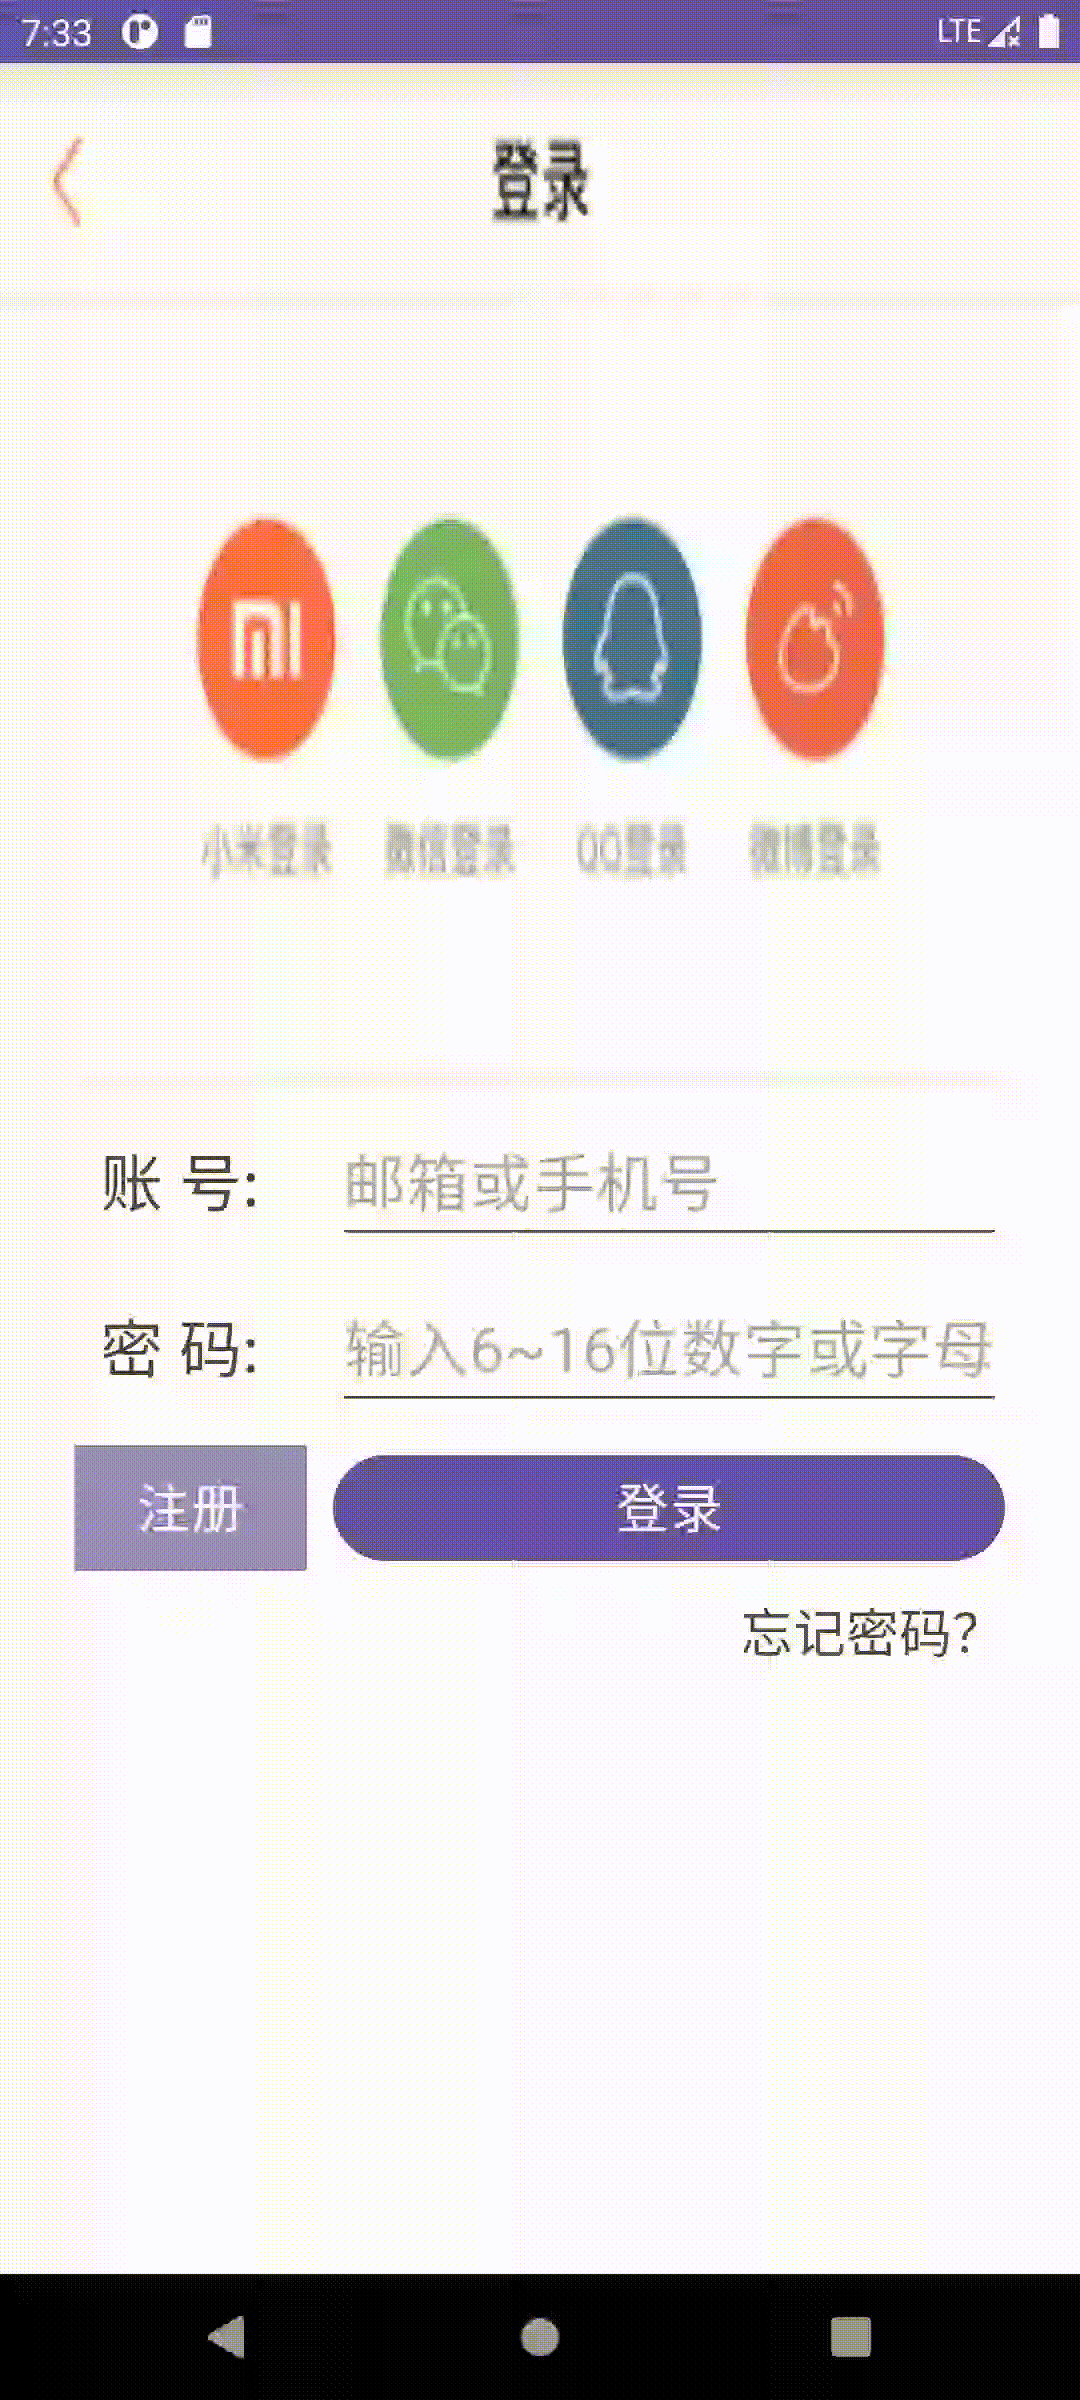
下面编写一个小例子(模拟喜马拉雅FM跳转至忘记密码界面)进行演示:
(1)主活动界面布局文件activity_main.xml内容如下:
<TableLayout xmlns:android="http://schemas.android.com/apk/res/android"
    xmlns:app="http://schemas.android.com/apk/res-auto"
    xmlns:tools="http://schemas.android.com/tools"
    android:layout_width="match_parent"
    android:layout_height="match_parent"
    android:background="@mipmap/biaoge"
    android:orientation="vertical"
    android:stretchColumns="0,3"
    tools:context=".MainActivity">

    <TableRow
        android:layout_width="match_parent"
        android:layout_height="wrap_content"
        android:layout_marginTop="400dp">
        <TextView/>
        <TextView
            android:layout_width="wrap_content"
            android:layout_height="wrap_content"
            android:padding="10dp"
            android:text="账 号:"
            android:textSize="24sp"/>
        <EditText
            android:layout_width="wrap_content"
            android:layout_height="wrap_content"
            android:hint="邮箱或手机号"
            android:textSize="24sp" />
        <TextView/>
    </TableRow>

    <TableRow
        android:layout_width="match_parent"
        android:layout_height="wrap_content"
        android:layout_marginTop="10dp">
        <TextView/>
        <TextView
            android:layout_width="wrap_content"
            android:layout_height="wrap_content"
            android:padding="10dp"
            android:text="密 码:"
            android:textSize="24sp"/>
        <EditText
            android:layout_width="wrap_content"
            android:layout_height="wrap_content"
            android:hint="输入6~16位数字或字母"
            android:textSize="24sp" />
        <TextView/>
    </TableRow>

    <TableRow
        android:layout_width="match_parent"
        android:layout_height="wrap_content"
        android:layout_marginTop="10dp">
        <TextView/>
        <Button
            android:layout_width="wrap_content"
            android:layout_height="wrap_content"
            android:text="注册"
            android:layout_marginRight="10dp"
            android:textSize="20sp"
            android:background="#AA000000"/>
        <Button
            android:layout_width="wrap_content"
            android:layout_height="wrap_content"
            android:text="登录"
            android:textSize="20sp"/>
        <TextView/>
    </TableRow>
    <TableRow
        android:layout_width="match_parent"
        android:layout_height="wrap_content"
        android:layout_marginTop="10dp">
        <TextView/>
        <TextView/>
        <TextView
            android:id="@+id/forgetPassword"
            android:layout_width="wrap_content"
            android:layout_height="wrap_content"
            android:layout_gravity="right"
            android:text="忘记密码?"
            android:textSize="20sp"/>
        <TextView/>
    </TableRow>

</TableLayout>
(2)创建一个名为PasswordActivity的Activity,并设置它的布局文件为activity_password.xml,内容如下:
<LinearLayout xmlns:android="http://schemas.android.com/apk/res/android"
    xmlns:app="http://schemas.android.com/apk/res-auto"
    xmlns:tools="http://schemas.android.com/tools"
    android:layout_width="match_parent"
    android:layout_height="match_parent"
    android:background="@mipmap/beijing"
    android:orientation="vertical"
    tools:context=".PasswordActivity">

    <ImageButton
        android:id="@+id/closeButton"
        android:layout_width="75dp"
        android:layout_height="75dp"
        android:src="@mipmap/guanbi"
        android:background="#FFFFFF"/>

    <TextView
        android:layout_width="wrap_content"
        android:layout_height="wrap_content"
        android:layout_marginLeft="20dp"
        android:layout_marginTop="30dp"
        android:text="你的邮箱或手机号:"
        android:textSize="20sp"/>

    <EditText
        android:layout_width="wrap_content"
        android:layout_height="wrap_content"
        android:layout_marginLeft="20dp"
        android:layout_marginTop="5dp"
        android:hint="请输入您的邮箱或手机号"/>

    <Button
        android:layout_width="wrap_content"
        android:layout_height="wrap_content"
        android:layout_marginLeft="20dp"
        android:layout_marginTop="5dp"
        android:text="提交"
        android:textSize="20sp"/>
</LinearLayout>
(3)在主活动MainActivity中为“忘记密码”设置setOnClickListener监听器,MainActivity.java文件内容如下:
public class MainActivity extends AppCompatActivity {
    TextView forgetPassword;

    @Override
    protected void onCreate(Bundle savedInstanceState) {
        super.onCreate(savedInstanceState);
        setContentView(R.layout.activity_main);

        forgetPassword = findViewById(R.id.forgetPassword);
        forgetPassword.setOnClickListener(new View.OnClickListener() {
            @Override
            public void onClick(View v) {
                Intent intent = new Intent(MainActivity.this, PasswordActivity.class);
                startActivity(intent);
            }
        });
    }
}
(4)在活动PasswordActivity中为“关闭按钮”设置setOnClickListener监听器,PasswordActivity.java文件内容如下:
public class PasswordActivity extends AppCompatActivity {
    ImageButton closeButton;

    @Override
    protected void onCreate(Bundle savedInstanceState) {
        super.onCreate(savedInstanceState);
        setContentView(R.layout.activity_password);

        closeButton = findViewById(R.id.closeButton);
        closeButton.setOnClickListener(new View.OnClickListener() {
            @Override
            public void onClick(View v) {
                finish();
            }
        });
    }
}
6.3 多个Activity的使用
在Android应用中,经常会有多个Activity,而这些Activity之间又经常需要交换数据。下面就来介绍如何使用Bundle在Activity之间交换数据,以及如何调用另一个Activity并返回结果。
6.3.1 使用Bundle在Activity之间交换数据
当在一个Activity中启动另一个Activity时,经常需要传递一些数据。这时就可以通过Intent来实现,因为Intent通常被称为时两个Activity之间的信使,通过将要传递的数据保存在Intent中,可以将其传递到另一个Activity中。在Android中,可以将要保存的数据存放在Bundle对象中,然后通过Intent提供的putExtras()方法将要携带的数据保存到Intent中。
说明:Bundle是一个key-value(键-值)对的组合,用于保存要携带的数据包。这些数据可以是boolean、byte、int、long、float、double和String等基本数据类型或者对应的数组,也可以是对象或者对象数组。如果时对象或者对象数组时,必须实现Serializable或者Parcelable接口。
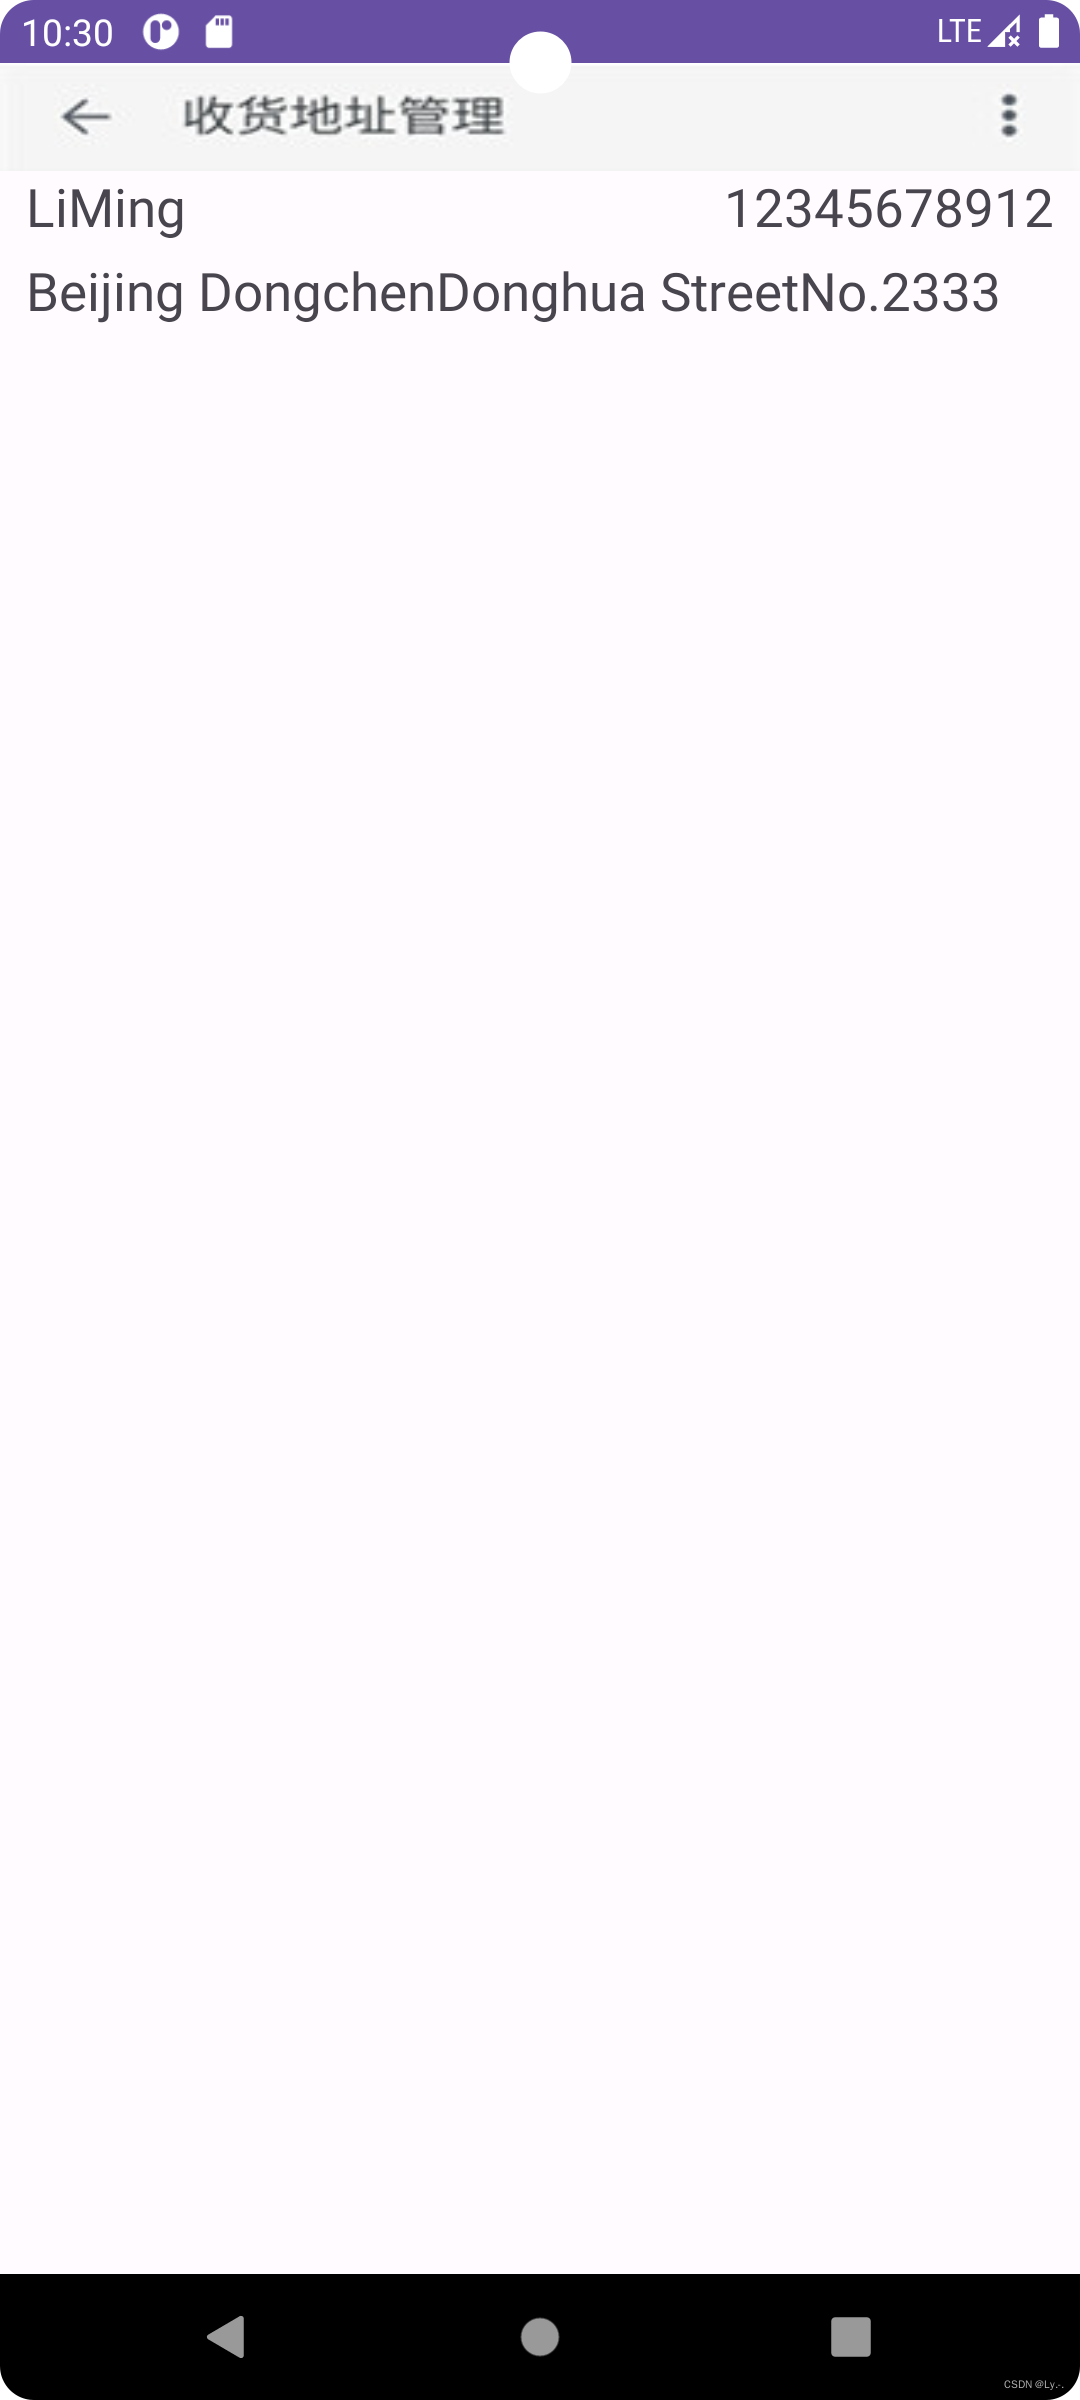
下面通过一个实例(模拟保存淘宝收货地址)介绍如何使用Bundel在Activity之间交换数据:
(1)主活动的布局文件activity_main.xml内容如下:
<RelativeLayout xmlns:android="http://schemas.android.com/apk/res/android"
    xmlns:app="http://schemas.android.com/apk/res-auto"
    xmlns:tools="http://schemas.android.com/tools"
    android:layout_width="match_parent"
    android:layout_height="match_parent"
    tools:context=".MainActivity">

    <ImageView
        android:id="@+id/investigation"
        android:layout_width="match_parent"
        android:layout_height="wrap_content"
        android:scaleType="fitXY"
        android:src="@mipmap/top"/>

    <EditText
        android:id="@+id/address1"
        android:layout_width="match_parent"
        android:layout_height="wrap_content"
        android:layout_below="@+id/investigation"
        android:layout_marginTop="5dp"
        android:hint="所在地区"/>

    <EditText
        android:id="@+id/address2"
        android:layout_width="match_parent"
        android:layout_height="wrap_content"
        android:layout_below="@+id/address1"
        android:layout_marginTop="5dp"
        android:hint="所在街道"/>

    <EditText
        android:id="@+id/address3"
        android:layout_width="match_parent"
        android:layout_height="wrap_content"
        android:layout_below="@+id/address2"
        android:layout_marginTop="5dp"
        android:hint="详细地址"/>

    <EditText
        android:id="@+id/name"
        android:layout_width="match_parent"
        android:layout_height="wrap_content"
        android:layout_below="@id/address3"
        android:layout_marginTop="5dp"
        android:hint="收货人姓名"/>

    <EditText
        android:id="@+id/phoneNumber"
        android:layout_width="match_parent"
        android:layout_height="wrap_content"
        android:layout_below="@id/name"
        android:layout_marginTop="5dp"
        android:hint="收货人手机号码"/>

    <EditText
        android:id="@+id/emailBox"
        android:layout_width="match_parent"
        android:layout_height="wrap_content"
        android:layout_below="@id/phoneNumber"
        android:layout_marginTop="5dp"
        android:hint="邮箱"/>

    <Button
        android:id="@+id/saveButton"
        android:layout_width="wrap_content"
        android:layout_height="wrap_content"
        android:layout_below="@id/emailBox"
        android:layout_alignParentRight="true"
        android:layout_marginTop="20dp"
        android:text="保存"
        android:textSize="24sp"/>

</RelativeLayout>
(2)新建活动AddressActivity,并且编写器布局文件activity_address.xml文件,其文件内容如下:
<RelativeLayout xmlns:android="http://schemas.android.com/apk/res/android"
    xmlns:app="http://schemas.android.com/apk/res-auto"
    xmlns:tools="http://schemas.android.com/tools"
    android:layout_width="match_parent"
    android:layout_height="match_parent"
    tools:context=".AddressActivity">

    <ImageView
        android:id="@+id/investigation2"
        android:layout_width="match_parent"
        android:layout_height="wrap_content"
        android:scaleType="fitXY"
        android:src="@mipmap/top"/>

    <TextView
        android:id="@+id/nameInfo"
        android:layout_width="wrap_content"
        android:layout_height="wrap_content"
        android:layout_below="@id/investigation2"
        android:layout_marginLeft="10dp"
        android:textSize="20sp"/>

    <TextView
        android:id="@+id/numberInfo"
        android:layout_width="wrap_content"
        android:layout_height="wrap_content"
        android:layout_alignBottom="@+id/nameInfo"
        android:layout_alignParentRight="true"
        android:layout_marginRight="10dp"
        android:textSize="20sp"/>

    <TextView
        android:id="@+id/addressInfo"
        android:layout_width="wrap_content"
        android:layout_height="wrap_content"
        android:layout_below="@id/nameInfo"
        android:layout_alignLeft="@id/nameInfo"
        android:layout_marginTop="5dp"
        android:textSize="20sp"/>
</RelativeLayout>
(3)主活动MainActivity的文件内容如下:
public class MainActivity extends AppCompatActivity {
    Button saveButton;

    @Override
    protected void onCreate(Bundle savedInstanceState) {
        super.onCreate(savedInstanceState);
        setContentView(R.layout.activity_main);

        saveButton = findViewById(R.id.saveButton);

        saveButton.setOnClickListener(new View.OnClickListener() {
            @Override
            public void onClick(View v) {
                String address1 = ((EditText)findViewById(R.id.address1)).getText().toString();
                String address2 = ((EditText)findViewById(R.id.address2)).getText().toString();
                String address3 = ((EditText)findViewById(R.id.address3)).getText().toString();

                String name = ((EditText)findViewById(R.id.name)).getText().toString();
                String phoneNumber = ((EditText)findViewById(R.id.phoneNumber)).getText().toString();
                String emailBox = ((EditText)findViewById(R.id.emailBox)).getText().toString();

                if(!"".equals(address1) && !"".equals(address2) && !"".equals(address3)
                        && !"".equals(name) && !"".equals(phoneNumber) && !"".equals(emailBox)) {
                    //将输入的信息保存到Bundle中,通过Intent传递到另一个Activity中显示出来
                    Intent intent = new Intent(MainActivity.this, AddressActivity.class);
                    //创建并实例化一个Bundle对象
                    Bundle bundle = new Bundle();
                    bundle.putCharSequence("name", name);
                    bundle.putCharSequence("phoneNumber", phoneNumber);
                    bundle.putCharSequence("address1", address1);
                    bundle.putCharSequence("address2", address2);
                    bundle.putCharSequence("address3", address3);
                    intent.putExtras(bundle); //将Bundle对象添加到Intent对象中
                    startActivity(intent);
                }
                else {
                    //设置对话框提示信息未填写完整
                    AlertDialog dialog = new AlertDialog.Builder(MainActivity.this).create();
                    dialog.setTitle("温馨提示"); //设置标题
                    dialog.setMessage("请将收货信息填写完整!"); //提示信息
                    dialog.setButton(DialogInterface.BUTTON_POSITIVE, "是", new DialogInterface.OnClickListener() {
                        @Override
                        public void onClick(DialogInterface dialog, int which) {

                        }
                    });
                    dialog.show();
                }
            }
        });
    }
}
(4)活动AddressActivity的文件内容如下:
public class AddressActivity extends AppCompatActivity {

    @Override
    protected void onCreate(Bundle savedInstanceState) {
        super.onCreate(savedInstanceState);
        setContentView(R.layout.activity_address);

        Intent intent = getIntent();
        Bundle bundle = intent.getExtras();
        TextView name = findViewById(R.id.nameInfo);
        TextView phoneNumber = findViewById(R.id.numberInfo);
        TextView address = findViewById(R.id.addressInfo);

        name.setText(bundle.getString("name"));
        phoneNumber.setText(bundle.getString("phoneNumber"));
        address.setText(bundle.getString("address1") + bundle.getString("address2") +
                bundle.getString("address3"));
    }
}
6.3.2 调用另一个Activity并返回结果
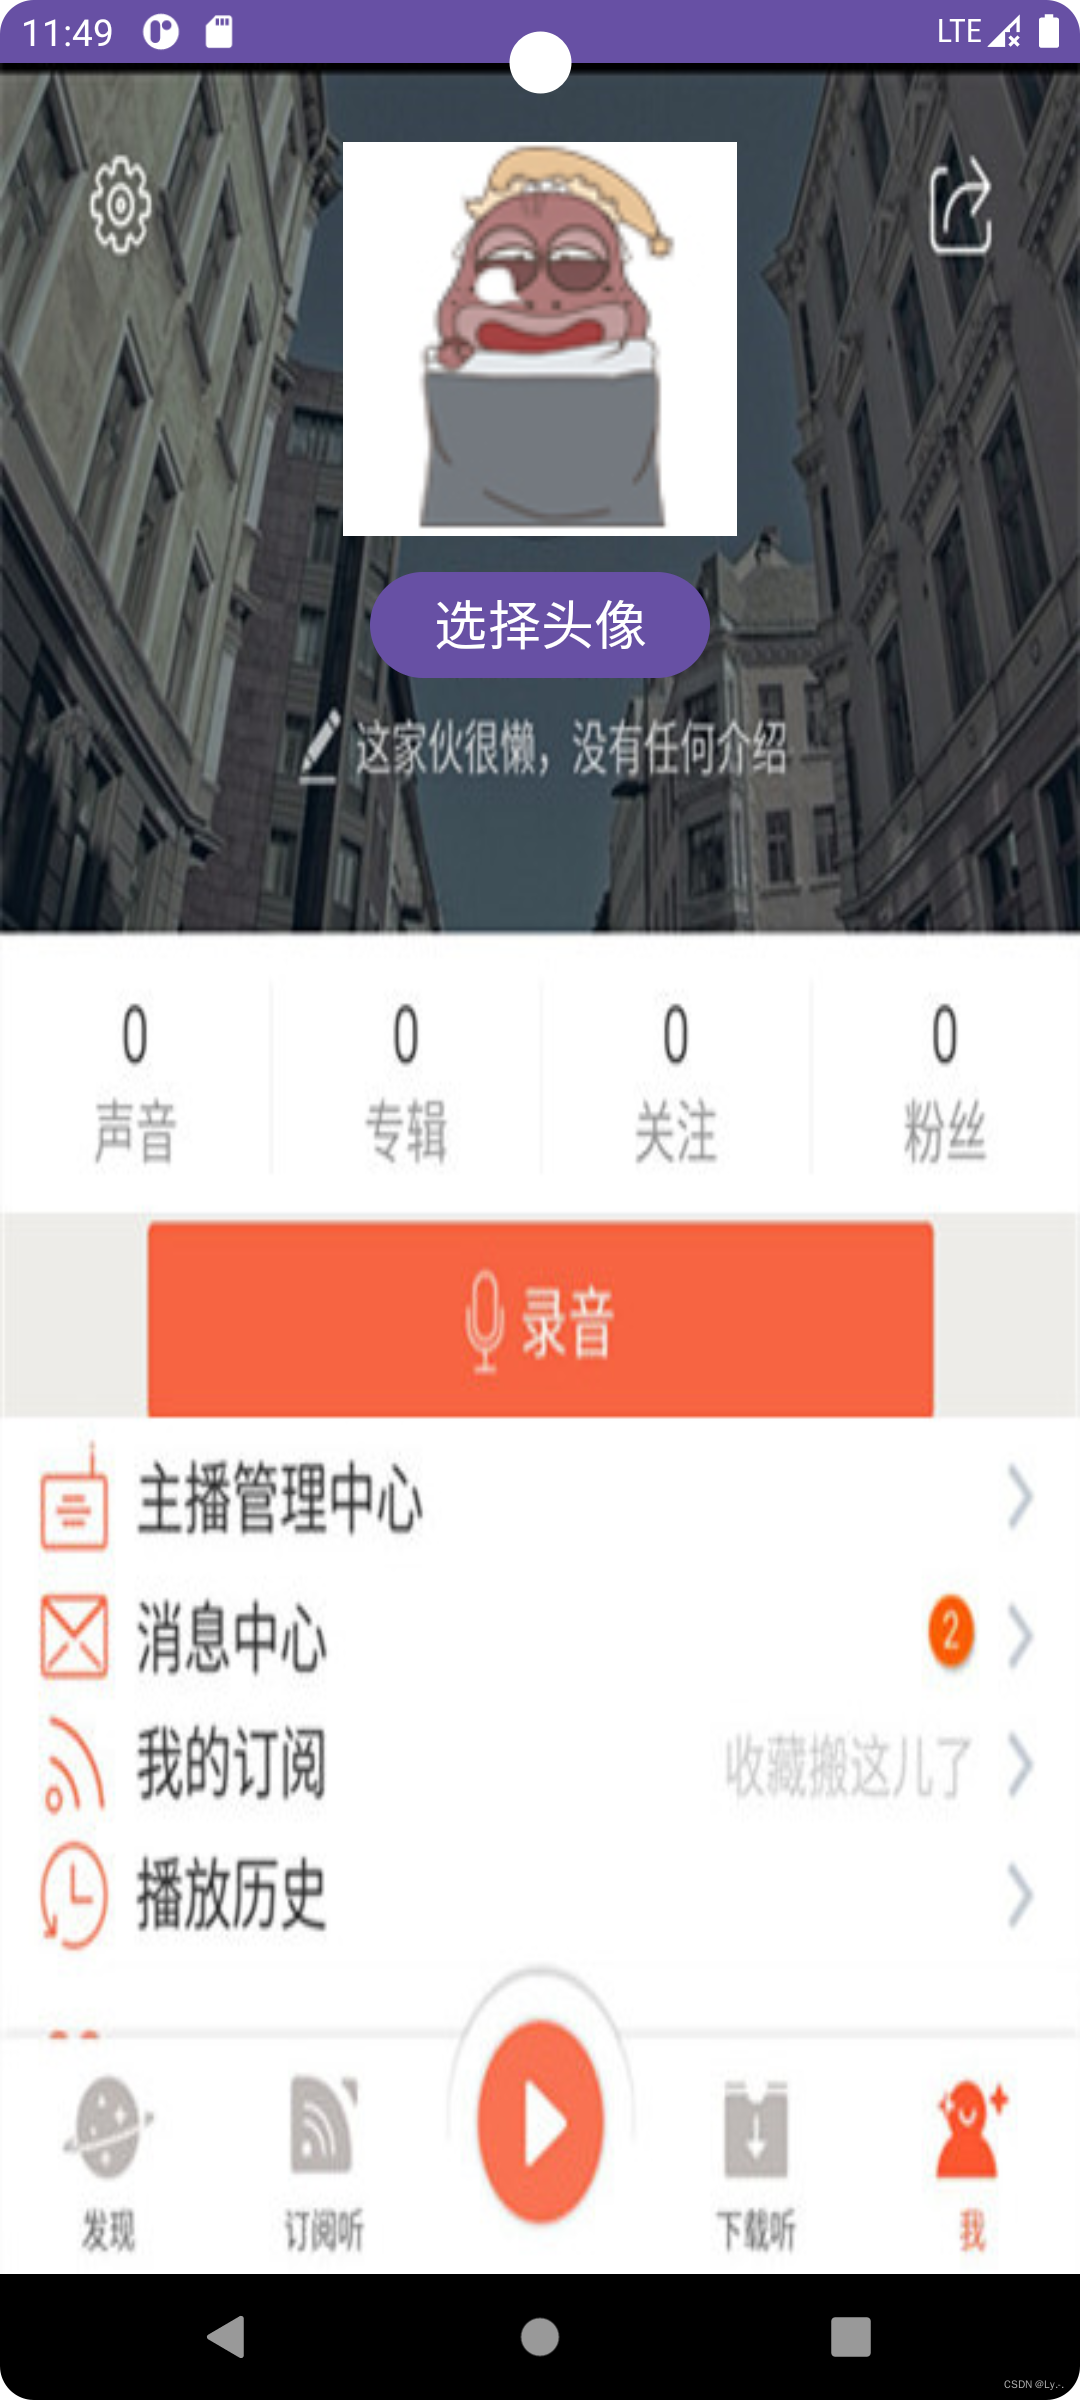
在Android应用开发时,有时候需要在一个Activity中调用另一个Activity,当用户在第二个Activity中选择完成后,程序将自动返回到第一个Activity中,第一个Activity能够获取并显示用户在第二个Activity中的选择。例如,用户在修改信息的时候可以对头像进行修改,在修改头像时首先需要调用选择头像的界面。在选择头像后会自动返回到修改信息界面,并显示用户选择的新头像。
此功能也可以通过Intent和Bundle来实现。与两个Activity之间交换数据不同的是,此处需要使用startActivityForResult()方法来启动另一个Activity。调用startActivityForResult()方法启动Activity后,关闭新启动的Activity时,可以将选择的结果返回Activity中。startActivityForResult()方法的语法格式如下:
public void startActivityForResult(Intent intent, int requestCode)
该方法将以指定的请求码启动Activity,并且程序将会获取新启动的Activity方式的结果(通过重写onActivityResult()方法来获取)。requestCode参数代表了启动Activity的请求码,该请求码的值由开发者根据业务自行设置,用于标识请求来源。
下面通过一个实例(模拟喜马拉雅FM更换头像)进行演示:
(1)主活动布局文件activity_main.xml内容如下:
<LinearLayout xmlns:android="http://schemas.android.com/apk/res/android"
    xmlns:app="http://schemas.android.com/apk/res-auto"
    xmlns:tools="http://schemas.android.com/tools"
    android:layout_width="match_parent"
    android:layout_height="match_parent"
    android:background="@mipmap/beijing"
    android:orientation="vertical"
    tools:context=".MainActivity">

    <ImageView
        android:id="@+id/image"
        android:layout_width="150dp"
        android:layout_height="150dp"
        android:src="@mipmap/touxiang"
        android:layout_marginTop="30dp"
        android:layout_gravity="center_horizontal"/>

    <Button
        android:id="@+id/selectButton"
        android:layout_width="wrap_content"
        android:layout_height="wrap_content"
        android:layout_marginTop="10dp"
        android:layout_gravity="center_horizontal"
        android:text="选择头像"
        android:textSize="20sp"/>

</LinearLayout>
(2)活动HeadActivity的布局文件activity_head.xml内容如下:
<LinearLayout xmlns:android="http://schemas.android.com/apk/res/android"
    xmlns:app="http://schemas.android.com/apk/res-auto"
    xmlns:tools="http://schemas.android.com/tools"
    android:layout_width="match_parent"
    android:layout_height="match_parent"
    android:orientation="vertical"
    tools:context=".HeadActivity">

    <GridView
        android:id="@+id/gridView"
        android:layout_width="match_parent"
        android:layout_height="match_parent"
        android:layout_marginTop="10dp"
        android:horizontalSpacing="3dp"
        android:verticalSpacing="3dp"
        android:numColumns="4"/>

</LinearLayout>
(3)为GridView添加OnItemClickListener事件监听器,在重写的onItemClick()方法中,首先获取Intent对象,然后创建一个要传递的数据包,并将选中的头像ID保存到该数据包中,再将要传递的数据包保存到Intent中,并设置返回的结果码及返回的Activity,最后关闭当前的Activity,HeadActivity.java内容如下:
public class HeadActivity extends AppCompatActivity {
    private int[] imageId = {
            R.mipmap.touxiang1, R.mipmap.touxiang2, R.mipmap.touxiang3,
            R.mipmap.touxiang4, R.mipmap.touxiang5
    };

    GridView gridView;
    @Override
    protected void onCreate(Bundle savedInstanceState) {
        super.onCreate(savedInstanceState);
        setContentView(R.layout.activity_head);

        gridView = findViewById(R.id.gridView);

        BaseAdapter adapter = new BaseAdapter() {
            @Override
            public int getCount() {
                return imageId.length;
            }

            @Override
            public Object getItem(int position) {
                return position;
            }

            @Override
            public long getItemId(int position) {
                return position;
            }

            @Override
            public View getView(int position, View convertView, ViewGroup parent) {
                ImageView imageView;
                if(convertView == null) {
                    imageView = new ImageView(HeadActivity.this);
                    imageView.setAdjustViewBounds(true);
                    imageView.setMaxWidth(158);
                    imageView.setMaxHeight(150);
                    imageView.setPadding(5, 5, 5, 5);
                }
                else {
                    imageView = (ImageView) convertView;
                }
                imageView.setImageResource(imageId[position]); //设置要显示的图片
                return imageView;
            }
        };
        gridView.setAdapter(adapter); //关联适配器

        gridView.setOnItemClickListener(new AdapterView.OnItemClickListener() {
            @Override
            public void onItemClick(AdapterView<?> parent, View view, int position, long id) {
                Intent intent = getIntent(); //获取intent对象
                Bundle bundle = new Bundle(); //实例化要传递的数据包
                bundle.putInt("imageId", imageId[position]); //显示选中的图片
                intent.putExtras(bundle); //将数据包保存在intent中
                setResult(0x11, intent); //设置返回的结果码,并返回调用该Activity的Activity
                finish();
            }
        });
    }
}
(4)在主活动MainActivity中重写onActivityResult()方法,在该方法中,需要判断requestCode请求码和resultCode结果码是否与预先设置的相同,如果相同,则获取传递的数据包,并从该数据宝中国获取选择的头像ID并显示,MainActivity.java内容如下:
public class MainActivity extends AppCompatActivity {
    Button selectButton;

    @Override
    protected void onCreate(Bundle savedInstanceState) {
        super.onCreate(savedInstanceState);
        setContentView(R.layout.activity_main);

        selectButton = findViewById(R.id.selectButton);
        selectButton.setOnClickListener(new View.OnClickListener() {
            @Override
            public void onClick(View v) {
                Intent intent = new Intent(MainActivity.this, HeadActivity.class);
                startActivityForResult(intent, 0X11);
            }
        });
    }

    @Override
    protected void onActivityResult(int requestCode, int resultCode, Intent data) {
        super.onActivityResult(requestCode, resultCode, data);
        if(requestCode == 0x11 && resultCode == 0x11) { //判断是否为待处理的结构
            Bundle bundle = data.getExtras(); //获取传递的数据包
            int imageId = bundle.getInt("imageId");
            ImageView imageView = findViewById(R.id.image);
            imageView.setImageResource(imageId); //显示选择的头像
        }
    }
}

6.4 使用Fragment
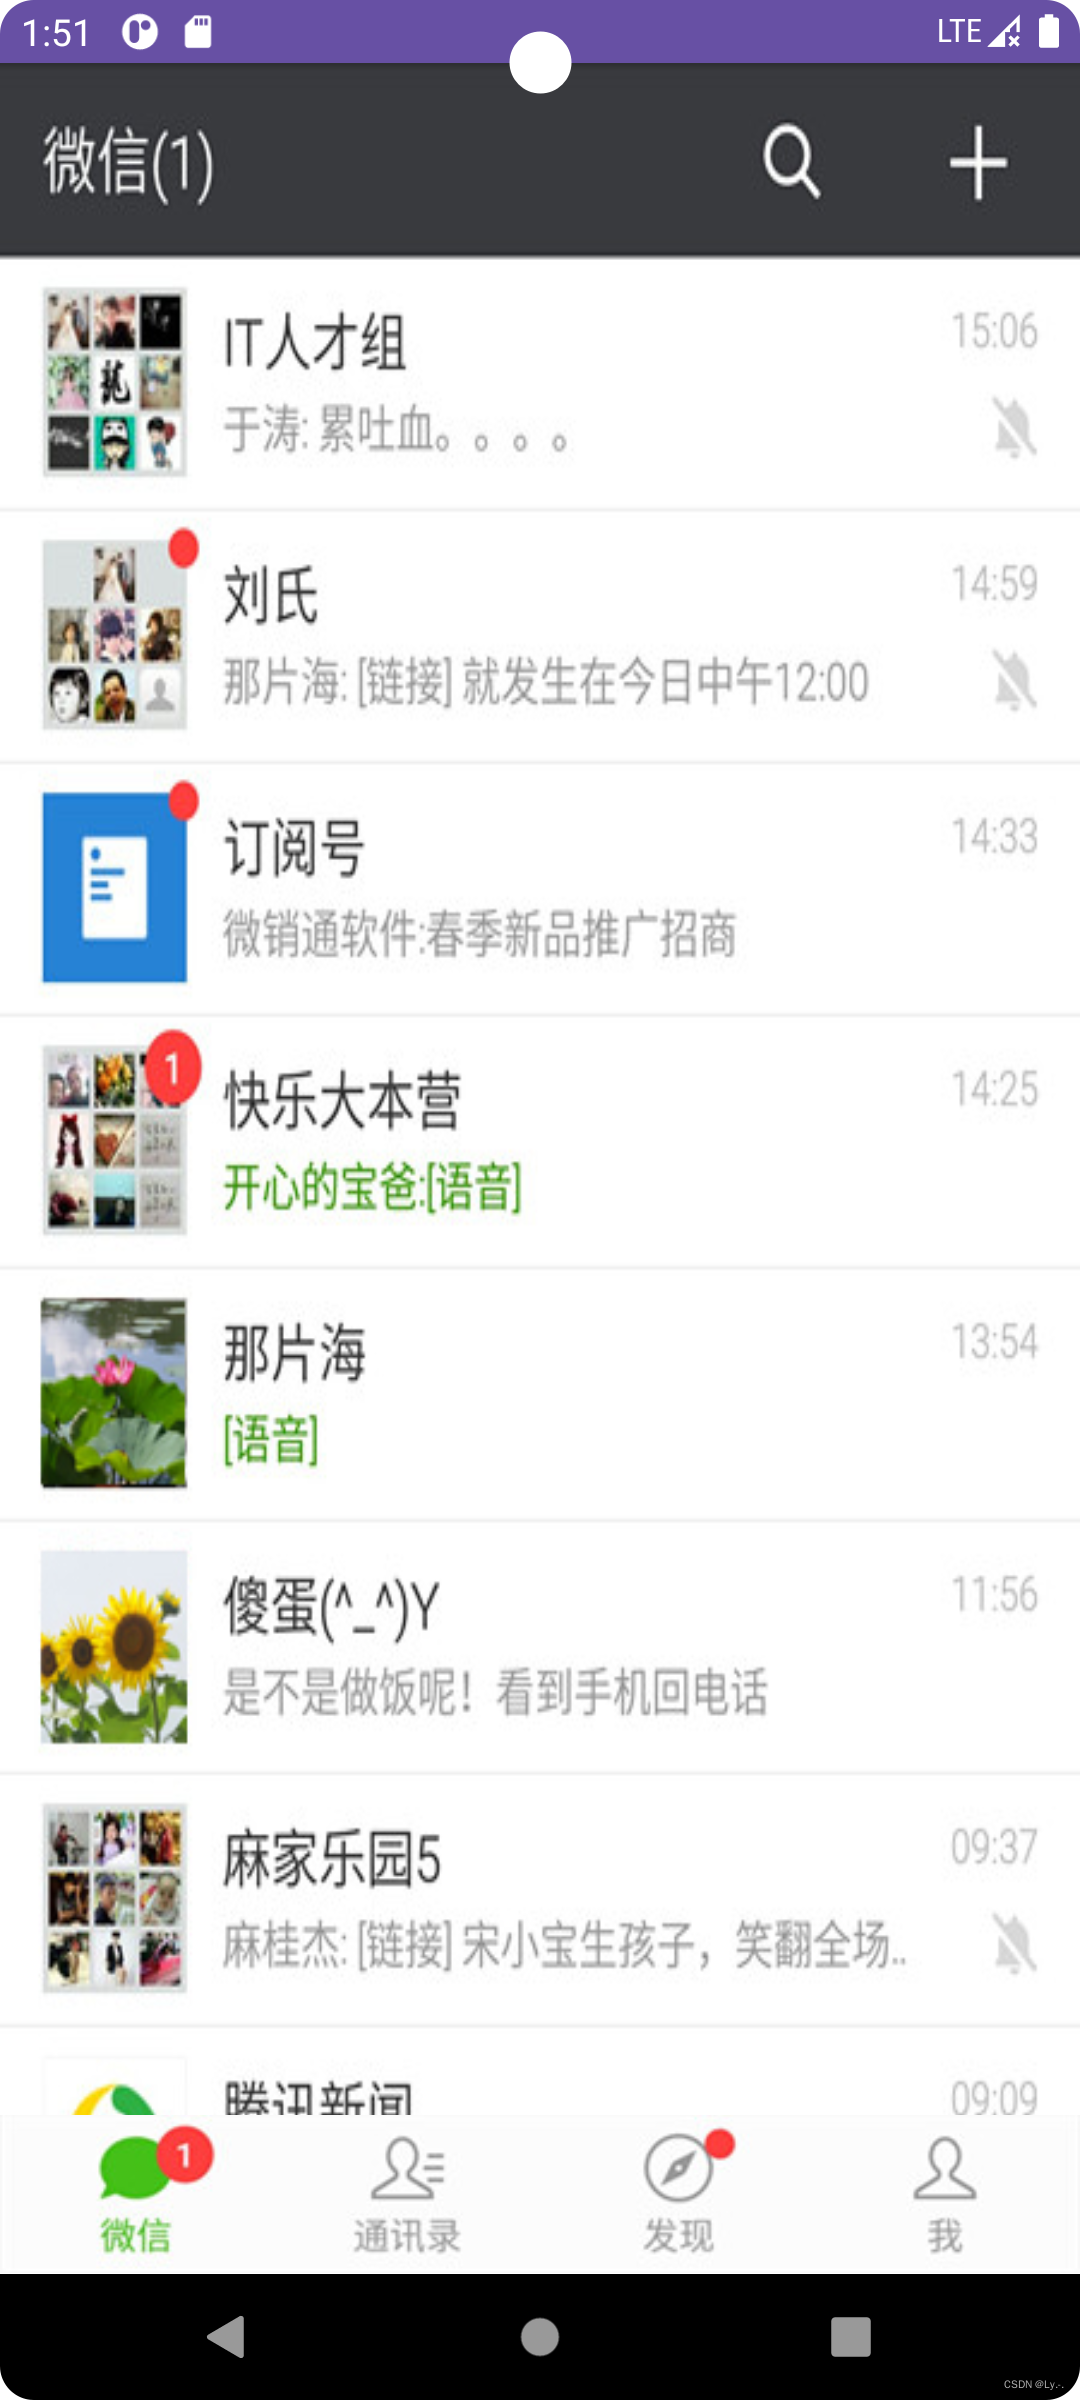
Fragment是Android 3.0新增的概念,其中文意思是碎片,它与Activity十分相似,用来在一个Activity中描述一些行为或一部分用户界面。使用多个Fragment可以在一个单独的Activity中建立多个UI面板,也可以在多个Activity中重用Fragment。例如,微信主界面就相当于一个Activity,在这个Activity中包含多个Fragment,其中“微信”,“通讯录”,“发现”,“我”这4个功能界面,每一个功能界面就相当于一个Fragment,它们之间可以随意切换。
6.4.1 Fragment的生命周期
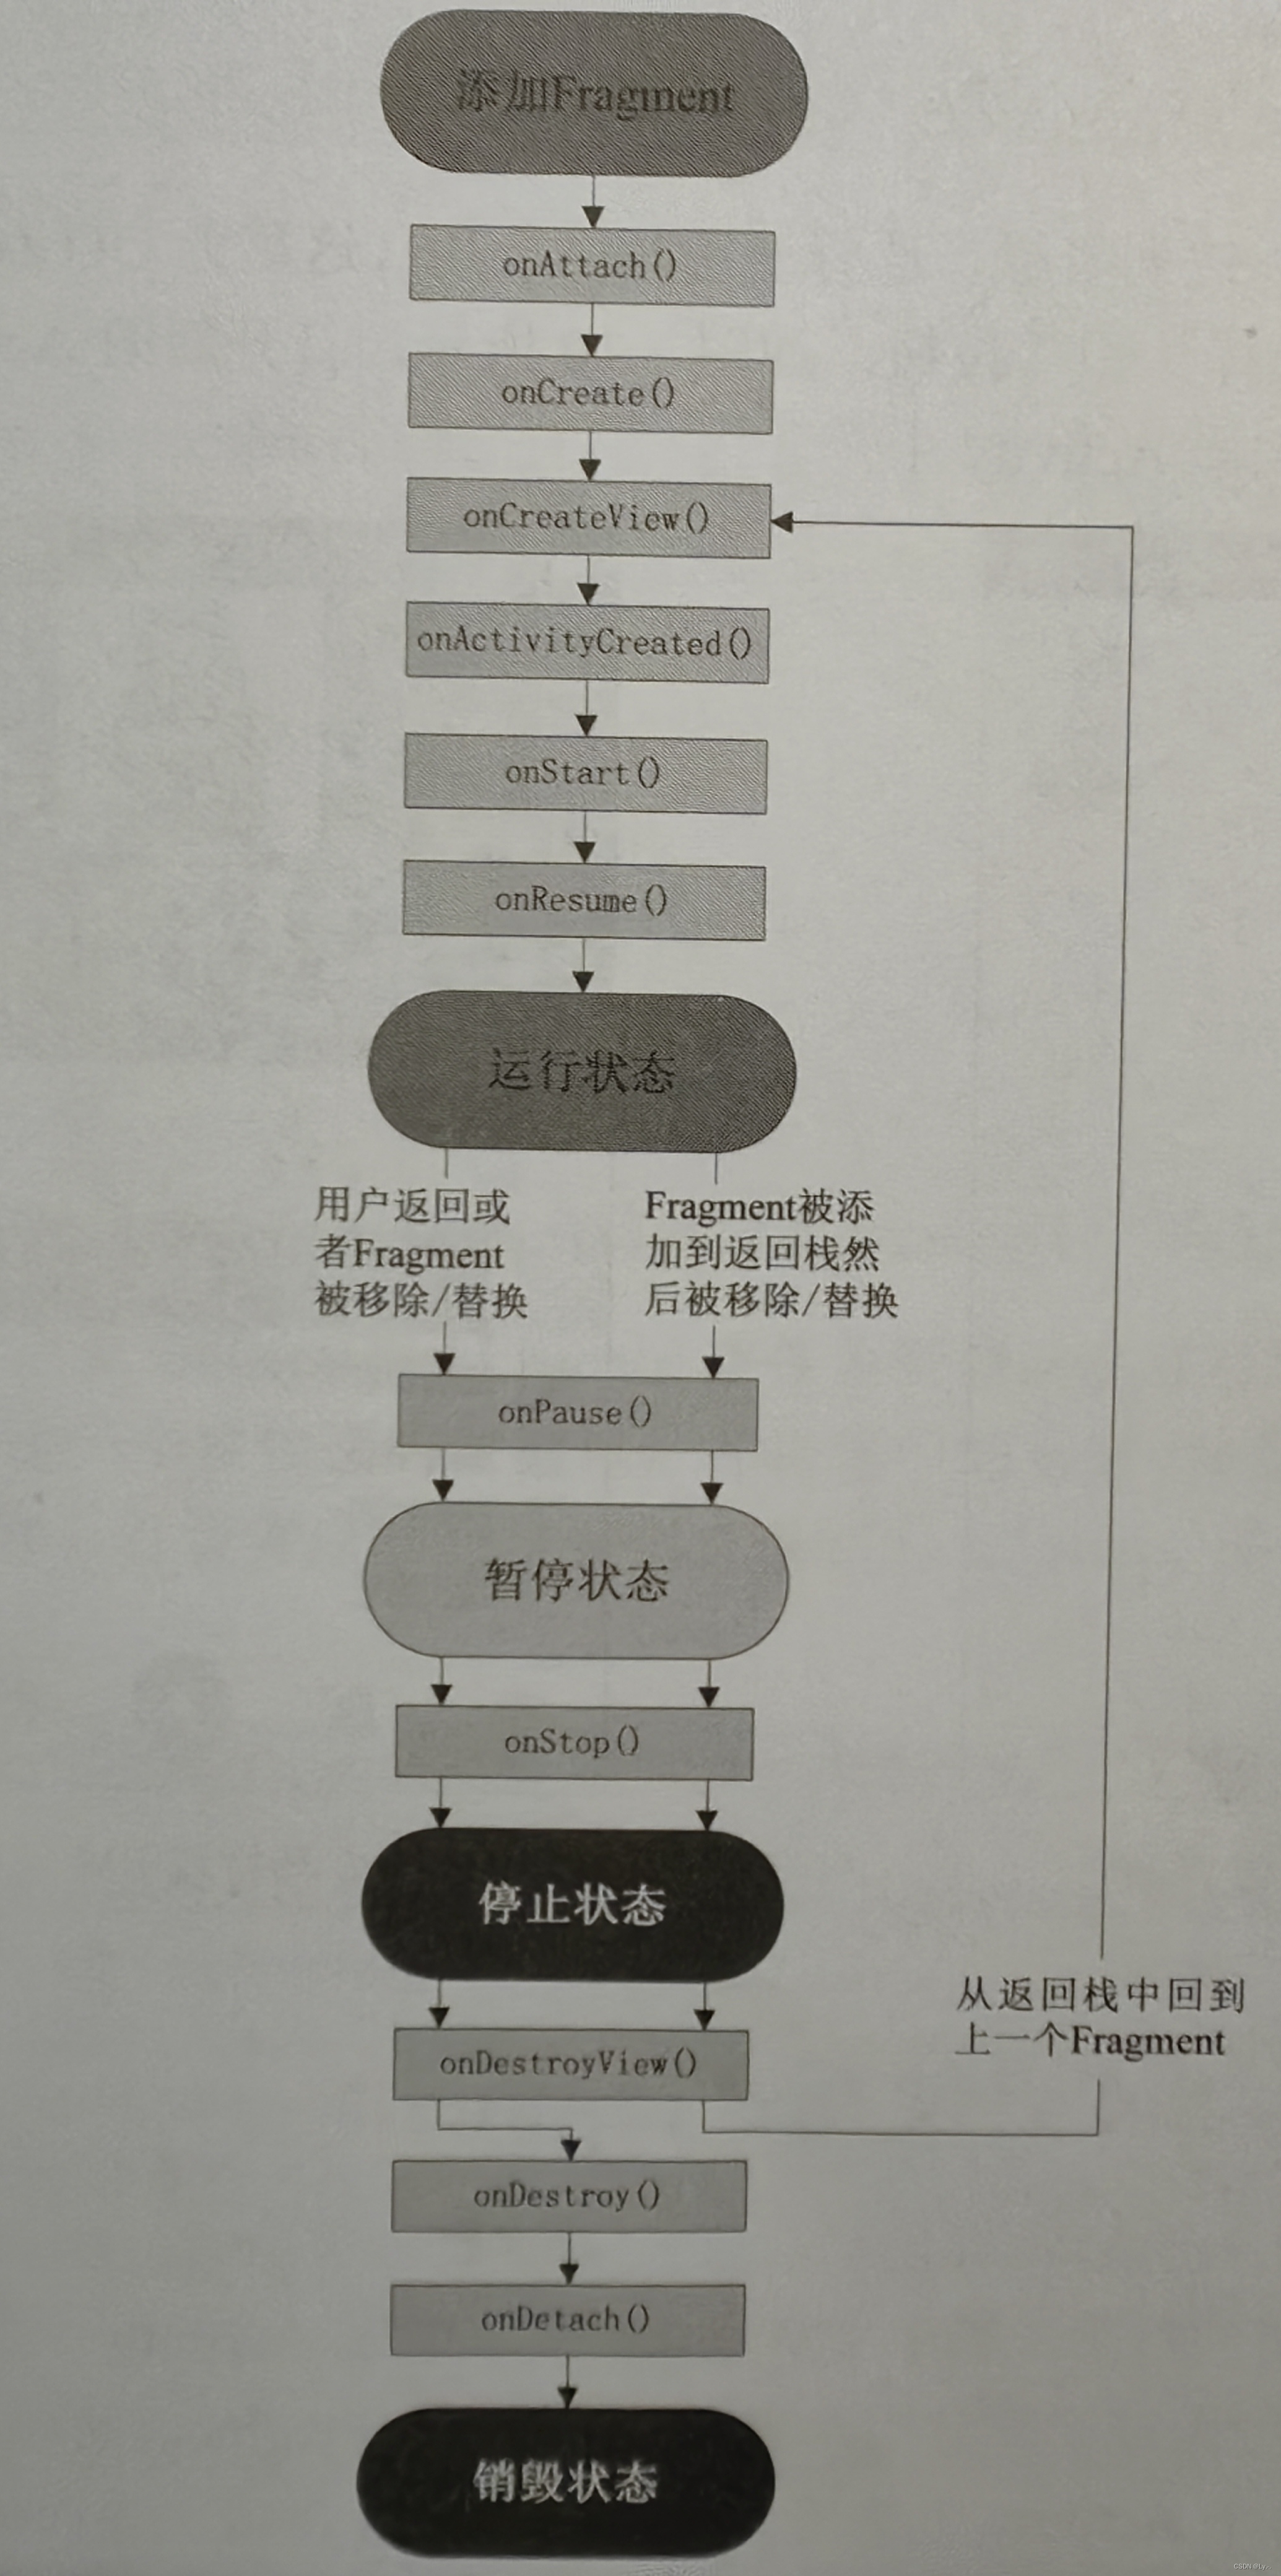
和Activity一样,Fragment也有自己的生命周期。一个Fragment必须被嵌入一个Activity中,它的生命周期直接受其所属的宿主Activity的生命周期影响。例如,当Activity被暂停时,其中的所有Fragment也被暂停;当Activity被销毁时,所有隶属于它的Fragment也将被销毁。然而,当一个Activity正在运行时(处于resumed状态),我们可以单独地对每一个Fragment进行操作,如添加或删除等。Fragment的完整生命周期如下图所示:
6.4.2 创建Fragment
要创建一个Fragment,必须创建一个Fragment的子类,或者继承自另一个已经存在的Fragment的子类。例如,要创建一个名称为NewsFragment的Fragment,并重写onCreateView()方法,可以使用下面的代码:
public class NewsFragment extends Fragment {
	@Override
	public View onCreateView(LayoutInflater inflater, ViewGroup container, Bundle savedInstanceState) {
		//从布局文件news.xml加载一个布局文件
		View v = inflater.inflate(R.layout.news, container, false);
	}
}
说明:当系统首次调用Fragment时,如果想绘制一个UI界面,那么在Fragment中,必须重写onCreateView()方法返回一个View;如果Fragment没有UI界面,可以返回null。
6.4.3 在Activity中添加Fragment
向Activity中添加Fragment有两种方法:一种是直接在布局文件中添加,将Fragment作为Activity整个布局的一部分;另一部分是当Activity运行时,将Fragment放入Activity布局中。下面分别进行介绍。
1. 直接在布局文件中添加Fragment
直接在布局文件中添加Fragment可以使用<fragment></fragment>标记实现。例如,要在一个布局文件中添加两个Fragment,可以使用下面的代码:
<LinearLayout
    android:layout_width="match_parent"
    android:layout_height="match_parent"
    android:orientation="horizontal">
    <fragment android:name="com.example.ListFragment"
        android:id="@+id/list"
        android:layout_weight="1"
        android:layout_width="0dp"
        android:layout_height="match_parent"/>

    <fragment android:name="com.example.DetailFragment"
        android:id="@+id/detail"
        android:layout_weight="2"
        android:layout_width="0dp"
        android:layout_height="match_parent"/>
</LinearLayout>
说明:在<fragment></fragment>标记中,android:name属性用于指定要添加的Fragment。
2. 当Activity运行时添加Fragment
当Activity运行时,也可以将Fragment添加到Activity的布局中,实现方法是获取一个FragmentTransaction的实例,然后使用add()方法添加一个Fragment,add()方法的第一个参数是Fragment要放入的ViewGroup(由Resource ID),第二个参数是需要添加的Fragment,最后为了使改变生效,还必须调用commit()方法提交事务。例如,要在Activity运行时添加一个名称为DetailFragment的Fragment,还可以使用下面的代码:
DetailFragment details = new DetailFragment(); //实例化一个DetailFragment的对象
FragmentTransaction ft = getFragmentManager().beginTransaction(); //获取一个FragmentTransaction的实例
ft.add(android.R.id.content, details); //添加一个显示详细内容放入Fragment
ft.commit(); //提交事务
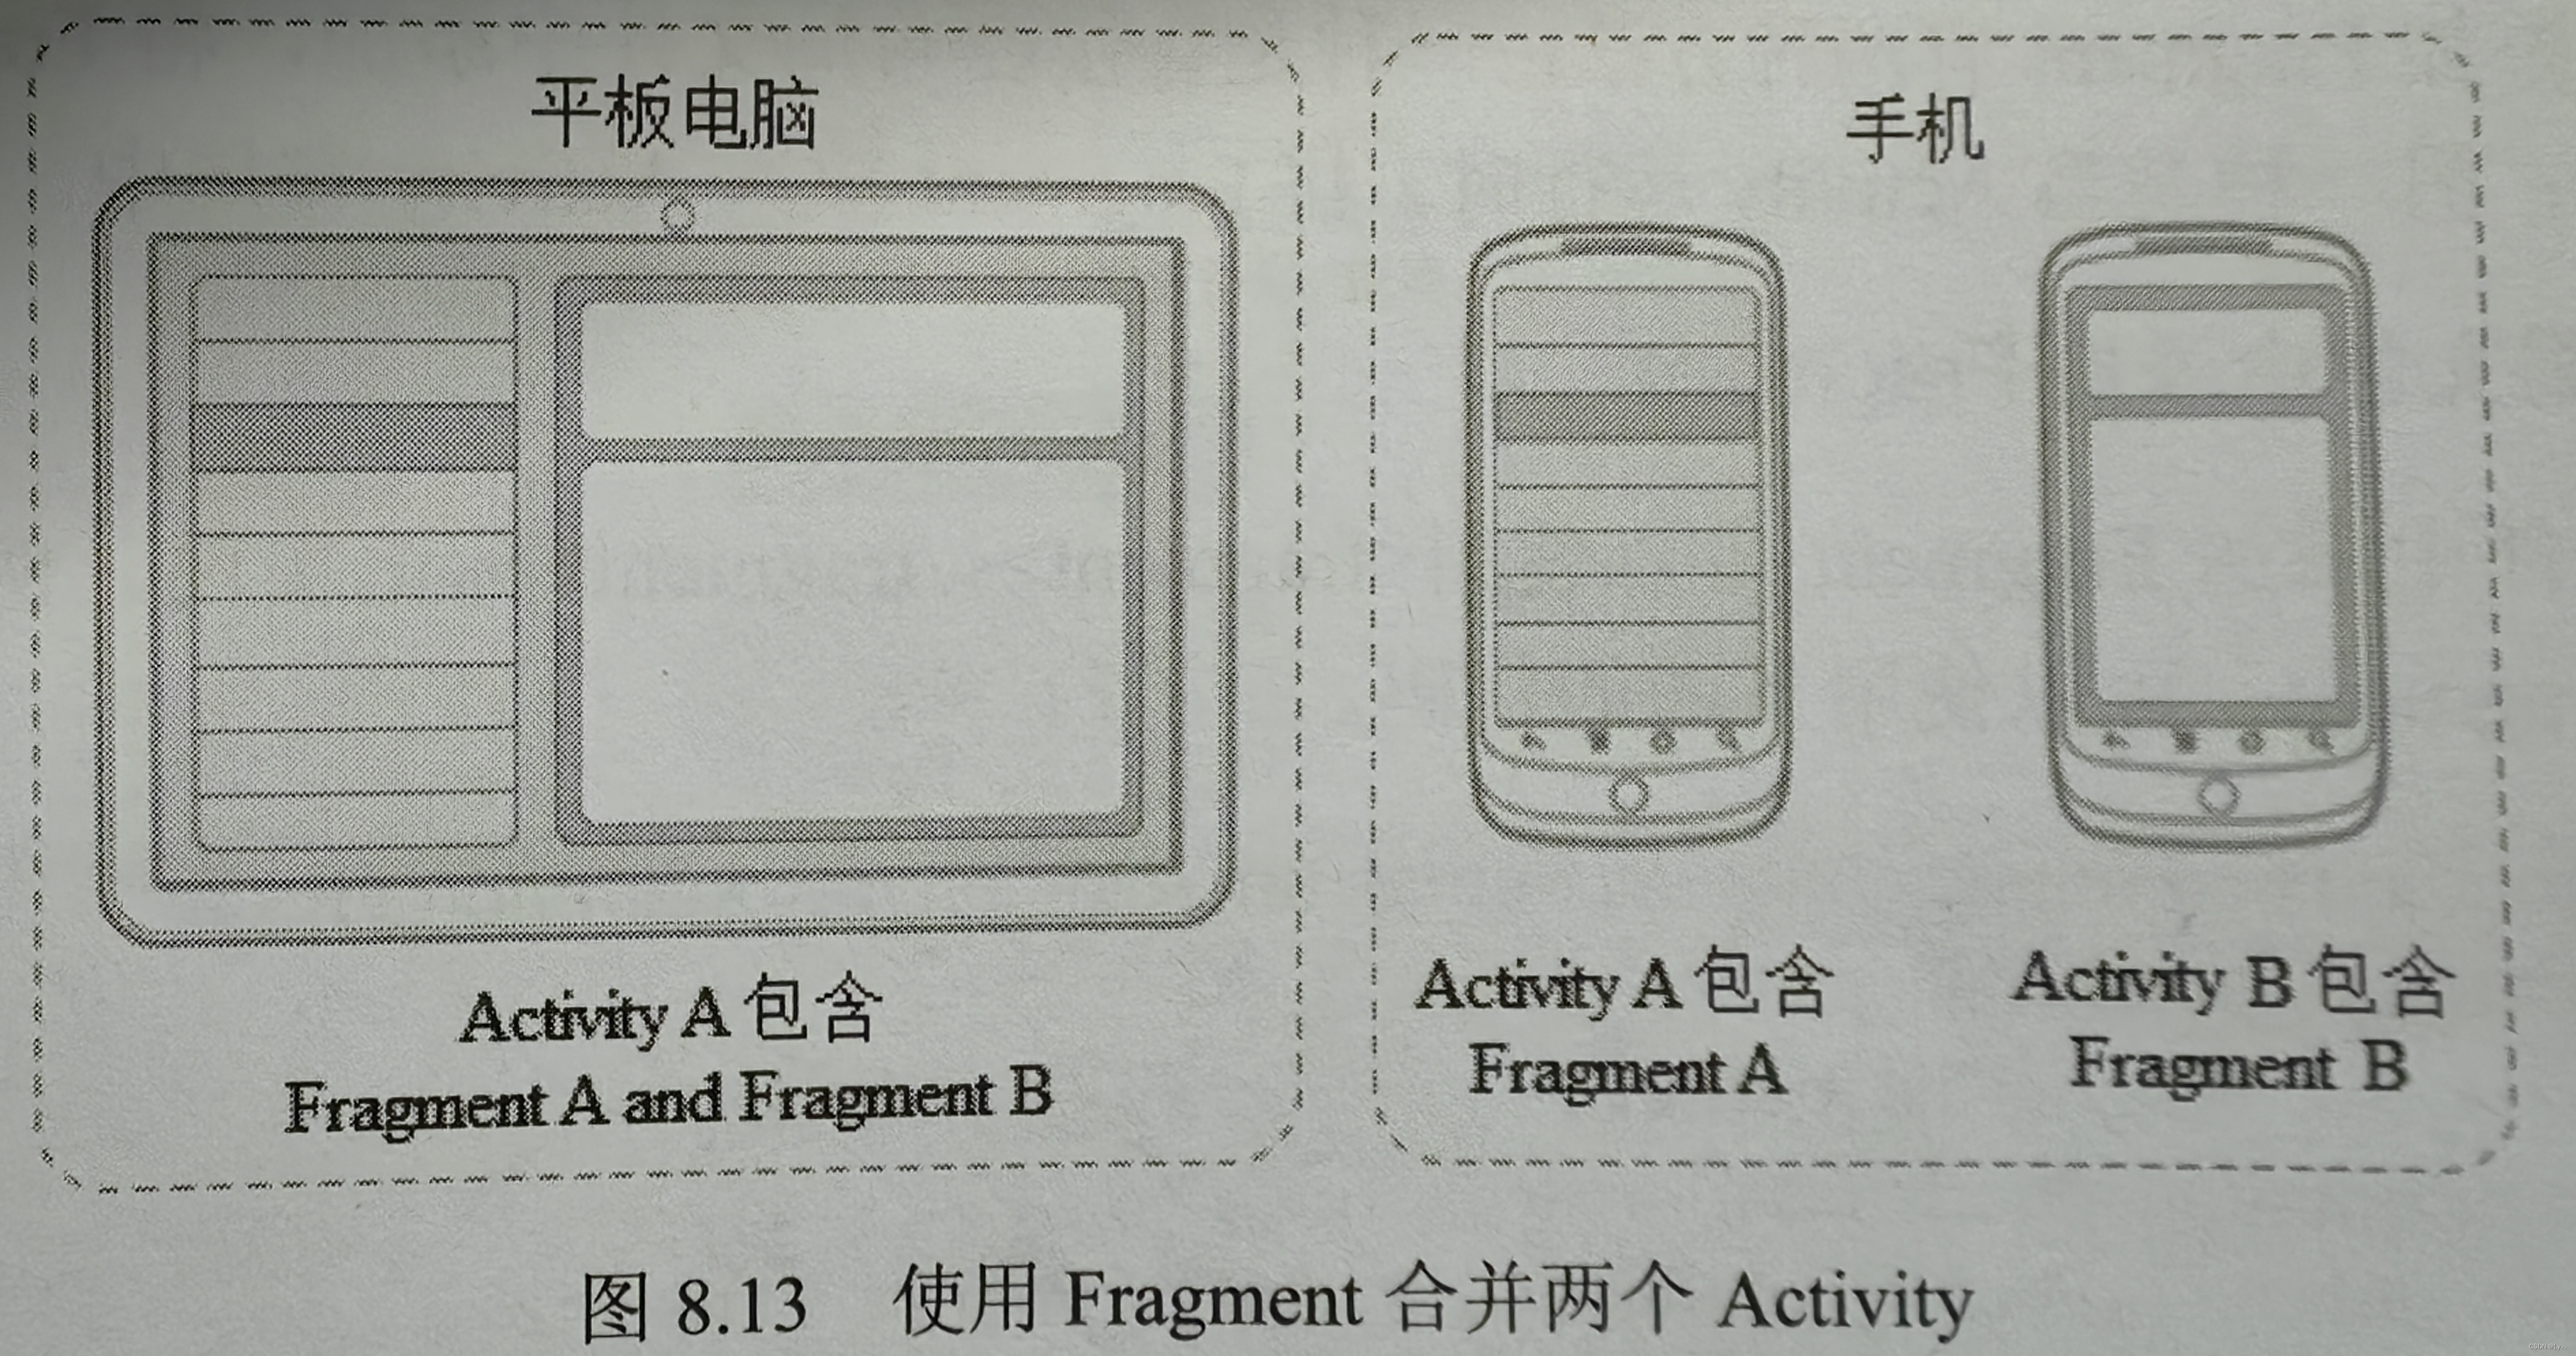
Fragment比较强大的功能之一就是可以合并两个Activity,从而让这两个Activity在一个屏幕上显示。如下图所示,左边的两个图分别代表两个Activity,右边的图表示包括两个Fragment的Activity,其中第一个Fragment的内容是Activity A,第二个Fragment的内容是Activity B。
下面通过一个实例(模拟微信切换界面)介绍在Fragment在App中的实际应用:
(1)修改新建的Module的res\layout目录下的布局文件activitt_main.xml,添加一个Fragment组件,并为其设置ID,在Fragment组件下面添加一个水平线性布局管理器,并设置其显示在容器底部,最后在水平线性布局管理器中添加4个布局宽度的ImageView,将它们的layout_weight属性设置为1,具体内容如下:
<RelativeLayout xmlns:android="http://schemas.android.com/apk/res/android"
    xmlns:app="http://schemas.android.com/apk/res-auto"
    xmlns:tools="http://schemas.android.com/tools"
    android:layout_width="match_parent"
    android:layout_height="match_parent"
    tools:context=".MainActivity">

    <fragment
        android:id="@+id/fragment"
        android:name="com.example.wechatinterfacechange.WeChat_Fragement"
        android:layout_width="match_parent"
        android:layout_height="match_parent"/>

    <LinearLayout
        android:layout_width="match_parent"
        android:layout_height="61dp"
        android:layout_alignParentBottom="true"
        android:orientation="horizontal">
        <ImageView
            android:id="@+id/image1"
            android:layout_weight="1"
            android:layout_width="0dp"
            android:layout_height="61dp"
            android:src="@mipmap/bottom_1"/>

        <ImageView
            android:id="@+id/image2"
            android:layout_weight="1"
            android:layout_width="0dp"
            android:layout_height="61dp"
            android:src="@mipmap/bottom_2"/>

        <ImageView
            android:id="@+id/image3"
            android:layout_weight="1"
            android:layout_width="0dp"
            android:layout_height="61dp"
            android:src="@mipmap/bottom_3"/>

        <ImageView
            android:id="@+id/image4"
            android:layout_weight="1"
            android:layout_width="0dp"
            android:layout_height="61dp"
            android:src="@mipmap/bottom_4"/>
    </LinearLayout>

</RelativeLayout>
(2)在res\layout目录下创建一个名称为wechat_fragment.xml的布局文件,并且将默认创建的线性布局布局管理器改为相对布局管理器,然后在该局部文件中添加一个ImageView组件,用户存放要显示的图片,具体内容如下:
<RelativeLayout xmlns:android="http://schemas.android.com/apk/res/android"
    android:layout_width="match_parent"
    android:layout_height="match_parent">

    <ImageView
        android:layout_width="match_parent"
        android:layout_height="match_parent"
        android:src="@mipmap/weixin"
        android:scaleType="fitXY"/>

</RelativeLayout>
(3)在工具窗口中的WeChat Interface Change\java节点的第一个com.example包中创建一个名称为WeChat_Fragment的类,让这个类继承Fragment,并且重写onCreateView()方法,然后为WeChatFragment添加wechat_fragment.xml布局文件,具体内容如下:
public class WeChat_Fragement extends Fragment {
    @Override
    public View onCreateView(LayoutInflater inflater, ViewGroup container, Bundle savedInstanceState) {
        View view = inflater.inflate(R.layout.wechat_fragment, null);
        return view;
    }
}
(4)按照步骤(2)、(3)的方法,再创建3个Fragement类和3个对应的布局文件,分别用于实现“通讯录”、“发现”、“我”3个界面
(5)打开默认的创建的MainActivity,获取布局文件中的4张Tab标签图片,并且为每一个图片设置单击事件监听器,并创建相应的Fragement替换原有的Fragement,具体内容如下:
public class MainActivity extends AppCompatActivity {
    private ImageView imageView1, imageView2, imageView3, imageView4;

    @Override
    protected void onCreate(Bundle savedInstanceState) {
        super.onCreate(savedInstanceState);
        setContentView(R.layout.activity_main);

        imageView1 = findViewById(R.id.image1);
        imageView2 = findViewById(R.id.image2);
        imageView3 = findViewById(R.id.image3);
        imageView4 = findViewById(R.id.image4);

        imageView1.setOnClickListener(new View.OnClickListener() {
            @Override
            public void onClick(View v) {
                FragmentTransaction ft = getFragmentManager().beginTransaction();
                Fragment f  = new WeChat_Fragement();
                ft.replace(R.id.fragment, f); //替换Fragment
                ft.commit(); //提交事务
            }
        });
        imageView2.setOnClickListener(new View.OnClickListener() {
            @Override
            public void onClick(View v) {
                FragmentTransaction ft = getFragmentManager().beginTransaction();
                Fragment f  = new Message_Fragment();
                ft.replace(R.id.fragment, f); //替换Fragment
                ft.commit(); //提交事务
            }
        });
        imageView3.setOnClickListener(new View.OnClickListener() {
            @Override
            public void onClick(View v) {
                FragmentTransaction ft = getFragmentManager().beginTransaction();
                Fragment f  = new Find_Fragment();
                ft.replace(R.id.fragment, f); //替换Fragment
                ft.commit(); //提交事务

            }
        });
        imageView4.setOnClickListener(new View.OnClickListener() {
            @Override
            public void onClick(View v) {
                FragmentTransaction ft = getFragmentManager().beginTransaction();
                Fragment f  = new Me_Fragment();
                ft.replace(R.id.fragment, f); //替换Fragment
                ft.commit(); //提交事务
            }
        });
    }
}


 875
875


 被折叠的 条评论
为什么被折叠?
被折叠的 条评论
为什么被折叠?
 到【灌水乐园】发言


