


序言
在本篇文章中,我将介绍我对山大会议客户端的设置页面所作的设计。
整体结构
整个设置模块被封装在一个 Setting 模块中,在客户端内将以 Modal 模态屏的形式展示给用户。其整体结构被划分为四个部分:
- 通用设置
- 音视频设备
- 与会状态
- 关于
每个部分都被细分为独立的模块,便于维护。
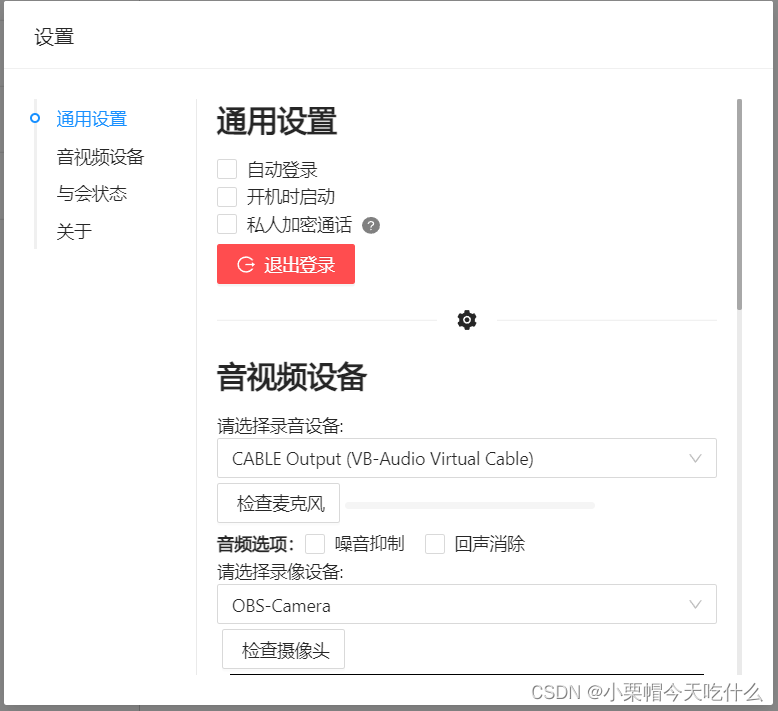
通用设置
下面先来介绍一下通用设置模块,它负责对应用的某些通用功能进行管理。包括是否需要在启动应用时自动登录,是否允许应用开机时自动启动,以及私人视频通话是否开启加密。
整个通用设置的模块代码如下:
import { AlertOutlined, LogoutOutlined, QuestionCircleFilled } from '@ant-design/icons';
import { Button, Checkbox, Modal, Tooltip } from 'antd';
import React, { useEffect, useState } from 'react';
import { getMainContent } from 'Utils/Global';
import { eWindow } from 'Utils/Types';

export default function General() {
	const [autoLogin, setAutoLogin] = useState(localStorage.getItem('autoLogin') === 'true');
	const [autoOpen, setAutoOpen] = useState(false);
	const [securityPrivateWebrtc, setSecurityPrivateWebrtc] = useState(
		localStorage.getItem('securityPrivateWebrtc') === 'true'
	);
	useEffect(() => {
		eWindow.ipc.invoke('GET_OPEN_AFTER_START_STATUS').then((status: boolean) => {
			setAutoOpen(status);
		});
	}, []);

	return (
		<>
			<div>
				<Checkbox
					checked={autoLogin}
					onChange={(e) => {
						setAutoLogin(e.target.checked);
						localStorage.setItem('autoLogin', `${e.target.checked}`);
					}}>
					自动登录
				</Checkbox>
			</div>
			<div>
				<Checkbox
					checked={autoOpen}
					onChange={(e) => {
						setAutoOpen(e.target.checked);
						eWindow.ipc.send('EXCHANGE_OPEN_AFTER_START_STATUS', e.target.checked);
					}}>
					开机时启动
				</Checkbox>
			</div>
			<div style={{ display: 'flex' }}>
				<Checkbox
					checked={securityPrivateWebrtc}
					onChange={(e) => {
						if (e.target.checked) {
							Modal.confirm({
								icon: <AlertOutlined />,
								content:
									'开启加密会大幅度提高客户端的CPU占用,请再三确认是否需要开启该功能!',
								cancelText: '暂不开启',
								okText: '确认开启',
								onCancel: () => {},
								onOk: () => {
									setSecurityPrivateWebrtc(true);
									localStorage.setItem('securityPrivateWebrtc', `${true}`);
								},
							});
						} else {
							setSecurityPrivateWebrtc(false);
							localStorage.setItem('securityPrivateWebrtc', `${false}`);
						}
					}}>
					私人加密通话
				</Checkbox>
				<Tooltip placement='right' overlay={'开启加密会大幅度提高CPU占用且不会开启GPU加速'}>
					<QuestionCircleFilled style={{ color: 'gray', transform: 'translateY(25%)' }} />
				</Tooltip>
			</div>
			<div style={{ marginTop: '5px' }}>
				<Button
					icon={<LogoutOutlined />}
					danger
					type='primary'
					onClick={() => {
						Modal.confirm({
							title: '注销',
							content: '你确定要退出当前用户登录吗?',
							icon: <LogoutOutlined />,
							cancelText: '取消',
							okText: '确认',
							okButtonProps: {
								danger: true,
							},
							onOk: () => {
								eWindow.ipc.send('LOG_OUT');
							},
							getContainer: getMainContent,
						});
					}}>
					退出登录
				</Button>
			</div>
		</>
	);
}
其中自动登录功能实现较为简单,我将着重介绍开机自启动功能的实现。
开机时启动
要实现本功能,需要对用户的注册表进行修改。而前端是不具备修改用户注册表的能力的,因此我们需要通过 electron 调用 Node.js 的模块,以实现对用户注册表的操作。
在 electron 的主进程部分,我们为 ipcMain 添加如下事件柄:
const { app } = require('electron');
const ipc = require('electron').ipcMain;
const cp = require('child_process');

ipc.on('EXCHANGE_OPEN_AFTER_START_STATUS', (evt, openAtLogin) => {
	if (app.isPackaged) {
		if (openAtLogin) {
			cp.exec(
				`REG ADD HKLM\\SOFTWARE\\WOW6432Node\\Microsoft\\Windows\\CurrentVersion\\Run /v SduMeeting /t REG_SZ /d "${process.execPath}" /f`,
				(err) => {
					console.log(err);
				}
			);
		} else {
			cp.exec(
				`REG DELETE HKLM\\SOFTWARE\\WOW6432Node\\Microsoft\\Windows\\CurrentVersion\\Run /v SduMeeting /f`,
				(err) => {
					console.log(err);
				}
			);
		}
	}
});

ipc.handle('GET_OPEN_AFTER_START_STATUS', () => {
	return new Promise((resolve) => {
		cp.exec(
			`REG QUERY HKLM\\SOFTWARE\\WOW6432Node\\Microsoft\\Windows\\CurrentVersion\\Run /v SduMeeting`,
			(err, stdout, stderr) => {
				if (err) {
					resolve(false);
				}
				resolve(stdout.indexOf('SduMeeting') >= 0);
			}
		);
	});
});
两个事件柄分别对应着修改开机启动状态以及获取开机启动状态。我们通过调用 Node.js 的 child_process 模块,通过 COMMAND 语句实现了对 Windows 系统上的注册表的增删改查,并以此实现了修改应用开机时自启动的能力。
需要注意的是,在生产环境下,由于修改注册表是需要管理员权限的,因此在打包时需要为应用申请管理员权限。由于我使用的是 electron-packager 进行打包的,打包时需要在打包命令中多添加一条参数 --win32metadata.requested-execution-level=requireAdministrator 。
音视频设备
由于本项目的目的是为了让多个用户在线进行视频会议,因此我们必须要为用户维护音视频设备的处理。为了方便维护,我将音频设备和视频设备拆分成了两个模块进行管理,在它们上面有一个多媒体设备模块负责管理共享的数据(比如当前的多媒体设备列表以及当前正在使用的设备Id)。
多媒体设备(MediaDevices.tsx)
在这个模块中,我们首先需要提取出用户当前设备连接的所有多媒体设备。要实现这一点,可以利用到我们之前的文章 【山大会议】WebRTC基础之用户媒体的获取 中的内容。
我们先来实现一个获取用户多媒体设备的函数:
/**
 * 获取用户多媒体设备
 */
function getUserMediaDevices() {
	return new Promise((resolve, reject) => {
		try {
			navigator.mediaDevices.enumerateDevices().then((devices) => {
				const generateDeviceJson = (device: MediaDeviceInfo) => {
					const formerIndex = device.label.indexOf(' (');
					const latterIndex = device.label.lastIndexOf(' (');
					const { label, webLabel } = ((label, deviceId) => {
						switch (deviceId) {
							case 'default':
								return {
									label: label.replace('Default - ', ''),
									webLabel: label.replace('Default - ', '默认 - '),
								};
							case 'communications':
								return {
									label: label.replace('Communications - ', ''),
									webLabel: label.replace('Communications - ', '通讯设备 - '),
								};
							default:
								return { label, webLabel: label };
						}
					})(
						formerIndex === latterIndex
							? device.label
							: device.label.substring(0, latterIndex),
						device.deviceId
					);
					return { label, webLabel, deviceId: device.deviceId };
				};
				let videoDevices = [],
					audioDevices = [];
				for (const index in devices) {
					const device = devices[index];
					if (device.kind === 'videoinput') {
						videoDevices.push(generateDeviceJson(device));
					} else if (device.kind === 'audioinput') {
						audioDevices.push(generateDeviceJson(device));
					}
				}
				store.dispatch(updateAvailableDevices(DEVICE_TYPE.VIDEO_DEVICE, videoDevices));
				store.dispatch(updateAvailableDevices(DEVICE_TYPE.AUDIO_DEVICE, audioDevices));
				resolve({ video: videoDevices, audio: audioDevices });
			});
		} catch (error) {
			console.warn('获取设备时发生错误');
			reject(error);
		}
	});
}
通过调用这个函数,我们将获取当前的多媒体设备信息,并将它发送至 Redux 进行状态更新。
整个多媒体设备模块的代码如下:
import { CustomerServiceOutlined } from '@ant-design/icons';
import { Button } from 'antd';
import { globalMessage } from 'Components/GlobalMessage/GlobalMessage';
import React, { useEffect, useState } from 'react';
import { DEVICE_TYPE } from 'Utils/Constraints';
import { updateAvailableDevices } from 'Utils/Store/actions';
import store from 'Utils/Store/store';
import { DeviceInfo } from 'Utils/Types';
import AudioDevices from './AudioDevices';
import VideoDevices from './VideoDevices';

export default function MediaDevices() {
	const [videoDevices, setVideoDevices] = useState(store.getState().availableVideoDevices);
	const [audioDevices, setAudioDevices] = useState(store.getState().availableAudioDevices);
	const [usingVideoDevice, setUsingVideoDevice] = useState('');
	const [usingAudioDevice, setUsingAudioDevice] = useState('');
	useEffect(
		() =>
			store.subscribe(() => {
				const storeState = store.getState();
				setVideoDevices(storeState.availableVideoDevices);
				setAudioDevices(storeState.availableAudioDevices);
				setUsingVideoDevice(`${(storeState.usingVideoDevice as DeviceInfo).webLabel}`);
				setUsingAudioDevice(`${(storeState.usingAudioDevice as DeviceInfo).webLabel}`);
			}),
		[]
	);

	useEffect(() => {
		getUserMediaDevices();
	}, []);

	return (
		<>
			<AudioDevices
				audioDevices={audioDevices}
				usingAudioDevice={usingAudioDevice}
				setUsingAudioDevice={setUsingAudioDevice}
			/>
			<VideoDevices
				videoDevices={videoDevices}
				usingVideoDevice={usingVideoDevice}
				setUsingVideoDevice={setUsingVideoDevice}
			/>
			<Button
				type='link'
				style={{ fontSize: '0.9em' }}
				icon={<CustomerServiceOutlined />}
				onClick={() => {
					getUserMediaDevices().then(() => {
						globalMessage.success('设备信息更新完毕', 0.5);
					});
				}}>
				没找到合适的设备?点我重新获取设备
			</Button>
		</>
	);
}

/**
 * 获取用户多媒体设备
 */
function getUserMediaDevices() {
	return new Promise((resolve, reject) => {
		try {
			navigator.mediaDevices.enumerateDevices().then((devices) => {
				const generateDeviceJson = (device: MediaDeviceInfo) => {
					const formerIndex = device.label.indexOf(' (');
					const latterIndex = device.label.lastIndexOf(' (');
					const { label, webLabel } = ((label, deviceId) => {
						switch (deviceId) {
							case 'default':
								return {
									label: label.replace('Default - ', ''),
									webLabel: label.replace('Default - ', '默认 - '),
								};
							case 'communications':
								return {
									label: label.replace('Communications - ', ''),
									webLabel: label.replace('Communications - ', '通讯设备 - '),
								};
							default:
								return { label, webLabel: label };
						}
					})(
						formerIndex === latterIndex
							? device.label
							: device.label.substring(0, latterIndex),
						device.deviceId
					);
					return { label, webLabel, deviceId: device.deviceId };
				};
				let videoDevices = [],
					audioDevices = [];
				for (const index in devices) {
					const device = devices[index];
					if (device.kind === 'videoinput') {
						videoDevices.push(generateDeviceJson(device));
					} else if (device.kind === 'audioinput') {
						audioDevices.push(generateDeviceJson(device));
					}
				}
				store.dispatch(updateAvailableDevices(DEVICE_TYPE.VIDEO_DEVICE, videoDevices));
				store.dispatch(updateAvailableDevices(DEVICE_TYPE.AUDIO_DEVICE, audioDevices));
				resolve({ video: videoDevices, audio: audioDevices });
			});
		} catch (error) {
			console.warn('获取设备时发生错误');
			reject(error);
		}
	});
}
视频设备(VideoDevices.tsx)
秉持先易后难的原则,我们先绕过音频设备模块,来讲一下视频设备模块。整个模块代码如下:
import { Button, Select } from 'antd';
import React, { useEffect, useRef, useState } from 'react';
import { DEVICE_TYPE } from 'Utils/Constraints';
import eventBus from 'Utils/EventBus/EventBus';
import { getDeviceStream } from 'Utils/Global';
import { exchangeMediaDevice } from 'Utils/Store/actions';
import store from 'Utils/Store/store';
import { DeviceInfo } from 'Utils/Types';

interface VideoDevicesProps {
	videoDevices: Array<DeviceInfo>;
	usingVideoDevice: string;
	setUsingVideoDevice: React.Dispatch<React.SetStateAction<string>>;
}

export default function VideoDevices(props: VideoDevicesProps) {
	const [isExamingCamera, setIsExamingCamera] = useState(false);
	const examCameraRef = useRef<HTMLVideoElement>(null);
	useEffect(() => {
		if (isExamingCamera) {
			videoConnect(examCameraRef);
		} else {
			const examCameraDOM = examCameraRef.current as HTMLVideoElement;
			examCameraDOM.pause();
			examCameraDOM.srcObject = null;
		}
	}, [isExamingCamera]);

	useEffect(() => {
		const onCloseSettingModal = function () {
			setIsExamingCamera(false);
		};
		eventBus.on('CLOSE_SETTING_MODAL', onCloseSettingModal);
		return () => {
			eventBus.off('CLOSE_SETTING_MODAL', onCloseSettingModal);
		};
	}, []);

	return (
		<div>
			请选择录像设备:
			<Select
				placeholder='请选择录像设备'
				style={{ width: '100%' }}
				onSelect={(
					label: string,
					option: { key: string; value: string; children: string }
				) => {
					props.setUsingVideoDevice(label);
					store.dispatch(
						exchangeMediaDevice(DEVICE_TYPE.VIDEO_DEVICE, {
							deviceId: option.key,
							label: option.value,
							webLabel: option.children,
						})
					);
					if (isExamingCamera) {
						videoConnect(examCameraRef);
					}
				}}
				value={props.usingVideoDevice}>
				{props.videoDevices.map((device) => (
					<Select.Option value={device.label} key={device.deviceId}>
						{device.webLabel}
					</Select.Option>
				))}
			</Select>
			<div style={{ margin: '0.25rem' }}>
				<Button
					style={{ width: '7em' }}
					onClick={() => {
						setIsExamingCamera(!isExamingCamera);
					}}>
					{isExamingCamera ? '停止检查' : '检查摄像头'}
				</Button>
			</div>
			<div
				style={{
					width: '100%',
					display: 'flex',
					justifyContent: 'center',
				}}>
				<video
					ref={examCameraRef}
					style={{
						background: 'black',
						width: '40vw',
						height: 'calc(40vw / 1920 * 1080)',
					}}
				/>
			</div>
		</div>
	);
}

async function videoConnect(examCameraRef: React.RefObject<HTMLVideoElement>) {
	const videoStream = await getDeviceStream(DEVICE_TYPE.VIDEO_DEVICE);
	const examCameraDOM = examCameraRef.current as HTMLVideoElement;
	examCameraDOM.srcObject = videoStream;
	examCameraDOM.play();
}
用户可使用本模块更换所需要使用的摄像头,并进行测试。
音频设备(AudioDevices)
音频设备模块所提供的功能与视频设备模块大致相同,但它多包含了测试麦克风音量的功能。在这个应用中,我通过 AudioWorkletNode 实现了麦克风音量的测试。首先需要在 public 下定义一个 worklet 脚本注册进程:
// \public\electronAssets\worklet\volumeMeter.js
/* eslint-disable no-underscore-dangle */
const SMOOTHING_FACTOR = 0.8;
// eslint-disable-next-line no-unused-vars
const MINIMUM_VALUE = 0.00001;
registerProcessor(
	'vumeter',
	class extends AudioWorkletProcessor {
		_volume;
		_updateIntervalInMS;
		_nextUpdateFrame;
		_currentTime;

		constructor() {
			super();
			this._volume = 0;
			this._updateIntervalInMS = 50;
			this._nextUpdateFrame = this._updateIntervalInMS;
			this._currentTime = 0;
			this.port.onmessage = (event) => {
				if (event.data.updateIntervalInMS) {
					this._updateIntervalInMS = event.data.updateIntervalInMS;
					// console.log(event.data.updateIntervalInMS);
				}
			};
		}

		get intervalInFrames() {
			// eslint-disable-next-line no-undef
			return (this._updateIntervalInMS / 1000) * sampleRate;
		}

		process(inputs, outputs, parameters) {
			const input = inputs[0];

			// Note that the input will be down-mixed to mono; however, if no inputs are
			// connected then zero channels will be passed in.
			if (0 < input.length) {
				const samples = input[0];
				let sum = 0;

				// Calculated the squared-sum.
				for (const sample of samples) {
					sum += sample ** 2;
				}

				// Calculate the RMS level and update the volume.
				const rms = Math.sqrt(sum / samples.length);
				this._volume = Math.max(rms, this._volume * SMOOTHING_FACTOR);

				// Update and sync the volume property with the main thread.
				this._nextUpdateFrame -= samples.length;
				if (this._nextUpdateFrame < 0) {
					this._nextUpdateFrame += this.intervalInFrames;
					// const currentTime = currentTime ;
					// eslint-disable-next-line no-undef
					if (!this._currentTime || 0.125 < currentTime - this._currentTime) {
						// eslint-disable-next-line no-undef
						this._currentTime = currentTime;
						// console.log(`currentTime: ${currentTime}`);
						this.port.postMessage({ volume: this._volume });
					}
				}
			}

			return true;
		}
	}
);
在 React 项目中,我使用一个自定义的 Hook 来调用这个 Worklet 脚本,测试音量:
/**
 * 【自定义Hooks】监听媒体流音量
 * @returns 音量、连接流函数、断连函数
 */
const useVolume = () => {
	const [volume, setVolume] = useState(0);
	const ref = useRef({});

	const onmessage = useCallback((evt) => {
		if (!ref.current.audioContext) {
			return;
		}
		if (evt.data.volume) {
			setVolume(Math.round(evt.data.volume * 200));
		}
	}, []);

	const disconnectAudioContext = useCallback(() => {
		if (ref.current.node) {
			try {
				ref.current.node.disconnect();
			} catch (err) {}
		}
		if (ref.current.source) {
			try {
				ref.current.source.disconnect();
			} catch (err) {}
		}
		ref.current.node = null;
		ref.current.source = null;
		ref.current.audioContext = null;
		setVolume(0);
	}, []);

	const connectAudioContext = useCallback(
		async (mediaStream: MediaStream) => {
			if (ref.current.audioContext) {
				disconnectAudioContext();
			}
			try {
				ref.current.audioContext = new AudioContext();
				await ref.current.audioContext.audioWorklet.addModule(
					'../electronAssets/worklet/volumeMeter.js'
				);
				if (!ref.current.audioContext) {
					return;
				}
				ref.current.source = ref.current.audioContext.createMediaStreamSource(mediaStream);
				ref.current.node = new AudioWorkletNode(ref.current.audioContext, 'vumeter');
				ref.current.node.port.onmessage = onmessage;
				ref.current.source
					.connect(ref.current.node)
					.connect(ref.current.audioContext.destination);
			} catch (errMsg) {
				disconnectAudioContext();
			}
		},
		[disconnectAudioContext, onmessage]
	);

	return [volume, connectAudioContext, disconnectAudioContext];
};
整个音频设备模块的源代码如下:
import { Button, Checkbox, Progress, Select } from 'antd';
import { globalMessage } from 'Components/GlobalMessage/GlobalMessage';
import React, { useEffect, useRef, useState } from 'react';
import { DEVICE_TYPE } from 'Utils/Constraints';
import eventBus from 'Utils/EventBus/EventBus';
import { getDeviceStream } from 'Utils/Global';
import { useVolume } from 'Utils/MyHooks/MyHooks';
import { exchangeMediaDevice } from 'Utils/Store/actions';
import store from 'Utils/Store/store';
import { DeviceInfo } from 'Utils/Types';

interface AudioDevicesProps {
	audioDevices: Array<DeviceInfo>;
	usingAudioDevice: string;
	setUsingAudioDevice: React.Dispatch<React.SetStateAction<string>>;
}

export default function AudioDevices(props: AudioDevicesProps) {
	const [isExamingMicroPhone, setIsExamingMicroPhone] = useState(false);
	const [isSoundMeterConnecting, setIsSoundMeterConnecting] = useState(false);
	const examMicroPhoneRef = useRef<HTMLAudioElement>(null);

	const [volume, connectStream, disconnectStream] = useVolume();

	useEffect(() => {
		const examMicroPhoneDOM = examMicroPhoneRef.current as HTMLAudioElement;
		if (isExamingMicroPhone) {
			getDeviceStream(DEVICE_TYPE.AUDIO_DEVICE).then((stream) => {
				connectStream(stream).then(() => {
					globalMessage.success('完成音频设备连接');
					setIsSoundMeterConnecting(false);
				});
				examMicroPhoneDOM.srcObject = stream;
				examMicroPhoneDOM.play();
			});
		} else {
			disconnectStream();
			examMicroPhoneDOM.pause();
		}
	}, [isExamingMicroPhone]);

	useEffect(() => {
		const onCloseSettingModal = function () {
			setIsExamingMicroPhone(false);
			setIsSoundMeterConnecting(false);
		};
		eventBus.on('CLOSE_SETTING_MODAL', onCloseSettingModal);
		return () => {
			eventBus.off('CLOSE_SETTING_MODAL', onCloseSettingModal);
		};
	}, []);

	const [noiseSuppression, setNoiseSuppression] = useState(
		localStorage.getItem('noiseSuppression') !== 'false'
	);
	const [echoCancellation, setEchoCancellation] = useState(
		localStorage.getItem('echoCancellation') !== 'false'
	);

	return (
		<div>
			请选择录音设备:
			<Select
				placeholder='请选择录音设备'
				style={{ width: '100%' }}
				onSelect={(
					label: string,
					option: { key: string; value: string; children: string }
				) => {
					props.setUsingAudioDevice(label);
					store.dispatch(
						exchangeMediaDevice(DEVICE_TYPE.AUDIO_DEVICE, {
							deviceId: option.key,
							label: option.value,
							webLabel: option.children,
						})
					);
					if (isExamingMicroPhone) {
						getDeviceStream(DEVICE_TYPE.AUDIO_DEVICE).then((stream) => {
							connectStream(stream).then(() => {
								globalMessage.success('完成音频设备连接');
								setIsSoundMeterConnecting(false);
							});
							const examMicroPhoneDOM = examMicroPhoneRef.current as HTMLAudioElement;
							examMicroPhoneDOM.pause();
							examMicroPhoneDOM.srcObject = stream;
							examMicroPhoneDOM.play();
						});
					}
				}}
				value={props.usingAudioDevice}>
				{props.audioDevices.map((device) => (
					<Select.Option value={device.label} key={device.deviceId}>
						{device.webLabel}
					</Select.Option>
				))}
			</Select>
			<div style={{ marginTop: '0.25rem', display: 'flex' }}>
				<div style={{ height: '1.2rem' }}>
					<Button
						style={{ width: '7em' }}
						onClick={() => {
							if (!isExamingMicroPhone) setIsSoundMeterConnecting(true);
							setIsExamingMicroPhone(!isExamingMicroPhone);
						}}
						loading={isSoundMeterConnecting}>
						{isExamingMicroPhone ? '停止检查' : '检查麦克风'}
					</Button>
				</div>
				<div style={{ width: '50%', margin: '0.25rem' }}>
					<Progress
						percent={volume}
						showInfo={false}
						strokeColor={
							isExamingMicroPhone ? (volume > 70 ? '#e91013' : '#108ee9') : 'gray'
						}
						size='small'
					/>
				</div>
				<audio ref={examMicroPhoneRef} />
			</div>
			<div style={{ display: 'flex', marginTop: '0.5em' }}>
				<div style={{ fontWeight: 'bold' }}>音频选项:</div>
				<div
					style={{
						display: 'flex',
						justifyContent: 'center',
					}}>
					<Checkbox
						checked={noiseSuppression}
						onChange={(evt) => {
							setNoiseSuppression(evt.target.checked);
							localStorage.setItem('noiseSuppression', `${evt.target.checked}`);
						}}>
						噪音抑制
					</Checkbox>
					<Checkbox
						checked={echoCancellation}
						onChange={(evt) => {
							setEchoCancellation(evt.target.checked);
							localStorage.setItem('echoCancellation', `${evt.target.checked}`);
						}}>
						回声消除
					</Checkbox>
				</div>
			</div>
		</div>
	);
}
除了更换测试麦克风、监听音量,它还允许用户自行选择连线时是否使用噪音抑制和回声消除。
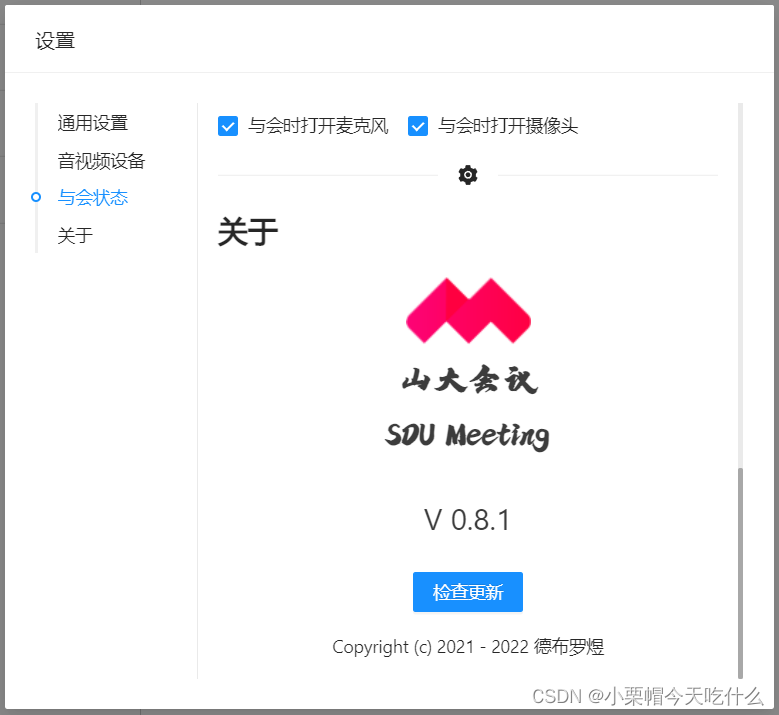
与会状态
与会状态模块则比较简单,只为用户维护加入会议是否默认开启麦克风和摄像头。代码如下:
import { Checkbox } from 'antd';
import React, { useState } from 'react';

export default function MeetingStatus() {
    const [autoOpenMicroPhone, setAutoOpenMicroPhone] = useState(
        localStorage.getItem('autoOpenMicroPhone') === 'true'
    );
    const [autoOpenCamera, setAutoOpenCamera] = useState(
        localStorage.getItem('autoOpenCamera') === 'true'
    );

    return (
        <>
            <Checkbox
                checked={autoOpenMicroPhone}
                onChange={(e) => {
                    setAutoOpenMicroPhone(e.target.checked);
                    localStorage.setItem('autoOpenMicroPhone', `${e.target.checked}`);
                }}>
                与会时打开麦克风
            </Checkbox>
            <Checkbox
                checked={autoOpenCamera}
                onChange={(e) => {
                    setAutoOpenCamera(e.target.checked);
                    localStorage.setItem('autoOpenCamera', `${e.target.checked}`);
                }}>
                与会时打开摄像头
            </Checkbox>
        </>
    );
}
关于
最后一个模块将展示应用的信息。其最核心的部分在于检测应用是否需要更新,为了实现这一点,首先我写了一个简单的比较版本号的函数。
function needUpdate(nowVersion: string, targetVersion: string) {
	const nowArr = nowVersion.split('.').map((i) => Number(i));
	const newArr = targetVersion.split('.').map((i) => Number(i));
	const lessLength = Math.min(nowArr.length, newArr.length);
	for (let i = 0; i < lessLength; i++) {
		if (nowArr[i] < newArr[i]) {
			return true;
		} else if (nowArr[i] > newArr[i]) {
			return false;
		}
	}
	if (nowArr.length < newArr.length) return true;
	return false;
}
整个关于模块的代码如下:
import { Button, Image, Progress } from 'antd';
import axios from 'axios';
import { globalMessage } from 'Components/GlobalMessage/GlobalMessage';
import React, { useEffect, useMemo, useState } from 'react';
import { eWindow } from 'Utils/Types';
import './style.scss';

function needUpdate(nowVersion: string, targetVersion: string) {
	const nowArr = nowVersion.split('.').map((i) => Number(i));
	const newArr = targetVersion.split('.').map((i) => Number(i));
	const lessLength = Math.min(nowArr.length, newArr.length);
	for (let i = 0; i < lessLength; i++) {
		if (nowArr[i] < newArr[i]) {
			return true;
		} else if (nowArr[i] > newArr[i]) {
			return false;
		}
	}
	if (nowArr.length < newArr.length) return true;
	return false;
}

export default function About() {
	const [appVersion, setAppVersion] = useState<string | undefined>(undefined);
	useEffect(() => {
		eWindow.ipc.invoke('APP_VERSION').then((version: string) => {
			setAppVersion(version);
		});
	}, []);

	const thisYear = useMemo(() => new Date().getFullYear(), []);

	const [latestVersion, setLatestVersion] = useState(false);
	const [checking, setChecking] = useState(false);
	const checkForUpdate = () => {
		setChecking(true);
		axios
			.get('https://assets.aiolia.top/ElectronApps/SduMeeting/manifest.json', {
				headers: {
					'Cache-Control': 'no-cache',
				},
			})
			.then((res) => {
				const { latest } = res.data;
				if (needUpdate(appVersion as string, latest)) setLatestVersion(latest);
				else globalMessage.success({ content: '当前已是最新版本,无需更新' });
			})
			.catch(() => {
				globalMessage.error({
					content: '检查更新失败',
				});
			})
			.finally(() => {
				setChecking(false);
			});
	};

	const [total, setTotal] = useState(Infinity);
	const [loaded, setLoaded] = useState(0);
	const [updating, setUpdating] = useState(false);
	const update = () => {
		setUpdating(true);
		axios
			.get(`https://assets.aiolia.top/ElectronApps/SduMeeting/${latestVersion}/update.zip`, {
				responseType: 'blob',
				onDownloadProgress: (evt) => {
					const { loaded, total } = evt;
					setTotal(total);
					setLoaded(loaded);
				},
				headers: {
					'Cache-Control': 'no-cache',
				},
			})
			.then((res) => {
				const fr = new FileReader();
				fr.onload = () => {
					eWindow.ipc.invoke('DOWNLOADED_UPDATE_ZIP', fr.result).then(() => {
						setTimeout(() => {
							eWindow.ipc.send('READY_TO_UPDATE');
						}, 500);
					});
				};
				fr.readAsBinaryString(res.data);
				globalMessage.success({ content: '更新包下载完毕,即将重启应用...' });
			});
	};

	return (
		<div id='settingAboutContainer'>
			<div>
				<Image
					src={'../electronAssets/favicon177x128.ico'}
					preview={false}
					width={'25%'}
					height={'25%'}
				/>
			</div>
			<div className='settingAboutFaviconText'>山大会议</div>
			<div className='settingAboutFaviconText'>SDU Meeting</div>
			<div id='settingVersionText'>V {appVersion}</div>
			{latestVersion ? (
				<>
					<div>检查到有新的可用版本:V {latestVersion},是否进行更新?</div>
					{updating ? (
						<>
							<Progress
								percent={Number(((loaded / total) * 100).toFixed(0))}
								status={loaded === total ? 'success' : 'active'}
							/>
						</>
					) : (
						<Button onClick={update}>开始下载</Button>
					)}
				</>
			) : (
				<Button type='primary' onClick={checkForUpdate} loading={checking}>
					检查更新
				</Button>
			)}
			<div id='copyright'>Copyright (c) 2021{thisYear ? ` - ${thisYear}` : ''} 德布罗煜</div>
		</div>
	);
}
当应用检测到新版本后,将会以 Blob 的形式下载最新的版本更新包,下载完成后,将会通过我在 electron 中编写的函数将更新包保存在特定的位置。
const ipc = require('electron').ipcMain;
const fs = require('fs-extra');

ipc.handle('DOWNLOADED_UPDATE_ZIP', (evt, data) => {
	fs.writeFileSync(path.join(EXEPATH, 'resources', 'update.zip'), data, 'binary');
	return true;
});
由于在应用开启的时候,更新包需要替换的部分文件处于占用状态,因此我在 electron 中写了另一个函数,用以开启一个独立于 山大会议 应用本身的子进程,在山大会议自动关闭后,调用我用 C++ 写的一个更新(解压)程序,将更新包的内容提取出来覆盖掉旧的文件,从而实现应用的更新。
// electron 中的更新进程
const { app } = require('electron');
const cp = require('child_process');

function readyToUpdate() {
	const { spawn } = cp;
	const child = spawn(
		path.join(EXEPATH, 'resources/ReadyUpdater.exe'),
		['YES_I_WANNA_UPDATE_ASAR'],
		{
			detached: true,
			shell: true,
		}
	);
	if (mainWindow) mainWindow.close();
	child.unref();
	app.quit();
}
// ReadyUpdater.cpp

#include <iostream>
#include <stdlib.h>
#include <tchar.h>
#include <Windows.h>
#include "unzip.h"
using namespace std;

int main(int argc, char* argv[])
{
	Sleep(300);
	if (argc < 2) {
		cout << "您正以不当方式运行该程序" << endl;
	}
	else {
		char* safetyKey = argv[1];
		if (strcmp("YES_I_WANNA_UPDATE_ASAR", safetyKey) != 0) {
			cout << "你不应当执行该程序" << endl;
		}
		else {
			HZIP hz = OpenZip(_T(".\\resources\\update.zip"), 0);
			SetUnzipBaseDir(hz, _T(".\\resources"));
			ZIPENTRY ze;
			GetZipItem(hz, -1, &ze);
			int numitems = ze.index;
			// -1 gives overall information about the zipfile
			for (int zi = 0; zi < numitems; zi++)
			{
				ZIPENTRY ze;
				GetZipItem(hz, zi, &ze); // fetch individual details
				UnzipItem(hz, zi, ze.name);         // e.g. the item's name.
			}
			CloseZip(hz);
			system("del .\\resources\\update.zip");
			cout << "更新完成" << endl;
			cout << "请重启应用" << endl;
		}
	}
	system("pause");
	return 0;
}


 2791
2791


 被折叠的 条评论
为什么被折叠?
被折叠的 条评论
为什么被折叠?
 到【灌水乐园】发言


