


前言
开发环境:ESP-IDF 4.3
操作系统:Windows10 专业版
开发板:自制的ESP32-WROOM-32E
十、软件定时器
freertos中的软件定时器与硬件无关,顾名思义与软件有关。
使用它需要除了需要包含FreeRTOS.h,还需要包含timers.h,具体细节我们看以下代码
#include <stdio.h>
#include <stdint.h>
#include "freertos/FreeRTOS.h"
#include "freertos/task.h"
#include "esp_system.h"
#include "../build/config/sdkconfig.h"
#include "esp_log.h"

#include "freertos/timers.h"

static const char *TAG = "SoftTimer";

int id1=1;//定时器变量1
int id2=2;//定时器变量2

void TimerCallBack(TimerHandle_t xTimer)//定时器任务
{
    const char *strName;
    strName = pcTimerGetName(xTimer);//读取定时器名字

    int *id;
    id=(int*)pvTimerGetTimerID(xTimer);//读取定时器id

    //printf("timer name=%s,id=%d\n",strName,*id);

	ESP_LOGI(TAG,"timer name=%s,id=%d\n",strName,*id);
}

void app_main(void)
{
    TimerHandle_t xTimer1;//定义计数器句柄
    TimerHandle_t xTimer2;//定义计数器句柄

    xTimer1 = xTimerCreate("Timer1",pdMS_TO_TICKS(1000),pdTRUE,(void*)&id1,TimerCallBack);//计数器1的触发频率是一秒一次
    xTimer2 = xTimerCreate("Timer2",pdMS_TO_TICKS(2000),pdTRUE,(void*)&id2,TimerCallBack);//计数器2的触发频率是两秒一次

    xTimerStart(xTimer1,0);//开启计数器1
    xTimerStart(xTimer2,0);//开启计数器2

    vTaskDelay(pdMS_TO_TICKS(6000));
    xTimerChangePeriod(xTimer1,pdMS_TO_TICKS(6000),0);//更改计数周期1的技术周期为6s

    vTaskDelay(pdMS_TO_TICKS(11000));
    xTimerReset(xTimer1,0);//重新计数

    vTaskDelay(pdMS_TO_TICKS(13000));
    xTimerStop(xTimer1,0);//停止计数器
}
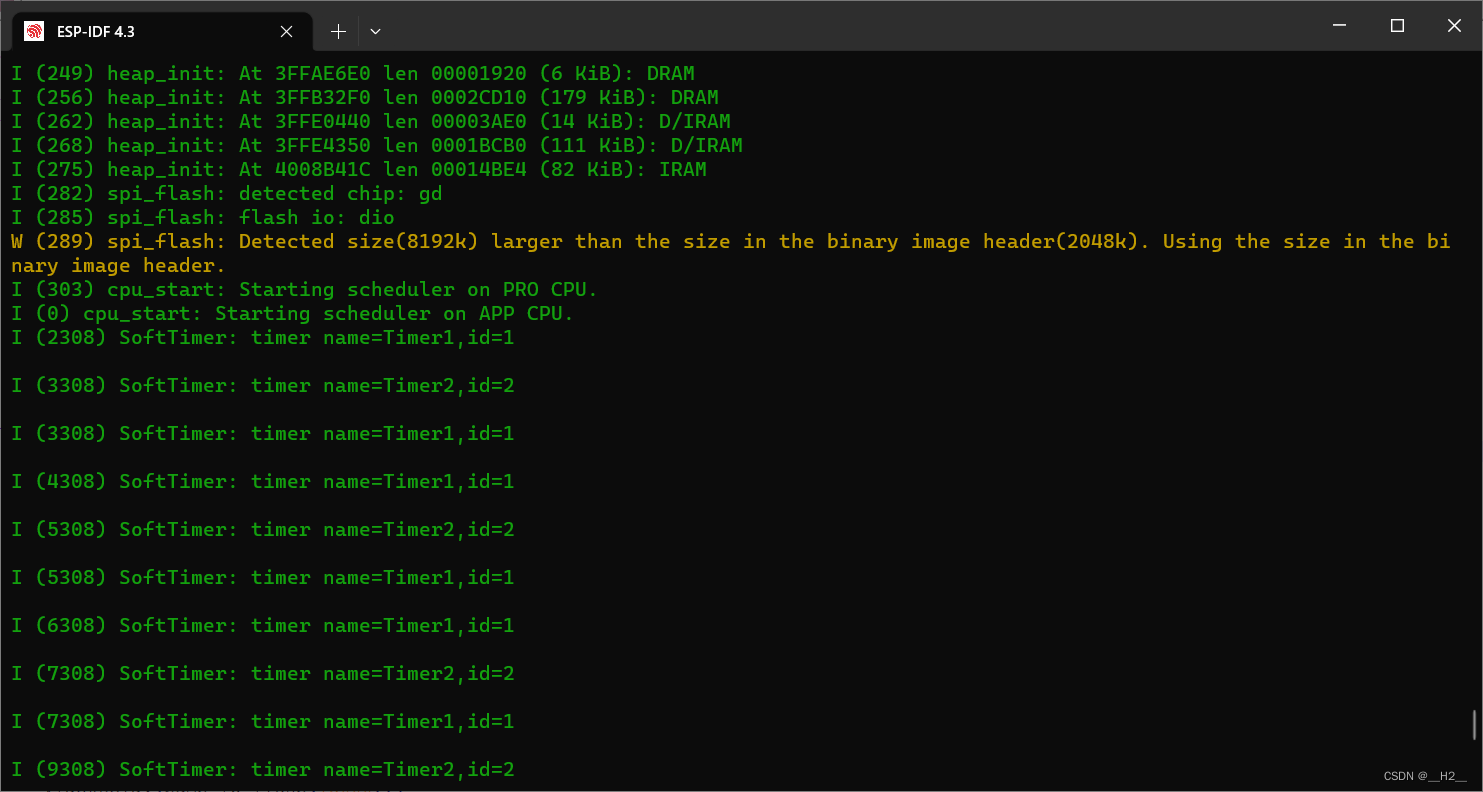
由图可以看出TIM2是两秒执行一次,而TIM1一秒执行一次
除了这个以外后面还会将TIM1关闭,TIM1将不再触发效果。
十一、二进制信号量
信号量可以用来控制共享资源和任务的同步。
二进制信号量的值自然是二进制:非0即1
二进制信号量的作用是满足任务间的互斥和同步,我们最好是用**xSemaphoreCreateBinary()**函数来创建信号量。
还有另一个创建信号量的函数是因旧版本向下兼容而保留,在此不做赘述。
使用信号量要包含"semphr.h"头文件。
先创建一个句柄来获取xSemaphoreCreateBinary()函数的返回值。
然后使用xSemaphoreGive()函数来用于释放创建的信号量。
在任务中里用xSemaphoreTask()来获取信号量执行任务。
代码如下:
#include <stdio.h>
#include <stdint.h>
#include "freertos/FreeRTOS.h"
#include "freertos/task.h"
#include "esp_system.h"
#include "../build/config/sdkconfig.h"
#include "esp_log.h"

#include "freertos/semphr.h"

static const char *TAG = "pv";

int pv = 0;

SemaphoreHandle_t semphrHandle;//创建一个SemaphoreHandle_t类型句柄

void Task1(void*pvParam)
{
    while (1)
    {
        xSemaphoreTake(semphrHandle,portMAX_DELAY);//获取信号量

		//任务1将在5s内占用信号量,5s后释放,此时任务2无法获取信号量从而任务无法执行
        for(int i=0;i<5;i++)
        {
            pv++;
            printf("Task1 pv = %d!\n",pv);
            vTaskDelay(pdMS_TO_TICKS(1000));
        }

        xSemaphoreGive(semphrHandle);//释放信号量
        vTaskDelay(pdMS_TO_TICKS(1000));
    }
}
void Task2(void*pvParam)
{
    while (1)
    {
        xSemaphoreTake(semphrHandle,portMAX_DELAY);//获取信号量

		//任务2将在5s内占用信号量,5s后释放,此时任务1无法获取信号量从而导致任务无法执行
        for(int i=0;i<5;i++)
        {
            pv++;
            printf("Task2 pv = %d!\n",pv);
            vTaskDelay(pdMS_TO_TICKS(1000));
        }

        xSemaphoreGive(semphrHandle);//释放信号量
        vTaskDelay(pdMS_TO_TICKS(1000));
    }
}

void app_main(void)
{
    semphrHandle = xSemaphoreCreateBinary();//创建信号量
    xSemaphoreGive(semphrHandle);//释放信号量

	//创建任务
    xTaskCreate(Task1,"Task1",1024*5,NULL,1,NULL);
    xTaskCreate(Task2,"Task2",1024*5,NULL,1,NULL);
}
运行效果是任务1和任务2各自占用信号量5s中,一方处于执行那么另一方将处于阻塞状态。
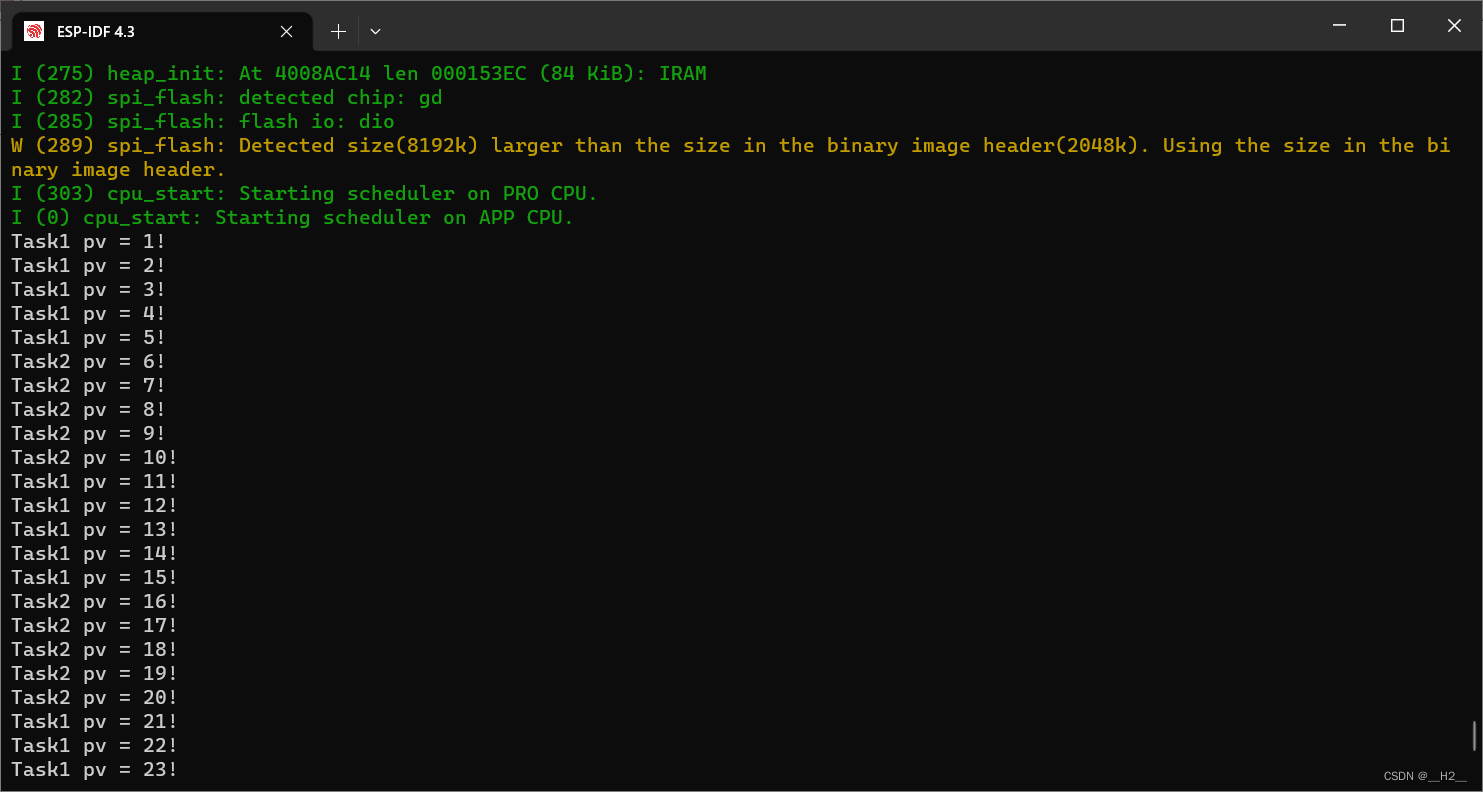
当多个任务同时阻塞在同一个信号量的时候,优先级最高的那个任务会优先获得信号量。这与我们的CPU资源争夺时,优先级高的任务先被执行一样。
十二、计数型信号量
比如说你去住酒店,酒店的客房数量是一个固定的数量,所以可以接纳的旅客数量是固定的。
假设总计100个客房,那么每分出一个客房,那么可供的客房数量就会减少一个。
这个可以使用的客房数量就是一个信号量,它控制着客房这个共享资源的使用。
这里我们就使用这个酒店管理来模拟我们的计数型信号量:
#include <stdio.h>
#include <stdint.h>
#include "freertos/FreeRTOS.h"
#include "freertos/task.h"
#include "esp_system.h"
#include "../build/config/sdkconfig.h"
#include "esp_log.h"

#include "freertos/semphr.h"

static const char *TAG = "酒店管理";


SemaphoreHandle_t semphrHandle;

//房间分配函数,若有空房间则分配出去,无房间则打印酒店已满。
void Task1(void*pvParam)
{
    int emptySpace=0;
    BaseType_t iResult;
    while (1)
    {
        emptySpace=uxSemaphoreGetCount(semphrHandle);//获取当前信号量值
        ESP_LOGI(TAG,"剩余%d房间\n",emptySpace);

        iResult=xSemaphoreTake(semphrHandle,0);//取得当前信号量,如果信号量为0则获取失败

        if(iResult == pdPASS)
            ESP_LOGI(TAG,"已分配房间\n");
        else
            ESP_LOGI(TAG,"酒店已满\n");

        vTaskDelay(pdMS_TO_TICKS(1000));
    }
}

//退房函数,每6s退一个
void Task2(void*pvParam)
{
    while (1)
    {
        vTaskDelay(pdMS_TO_TICKS(6000));
        xSemaphoreGive(semphrHandle);
        ESP_LOGI(TAG,"已退房");
    }
}

void app_main(void)
{
    semphrHandle = xSemaphoreCreateCounting(5,5);//创建计数型信号量
    xSemaphoreGive(semphrHandle);

    xTaskCreate(Task1,"Task1",1024*5,NULL,1,NULL);
    xTaskCreate(Task2,"Task2",1024*5,NULL,1,NULL);
}
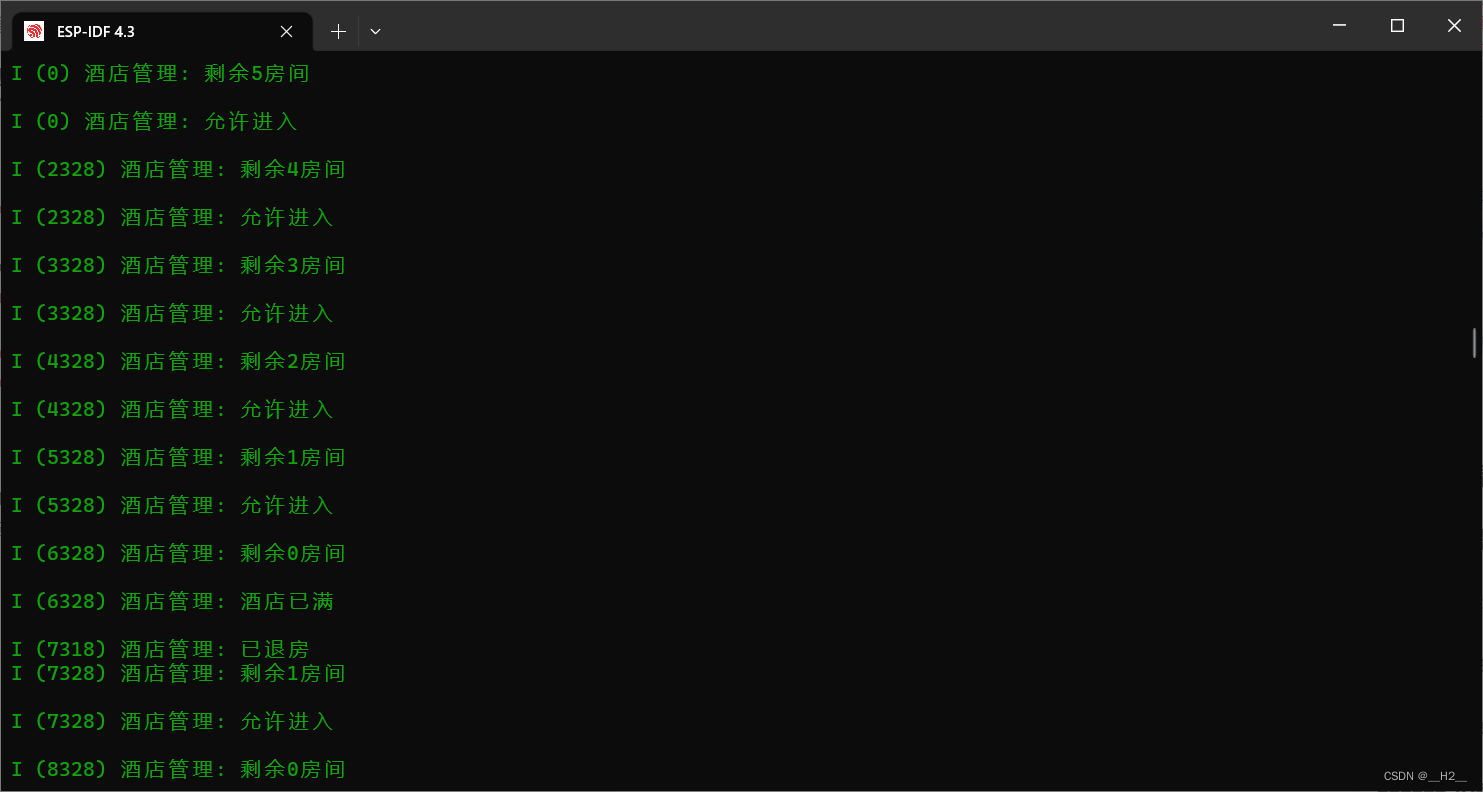
这里任务1每1000ms申请一个房间分配,任务2则每6000ms产生一个房间空位,这种供不应求的情况下将导致信号量很快耗尽,并且得不到补给,效果如下:
十三、互斥型信号量
1. 互斥量是用于线程的互斥,信号量则是用于线程的同步。
2. 互斥量值只能为0/1,信号量值可以为非负整数
3. 互斥量的加锁和解锁必须由同一线程分别对应使用,信号量可以由一个线程释放,另一个线程得到。
Mutex对象的值,只有0和1两个值。这两个值也分别代表了Mutex的两种状态。值为0, 表示锁定状态;值为1,表示空闲状态。
#include <stdio.h>
#include <stdint.h>
#include "freertos/FreeRTOS.h"
#include "freertos/task.h"
#include "esp_system.h"
#include "../build/config/sdkconfig.h"
#include "esp_log.h"

#include "freertos/semphr.h"

static const char *TAG = "互斥型信号量";

SemaphoreHandle_t mutexHandle;

void Task1(void*pvParam)
{
    BaseType_t iRet;
    while(1)
    {
        ESP_LOGI(TAG,"Task1 is begin!\n");
        iRet = xSemaphoreTake(mutexHandle,1000);//创建互斥信号量
        if(iRet==pdPASS)//判断是否创建成功
        {
            ESP_LOGI(TAG,"Task1 Start!\n");

            for(int i=0;i<50;i++)
            {
                ESP_LOGI(TAG,"Task1 i=%d\n",i);
                vTaskDelay(pdMS_TO_TICKS(1000));
            }
            ESP_LOGI(TAG,"Task1 End!\n");
            xSemaphoreGive(mutexHandle);//释放信号量
            vTaskDelay(pdMS_TO_TICKS(5000));
        }
        else
        {
            ESP_LOGI(TAG,"Task3 Fail!\n");
            vTaskDelay(pdMS_TO_TICKS(1000));
        }
    }
}


void Task2(void*pvParam)
{
    ESP_LOGI(TAG,"Task2 is begin!\n");
    vTaskDelay(pdMS_TO_TICKS(1000));

    while(1)
    {
     vTaskDelay(pdMS_TO_TICKS(1000));
    }
}


void Task3(void*pvParam)
{
    BaseType_t iRet;
    ESP_LOGI(TAG,"Task3 is begin!\n");
    vTaskDelay(pdMS_TO_TICKS(1000));
    while (1)
    {
        iRet = xSemaphoreTake(mutexHandle,1000);//获得斥信号量
        if(iRet==pdPASS)//判断是否创建成功
        {
            ESP_LOGI(TAG,"Task3 Start!\n");
            for(int i=0;i<10;i++)
            {
                ESP_LOGI(TAG,"Task3 i=%d\n",i);
                vTaskDelay(pdMS_TO_TICKS(1000));
            }
            ESP_LOGI(TAG,"Task3 End!\n");
            xSemaphoreGive(mutexHandle);//释放信号量
            vTaskDelay(pdMS_TO_TICKS(5000));
        }
        else
        {
            ESP_LOGI(TAG,"Task3 Fail!\n");
            vTaskDelay(pdMS_TO_TICKS(1000));
        }
    }

}


void app_main(void)
{
    mutexHandle = xSemaphoreCreateMutex();//创建斥信号量
	xSemaphoreGive(mutexHandle);		  //释放互斥信号量


    vTaskSuspendAll();//挂起所有任务

    xTaskCreate(Task1,"Task1",1024*10,NULL,1,NULL);
    xTaskCreate(Task2,"Task2",1024*10,NULL,2,NULL);
    xTaskCreate(Task3,"Task3",1024*10,NULL,3,NULL);

    xTaskResumeAll();//恢复所有任务
}
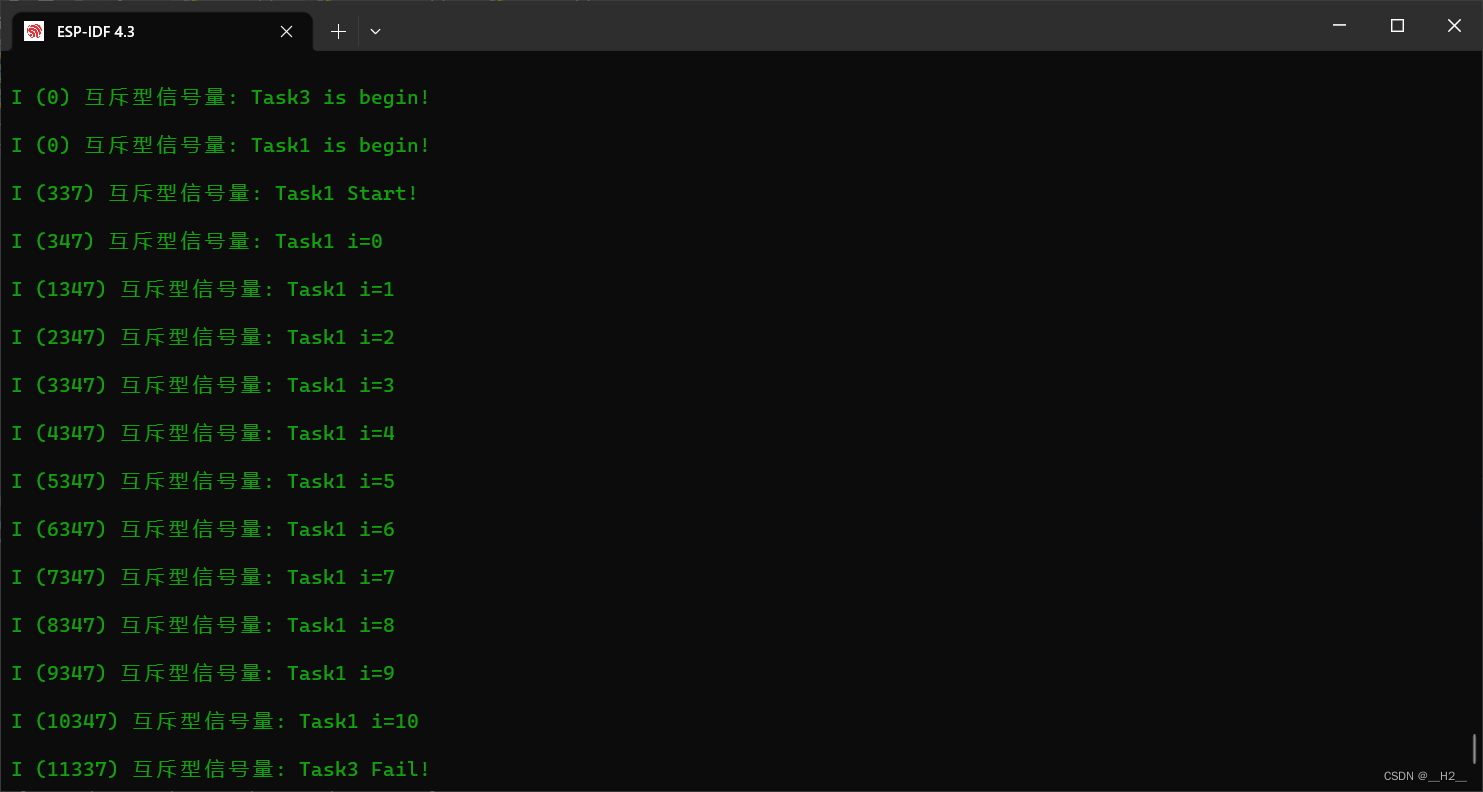
演示效果如下,我们可以看到在11337时刻尽管任务3的优先级更高,但是由于它没有获取到斥信号量,被优先级更低的任务1给阻塞了:
十三、递归互斥量
递归互斥量可以由拥有者多次获取,但是也要求拥有者释放相同次数。
如,一个递归互斥量被获取了10次,那么它同样的需要被释放10次,如果未释放完全那么其他任务将无法获取。
#include <stdio.h>
#include <stdint.h>
#include "freertos/FreeRTOS.h"
#include "freertos/task.h"
#include "esp_system.h"
#include "../build/config/sdkconfig.h"
#include "esp_log.h"

#include "freertos/semphr.h"

static const char *TAG = "递归信号量";

SemaphoreHandle_t mutexHandle;

void Task1(void*pvParam)
{
    while(1)
    {
        ESP_LOGI(TAG,"-----------------------------------------\n");
        ESP_LOGI(TAG,"Task1 is begin!\n");
        xSemaphoreTakeRecursive(mutexHandle,portMAX_DELAY);//创建递归互斥信号量A
        ESP_LOGI(TAG,"Task1 take A!\n");
        for(int i=0;i<10;i++)
        {
            ESP_LOGI(TAG,"Task1 i=%d for A!\n", i);
            vTaskDelay(pdMS_TO_TICKS(1000));
        }

        xSemaphoreTakeRecursive(mutexHandle,portMAX_DELAY);//创建递归互斥信号量B
        ESP_LOGI(TAG,"Task1 take B!\n");
        for(int i=0;i<10;i++)
        {
            ESP_LOGI(TAG,"Task1 i=%d for B!\n", i);
            vTaskDelay(pdMS_TO_TICKS(1000));
        }
        ESP_LOGI(TAG,"Task1 give B!\n");
        xSemaphoreGiveRecursive(mutexHandle);//释放递归互斥信号量B
        vTaskDelay(pdMS_TO_TICKS(3000));//延时3s

        ESP_LOGI(TAG,"Task1 give A!\n");
        xSemaphoreGiveRecursive(mutexHandle);//释放递归互斥信号量A
        vTaskDelay(pdMS_TO_TICKS(3000));//延时3s
    }

}
void Task2(void*pvParam)
{
    vTaskDelay(pdMS_TO_TICKS(1000));
    while(1)
    {
        ESP_LOGI(TAG,"-----------------------------------------\n");
        ESP_LOGI(TAG,"Task2 is begin!\n");
        xSemaphoreTakeRecursive(mutexHandle,portMAX_DELAY);//创建递归互斥信号量
        ESP_LOGI(TAG,"Task2 take!\n");
        for(int i=0;i<10;i++)
        {
            ESP_LOGI(TAG,"Task2 i=%d!\n", i);
            vTaskDelay(pdMS_TO_TICKS(1000));
        }
        ESP_LOGI(TAG,"Task2 give!\n");
        xSemaphoreGiveRecursive(mutexHandle);//释放递归互斥信号量
        vTaskDelay(pdMS_TO_TICKS(3000));//延时3s
    }
}


void app_main(void)
{
    mutexHandle = xSemaphoreCreateRecursiveMutex();//创建递归互斥信号量
    vTaskSuspendAll();//挂起所有任务
    xTaskCreate(Task2,"Task2",1024*5,NULL,1,NULL);
    xTaskCreate(Task1,"Task1",1024*5,NULL,1,NULL);

    xTaskResumeAll();//恢复所有任务
}
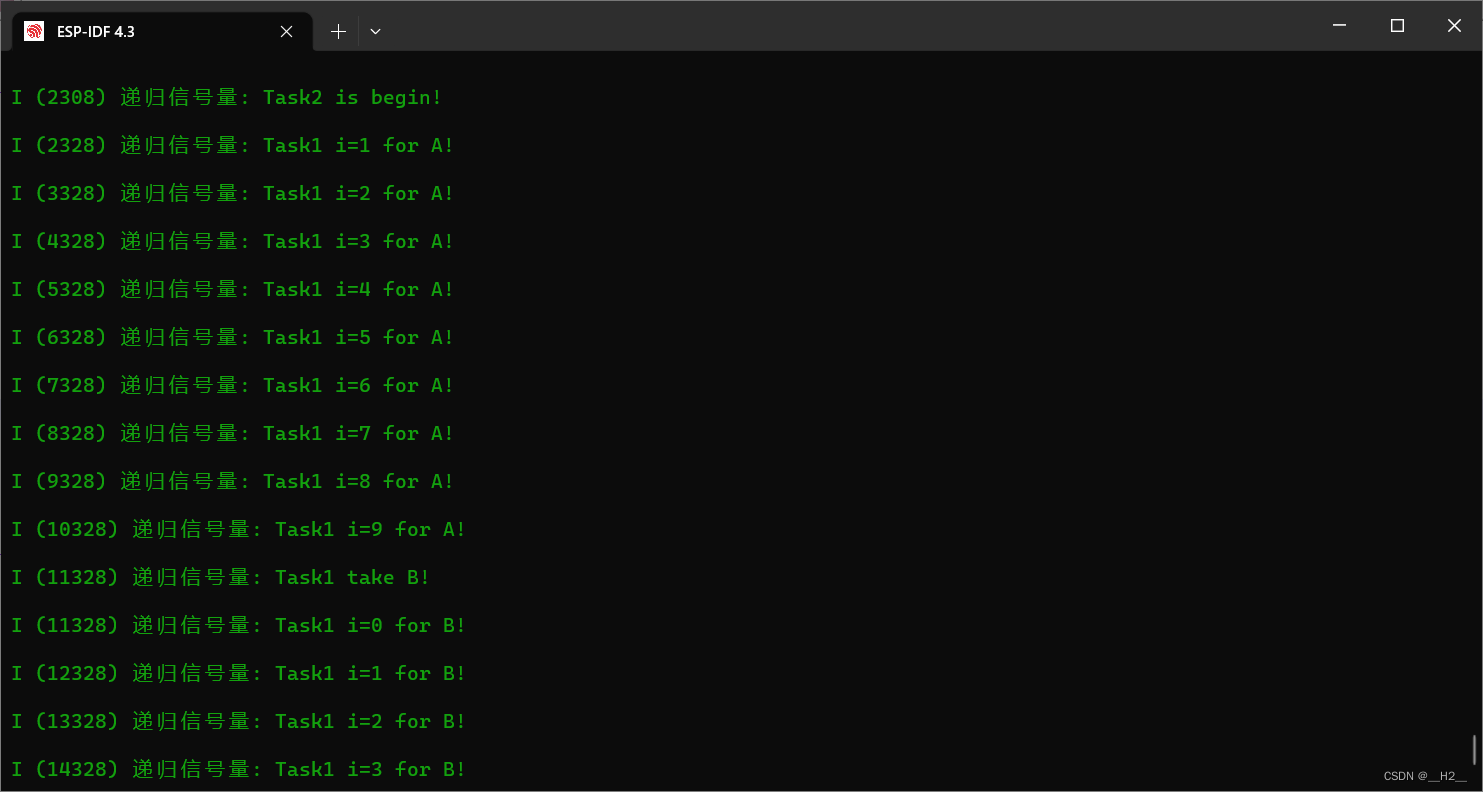
可以看到在任务1的信号量完全释放前,任务2是出于阻塞状态不被执行的。
小结
此节主要学习了信号量和互斥量还有Freertos的软件定时器。
你还可以查看以下文章来进行学习:


 1312
1312


 被折叠的 条评论
为什么被折叠?
被折叠的 条评论
为什么被折叠?
 到【灌水乐园】发言


