


目录
前言:前面我们使用Rest Tmplate结合ribbon的方式实现负载均衡时,利用了RestTemplate对HTTP请求进行封装处理,从而实现了一套模板化的调用方法。但是在实际开发中,由于不止一个地方调用服务依赖,往往一个接口会被多个地方调用,因此通常会对每个微服务架构进行封装一些用于包装依赖服务的调用的客户端类。SpringCloud对Feign进行了封装,它能够使服务之间的调用变得更加简单。
一、Feign
- 什么是Feign?
Feign是一种声明式、模板化的HTTP客户端,它可以帮助我们更快捷、更准确的调用HTTPAPI。Feign支持多种注解,包括Feign自带注解以及JAX-RS注解等。
当Feign与Eureka和Ribbon组合使用时,Feign就具有了负载均衡的功能。在实现Feign的情况下,我们只需要定义一个接口并使用注解的方式配置,即可完成服务接口的绑定,从而简化了Ribbon自动封装服务调用客户端的开发工作量。
- 为什么要使用Feign?
- 早期的RestTemplate调用微服务时,如果请求的url后面拼接很多参数时,那么在地址后面会拼接很多&参数={},看起来代码很长同时也不利于维护。
- Feign能够将一些共用的API抽离出来,相当于一个接口,有利于降低代码的耦合度。
- Feign能够与Hystrix优雅的结合,在服务调用时,如果出现错误,那么可以直接将错误进行回调处理,如将错误通过日志记录下来。
二、Feign快速入门
为了帮助大家快速认识Feign,本节我们将通过案例讲解的方式介绍如何使用Spring Cloud Feign 实现声明式服务调用。
2.1 第一个Feign程序
首先看一个Feign程序的架构如图所示: 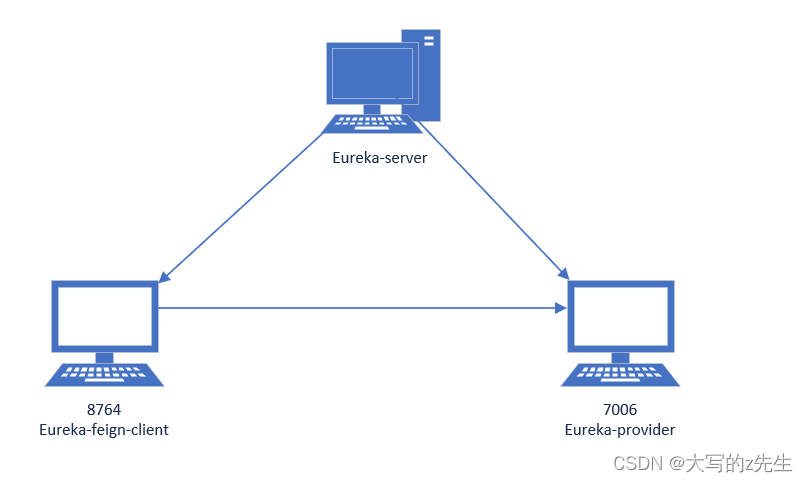
2.1.1 搭建Eureka server
我们在这里使用搭建Eureka时所使用的SpringBoot项目demo-server作为Eureka-server
2.2.2 创建服务提供者
在这里我们使用搭建Eureka时所创建的demo-provider,创建controller包,并在包下创建HelloController类,该类定义了一个sayHello()方法,用于处理/hello的请求,代码如下:

package com.example.demoprovider.controller;

import org.springframework.web.bind.annotation.RequestMapping;
import org.springframework.web.bind.annotation.RequestMethod;
import org.springframework.web.bind.annotation.RestController;

/**
 * @Title: HelloController
 * @Description:
 * @Auther:
 * @Version: 1.0
 * @create 2023/5/7 16:38
 */
@RestController
public class HelloController {
    @RequestMapping(value = "/hello",method = RequestMethod.GET)
    public String sayHello(){
        return "hello Feign!";
    }
}
2.2.3 创建Feign
第一步:创建一个名为demo-feign-client的SpringBoot项目,添加Eureka Client,Feign,web依赖。

项目创建好后的pom为:
<?xml version="1.0" encoding="UTF-8"?>
<project xmlns="http://maven.apache.org/POM/4.0.0" xmlns:xsi="http://www.w3.org/2001/XMLSchema-instance"
	xsi:schemaLocation="http://maven.apache.org/POM/4.0.0 https://maven.apache.org/xsd/maven-4.0.0.xsd">
	<modelVersion>4.0.0</modelVersion>
	<parent>
		<groupId>org.springframework.boot</groupId>
		<artifactId>spring-boot-starter-parent</artifactId>
		<version>2.7.11</version>
		<relativePath/> <!-- lookup parent from repository -->
	</parent>
	<groupId>com.example</groupId>
	<artifactId>demo-feign-client</artifactId>
	<version>0.0.1-SNAPSHOT</version>
	<name>demo-feign-client</name>
	<description>Demo project for Spring Boot</description>
	<properties>
		<java.version>1.8</java.version>
		<spring-cloud.version>2021.0.7</spring-cloud.version>
	</properties>
	<dependencies>
		<dependency>
			<groupId>org.springframework.boot</groupId>
			<artifactId>spring-boot-starter-web</artifactId>
		</dependency>
		<dependency>
			<groupId>org.springframework.cloud</groupId>
			<artifactId>spring-cloud-starter-netflix-eureka-client</artifactId>
		</dependency>
		<dependency>
			<groupId>org.springframework.cloud</groupId>
			<artifactId>spring-cloud-starter-openfeign</artifactId>
		</dependency>

		<dependency>
			<groupId>org.springframework.boot</groupId>
			<artifactId>spring-boot-starter-test</artifactId>
			<scope>test</scope>
		</dependency>
	</dependencies>
	<dependencyManagement>
		<dependencies>
			<dependency>
				<groupId>org.springframework.cloud</groupId>
				<artifactId>spring-cloud-dependencies</artifactId>
				<version>${spring-cloud.version}</version>
				<type>pom</type>
				<scope>import</scope>
			</dependency>
		</dependencies>
	</dependencyManagement>

	<build>
		<plugins>
			<plugin>
				<groupId>org.springframework.boot</groupId>
				<artifactId>spring-boot-maven-plugin</artifactId>
			</plugin>
		</plugins>
	</build>

</project>
第二步,引入依赖后,修改全局配置文件
spring:
  application:
    name: demo-feign-client
server:
  port: 8764

eureka:
  client:
    service-url:
      defaultZone: http://localhost:7000/eureka
第三步:在启动类中添加@EnableEurekaClient注解,开启Eureka Client功能,添加@EnableFeignClients注解开启FeignClient功能,具体如下:
package com.example.demofeignclient;

import org.springframework.boot.SpringApplication;
import org.springframework.boot.autoconfigure.SpringBootApplication;
import org.springframework.cloud.netflix.eureka.EnableEurekaClient;
import org.springframework.cloud.openfeign.EnableFeignClients;

@EnableEurekaClient
@EnableFeignClients
@SpringBootApplication
public class DemoFeignClientApplication {

	public static void main(String[] args) {
		SpringApplication.run(DemoFeignClientApplication.class, args);
	}

}
第四步:实现一个简单的FeignClient
在eureka-feign-client中创建service包,并在该包下创建接口FeignService,添加@FeignClient注解指定要调用的服务,具体如下:

package com.example.demofeignclient.service;

import org.springframework.cloud.openfeign.FeignClient;
import org.springframework.stereotype.Service;
import org.springframework.web.bind.annotation.RequestMapping;
import org.springframework.web.bind.annotation.RequestMethod;

/**
 * @Title: FeignService
 * @Description:
 * @Auther:
 * @Version: 1.0
 * @create 2023/5/7 17:21
 */
@Service
@FeignClient(name = "demo-provider")
public interface FeignService {
    @RequestMapping(value = "/hello",method = RequestMethod.GET)
    public String sayHello();
}
第五步:在demo-feign-client 中创建controller包,在包下创建FeignController类。
package com.example.demofeignclient.controller;

import com.example.demofeignclient.service.FeignService;
import org.springframework.beans.factory.annotation.Autowired;
import org.springframework.web.bind.annotation.RequestMapping;
import org.springframework.web.bind.annotation.RequestMethod;
import org.springframework.web.bind.annotation.RestController;

/**
 * @Title: FeignController
 * @Description:
 * @Auther:
 * @Version: 1.0
 * @create 2023/5/7 17:25
 */
@RestController
public class FeignController {
    @Autowired
    FeignService feignService;
        @RequestMapping(value = "/hello",method = RequestMethod.GET)
        public String hello() {
            return feignService.sayHello();
        }
}
2.2.4 启动服务并测试
依次启动demo-server,demo-provider和demo-feign-client,启动成功后使用浏览器访问http://localhost:8764/hello
界面显示结果为:
hello Feign!
可以看出页面输出了调用eureka-feign-client 服务输出的信息。与使用Ribbon调用服务相比,使用Feign远程调用服务,只需要声明式指定要调用的服务名称有,即可简单的实现调用。
三、Feign工作原理
3.1 Feign服务调用实现原理
Feign的工作原理我们可以总结为以下几个步骤:
- 首先通过@EnableFeignClients注解开启FeignClient功能。程序启动时,会通过该注解开启对@FeignClient注解的包扫描。
- 根据Feign规则实现接口,并在接口上面添加@feign注解。
- 程序启动后,会进行包扫描,扫描所有的@FeignClient注解类,并将这些信息注入IOC容器。
- 当接口方法被调用时,首先通过JDK的代理生成具体的RequestTemplate模板对象,然后根据Rest Template再生成HTTP请求的Request对象,最后把Request对象交给Client处理。
具体是如何进行的,我推荐给大家一位大佬的博客,个人认为讲的很详细:Feign服务调用工作原理![]() https://blog.csdn.net/cs_coding/article/details/109045650
https://blog.csdn.net/cs_coding/article/details/109045650
3.2 Feign和Ribbon的具体区别
Ribbon添加maven依赖 :spring-starter-ribbon 使用@RibbonClient(value="服务名称") 使用RestTemplate调用远程服务对应的方法
feign添加maven依赖: spring-starter-feign 服务提供方提供对外接口 调用方使用 在接口上使用@FeignClient("指定服务名")
Ribbon和Feign都是用于调用其他服务的,不过方式不同:
- 启动类使用的注解不同,Ribbon用的是@RibbonClient,Feign用的是@EnableFeignClients。
- 服务的指定位置不同,Ribbon是在@RibbonClient注解上声明,Feign则是在定义抽象方法的接口中使用@FeignClient声明。
- 调用方式不同,Ribbon需要自己构建http请求,模拟http请求然后使用RestTemplate发送给其他服务,步骤相当繁琐。
- Feign则是在Ribbon的基础上进行了一次改进,采用接口的方式,将需要调用的其他服务的方法定义成抽象方法即可,
- 不需要自己构建http请求。不过要注意的是抽象方法的注解、方法签名要和提供服务的方法完全一致。


 2709
2709


 被折叠的 条评论
为什么被折叠?
被折叠的 条评论
为什么被折叠?
 到【灌水乐园】发言


