


Egg.js的简单初步使用
所使用代码已上传github, 注意数据库配置方面。如有问题可交流。
简单使用 – 骨架类型
eggjs 是阿里出品的企业级 node 框架,奉行 约定优于配置 ,一切基于约定开发,减少团队沟通成本,另一个比较重要的点是 egg 拥有完善的日志系统,对于 bug 定位等及其方便。
| 骨架类型 | 说明 |
|---|---|
| simple | 简单 egg 应用程序骨架 |
| empty | 空的 egg 应用程序骨架 |
| plugin | egg plugin 骨架 |
| framework | egg framework 骨架 |
安装依赖 yarn create egg --type=simple 或者 npm install -g yarn ,然后yarn 或者 npm i安装
npx egg-init --type=ts showcase
cd showcase && npm i
npm run dev

启动:yarn dev
- dev : 开发环境中使用,不用重启服务器,只要刷新。修改内容就会更改。
- start:生产环境中使用,也就是开发完成,正式运营之后。以服务的方式运行。修改后要停止和重启后才会发生改变。


- app                        - 项目开发的主目录,工作中的代码几乎都写在这里面
-- controller                -- 控制器目录,所有的控制器都写在这个里面
-- router.js                 -- 项目的路由文件
- config                     - 项目配置目录,比如插件相关的配置
-- config.default.js         -- 系统默认配置文件
-- plugin.js                 -- 插件配置文件
- logs                       -- 项目启动后的日志文件夹
- node_modules               - 项目的运行/开发依赖包,都会放到这个文件夹下面
- test                       - 项目测试/单元测试时使用的目录
- run                        - 项目启动后生成的临时文件,用于保证项目正确运行
- typings                    - TypeScript配置目录,说明项目可以使用TS开发
- .eslintignore              - ESLint配置文件
- .eslintrc                  - ESLint配置文件,语法规则的详细配置文件
- .gitignore                 - git相关配置文件,比如那些文件归于Git管理,那些不需要
- jsconfig.js                - js配置文件,可以对所在目录下的所有JS代码个性化支持
- package.json               - 项目管理文件,包含包管理文件和命令管理文件
- README.MD                  - 项目描述文件
Egg.js与Koa/Express 对比
框架的设计理念 约定优于配置 .

编写controller 和 单元测试
同步单元测试 和 异步单元测试
// zhuba.js
'use strict';

const Controller = require('egg').Controller;

class zhubaController extends Controller {
  async index() {
    const {
      ctx,
    } = this;
    ctx.body = '<h2>This is zhuBaController <h2>';
  }
}

module.exports = zhubaController;

// zhuba.test.js
'use strict';

const {
  app,
} = require('egg-mock/bootstrap');

describe('zhuba test', () => {
  it('zhuba index', () => {
    return app.httpRequest().get('/zhuba').expect(200)
      .expect('<h2>This is zhuBaController <h2>');
  });
});

// describe( )方法有两个参数,第一个是测试的描述(字符串类型),这个描述一般都是用文件的路径。
// 第二个参数是一个回调函数,里边是对这个控制器里边的具体方法的测试用例。

// 官方的 home.test.js
'use strict';

const {
  app,
  assert,
} = require('egg-mock/bootstrap');

describe('test/app/controller/home.test.js', () => {
  it('should assert', async () => {
    const pkg = require('../../../package.json');
    assert(app.config.keys.startsWith(pkg.name));
  });

  it('should GET /', async () => {
    return app.httpRequest()
      .get('/')
      .expect('Hello World! Egg.js')
      .expect(200);
  });
});

yarn test 全绿即是没问题
// zhuba.js
'use strict';

const Controller = require('egg').Controller;

class zhubaController extends Controller {
  async index() {
    const {
      ctx,
    } = this;
    ctx.body = '<h2>This is zhuBaController <h2>';
  }
  async getGirls() {
    const {
      ctx,
    } = this;
    await new Promise(resolve => {
      setTimeout(() => {
        resolve(ctx.body = '<h1>kunkun,正在向你走来</h1>');
      }, 1000);
    });

  }
}

module.exports = zhubaController;

// zhuba.test.js
'use strict';

const {
  app,
} = require('egg-mock/bootstrap');

describe('zhuba test', () => {
  it('zhuba index', () => {
    return app.httpRequest().get('/zhuba').expect(200)
      .expect('<h2>This is zhuBaController <h2>');
  });
  it('zhuba getGirls', async () => {
    await app.httpRequest().get('/getGirls').expect(200)
      .expect('<h1>kunkun,正在向你走来</h1>');
  });
});
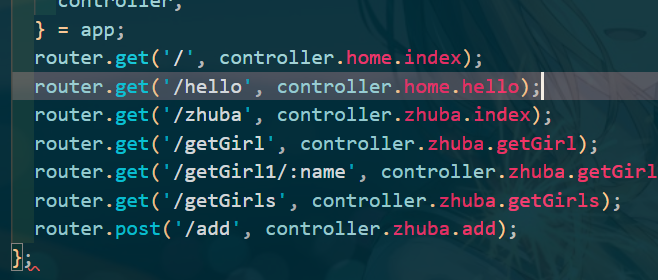
Get 请求和参数传递
自由传参
配置好router后


严格传参
少参数就会404


POST 请求

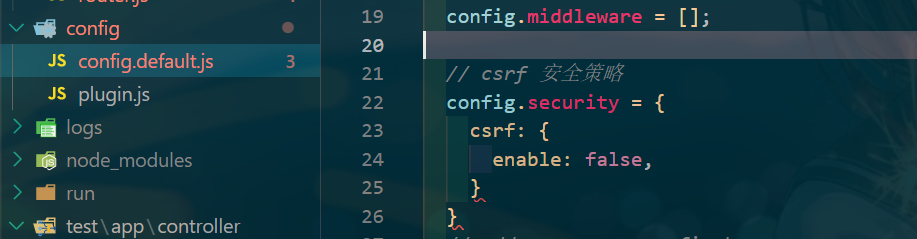
添加config/config.default.js, 关闭csrf安全策略
CSRF的全名为 Cross-site request forgery, 它的中文名为 伪造跨站请求。
// csrf 安全策略
  config.security = {
    csrf: {
      enable: false,
    }
  }
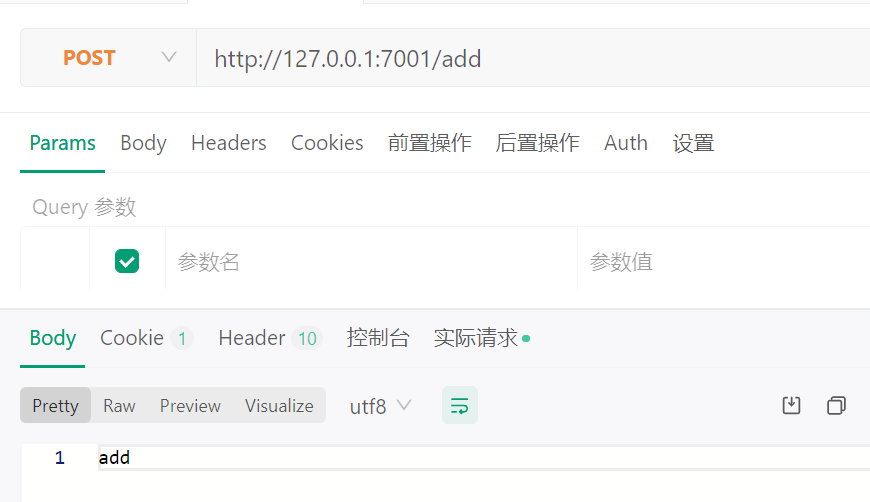
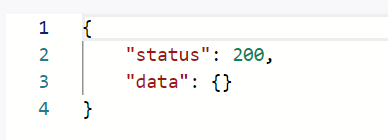
服务端接受请求:
async add(){
    const ctx = this.ctx
    ctx.body = {
      status: 200,
      data:ctx.request.body
    }
  }
Service 服务
Service是用来编写和数据库直接交互的业务逻辑代码。Service就是在复杂业务场景下用于做业务逻辑封装的一个抽象层。
简单来说,就是把业务逻辑代码进一步细化和分类,所以和数据库交互的代码都放到Service中。这样作有三个明显的好处。
- 保持Controller中的逻辑更加简介,
- 保持业务逻辑的独立性,抽象出来的Service可以被多个Controller调用。
- 将逻辑和展现分离,更容易编写测试用例。
只要是和数据库的交互操作,都写在Service里,用了Egg框架,就要遵守它的约定。
在/app/service目录下编写自己的服务
service方法的可调用性
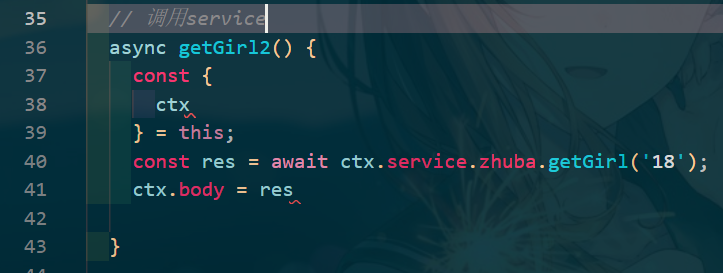
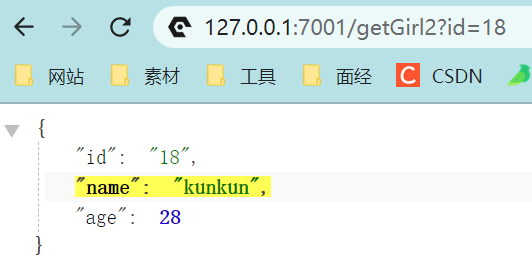
一个service方法完成后,可以在其它的Controller里进行使用。比如在home.js中进行使用。打开/app/controller/home.js文件下,新建一个testGetGirl( )方法,然后新增好路由,这样id即可被数据库得到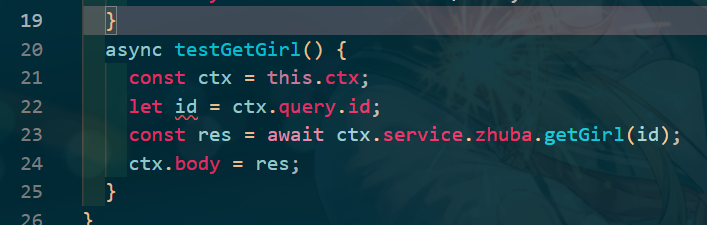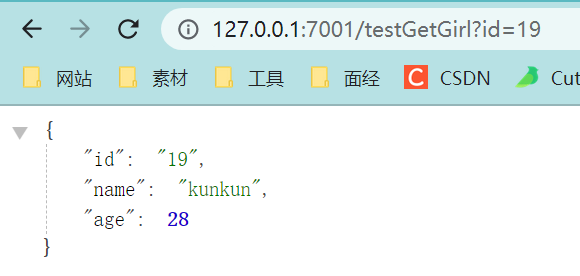
起名的时候最好和Controller对应起来。写法和Controller类似,并且在任何Controller下都可以得到Service提供的数据。
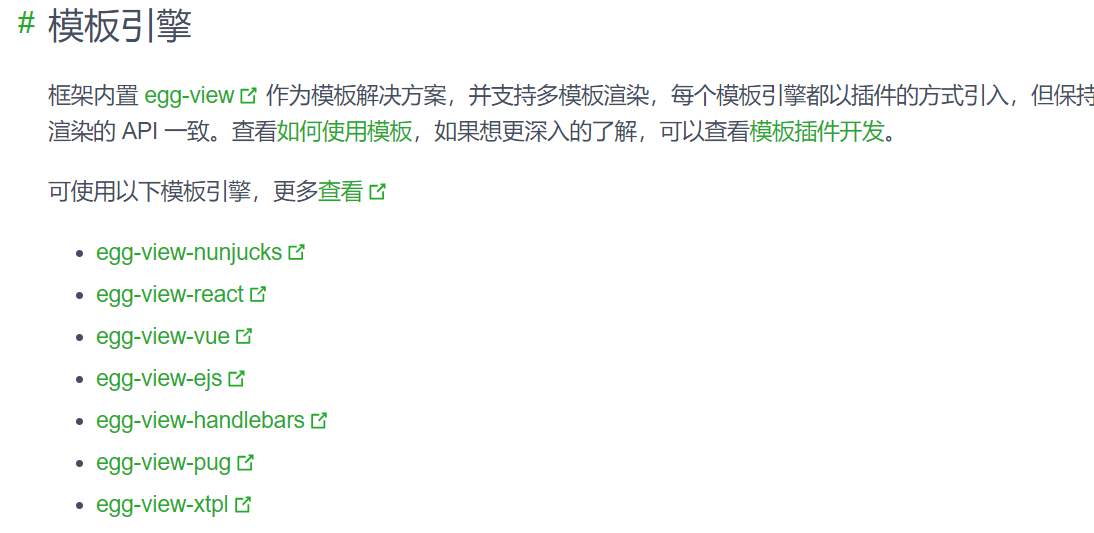
View中使用EJS模板引擎
介绍
可选的模板不少,具体参考官方文档。
服务端渲染的好处
- 对SEO非常友好,单页应用,比如Vue是到客户端才生成的。这种应用对于国内的搜索引擎是没办法爬取的,这样SEO就不会有好的结果。所以如果是官网、新闻网站、博客这些展示类、宣传类的网址,必须要使用服务端渲染技术。
- 后端渲染是老牌开发模式,渲染性能也是得到一致认可的。在PHP时代,这种后端渲染的技术达到了顶峰。
- 对前后端分离开发模式的补充,并不是所有的功能都可以实现前后端分离的。特别现在流行的中台系统,有很多一次登录,处处可用的原则。这时候就需要服务端渲染来帮忙。
EJS1
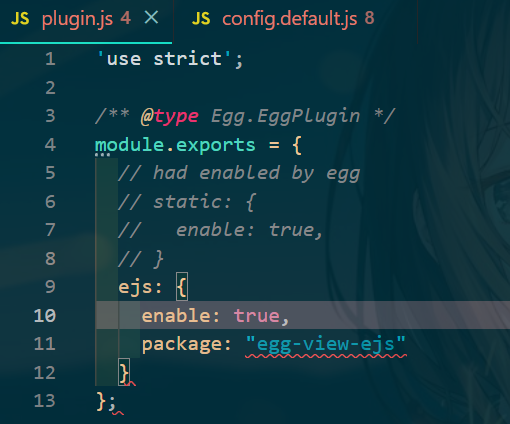
安装和配置、使用:yarn add egg-view-ejs
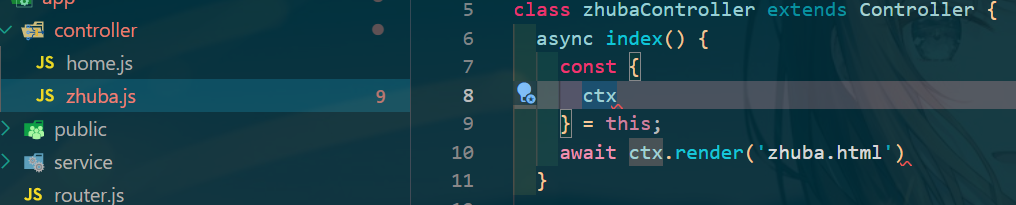
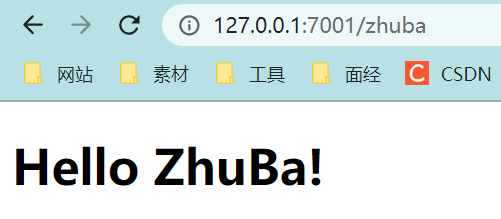
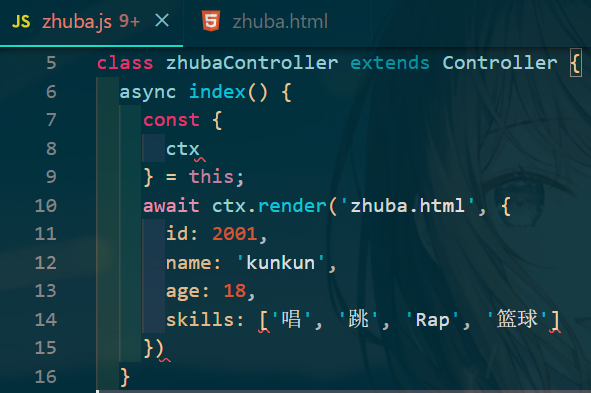
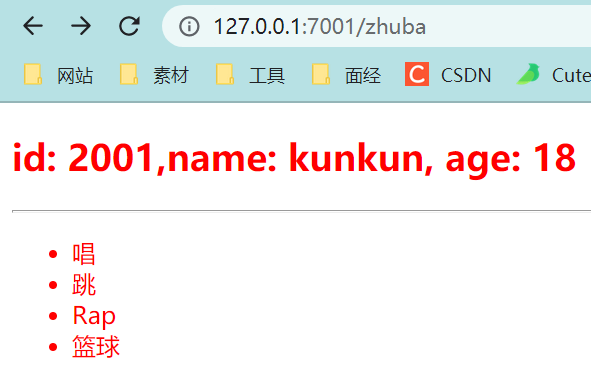
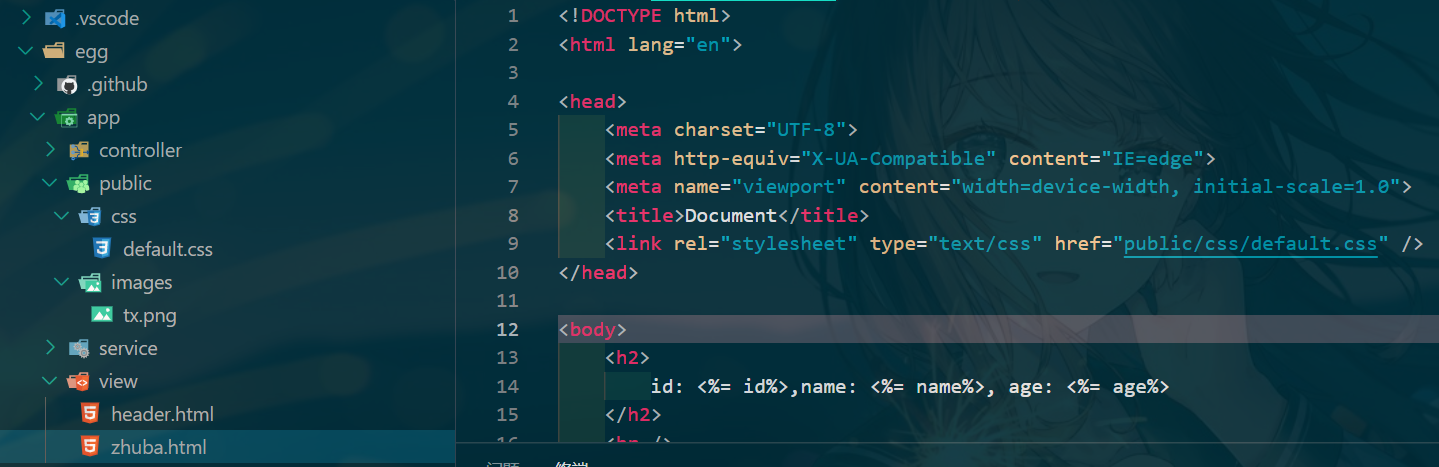
/app/view/下新建 zhuba.html文件即可被渲染,访问该路由地址即可
EJS2
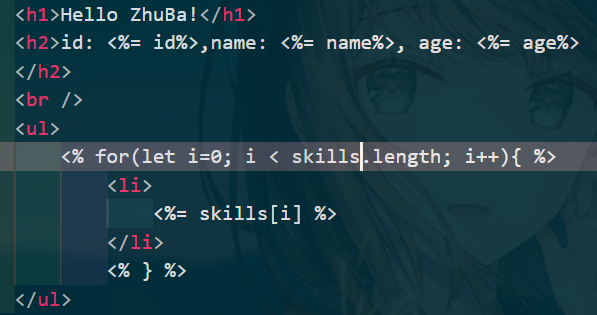
- 显示controller中数据 (<%= 参数 %>)
- 数据的循环显示 (for)
- 修改默认分隔符
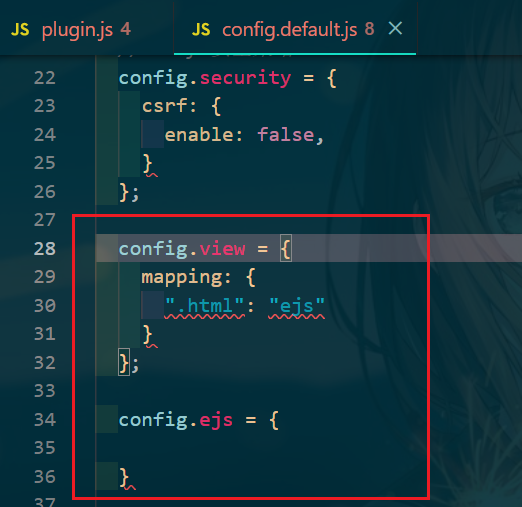
config.ejs={
  delimiter: "$"
}
EJS3
- 公共代码片段的使用 只需要写一些代码片段,即抽离公共部分(组件思想)
**<%- include('header.html') %>**

- 配置静态资源:/app/public目录下,可以直接访问,不需配置路由,直接显示文件内容,因为Egg使用了egg-static插件
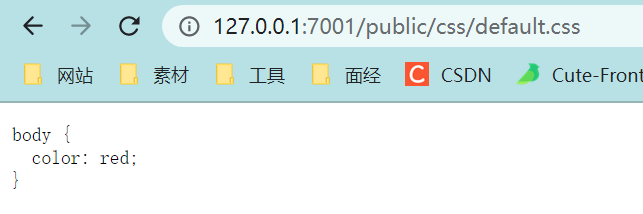
修改config.default.js可以将访问public变成assets,当然此时使用public会404
onfig.static = {
  prefix:"/assets/"
}
- 使用静态资源 在.html中
<link rel="stylesheet"type="text/css"href="public/css/default.css" />
和正常使用一致
Cookie
增删改查
HTTP请求是无状态的,但是在开发时,有些情况是需要知道请求的人是谁的。为了解决这个问题,HTTP协议设计了一个特殊的请求头:Cookie。服务端可以通过响应头(set-cookie)将少量数据响应给客户端,浏览器会遵循协议将数据保留,并在下一次请求同一个服务的时候带上。
// html中插入DOM和JS方法
<div>
    <button onclick="add()">增加Cookie</button>
    <button onclick="del()">删除Cookie</button>
    <button onclick="editor()">修改Cookie</button>
    <button onclick="show()">查看Cookie</button>
</div>
<script>
    function add(){
        fetch("/add",{
            method:"post",
            headers:{
                "Content-type":"application/json"
            }
        });
    }
    function del(){
        fetch("/del",{
            method:"post",
            headers:{
                "Content-type":"application/json"
            }
        });
    }
    function editor(){
        fetch("/editor",{
            method:"post",
            headers:{
                "Content-type":"application/json"
            }
        });
    }
    function show(){
        fetch("/show",{
            method:"post",
            headers:{
                "Content-type":"application/json"
            }
        });
    }
</script>
async add() {
  const ctx = this.ctx
  ctx.cookies.set("user", "jspang.com")
  ctx.body = {
    status:200,
    data:'Cookie添加成功'
  }
}
async del() {
  const ctx = this.ctx
  ctx.cookies.set("user", null)
  ctx.body = {
    status:200,
    data:'Cookie删除成功'
  }
}
async editor() {
  const ctx = this.ctx
  ctx.cookies.set("user",'bilibili')
  ctx.body = {
    status:200,
    data:'Cookie修改成功'
  }
}
async show() {
  const ctx = this.ctx
  const user=ctx.cookies.get("user")
  console.log(user)
  ctx.body = {
    status:200,
    data:'Cookie显示成功'
  }
}

// 配置路由
router.post('/add', controller.zhuba.add);
router.post('/del', controller.zhuba.del);
router.post('/editor', controller.zhuba.editor);
router.post('/show', controller.zhuba.show);

差:

配置和加密
一些配置选项,比如有效时间、服务端操作设置和中文编写加密这些操作。
ctx.cookies.set( ) 方法是有三个参数的,第一个参数是key,第二个参数是value,第三个参数就可以进行配置。比如你需要配置Cookie的有效时间,可以使用maxAge属性。(这个时间是毫秒。)
- maxAge 时效设置
maxAge: 1000 * 2 (毫秒)
async add(){
  const ctx = this.ctx
  ctx.cookies.set("user","jspang.com",{
    maxAge:1000*2
  })
  ctx.body = {
    status:200,
    data:'Cookie添加成功'
  }
}
- HhttpOnly 是否只允许服务端来操作Cookie
httpOnly:false
伪造Cookie来绕过登录是黑客经常使用的一种手段,所以为了安全,Egg.js默认设置只允许服务端来操作Cookie。
比如通过JS的方式document.cookie获取Cookie是不能获取的(需要在浏览器的控制台输入获取)。当我们想通过客户端操作Cookie时,可以通过下面的代码进行设置。
sync add(){
  const ctx = this.ctx
  ctx.cookies.set("user","jspang.com",{
    maxAge:1000*60,
    httpOnly:false
  })
  ctx.body = {
    status:200,
    data:'Cookie添加成功'
  }
}
- encrypt 设置中文Cookie (set加密 show解密)
加密只要在第三个参数中,加入encrypt:true,就可以加密成功。
ctx.cookies.set("user","zhuba",{
  encrypt:true
})
直接通过ctx.cookies.get( )方法获取,获取的是undefind,也就是无法获取的。这时候需要再次配置解密才可以使用, 在show( )方法里配置代码如下。
const user=ctx.cookies.get("user",{
  encrypt:true
})
Session
Cookie和Session非常类似,Egg中的Session就存储再Cookie中,但是Session比Cookie的安全性更高。所以在开发中经常使用Cookie来保存是否登录,而用Session来保存登录信息和用户信息。
添加、获取、删除
添加:在add()方法中 ctx.session.username = 'zhuba'
获取:直接获取 const username = ctx.session.username
删除:把值赋为空即可 ctx.session.username = null
session是支持中文的,不需要加密解密
配置项
config.session = {
    key :"PANG_SESS",   // 设置Key的默认值
    httpOnly:true,      // 设置服务端操作
    maxAge:1000*60  ,   // 设置最大有效时间
    renew: true,        // 页面有访问动作自动刷新session
}
中间件的编写
Egg是对Koa的二次封装,所以中间件这部分和Koa框架是一样的,也追寻洋葱圈模型。
Egg.js约定中间件要写在/app/middleware文件夹下
module.exports = options => {
  return async (ctx, next) => {
    if (ctx.session.counter) { // 没学数据库先使用session
      ctx.session.counter++;
    } else {
      ctx.session.counter = 1;
    }
    await next();
  }
};
手动挂载:config/config.default.js config.middleware = ['counter'];
在index()中使用, 可以发现中间件现在的作用域是全局的。

要想只在某一页面使用需要在router(路由)中配置中间件的使用,并去除全局挂载。
  const counter = app.middleware.counter()
  const {
    router,
    controller,
  } = app;
  router.get('/', counter, controller.home.index);
在实际开发中中间件还是有很多用处的,比如日志的记录、比如所有页面的Gzip压缩展示、比如全局埋点的使用。
Extend-application 方法扩展
eggjs的方法的扩展和编写
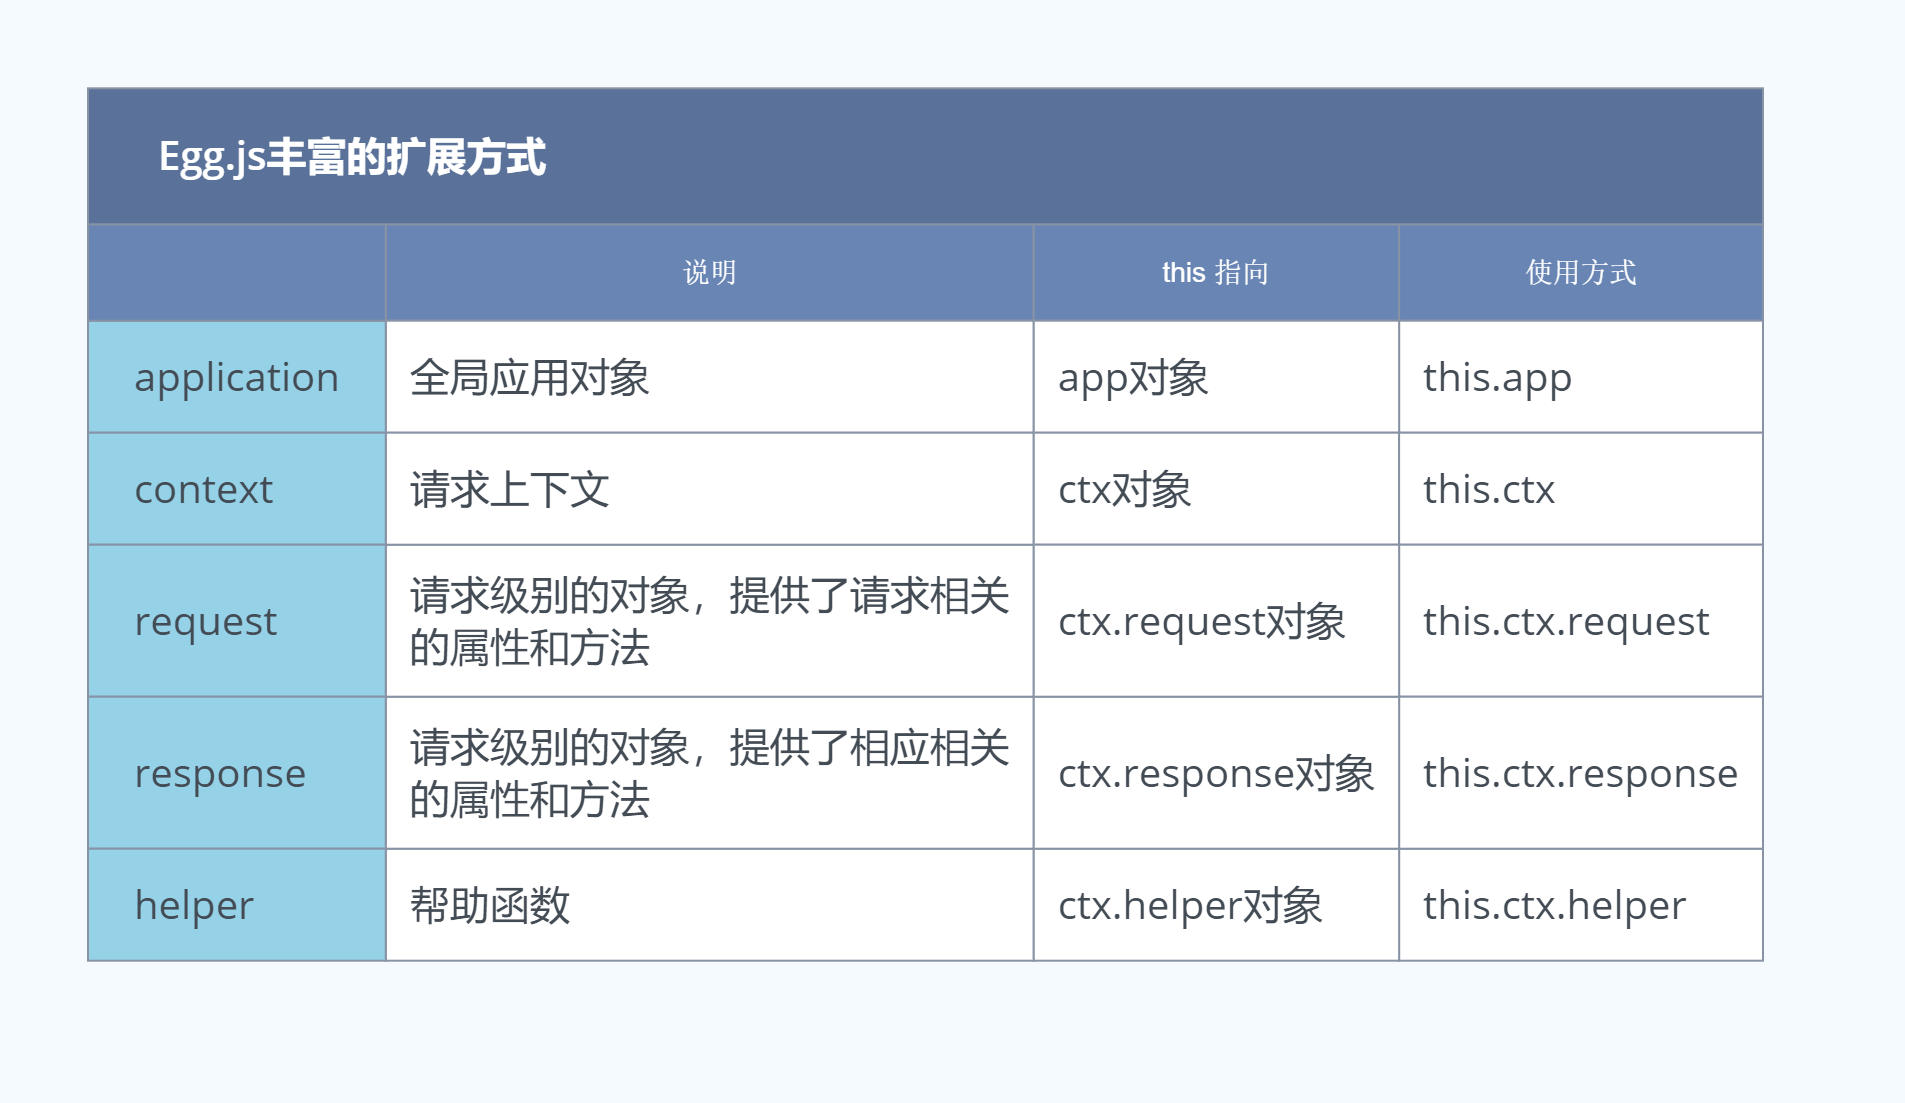
Egg.js可以对内部的五种对象进行扩展,以下是可扩展的对象、说明、this指向和使用方式。
application对象方法拓展
按照Egg的约定,扩展的文件夹和文件的名字必须是固定的。比如要对application扩展,要在/app目录下,新建一个/extend文件夹,然后在建立一个application.js文件。
module.exports = {
// 方法扩展
currentTime() {
const current = getTime();
return current;
},
};
function getTime() {
const now = new Date();
const year = now.getFullYear(); // 得到年份
const month = now.getMonth() + 1; // 得到月份
const date = now.getDate(); // 得到日期
const hour = now.getHours(); // 得到小时数
const minute = now.getMinutes(); // 得到分钟数
const second = now.getSeconds(); // 得到秒数
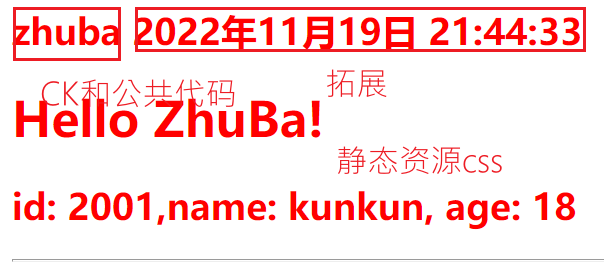
const nowTime = year + '年' + month + '月' + date + '日 ' + hour + ':' + minute + ':' + second;
return nowTime;
}
使用:
// .js
async index() {
  const { ctx ,app } = this;
  await ctx.render(
    'zhuba.html',{
      nowTime: app.currentTime()
    })
}
// .html 模板
<%= nowTime %>
application对象属性拓展
对属性( property) 的扩展的关键字是get,也需要写在application.js文件里。
module.exports = {
    //方法扩展
    currentTime(){
        const current = getTime();
        return current;
    },
    //属性扩展
    get timeProp(){
        return getTime();
    }
};
加入get,就会默认是一个属性,可以直接以属性的形式在controller方法里进行调用。
Extend-context 上下文对象的方法拓展
之前通过上下文来获取传递参数时,get方法请求和post方法请求的获取方式是不同的,我们编写的方法可以让这两个请求获取参数的方法统一化,都用params( )方法。新建context.js,配置好页面和路由后使用
// context.js
module.exports = {
params(key) {
const method = this.request.method
if (method === 'GET') {
return key ? this.query[key] : this.query;
}
return key ? this.request.body[key] : this.request.body;
},
};
// newContext zhuba.js
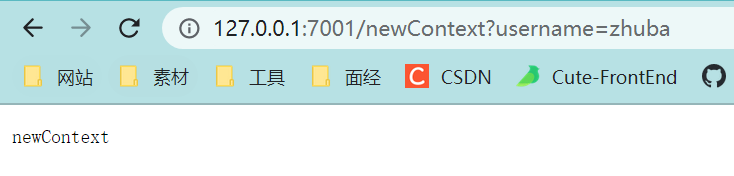
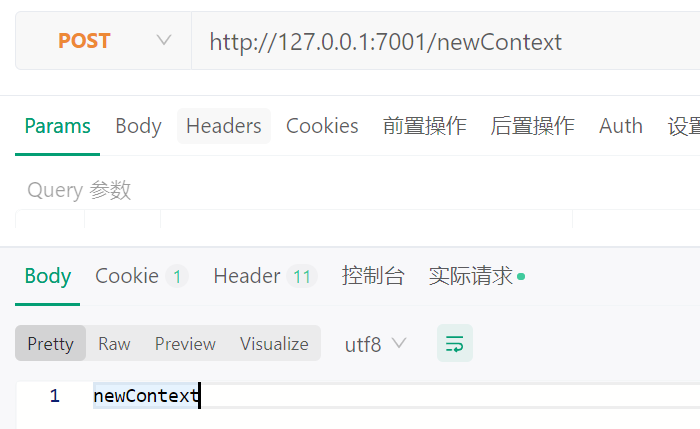
async newContext() {
const {
ctx,
} = this;
const params = ctx.params();
console.log(params);
ctx.body = 'newContext';
}
// router.js
router.get('/newContext', controller.zhuba.newContext);
router.post('/newContext', controller.zhuba.newContext);
Extend-request
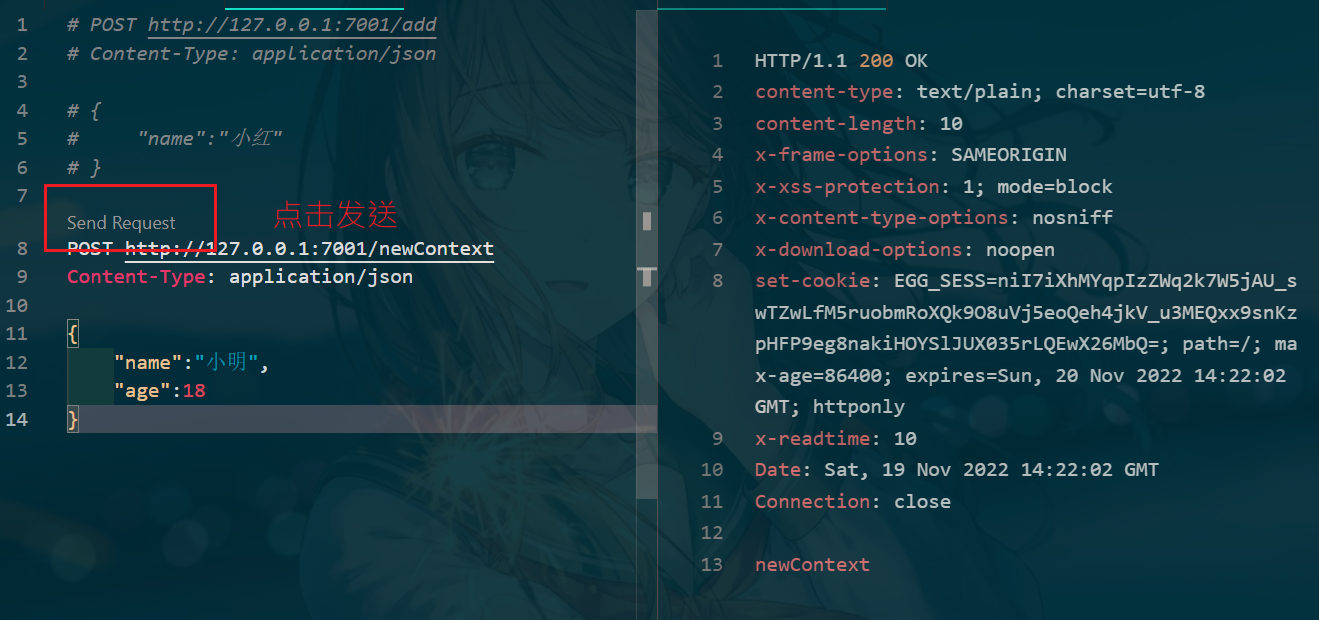
Request 中的扩展一般是扩展的属性。比如扩展 Request 中的一个属性,通过属性直接得到请求头中的 token 属性。
// Extend-request
  async newRequest() {
    const {
      ctx,
    } = this;
    const token = ctx.request.token;
    ctx.body = {
      status: 200,
      body: token,
    };
  }
Egg.js 对 Request 的扩展也需要在/app/extend文件夹下,新建一个request.js文件,然后在这个文件里写扩展属性。
module.exports = {
  get token() {
    console.log('token', this.get('token'));
    return this.get('token');
  },
};
// http测试
POST http://127.0.0.1:7001/newRequest
Content-Type: application/json
token: 'zhuba'

{
    "name":"小红",
    "age":18
}

Extend-response、helper
response
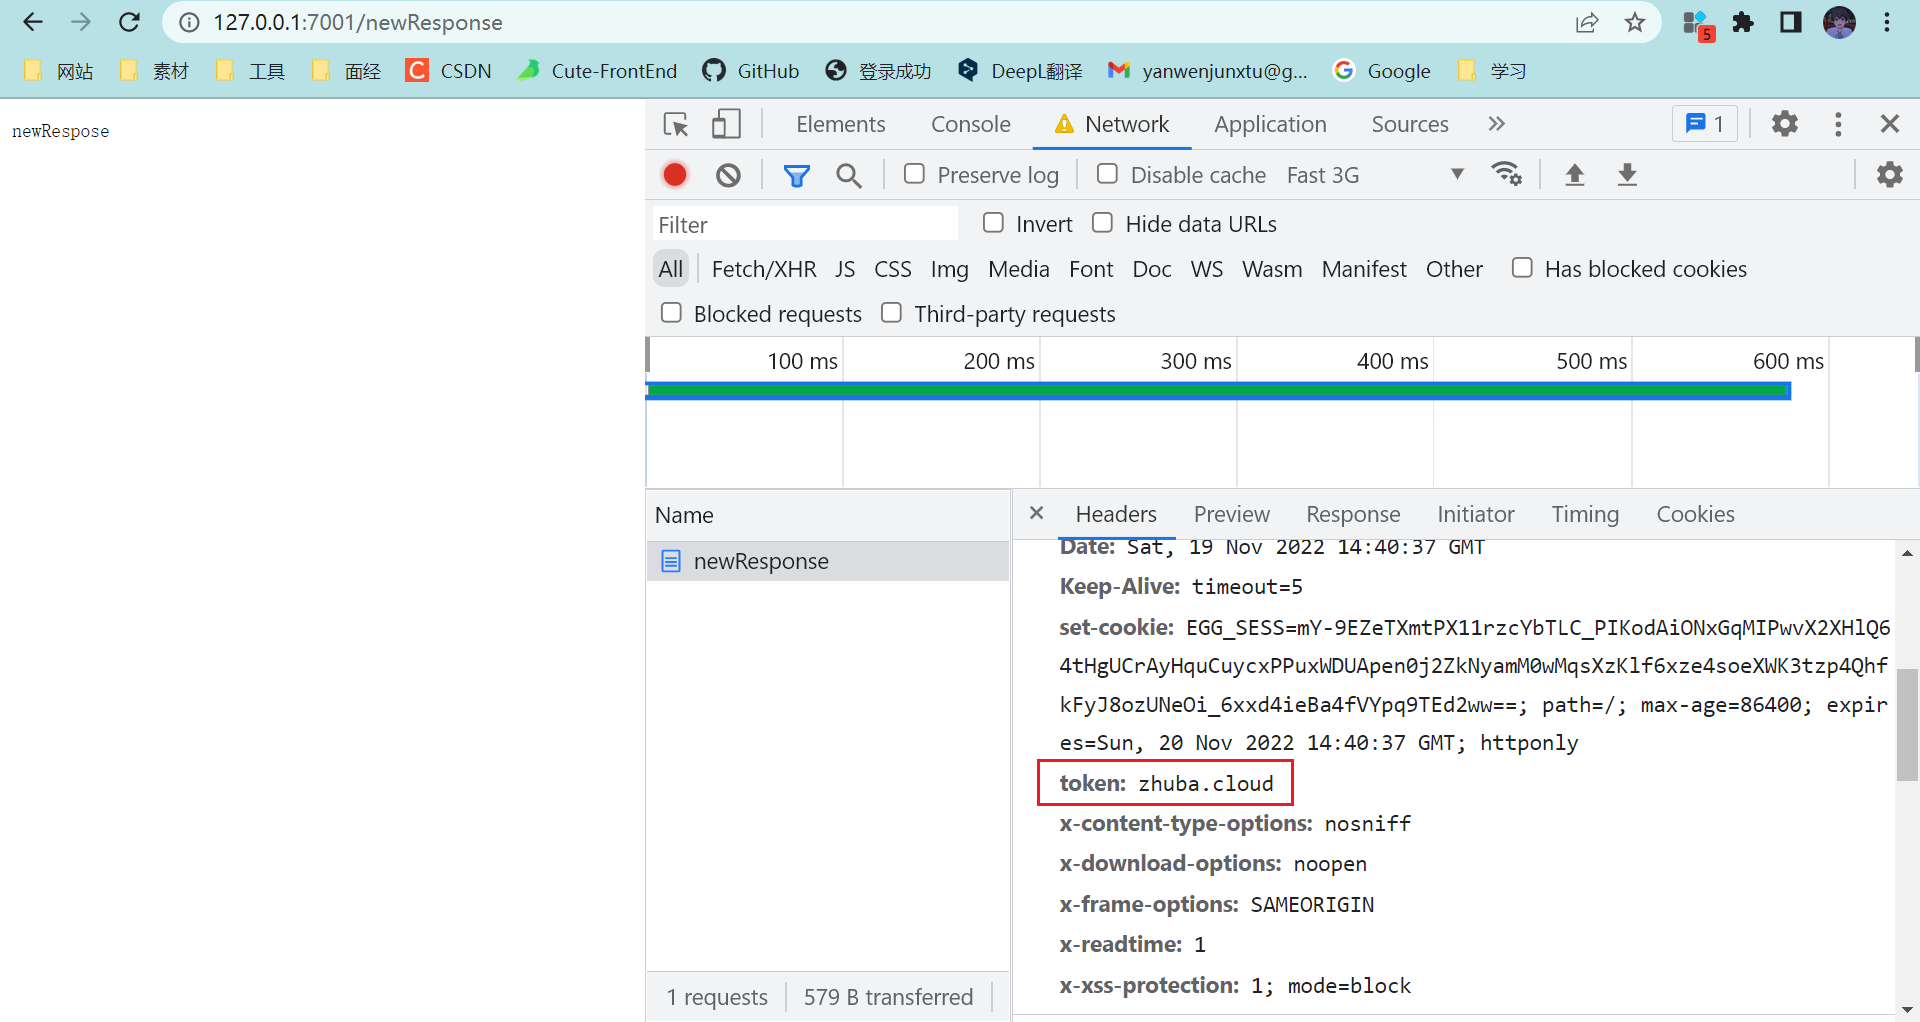
和上一个是差不多的, 需要设置的方法以set关键字开头,然后用this.set( )就可以设置返回的token了。
module.exports = {
  set token(token) {
    this.set('token', token);
  },
};

// zhuba.js
// newRespose
async newResponse() {
  const {
    ctx,
  } = this;
  ctx.response.token = 'zhuba.cloud';
  ctx.body = 'newRespose';
}
// router.js
router.get('/newResponse', controller.zhuba.newResponse);
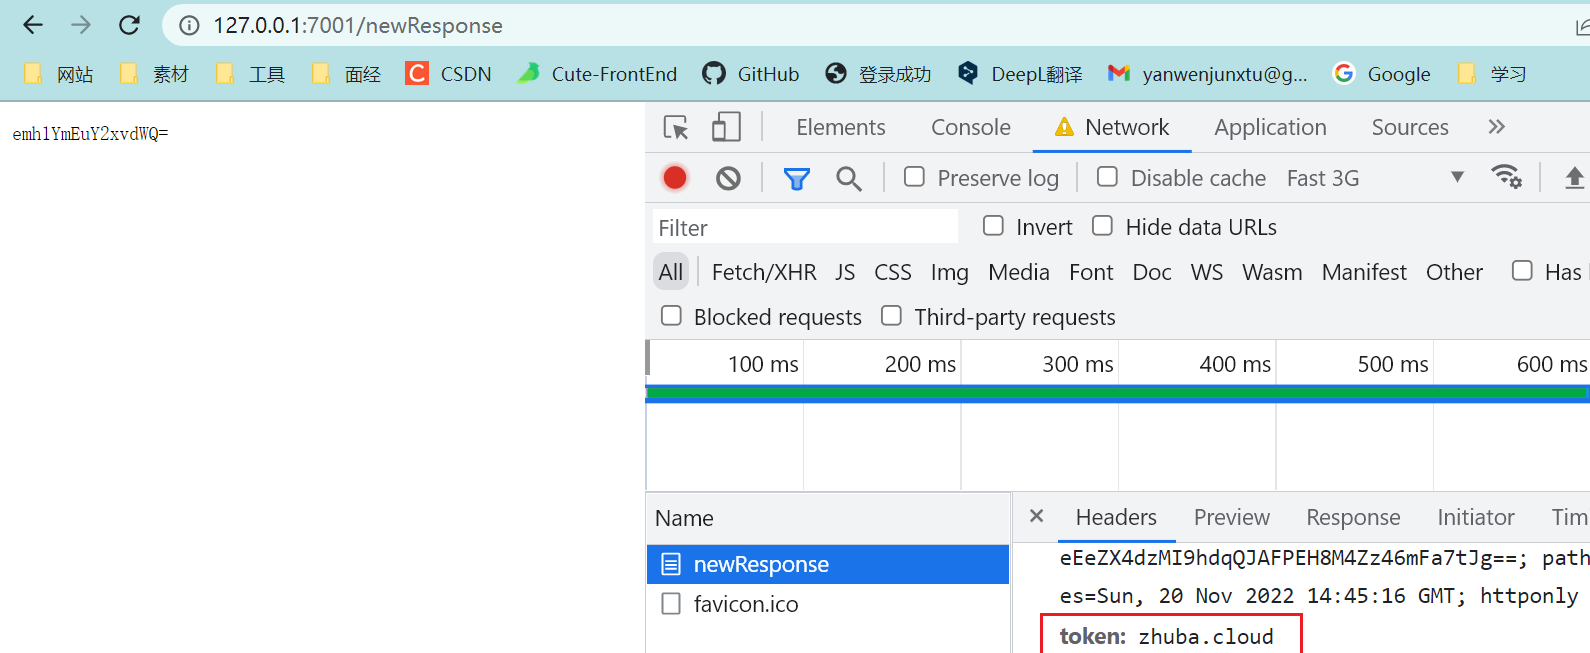
helper
demo是编写一个字符串进行base64加密的方法。
module.exports = {
  base64Encode(str = '') {
    return new Buffer(str).toString('base64');
  },
};

// 重新利用一下原本的 newRespose
// newRespose
async newResponse() {
  const {
    ctx,
  } = this;
  ctx.response.token = 'zhuba.cloud';
  // ctx.body = 'newRespose';
  const testBase64 = ctx.helper.base64Encode('zhuba.cloud');
  ctx.body = testBase64;
}
定时任务编写
定时任务需要按照Egg的约定,/app目录下,新建shedule文件夹。然后在shedule文件夹下,新建一个get_time.js文件。设置每3秒钟,在控制台输出当前时间戳。
const Subscription = require('egg').Subscription;

class GetTime extends Subscription {
  static get schedule() {
    return {
      interval: '10s',
      type: 'worker',
    };
  }

  async subscribe() {
    console.log(Date.now());
  }
}

module.exports = GetTime;
也可以使用更复杂的cron属性进行定时。cron属性有6个参数。
*    *    *    *    *    *
┬    ┬    ┬    ┬    ┬    ┬
│    │    │    │    │    |
│    │    │    │    │    └ day of week (0 - 7) (0 or 7 is Sun)
│    │    │    │    └───── month (1 - 12)
│    │    │    └────────── day of month (1 - 31)
│    │    └─────────────── hour (0 - 23)
│    └──────────────────── minute (0 - 59)
└───────────────────────── second (0 - 59, optional)

比如设置每3秒钟,返回时间戳,可以写成下面的样子。

static get schedule(){
  return {
    cron: '*/3 * * * * *',
    type:'worker'
  };
}
配置连接MySql数据库
安装依赖和配置:yarn add egg-mysql -S
// /config/plugin.js
'use strict';

/** @type Egg.EggPlugin */
module.exports = {
  // had enabled by egg
  // static: {
  //   enable: true,
  // }
  ejs: {
    enable: true,
    package: 'egg-view-ejs',
  },
  mysql: {
    enable: true,
    package: 'egg-mysql',
  },
};

// /config/config.default.js
  // // ejs egg-mysql
  config.mysql = {
    app: true, // 是否挂载到app下面
    agent: false, // 是否挂载到代理下面
    client: {
      host: 'localhost', // 数据库地址
      port: '3306', // 端口
      user: 'root', // 用户名
      password: '12345', // 密码
      database: 'egg', // 连接的数据库名称
    },
  };
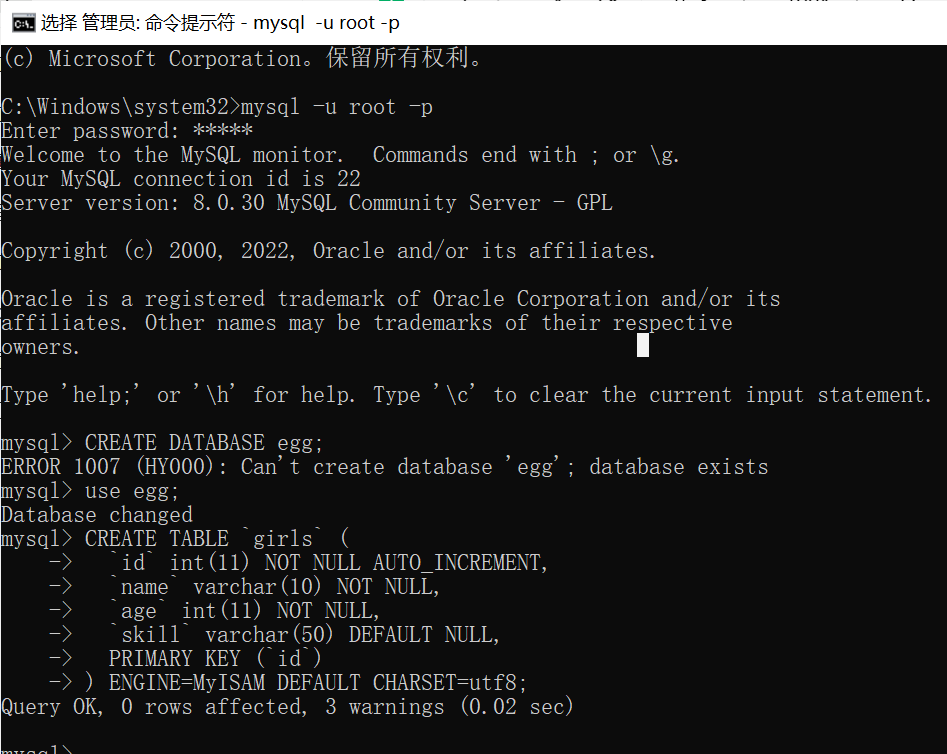
创建数据库和表
# 切换数据库
use egg

# 创建表
CREATE TABLE `girls` (
  `id` int(11) NOT NULL AUTO_INCREMENT,
  `name` varchar(10) NOT NULL,
  `age` int(11) NOT NULL,
  `skill` varchar(50) DEFAULT NULL,
  PRIMARY KEY (`id`)
) ENGINE=MyISAM DEFAULT CHARSET=utf8;
// router.js
// 操作数据库
router.get('/addGirl', controller.girlsManage.addGirl);
router.get('/delGirl', controller.girlsManage.delGirl);
router.get('/updateGirl', controller.girlsManage.updateGirl);
router.get('/getGirls', controller.girlsManage.getGirls);

// controller.girlsManage.js
'use strict';

const Controller = require('egg').Controller;

class GirlManage extends Controller {
  async addG() {
    const {
      ctx,
    } = this;
    const params = {
      name: '小白',
      age: 18,
      skill: '头疗',
    };
    const res = await ctx.service.testdb.addG(params);
    ctx.body = '添加女孩-成功!' + res;
  }

  async delG() {
    const {
      ctx,
    } = this;
    const id = {
      id: 3,
    };
    const res = await ctx.service.testdb.delG(id);
    console.log(res);
    if (res) {
      ctx.body = '删除女孩-成功';
    } else {
      ctx.body = '删除失败';
    }

  }

  async updateG() {
    const {
      ctx,
    } = this;
    const params = {
      id: 3,
      name: '小白',
      age: 20,
      skill: '头疗',
    };
    const res = await ctx.service.testdb.updateG(params);
    if (res) {
      ctx.body = '修改女孩-成功';
    } else {
      ctx.body = '修改失败';
    }
  }

  async getG() {
    const {
      ctx,
    } = this;
    const res = await ctx.service.testdb.getG(10);
    ctx.body = '查询女孩:' + JSON.stringify(res);
  }
}

module.exports = GirlManage;

// server/testdb.js
'use strict';

const Service = require('egg').Service;

class testdbService extends Service {
  // // 添加数据库
  async addG(params) {
    try {
      const {
        app,
      } = this;
      const res = await app.mysql.insert('girls', params);
      return res;
    } catch (error) {
      console.log(error);
      return null;
    }
  }

  // // 删除数据库
  async delG(id) {
    try {
      const {
        app,
      } = this;
      const res = await app.mysql.delete('girls', id);
      return res;
    } catch (error) {
      console.log(error);
      return null;
    }

  }

  // // 修改数据库
  async updateG(params) {
    try {
      const {
        app,
      } = this;
      const res = await app.mysql.update('girls', params);
      return res;
    } catch (error) {
      console.log(error);
      return null;
    }
  }

  // // 查询数据库
  async getG(id = 10) {
    console.log(id); // 没有数据意思一下
    try {
      const app = this.app;
      const res = await app.mysql.select('girls');
      return res;
    } catch (error) {
      console.log(error);
      return null;
    }
  }
}

module.exports = testdbService;
TS版体验
安装依赖和配置
npm init egg --type=ts
npm i

// egg-cors 跨域包 egg-jwt token生成以及验证包
npm install egg-cors egg-jwt --save


// config/plugin.ts
import { EggPlugin } from 'egg';

const plugin: EggPlugin = {
  jwt: {
    enable: true,
    package: "egg-jwt"
  },
  cors: {
    enable: true,
    package: 'egg-cors',
  }
};

export default plugin;

// config/config.default.ts
config.jwt = {
  secret: "123456"//自定义 token 的加密条件字符串
};
config.security = {
  csrf: {
    enable: false,
    ignoreJSON: true
  },
  domainWhiteList: ['http://localhost:8080'],//允许访问接口的白名单
};
config.cors = {
  origin:'*',
  allowMethods: 'GET,HEAD,PUT,POST,DELETE,PATCH'
};


// typings/index.d.ts
import 'egg';
declare module 'egg' {
    interface Application {
        jwt: any;
    }
}
创建路由、编写控制器
// router.js
import { Application } from "egg";
export default (app: Application) => {
const { controller, router, jwt } = app;
router.get("/", controller.home.index);
// ----- //
//正常路由
router.post("/admin/login", controller.home.login);
/*
* 这里的第二个对象不再是控制器,而是 jwt 验证对象,第三个地方才是控制器
* 只有在需要验证 token 的路由才需要第二个 是 jwt 否则第二个对象为控制器
**/
router.post("/admin", jwt, controller.home.index);
// ----- //
};
// home.ts
import { Controller } from "egg";
export default class HomeController extends Controller {
// public async index() {
// const { ctx } = this;
// ctx.body = await ctx.service.test.sayHi("egg");
// }
// ----- //
// 验证登录并且生成 token
public async login() {
const { ctx, app } = this;
//获取用户端传递过来的参数
const data = ctx.request.body;
// 进行验证 data 数据 登录是否成功
// .........
//成功过后进行一下操作
//生成 token 的方式
const token = app.jwt.sign(
{
username: data.username, //需要存储的 token 数据
//......
},
app.config.jwt.secret
);
// 生成的token = eyJhbGciOiJIUzI1NiIsInR5cCI6IkpXVCJ9.eyJmb28iOiJiYXIiLCJpYXQiOjE1NjAzNDY5MDN9.B95GqH-fdRpyZIE5g_T0l8RgzNyWOyXepkLiynWqrJg
// 返回 token 到前端
ctx.body = token;
}
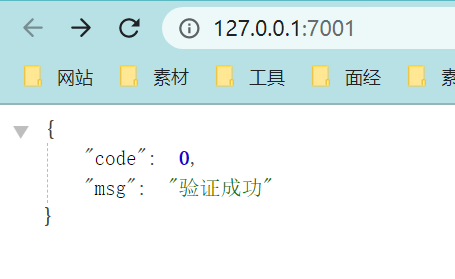
//访问admin数据时进行验证token,并且解析 token 的数据
public async index() {
const { ctx } = this;
console.log(ctx.state.user);
/*
* 打印内容为:{ username : 'admin', iat: 1560346903 }
* iat 为过期时间,可以单独写中间件验证,这里不做细究
* 除了 iat 之后,其余的为当时存储的数据
**/
ctx.body = { code: 0, msg: "验证成功" };
}
// ----- //
}
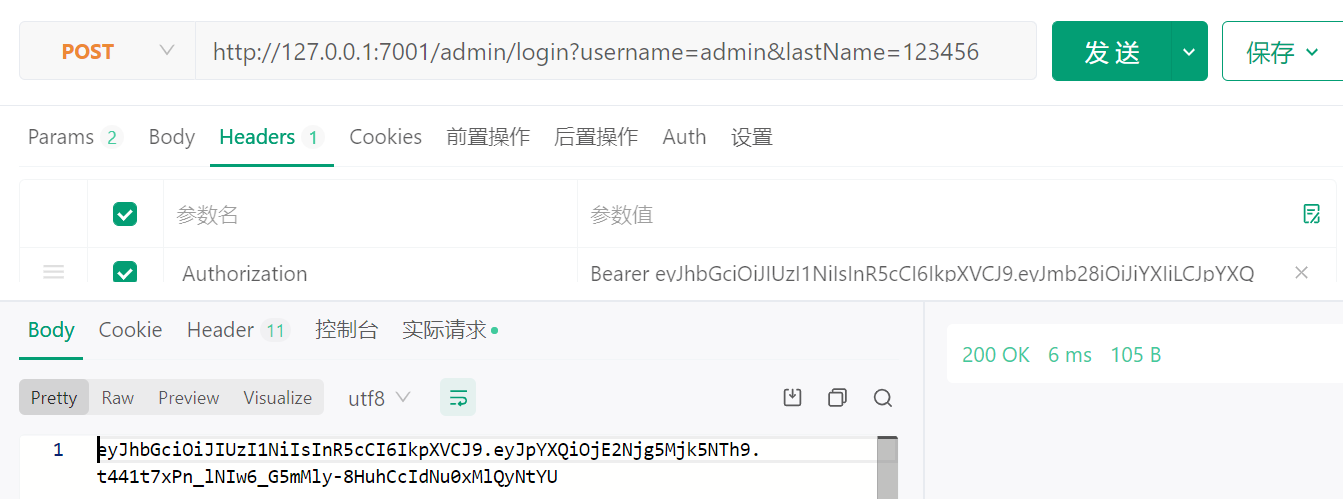
axios测试 /admi/login
axios({
  method: 'post',
  url: 'http://127.0.0.1:7001/admin',
  data: {
    username: 'admin',
    lastName: '123456'
  },
  headers:{
    // 切记 token 不要直接发送,要在前面加上 Bearer 字符串和一个空格
    'Authorization':`Bearer ${token}`
  }
}).then(res=>{
  console.log(res.data)})
汇总
egg-project
├── package.json
├── app.js (可选)
├── agent.js (可选)
├── app/ # 一定要按约定写
|   ├── router.js # 用于配置 URL 路由规则
│   ├── controller/ # 用于存放控制器(解析用户的输入、加工处理、返回结果)
│   ├── model/ (可选) # 用于存放数据库模型
│   ├── service/ (可选) # 用于编写业务逻辑层
│   ├── middleware/ (可选) # 用于编写中间件
│   ├── schedule/ (可选) # 用于设置定时任务
│   ├── public/ (可选) # 用于放置静态资源
│   ├── view/ (可选) # 用于放置模板文件
│   └── extend/ (可选) # 用于框架的扩展
│       ├── helper.js (可选)
│       ├── request.js (可选)
│       ├── response.js (可选)
│       ├── context.js (可选)
│       ├── application.js (可选)
│       └── agent.js (可选)
├── config/
|   ├── plugin.js # 用于配置需要加载的插件
|   ├── config.{env}.js # 用于编写配置文件(env 可以是 default,prod,test,local,unittest)


 2607
2607

 被折叠的 条评论
为什么被折叠?
被折叠的 条评论
为什么被折叠?
 到【灌水乐园】发言


