


一、创建vue3项目
1. 前提环境条件
已安装 16.0 或更高版本的 Node.js
node -v
2. 创建一个Vue应用
npm init vue@latest
这一指令将会安装并执行 create-vue
二、基本语法
1.setup语法糖
执行时机在beforeCreate之前
<script setup>
import {ref} from 'vue'

const val = ref(100)
console.log(val);
</script>
2.reactive和ref函数
reactive()
作用:接受对象类型数据的参数传入并返回一个响应式的对象.
<script setup>
import {reactive} from 'vue'

const val = reactive({
  name:100
})
const addfn = () => {
  val.name++
}
</script>
<template>
  <div>
    {{ val.name}}
    <button @click="addfn"></button>
  </div>
</template>
可直接通过 val.name 进行修改,模版中使用val.name进行调用
ref()
作用:接收简单类型或者对象类型的数据传入并返回一个响应式的对象
<script setup>
import {ref} from 'vue'

const val = ref(100)
console.log(val);
const addfn = () => {
  val.value++
}
</script>
<template>
  <div>
    {{ val}}
    <button @click="addfn"></button>
  </div>
</template>
需要通过val.value进行修改,模版中直接使用val即可访问,若是复杂类型,只需后面接着 .属性名 即可
3.computed
核心步骤:
1.导入computed函数
2.执行函数在回调参数中return基于响应式数据做计算的值,用变量接收
<script setup>
import { computed, ref } from 'vue'

const val = ref([1,2,3,4,5,6])
const newval = computed(() => {
  return val.value.filter(item => item > 3)
})
console.log(val);
console.log(newval.value);
</script>

<template>
  <div>
 {{ val }}---{{ newval}}
  </div>
</template>

计算属性一般来说是只读的,但遇到特殊情况可以使用get()和set()方法
<script setup>
import { computed, ref } from 'vue'

const val = ref(100)
const newval = computed({
  get(){
  return val.value+1
  },
  set(newvalue){
    val.value = newvalue
  }

})
console.log(val.value);
console.log(newval.value);
newval.value = 50
console.log(val.value);
console.log(newval.value);
</script>

4.watch
作用:侦听一个或者多个数据的变化,数据变化时执行回调函数
俩个额外参数:1.immediate(立即执行)2.deep(深度侦听)
1.导入watch函数
2.执行watch函数传入要侦听的响应式数据(ref对象)和回调函数
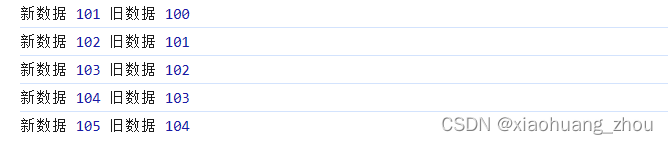
监听单个数据
<script setup>
import { ref, watch } from 'vue'
const num = ref(100)
watch(num, (newVal, oldVal) => {
  console.log('新数据',newVal,'旧数据',oldVal);
})
const addfn = () => {
  num.value++
}
</script>

<template>
  <div>
    {{ num }}
    <button @click="addfn">num++</button>
  </div>
</template>
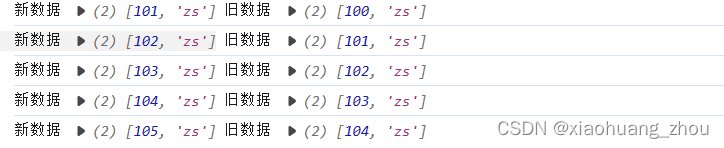
监听多个数据
<script setup>
import { ref, watch } from 'vue'
const num = ref(100)
const name = ref('zs')
watch([num,name], (newVal, oldVal) => {
  console.log('新数据',newVal,'旧数据',oldVal);
})
const addfn = () => {
  num.value++
}
</script>

<template>
  <div>
    {{ num }}
    <button @click="addfn">num++</button>
  </div>
</template>
immediate
说明:在侦听器创建时立即触发回调,响应式数据变化之后继续执行回调
deep
默认机制:通过watch监听的ref对象默认是浅层侦听的,直接修改嵌套的对象属性不会触发回调执行,需要开启deep 选项
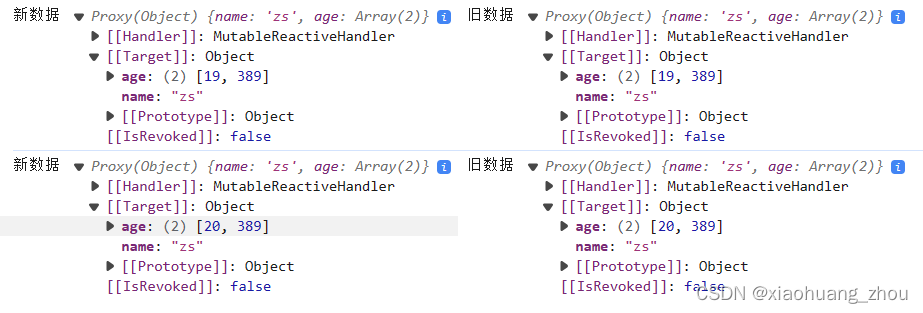
监听整个对象,有变化的就触发
<script setup>
import { ref, watch } from 'vue'
const num = ref({
  name: 'zs',
  age:[18,389]
})
watch(num, (newVal, oldVal) => {
  console.log('新数据',newVal,'旧数据',oldVal);
}, {
  immediate: true,
  deep:true
})
const addfn = () => {
  num.value.age[0]++
}
</script>
监听对象中的单个属性
<script setup>
import { ref, watch } from 'vue'
const num = ref({
  name: 'zs',
  age:19
})
watch(()=>num.value.age, (newVal, oldVal) => {
  console.log('新数据',newVal,'旧数据',oldVal);
}, {
  immediate: true,
  deep:true
})
const addfn = () => {
  num.value.age++
}
</script>
如果需要监听对象中的多个属性但非全部属性,可以结合[ ]来使用,即
watch([()=>num.value.age,()->{num.value.name}],(newVal,oldVal)=>{})
5.生命周期函数
| 选项式API | 组合式API |
|---|---|
| beforeCreate/created | setup |
| beforeMount | onBeforeMount |
| mounted | onMounted |
| beforeUpdate | onBeforeUpdate |
| update | onUpdate |
| beforeUnmount | onBeforeUnmount |
| unmounted | onUnmounted |
 <script setup>
import { onMounted } from 'vue';
onMounted(() => {
  console.log('我是生命周期钩子');
 })
</script>
6.父子通信
组合式API下的父传子
defineProps原理:就是编译阶段的一个标识,实际编译器解析时,遇到后会进行编译转换.
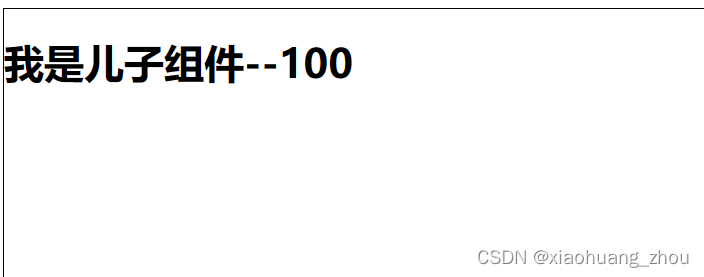
父亲App.vue
<template>
    <div class="son">
<h1>我是儿子组件--{{ mes }}</h1>
    </div>
</template>

<script setup>
defineProps({
    mes: Number,
})
</script>
儿子sonIndex.vue
<template>
    <div class="son">
<h1>我是儿子组件--{{ mes }}</h1>
    </div>
</template>

<script setup>
defineProps({
    mes: Number,
})
</script>
组合式API下的子传父
基本思想
1.父组件中给子组件标签通过@绑定事件2.子组件内部通过emit方法触发事件
父:app.vue
<script setup>
import sonIndex from './components/sonIndex.vue'
import {ref} from 'vue'
const mes = ref(100)

const changemess = (num) => {
  mes.value += num
}
</script>

<template>
  <div>
    <h1></h1>
    <sonIndex :mes='mes' @chanegmes='changemess' ></sonIndex>
  </div>
</template>
子:sonIndex.vue
<template>
    <div class="son">
<h1>我是儿子组件--{{ mes }}</h1>
<button @click="addfn">+1</button>
    </div>
</template>

<script setup>
const mes = defineProps({
    mes: Number,
})

const emit = defineEmits('chanegmes')
const addfn = () => {
    emit('chanegmes',1)
}
</script>
子传父时要先定义方法const emit = defineEmits(‘chanegmes’)
7.模版引用
模板引用的概念
通过ref标识获取真实的dom对象或者组件实例对象
1.调用ref函数生成一个ref对象
2.通过ref标识绑定ref对象到标签
<script setup>
import sonIndex from './components/sonIndex.vue'
import {ref} from 'vue'
const son = ref(null)
const h1Ref = ref(null)
console.log(son);

console.log(h1Ref);
</script>

<template>
  <div>
    <h1 ref="h1Ref" class="ref"></h1>
    <sonIndex ref="son" ></sonIndex>
  </div>
</template>
defineExpose()
默认情况下在语法糖下组件内部的属性和方法是不开放给父组件访问的,可以通过defineExpose编译宏指定哪些属性和方法允许访问
父:app.vue
<script setup>
import sonIndex from './components/sonIndex.vue'
import {ref} from 'vue'
const son = ref(null)
const addfn = () => {
  console.log(son.value.count);
  son.value.sonSpeak()
}
</script>

<template>
  <div>
    <h1 ref="h1Ref" class="ref" @click="addfn">1111111111111</h1>
    <sonIndex ref="son" ></sonIndex>
  </div>
</template>
子:sonIndex.vue
<template>
    <div class="son">
       <p>12345678</p>
    </div>
</template>

<script setup>
import {ref} from 'vue'
const count = ref(100)
const sonSpeak = () => {
    console.log('我是儿子');
}
defineExpose({
    count,
    sonSpeak
})
</script>

8.provide和inject
作用和场景
顶层组件向任意的底层组件传递数据和方法,实现跨层组件通信
跨层传递普通数据
1.顶层组件通过provide函数提供数据
2.底层组件通过inject函数获取数据
顶层组件App.vue
<script setup>
import sonIndex from './components/sonIndex.vue'
import {ref,provide} from 'vue'
provide('message', 100)
const count = ref(10000)
provide('message2', count)
const changecount = () => {
  count.value++
}
provide('message3', changecount)
</script>

<template>
  <div>
    <h1 ref="h1Ref" class="ref" @click="addfn">1111111111111</h1>
    <sonIndex ref="son" ></sonIndex>
  </div>
</template>
孙子(底层)组件:sonsonIndex.vue
<template>
    <div>
我是孙子
<button @click="change">按钮</button>
    </div>
</template>

<script setup>
import {inject} from 'vue'
const val = inject('message')
console.log(val);
const val2 = inject('message2')
console.log(val2.value);
const val3 = inject('message3')
const change = () => {
    val3()
    console.log(val2.value);
}
</script>

可以传普通数据,响应式数据,函数,在底层组件中不可以修改顶层组件的响应式数据,但可以通过顶层组件传下来的函数进行修改。
9.Vue3.3新特性-defineOptions
Vue3.3新特性-defineOptions
背景说明:
有之前,如果要定义props,emits可以轻而易举地添加一个与setup平级的属性。
但是用了后,就没法这么干了setup属性已经没有了,自然无法添加与其平级的属性。
为了解决这一问题,引入了defineProps与defineEmits这两个宏。但这只解决了props与emits这两个属性。
如果我们要定义组件的name或其他自定义的属性,还是得回到最原始的用法——再添加一个普通的
<template>
    <div class="son">
       <sonsonIndex></sonsonIndex>
    </div>
</template>

<script setup>
import sonsonIndex from './sonsonIndex.vue'
defineOptions({
  name:'SonIndex'
})

</script>
Vue3.3新特性-defineOptions
所以在Vue3.3中新引入了defineOptions宏。顾名思义,主要是用来定义OptionsAPI的选项。可以用
defineOptions定义任意的选项,props,emits,expose,slots除外(因为这些可以使用defineXXX来做到)
10.Vue3.3新特性-defineModel
Vue3中的v-model和defineModel
在Vue3中,自定义组件上使用v-model,相当于传递一个modelValue属性,同时触发update:modelValue事件我们需要先定义props,再定义emits。其中有许多重复的代码。如果需要修改此值,还需要手动调用emit函数。
<sonIndex v-model="isVisivle"></sonIndex>
<sonIndex :modelValue="isVisivle" @update:modelValue="$event"></sonIndex>
不用defineModel的方法
app.vue
<script setup>
import {ref } from 'vue'
import sonIndex from './components/sonIndex.vue'
const text = ref('123')
</script>

<template>
  <div>
<sonIndex v-model="text"></sonIndex>
{{ text }}
  </div>
</template>
sonIndex.vue
<template>
    <div>
<input type="text" :value="modelValue" @input="e => emit('update:modelValue',e.target.value)"/>
    </div>
</template>

<script setup>
defineProps({
    modelValue:String
})
const emit = defineEmits(['update:modelValue'])
</script>

使用defineModel
(目前defineModel处在实验阶段在vite.config.js中配置)
 plugins: [
    vue({
      script: {
        defineModel: true,
      },
    }),
  ],
app.vue
<script setup>
import {ref } from 'vue'
import sonIndex from './components/sonIndex.vue'
const text = ref('123')
</script>

<template>
  <div>
<sonIndex v-model="text"></sonIndex>
{{ text }}
  </div>
</template>
sonIndex.vue
<template>
    <div>
<input type="text" :value="modelValue" @input="e => modelValue=e.target.value">
    </div>
</template>

<script setup>
import { defineModel } from 'vue';
const modelValue = defineModel()
console.log(modelValue);
</script>


 8215
8215


 被折叠的 条评论
为什么被折叠?
被折叠的 条评论
为什么被折叠?
 到【灌水乐园】发言


