


React.js
本篇为学习jspang react.js过程中的学习笔记
安装环境
npm install -g create-react-app
mkdir ReactDemo  //创建ReactDemo文件夹
create-react-app demo01   //用脚手架创建React项目
cd demo01   //等创建完成后,进入项目目录
npm start   //预览项目,如果能正常打开,说明项目创建成功
报错:npm WARN deprecated tar@2.2.2: This version of tar is no longer supported, and will not receive security updates. Please upgrade asap.
解决:解决方法
HelloWorld和组件的讲解
打开项目文件夹,删除src下的文件,新建index.js(项目的入口文件),写入
import React from 'react'
import ReactDOM from 'react-dom'
import App from './App'
ReactDOM.render(<App />,document.getElementById('root'))
上述代码的意义是引入两个react很重要的文件,然后引入App.js文件,将他渲染到root
新建App.js文件
import React, { Component } from 'react';  //imrc
class App extends Component {  //cc
  render() {
    return (
      <div>
        hello zjx
      </div>
    );
  }
}

export default App;
启动项目
npm start
React JSX语法
JSX简介
JSX就是Javascript和XML结合的一种格式。React发明了JSX,可以方便的利用HTML语法来创建虚拟DOM,当遇到<JSX就当作HTML解析,遇到{就当JavaScript解析。
React 实例
Family.js
Fragment标签是外层包裹,因为render必须有一个外层包裹,但是如果使用div有一些情况会产生一些冲突,所以用Fragment,这个标签在浏览器中是看不到的
import React, { Component ,Fragment } from 'react';

class Family extends Component {
  render() {
    return (
      <Fragment>
        <div>
          <input/>
          <button>增加家人</button>
        </div>
        <ul>
          <li>张景宣</li>
          <li>周帅</li>
        </ul>
      </Fragment>
    );
  }
}

export default Family;
响应式设计和数据的绑定(state)
数据定义:
import React, { Component ,Fragment } from 'react';

class Family extends Component {
  constructor(props) {
    super(props);
    this.state = {
      inputValue:'',  //input中的值
      list:[] // 家人列表
    }
  }
  render() {
    return (
      <Fragment>
        <div>
          <input/>
          <button>增加家人</button>
        </div>
        <ul>
          <li>张景宣</li>
          <li>周帅</li>
        </ul>
      </Fragment>
    );
  }
}

export default Family;
输入框和数据的双向绑定
<input value = {this.state.inputValue} />
这时候你到界面的文本框中去输入值,是没有任何变化的,这是因为我们强制绑定了inputValue的值。如果要想改变,需要绑定响应事件,改变inputValue的值。比如绑定一个改变事件,这个事件执行inputChange()(当然这个方法还没有)方法
所以绑定数据之后还需要一个事件方法
<input value = {this.state.inputValue} onChange={this.inputChange.bind(this)} />   //inputChange函数里面的this是undifined 所以需要吧这个函数的this绑定为外面的this,也就是Family类的this
//如果实在理解不了那就记住 基本每个实践方法都需要bind绑定一下this
  inputChange(e){
    console.log(e.target.value);
    this.setState ({
      inputValue:e.target.value  //修改数据需要setState传入参数是对象
    })
  }
import React, { Component ,Fragment } from 'react';

class Family extends Component {
  constructor(props) {
    super(props);
    this.state = {
      inputValue:'',  //input中的值
      list:[] // 家人列表
    }
  }
  render() {
    return (
      <Fragment>
        <div>
          <input value = {this.state.inputValue} onChange={this.inputChange.bind(this)} />
          <button>增加家人</button>
        </div>
        <ul>
          <li>张景宣</li>
          <li>周帅</li>
        </ul>
      </Fragment>
    );
  }

  inputChange(e){
    console.log(e.target.value);
    this.setState ({
      inputValue:e.target.value
    })
  }
}

export default Family;
但是上述我们写的代码中li的数据是固定的,我们现在将它改为响应式数据
constructor(props) {
    super(props);
    this.state = {
      inputValue:'zjx',  //input中的值
      list:['张景宣','周帅'] // 家人列表
    }
  }
<ul>
  {
    this.state.list.map((item,index)=>{
      return <li>{item}</li>
    })
  }  //jsx语法 第一个{}为了读取数据 return一个jsx标签
</ul>
增加列表选项——点击事件
addList(){
    this.setState({
      list:[...this.state.list,this.state.inputValue]
    })
  }
这里setState里面的参数都是对象 不需要this调用,但是如果是调用state里的参数就需要this
删除列表项
给li标签增加点击事件
<ul>
          {
            this.state.list.map((item,index)=>{
              return(
                <li
                  onClick={this.deleteItem.bind(this,index)}
                >
                  {item}
                </li>
              )
            })
          }
        </ul>
bind第一个参数是修改的thisarg,剩下就是这个函数的参数
deleteItem(index){
    let list = this.state.list;
    list.splice(index,1);
    this.setState({
      list:list
    })
  }
错误代码
注意绝对不可以直接修改state的值
//删除单项服务
deleteItem(index){
    this.state.list.splice(index,1)
    this.setState({
        list:this.state.list
    })
}
setState提供的异步方法
addList(){
    this.setState({
        list:[...this.state.list,this.state.inputValue],
        inputValue:''
        //关键代码--------------start
    },()=>{
        console.log(this.ul.querySelectorAll('div').length)
    })
    //关键代码--------------end
}
JSX注意事项
JSX代码注释
快捷键ctrl+/
{/* jsx */}
JSX中的class陷阱
类名调用要用className而不是class
React进阶
组件的拆分
在Family引入
import FamilyItem from './FamilyItem'
FamilyItem:
import React, { Component } from 'react';
class FamilyItem extends Component {
  state = {  }
  render() {
    return (
      <div>周帅</div>
    );
  }
}

export default FamilyItem;
Family修改部分代码:
<ul>
  {
    this.state.list.map((item,index)=>{
      return(
        <FamilyItem></FamilyItem>
      )
    })
  }
</ul>
父子组件的传值
父组件向子组件传值
Family:
<ul>
  {
    this.state.list.map((item,index)=>{
      return(

        <FamilyItem content = {item}></FamilyItem>
      )
    })
  }
</ul>
FamilyItem:
import React, { Component } from 'react';
class FamilyItem extends Component {
  state = {  }
  render() {
    return (
      <div>{this.props.content}</div>
    );
  }
}

export default FamilyItem;
父组件调用子组件通过添加属性从而传递参数,子组件通过this.props.key进行调用父组件添加的属性
子组件向父组件传值
<ul>
  {
    this.state.list.map((item,index)=>{
      return(
        <FamilyItem
            key = {index+item}  //循环调用必须加key不然console会有warining
            content = {item}
          >
          </FamilyItem>
      )
    })
  }
</ul>
一般我们调用方法的时候进行bind的this绑定
import React, { Component } from 'react';
class FamilyItem extends Component {
  state = {  }
  render() {
    return (
      <div
        onClick={this.handleClick.bind(this)}
      >{this.props.content}</div>
    );
  }
  handleClick(){
    console.log(this.props.index);
  }

}

export default FamilyItem;
高级组件开发中我们把this的绑定写在构造函数中,这样能提升开发性能
FamilyItem:
constructor(props) {
    super(props);
    this.handleClick = this.handleClick.bind(this);
  }
那么我们所谓的子组件向父组件传值,其中的业务逻辑也就是子组件调用父组件的deletItem方法
首先我们需要把这个方法通过父组件传给子组件,然后子组件进行调用
<FamilyItem
    key = {index+item}
    content = {item}
    index ={index}
    deleteItem ={this.deleteItem.bind(this)} //注意这里要实现绑定好this,不然传过去再绑定this就是子组件的类了!!!!!!!!
    >
</FamilyItem>
import React, { Component } from 'react';
class FamilyItem extends Component {
  constructor(props) {
    super(props);
    this.handleClick = this.handleClick.bind(this);
  }
  state = {  }
  render() {
    return (
      <div
        onClick={this.handleClick}
      >{this.props.content}</div>
    );
  }
  handleClick(){
    this.props.deleteItem(this.props.index);
  }

}

export default FamilyItem;
2022.10.8
单项数据流和其他
我们现在把父组件的list传过来,然后在子组件进行修改
Family:
<FamilyItem
    key = {index+item}
    content = {item}
    index ={index}
    list = {this.state.list}
    deleteItem ={this.deleteItem.bind(this)}
    >
</FamilyItem>
FamilyItem:
import React, { Component } from 'react';
class FamilyItem extends Component {
  constructor(props) {
    super(props);
    this.handleClick = this.handleClick.bind(this);
  }
  state = {  }
  render() {
    return (
      <div
        onClick={this.handleClick}
      >{this.props.content}</div>
    );
  }
  handleClick(){
    this.props.list = []; //在这里清空父组件传来的list
    this.props.deleteItem(this.props.index);
  }

}

export default FamilyItem;
handleClick事件运行时报错
TypeError: Cannot assign to read only property 'list' of object '#<Object>'
这是因为list这个数据是只读的,单向数据流。我们想要修改也可以,就是通过上节课子组件调用父组件的方法来实现
代码如下
import React, { Component } from 'react';
class FamilyItem extends Component {
  constructor(props) {
    super(props);
    this.handleClick = this.handleClick.bind(this);
    this.eraseList = this.eraseList.bind(this);
  }
  state = {  }
  render() {
    return (
      <div
        onClick={this.eraseList}
      >{this.props.content}</div>
    );
  }
  handleClick(){
    this.props.list = [];
    this.props.deleteItem(this.props.index);
  }
  eraseList(){
    this.props.clearList([]);
  }

}

export default FamilyItem;
<FamilyItem
    key = {index+item}
    content = {item}
    index ={index}
    list = {this.state.list}
    deleteItem ={this.deleteItem.bind(this)}
    clearList = {this.clearList.bind(this)}
  	>
 </FamilyItem>

clearList(l){
    this.setState({
      list:l,
    })
  }
调试工具的安装及应用
React developer tools
PropTypes效验传递值
PropTypes的简单应用
规定传递的数据类型
父组件向子组件传递的值可以用PropTypes限制,首先需要在组件中引用
import PropTypes from 'prop-types‘
然后在子组件的类下面写propType(注意是写道类外面)
FamilyItem.propTypes = {    //组件名字.propTypes
  content:PropTypes.string,
  deleteItem: PropTypes.func,
  index:PropTypes.number,
}
为了检验propType,我们故意把index改成字符串
发现浏览器报错了:
Failed prop type: Invalid prop `index` of type `number` supplied to `FamilyItem`, expected `string`.
必传值的效验
我们先写一个fname属性进行传递
<FamilyItem
    key = {index+item}
    content = {item}
    index ={index}
    fname = '宣哥'
    list = {this.state.list}
    deleteItem ={this.deleteItem.bind(this)}
    // clearList = {this.clearList.bind(this)}
  >
</FamilyItem>
avname:PropTypes.string.isRequired //这个传来的值不能为空
使用默认值
FamilyItem.defaultProps = {
  fname : 'zjx',
}  //定义在子组件,类之外
这时就算父组件不传fname还是会显示
ref的使用方法
在父组件中我们曾经使用e.target,用来读取输入到input的值
<input value = {this.state.inputValue} onChange={this.inputChange.bind(this)} />


inputChange(e){
    console.log(e.target.value);
    this.setState ({
      inputValue:e.target.value
    })
  }
如果要使用ref来进行,需要在JSX中进行绑定
<input
      value = {this.state.inputValue}
      onChange={this.inputChange.bind(this)}
      ref = {(input)=>{this.input = input}}  //this.[name]是一个节点,回调函数的参数是这个虚拟节点(dom)
      />

inputChange(){
    this.setState ({
      inputValue:this.input.value,
    })
  }
生命周期的讲解
React生命周期深度完全解读 - 腾讯云开发者社区-腾讯云 (tencent.com)
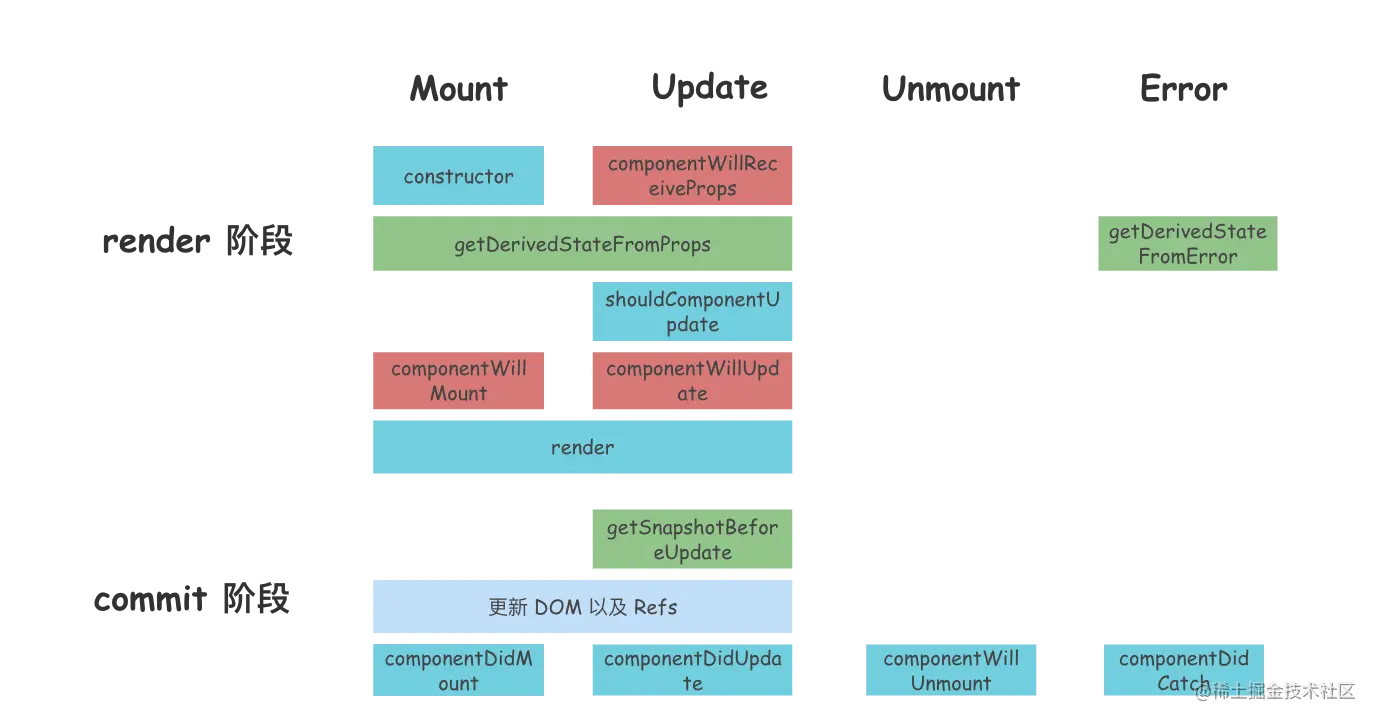
render阶段
mount有关生命周期只调用一次
constructor
该方法只会执行一次,调用该方法会返回一个组件实例。
在初始化阶段执行,可直接对 this.state 赋值。其他生命周期函数中只能通过 this.setState 修改 state,不能直接为 this.state 赋值。
getDerivedStateFromProps
它是一个静态方法,接收 props 和 state 两个参数。它会在调用 render 方法之前被调用,不管是在初始挂载时还是在后续组件更新时都会被调用。
它的调用时机和 componentWillMount、componentWillUpdate、componentWillReceiveProps 一样都是在 render 方法被调用之前,它可以作为 componentWillMount、componentWillUpdate 和 componentWillReceiveProps 的替代方案。
当然,它的作用不止如此,它可以返回一个对象,用来更新 state,就像它的名字一样,从 props 中获取衍生的 state。如果不需要更新 state 则可以返回 null。
需要注意的是:这个生命周期函数是类的静态方法,并不是原型中的方法,所以在其内部使用 this 访问到的不是组件实例。(直接使用props)
此生命周期钩子不常用,如果可以的话,我们也尽可能不会使用它。
shouldComponentUpdate
在组件准备更新之前调用,但是首次渲染或者使用 forceUpdate 函数时不会被调用。跟它的名字一样,它用来判断一个组件是否应该更新。
默认情况下,当组件的 props 或者 state 变化时,都会导致组件更新。它在 render 方法之前执行,如果它的返回值为 false,则不会更新组件,也不会执行后面的 render 方法。
它接收两个参数,nextProps 和 nextState,即下一次更新的 props 和下一次更新的 state。我们可以将 this.props 和 nextProps 比较,以及将 this.state 与 nextState 比较,并返回 false,让组件跳过更新。不过注意:它并不会阻止子组件因为 state 改变而导致的更新
commit 阶段
commit 阶段在首次渲染时会执行 componentDidMount,在组件更新时会执行 getSnapshotBeforeUpdate 和 componentDidUpdate。
componentDidMount
该生命周期方法会在组件挂载之后执行,也只会执行一次,也就是将组件对应的 DOM 插入 DOM 树中之后调用。它会在浏览器更新视图之前调用,如果在 componentDidMount 中直接调用 this.setState,它会触发额外的渲染,会再一次调用 render 函数,但是浏览器中视图的更新只会执行一次。
使用场景:
依赖于 DOM 的初始化操作应该放在这里,此外,我们一般在这个生命周期方法中发送网络请求、添加订阅等。
getSnapshotBeforeUpdate
此生命周期函数在最近一次渲染提交至 DOM 树之前执行,此时 DOM 树还未改变,我们可以在这里获取 DOM 改变前的信息,例如:更新前 DOM 的滚动位置。
它接收两个参数,分别是:prevProps、prevState,上一个状态的 props 和上一个状态的 state。它的返回值将会传递给 componentDidUpdate 生命周期钩子的第三个参数。
componentDidUpdate
在组件更新后立即调用,首次渲染不会调用该方法。它的执行时机和 componentDidMount 一致,只是 componentDidMount 在首次渲染时调用,而 componentDidUpdate 在后续的组件更新时调用。可以在这个生命周期中直接调用 this.setState,但是必须包裹在一个条件语句中,否则会导致死循环。
componentDidUpdate 接收三个参数,分别是 prevProps、prevState、snapshot,即:前一个状态的 props,前一个状态的 state、getSnapshotBeforeUpdate 的返回值。
如果组件实现了 getSnapshotBeforeUpdate 生命周期函数,则 getSnapshotBeforeUpdate 的返回值将作为 componentDidUpdate 的第三个参数。
使用场景:
在这个生命周期方法中,可以对 DOM 进行操作或者进行网络请求。
componentWillUnmount
这个生命周期函数会在组件卸载以及销毁之前调用。
使用场景:
通常用来执行组件的清理操作,例如:清除 timer、取消网络请求、清除订阅等。
实例
import React from 'react';

class App extends React.Component {

  constructor(props) {
    super(props);
    this.state = {
      count: 0,
    }
    console.log('App constructor');
  }

  static getDerivedStateFromProps() {
    console.log('App static getDerivedStateFromProps');
    return null;
  }

  componentDidMount() {
    console.log('App componentDidMount');
  }

  render() {
    console.log('App render');
    return (
      <div>
        <Child order={1} />
        <Child order={2} />
      </div>
    )
  }
}

class Child extends React.Component {

  constructor(props) {
    super(props);
    this.state = {
      count: 0,
    };
    console.log(`Child${this.props.order} constructor`);
  }

  static getDerivedStateFromProps(props) {
    console.log(`Child${props.order} static getDerivedStateFromProps`);
    return null;
  }

  componentDidMount() {
    console.log(`Child${this.props.order} componentDidMount`);
  }

  render() {
    console.log(`Child${this.props.order} render`);
    return (
      <div>
        Child{this.props.order}      </div>
    )
  }
}

export default App;
App constructor
lifeCycle.js:14 App static getDerivedStateFromProps
lifeCycle.js:23 App render
lifeCycle.js:40 Child1 constructor
lifeCycle.js:44 Child1 static getDerivedStateFromProps
lifeCycle.js:53 Child1 render
lifeCycle.js:40 Child2 constructor
lifeCycle.js:44 Child2 static getDerivedStateFromProps
lifeCycle.js:53 Child2 render
lifeCycle.js:49 Child1 componentDidMount
lifeCycle.js:49 Child2 componentDidMount
lifeCycle.js:19 App componentDidMount
2022.10.14
React高级
用css3实现react动画
react隐藏或者显示标签的方法
import React, { Component ,Fragment} from 'react'
class cssAnime extends Component {
  constructor(props) {
    super(props);
    this.show = this.show.bind(this);

  }
  state = {
    isShow:true,
  }
  render() {
    return (
      <Fragment>
        {this.state.isShow&&<div >这是张景宣</div>}  //这种显示和隐藏元素的方法要记住
        <div><button onClick={this.show}> 召唤周帅</button></div>
      </Fragment>
     );
  }
  show(){
    this.setState({
      isShow:this.state.isShow ? false : true,
    })
  }
}

export default cssAnime;
新建style.css文件
.hide{
  opacity: 0;
  transition: all 1.5s ease-in;
}

.show{
  opacity: 1;
  transition: all 1.5s ease-out;
}
import React, { Component ,Fragment} from 'react'
import './style.css' //
class cssAnime extends Component {
  constructor(props) {
    super(props);
    this.show = this.show.bind(this);

  }
  state = {
    isShow:true,
  }
  render() {
    return (
      <Fragment>
        <div className={this.state.isShow?'show':'hide'}>这是张景宣</div>
        <div><button onClick={this.show}> 召唤周帅</button></div>
      </Fragment>
     );
  }
  show(){
    this.setState({
      isShow:this.state.isShow ? false : true,
    })
  }
}

export default cssAnime;
react第三方插件react-transition-group
先进行安装
npm install react-transition-group --save
引入
import { CSSTransition } from 'react-transition-group'
  isShow:this.state.isShow ? false : true,
})
}
}
export default cssAnime;
新建style.css文件

```css
.hide{
  opacity: 0;
  transition: all 1.5s ease-in;
}

.show{
  opacity: 1;
  transition: all 1.5s ease-out;
}
import React, { Component ,Fragment} from 'react'
import './style.css' //
class cssAnime extends Component {
  constructor(props) {
    super(props);
    this.show = this.show.bind(this);

  }
  state = {
    isShow:true,
  }
  render() {
    return (
      <Fragment>
        <div className={this.state.isShow?'show':'hide'}>这是张景宣</div>
        <div><button onClick={this.show}> 召唤周帅</button></div>
      </Fragment>
     );
  }
  show(){
    this.setState({
      isShow:this.state.isShow ? false : true,
    })
  }
}

export default cssAnime;


 97
97


 被折叠的 条评论
为什么被折叠?
被折叠的 条评论
为什么被折叠?
 到【灌水乐园】发言


