


SpringBoot
yaml配置文件的基本使用
必须设置名为 application.yaml
server:
  port: 8081   #设置端口号
#设置Dog类属性值
dog:
  name: "旺财"
  age: 10
  #list、set集合或数组
  list: [ 1,2,3,5,6 ]
  #map集合
  map: { k1: "嘻嘻",k2: "666" }
  #时间
  date: 2022/1/26
  #对象属性
  cat:
    name: "喵喵"
    age: 3
Dog实体类
@Component//Spring接管
@ConfigurationProperties("dog")//yaml配置属性,与yaml上配置对象名字对应
public class Dog {
    String name;
    int age;
    List list;
    Map map;
    Date date;
    @Autowired//自动装配
    Cat cat;
Cat类
@Component
@ConfigurationProperties("cat")
public class Cat {
    String name;
    int age;
@ConfigurationProperties("")报红,添加依赖
        <!--yaml配置文件-->
        <dependency>
            <groupId>org.springframework.boot</groupId>
            <artifactId>spring-boot-configuration-processor</artifactId>
            <optional>true</optional>
        </dependency>
结论:
配置yml和配置properties都可以获取到值 , 强烈推荐 yml;
如果我们在某个业务中,只需要获取配置文件中的某个值,可以使用一下 @value;
如果说,我们专门编写了一个JavaBean来和配置文件进行一一映射,就直接@configurationProperties,不要犹豫!
JSR303 数据校验
基本注解@Validated 注解在类上,表示开启JSR303数据校验,其他注解在类的属性上,来进行校验该属性值的数据,message=“邮箱格式错误” 会在控制台打印出来
@Component //注册bean
@ConfigurationProperties(prefix = "person")
@Validated  //JSR303数据校验
public class Person {

    @Email(message="邮箱格式错误") //name必须是邮箱格式
    private String name;

@NotNull(message="名字不能为空")
private String userName;
@Max(value=120,message="年龄最大不能查过120")
private int age;
@Email(message="邮箱格式错误")
private String email;

空检查
@Null       验证对象是否为null
@NotNull    验证对象是否不为null, 无法查检长度为0的字符串
@NotBlank   检查约束字符串是不是Null还有被Trim的长度是否大于0,只对字符串,且会去掉前后空格.
@NotEmpty   检查约束元素是否为NULL或者是EMPTY.

Booelan检查
@AssertTrue     验证 Boolean 对象是否为 true
@AssertFalse    验证 Boolean 对象是否为 false

长度检查
@Size(min=, max=) 验证对象(Array,Collection,Map,String)长度是否在给定的范围之内
@Length(min=, max=) string is between min and max included.

日期检查
@Past       验证 Date 和 Calendar 对象是否在当前时间之前
@Future     验证 Date 和 Calendar 对象是否在当前时间之后
@Pattern    验证 String 对象是否符合正则表达式的规则

.......等等
除此以外,我们还可以自定义一些数据校验规则
}
源码分析
每个xxxConfiguration都对应这一个xxxProperties
xxxProperties类是xxxConfiguration的默认配置,
xxxConfiguration类这种有这样的注解@EnableConfigurationProperties(xxxProperties.class)
来表示他默认的配置是哪个Properties类。
//以类为条件
@ConditionalOnClass({ DataSource.class, EmbeddedDatabaseType.class })
//以缺少bean为条件
@ConditionalOnMissingBean(type = "io.r2dbc.spi.ConnectionFactory")
//以那个类为默认的配置
@EnableConfigurationProperties(xxxProperties.class)
@ConditionalO…都表示限制条件,来限制能否使用配置文件配置,如果这个注解后面有报红,就表示不能配置,需要添加响应的依赖
xxxProperties类中又有这样的注解@ConfigurationProperties(prefix = “Spring.xxx”)
所以我们可以根据xxxProperties来修改xxxConfiguration类的属性,在yml文件里进行配置
@ConfigurationProperties(prefix = "spring.xxx")//表示这个类可以在yml文件中配置
所以xxxProperties类配置了,就等于xxxConfiguration被配置了。
所有的xxxConfiguration都在这里

精髓
1、SpringBoot启动会加载大量的自动配置类
2、我们看我们需要的功能有没有在SpringBoot默认写好的自动配置类当中;
3、我们再来看这个自动配置类中到底配置了哪些组件;(只要我们要用的组件存在在其中,我们就不需要再手动配置了)
4、给容器中自动配置类添加组件的时候,会从properties类中获取某些属性。我们只需要在配置文件中指定这些属性的值即可;
**xxxxAutoConfigurartion:自动配置类;**给容器中添加组件
xxxxProperties:封装配置文件中相关属性;
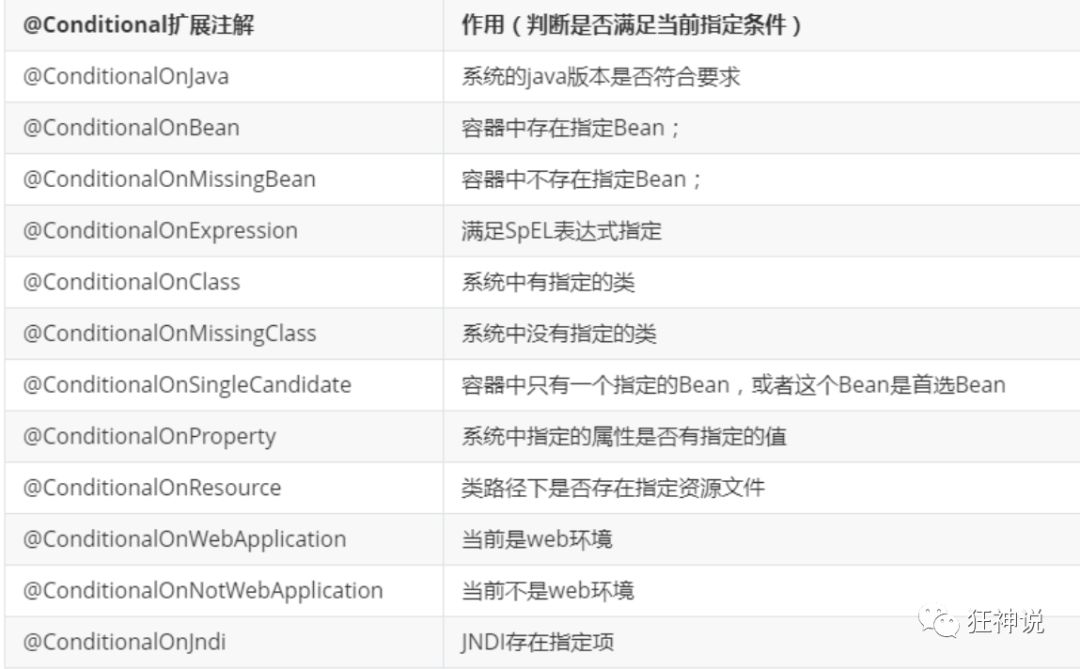
了解:@Conditional
了解完自动装配的原理后,我们来关注一个细节问题,自动配置类必须在一定的条件下才能生效;
@Conditional派生注解(Spring注解版原生的@Conditional作用)
作用:必须是@Conditional指定的条件成立,才给容器中添加组件,配置配里面的所有内容才生效;
那么多的自动配置类,必须在一定的条件下才能生效;也就是说,我们加载了这么多的配置类,但不是所有的都生效了。
我们怎么知道哪些自动配置类生效?
我们可以通过启用 debug=true属性;来让控制台打印自动配置报告,这样我们就可以很方便的知道哪些自动配置类生效;
#开启springboot的调试类debug=true
Positive matches:(自动配置类启用的:正匹配)
Negative matches:(没有启动,没有匹配成功的自动配置类:负匹配)
Unconditional classes: (没有条件的类)
【演示:查看输出的日志】
掌握吸收理解原理,即可以不变应万变!
静态资源放的位置
SpringBoot中处理静态资源的路径
根目录下 public(公开的),static(静态的),/**,resources 都可以存放
优先级:resources>static(默认)>public 一般都放static就行,Spring自动创建出来的
存在这些包里的静态资源 访问时不用写上包名 localhost:8080/xx即可访问
templates(相当于WEB-IF包下,只能通过Controller请求访问)
[外链图片转存失败,源站可能有防盗链机制,建议将图片保存下来直接上传(img-IW0H902C-1645420414190)(…/AppData/Roaming/Typora/typora-user-images/1643275898893.png)]
自定义静态资源存放径
spring:
  mvc:
    static-path-pattern: /...
thymeleaf模板引擎
依赖
<!--thymeleaf模板引擎-->
<dependency>
    <groupId>org.springframework.boot</groupId>
    <artifactId>spring-boot-starter-thymeleaf</artifactId>
</dependency>
SpringBoot这个项目首先是以jar的方式,不是war,像第二,我们用的还是嵌入式的Tomcat,所以呢,他现在默认是不支持jsp的。
SpringBoot推荐你可以来使用模板引擎:
模板引擎,我们其实大家听到很多,其实jsp就是一个模板引擎,还有用的比较多的freemarker,包括SpringBoot给我们推荐的Thymeleaf
ThymeleafProperties类
@ConfigurationProperties(prefix = "spring.thymeleaf")
public class ThymeleafProperties {
    //相当于mvc视图解析器

	private static final Charset DEFAULT_ENCODING = StandardCharsets.UTF_8;
											//以前mvc中前缀是WEB-INF包下现在是templates
	public static final String DEFAULT_PREFIX = "classpath:/templates/";//前缀
								//以前mvc中后缀是.jsp,现在Springboot默认不支持jsp,现在是h
	public static final String DEFAULT_SUFFIX = ".html";//后缀
statert依赖是一个集,里面有依赖和不同的版本,都存放在springboot中
变更starter依赖
<dependencies>
        <dependency>

            <exclusions>
                <exclusion>
			<groupId>xxx</groupId>
            <artifactId>xxx</artifactId>
                </exclusion>
            </exclusions>
        </dependency>
[外链图片转存失败,源站可能有防盗链机制,建议将图片保存下来直接上传(img-V4VCULIb-1645420414191)(…/AppData/Roaming/Typora/typora-user-images/1643289365467.png)]
扩展视图解析器
//如果你想要diy一些定制化的功能,只要写这个组件,然后将它交给springboot,springboot就会自动装配!!
//扩展SpringMvc
@Configuration
//@E.....如果加上这个注解就会导入dispatchservlet类,而Springboot底层视图解析器,限制不允许有这个类
//如果有这个类,底层的视图解析器就会失效
public class MyMvcConfig implements WebMvcConfigurer {

    //ViewResolver实现了视图解析器接口的类,我们就可以把它看做视图解析器
    @Bean//相当于<bean name="myVilewResolver" class="ViewResolver">
    public ViewResolver myVilewResolver(){
        return new MyViewResolver();
    }

    //自定义了一个自己的视图解析器MyViewResolver
    public static class MyViewResolver implements ViewResolver{
        @Override
        public View resolveViewName(String viewName, Locale locale) throws Exception {
            return null;
        }
    }

 //视图跳转
    @Override
    public void addViewControllers(ViewControllerRegistry registry) {
        registry.addViewController("/wang").setViewName("test");
    }

}
相当于Tomcat项目名路径自动在url前面拼接上/jing
server.servlet.context-path=/jing
拦截器
先自定义一个拦截器
LoginHandlerInterceptor,实现HandlerInterceptor接口重写preHandle方法就是拦截前要做的操作
return false拦截 treue放行
public class LoginHandlerInterceptor implements HandlerInterceptor {


    @Override
    public boolean preHandle(HttpServletRequest request, HttpServletResponse response, Object handler) throws Exception {
        Object username = request.getSession().getAttribute("username");
        if (username == null) {
            request.setAttribute("msg", "登录才可访问主页");
            request.getRequestDispatcher("/index.html").forward(request, response);
            System.out.println(username);
            //用户没登录拦截
            return false;

        } else {
            System.out.println(12);
            //用户已登录,放行
            return true;
        }
    }

}
在扩展springMvcConfig的拦截器配置;
写一个类实现WebMvcConfigurer接口,并且标注@Configuration注册到spring容器中
重写addInterceptors方法…
@Configuration//注册到Spring容器中,标注是一个config类,也是@Component的衍生
public class MyMvcConfig implements WebMvcConfigurer {
    //定制mvc拦截器
    @Override
    public void addInterceptors(InterceptorRegistry registry) {
       							//new的是自定义的拦截器
        registry.addInterceptor(new LoginHandlerInterceptor())
                .addPathPatterns("/**")//要拦截的路径
                .excludePathPatterns("/index.html", "/", "/login", "/css/**", "/js/**", "/img/**"); //排除的路径(这些会默认放行)
    }
}
SpringBoot数据库连接
依赖:
 <!-- 阿里巴巴druid(德鲁伊)数据源,可以查看详细的sql日志-->
        <dependency>
            <groupId>com.alibaba</groupId>
            <artifactId>druid</artifactId>
            <version>1.1.21</version>
        </dependency>
        <!--log4j日志-->
        <dependency>
            <groupId>log4j</groupId>
            <artifactId>log4j</artifactId>
            <version>1.2.16</version>

        </dependency>
        <!--jdbc-->
        <dependency>
            <groupId>org.springframework.boot</groupId>
            <artifactId>spring-boot-starter-jdbc</artifactId>
        </dependency>
	<!--mybatis-->
        <dependency>
            <groupId>org.mybatis.spring.boot</groupId>
            <artifactId>mybatis-spring-boot-starter</artifactId>
            <version>2.2.2</version>
        </dependency>
        <!--mysql-->
        <dependency>
            <groupId>mysql</groupId>
            <artifactId>mysql-connector-java</artifactId>
            <scope>runtime</scope>
        </dependency>
JDBC连接,Druid数据源配置,以及Mybatis设置
yml文件配置
#jdbc连接
spring:
  datasource:
    username: root
    password: root                        #?serverTimezone=UTC解决时区的报错,设置统一字符编码
    url: jdbc:mysql://localhost:3306/user?serverTimezone=UTC&useUnicode=true&characterEncoding=utf-8
    driver-class-name: com.mysql.cj.jdbc.Driver
    type: com.alibaba.druid.pool.DruidDataSource

    #Spring Boot 默认是不注入这些属性值的,需要自己绑定
    #druid 数据源专有配置
    initialSize: 5
    minIdle: 5
    maxActive: 20
    maxWait: 60000
    timeBetweenEvictionRunsMillis: 60000
    minEvictableIdleTimeMillis: 300000
    validationQuery: SELECT 1 FROM DUAL
    testWhileIdle: true
    testOnBorrow: false
    testOnReturn: false
    poolPreparedStatements: true

    #配置监控统计拦截的filters,stat:监控统计、log4j:日志记录、wall:防御sql注入
    #如果允许时报错  java.lang.ClassNotFoundException: org.apache.log4j.Priority
    #则导入 log4j 依赖即可,Maven 地址:https://mvnrepository.com/artifact/log4j/log4j
    filters: stat,wall,log4j
    maxPoolPreparedStatementPerConnectionSize: 20
    useGlobalDataSourceStat: true
    connectionProperties: druid.stat.mergeSql=true;druid.stat.slowSqlMillis=500


#Mybatis配置
mybatis:
  type-aliases-package: com.jing.pojo #起对象别名,无视大小写
  mapper-locations: classpath:com/jing/mapper/*.xml #扫描mapper.xml映射文件
druidConfig配置
只有配置了这个,yml文件中配置的druid独有设置才能生效。
druid后台监管配置
import com.alibaba.druid.pool.DruidDataSource;
import com.alibaba.druid.support.http.StatViewServlet;
import org.springframework.boot.context.properties.ConfigurationProperties;
import org.springframework.boot.web.servlet.ServletRegistrationBean;
import org.springframework.context.annotation.Bean;
import org.springframework.context.annotation.Configuration;

import javax.sql.DataSource;
import java.util.HashMap;
import java.util.Map;

//若需设置Druid数据源的功能,需要写这样一个Config类
@Configuration//这个类就相当于是一个beans.xml
public class DruidConfig {
    @ConfigurationProperties(prefix = "spring.datasource")//可以在yml文件中配置此 bean类
    @Bean//相当于在此beans.xml文件中写入<bean id=""  class=""></bean> 返回值就是class类型, 方法名就是id 类的对象
    public DataSource druidDataSource() {
        return new DruidDataSource();
    }

    //配置 Druid 监控管理后台的Servlet;
    //内置 Servlet 容器时没有web.xml文件,所以使用 Spring Boot 的注册 Servlet 方式
    @Bean
    public ServletRegistrationBean statViewServlet() {
        ServletRegistrationBean bean = new ServletRegistrationBean(new StatViewServlet(), "/druid/*");

        // 这些参数可以在 com.alibaba.druid.support.http.StatViewServlet
        // 的父类 com.alibaba.druid.support.http.ResourceServlet 中找到
        Map<String, String> initParams = new HashMap<>();
        initParams.put("loginUsername", "admin"); //后台管理界面的登录账号,账号和密码的key是固定的loginUsername,loginPassword
        initParams.put("loginPassword", "12356"); //后台管理界面的登录密码

        //后台允许谁可以访问
        //initParams.put("allow", "localhost"):表示只有本机可以访问
        //initParams.put("allow", ""):为空或者为null时,表示允许所有访问
        initParams.put("allow", "");
        //deny:Druid 后台拒绝谁访问
        //initParams.put("kuangshen", "192.168.1.20");表示禁止此ip访问

        //设置初始化参数
        bean.setInitParameters(initParams);
        return bean;
    }
}
SpringBootMybatis整合
编写Mapper接口与Mapper.xml映射同名同包下的文件, 一般都设在com.jing.mapper包下
Mapper接口,需要设上@Repository @Mapper两个注解,@Mapper表示他是Mybatis的mapper接口
@Repository 表示他是SpringBoot的数据库DAO层的类,与Com…同理,就是将它注入到Spring容器中
@Repository//与Com...同理
@Mapper//@Mapper表示他是Mybatis的mapper接口
public interface BooksMapper {
    @Select("select * from books")
    List<Books> selectAll();
}
Mapper.xml
<?xml version="1.0" encoding="UTF-8" ?>
<!DOCTYPE mapper
        PUBLIC "-//mybatis.org//DTD Mapper 3.0//EN"
        "http://mybatis.org/dtd/mybatis-3-mapper.dtd">
<mapper namespace="com.jing.mapper.BooksMapper">

</mapper>
SpringBoot的Mybatis配置在yml配置文件中配置
如:
#Mybatis配置
mybatis:
  type-aliases-package: com.jing.pojo #起对象别名,无视大小写
  mapper-locations: classpath:com/jing/mapper/*.xml #扫描mapper.xml映射文件
异步执行与定时器
@Async//异步方法注解 这俩注解都需在主方法开启
//定时器 每6秒执行一次,是固定执行,没调用此方法,它也会执行,Spring一启动,它就会按照cron规则进行执行
@Scheduled(cron = “0/6 * * * * ?”)
@Service
public class AsyncService {
    @Async//异步方法注解    这俩注解都需在主方法开启
    @Scheduled(cron = "0/6 * * * * ?")//定时器 每6秒执行一次,是固定执行,没调用此方法,它也会执行,Spring一启动,它就会按照cron规则进行执行
    public void hello() {
        System.out.println("其他线程执行开始");
        try {
            Thread.sleep(3000);
        } catch (InterruptedException e) {
            e.printStackTrace();
        }
        System.out.println("执行完毕");

    }
}
主方法上开启异步与定时器
@EnableAsync//开启异步注解功能
@EnableScheduling//开启定时器注解功能
@SpringBootApplication
@EnableAsync//开启异步注解功能
@EnableScheduling//开启定时器注解功能
public class SpringBootDemoApplication {

    public static void main(String[] args) {
        SpringApplication.run(SpringBootDemoApplication.class, args);
    }

}
Controller调用
@RestController
public class TestController {
    @Autowired
    AsyncService async;

    @GetMapping("/hello")
    public String test() {
        async.hello();
        return "xi";
    }
}
Email邮件发送
mail启动依赖
      <!--mail启动器-->
        <!-- https://mvnrepository.com/artifact/org.springframework.boot/spring-boot-starter-mail -->
        <dependency>
            <groupId>org.springframework.boot</groupId>
            <artifactId>spring-boot-starter-mail</artifactId>
        </dependency>
Spring Boot 发送邮件实战全解析
https://felord.blog.csdn.net/article/details/103998078
qq邮箱配置
# 需要开启 smtp
spring.mail.host=smtp.qq.com
#spring.mail.port=465
# 发件人的邮箱
spring.mail.username=1575197002@qq.com
# qq 邮箱的第三方授权码 并非个人密码
spring.mail.password=qtuqzswmnuahgjgd
#开启ssl 否则 503 错误
spring.mail.properties.mail.smtp.ssl.enable=true
测试
@SpringBootTest
class SpringBoootEmailApplicationTests {


    @Autowired
    private JavaMailSender sender;
    @Value("${spring.mail.username}")//将配置文件中的username通过@vaule赋给它
    private String fromUser;

    @Test
    void contextLoads() {
        //一个简单的邮件
        SimpleMailMessage mailMessage = new SimpleMailMessage();
        //邮件标题
        mailMessage.setSubject("祝你生日快乐");
        //文本,邮件主体
        mailMessage.setText("今晚六点聚一聚");
        //收件人的邮箱地址
        mailMessage.setTo("2037336608@qq.com");
        //发送人的邮箱地址
        mailMessage.setFrom(fromUser);
        //发送
        sender.send(mailMessage);
    }

    //复杂的邮件,可以发送附件
    @Test
    void test() throws MessagingException {
        MimeMessage mimeMessage = sender.createMimeMessage();
        MimeMessageHelper helper = new MimeMessageHelper(mimeMessage, true);
        helper.setSubject("通知-明天来狂神这听课");
        helper.setText("<b style='color:red'>今天 7:30来开会</b>", true);

        //发送附件
        helper.addAttachment("杀死那个石家庄人.mp3", new File("D:\\音乐\\杀死那个石家庄人.mp3"));//这里文件名要带上后缀
        helper.addAttachment("小丑.jpeg", new File("D:\\音乐\\小丑.jpeg"));

        helper.setTo("2037336608@qq.com");
        helper.setFrom(fromUser);
        sender.send(mimeMessage);

    }

}
//发送人的邮箱地址
    mailMessage.setFrom(fromUser);
    //发送
    sender.send(mailMessage);
}

//复杂的邮件,可以发送附件
@Test
void test() throws MessagingException {
    MimeMessage mimeMessage = sender.createMimeMessage();
    MimeMessageHelper helper = new MimeMessageHelper(mimeMessage, true);
    helper.setSubject("通知-明天来狂神这听课");
    helper.setText("<b style='color:red'>今天 7:30来开会</b>", true);

    //发送附件
    helper.addAttachment("杀死那个石家庄人.mp3", new File("D:\\音乐\\杀死那个石家庄人.mp3"));//这里文件名要带上后缀
    helper.addAttachment("小丑.jpeg", new File("D:\\音乐\\小丑.jpeg"));

    helper.setTo("2037336608@qq.com");
    helper.setFrom(fromUser);
    sender.send(mimeMessage);

}
}


 328
328


 被折叠的 条评论
为什么被折叠?
被折叠的 条评论
为什么被折叠?
 到【灌水乐园】发言


