


前言
- 官网地址:Vue.js - 渐进式 JavaScript 框架 | Vue.js (vuejs.org)
- 下面只讲
Vue3与Vue2有差异的地方,一些相同的地方我会忽略或者一笔带过- 与
Vue3一同出来的还有Vite,但是现在不使用它,等以后会有单独的教程使用。目前仍旧使用vue-cli创建vue3项目Vue3有两种代码编写形式。下面演示主要使用第二种
- 一种是和
vue2相仿的选项式API写法- 另一种是
组合式API的写法。- 具体两种代码编写的区别与优缺点,可以自行去官网查看。
vue3版本向下兼容。所以Vue2的写法依旧可以继续使用,不过只能搭配第一种选项是API的写法一同使用。
1、基础
1、初始化Vue
- 使用
vue-cli创建好项目后,打开main.js文件,可以看到和vue2的区别。vue3中使用起来更加语义明显,并且不需要使用new Vue那么笨重的构造函数,而是封装好了需要的函数,只把这些函数提供给我们。
1.1、vue2中
import Vue from 'vue'
import App from './App.vue'
import router from './router'
import store from './store'


new Vue({
  router,
  store,
  render: h => h(App)
}).$mount('#app')
1.2、vue3中
import { createApp } from 'vue'
import App from './App.vue'
import router from './router'
import store from './store'

createApp(App).use(store).use(router).mount('#app')
打印下
createApp()函数返给我们的内容看看,可以看到几个常用的函数

2、生命周期
vue2中,组件挂载会执行mounted钩子函数,对应的卸载,会使用beforeDestroy、destroyed钩子函数。vue3中,其他钩子函数依旧不变,包括挂载mounted,但是,卸载改为了beforeUnmounted、unmounted。
3、模板语法
- 模板语法中
v-model、v-bind、v-on等,包括其对应的简写形式,都没有改变。- 唯一的区别就是,标签
template中,不再强制必须有一个外层标签嵌套里面所有内容了。
3.1、vue2中
<template>
  <!-- 模板中,只能有一个主标签,如果有两个,则会报错 -->
  <div>
    <h1>HomeView</h1>
    <!-- ... -->
  </div>
</template>
3.2、vue3中
<template>
  <!-- 不强制必须有外层的主标签了 -->
  <h1>HomeView</h1>
  <!-- ... -->
</template>
4、响应式基础(重要)
vue2中,响应式数据全部存放到data函数中。vue3中,也可以使用vue2的方式,不过我们使用的是组合式API,就不能那么写了。- 根据数据类型可以分为两种方式
- ref(xxx):可以将所有类型的数据定义为响应式、基础类型,以及对象。不过在js中访问数据需要添加
.value。返回的值为RefImpl对象- reactive(xxx):只能将对象\数组类型数据转为响应式。但是在js中访问数据不需要添加
.value- 其实ref函数中,会根据参数数据类型进行判断,如果是对象,其内部还是使用的
reactive将对象转为响应式,不过会将转换完的数据,封装起来,外面包一层。
4.1、基本数据类型(ref)
代码
<template>
  <!-- 在模板中使用的话,则不需要.value,vue自动执行 -->
  <h2>checkbox的值:{{ flag }}</h2>
  <input type="checkbox" v-model="flag">


  <h2>input的值:{{ str }}</h2>
  <input type="text" v-model="str">
</template>

<!-- 组合式API,只需要在script标签上,使用 setup 即可 -->
<script setup>
  // 使用什么,就导入什么
  import { ref } from "vue";

  // 此时,flag就是一个响应式对象
  const flag = ref(true);
  // 访问的是包装以后的对象,并不是真正的值,需要.value才能获取到真正的值
  console.log("flag", flag);

  const str = ref("123");
  /* 真正的str的值 */
  console.log("str", str.value);
</script>
效果

4.2、对象类型(ref)
代码
<template>
  <button @click="changeAge">姓名+1</button>
  <h2>姓名:</h2>{{ user.name}}
  <h2>年龄:</h2>{{ user.age}}
</template>

<script setup>
  import { ref } from "vue";

  const user = ref(
    {
      name: "张三",
      age: 18
    }
  )
  // Proxy对象
  console.log("user", user.value);


  function changeAge() {
    // 必须要使用.value,才能获取到对象
    user.value.age++;
  }
</script>
效果

4.3、对象类型(reactive)
代码
<template>
  <button @click="changeAge">姓名+1</button>
  <h2>姓名:</h2>{{ user.name}}
  <h2>年龄:</h2>{{ user.age}}
</template>

<script setup>
  import { ref, reactive } from "vue";

  const user = reactive(
    {
      name: "张三",
      age: 18
    }
  )
  // 还是Proxy对象
  console.log("user", user);


  function changeAge() {
    // 不用使用.value,就可以获取到对象
    user.age++;
  }
</script>
效果

5、响应式基础总结
- vue2中
- 不管是基本数据类型,还是对象类型,都会使用
Object.defineProperty的最后一个参数get、set方法,实现对数据的响应式。- 基本类型的数据,只能进行获取或者修改操作,实现起来毫无问题。
- 对象或数组,不仅有获取、修改操作,还可以动态的添加属性,或者删除属性等操作,这种操作使用
Object.defineProperty是监听不到的。下面第5.1章有演示- 针对上面这种操作,vue提供了几种解决办法
Vue重新实现了数组的一系列函数,才实现数组的响应式。- 另外,
Vue还提供了$set(object,field,val),针对字面的动态添加对象属性/数组值的响应式- vue3中
- 现在ES6提出了
Proxy代理,使用代理,我们就可以监听到任何针对对象的操作。上面的问题才得以解决Vue3针对数组和对象,就采取了Proxy的方式,实现了对象数据响应式。不需要再使用$set等方法了。下面5.2章有演示- 针对上面演示,也可以发现,针对对象数据类型,返回的值为
Proxy类型的数据ref和reactive区别
- ref:将所有类型的数据转换为响应式对象。在
script使用时,需要.value访问,在模板语法中使用时则不需要。- reactive:只能将对象/数组类型数据转为响应式。在
script使用时,不需要.value访问,直接访问即可。- 建议:
- 不管是
对象/数组还是基本类型数据,都建议使用ref进行封装。详细请看为什么建议使用ref
5.1、vue2响应式失效演示
代码
<template>
  <div class="home">
    <button @click="addUserSex">添加用户性别-男</button>
    <button @click="addUserHobby">添加用户爱好-羽毛球</button>
    <h2>用户名:</h2>{{ user.name }}
    <h2>密码:</h2>{{ user.password }}
    <h2>性别:</h2>{{ user.sex }}
    <h2>爱好:</h2>{{ user.hobby }}
  </div>
</template>

<script>
export default {
  data() {
    return {
      user: {
        name: 'admin',
        password: '123456',
        hobby:[
          '篮球', '足球'
        ]
      }
    };
  },
  methods: {
    addUserSex() {
      this.user.sex = '男';
      console.log(this.user);
    },

    addUserHobby() {
      this.user.hobby[2] = '羽毛球';
      console.log(this.user);
    }
  },
};
</script>
效果

5.2、vue3相同赋值方式生效演示
代码
<template>
  <button @click="addUserSex">添加用户性别-男</button>
  <button @click="addUserHobby">添加用户爱好-羽毛球</button>
  <h2>用户名:</h2>{{ user.name }}
  <h2>密码:</h2>{{ user.password }}
  <h2>性别:</h2>{{ user.sex }}
  <h2>爱好:</h2>{{ user.hobby }}
</template>

<script setup>
  import { ref, reactive } from "vue";

  const user = reactive(
    {
      name: 'admin',
      password: '123456',
      hobby:[
        '篮球', '足球'
      ]
    }
  )
  // 还是Proxy对象
  console.log("user", user);


  function addUserSex() {
    user.sex = '男';
    console.log(user);
  }

  function addUserHobby() {
    user.hobby[2] = '羽毛球';
    console.log(user);
  }
</script>
效果

6、条件渲染与列表渲染
- 条件渲染依旧使用
v-if、v-else-if、v-else,目标组件必须相邻- 列表渲染也依旧使用
v-for="(item, index) in hobbys"。- 下面主要讲的是同时使用。其实vue是不建议同时使用的。
- 在
vue2中,v-if、v-for同时使用的话,v-for的优先级更高,v-if是可以拿v-for中的变量去动态判断的。- 在
vue3中,v-if、v-for同时使用的话,则相反了,v-if的优先级更高,意味着在v-if中,是拿不到item去判断的!
6.1、vue2中演示
代码
<template>
  <div class="home">
    <ul>
      <!-- 如果不是过滤不是打球的选项 -->
      <li v-for="item in hobby" :key="item" v-if="item != '打球'">{{ item }}</li>
    </ul>
  </div>
</template>

<script>
export default {
  data() {
    return {
      hobby:[
        '篮球', '足球', '排球', '打球'
      ]
    };
  },
};
</script>
效果

6.2、vue3中演示
代码
<template>
  <ul>
      <!-- 如果不是过滤不是打球的选项 -->
      <li v-for="item in hobby" :key="item" v-if="item != '打球'">{{ item }}</li>
  <ul>
</template>

<script setup>
  import { ref, reactive } from "vue";

  const hobby = reactive(
    [
      '篮球', '足球', '排球', '打球'
    ]
  )
</script>
效果

7、模板引用
- 在vue2中,我们给dom标签上使用
ref="xxx",然后在js中,使用this.$refs.xxx获取绑定的dom元素。- 在vue3中,我们需要在
script中,定义和ref绑定的同名的变量(ref响应式函数返回),vue即可自动绑定上。
7.1、vue2中
代码
<template>
  <div class="home">
  <button @click="focusInput">激活光标</button>
    <input type="text" ref="input">
  </div>
</template>

<script>
export default {
  methods: {
    focusInput() {
      console.log(this.$refs.input);
      this.$refs.input.focus();
    }
  }
};
</script>
效果

7.3、vue3中
代码
<template>
  <button @click="focusInput">激活光标</button>
  <input type="text" ref="input">
</template>

<script setup>
  import { ref, reactive } from "vue";

  // 变量名必须与dom标签中ref绑定的变量一致 参数不管写不写,值都是ref绑定的dom。且必须放到script中,不能放到函数中
  const input = ref();
  console.log("input", input);

  function focusInput() {
    input.value.focus();
  }
</script>
效果

8、计算属性
vue2中,我们使用的是选项式API(computed{})定义,此时它是一个对象。vue3中,我们使用的是vue提供的computed()函数定义,此时它是一个函数,并且没有参数。
- 如果参数使用的是函数的话,那么默认是
get方法- 如果参数是一个对象的话,那么可以单独定义
get、set方法
8.1、vue2中
代码
<template>
  <div class="home">
    <button @click="changeVal">val值+1</button>
    <h2>val值:</h2>{{ val }}
    <h2>val是否为偶数:</h2>{{ flag }}
  </div>
</template>

<script>
export default {
  computed: {
    flag() {
      return this.val % 2 == 0;
    }
  },
  data() {
    return {
      val: 1,
    }
  },
  methods: {
    changeVal() {
      this.val++;
    }
  }
};
</script>
效果

8.2、vue3中
代码
<template>
  <button @click="changeVal">val值+1</button>
  <h2>val值:</h2>{{ val }}
  <h2>val是否为偶数:</h2>{{ flag }}
</template>

<script setup>
  import { ref, reactive, computed } from "vue";

  const val = ref(1);

  const flag = computed(() => {
    // 记得使用.value
    return val.value % 2 == 0;
  })

  function changeVal() {
    val.value++;
  }
</script>
效果

9、侦听器-watch
- 监听按数量可以分为两类:
单个数据监听、多个数据监听- 按监听的数据类型分类可以分为四类:
基本数据类型、对象、对象基本属性、对象中对象/数组属性- 注意:如果监听由reactive创建出来的对象的话,不需要什么配置,默认就是深度监听。如果是ref创建出来的对象的话,需要手动打开
deep:true配置- 监听对象的话,
newValue和oldValue的值相同
9.1、语法
watch(被监听的双向绑定的数据, 数据改变的回调, 配置)
9.2、监听基本数据类型
代码
<template>
  <button @click="changeVal">val值+1</button>
  <h2>val值:</h2>{{ val }}
</template>

<script setup>
  import { ref, reactive, computed, watch } from "vue";

  const val = ref(1);

  watch(val, (newVal, oldVal) => {
    console.log("val的值改变了", newVal, oldVal);
  })

  function changeVal() {
    val.value++;
  }
</script>
效果

9.3、监听对象
- 默认是深度监听
- 如果想监听整个user改变的话,就不能使用
reactive了,要使用ref,然后修改user.value = ...即可监听到
代码
<template>
  <button @click="changeAge">用户年龄+1</button>

  <h2>用户名</h2>{{ user.name }}
  <h2>用户年龄</h2>{{ user.age }}
</template>

<script setup>
  import { ref, reactive, computed, watch } from "vue";

  let user = reactive({
    name: "张三",
    age: 18
  })

  // 只有由reactive创建出来的对象,才不需要手动开启deep配置,默认深度监听
  watch(user, (newVal, oldVal) => {
    console.log("user的值改变了", newVal, oldVal);
  })


  function changeAge() {
    user.age++;
  }
</script>
效果

9.4、监听对象中基本属性
监听对象中的属性,要提供一个
get函数才可以
代码
<template>
  <button @click="changeAge">用户年龄+1</button>

  <h2>用户名</h2>{{ user.name }}
  <h2>用户年龄</h2>{{ user.age }}
</template>

<script setup>
  import { ref, reactive, computed, watch } from "vue";

  let user = reactive({
    name: "张三",
    age: 18
  })

  // 参数1为get函数
  watch(() => user.age, (newVal, oldVal) => {
    console.log("userAge的值改变了", newVal, oldVal);
  })


  // 错误,因为得到的是一个基本数据类型number。如果监听的是user中的对象/数组的话,则这么写
  //watch(user.age, (newVal, oldVal) => {
  //  console.log("userAge的值改变了", newVal, oldVal);
  //})


  function changeAge() {
    user.age++;
  }
</script>
效果

9.5、监听对象中对象/数组
代码
<template>
  <button @click="changeAge">用户年龄+1</button>
  <button @click="changeHobby">修改用户爱好</button>
  <button @click="changeAddress">修改用户地址</button>


  <h2>用户名</h2>{{ user.name }}
  <h2>用户年龄</h2>{{ user.age }}
  <h2>爱好</h2>{{ user.hobbys }}
</template>

<script setup>
  import { ref, reactive, computed, watch } from "vue";

  let user = reactive({
    name: "张三",
    age: 18,
    hobbys: ["吃饭", "睡觉", "打豆豆"],
    address: {
      province: "浙江省",
      city: "杭州市",
      county: "西湖区"
    }
  })

  // 不需要get函数了
  watch(user.hobbys, (newValue, oldValue) => {
    console.log("爱好改变了", newValue, oldValue);
  })

  // 不需要get函数了
  watch(user.address, (newValue, oldValue) => {
    console.log("地址改变了", newValue, oldValue);
  })

  function changeHobby() {
    user.hobbys.push("打游戏");
  }

  function changeAge() {
    user.age++;
  }

function changeAddress() {
  user.address.city = "温州市";
}
</script>
效果

9.6、监听配置
- 与
vue2一样,同样有两个配置immediate、deep。- 如果监听的是由reactive创建出来的对象的话,deep失效,默认深度监听。如果是由ref创建出来的对象的话,则需要手动开启
deep配置
代码
watch(user, (newVal, oldVal) => {
    console.log("user的值改变了", newVal, oldVal);
}, {
    immediate: true, // 立即执行
    deep: true // 深度监听
})
10、侦听器-watchEffect
watchEffect和计算属性差不多,不用显式的声明监视哪个属性,它会自动收集函数中用到的响应式数据,如果响应式数据改变了,就会自动执行- 如果你想监听一个对象中的多个属性的话,使用
watchEffect会更好,因为它只会监听函数中用到的属性,而不是整个对象中的所有属性- 如果函数里面有数组类型的数据,则监听不到整个数组的变化,只能监听某一个下标值的变化
- 刚加载出来的时候,会执行一次,相当于默认
immediate: true
10.1、代码
<template>
  <button @click="changeAge">用户年龄+1</button>
  <button @click="changeAddress">修改用户地址</button>
  <button @click="changeHobbys">修改用户爱好</button>


  <h2>用户名</h2>{{ user.name }}
  <h2>用户年龄</h2>{{ user.age }}
  <h2>爱好</h2>{{ user.hobbys }}
</template>

<script setup>
  import { ref, reactive, computed, watch, watchEffect } from "vue";

  let user = reactive({
    name: "张三",
    age: 18,
    hobbys: ["吃饭", "睡觉", "打豆豆"],
    address: {
      province: "浙江省",
      city: "杭州市",
      county: "西湖区"
    }
  })


  /* 没有新旧值的参数 */
  watchEffect((aaa) => {
    console.log("userAge可能改变了", user.age);
    console.log("userHobby可能改变了", user.hobbys[0]);
    // console.log("userHobby可能改变了", user.hobbys); 监听失效
    console.log("userAddress可能改变了", user.address.city);
  })

  function changeHobbys() {
    user.hobbys[0] = "打游戏";
  }

  function changeAge() {
    user.age++;
  }

function changeAddress() {
  user.address.city = "温州市";
}
</script>
10.2、效果

11、侦听器总结
- 参考官网:侦听器 | Vue.js (vuejs.org)
- 取消侦听器:
watch、watchEffect都会返回一个取消当前侦听器的函数,调用函数即可取消侦听。- watch
- 可以直接对双向绑定的基本类型数据进行监听。
- 如果监听由reactive创建出来的对象,则默认是深度监听,ref创建出来的话,需要手动开启深度监听配置。并且
newValue和oldValue的值相同。- 如果监听对象里面的基本属性,则第一个参数需要传入那个属性的一个get函数。
- 如果监听对象里的的对象/数组,则第一个参数直接使用
对象.属性即可,不需要封装为get函数- watchEffect
- 不需要指明被监听的对象,函数里用到的响应式数据,会自动被监听到。
- 非常适合对象里的多个属性被监听都会执行同一段逻辑的时候。
- 如果函数里用到数组的话,则只会在函数内指明数组下标获取数据时,对应下标数据发生变化才会被监听到。监听数组还是建议使用
watch监听
2、深入组件
1、组件注册
1.1、全局注册
方法一
import { createApp } from 'vue'
import App from './App.vue'


createApp(App)
.use(ElementPlus)
.component('MyButton2', {
    // 组件实现。。。
})
.mount('#app')
方法二
import { createApp } from 'vue'
import App from './App.vue'
// 全局导入
import MyButton2 from '@/components/MyButton2';


createApp(App)
.component('MyButton2', MyButton2)
.mount('#app')
方法三
import { createApp } from 'vue'
import App from './App.vue'
// 全局导入
import MyButton2 from '@/components/MyButton2';
import MyButton3 from '@/components/MyButton3';

createApp(App)
.component('MyButton2', MyButton2) // 链式导入
.component('MyButton3', MyButton3)
.mount('#app')
1.2、局部注册
- 无需像
vue2一样,需要导入->注册了。直接导入即可使用
<template>
  <!-- 局部导入 -->
  <MyButton></MyButton>
  <!-- 全局组件 -->
  <MyButton2></MyButton2>
</template>

<script setup>
  import { ref, reactive, nextTick } from 'vue';
  import MyButton from '@/components/MyButton.vue';


</script>
2、props
- 在使用
<script setup>的单文件组件中,props 可以使用defineProps()宏来声明
2.1、语法
// 语法一
const prop = defineProps(['defaultColor'])
console.log(prop.defaultColor);

// 语法二:带有类型校验和默认值
const prop = defineProps({
    defaultColor: {
      type: String,
      default:'red'
    }
  })

console.log(prop);
2.2、案例
<template>
  <div class="myButton">
    <button @click="changeColor" :style="{backgroundColor: btnBgcColor}">点我改变按钮颜色(局部导入)</button>
  </div>
</template>

<script setup>
  import { ref } from 'vue'

  const prop = defineProps({
    defaultColor: {
      type: String,
      default:'red'
    }
  })

  console.log(prop);

  // 获取父组件传入的参数
  const btnBgcColor = ref(prop.defaultColor);


  function changeColor() {
    btnBgcColor.value = randomColor();
  }

  function randomColor() {
    return '#' + Math.random().toString(16).slice(2, 8).padEnd(6, '0');
  }

</script>

<style scoped lang="scss">
.myButton {
  button {
    padding: 5px 10px;
    border-radius: 5px;
  }
}
</style>
3、事件
总共分为两种写法
- 在模板中直接调用,使用
$emit(xxxx)即可,和vue2使用方法一致。- 在
script中调用,需要先在defineEmits([xxx,xxx])中声明,然后下面使用这个函数的返回值进行调用。
- 可以对函数参数进行校验,校验失败则会在控制台提示警告,但不阻碍父组件函数执行
调用的时候,不管是模板中使用
$emit,还是script中使用emit,第一个参数永远是绑定在组件上的方法属性名,后面所有参数为调用这个方法的参数
3.1、直接在模板中调用
<!-- 子组件 -->
<template>
  <div class="myButton">
    <!-- 直接使用$emit,调用预期绑定的函数即可 -->
    <button @click="$emit('myButtonClick')">点我执行方法</button>
  </div>
</template>


<!-- 父组件 -->
<template>
  <MyButton @myButtonClick="handleBtnFun"></MyButton>
</template>

<script setup>
  import MyButton from '@/components/MyButton.vue';

  // 点击 MyButton 组件中的按钮,将会执行这个方法
  function handleBtnFun() {
    alert('按钮被点击了');
  }

</script>
3.2、在script中调用
<!-- 父组件不变,所以省略 -->


<!-- 子组件 -->
<template>
  <div class="myButton">
    <button @click="handleBtnFun">点我执行方法</button>
  </div>
</template>

<script setup>
  // 需要先声明接受的函数
  /*
    如果这里没有声明,下面直接调用,那么控制台会警告
    [Vue warn]: Component emitted event "myButtonClick1" but it is neither declared in the emits option 	nor as an "onMyButtonClick1" prop.
  */
  const emit = defineEmits(['myButtonClick'])

  function handleBtnFun() {
    emit('myButtonClick')
  }

</script>
3.3、defineEmits校验参数
- 校验成功返回
true,失败则返回false- 如果校验失败,那么会在控制台打印警告信息,但是并不会阻碍父组件函数执行
代码
<!-- 子组件 -->
<template>
  <div class="myButton">
    <button @click="handleBtnFun">点我执行方法</button>
  </div>
</template>

<script setup>
  // 需要先声明接受的函数
  /*
    如果这里没有声明,下面直接调用,那么控制台会警告
    [Vue warn]: Component emitted event "myButtonClick1" but it is neither declared in the emits option nor as an "onMyButtonClick1" prop.
  */
  const emit = defineEmits({
    myButtonClick: data => {
      console.log(data);
      // 判断参数是否小于 0.5 如果小于,则警告,但是并不影响执行父组件绑定的方法
      if(data < 0.5) {
        console.warn('data < 0.5');
        return false;
      }

      return true;
    }
  })

  function handleBtnFun() {
    emit('myButtonClick', Math.random())
  }

</script>


<!-- 父组件 -->
<template>
  <!-- 局部导入 -->
  <MyButton defaultColor="pink" @myButtonClick="handleBtnFun"></MyButton>
</template>

<script setup>
  import MyButton from '@/components/MyButton.vue';

  function handleBtnFun(data) {
    alert('按钮被点击了', data);
  }

</script>
效果

4、组件v-model
v-model其实就是歌语法糖,原本需要在组件上写一个动态属性(赋值),以及绑定一个修改函数(该值)。现在只需要写一个v-model即可。
- vue2中
- 将内部原生
<input>元素的valueattribute 绑定到valueprop- 当原生的
input事件触发时,触发一个携带了新值的input自定义事件- vue3中
- 将内部原生
<input>元素的valueattribute 绑定到modelValueprop- 当原生的
input事件触发时,触发一个携带了新值的update:modelValue自定义事件- 这个
modelValue的名字是可以自行修改的,下面v-model的参数会讲到(用于处理组件内有多个双向绑定表单框的情况)。
4.1、案例一(通用)
子组件
<template>
  <input type="text" :value="modelValue" @input="$emit('update:modelValue', $event.target.value)">
</template>
<script setup>
const { modelValue } = defineProps(['modelValue'])

console.log(modelValue);

</script>
父组件
<template>
  <!-- 局部导入 -->
  <MyInput v-model="value"></MyInput>
</template>

<script setup>
  import { ref } from 'vue';
  import MyInput from '@/components/MyInput.vue';

  const value = ref('');

</script>
4.2、案例二(使用computed)
父组件不变,所以省略不写
子组件
<template>
  <input type="text" v-model="value">
</template>
<script setup>
import { computed } from 'vue';

const props = defineProps(['modelValue'])
const emit = defineEmits(['update:modelValue'])

const value = computed({
  get() {
    return props.modelValue
  },
  set(val) {
    emit('update:modelValue', val)
  }
})

</script>
4.3、修改默认绑定的modelValue属性名
- vue2中
- 默认绑定的属性名为
value,并且无法修改- vue3中
- 提供了给
v-model提供参数的写法,可以修改绑定的属性名v-model:xxx="value"
父组件
<template>
  <!-- 将v-model 默认绑定的modelValue属性名 改为abc -->
  <MyInput v-model:abc="value"></MyInput>
</template>

<script setup>
  import { ref, reactive, nextTick } from 'vue';
  import MyInput from '@/components/MyInput.vue';

  const value = ref('');

</script>
子组件
<template>
  <input type="text" :value="abc" @input="$emit('update:abc', $event.target.value)">
</template>
<script setup>
const { abc } = defineProps(['abc'])

</script>
4.4、处理组件多v-model情况(使用4.3方法)
- 有了上面修改属性名的方法,那么我们给组件中每个input绑定单独的属性名即可
父组件
<template>
  <!-- 局部导入 -->
  <MyInput v-model:value1="value1" v-model:value2="value2"></MyInput>
</template>

<script setup>
  import { ref, reactive, nextTick } from 'vue';
  import MyInput from '@/components/MyInput.vue';

  const value1 = ref('');
  const value2 = ref('');

</script>
子组件
<template>
  <input type="text" :value="value1" @input="$emit('update:value1', $event.target.value)">
  <br>
  <br>
  <input type="text" :value="value2" @input="$emit('update:value2', $event.target.value)">
</template>
<script setup>
const { value1, value2 } = defineProps(['value1', 'value2'])

</script>
效果

4.5、组件内单独处理v-model修饰符
v-model已经自带了一些修饰符,像.number、.lazy、.trim等,vue2是无法自定义修饰符的。- 在
vue3中,你可以在组件中接收v-model的修饰符,并做出一些单独的处理,不过只能针对你当前组件,并不是全局的。- 在子组件中,可以在
defineProps中多接收一个参数modelModifiers,来接收所有绑定在v-model上的修饰符modelModifiers是个对象,如果传入修饰符xxx,那么xxx对应的值则是true- 最好在接收
modelModifiers的时候,赋一个默认值为{}。- 下面演示将
v-model的首字母转为大写的案例
父组件
<template>
  <!-- 局部导入 -->
  <MyInput v-model.capitalize="value"></MyInput>
</template>

<script setup>
  import { ref, reactive, nextTick } from 'vue';
  import MyInput from '@/components/MyInput.vue';

  const value = ref('');

</script>
子组件
<template>
  <input type="text" :value="modelValue" @input="emitValue">
</template>
<script setup>
const emit = defineEmits(['update:modelValue'])
const { modelValue, modelModifiers } = defineProps({
  modelModifiers: {
    type: Object,
    default: () => ({})
  },
  modelValue: {
    type: String,
    default: ''
  }
})

console.log("modelModifiers", modelModifiers.capitalize); // true

// input 修改事件,将首字母转为大写
function emitValue(el) {
  let val = el.target.value;

  if(modelModifiers.capitalize) {
    // 将modelValue首字母大写
    val = val.charAt(0).toUpperCase() + val.slice(1);
  }

  emit('update:modelValue', val)
}
</script>
效果

4.6、处理带参数(修改默认绑定属性名)并且带修饰符的情况
- 对于又有参数又有修饰符的
v-model绑定,生成的 prop 名将是arg + "Modifiers"- 不管是一个
v-model还是多个,都是上面这个规则。
父组件
<template>
  <!-- 局部导入 -->
  <MyInput v-model:abc.capitalize="value"></MyInput>
</template>

<script setup>
  import { ref, reactive, nextTick } from 'vue';
  import MyInput from '@/components/MyInput.vue';

  const value = ref('');

</script>
子组件
<template>
  <input type="text" :value="abc" @input="emitValue">
</template>
<script setup>
const emit = defineEmits(['update:abc'])
const { abc, abcModifiers } = defineProps({
  abcModifiers: {
    type: Object,
    default: () => ({})
  },
  abc: {
    type: String,
    default: ''
  }
})

console.log("abcModifiers", abcModifiers.capitalize); // true

// input 修改事件,将首字母转为大写
function emitValue(el) {
  let val = el.target.value;

  if(abcModifiers.capitalize) {
    // 将modelValue首字母大写
    val = val.charAt(0).toUpperCase() + val.slice(1);
  }

  emit('update:abc', val)
}
</script>
效果

5、透传Attributes
5.1、举例透传
- 如果父组件上绑定了
@click事件,那么就相当于在子组件的button上绑定了@click事件。事件接收到的$event.target实际上指向的就是button元素
子组件
<template>
  <button>测试按钮</button>
</template>

<script setup>

</script>

<style scoped lang="scss">
  button {
    padding: 5px 10px;
    border-radius: 5px;
  }
</style>
父组件
<template>
  <!-- 局部导入 -->
  <MyButton class="myButton2"></MyButton>
</template>

<script setup>
  import MyButton from '@/components/MyButton.vue';
</script>
实际渲染效果

5.2、举例透传合并
- 不仅针对
class、style,对于v-on绑定的事件也是如此,如果在组件上绑定了@click事件,子组件的button上也绑定了@click事件,则子组件的事件(先)和父组件上绑定的事件(后)则会同时触发。
子组件
<template>
  <button class="myButton">测试按钮</button>
</template>

<script setup>

</script>

<style scoped lang="scss">
  button {
    padding: 5px 10px;
    border-radius: 5px;
  }
</style>
父组件
<template>
  <!-- 局部导入 -->
  <MyButton class="myButton2"></MyButton>
</template>

<script setup>
  import MyButton from '@/components/MyButton.vue';
</script>
实际渲染效果

5.3、深层组件继承
- 如果子组件的根节点是孙子组件,并且子组件中并没有使用
props接收(消费),那么class、style、@click等,会直接透传到孙子组件上,下面只演示class透传
父组件
<template>
  <!-- 局部导入 -->
  <MyButton class="testClass" @click="handleBtnClick"></MyButton>
</template>

<script setup>
  import { ref } from 'vue';
  import MyButton from '@/components/MyButton.vue';

  function handleBtnClick(el) {
    // 指向 Mybutton2里的button
    console.log('handleBtnClick', el.target);
  }

</script>
子组件
<template>
  <MyButton2 class="myButton">测试按钮</MyButton2>
</template>

<script setup>
import MyButton2 from '@/components/MyButton2';
</script>

<style scoped lang="scss">
  button {
    padding: 5px 10px;
    border-radius: 5px;
  }
</style>
孙子组件
<template>
  <button class="mubutton2">测试按钮2</button>
</template>

<script setup>
  import { ref } from 'vue'

</script>

<style scoped lang="scss">
  button {
    padding: 5px 10px;
    border-radius: 5px;
  }
</style>
实际渲染效果

5.4、禁用Attributes继承
- 如果你不想要一个组件自动地继承 attribute,你可以在组件选项中设置
inheritAttrs: false- 从 3.3 开始你也可以直接在
<script setup>中使用defineOptions- 最常见的需要禁用 attribute 继承的场景就是 attribute 需要应用在根节点以外的其他元素上。通过设置
inheritAttrs选项为false,你可以完全控制透传进来的 attribute 被如何使用- 这些透传进来的 attribute 可以在模板的表达式中直接用
$attrs访问到- 这个
$attrs对象包含了除组件所声明的props和emits之外的所有其他 attribute,例如class,style,v-on监听器等等- 有几点需要注意:
- 和 props 有所不同,透传 attributes 在 JavaScript 中保留了它们原始的大小写,所以像
foo-bar这样的一个 attribute 需要通过$attrs['foo-bar']来访问。- 像
@click这样的一个v-on事件监听器将在此对象下被暴露为一个函数$attrs.onClick。
父组件
<template>
  <!-- 局部导入 -->
  <MyButton class="testClass" my-attr="aaa" @click="handleBtnClick"></MyButton>
</template>

<script setup>
  import { ref } from 'vue';
  import MyButton from '@/components/MyButton.vue';

  function handleBtnClick(el) {
    // 指向 Mybutton里的button
    console.log('handleBtnClick', el.target);
  }
</script>
子组件
<template>
  <div class="mybutton">
    <span>{{ logAttrs($attrs) }}</span>
    <br>
    <button class="btn" v-bind="$attrs">测试按钮</button>
  </div>
</template>

<script setup>

// 阻止属性透传
defineOptions({
  inheritAttrs: false
})

function logAttrs(attrs) {
  console.log("logAttrs", attrs);
  return attrs;
}
</script>

<style scoped lang="scss">
  button {
    padding: 5px 10px;
    border-radius: 5px;
  }
</style>
效果

5.5、多根节点的Attributes的继承
- 和单根节点组件有所不同,有着多个根节点的组件没有自动 attribute 透传行为。如果
$attrs没有被显式绑定,将会抛出一个运行时警告
子组件
<template>
  <button class="btn">测试按钮</button>
  <br>
  <button class="btn2">测试按钮</button>
</template>

<script setup>

</script>

<style scoped lang="scss">
  button {
    padding: 5px 10px;
    border-radius: 5px;
  }
</style>
效果

5.6、在JS中访问透传的Attributes
- 如果需要,你可以在
<script setup>中使用useAttrs()API 来访问一个组件的所有透传 attribute- 需要注意的是,虽然这里的
attrs对象总是反映为最新的透传 attribute,但它并不是响应式的 (考虑到性能因素)。你不能通过侦听器去监听它的变化。- 如果你需要响应性,可以使用 prop。或者你也可以使用
onUpdated()使得在每次更新时结合最新的attrs执行副作用。
子组件
<template>
  <div class="mybutton">
    <button class="btn" v-bind="$attrs">测试按钮</button>
  </div>
</template>

<script setup>
import { useAttrs } from 'vue'

// 阻止属性透传
defineOptions({
  inheritAttrs: false
})

console.log(useAttrs());

</script>

<style scoped lang="scss">
  button {
    padding: 5px 10px;
    border-radius: 5px;
  }
</style>
效果

6、插槽
- 插槽看
vue3官方教程和vue2官方教程用法基本一致。- 但是
vue3教程中并没有提示在模板中、JS中怎样获取父组件传过来的插槽。- 其实和上面透传
Attributes一致
- 在
template中,使用$slots即可获取所有传过来的插槽。- 在
JS中,使用useSlots即可获取所有传过来的插槽
6.1、父组件
<template>
  <!-- 局部导入 -->
  <MyButton>
    <template #default>
      <h2>default</h2>
    </template>

    <template #slot2>
      <h2>slot2</h2>
    </template>

    <template #slot3>
      <h2>slot3</h2>
    </template>
  </MyButton>
</template>

<script setup>
  import MyButton from '@/components/MyButton.vue';
</script>
6.2、子组件
<template>
  <div class="mybutton">
    <span>{{ logSlots($slots) }}</span>
    <slot name="default"></slot>
    <slot name="slot2"></slot>
    <slot name="slot3"></slot>
  </div>
</template>

<script setup>
import { useSlots } from 'vue'


function logSlots(slots) {
  console.log("logSlots", slots);
  return slots;
}

console.log("useSlots", useSlots());

</script>

<style scoped lang="scss">
  button {
    padding: 5px 10px;
    border-radius: 5px;
  }
</style>
6.3、效果

7、依赖注入(provide/inject)
provide和inject一个父组件相对于其所有的后代组件,会作为依赖提供者。任何后代的组件树,无论层级有多深,都可以注入由父组件提供给整条链路的依赖。

provide和inject的功能我就不多介绍了,vue2中也有,下面主要演示api如何使用
7.1、provide写法
provide()函数接收两个参数。
- 第一个参数被称为注入名,可以是一个字符串或是一个
Symbol。后代组件会用注入名来查找期望注入的值。一个组件可以多次调用provide(),使用不同的注入名,注入不同的依赖值。- 第二个参数是提供的值,值可以是任意类型,包括响应式的状态,比如一个 ref
// 传入静态值
provide('test1', 'test1')

// 传入动态值
const test2 = ref(1);
provide('test2', test2);


// 传入事件
function handleTest2Change() {
    test2.value++;
}
provide('handleTest2Change', handleTest2Change);
7.2、全局provide
- 除了在一个组件中提供依赖,我们还可以在整个应用层面提供依赖
- 在应用级别提供的数据在该应用内的所有组件中都可以注入。这在你编写插件时会特别有用,因为插件一般都不会使用组件形式来提供值。
import { createApp } from 'vue'
import App from './App.vue'

createApp(App)
.provide('message', 'hello world!')
.mount('#app')
7.3、inject写法与演示
inject()接收三个参数
- 第一个参数是接收的注入名,可以是一个字符串或
Symble- 第二个参数是默认值,当接收不到的时候,默认值就会生效
- 第三个参数表示默认值应该被当作一个工厂函数
父组件
<template>
  <div class="homeView">
    <h2>父组件</h2>
    <MyButton></MyButton>
  </div>
</template>

<script setup>
  import { ref, provide } from 'vue';
  import MyButton from '@/components/MyButton.vue';

  // 传入静态值
  provide('test1', 'test1')

  // 传入动态值
  const test2 = ref(1);
  provide('test2', test2);


  // 传入事件
  function handleTest2Change() {
    test2.value++;
  }
  provide('handleTest2Change', handleTest2Change);

</script>

<style scoped lang="scss">
  .homeView {
    border: 1px solid red;
  }
</style>
子组件
<template>
  <div class="mybutton">
    <h2>子组件</h2>
    <h3>test1的值:{{ test1 }}</h3>
    <h3>test2的值:{{ test2 }}</h3>
    <h3>test3的值:{{ test3 }}</h3>
    <h3>全局message的值:{{ message }}</h3>
    <button @click="handleTest2Change">修改test2的值</button>
    <my-button2></my-button2>
  </div>
</template>

<script setup>
import { inject } from 'vue'
import MyButton2 from '@/components/MyButton2';

const test1 = inject('test1')

const test2 = inject('test2');

// 由于没有提供test3,所以会使用默认值:test3
const test3 = inject('test3', '使用默认值:test3');

// 全局message, 因为在main.js中使用app.provide()注入了message
const message = inject('message');

// 调用提供者的函数,修改提供者中的test2的值
const handleTest2Change = inject('handleTest2Change')


</script>

<style scoped lang="scss">
  .mybutton {
    border: 1px solid #000;
    margin: 10px;
  }
  button {
    padding: 5px 10px;
    border-radius: 5px;
  }
</style>
孙子组件
<template>
  <div class="myButton2">
    <h2>孙子组件</h2>
    <h2>子组件</h2>
    <h3>test1的值:{{ test1 }}</h3>
    <h3>test2的值:{{ test2 }}</h3>
    <h3>test3的值:{{ test3 }}</h3>
    <h3>全局message的值:{{ message }}</h3>
    <button @click="handleTest2Change">修改test2的值</button>
  </div>
</template>

<script setup>

import { ref, inject } from 'vue'

const test1 = inject('test1')

const test2 = inject('test2');

// 由于没有提供test3,所以会使用默认值:test3
const test3 = inject('test3', '使用默认值:test3');

// 全局message, 因为在main.js中使用app.provide()注入了message
const message = inject('message');

// 调用提供者的函数,修改提供者中的test2的值
const handleTest2Change = inject('handleTest2Change')

</script>

<style scoped lang="scss">
  .myButton2 {
    border: 1px solid pink;
    margin: 10px;
  }
  button {
    padding: 5px 10px;
    border-radius: 5px;
  }
</style>
效果

7.4、和响应式数据配合使用
- 当提供 / 注入响应式的数据时,建议尽可能将任何对响应式状态的变更都保持在供给方组件中。这样可以确保所提供状态的声明和变更操作都内聚在同一个组件内,使其更容易维护。
- 有的时候,我们可能需要在注入方组件中更改数据。在这种情况下,我们推荐在供给方组件内声明并提供一个更改数据的方法函数,像下面案例
- 最后,如果你想确保提供的数据不能被注入方的组件更改,你可以使用
readonly()来包装提供的值。- 以下案例,将上面案例进行优化修改
父组件
<template>
  <div class="homeView">
    <h2>父组件</h2>
    <MyButton></MyButton>
  </div>
</template>

<script setup>
  import { ref, provide, readonly } from 'vue';
  import MyButton from '@/components/MyButton.vue';

  provide('test1', readonly(ref('a')))

  // 传入动态值
  const test2 = ref(1);
  provide('test2', {
    test2: readonly(test2),
    handleTest2Change
  });


  // 传入事件
  function handleTest2Change() {
    test2.value++;
  }
</script>

<style scoped lang="scss">
  .homeView {
    border: 1px solid red;
  }
</style>
子组件
<template>
  <div class="mybutton">
    <h2>子组件</h2>
    <h3>test1的值:{{ test1 }}</h3>
    <h3>test2的值:{{ test2 }}</h3>
    <h3>test3的值:{{ test3 }}</h3>
    <h3>全局message的值:{{ message }}</h3>
    <!-- 子组件内直接修改值是 不可以的 -->
    <button @click="test1+='a'">修改test1的值</button>
    <button @click="handleTest2Change">修改test2的值</button>
    <my-button2></my-button2>
  </div>
</template>

<script setup>
import { inject } from 'vue'
import MyButton2 from '@/components/MyButton2';

const test1 = inject('test1')

const { test2, handleTest2Change } = inject('test2');

// 由于没有提供test3,所以会使用默认值:test3
const test3 = inject('test3', '使用默认值:test3');

// 全局message, 因为在main.js中使用app.provide()注入了message
const message = inject('message');

</script>

<style scoped lang="scss">
  .mybutton {
    border: 1px solid #000;
    margin: 10px;
  }
  button {
    padding: 5px 10px;
    border-radius: 5px;
  }
</style>
孙子组件
<template>
  <div class="myButton2">
    <h2>孙子组件</h2>
    <h2>子组件</h2>
    <h3>test1的值:{{ test1 }}</h3>
    <h3>test2的值:{{ test2 }}</h3>
    <h3>test3的值:{{ test3 }}</h3>
    <h3>全局message的值:{{ message }}</h3>
    <!-- 子组件内直接修改值是 不可以的 -->
    <button @click="test1+='a'">修改test1的值</button>
    <button @click="handleTest2Change">修改test2的值</button>
  </div>
</template>

<script setup>

import { ref, inject } from 'vue'

const test1 = inject('test1')

const { test2, handleTest2Change } = inject('test2');

// 由于没有提供test3,所以会使用默认值:test3
const test3 = inject('test3', '使用默认值:test3');

// 全局message, 因为在main.js中使用app.provide()注入了message
const message = inject('message');

</script>

<style scoped lang="scss">
  .myButton2 {
    border: 1px solid pink;
    margin: 10px;
  }
  button {
    padding: 5px 10px;
    border-radius: 5px;
  }
</style>
效果

7.5、使用Symbol作注入名
- 如果你正在构建大型的应用,包含非常多的依赖提供,或者你正在编写提供给其他开发者使用的组件库,建议最好使用
Symbol来作为注入名以避免潜在的冲突。- 通常推荐在一个单独的文件中导出这些注入名 Symbol
keys.js
export const test1Provide = Symbol('test1');

export const test2Provide = Symbol('test2');
父组件
// 省略html

<script setup>
  import { ref, provide, readonly } from 'vue';
  import { test1Provide, test2Provide } from '@/utils/keys.js';
  import MyButton from '@/components/MyButton.vue';

  provide(test1Provide, readonly(ref('a')))

  // 传入动态值
  const test2Val = ref(1);
  provide(test2Provide, {
    test2: readonly(test2Val),
    handleTest2Change
  });


  // 传入事件
  function handleTest2Change() {
    test2Val.value++;
  }
</script>

// 省略css
子组件
// 省略html...

<script setup>
import { inject } from 'vue'
import { test1Provide, test2Provide } from '@/utils/keys.js';

import MyButton2 from '@/components/MyButton2';

const test1 = inject(test1Provide)

const { test2, handleTest2Change } = inject(test2Provide);

// 由于没有提供test3,所以会使用默认值:test3
const test3 = inject('test3', '使用默认值:test3');

// 全局message, 因为在main.js中使用app.provide()注入了message
const message = inject('message');

</script>

// 省略css...
孙子组件
// 省略html...

<script setup>
import { ref, inject } from 'vue'
import { test1Provide, test2Provide } from '@/utils/keys.js';

const test1 = inject(test1Provide)

const { test2, handleTest2Change } = inject(test2Provide);

// 由于没有提供test3,所以会使用默认值:test3
const test3 = inject('test3', '使用默认值:test3');

// 全局message, 因为在main.js中使用app.provide()注入了message
const message = inject('message');

</script>

// 省略css...
效果

8、异步组件
- 在大型项目中,我们可能需要拆分应用为更小的块,并仅在需要时再从服务器加载相关组件
- Vue 提供了
defineAsyncComponent方法来实现此功能
8.1、语法
defineAsyncComponent方法接收一个返回 Promise 的加载函数。这个 Promise 的resolve回调方法应该在从服务器获得组件定义时调用。你也可以调用reject(reason)表明加载失败
import { defineAsyncComponent } from 'vue'

const AsyncComp = defineAsyncComponent(() => {
  return new Promise((resolve, reject) => {
    // ...从服务器获取组件
    resolve(/* 获取到的组件 */)
  })
})
// ... 像使用其他一般组件一样使用 `AsyncComp`
- ES 模块动态导入也会返回一个 Promise,所以多数情况下我们会将它和
defineAsyncComponent搭配使用- 最后得到的
AsyncComp是一个外层包装过的组件,仅在页面需要它渲染时才会调用加载内部实际组件的函数。- 它会将接收到的 props 和插槽传给内部组件,所以你可以使用这个异步的包装组件无缝地替换原始组件,同时实现延迟加载
import { defineAsyncComponent } from 'vue'

const AsyncComp = defineAsyncComponent(() =>
  import('./components/MyComponent.vue')
)
8.2、全/局部注册
- 与普通组件一样,异步组件可以使用
app.component()全局注册
app.component('MyComponent', defineAsyncComponent(() =>
  import('./components/MyComponent.vue')
))
- 也可以直接在父组件中直接定义它们:
<script setup>
import { defineAsyncComponent } from 'vue'

const AdminPage = defineAsyncComponent(() =>
  import('./components/AdminPageComponent.vue')
)
</script>

<template>
  <AdminPage />
</template>
8.3、加载与错误状态
- 异步操作不可避免地会涉及到加载和错误状态,因此
defineAsyncComponent()也支持在高级选项中处理这些状态- 如果提供了一个加载组件,它将在内部组件加载时先行显示。
- 在加载组件显示之前有一个默认的 200ms 延迟——这是因为在网络状况较好时,加载完成得很快,加载组件和最终组件之间的替换太快可能产生闪烁,反而影响用户感受。
- 如果提供了一个报错组件,则它会在加载器函数返回的 Promise 抛错时被渲染。你还可以指定一个超时时间,在请求耗时超过指定时间时也会渲染报错组件。
const AsyncComp = defineAsyncComponent({
  // 加载函数
  loader: () => import('./Foo.vue'),

  // 加载异步组件时使用的组件
  loadingComponent: LoadingComponent,
  // 展示加载组件前的延迟时间,默认为 200ms
  delay: 200,

  // 加载失败后展示的组件
  errorComponent: ErrorComponent,
  // 如果提供了一个 timeout 时间限制,并超时了
  // 也会显示这里配置的报错组件,默认值是:Infinity
  timeout: 3000
})
8.4、搭配 Suspense 使用
- 异步组件可以搭配内置的
<Suspense>组件一起使用,若想了解<Suspense>和异步组件之间交互,请参阅 `` 章节。
8.5、演示
Error和Loading组件还有子组件

父组件
<template>
  <div class="homeView">
    <h2>父组件</h2>
    <MyButton></MyButton>
  </div>
</template>

<script setup>
  import { ref, defineAsyncComponent } from 'vue';
  import Error from '@/components/Error';
  import Loading from '@/components/Loading';

  const MyButton = defineAsyncComponent({
    loader: () => {
      return new Promise((resolve, reject) => {
        setTimeout(() => {
          // reject('111') // 使用reject后,也会展示Error组件
          resolve(import('@/components/MyButton.vue'))
        }, 2000) // 改成大于3秒后,将会展示Error组件。
      })
    },
    // 加载异步组件时使用的组件
    loadingComponent: Loading,
    // 展示加载组件前的延迟时间,默认为 200ms
    delay: 200,
    // 加载失败后展示的组件
    errorComponent: Error,
    // 如果提供了一个 timeout 时间限制,并超时了
    // 也会显示这里配置的报错组件,默认值是:Infinity
    timeout: 3000
  })

</script>

<style scoped lang="scss">
  .homeView {
    border: 1px solid red;
  }
</style>
加载成功效果

加载失败效果

3、逻辑复用
1、组合式函数
1.1、什么是组合式函数
1.2、鼠标跟踪器示例
当你持续想获取当前鼠标的
x,y坐标时,需要使用监听器,监听鼠标移动事件,并且赋值给两个响应式变量。然后等页面销毁后,也得取消监听器监听。
组件代码
<template>
  <div class="homeView">
    <h2>鼠标X坐标:{{ mousePosition.x }}</h2>
    <h2>鼠标Y坐标:{{ mousePosition.y }}</h2>
  </div>
</template>

<script setup>
  import { ref, onMounted, onUnmounted } from 'vue';

  // 监听鼠标x,y轴坐标
  const mousePosition = ref({ x: 0, y: 0 });

  function handleMouseMove(e) {
    mousePosition.value = {
      x: e.pageX,
      y: e.pageY
    };
  }

  onMounted(() => {
    window.addEventListener('mousemove', handleMouseMove);
  });

  onUnmounted(() => {
    window.removeEventListener('mousemove', handleMouseMove);
  });

</script>
- 一个页面监听一次,就要写这么多代码,如果多个页面都需要监听,那么要写很多遍。
- 这时候我们就要考虑吧要把这个组件封装一下以便复用了
- 我们做的只是把它移到一个外部函数中去,并返回需要暴露的状态。和在组件中一样,你也可以在组合式函数中使用所有的组合式 API。现在,
useMouse()的功能可以在任何组件中轻易复用了。- 你还可以嵌套多个组合式函数:一个组合式函数可以调用一个或多个其他的组合式函数。
- 这使得我们可以像使用多个组件组合成整个应用一样,用多个较小且逻辑独立的单元来组合形成复杂的逻辑。
mouse.js
import { ref, onMounted, onUnmounted } from 'vue';

export const useMouse = () => {
  // 监听鼠标x,y轴坐标
  const mousePosition = ref({ x: 0, y: 0 });

  function handleMouseMove(e) {
    mousePosition.value = {
      x: e.pageX,
      y: e.pageY
    };
  }

  onMounted(() => {
    window.addEventListener('mousemove', handleMouseMove);
  });

  onUnmounted(() => {
    window.removeEventListener('mousemove', handleMouseMove);
  });

  return mousePosition;
}
组件代码
<template>
  <div class="homeView">
    <h2>鼠标X坐标:{{ mousePosition.x }}</h2>
    <h2>鼠标Y坐标:{{ mousePosition.y }}</h2>
  </div>
</template>

<script setup>
  import { ref, onMounted, onUnmounted } from 'vue';
  import { useMouse } from '@/hooks/mouse.js';

  // mousePosition是一个ref对象,已是响应式
  const mousePosition = useMouse();

</script>
1.3、优化封装
- 我们不妨再想想,对事件的监听和当组件销毁时,取消监听。也是一步经常会用到的操作,我们不妨再把这两步给封装以下。
event.js
import { onMounted, onUnmounted } from "vue";

export const useEvent = (el, eventName, handler) => {
  onMounted(() => {
    el.addEventListener(eventName, handler);
  });
  onUnmounted(() => {
    el.removeEventListener(eventName, handler);
  });
};
优化后的mouse.js
import { ref, onMounted, onUnmounted } from 'vue';
import { useEvent } from './event';

export const useMouse = () => {
  // 监听鼠标x,y轴坐标
  const mousePosition = ref({ x: 0, y: 0 });

  function handleMouseMove(e) {
    mousePosition.value = {
      x: e.pageX,
      y: e.pageY
    };
  }

  useEvent(window, 'mousemove', handleMouseMove);

  return mousePosition;
}
1.4、异步状态示例
useMouse()组合式函数没有接收任何参数,因此让我们再来看一个需要接收一个参数的组合式函数示例。在做异步数据请求时,我们常常需要处理不同的状态:加载中、加载成功和加载失败。
<script setup>
import { ref } from 'vue'

const data = ref(null)
const error = ref(null)

fetch('...')
  .then((res) => res.json())
  .then((json) => (data.value = json))
  .catch((err) => (error.value = err))
</script>

<template>
  <div v-if="error">Oops! Error encountered: {{ error.message }}</div>
  <div v-else-if="data">
    Data loaded:
    <pre>{{ data }}</pre>
  </div>
  <div v-else>Loading...</div>
</template>
如果在每个需要获取数据的组件中都要重复这种模式,那就太繁琐了。让我们把它抽取成一个组合式函数:
// fetch.js
import { ref } from 'vue'

export function useFetch(url) {
  const data = ref(null)
  const error = ref(null)

  fetch(url)
    .then((res) => res.json())
    .then((json) => (data.value = json))
    .catch((err) => (error.value = err))

  return { data, error }
}
现在我们在组件里只需要:
<script setup>
import { useFetch } from './fetch.js'

const { data, error } = useFetch('...')
</script>
1.5、接收响应式状态
useFetch()接收一个静态 URL 字符串作为输入——因此它只会执行一次 fetch 并且就此结束。如果我们想要在 URL 改变时重新 fetch 呢?为了实现这一点,我们需要将响应式状态传入组合式函数,并让它基于传入的状态来创建执行操作的侦听器。
举例来说,
useFetch()应该能够接收一个 ref:或者接收一个 getter 函数:
const url = ref('/initial-url')

const { data, error } = useFetch(url)

// 这将会重新触发 fetch
url.value = '/new-url'
// 当 props.id 改变时重新 fetch
const { data, error } = useFetch(() => `/posts/${props.id}`)
我们可以用
watchEffect()和toValue()API 来重构我们现有的实现:
// fetch.js
import { ref, watchEffect, toValue } from 'vue'

export function useFetch(url) {
  const data = ref(null)
  const error = ref(null)

  const fetchData = () => {
    // reset state before fetching..
    data.value = null
    error.value = null

    fetch(toValue(url))
      .then((res) => res.json())
      .then((json) => (data.value = json))
      .catch((err) => (error.value = err))
  }

  watchEffect(() => {
    fetchData()
  })

  return { data, error }
}
- 这个版本的
useFetch()现在能接收静态 URL 字符串、ref 和 getter,使其更加灵活。watch effect 会立即运行,并且会跟踪toValue(url)期间访问的任何依赖项。- 如果没有跟踪到依赖项(例如 url 已经是字符串),则 effect 只会运行一次;否则,它将在跟踪到的任何依赖项更改时重新运行。
1.6、toValue介绍
toValue()是一个在 3.3 版本中新增的 API。- 它的设计目的是将 ref 或 getter 规范化为值。如果参数是 ref,它会返回 ref 的值;如果参数是函数,它会调用函数并返回其返回值。否则,它会原样返回参数。
- 注意
toValue(url)是在watchEffect回调函数的内部调用的。这确保了在toValue()规范化期间访问的任何响应式依赖项都会被侦听器跟踪。
1.7、约定和实践
1.7.1、命名
组合式函数约定用驼峰命名法命名,并以“use”作为开头。
1.7.2、输入参数
- 即便不依赖于 ref 或 getter 的响应性,组合式函数也可以接收它们作为参数。
- 如果你正在编写一个可能被其他开发者使用的组合式函数,最好处理一下输入参数是 ref 或 getter 而非原始值的情况。
- 可以利用
toValue()工具函数来实现
import { toValue } from 'vue'

function useFeature(maybeRefOrGetter) {
  // 如果 maybeRefOrGetter 是一个 ref 或 getter,
  // 将返回它的规范化值。
  // 否则原样返回。
  const value = toValue(maybeRefOrGetter)
}
如果你的组合式函数在输入参数是 ref 或 getter 的情况下创建了响应式 effect,为了让它能够被正确追踪,请确保要么使用
watch()显式地监视 ref 或 getter,要么在watchEffect()中调用toValue()。
1.7.3、使用限制
- 组合式函数只能在
<script setup>或setup()钩子中被调用。- 在这些上下文中,它们也只能被同步调用。
- 在某些情况下,你也可以在像
onMounted()这样的生命周期钩子中调用它们。- 这些限制很重要,因为这些是 Vue 用于确定当前活跃的组件实例的上下文。访问活跃的组件实例很有必要,这样才能:
- 将生命周期钩子注册到该组件实例上
- 将计算属性和监听器注册到该组件实例上,以便在该组件被卸载时停止监听,避免内存泄漏。
1.8、与其他模式的比较
1.8.1、和 Mixin 的对比
Vue 2 的用户可能会对 mixins 选项比较熟悉。它也让我们能够把组件逻辑提取到可复用的单元里。然而 mixins 有三个主要的短板:
- 不清晰的数据来源:当使用了多个 mixin 时,实例上的数据属性来自哪个 mixin 变得不清晰,这使追溯实现和理解组件行为变得困难。这也是我们推荐在组合式函数中使用 ref + 解构模式的理由:让属性的来源在消费组件时一目了然。
- 命名空间冲突:多个来自不同作者的 mixin 可能会注册相同的属性名,造成命名冲突。若使用组合式函数,你可以通过在解构变量时对变量进行重命名来避免相同的键名。
- 隐式的跨 mixin 交流:多个 mixin 需要依赖共享的属性名来进行相互作用,这使得它们隐性地耦合在一起。而一个组合式函数的返回值可以作为另一个组合式函数的参数被传入,像普通函数那样。
基于上述理由,我们不再推荐在 Vue 3 中继续使用 mixin。保留该功能只是为了项目迁移的需求和照顾熟悉它的用户。
1.8.2、和无渲染组件的对比
- 在组件插槽一章中,我们讨论过了基于作用域插槽的无渲染组件。我们甚至用它实现了一样的鼠标追踪器示例。
- 组合式函数相对于无渲染组件的主要优势是:组合式函数不会产生额外的组件实例开销。当在整个应用中使用时,由无渲染组件产生的额外组件实例会带来无法忽视的性能开销。
- 我们推荐在纯逻辑复用时使用组合式函数,在需要同时复用逻辑和视图布局时使用无渲染组件。
1.8.3、和 React Hooks 的对比
如果你有 React 的开发经验,你可能注意到组合式函数和自定义 React hooks 非常相似。组合式 API 的一部分灵感正来自于 React hooks,Vue 的组合式函数也的确在逻辑组合能力上与 React hooks 相近。然而,Vue 的组合式函数是基于 Vue 细粒度的响应性系统,这和 React hooks 的执行模型有本质上的不同。这一话题在组合式 API 的常见问题中有更细致的讨论。
2、自定义指令
- 除了 Vue 内置的一系列指令 (比如
v-model或v-show) 之外,Vue 还允许你注册自定义的指令 (Custom Directives)。- 我们已经介绍了两种在 Vue 中重用代码的方式:组件和组合式函数。组件是主要的构建模块,而组合式函数则侧重于有状态的逻辑。另一方面,自定义指令主要是为了重用涉及普通元素的底层 DOM 访问的逻辑。
- 一个自定义指令由一个包含类似组件生命周期钩子的对象来定义。钩子函数会接收到指令所绑定元素作为其参数。
提示:
- 只有当所需功能只能通过直接的 DOM 操作来实现时,才应该使用自定义指令。
- 其他情况下应该尽可能地使用
v-bind这样的内置指令来声明式地使用模板,这样更高效,也对服务端渲染更友好。
2.0、指令钩子(重要)
一个指令的定义对象可以提供几种钩子函数 (都是可选的):
const myDirective = {
  // 在绑定元素的 attribute 前
  // 或事件监听器应用前调用
  created(el, binding, vnode, prevVnode) {
    // 下面会介绍各个参数的细节
  },
  // 在元素被插入到 DOM 前调用
  beforeMount(el, binding, vnode, prevVnode) {},
  // 在绑定元素的父组件
  // 及他自己的所有子节点都挂载完成后调用
  mounted(el, binding, vnode, prevVnode) {},
  // 绑定元素的父组件更新前调用
  beforeUpdate(el, binding, vnode, prevVnode) {},
  // 在绑定元素的父组件
  // 及他自己的所有子节点都更新后调用
  updated(el, binding, vnode, prevVnode) {},
  // 绑定元素的父组件卸载前调用
  beforeUnmount(el, binding, vnode, prevVnode) {},
  // 绑定元素的父组件卸载后调用
  unmounted(el, binding, vnode, prevVnode) {}
}
2.1、钩子参数
指令的钩子会传递以下几种参数:
el:指令绑定到的元素。这可以用于直接操作 DOM。binding:一个对象,包含以下属性。
value:传递给指令的值。例如在v-my-directive="1 + 1"中,值是2。oldValue:之前的值,仅在beforeUpdate和updated中可用。无论值是否更改,它都可用。arg:传递给指令的参数 (如果有的话)。例如在v-my-directive:foo中,参数是"foo"。modifiers:一个包含修饰符的对象 (如果有的话)。例如在v-my-directive.foo.bar中,修饰符对象是{ foo: true, bar: true }。instance:使用该指令的组件实例。dir:指令的定义对象。vnode:代表绑定元素的底层 VNode。prevNode:代表之前的渲染中指令所绑定元素的 VNode。仅在beforeUpdate和updated钩子中可用。提示:
- 除了
el外,其他参数都是只读的,不要更改它们。若你需要在不同的钩子间共享信息,推荐通过元素的 dataset attribute 实现。
2.1.1、举例
举例来说,像下面这样使用指令
<div v-example:foo.bar="baz">
binding参数会是一个这样的对象:
{
  arg: 'foo',
  modifiers: { bar: true },
  value: /* `baz` 的值 */,
  oldValue: /* 上一次更新时 `baz` 的值 */
}
这里指令的参数会基于组件的
arg数据属性响应式地更新。和内置指令类似,自定义指令的参数也可以是动态的。举例来说:
<div v-example:[arg]="value"></div>
2.2、基本使用
- 下面是一个自定义指令的例子,当一个 input 元素被 Vue 插入到 DOM 中后,它会被自动聚焦。
- 假设你还未点击页面中的其他地方,那么上面这个 input 元素应该会被自动聚焦。该指令比
autofocusattribute 更有用,因为它不仅仅可以在页面加载完成后生效,还可以在 Vue 动态插入元素后生效。- 在
<script setup>中,任何以v开头的驼峰式命名的变量都可以被用作一个自定义指令。- 在下面的例子中,
vFocus即可以在模板中以v-focus的形式使用。
<template>
  <div class="homeView">
    <input v-focus />
  </div>
</template>

<script setup>
  import { ref } from 'vue';

  // 在模板中启用 v-focus
  const vFocus = {
    mounted: (el) => el.focus()
  }

</script>
2.3、不使用setup语法糖
- 在没有使用
<script setup>的情况下,自定义指令需要通过directives选项注册:
export default {
  setup() {
    /*...*/
  },
  directives: {
    // 在模板中启用 v-focus
    focus: {
      /* ... */
    }
  }
}
2.4、注册全局指令
const app = createApp({})

// 使 v-focus 在所有组件中都可用
app.directive('focus', {
  /* ... */
})
2.5、简化形式
- 对于自定义指令来说,一个很常见的情况是仅仅需要在
mounted和updated上实现相同的行为,除此之外并不需要其他钩子- 这种情况下我们可以直接用一个函数来定义指令,如下所示:
<!-- 使用 -->
<div v-color="color"></div>


<script>
	<!-- 全局注册 -->
    app.directive('color', (el, binding) => {
      // 这会在 `mounted` 和 `updated` 时都调用
      el.style.color = binding.value
    })
</script>
2.6、对象字面量
- 如果你的指令需要多个值,你可以向它传递一个 JavaScript 对象字面量。
- 别忘了,指令也可以接收任何合法的 JavaScript 表达式。
<!-- 使用 -->
<div v-demo="{ color: 'white', text: 'hello!' }"></div>


<script>
	<!-- 全局注册 -->
    app.directive('demo', (el, binding) => {
      console.log(binding.value.color) // => "white"
      console.log(binding.value.text) // => "hello!"
    })
</script>
2.7、在组件上使用
当在组件上使用自定义指令时,它会始终应用于组件的根节点,和透传 attributes 类似。
注意:
- 组件可能含有多个根节点。当应用到一个多根组件时,指令将会被忽略且抛出一个警告。
- 和 attribute 不同,指令不能通过
v-bind="$attrs"来传递给一个不同的元素。- 总的来说,不推荐在组件上使用自定义指令。
父组件
<MyComponent v-demo="test" />
子组件
<!-- MyComponent 的模板 -->

<div> <!-- v-demo 指令会被应用在此处 -->
  <span>My component content</span>
</div>
4、内置组件
vue3中,总共有5个内置组件。
- Transition:针对单个dom元素的动画做处理
- TransitionGroup:针对一组dom元素的动画做处理
- KeepAlive:针对组件做缓存处理
- Teleport:将dom移动到指定另一个dom里
- Suspense:处理异步组件加载显示问题。
如果需要的话,参考官网Transition | Vue.js (vuejs.org)
5、CSS功能
1、作用域css
1.1、基本写法
当
<style>标签带有scopedattribute 的时候,它的 CSS 只会影响当前组件的元素,和 Shadow DOM 中的样式封装类似。使用时有一些注意事项,不过好处是不需要任何的 polyfill。它的实现方式是通过 PostCSS 将以下内容:
<style scoped>
.example {
  color: red;
}
</style>

<template>
  <div class="example">hi</div>
</template>
转换为:
<style>
.example[data-v-f3f3eg9] {
  color: red;
}
</style>

<template>
  <div class="example" data-v-f3f3eg9>hi</div>
</template>
1.2、子组件的根元素
使用
scoped后,父组件的样式将不会渗透到子组件中。不过,子组件的根节点会同时被父组件的作用域样式和子组件的作用域样式影响。这样设计是为了让父组件可以从布局的角度出发,调整其子组件根元素的样式。
子组件
<template>
  <div class="testComponent">
    <div class="div1"></div>
    <div class="div2"></div>
    <div class="div3"></div>
  </div>
</template>

<style lang="scss" scoped>
.testComponent {
  display: flex;
  gap: 10px;
  padding: 20px;
  & > div {
    width: 200px;
    height: 200px;
    border: 1px solid #000;
  }
}
</style>
父组件
<template>
  <TestComponent />
</template>

<script setup>
  import TestComponent from '@/components/TestComponent';
</script>

<style lang="scss" scoped>
.testComponent {
  /* 有效 */
  border: 1px solid red;

  /* 下面皆无效 */
  .div1 {
    background-color: antiquewhite;
  }

  .div2 {
    background-color: darkcyan;
  }

  .div3 {
    background-color: salmon;
  }
}
</style>
效果

1.3、深度选择器
- 可以发现在父组件中给子组件除了根元素外设置样式,均无效,想要处理这种情况,需用下面的写法
- 处于
scoped样式中的选择器如果想要做更“深度”的选择,也即:影响到子组件,可以使用:deep()这个伪类:提示:
- 通过
v-html创建的 DOM 内容不会被作用域样式影响,但你仍然可以使用深度选择器来设置其样式。
写法一:
代码
<style lang="scss" scoped>
.testComponent {
  /* 有效 */
  border: 1px solid red;

  /* 下面样式也全部生效 */
  :deep(.div1) {
    background-color: antiquewhite;
  }

  :deep(.div2) {
    background-color: darkcyan;
  }

  :deep(.div3) {
    background-color: salmon;
  }
}
</style>
实际编译后
.testComponent[data-v-f3f3eg9] {
    border: 1px solid red;
}

.testComponent[data-v-f3f3eg9] .div1 {
    background-color: antiquewhite;
}

/* 下面一致,省略不写... */
效果

写法二:
- 上面一个选择器一个
:deep()太麻烦了,我们可以直接使用:deep {....}在里面写我们需要穿透的样式。- 不过后面那种写法在编辑的适合控制台会有警告,这种写法已弃用,不建议使用。
<style lang="scss" scoped>
.testComponent {
  /* 有效 */
  border: 1px solid red;

  /* 下面样式也全部生效 */
  :deep {
    .div1 {
      background-color: antiquewhite;
    }

    .div2 {
      background-color: darkcyan;
    }

    .div3 {
      background-color: salmon;
    }
  }

}
</style>
1.4、插槽选择器
默认情况下,作用域样式不会影响到
<slot/>渲染出来的内容,因为它们被认为是父组件所持有并传递进来的。使用:slotted伪类以明确地将插槽内容作为选择器的目标:
子组件
<template>
  <div class="testComponent">
    <div class="div1"></div>
    <div class="div2"></div>
    <div class="div3"></div>
    <slot></slot>
  </div>
</template>

<style lang="scss" scoped>
.testComponent {
  display: flex;
  gap: 10px;
  padding: 20px;
  /* 子组件内本身div元素的样式 */
  & > div {
    width: 200px;
    height: 200px;
    border: 1px solid #000;
  }

  /* 子组件内,单独指定插槽内div元素样式 */
  :slotted(div) {
    width: 100px;
    height: 100px;
    border: 1px solid #000;
  }
}
</style>
父组件
<template>
  <TestComponent>
    <div class="div4">
      2222
    </div>
  </TestComponent>
</template>

<script setup>
  import TestComponent from '@/components/TestComponent';
</script>

<style lang="scss" scoped>
.testComponent {
  /* 有效 */
  border: 1px solid red;

  /* 下面样式也全部生效 */
  :deep {
    .div1 {
      background-color: antiquewhite;
    }

    .div2 {
      background-color: darkcyan;
    }

    .div3 {
      background-color: salmon;
    }
  }

}
</style>
效果

1.5、全局选择器
如果想让其中一个样式规则应用到全局,比起另外创建一个
<style>,可以使用:global伪类来实现 (看下面的代码):
代码
<style lang="scss" scoped>
/* 组件内设置根元素样式,无效 */
/* #app {
  background-color: cadetblue;
} */
/* 设置为全局样式,这样就可以应用到最外层根元素样式了 相当于写在去掉scoped的style标签里面 */
:global(#app) {
  background-color: cadetblue;
}

.testComponent {
  /* 有效 */
  border: 1px solid red;

  /* 下面样式也全部生效 */
  :deep {
    .div1 {
      background-color: antiquewhite;
    }

    .div2 {
      background-color: darkcyan;
    }

    .div3 {
      background-color: salmon;
    }
  }

}
</style>
效果

1.6、混合使用局部样式
也可以在同一个组件中同时包含作用域样式和非作用域样式:
<style>
/* 全局样式 */
</style>

<style scoped>
/* 局部样式 */
</style>
1.7、作用域样式须知
- 作用域样式并没有消除对 class 的需求。由于浏览器渲染各种各样 CSS 选择器的方式,
p { color: red }结合作用域样式使用时 (即当与 attribute 选择器组合的时候) 会慢很多倍。如果你使用 class 或者 id 来替代,例如.example { color: red },那你几乎就可以避免性能的损失。- 小心递归组件中的后代选择器!对于一个使用了
.a .b选择器的样式规则来说,如果匹配到.a的元素包含了一个递归的子组件,那么所有的在那个子组件中的.b都会匹配到这条样式规则。
2、CssModules
2.1、基本写法
- 一个
<style module>标签会被编译为 CSS Modules 并且将生成的 CSS class 作为$style对象暴露给组件- 得出的 class 将被哈希化以避免冲突,实现了同样的将 CSS 仅作用于当前组件的效果。
代码
<template>
  <!-- 样式失效 -->
  <div class="div1">
    111
  </div>
  <!-- 样式生效 -->
  <div :class="$style.div2">
    222
  </div>
</template>

<script setup>
</script>

<style lang="scss" module>
  .div1,.div2 {
    width: 200px;
    height: 200px;
    border: 1px solid #000;
  }

</style>
效果

2.2、自定义注入名称
你可以通过给
moduleattribute 一个值来自定义注入 class 对象的属性名:
<template>
  <!-- 样式生效 将$style修改为homeView -->
  <div :class="homeView.div1">
    111
  </div>
  <!-- 样式生效 -->
  <div :class="homeView.div2">
    222
  </div>
</template>

<script setup>
</script>

<!-- 修改module对象名 -->
<style lang="scss" module="homeView">
  .div1,.div2 {
    width: 200px;
    height: 200px;
    border: 1px solid #000;
  }

</style>
2.3、与组合式API使用
可以通过
useCssModuleAPI 在setup()和<script setup>中访问注入的 class。对于使用了自定义注入名称的<style module>块,useCssModule接收一个匹配的moduleattribute 值作为第一个参数:
<template>
  <!-- 样式生效 -->
  <div :class="homeView.div1">
    111
  </div>
  <!-- 样式生效 直接使用js中的homeView2 -->
  <div :class="homeView2.div2">
    222
  </div>
</template>

<script setup>
  import { useCssModule  } from 'vue';

  // 默认情况下, 返回 <style module> 的 class
  // const default1 = useCssModule();

  // 具名情况下, 返回 <style module="homeView"> 的 class
  const homeView2 = useCssModule('homeView')
  console.log(homeView2);
</script>

<style lang="scss" module="homeView">
  .div1,.div2 {
    width: 200px;
    height: 200px;
    border: 1px solid #000;
  }

</style>

3、Css中的v-bind()
- 在过去,css想使用
data里面的属性值,需要使用:style等其他方式,引用到data中的属性,并不能直接在css中使用。vue3中,可以直接在css中使用v-bind(属性名)进行引用。- 实际的值会被编译成哈希化的 CSS 自定义属性,因此 CSS 本身仍然是静态的。自定义属性会通过内联样式的方式应用到组件的根元素上,并且在源值变更的时候响应式地更新。
代码
<template>
  <div class="div1">
    111
  </div>
  <div class="div2">
    222
  </div>

  <button @click="changeColor">全部改为黄色</button>
</template>

<script setup>
  import { ref } from 'vue'

  const div1Color = ref('red')

  const div2 = ref({
    color: 'blue'
  })

  function changeColor() {
    div1Color.value ='yellow'
    div2.value.color ='yellow'
  }
</script>

<style lang="scss" scoped>
.div1, .div2 {
  width: 200px;
  height: 200px;
  margin-top: 20px;
}

.div1 {
  background-color: v-bind(div1Color);
}

/* 如果是对象里面的属性,则需要使用引号包裹!!! */
.div2 {
  background-color: v-bind('div2.color');
}
</style>
效果

答疑篇
1、为什么建议使用ref
1.1、想修改整个对象时
代码
<template>
  <button @click="editUser1">点击修改用户1</button>
  <button @click="editUser2">点击修改用户2</button>
  <button @click="editUser3">点击修改用户3</button>

  <h2>姓名:{{ user.name }}</h2>
  <h2>年龄:{{ user.age }}</h2> <button @click="user.age++">年龄+1</button>
  <h2>
    地址:{{ user.address.street }} {{ user.address.city }} {{ user.address.state }}
  </h2><button @click="user.address.city = '北京'">修改城市</button>

</template>

<script setup>
  import { reactive } from 'vue';

  let user = reactive({
    name: '张三',
    age: 25,
    address: {
      street: '河南省',
      city: '安阳市',
      state: '林州市',
    }
  });


  // 想要修改整改对象的值 这么修改会失去响应式
  function editUser1() {
    user = {
      name: '李四',
      age: 20,
      address: {
        street: '江苏省',
        city: '南京市',
        state: '江宁区',
      }
    }

    console.log("editUser1", user);
  }

  // 这么修改响应式依旧会丢失
  function editUser2() {
    user = reactive({
      name: '李四',
      age: 20,
      address: {
        street: '江苏省',
        city: '南京市',
        state: '江宁区',
      }
    })
    console.log("editUser2", user);
  }

  // 只有一个一个修改值才可以
  function editUser3() {
    user.name = '李四';
    user.age = 20;
    user.address.city = '南京市';
    user.address.state = '江宁区';
    user.address.street = '江苏省';
    console.log("editUser3", user);
  }


</script>
效果

1.2、想给对象置空时
同上,只能一个值一个值设置空值,将整个对象设置为空值无效,不会触发页面更新
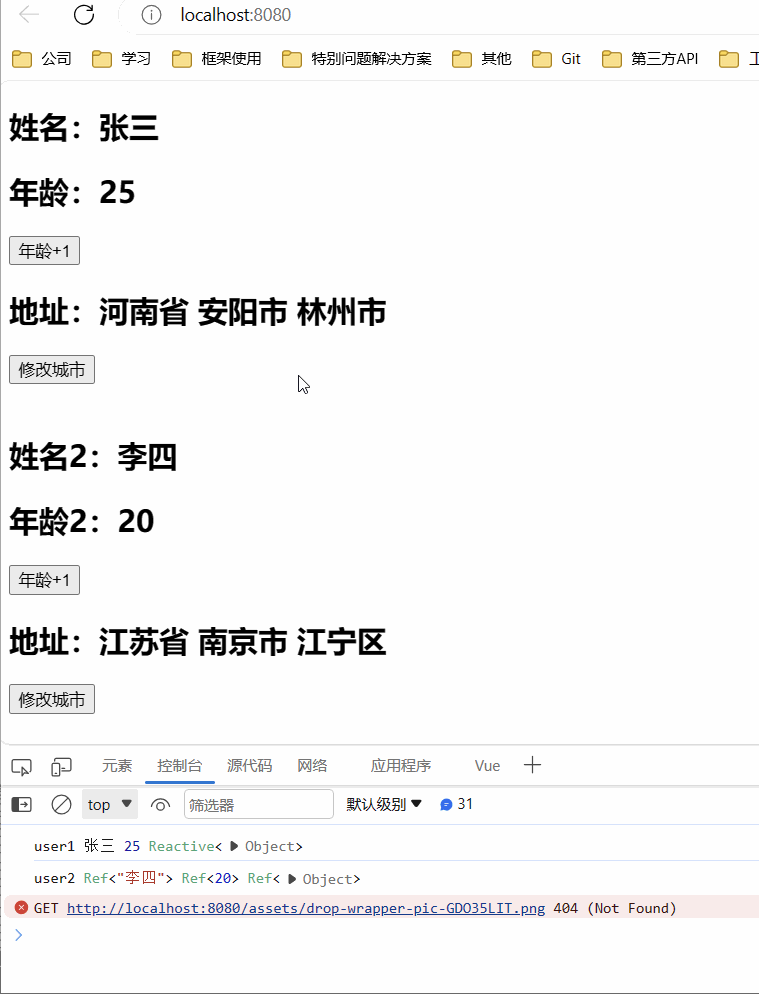
1.3、解构时
- 结构后的数据会丢失响应式
- 只有再使用
toRefs才可以继续将结构后的数据转化为响应式
代码
<template>
  <h2>姓名:{{ name }}</h2>
  <h2>年龄:{{ age }}</h2> <button @click="age++">年龄+1</button>
  <h2>
    地址:{{ address.street }} {{ address.city }} {{ address.state }}
  </h2><button @click="address.city = '北京'">修改城市</button>

  <br>
  <br>

  <h2>姓名2:{{ name2 }}</h2>
  <h2>年龄2:{{ age2 }}</h2> <button @click="age2++;">年龄+1</button>
  <h2>
    地址:{{ address2.street }} {{ address2.city }} {{ address2.state }}
  </h2><button @click="address2.street = '河南省';address2.city = '郑州市';address2.state = '金水区';">修改城市</button>

</template>

<script setup>
  import { reactive, toRefs, isRef } from 'vue';

  const user = reactive({
    name: '张三',
    age: 25,
    address: {
      street: '河南省',
      city: '安阳市',
      state: '林州市',
    }
  });

  const { name, age, address } = user;


  console.log("user1", name, age, address);


  const user2 = reactive({
    name2: '李四',
    age2: 20,
    address2: {
      street: '江苏省',
      city: '南京市',
      state: '江宁区',
    }
  });

  const { name2, age2, address2 } = toRefs(user2);

  console.log("user2", name2, age2, address2);
</script>
效果


 9520
9520


 被折叠的 条评论
为什么被折叠?
被折叠的 条评论
为什么被折叠?
 到【灌水乐园】发言


