


搞了一天,差不多搞完了,记录下,目前官方还有一些问题 会在下一个next版本修复(使用api9 版本 新版本自行参考修改)
0、实现效果
鸿蒙实现图片上传
1、准备页面
build() {
    Row() {
      Column() {
        Button('选择图片28')
          .onClick(this.onChooseImage)
        // 显示选中的图片(本地地址 非http)
        ForEach(this.showChooseImage, (item, idnex) => {
          Image(item).width(80).height(80).margin({bottom: 20})
        })
        // 为了方便展示选中的图片信息
        ForEach(this.showListData, (item, idnex) => {
          Text(item.path)
        })
      }
      .width('100%')
    }
    .height('100%')
  }
2、授权逻辑
点击“选中图片28”之后,需要先判断是否有读写图片的权限。如果有走后面的流程,如果没有,需要系统弹窗让用户去授权。如果用户授权了,走后面的逻辑;如果用户不授权需要提示用户去系统里面的应用列表去授权(也可以不做这个操作)。
官方文档:文档中心
3、判断是否授权媒体
import abilityAccessCtrl, { Permissions } from '@ohos.abilityAccessCtrl';
let atManager = abilityAccessCtrl.createAtManager();
import bundleManager from '@ohos.bundle.bundleManager';
// let bundleFlags = bundleManager.BundleFlag.GET_BUNDLE_INFO_DEFAULT;
let bundleFlags = bundleManager.BundleFlag.GET_BUNDLE_INFO_WITH_APPLICATION;
// let tokenID = bundleFlags;
let tokenID
import common from '@ohos.app.ability.common';
import picker from '@ohos.file.picker';
import request from '@ohos.request';
let context = getContext(this) as common.UIAbilityContext;
/**
 * 对应用权限进行校验封装 我这边默认只能一个一个授权,多个授权自己封装
 */
export const permissionsIsAllow = async (type: Permissions, cb:Function) => {
  let bundleInfo: bundleManager.BundleInfo = await bundleManager.getBundleInfoForSelf(bundleFlags);
  let appInfo: bundleManager.ApplicationInfo = bundleInfo.appInfo;
  tokenID = appInfo.accessTokenId;
  console.log('tokenID', tokenID)
  try {
      atManager.checkAccessToken(tokenID, type).then((data) => {
      console.log(`${type} success, data->${JSON.stringify(data)}`);
      if (data === 0) { // 已授权
        cb()
      } else { // 未授权
        AlertDialog.show(
          {
            title: '温馨提示',
            message: '您还没有授权',
            autoCancel: false,
            alignment: DialogAlignment.Bottom,
            gridCount: 4,
            primaryButton: {
              value: '取消授权',
              action: () => {
                console.info('Callback when the first button is clicked')
                AlertDialog.show(
                  {
                    title: '温馨提示',
                    message: '必须要授权才能使用,是否前往应用进行授权',
                    autoCancel: false,
                    alignment: DialogAlignment.Bottom,
                    gridCount: 4,
                    primaryButton: {
                      value: '取消',
                      action: () => {
                        console.warn('用户再次取消授权')
                      }
                    },
                    secondaryButton: {
                      value: '前往授权',
                      action: () => {
                        let wantInfo = {
                          action: 'action.settings.app.info',
                          parameters: {
                            settingsParamBundleName: 'com.example.medicaltreatment' // 打开指定应用的详情页面
                          }
                        }
                        context.startAbility(wantInfo).then((data) => {
                          // ...
                          console.info('前往授权页面成功', JSON.stringify(data))
                        }).catch((err) => {
                          // ...
                          console.error('前往授权页面失败', JSON.stringify(err))
                        })
                      }
                    }
                  }
                )
              }
            },
            secondaryButton: {
              value: '确认授权',
              action: () => {
                atManager.requestPermissionsFromUser(context, [type]).then((data) => {
                  console.info("data:" + JSON.stringify(data));
                  console.info("data permissions:" + data.permissions);
                  console.info("data authResults:", JSON.stringify(data.authResults));
                  let length: number = data.authResults.length;
                  for (let i = 0; i < length; i++) {
                    if (data.authResults[i] === 0) {
                      // 用户授权,可以继续访问目标操作
                      cb()
                    } else {
                      // 用户拒绝授权,提示用户必须授权才能访问当前页面的功能,并引导用户到系统设置中打开相应的权限
                      return;
                    }
                  }
                }).catch((err) => {
                  console.info("data:" + JSON.stringify(err));
                })
              }
            },
            cancel: () => {
              console.info('Closed callbacks')
            }
          }
        )
      }
    }).catch((err) => {
      console.warn(`${type} fail, err->${JSON.stringify(err)}`);
    });
  } catch(err) {
    console.log(`catch err->${JSON.stringify(err)}`);
  }
}
效果:


4、选择图片
/**
 * 选择图片 单/多
 */
export const chooseImage = (cb: Function, number: number) => {
  try {
    let PhotoSelectOptions = new picker.PhotoSelectOptions();
    PhotoSelectOptions.MIMEType = picker.PhotoViewMIMETypes.IMAGE_TYPE;
    PhotoSelectOptions.maxSelectNumber = number;
    let photoPicker = new picker.PhotoViewPicker();
    photoPicker.select(PhotoSelectOptions).then((PhotoSelectResult) => {
      console.info('PhotoViewPicker.select successfully, PhotoSelectResult uri: ' + JSON.stringify(PhotoSelectResult));
      console.log('PhotoSelectResult111', PhotoSelectResult)
      if (PhotoSelectResult && PhotoSelectResult.photoUris) {
        const imgList = PhotoSelectResult.photoUris;
        cb(imgList)
      }
    }).catch((err) => {
      console.error('PhotoViewPicker.select failed with err: ' + err);
    });
  } catch (err) {
    console.error('PhotoViewPicker failed with err: ' + err);
  }
}
选中的图片的路径是这样的:

5、将datashare的路径进行转换
为什么要转换: 看官方文档:文档中心
private onDealWithData = (fileUris: string[]) => {
    console.log('appLog:fileUris:', JSON.stringify(fileUris));
    this.showChooseImage = fileUris
    this.onUploadImageFileList = []
    const promises = fileUris.map(async item => await this.onPromiseTask(item));
    Promise.all(promises)
      .then(() => {
        console.log("All tasks completed. Proceed to the next step.");
        if (this.onUploadImageFileList.length > 0) {
          this.onUploadFile(this.onUploadImageFileList);
        } else {
          console.log('onUploadImageFileList的长度为0')
        }
        // 在这里执行下一步操作
      })
      .catch(error => {
        console.error("Error occurred:", error);
      });
  }
  private onPromiseTask = (v) => {
    return new Promise((resolve, reject) => {
      fs.open(v, fs.OpenMode.READ_ONLY).then((file) => { // READ_ONLY READ_WRITE
        const dateStr = (new Date().getTime()).toString()
        let newPath = context.cacheDir + `/${dateStr}.png`;
        fs.copyFile(file.fd, newPath).then(() => {
          console.info("applog:copy file succeed");
          let realUri = "internal://cache/"+newPath.split("cache/")[1];
          const obj = {
            filename: `${dateStr}.png`,
            name: "files",
            uri: realUri,
            type: "png"
          }
          this.onUploadImageFileList.push(obj);
          resolve(true)
        }).catch((err) => {
          console.info("applog:copy file failed with error message: " + err.message + ", error code: " + err.code);
        });
      }).catch((err) => {
        console.info("applog:open file failed with error message: " + err.message + ", error code: " + err.code);
      });
    })
  }
转换好之后的文件路径是这样的:

6、上传到服务器
/**
* 上传图片
*/
export const uploadImageListOrSingle = async (files, cb:Function) => {
const token = await PreferenceModel.getPreference('tokenInfo', 'token')
const uploadConfigData = []
console.info('转换之后的files', JSON.stringify(files))
files.forEach(v => {
const uploadConfig = {
url: 'https://xxx.xxx.xxx/api/v1.0/oss/upload',
header: {
'Hwkj-Custom-Client': 'PlatformOfWeb',
"Authorization": token ? 'Bearer ' + token : '',
},
method: "POST",
files: [v],
data: [{ name: "files", value: "files"}],
}
uploadConfigData.push(uploadConfig)
})
const promises = uploadConfigData.map(async item => await onGetImageUploadBackUrl(item));
Promise.all(promises)
.then((data) => {
const showList = []
data.forEach(v => {
showList.push(v[0])
})
cb(showList)
})
.catch(error => {
console.error("Error occurred1:", error);
});
}
const onGetImageUploadBackUrl = (uploadConfig) => {
let uploadTask;
return new Promise((resolve, reject) => {
try {
request.uploadFile( getContext(this), uploadConfig).then((data) => {
console.info('JSON.stringify(data)', JSON.stringify(data))
uploadTask = data;
let upProgressCallback = (data) => {
console.info("data1111:" + JSON.stringify(data));
resolve(data)
};
uploadTask.on('complete', upProgressCallback);
}).catch((err) => {
console.error('Failed to request the upload. Cause: ' + JSON.stringify(err));
});
} catch (err) {
console.error('applog:', JSON.stringify(err));
console.error('err.code : ' + err.code + ', err.message : ' + err.message);
}
})
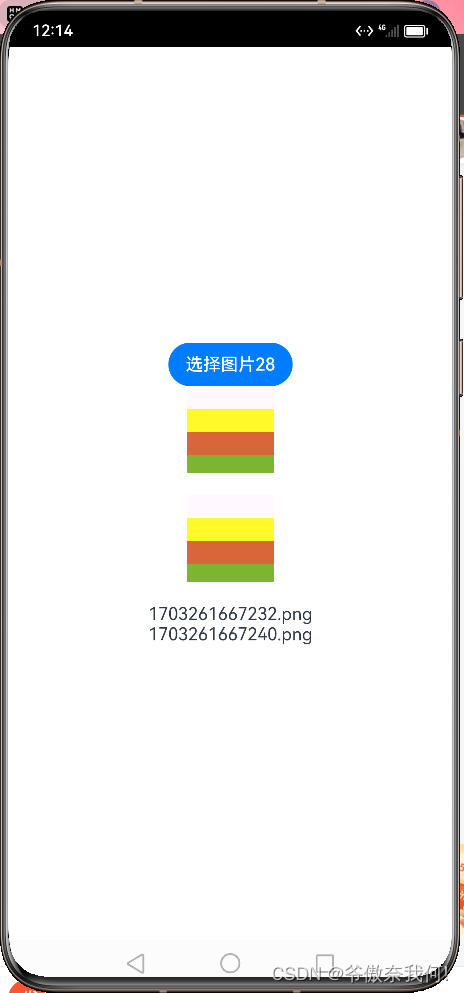
}6、显示选中的和上传接口返回的数据信息(效果图)
注意事项:
1、不知道为什么checkAccessToken永远走的.catch,不知道是代码原因还是本来这个api的原因。导致用户同意授权之后,下一次仍然是未授权。目前还未解决,还在等官方的回答(已解决 上方的代码已经解决了)
2、大家可以看到 当通过上传接口返回的数据并不是服务器返回的数据而是官方返回的图片信息

我已经对这个问题给官方说了:
“我们这个上传接口会返回一个图片的url 但是现在执行complete之后 返回的并不是服务器返回的数据 这种情况怎么办呢?”
官方的回答是:

7、完整代码
1、页面ui代码
import fs from '@ohos.file.fs';
import common from '@ohos.app.ability.common';
let context = getContext(this) as common.UIAbilityContext;
import { permissionsIsAllow, chooseImage, uploadImageListOrSingle } from '../../utils'
@Entry
@Component
struct AccountSettingIndex {
  @State showListData: any[] = []
  @State showChooseImage: any[] = []
  @State onUploadImageFileList: any[] = []
  private onChooseImage = () => {
    permissionsIsAllow('ohos.permission.WRITE_MEDIA', () => { // READ_MEDIA
      this.onChooseImageFin()
    })
  }
  private onChooseImageFin = () => {
    chooseImage((imgList) => {
      this.onDealWithData(imgList)
    }, 2)
  }
  private onDealWithData = (fileUris: string[]) => {
    console.log('appLog:fileUris:', JSON.stringify(fileUris));
    this.showChooseImage = fileUris
    this.onUploadImageFileList = []
    const promises = fileUris.map(async item => await this.onPromiseTask(item));
    Promise.all(promises)
      .then(() => {
        console.log("All tasks completed. Proceed to the next step.");
        if (this.onUploadImageFileList.length > 0) {
          this.onUploadFile(this.onUploadImageFileList);
        } else {
          console.log('onUploadImageFileList的长度为0')
        }
        // 在这里执行下一步操作
      })
      .catch(error => {
        console.error("Error occurred:", error);
      });
  }
  private onPromiseTask = (v) => {
    return new Promise((resolve, reject) => {
      fs.open(v, fs.OpenMode.READ_ONLY).then((file) => { // READ_ONLY READ_WRITE
        const dateStr = (new Date().getTime()).toString()
        let newPath = context.cacheDir + `/${dateStr}.png`;
        fs.copyFile(file.fd, newPath).then(() => {
          console.info("applog:copy file succeed");
          let realUri = "internal://cache/"+newPath.split("cache/")[1];
          const obj = {
            filename: `${dateStr}.png`,
            name: "files",
            uri: realUri,
            type: "png"
          }
          this.onUploadImageFileList.push(obj);
          resolve(true)
        }).catch((err) => {
          console.info("applog:copy file failed with error message: " + err.message + ", error code: " + err.code);
        });
      }).catch((err) => {
        console.info("applog:open file failed with error message: " + err.message + ", error code: " + err.code);
      });
    })
  }
  private onUploadFile = async (fileUri) => {
    uploadImageListOrSingle(fileUri, (data) => {
      console.log('获取到的url是', typeof data ,data)
      this.showListData = data
    })
  }
  build() {
    Row() {
      Column() {
        Button('选择图片28')
          .onClick(this.onChooseImage)
        // 显示选中的图片
        ForEach(this.showChooseImage, (item, idnex) => {
          Image(item).width(80).height(80).margin({bottom: 20})
        })
        // 为了方便展示选中的图片信息
        ForEach(this.showListData, (item, idnex) => {
          Text(item.path)
        })
      }
      .width('100%')
    }
    .height('100%')
  }
}
2、utils文件下面的三个方法
import abilityAccessCtrl, { Permissions } from '@ohos.abilityAccessCtrl';
let atManager = abilityAccessCtrl.createAtManager();
import bundleManager from '@ohos.bundle.bundleManager';
// let bundleFlags = bundleManager.BundleFlag.GET_BUNDLE_INFO_DEFAULT;
let bundleFlags = bundleManager.BundleFlag.GET_BUNDLE_INFO_WITH_APPLICATION;
// let tokenID = bundleFlags;
let tokenID
import common from '@ohos.app.ability.common';
import picker from '@ohos.file.picker';
import request from '@ohos.request';
let context = getContext(this) as common.UIAbilityContext;
/**
 * 对应用权限进行校验封装 我这边默认只能一个一个授权,多个授权自己封装
 */
export const permissionsIsAllow = async (type: Permissions, cb:Function) => {
  let bundleInfo: bundleManager.BundleInfo = await bundleManager.getBundleInfoForSelf(bundleFlags);
  let appInfo: bundleManager.ApplicationInfo = bundleInfo.appInfo;
  tokenID = appInfo.accessTokenId;
  console.log('tokenID', tokenID)
  try {
      atManager.checkAccessToken(tokenID, type).then((data) => {
      console.log(`${type} success, data->${JSON.stringify(data)}`);
      if (data === 0) { // 已授权
        cb()
      } else { // 未授权
        AlertDialog.show(
          {
            title: '温馨提示',
            message: '您还没有授权',
            autoCancel: false,
            alignment: DialogAlignment.Bottom,
            gridCount: 4,
            primaryButton: {
              value: '取消授权',
              action: () => {
                console.info('Callback when the first button is clicked')
                AlertDialog.show(
                  {
                    title: '温馨提示',
                    message: '必须要授权才能使用,是否前往应用进行授权',
                    autoCancel: false,
                    alignment: DialogAlignment.Bottom,
                    gridCount: 4,
                    primaryButton: {
                      value: '取消',
                      action: () => {
                        console.warn('用户再次取消授权')
                      }
                    },
                    secondaryButton: {
                      value: '前往授权',
                      action: () => {
                        let wantInfo = {
                          action: 'action.settings.app.info',
                          parameters: {
                            settingsParamBundleName: 'com.example.medicaltreatment' // 打开指定应用的详情页面
                          }
                        }
                        context.startAbility(wantInfo).then((data) => {
                          // ...
                          console.info('前往授权页面成功', JSON.stringify(data))
                        }).catch((err) => {
                          // ...
                          console.error('前往授权页面失败', JSON.stringify(err))
                        })
                      }
                    }
                  }
                )
              }
            },
            secondaryButton: {
              value: '确认授权',
              action: () => {
                atManager.requestPermissionsFromUser(context, [type]).then((data) => {
                  console.info("data:" + JSON.stringify(data));
                  console.info("data permissions:" + data.permissions);
                  console.info("data authResults:", JSON.stringify(data.authResults));
                  let length: number = data.authResults.length;
                  for (let i = 0; i < length; i++) {
                    if (data.authResults[i] === 0) {
                      // 用户授权,可以继续访问目标操作
                      cb()
                    } else {
                      // 用户拒绝授权,提示用户必须授权才能访问当前页面的功能,并引导用户到系统设置中打开相应的权限
                      return;
                    }
                  }
                }).catch((err) => {
                  console.info("data:" + JSON.stringify(err));
                })
              }
            },
            cancel: () => {
              console.info('Closed callbacks')
            }
          }
        )
      }
    }).catch((err) => {
      console.warn(`${type} fail, err->${JSON.stringify(err)}`);
    });
  } catch(err) {
    console.log(`catch err->${JSON.stringify(err)}`);
  }
}
/**
 * 选择图片 单/多
 */
export const chooseImage = (cb: Function, number: number) => {
  try {
    let PhotoSelectOptions = new picker.PhotoSelectOptions();
    PhotoSelectOptions.MIMEType = picker.PhotoViewMIMETypes.IMAGE_TYPE;
    PhotoSelectOptions.maxSelectNumber = number;
    let photoPicker = new picker.PhotoViewPicker();
    photoPicker.select(PhotoSelectOptions).then((PhotoSelectResult) => {
      console.info('PhotoViewPicker.select successfully, PhotoSelectResult uri: ' + JSON.stringify(PhotoSelectResult));
      console.log('PhotoSelectResult111', PhotoSelectResult)
      if (PhotoSelectResult && PhotoSelectResult.photoUris) {
        const imgList = PhotoSelectResult.photoUris;
        cb(imgList)
      }
    }).catch((err) => {
      console.error('PhotoViewPicker.select failed with err: ' + err);
    });
  } catch (err) {
    console.error('PhotoViewPicker failed with err: ' + err);
  }
}
/**
 * 上传图片
 */
export const uploadImageListOrSingle = async (files, cb:Function) => {
  const token = await PreferenceModel.getPreference('tokenInfo', 'token')
  const uploadConfigData = []
  console.info('转换之后的files', JSON.stringify(files))
  files.forEach(v => {
    const uploadConfig = {
      url: 'https://xxx.xxx.com/api/v1.0/oss/upload',
      header: {
        'Hwkj-Custom-Client': 'PlatformOfWeb',
        "Authorization": token ? 'Bearer ' + token : '',
      },
      method: "POST",
      files: [v],
      data: [{ name: "files", value: "files"}],
    }
    uploadConfigData.push(uploadConfig)
  })
  const promises = uploadConfigData.map(async item => await onGetImageUploadBackUrl(item));
  Promise.all(promises)
    .then((data) => {
      const showList = []
      data.forEach(v => {
        showList.push(v[0])
      })
      cb(showList)
    })
    .catch(error => {
      console.error("Error occurred1:", error);
    });
}
const onGetImageUploadBackUrl = (uploadConfig) => {
  let uploadTask;
  return new Promise((resolve, reject) => {
    try {
      request.uploadFile( getContext(this), uploadConfig).then((data) => {
        console.info('JSON.stringify(data)', JSON.stringify(data))
        uploadTask = data;
        let upProgressCallback = (data) => {
          console.info("data1111:" + JSON.stringify(data));
          resolve(data)
        };
        uploadTask.on('complete', upProgressCallback);
      }).catch((err) => {
        console.error('Failed to request the upload. Cause: ' + JSON.stringify(err));
      });
    } catch (err) {
      console.error('applog:', JSON.stringify(err));
      console.error('err.code : ' + err.code + ', err.message : ' + err.message);
    }
  })
}


 1118
1118


 被折叠的 条评论
为什么被折叠?
被折叠的 条评论
为什么被折叠?
 到【灌水乐园】发言


