


Fragment

核心要点
- 3.0版本后引入,即minSdk要大于11
- Fragment需要嵌套在Activity中使用,当然也可以嵌套到另一个Fragment中,但这个被嵌套的Fragment也是需要嵌套在Activity中的,间接地说,Fragment还是需要嵌套在Activity中!受寄主Activity的生命周期影响,当然Fragment也有自己的生命周期!另外不建议在Fragment里面嵌套Fragment 因为嵌套在里面的Fragment生命周期不可控!
- 官方文档说创建Fragment时至少需要实现三个方法:
onCreate(), onCreateView(), onPause();不过貌似致谢一个onCreateView也是可以的。 - Fragment的生命周期和Activity有点相似,都有三种状态:
- Resumed :在允许中的Fragment可见
- Paused: 所在Activity可见,但是得不到焦点
- Stoped:盗用addToBackStack() ,Fragment 被添加到Back 栈,该Activity转向后台,或者该Fragment被替换/删除。
Stoped状态的Fragment任然活着(所有状态和成员信息都被系统保持着),然而,它对用户来说不再可见,并且如果Activity被销毁,Fragment也会被一起销毁。
创建一个Fragment
静态加载
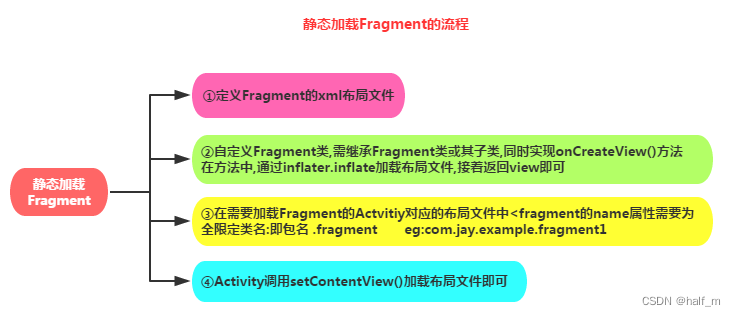
Step1: 定义Fragment的布局,也就是要显示的内容
Step2:自定义一个Fragment类,需要继承Fragment或者其子类,重写onCreateView() 方法 在该方法中调用:inflater,inflate() 方法加载Fragment的布局文件,接着返回加载的view 对象。
public clss Fragment extends Fragment {
 @Override
 public View onCreateView(LayoutInflater inflater, ViewGroup container, Bundle savedInstanceState) {
 View view = inflater.inflate(R.layout.fragment1, container,false);
 return view;
 }
}
Step3: 在需要加载Fragment的Activity对应的布局文件中添加fragment的标签,记住,name属性是全限定类名,就是要包含Fragment的包名,如:
<fragment
    android:id="@+id/fragment1"
    android:name="com.jay.example.fragmentdemo.Fragmentone"
    android:layout_width="match_parent"
    android:layout_height="0dp"
    android:layout_weight="1" />
Step4: Activity 在onCreate() 方法中调用setContentView() 加载布局文件即可!
动态加载
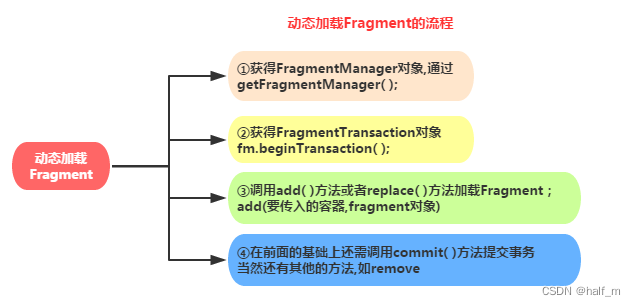
静态就是直接在XMl文件中添加布局,动态是直接在activity的java文件中添加 ,相当于对某个组件的替换。
下面我们举一个当横竖屏切换的时候切换Fragment的例子:(只写Activity的关键部分)
 		DisplayMetrics dm = new DisplayMetrics();
        getWindowManager().getDefaultDisplay().getMetrics(dm);
        if (dm.widthPixels < dm.heightPixels) {
            BlankFragment fragment = new BlankFragment();
            getSupportFragmentManager().beginTransaction().replace(R.id.linearLayout2,fragment).commit();

        }
        else {
            BlankFragment2 fragment2 = new BlankFragment2();
            getSupportFragmentManager().beginTransaction().replace(R.id.linearLayout2,fragment2).commit();

        }
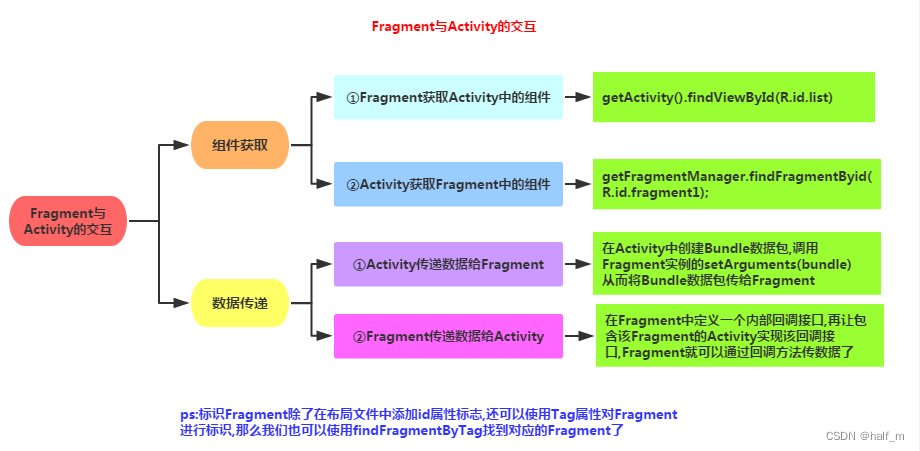
组件获取
Fragment获得Activity中的组件:fragment.getActivity().findViewById(R.id.textView);
Activity获得Fragment中的组件(根据id和tag都可以): getSupportFragmentManager().findFragmentById(R.id.textView);
PS:上述图片过旧,有些方法在如今的环境下已经不能用了,或者说是被官方给去掉了,文字内容会根据现在使用的方法进行修改。
数据传递
- Activity传递数据给Fragment:
在Activity中创建Bundle数据包,调用Fragment实例的setArguments(bundle)从而将Bundle数据包传给Fragment,然后Fragment中调用getArguments获得Bundle对象,然后进行解析就可以了。
- Fragment传递数据给Activity
在Fragment中定义一个内部回调接口,再让包含该Fragment的Activity实现该回调接口,Fragment就可以通过回调接口传数据了。
因为上面的是在菜鸟看的,看的我是迷迷糊糊,写的代码报错,我就写了别的;用getActivity来传递数据。
使用getActivity传递数据
BlankFragment.java
public class BlankFragment extends Fragment {

   Button button;
    public BlankFragment() {
        // Required empty public constructor
    }


    @Override
    public void onCreate(Bundle savedInstanceState) {
        super.onCreate(savedInstanceState);

    }

    @Override
    public View onCreateView(LayoutInflater inflater, ViewGroup container,
                             Bundle savedInstanceState) {
        // Inflate the layout for this fragment
        return inflater.inflate(R.layout.fragment_blank, container, false);
    }

    @Override
    public void onViewCreated(@NonNull View view, @Nullable Bundle savedInstanceState) {
        super.onViewCreated(view, savedInstanceState);
        button = view.findViewById(R.id.tz);
        button.setOnClickListener(new View.OnClickListener() {
            @Override
            public void onClick(View v) {
                ((MainActivity) getActivity()).receiveDataFragment("这是我传的值");
            }
        });
    }
}
MainActivity.java
public class MainActivity extends AppCompatActivity {

    BlankFragment fragment;
    @Override
    protected void onCreate(Bundle savedInstanceState) {
        super.onCreate(savedInstanceState);
        setContentView(R.layout.activity_main);

        fragment = new BlankFragment();
        FragmentManager fragmentManager = getSupportFragmentManager();
        FragmentTransaction fragmentTransaction = fragmentManager.beginTransaction();
        fragmentTransaction.replace(R.id.line1,fragment,null).commit();
    }
    public void receiveDataFragment(String data) {
        Toast.makeText(this,"收到来自Fragment的数据 " + data, Toast.LENGTH_SHORT).show();
    }
}
可以看看这个,就是界面切换,但是比之前我自己写的切换多个Activity比较好些,占的资源少;建议使用这样的Fragment来替换之前写的Activity。
可以考虑参照这个例子来重写之前的代码
https://www.runoob.com/w3cnote/android-tutorial-fragment-demo2.html


 1977
1977


 被折叠的 条评论
为什么被折叠?
被折叠的 条评论
为什么被折叠?
 到【灌水乐园】发言


