STM32的型号

五一起个大早,有个小伙伴问到了stm32f103c8t6和stm32f103zet6的选型,那咱们就简单唠唠。

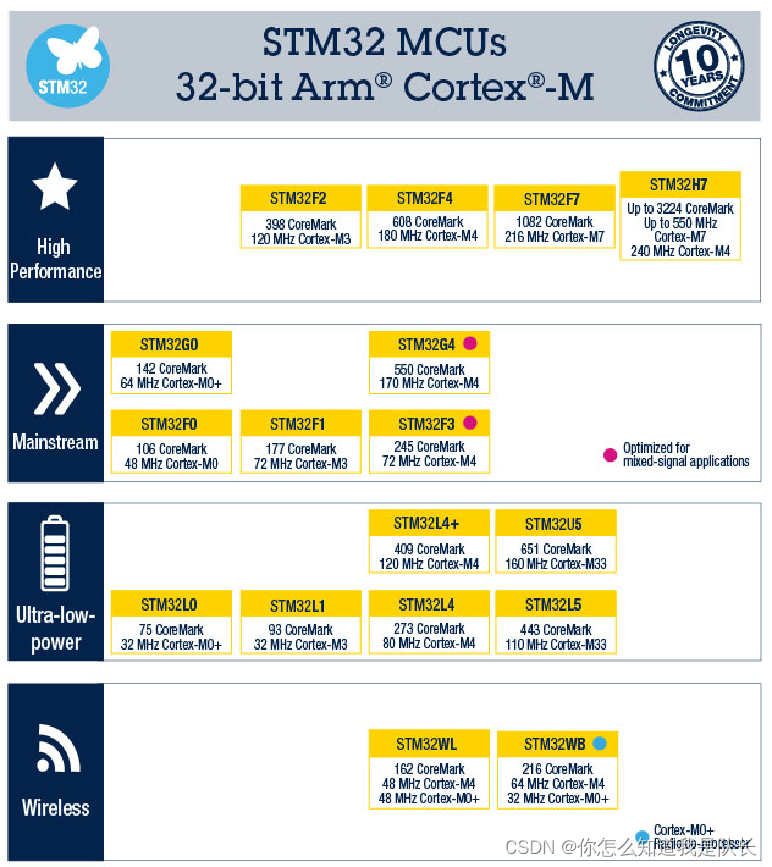
下面这张图片是官方那边的截图,由图可见,stm32主要分了四种类型:

高性能(High Performance)、主流(Mainstream)、低功耗(ULtra-low-power)、无线(Wireless)。

当然在这里面博主也仅仅只是用过高性能和主流,F4系列就是高性能,部分高校会用,网上也是一大把的教程,主流的就是F1系列那种,网上也是大把的教程。建议入门的去关注这个博主。江协科技的个人空间-江协科技个人主页-哔哩哔哩视频 (bilibili.com)

博主使用过低功耗的32位的话用过类似的n32,就是国民技术的芯片,其实用起来都差不多。

无线的是互联型的芯片,没有具体的用过,但是猜测这系列的芯片有自主上网功能。

废话不多说,进入今天的主题,解决小伙伴问的问题

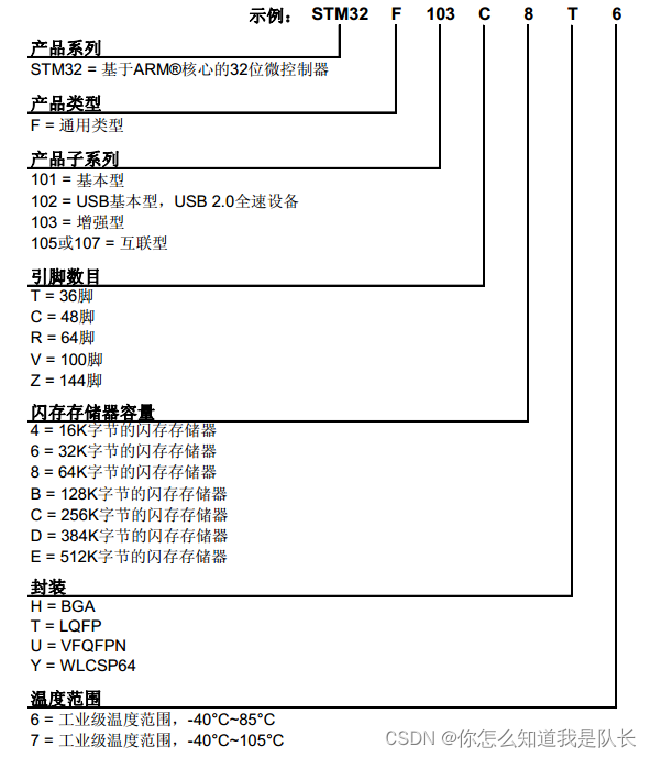
如下图所示,stm32f103zet6和stm32f103c8t6的区别体现在引脚数目和FLASH的容量上。

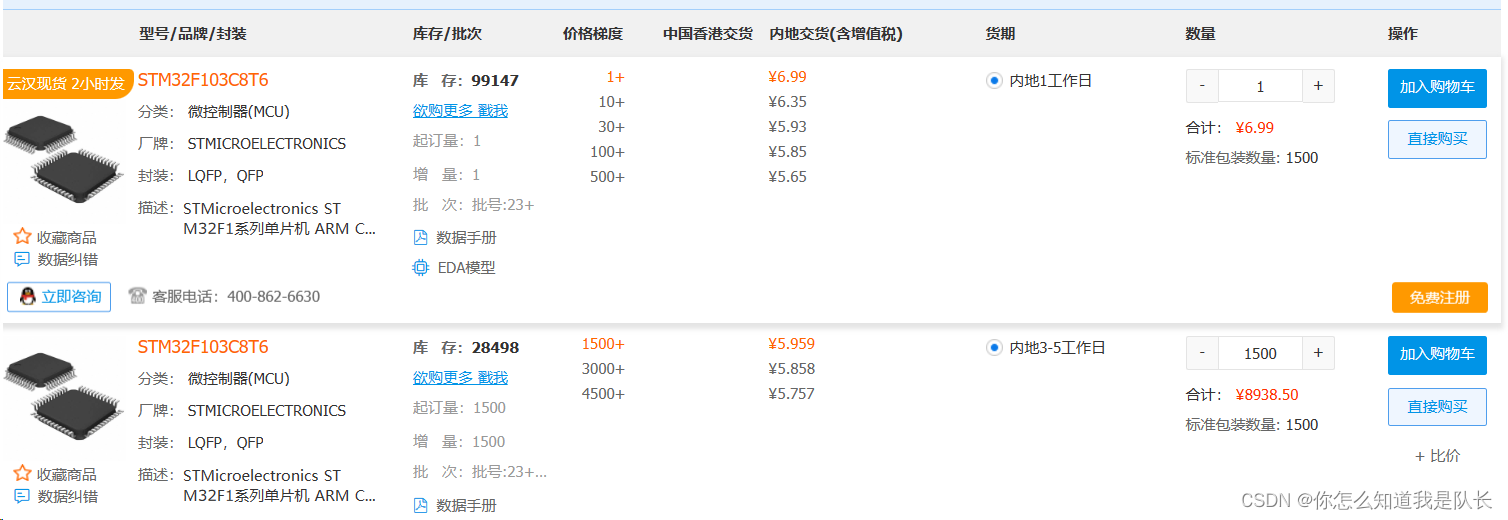
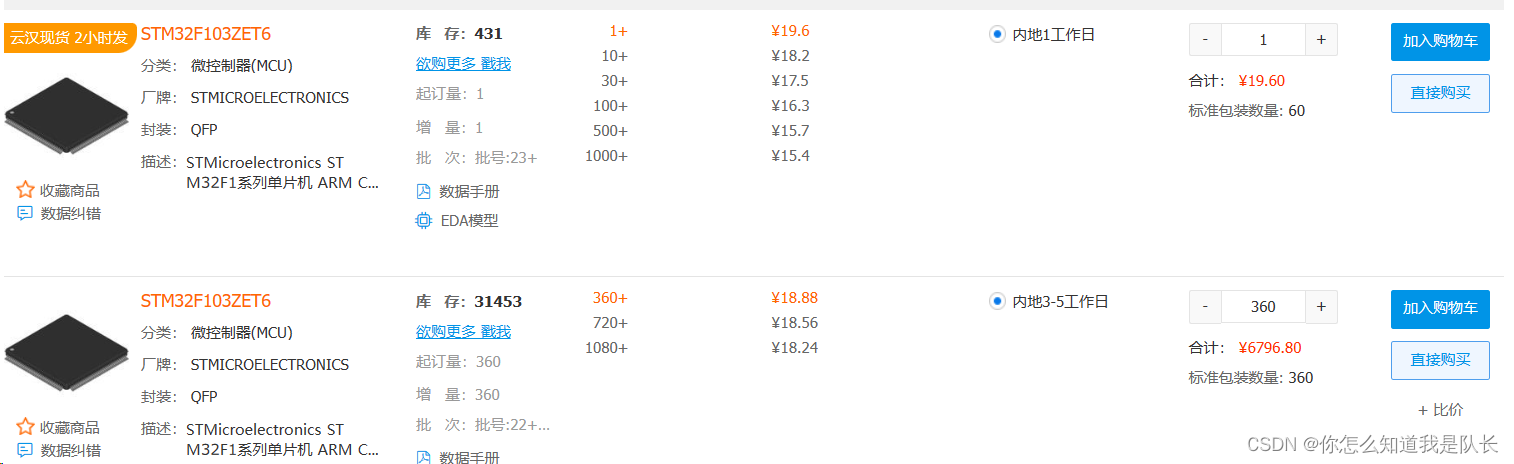
接下来看看他们的价格对比,zet6的价格是c8t6的一坤倍(2.5倍),使用当c8t6足够用的时候是不会选择zet6的,实际上现在很多公司的产品c8t6都用不起,太贵了没有竞争力。

价格对比来自云汉芯城官网:电子元器件采购_BOM配单_SMT贴片_PCB打样-云汉芯城ickey.cn

### STM32CubeMX Configuration for STM32F103C8T6 Project Template and Usage Guide #### Selecting the Microcontroller and Starting a New Project To begin configuring an STM32F103C8T6 project using STM32CubeMX, start by opening the software and selecting "ACCESS TO MCU SELECTOR". Choose the specific microcontroller model, which is STM32F103C8T6 in this case, followed by initiating a new engineering project[^1]. #### Setting Up System Parameters After choosing the correct microcontroller, proceed to configure system parameters including RCC (Reset and Clock Control). This involves setting up both external and internal oscillators based on application requirements. Additionally, select appropriate debugging modes under SYS settings as needed. #### Configuring Peripherals Peripheral configurations are crucial depending upon the intended functionality of the device. For instance: - **TIM4 Timer**: Set its frequency according to timing needs. - **USART Serial Communication Interface**: Configure UART pins like PA9 for TX and PA10 for RX if serial communication is required. - **Interrupts via NVIC**: Define interrupt priorities especially when multiple interrupts need handling simultaneously. For LED control specifically mentioned with PC13 and PC14 controlling LEDs while PA0 serves as input from KEY1 switch, these GPIO ports should be properly initialized within the peripheral setup phase[^5]. #### Managing Projects Specify paths along with naming conventions adhering strictly to English alphabets only during project creation stages. Ensure that KEIL MDK-ARM has been chosen correctly as the target IDE environment before proceeding further into code generation steps. #### Generating Source Code Finally, click “GENERATE CODE” after completing all necessary setups above; ensure saving changes made throughout this process regularly until completion[^4]. ```c // Example C function generated by STM32CubeMX showing basic initialization structure void MX_GPIO_Init(void){ __HAL_RCC_GPIOD_CLK_ENABLE(); /*Configure GPIO pin Output Level */ HAL_GPIO_WritePin(GPIOD, GPIO_PIN_12|GPIO_PIN_13|GPIO_PIN_14|GPIO_PIN_15, GPIO_PIN_RESET); /*Configure GPIO pins : PD12 PD13 PD14 PD15 */ GPIO_InitStruct.Pin = GPIO_PIN_12|GPIO_PIN_13|GPIO_PIN_14|GPIO_PIN_15; GPIO_InitStruct.Mode = GPIO_MODE_OUTPUT_PP; GPIO_InitStruct.Pull = GPIO_NOPULL; GPIO_InitStruct.Speed = GPIO_SPEED_FREQ_LOW; HAL_GPIO_Init(GPIOD, &GPIO_InitStruct); } ``` --related questions-- 1. How does one modify clock sources or adjust their frequencies through STM32CubeMX? 2. What considerations must be taken when deciding between different types of peripherals such as ADC versus DAC? 3. Can you explain how to integrate FreeRTOS scheduling alongside hardware timer functionalities? 4. In what scenarios would it make sense to use DMA over standard polling methods for data transfer operations? 5. Is there any difference in configuring USART interfaces across various series of STM32 chips?
评论
添加红包

请填写红包祝福语或标题

红包个数最小为10个

红包金额最低5元

当前余额3.43前往充值 >
需支付:10.00
成就一亿技术人!
领取后你会自动成为博主和红包主的粉丝 规则
hope_wisdom
发出的红包
实付
使用余额支付
点击重新获取
扫码支付
钱包余额 0

抵扣说明:

1.余额是钱包充值的虚拟货币,按照1:1的比例进行支付金额的抵扣。
2.余额无法直接购买下载,可以购买VIP、付费专栏及课程。

余额充值