


Vue组件
01 单文件 介绍
1.1 一个.vue 文件的组成(3个部分)
- 模板部分
<template>
页面模板
</template>
- JS模块对象
<script>
export default{
	data(){
return {}
},
	methods:{},
	computed:{},
	components:{}
}

</script>
- 样式
<style>样式定义</style>
1.2 基本使用
- 引入组件
- 映射成标签
- 使用组件标签
02 写一个组件
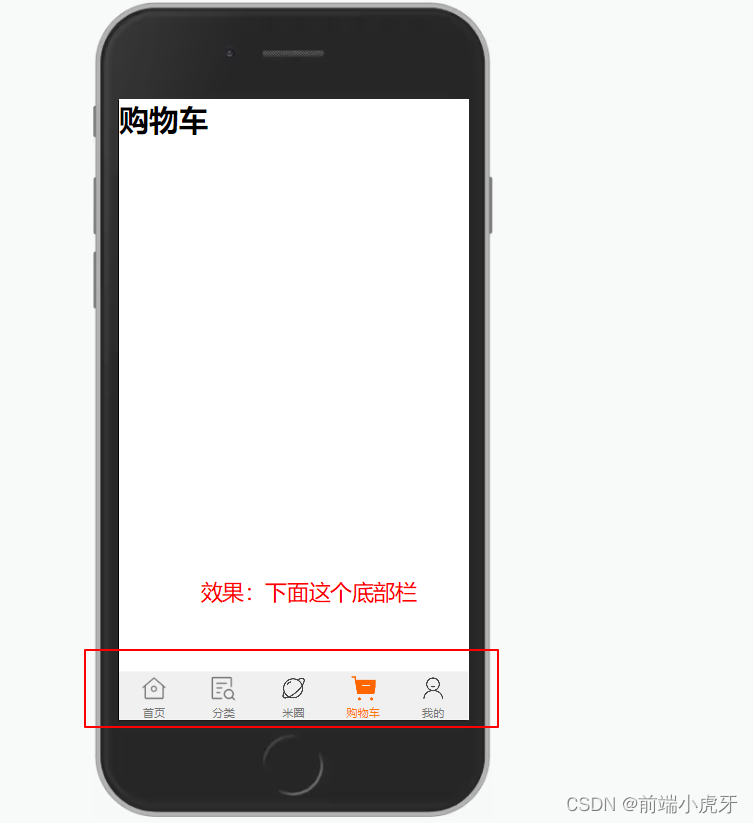
小米底部栏为例子
- 引入组件
在
App.vue里 引入组件,并注册代码看以下:
<script>
import TabsCom from "@/components/TabsCom.vue";
export default {
    components: { TabsCom },
};
</script>
- 在
components里新建 一个.vue文件,命名为TabsCom.vue;
以下 图片路径是自己项目下的,注意区分:
<template>
    <div>
        <div class="tabs">
            <router-link to="/" class="link ahome">首页</router-link>
            <router-link to="/sort" class="link acate">分类</router-link>
            <router-link to="/mi" class="link circle">米圈</router-link>
            <router-link to="/shop" class="link shopcar">购物车</router-link>
            <router-link to="/user" class="link users">我的</router-link>
        </div>
    </div>
</template>
<style lang="scss" scoped>
.tabs {
    /* 底部栏固定定位 */
    position: fixed;
    height: 1rem;
    width: 100%;
    left: 0;
    right: 0;
    bottom: 0;
    background-color: #f0f0f0;
    display: flex;
    .link {
        /* 自适应宽水平对齐,文字是9px 9px*2 =18px  0.18rem */
        flex: 1;
        text-align: center;
        font-size: 0.18rem;
    }
    .link.router-link-exact-active {
        /* 选中文本颜色 */
        /* .router-link-exact-active 当前路由精确匹配to 的值(自带的) */
        color: #f70;
    }
    .link::before {
        content: "";
        display: block;
        height: 0.5rem;
        width: 0.5rem;
        background-image: url(../assets/home.png);
        background-repeat: no-repeat;
        /* 背景图覆盖整个大小0.5rem */
        background-size: cover;
        margin: 0.1rem auto;
    }

    /* 设置分类的图标 */
    .ahome.router-link-exact-active::before {
        /* .ahome 与 .router-link-exact-active 之间没有空格
    代表这个选中的元素既有class .ahome 也有class.router-link...
    在查找子伪元素before
    */
        background-image: url(../assets/home-h.png);
    }
    .acate::before {
        background-image: url(../assets/cat.png);
    }

    /* 设置分类选中的图标 */
    .acate.router-link-exact-active::before {
        background-image: url(../assets/cat-h.png);
    }
    /* 设置米圈图标 */
    .circle::before {
        background-image: url(../assets/ball.png);
    }
    .circle.router-link-exact-active::before {
        background-image: url(../assets/ball-h.png);
    }

    /* 设置购物车图标 */
    .shopcar::before {
        background-image: url(../assets/cart.png);
    }
    .shopcar.router-link-exact-active::before {
        background-image: url(../assets/cart-h.png);
    }

    /* 设置我的图标 */
    .users::before {
        background-image: url(../assets/user.png);
    }
    .users.router-link-exact-active::before {
        background-image: url(../assets/user-h.png);
    }
}
</style>
- 使用组件
在
App.vue里使用
<template>
    <div id="app">
        <router-view class="page has-tabs"></router-view>
        <tabs-com></tabs-com>
    </div>
</template>
- 样式实现
Vue插件
01 介绍
插件(Plugins)是一种能为Vue添加全局功能的工具代码。
import {createApp} from 'vue'
const app = createApp({})
app.use(myPlugin,{
/* 可选的选项  */
})
通过Vue.use 来注册插件(如果是一个对象,必须提供install方法。如果插件是一个函数,它会被作为install方法。install方法调用时,会将Vue作为参数传入)
- 插件是一个对象,必须实现install方法
- 插件需要在vue 文件中使用 Vue.use(插件)
02 编写 插件plugin
- 插件方法
Vue.extend(.vue 文件)    //继承.vue 文件的构造函数

instance.$mount(dom)    // 手动挂载

instance.$el     // 实例的真实dom

Vue.prototype.$toast = Toast  // 将插件挂载到全局(所有组件的实例都拥有插件的方法和属性)
代码实现
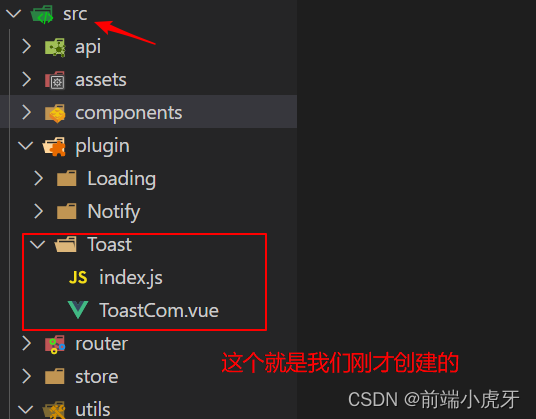
- 在
src里面新建文件夹plugin,在plugin里面新建 文件夹Toast,在Toast里新建index.js和ToastCom.vue,最后目录结构为以下这样;
- 在
ToastCom.vue写以下代码;
<template>
    <div class="toast" v-if="msg">
        {{ msg }}
    </div>
</template>

<script>
export default {
    data() {
        return {
            msg: "",
        };
    },
    methods: {
        show(str = "请稍等一下...", delay = 2000) {
            this.msg = str;
            setTimeout(() => this.hide(), delay);
        },
        hide() {
            this.msg = "";
        },
    },
};
</script>

<style scoped>
.toast {
    position: fixed;
    left: 50%;
    top: 50%;
    transform: translate(-50%, -50%);
    padding: 15px;
    border-radius: 4px;
    color: #fff;
    background-color: rgba(0, 0, 0, 0.4);
    z-index: 10000;
}
</style>
- 在
index.js写以下代码;
//01 导入组件
import ToastVue from "./ToastCom.vue";

// 定义一个插件
var Toast = {};

// Vue 的插件 必须实现 install 方法
Toast.install = function (Vue) {
    // 02 获取组件的构造函数
    var ToastCom = Vue.extend(ToastVue);
    //03 创建组件的实例
    var instance = new ToastCom();
    //04 挂载到 真实 的dom
    instance.$mount(document.createElement("div"));
    //05 插入到body
    document.body.appendChild(instance.$el);
    //06 关联 Toast 插件
    Toast.show = instance.show;
    Toast.hide = instance.hide;

    //把当前对象挂载到Vue 的原型上
    //Vue 所有的组件和实例都可以使用 $toast 方法
    Vue.prototype.$toast = Toast;
};

// 导出插件
export default Toast;
- 在
main.js使用这个插件
//导入插件
import Toast from "@/plugin/Toast/index.js";

//使用插件 (执行Toast 的 install方法)
Vue.use(Toast);
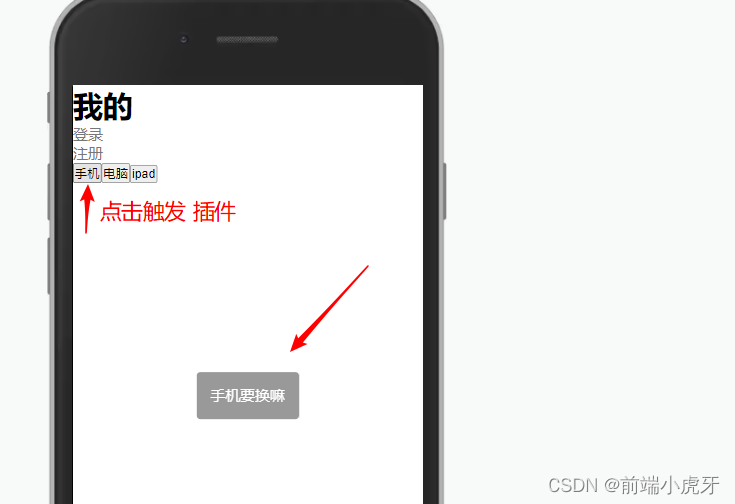
- 在项目里使用
this.$toast.show();
或者
<button @click="$toast.show('手机要换嘛')">手机</button>
<button @click="$toast.show('电脑屏不大嘛')">电脑</button>
<button @click="$toast.show('用ipad不香嘛', 5000)">ipad</button>
- 效果
03 编写 插件Notify 插件
- 插件方法同上
代码实现
- 在
src里面新建文件夹plugin,在plugin里面新建 文件夹Notify,在Notify里新建index.js和NotifyCom.vue,最后目录结构为以下这样;

- 在
NotifyCom.vue写以下代码;
<template>
    <div
        class="notify"
        v-if="msg"
        :style="{ color: color, backgroundColor: bgColor }"
    >
        {{ msg }}
    </div>
</template>

<script>
export default {
    data() {
        return {
            msg: "", //通知的文本
            color: "#ad0000",
            bgColor: "#ffe1e1",
        };
    },
    methods: {
        show(msg, bgColor = "#090", color = "#fff") {
            this.msg = msg;
            this.bgColor = bgColor;
            this.color = color;
            // 2秒后隐藏
            setTimeout(() => {
                this.hide();
            }, 2000);
        },
        hide() {
            this.msg = "";
        },
        success(msg) {
            this.show(msg, "#090");
        },
        danger(msg) {
            this.show(msg, "#ff5500");
        },
        warning(msg) {
            this.show(msg, "#ffd606");
        },
    },
};
</script>

<style scoped>
.notify {
    /* padding: 10px; */
    width: 100vw;
    height: 44px;
    line-height: 44px;
    font-size: 16px;
    text-align: center;
    position: fixed;
    top: 0;
    left: 0;
    z-index: 10000;
    /* border-top-left-radius: 20px;
    border-top-right-radius: 20px; */
    animation: fadeInDown 1s;
}
/*从上到下*/
@keyframes fadeInDown {
    from {
        opacity: 0;
        -webkit-transform: translate(0, -1000px); /* Safari */
        transform: stranslate(0, -1000px); /* 标准语法 */
    }
    to {
        opacity: 1;
        -webkit-transform: translate(0, 10px); /* Safari */
        transform: stranslate(0, 10px); /* 标准语法 */
    }
}
</style>
- 在
index.js写以下代码;
//01 导入组件
import NotifyVue from "./NotifyCom.vue";

// 定义一个插件
const Notify = {};
// Vue 的插件 必须实现 install 方法
Notify.install = function (Vue) {
    // 02 获取组件的构造函数
    var NotifyCom = Vue.extend(NotifyVue);
    //03 创建组件的实例
    var instance = new NotifyCom();
    //04 挂载到 真实 的dom
    instance.$mount(document.createElement("div"));
    //05 插入到body
    document.body.appendChild(instance.$el);
    //06 同步插件 Notify 和 NotifyVue实例的方法
    Notify.show = instance.show;
    Notify.hide = instance.hide;
    Notify.success = instance.success;
    Notify.danger = instance.danger;
    Notify.warning = instance.warning;

    //把当前对象挂载到Vue 的原型上
    //Vue 所有的组件和实例都可以使用 $Notify 方法
    Vue.prototype.$notify = Notify;
};

// 导出插件
export default Notify;
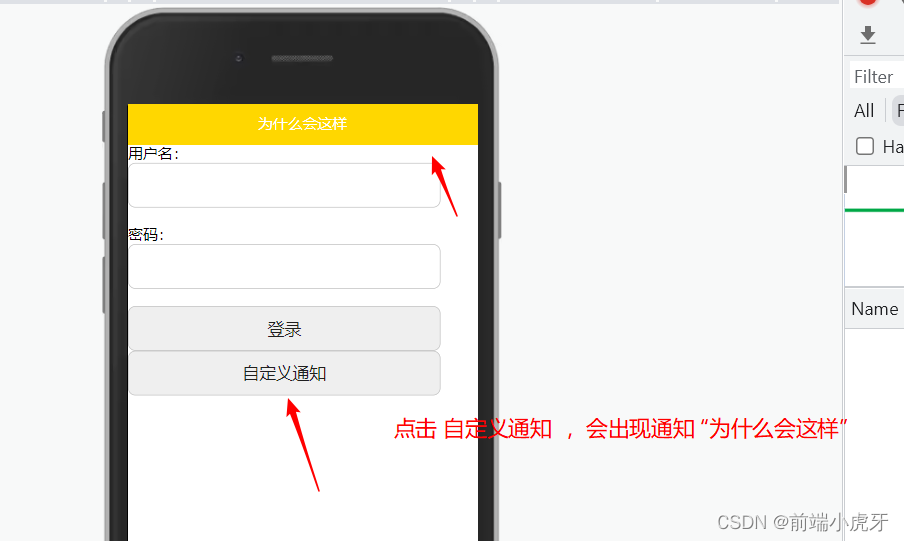
- 在项目里使用
<button @click="$notify.show('为什么会这样','gold')">自定义通知</button>
或
 this.$notify.success(res.data.msg);

 this.$notify.danger(res.data.msg);
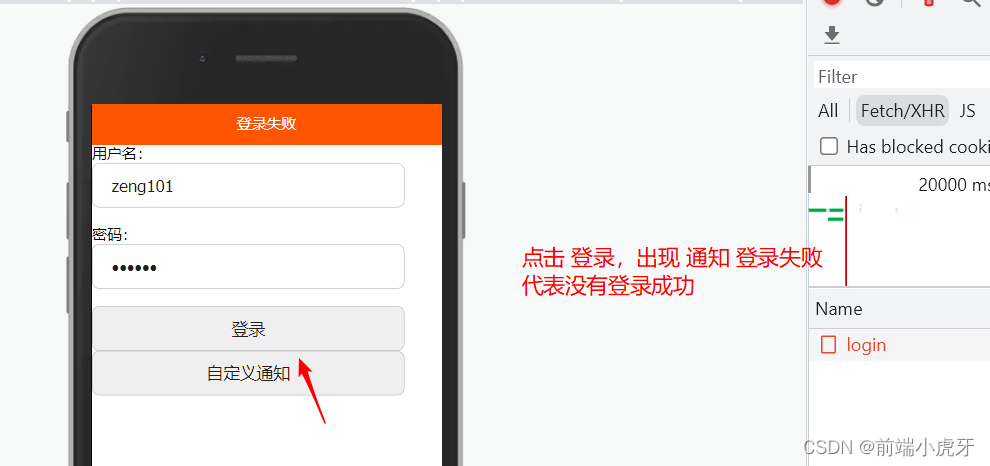
- 效果图展示
今天的分享就到这里了~


 125
125


 被折叠的 条评论
为什么被折叠?
被折叠的 条评论
为什么被折叠?
 到【灌水乐园】发言


