


一、配置文件
🌔 1、什么是 yaml ?
-
YAML 是 “YAML Ain’t Markup Language”(YAML 不是一种标记语言)的递归缩写。在开发的这种语言时,YAML 的意思其实是:“Yet Another Markup Language”(仍是一种标记语言)。
-
适用于以数据为中心的配置文件
🌔 2、基本语法
- 普通的
key: value, kv之间有一个空格 - 区分大小写
- 使用缩进表示层级关系
- 缩进不用tab
- 只允许用空格
- 空格数不重要,只要相同层级的元素左对齐即可
- 用 # 表示注释
- 字符串无需加引号,如果要加分为两种情况
- 单引号不会转义,会将 \n 作为字符串输出
- 双引号会转义,会将 \n作为换行输出
🌔 3、针对每类数据类型的语法
(1)字面量:单个的、不可再分的值。 date、boolean、string、number、null
k: v
(2)对象:键值对的集合。map、hash、set、object
# 第一种写法
k: {k1:v1,k2:v2,k3:v3}
# 第二种写法
k:
    k1: v1
    k2: v2
    k3: v3
(3)数组:一组按照次序排列的值。 array、list、queue
# 第一种写法
k: [v1,v2,v3]
# 第二中写法
k:
   - v1
   - v2
   - v3
我们通过一个案例来演示,具体在yaml文件中如何对属性值进行配置
- 实体类
package com.atguigu.boot.bean;

import lombok.Data;
import lombok.ToString;
import org.springframework.boot.context.properties.ConfigurationProperties;
import org.springframework.stereotype.Component;

import java.util.Date;
import java.util.List;
import java.util.Map;
import java.util.Set;

/**
 * @author Bonbons
 * @version 1.0
 * 演示各种数据类型对应的yaml语法编写
 */
@Data
@Component
@ToString
@ConfigurationProperties(prefix = "person")
public class Person {
    private String userName;
    private Boolean boss;
    private Date birth;
    private Integer age;
    private Pet pet;
    private String [] interest;
    private List<String> animal;
    private Map<String, Object> score;
    private Set<Double> salarys;
    private Map<String, List<Pet>> allPets;
}

@Data
@Component
@ToString
class Pet{
    private String name;
    private Double weight;
}
- 编写 application.yml
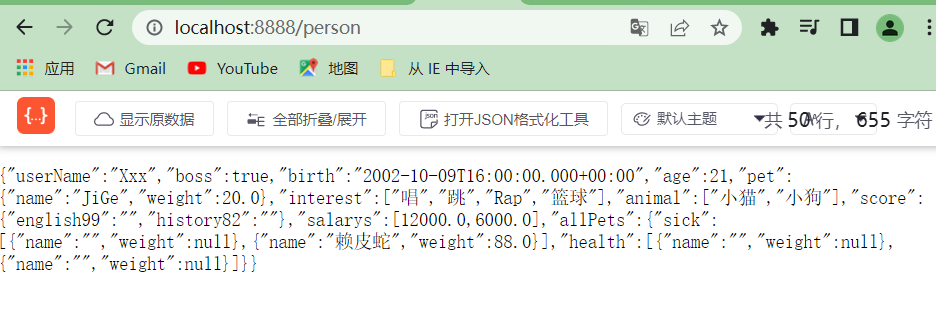
person:
  userName: "JiMei"
  boss: true
  birth: 2002/10/10
  age: 21
  interest: ['唱', '跳', 'Rap', '篮球']
  pet:
    name: "JiGe"
    weight: 20
  animal:
    - '小猫'
    - '小狗'
  score: {english:99,history:82}
  salarys:
    - 12000.0
    - 6000.0
  allPets:
    sick:
      - {name:阿芙,weight:10}
      - name: 赖皮蛇
        weight: 88
    health: [{name:诺手,weight:99}, {name:双面龟,weight:999}]
-
可以看到我在上面用到了 @ConfigurationProperties注解,因为也对 application.properties 进行了配置
server.port=8888 person.userName=Xxx -
在附上我们的主程序
package com.atguigu.boot;

import org.springframework.boot.SpringApplication;
import org.springframework.boot.autoconfigure.SpringBootApplication;

/**
 * @author Bonbons
 * @version 1.0
 */
@SpringBootApplication
public class HelloWorldApplication {
    public static void main(String[] args) {
        SpringApplication.run(HelloWorldApplication.class, args);

        System.out.println("项目启动成功!");
    }
}
运行结果如下
- 可以发现在 .properties、.yml 中的配置全都生效了,优先选择的properties中设定的配置
- 这两个文件都是作为全局配置文件使用的
🌔 4、如何开启配置提示呢?
-
就是我们在编写 yml 文件的时候,会根据我们打出的部分提示可能输入的内容
-
我们可以导入一个依赖来完成这个功能
<dependency> <groupId>org.springframework.boot</groupId> <artifactId>spring-boot-configuration-processor</artifactId> <optional>true</optional> </dependency> -
还有一个打包插件:
	<build>
        <plugins>
            <plugin>
                <groupId>org.springframework.boot</groupId>
                <artifactId>spring-boot-maven-plugin</artifactId>
                <configuration>
                    <excludes>
                        <exclude>
                            <groupId>org.springframework.boot</groupId>
                            <artifactId>spring-boot-configuration-processor</artifactId>
                        </exclude>
                    </excludes>
                </configuration>
            </plugin>
        </plugins>
    </build>
二、Web开发
2.1 简单功能分析
🌔 1、如何访问到静态资源?
- SpringBoot 为我们提供了两种方式来访问静态资源:
- 把所有的静态资源放在指定的文件夹下,直接通过根路径就可以访问的到
- 我们可以自定义静态资源文件夹
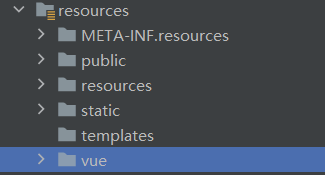
resources 的六个子目录,出了vue是我自定义的静态资源文件夹,其他几个都是默认的
查找静态资源的优先级: 自定义 > /META-INF/resources/ > resources > static > public
- 自定义静态资源的路径,需要在 application.yml 文件中进行配置【多个路径用逗号分隔】
spring:
	resources:
      static-locations: [classpath:/vue/]
-
请求进来,先去找Controller看能不能处理。不能处理的所有请求又都交给静态资源处理器。静态资源也找不到则响应404页面
- 也就是说: 如果控制器配置了与静态资源同名的请求处理,那么请求就会被控制器拦截
-
使用了自定义的静态资源路径后,原来默认的静态资源路径仍会生效
-
下面为默认路径在源码中的相关体现:
@ConfigurationProperties(prefix = "spring.resources", ignoreUnknownFields = false)
public class ResourceProperties {

	private static final String[] CLASSPATH_RESOURCE_LOCATIONS = { "classpath:/META-INF/resources/",
			"classpath:/resources/", "classpath:/static/", "classpath:/public/" };

	/**
	 * Locations of static resources. Defaults to classpath:[/META-INF/resources/,
	 * /resources/, /static/, /public/].
	 */
	private String[] staticLocations = CLASSPATH_RESOURCE_LOCATIONS;
🌔 2、如果一个项目中有很多静态资源,我们如何区分调用它们呢?
-
我们可以为静态资源设置访问前缀
spring: mvc: static-path-pattern: /res/** -
之后我们想要在浏览器发送请求访问我们的静态资源,就要采取 当前项目 + static-path-pattern + 静态资源名 的方式
-
如果觉得加上前缀很麻烦,我们可以使用 webjar 来解决:
- 我们需要导入对应的依赖
<dependency> <groupId>org.webjars</groupId> <artifactId>jquery</artifactId> <version>3.5.1</version> </dependency>- 对于webjar依赖中的静态资源,会被映射处理成两种请求路径:
/webjars/**;/static-path-pattern属性值/webjars/**- 所以访问webjars中的静态资源时,静态请求前缀可加可不加
🌔 3、SpringBoot 支持欢迎页特性
-
需要我们将欢迎页 index 放到静态资源路径下
-
可以配置额外的静态资源路径,但是不能设置访问前缀,否则我们只能通过 Controller 来处理 /index 请求 【底层源码是这样解释的】
WelcomePageHandlerMapping(TemplateAvailabilityProviders templateAvailabilityProviders, ApplicationContext applicationContext, Optional<Resource> welcomePage, String staticPathPattern) { if (welcomePage.isPresent() && "/**".equals(staticPathPattern)) { logger.info("Adding welcome page: " + welcomePage.get()); this.setRootViewName("forward:index.html"); } else if (this.welcomeTemplateExists(templateAvailabilityProviders, applicationContext)) { logger.info("Adding welcome page template: index"); this.setRootViewName("index"); } } -
我们可以采取下面的方案,来实现添加前缀也能找到Welcome页 【在配置文件中进行配置】

- 欢迎页的处理规则
	HandlerMapping:处理器映射。保存了每一个Handler能处理哪些请求。

	@Bean
		public WelcomePageHandlerMapping welcomePageHandlerMapping(ApplicationContext applicationContext,
				FormattingConversionService mvcConversionService, ResourceUrlProvider mvcResourceUrlProvider) {
			WelcomePageHandlerMapping welcomePageHandlerMapping = new WelcomePageHandlerMapping(
					new TemplateAvailabilityProviders(applicationContext), applicationContext, getWelcomePage(),
					this.mvcProperties.getStaticPathPattern());
			welcomePageHandlerMapping.setInterceptors(getInterceptors(mvcConversionService, mvcResourceUrlProvider));
			welcomePageHandlerMapping.setCorsConfigurations(getCorsConfigurations());
			return welcomePageHandlerMapping;
		}

	WelcomePageHandlerMapping(TemplateAvailabilityProviders templateAvailabilityProviders,
			ApplicationContext applicationContext, Optional<Resource> welcomePage, String staticPathPattern) {
		if (welcomePage.isPresent() && "/**".equals(staticPathPattern)) {
            //要用欢迎页功能,必须是/**
			logger.info("Adding welcome page: " + welcomePage.get());
			setRootViewName("forward:index.html");
		}
		else if (welcomeTemplateExists(templateAvailabilityProviders, applicationContext)) {
            // 调用Controller  /index
			logger.info("Adding welcome page template: index");
			setRootViewName("index");
		}
	}
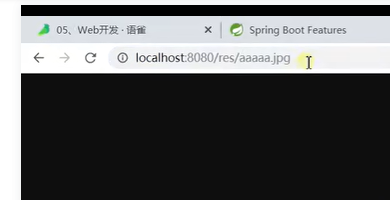
🌔 4、我们还可以自定义网站图标
- 只需要把图标文件 favicon.ico 放在静态资源目录下即可
- 需要注意:浏览器的session没关,就是同一次会话,浏览器的访问图标修改后也不会变
- 我们可以更换一个浏览器进行访问
- 打开浏览器开发者工具,禁用缓存后反复刷新 【不要关闭开发者工具这个页面】
🌔 5、静态资源的配置原理
- SpringBoot启动默认加载 xxxAutoConfiguration 类(自动配置类)
- SpringMVC功能的自动配置类 WebMvcAutoConfiguration,生效
@Configuration(proxyBeanMethods = false)
@ConditionalOnWebApplication(type = Type.SERVLET)
@ConditionalOnClass({ Servlet.class, DispatcherServlet.class, WebMvcConfigurer.class })
@ConditionalOnMissingBean(WebMvcConfigurationSupport.class)
@AutoConfigureOrder(Ordered.HIGHEST_PRECEDENCE + 10)
@AutoConfigureAfter({ DispatcherServletAutoConfiguration.class, TaskExecutionAutoConfiguration.class,
		ValidationAutoConfiguration.class })
public class WebMvcAutoConfiguration {}
- 那么给容器中配置了什么呢?
	@Configuration(proxyBeanMethods = false)
	@Import(EnableWebMvcConfiguration.class)
	@EnableConfigurationProperties({ WebMvcProperties.class, ResourceProperties.class })
	@Order(0)
	public static class WebMvcAutoConfigurationAdapter implements WebMvcConfigurer {}
-
配置文件的相关属性和xxx进行了绑定。
WebMvcProperties==spring.mvc、ResourceProperties==spring.resources -
在配置类中只有一个有参构造器
	//有参构造器所有参数的值都会从容器中确定
//ResourceProperties resourceProperties;获取和spring.resources绑定的所有的值的对象
//WebMvcProperties mvcProperties 获取和spring.mvc绑定的所有的值的对象
//ListableBeanFactory beanFactory Spring的beanFactory
//HttpMessageConverters 找到所有的HttpMessageConverters
//ResourceHandlerRegistrationCustomizer 找到 资源处理器的自定义器。=========
//DispatcherServletPath
//ServletRegistrationBean   给应用注册Servlet、Filter....
	public WebMvcAutoConfigurationAdapter(ResourceProperties resourceProperties, WebMvcProperties mvcProperties,
				ListableBeanFactory beanFactory, ObjectProvider<HttpMessageConverters> messageConvertersProvider,
				ObjectProvider<ResourceHandlerRegistrationCustomizer> resourceHandlerRegistrationCustomizerProvider,
				ObjectProvider<DispatcherServletPath> dispatcherServletPath,
				ObjectProvider<ServletRegistrationBean<?>> servletRegistrations) {
			this.resourceProperties = resourceProperties;
			this.mvcProperties = mvcProperties;
			this.beanFactory = beanFactory;
			this.messageConvertersProvider = messageConvertersProvider;
			this.resourceHandlerRegistrationCustomizer = resourceHandlerRegistrationCustomizerProvider.getIfAvailable();
			this.dispatcherServletPath = dispatcherServletPath;
			this.servletRegistrations = servletRegistrations;
		}
2.2 请求参数处理
2.2.1 请求映射
🌔 1、rest(一种编程风格)的使用和原理
-
REST 风格支持 使用HTTP请求方式动词来表示对资源的操作
- 以前:/getUser 获取用户 /deleteUser 删除用户 /editUser 修改用户 /saveUser 保存用户
- 现在: /user GET-获取用户 DELETE-删除用户 PUT-修改用户 POST-保存用户
-
正常不支持直接将method设置为 put 和 delete 的表单请求,会默认改为get请求
- 不过我们可以先将表单设置为post请求,再使用一个隐藏参数_method更换为这两个请求
- 手动开启 restful 风格
hidden-method: filter: enabled: true
(1) 编写Mapping映射
@RequestMapping(value = "/user",method = RequestMethod.GET)
    public String getUser(){
        return "GET-张三";
    }

    @RequestMapping(value = "/user",method = RequestMethod.POST)
    public String saveUser(){
        return "POST-张三";
    }


    @RequestMapping(value = "/user",method = RequestMethod.PUT)
    public String putUser(){
        return "PUT-张三";
    }

    @RequestMapping(value = "/user",method = RequestMethod.DELETE)
    public String deleteUser(){
        return "DELETE-张三";
    }
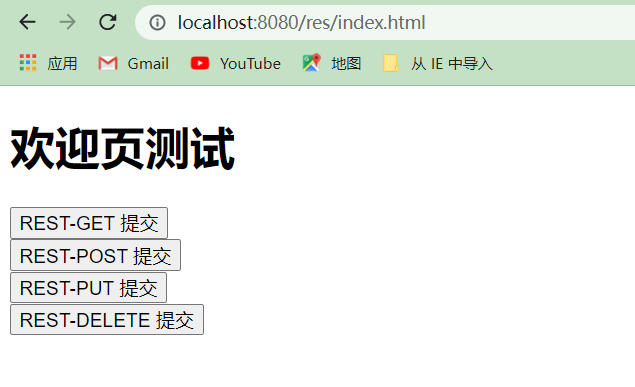
(2) 在欢迎页里编写表单
<!--设计四个表单,测试是否能完成四种类型的请求-->
<form action="/user" method="get">
    <input value="REST-GET 提交" type="submit" />
</form>
<form action="/user" method="post">
      <input value="REST-POST 提交" type="submit" />
</form>
<form action="/user" method="post">
    <input name="_method" type="hidden" value="put">
    <input value="REST-PUT 提交" type="submit" />
</form>
<form action="/user" method="post">
    <input name="_zbc" type="hidden" value="delete">
    <input name="_method" type="hidden" value="delete">
      <input value="REST-DELETE 提交" type="submit" />
</form>
(3)在 application.yml 中开启restful风格的设定
- 经过测试发送的几个请求都达到了预期效果
- 我们可以在控制器的映射注解中去掉 method,将注解进行替换
- @GetMapping、@PostMapping、@PutMapping、@DeleteMapping
- 可以看到我的post表单还有一个隐藏的属性: _zbc
- 通过创建一个 HiddenHttpMethodFilter 组件,实现将_method 修改为我们指定的内容
package com.atguigu.boot.config;

import org.springframework.context.annotation.Bean;
import org.springframework.context.annotation.Configuration;
import org.springframework.web.filter.HiddenHttpMethodFilter;

/**
 * @author Bonbons
 * @version 1.0
 */
@Configuration
public class WebConfig {

    @Bean
    public HiddenHttpMethodFilter hiddenHttpMethodFilter(){
        HiddenHttpMethodFilter hiddenHttpMethodFilter = new HiddenHttpMethodFilter();
        //修改_method为_zbc
        hiddenHttpMethodFilter.setMethodParam("_zbc");
        return hiddenHttpMethodFilter;
    }
}
🌔 2、在使用Rest完成表单提交的原理 【只用于表单提交】
- 表单提交会带上 _method =PUT/DELETE
- 请求过来被HiddenHttpMethodFilter拦截
- 先检查 请求是否正常,并且是POST
- 满足上面的条件再获取到_method的值 【_method 的值可以是 PUT.DELETE.PATCH】
- 原生request(post),包装模式requesWrapper重写了getMethod方法,返回的是传入的值
- 过滤器链放行的时候用wrapper。以后的方法调用getMethod是调用requesWrapper的
需要注意:上面的这个应用原理是针对表单请求而言的,而且在SpringBoot中是通过配置选择开启的
spring:
  mvc:
    hiddenmethod:
      filter:
        enabled: true   #开启页面表单的Rest功能
🌔 3、我们需要了解请求映射的原理

- 这是一个向下继承,层级调用的体现
- 每个请求都被 org.springframework.web.servlet.DispatcherServlet 的 doDispatch()处理
protected void doDispatch(HttpServletRequest request, HttpServletResponse response) throws Exception {
		HttpServletRequest processedRequest = request;
		HandlerExecutionChain mappedHandler = null;
		boolean multipartRequestParsed = false;

		WebAsyncManager asyncManager = WebAsyncUtils.getAsyncManager(request);

		try {
			ModelAndView mv = null;
			Exception dispatchException = null;

			try {
				processedRequest = checkMultipart(request);
				multipartRequestParsed = (processedRequest != request);

				// 找到当前请求使用哪个Handler(Controller的方法)处理
				mappedHandler = getHandler(processedRequest);

                //HandlerMapping:处理器映射。/xxx->>xxxx
-
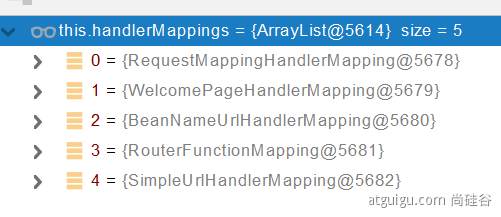
RequestMappingHandlerMapping:保存了所有@RequestMapping 和handler的映射规则
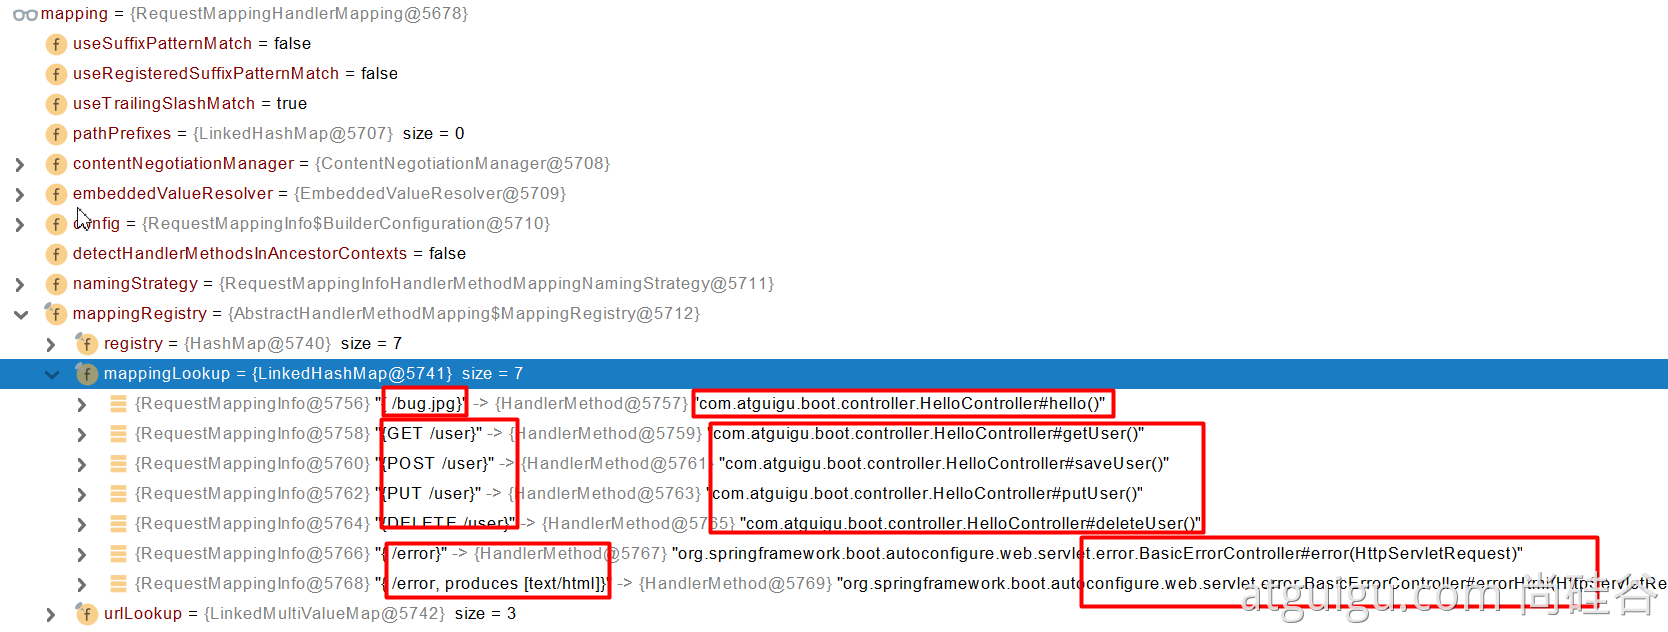
-
所有的请求映射都在HandlerMapping中。
- SpringBoot自动配置欢迎页的 WelcomePageHandlerMapping 。访问 /能访问到index.html;
- SpringBoot自动配置了默认 的 RequestMappingHandlerMapping
- 请求进来,挨个尝试所有的HandlerMapping看是否有请求信息。
- 如果有就找到这个请求对应的handler
- 如果没有就是下一个 HandlerMapping
- 我们需要一些自定义的映射处理,我们也可以自己给容器中放HandlerMapping。自定义 HandlerMapping
	protected HandlerExecutionChain getHandler(HttpServletRequest request) throws Exception {
		if (this.handlerMappings != null) {
			for (HandlerMapping mapping : this.handlerMappings) {
				HandlerExecutionChain handler = mapping.getHandler(request);
				if (handler != null) {
					return handler;
				}
			}
		}
		return null;
	}
2.2.2 普通参数与基本注解
- 在此部分我将介绍一些底层常用注解,会演示如何使用以及简单的对原理试图理解
🌔 1、先介绍@PathVariable、@RequestHeader、@RequestAttribute、@RequestParam、@MatrixVariable、@CookieValue、@RequestBody
- @PathVariable 代表路径变量,使用的形式
@PathVariable("name") String name,用{}代表路径 - @RequestHeader 代表请求头信息,我们可以获取指定的请求头,也可以获取全部的请求头
- @RequestAttribute 代表请求域中的数据,我们可以向请求域添加数据,也可以取数据
- @RequestParam 代表请求参数,我们可以获取到指定的请求参数和全部的请求参数
- @MatrixVariable 代表矩阵变量,在SpringBoot中默认是禁用的,需要我们进行配置,是一种用分号相隔的请求
- @CookieValue 代表Cookie,我们可以获取指定的cookie
- @RequestBody 代表请求体,我们可以获取POST请求的请求体
接下来我们通过具体的代码进行演示
- (1)直接给出了完整的用于发起请求的测试页面: annotation.html
<!DOCTYPE html>
<html lang="en">
<head>
    <meta charset="UTF-8">
    <title>测试基本注解</title>
</head>
<body>
<!--用户发起GET请求-->
<a href="/car/3/owner/zhangsan?age=18&inters=basket&inters=game">点击发起测试</a>
<!--&age=18&inters=basket&inters=game-->
<!--获取请求的请求体,因为只有post请求才有请求体,所以我们设计一个表单-->
<form action="/save" method="post">
    测试RequestBody获取数据 <br/>
    用户名 <input name="username" /><br>
    邮箱 <input name="email" />
    <input type="submit" value="提交">
</form>

<!--测试矩阵变量-->
<a href="/cars/sell;low=32;brand=biyadi,benchi">一个属性对应多个值,采用逗号隔开</a> <br>
<a href="/cars/sell;low=21;brand=aodi;brand=laosilaisi">一个属性对应多个值,采用k=v分号隔开</a> <br>
<a href="/boss/1;age=38/2;age=22">绑定多个路径,存在相同属性</a>
</body>
</html>
- (2)接下来是我们用来处理请求的控制器方法:ParameterTestController.java
package com.atguigu.boot.controller;

import org.springframework.web.bind.annotation.*;

import javax.servlet.http.Cookie;
import java.util.HashMap;
import java.util.List;
import java.util.Map;

/**
 * @author Bonbons
 * @version 1.0
 *
 */
@RestController
public class ParameterTestController {
	//结合表单发起POST请求,测试@RequestBody获取请求体
    @PostMapping("/save")
    public Map postMethod(@RequestBody String context){
        Map<String, Object> map = new HashMap<>();
        map.put("context", context);
        return map;
    }
	//测试了路径变量、请求体、请求参数、Cookie值
   @GetMapping("/car/{id}/owner/{username}")
    public Map<String,Object> getCar(@PathVariable("id") Integer id,
                                     @PathVariable("username") String name,
                                     @PathVariable Map<String,String> pv,
                                     @RequestHeader("User-Agent") String userAgent,
                                     @RequestHeader Map<String,String> header,
                                     @RequestParam("age") Integer age,
                                     @RequestParam("inters") List<String> inters,
                                     @RequestParam Map<String,String> params,
                                     @CookieValue("_ga") String _ga,
                                     @CookieValue("_ga") Cookie cookie){
        //这里直接运行会产生保存,原因:我没有 _ga 这个@Cookie

        Map<String,Object> map = new HashMap<>();

        map.put("id",id);
        map.put("name",name);
        map.put("pv",pv);
        map.put("userAgent",userAgent);
        map.put("headers",header);
        map.put("age",age);
        map.put("inters",inters);
        map.put("params",params);
        map.put("_ga",_ga);
        System.out.println(cookie.getName()+"===>"+cookie.getValue());
        return map;
    }

	//测试的是矩阵变量
    // 测试/cars/sell;low=31;brand=biyadi,benchi
    @GetMapping("/cars/{path}")
    public Map carsSell(@MatrixVariable("low") Integer low,
                        @MatrixVariable("brand") List<Object> brand,
                        @PathVariable("path") String path){
        Map<String, Object> map = new HashMap<>();
        map.put("low", low);
        map.put("brand", brand);
        map.put("path", path);
        return map;
    }

    //针对不同路径有相同属性名的演示
    @GetMapping("/boss/{bossId}/{empId}")
    public Map boss(@MatrixVariable(value = "age", pathVar = "bossId") Integer bossAge,
                    @MatrixVariable(value = "age", pathVar = "empId") Integer empAge){
        Map<String, Object> map = new HashMap<>();
        map.put("bossAge", bossAge);
        map.put("empAge", empAge);
        return map;
    }

}
- 因为矩阵变量默认是禁用的,所以我们需要进行一些配置才能使用矩阵变量的特性
- 方案一:在我们的配置类中利用@Bean注解,将WebMvcConfigurer注册到容器中
@Bean public WebMvcConfigurer webMvcConfigurer(){ return new WebMvcConfigurer() { @Override public void configurePathMatch(PathMatchConfigurer configurer) { UrlPathHelper urlPathHelper = new UrlPathHelper(); //关闭自动移除分号后内容 -- 开启矩阵变量 urlPathHelper.setRemoveSemicolonContent(false); configurer.setUrlPathHelper(urlPathHelper); } }; }- 方案二:我们让配置类实现WebMvcConfigurer接口,然后重写它的 configurerPathMatch方法
@Configuration
public class WebConfig implements WebMvcConfigurer{
	@Override
	public void configurePathMatch(PathMatchConfigurer configurer) {
		UrlPathHelper urlPathHelper = new UrlPathHelper();
		urlPathHelper.setRemoveSemicolonContent(false);
		configurer.setUrlPathHelper(urlPathHelper);
	}
}
🌔 2、补充几个知识点
-
@RestController注解声明控制器时,代表将控制器方法的返回值当做数据响应浏览器
- 也就是我们想让控制器方法的返回值作为请求转发,那么只能用普通的 @Controller 声明控制器
-
当浏览器的Cookie被禁用,我们如何获取请求数据呢?
- 通过url重写,可以解决cookie禁用的问题,把cookie的值通过矩阵变量的方式进行传递
2.2.3 ServletAPI
- WebRequest、ServletRequest、MultipartRequest、 HttpSession、javax.servlet.http.PushBuilder、Principal、InputStream、Reader、HttpMethod、Locale、TimeZone、ZoneId
@Override
	public boolean supportsParameter(MethodParameter parameter) {
		Class<?> paramType = parameter.getParameterType();
		return (WebRequest.class.isAssignableFrom(paramType) ||
				ServletRequest.class.isAssignableFrom(paramType) ||
				MultipartRequest.class.isAssignableFrom(paramType) ||
				HttpSession.class.isAssignableFrom(paramType) ||
				(pushBuilder != null && pushBuilder.isAssignableFrom(paramType)) ||
				Principal.class.isAssignableFrom(paramType) ||
				InputStream.class.isAssignableFrom(paramType) ||
				Reader.class.isAssignableFrom(paramType) ||
				HttpMethod.class == paramType ||
				Locale.class == paramType ||
				TimeZone.class == paramType ||
				ZoneId.class == paramType);
	}
2.2.4 复杂参数
- 这部分说的主要是在控制器方法的参数
- Map、Model(map、model里面的数据会被放在request的请求域 request.setAttribute)、Errors/BindingResult、RedirectAttributes( 重定向携带数据)、ServletResponse(response)、SessionStatus、UriComponentsBuilder、ServletUriComponentsBuilder
编写一个两个控制器方法进行测试:
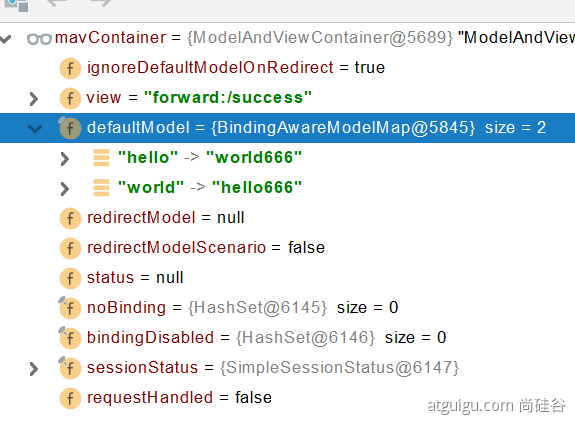
//我们要测试Map、Model、HttpServletRequest、HttpServletResponse 作为参数的效果
    @GetMapping("/params")
    public String testParams(Map<String, Object> map,
                             Model model,
                             HttpServletRequest request,
                             HttpServletResponse response){

        //对于Map、Model、HttpServletRequest 都可以向请求域中添加数据
        map.put("hello", "world");
        model.addAttribute("world", "hello");
        request.setAttribute("message", "HelloWorld");
        //创建一个Cookie
        Cookie cookie = new Cookie("c1", "v1");
        response.addCookie(cookie);
        return "forward:/success";
    }
    @ResponseBody
    @GetMapping("/success")
    public Map success(@RequestAttribute(name = "msg", required = false) String msg,
                       @RequestAttribute(name = "code", required = false) Integer code,
                       HttpServletRequest request){
        Map<String, Object> map = new HashMap<>();
        //尝试获取我们添加到请求域中的数据
        Object hello = request.getAttribute("hello");
        Object world = request.getAttribute("world");
        Object message = request.getAttribute("message");
        map.put("hello", hello);
        map.put("world", world);
        map.put("message", message);
        return map;
    }
-
将Map、Model作为参数,相当于调用了RequestAttribute,将参数返回值添加到请求域中
-
请求域参数不是必须的 required = false;
-
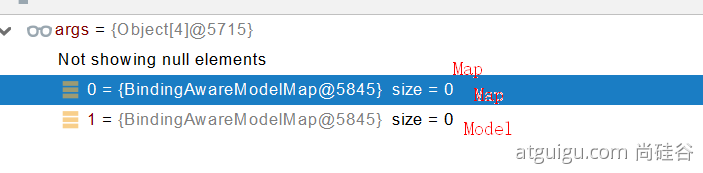
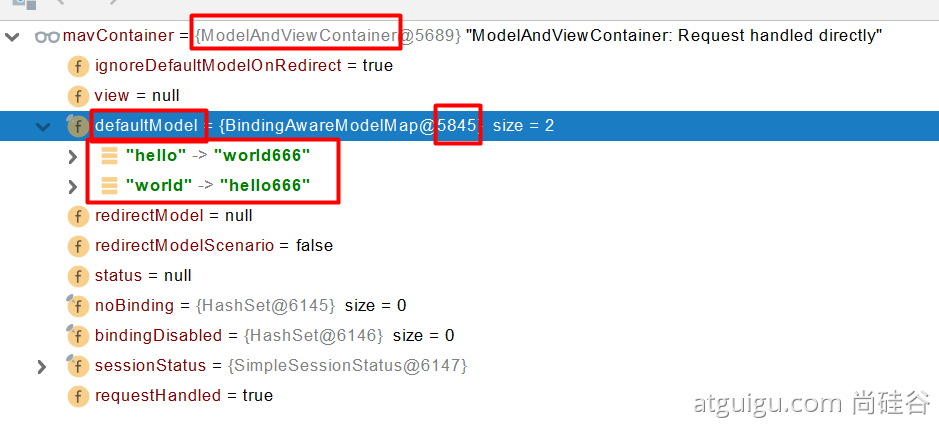
为什么 Model 和 Map都是对同一个请求域进行操作呢?
- Map、Model类型的参数,会返回 mavContainer.getModel();—> BindingAwareModelMap 是Model 也是Map
- mavContainer.getModel(); 获取到值的
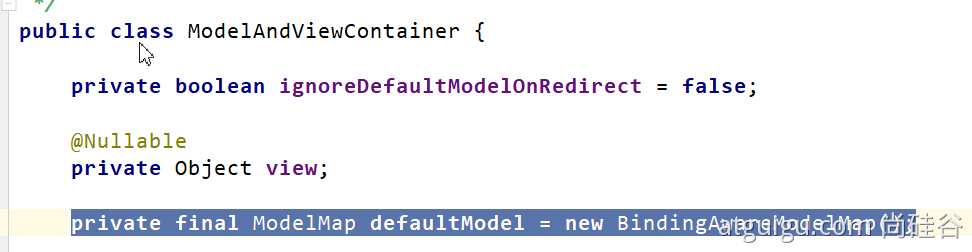
- 通过下面这张图片更可以看出操作的事同一个对象
2.2.5 自定义参数
- SpringBoot通过自定义对象参数,可以实现自动类型转换与格式化,并可以级联封装
- 网页携带的数据如果满足某个pojo类,那么就会自动封装成这个pojo的对象
(1) 我们设计的POJO类
package com.atguigu.boot.bean;

import lombok.AllArgsConstructor;
import lombok.NoArgsConstructor;
import lombok.ToString;
import java.util.Date;
import javax.xml.crypto.Data;

/**
 * @author Bonbons
 * @version 1.0
 */
@lombok.Data
@ToString
@AllArgsConstructor
@NoArgsConstructor
public class Person {
    private String name;
    private Integer age;
    private Date birth;
    private Pet pet;
}
package com.atguigu.boot.bean;

import lombok.AllArgsConstructor;
import lombok.NoArgsConstructor;
import lombok.ToString;

/**
 * @author Bonbons
 * @version 1.0
 */
@lombok.Data
@ToString
@AllArgsConstructor
@NoArgsConstructor
public class Pet {
    private String name;
    private Integer age;
}
(2) 发起请求的前端表单
<!--自定义对象函数测试-->
<form action="/savePerson" method="post">
    姓名:<input name="userName" value="zhangsan"> <br>
    年龄:<input name="age" value="18" />
    生日:<input name="birth" value= "2002-06-01" />
    宠物姓名:<input name="pet.name" value="小花">
    宠物年龄:<input name="pet.age" value="2">
    <input type="submit" value="保存" />
</form>
(3) Controller 类
@PostMapping("/savePerson")
public Person savePerson(Person person){
	return person;
}

-
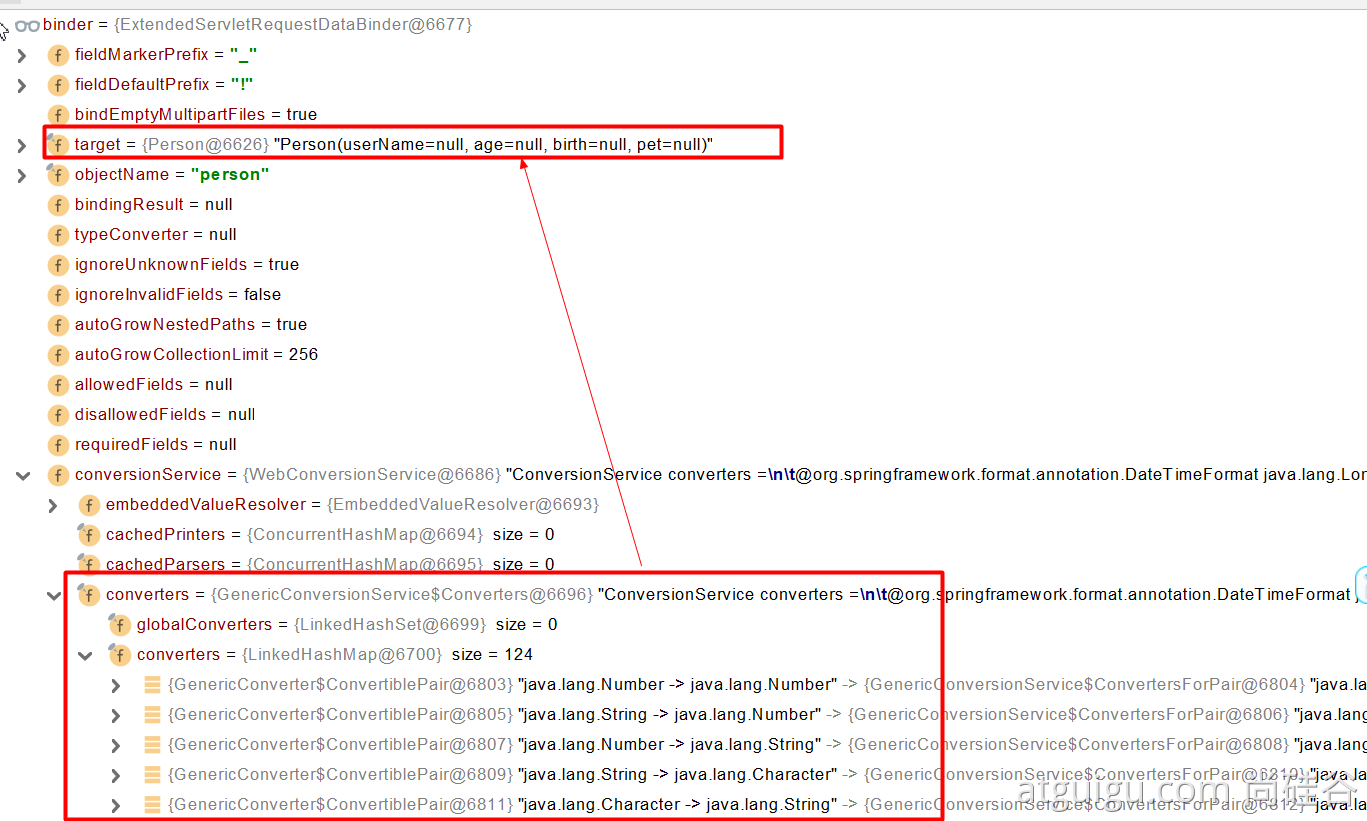
SpringBoot 之所以可以自动获取表单值封装为指定类型对象,是因为SpringBoot 具有严密的参数解析机制, 但是若我们的输入值SpringBoot 不能解析时,那么应该如何处理呢?
<form action="/savePerson" method="post"> 姓名:<input name="userName" value="zhangsan"> <br> 年龄:<input name="age" value="18" /> 生日:<input name="birth" value= "2002-06-01" /> 宠物:<input name="pet.name" value="小花,2"> <input type="submit" value="保存" /> </form> -
我们可以使用自定义参数封装POJO
- 编写WebConfig类实现WebMvcConfigurer类,重写 addFormatters 方法
package com.example.demo2.config;
import com.example.demo2.bean.Pet;
import org.springframework.context.annotation.Bean;
import org.springframework.context.annotation.Configuration;
import org.springframework.core.convert.converter.Converter;
import org.springframework.format.FormatterRegistry;
import org.springframework.util.StringUtils;
import org.springframework.web.servlet.config.annotation.WebMvcConfigurer;
@Configuration
public class WebConfig implements WebMvcConfigurer{
    //1、WebMvcConfigurer定制化SpringMVC的功能
    @Bean
    public WebMvcConfigurer webMvcConfigurer(){
        return new WebMvcConfigurer() {
            @Override
            public void addFormatters(FormatterRegistry registry) {
                registry.addConverter(new Converter<String, Pet>() {
                    @Override
                    public Pet convert(String source) {
                        if(!StringUtils.isEmpty(source)){
                            Pet pet = new Pet();
                            String[] split = source.split(",");
                            pet.setName(split[0]);
                            pet.setAge(split[1]);
                            return pet;
                        }
                        return null;
                    }
                });
            }
        };
    }
}
- 编写WebConfig类实现WebMvcConfigurer类,重写 addFormatters 方法
2.3 参数处理原理
- HandlerMapping中找到能处理请求的Handler(Controller.method())
- 为当前Handler 找一个适配器 HandlerAdapter; RequestMappingHandlerAdapter
- 适配器执行目标方法并确定方法参数的每一个值
🌔 1、HandlerAdapter
- 为能处理请求的控制器方法找到一个适配器

- 0 - 支持方法上标注@RequestMapping
- 1 - 支持函数式编程的
🌔 2、执行目标方法
-
在源码中执行目标方法的核心语句是下面这条:
// Actually invoke the handler. //DispatcherServlet -- doDispatch mv = ha.handle(processedRequest, response, mappedHandler.getHandler()); -
mav 是ModelAndView的对象
mav = invokeHandlerMethod(request, response, handlerMethod); //执行目标方法
//ServletInvocableHandlerMethod
Object returnValue = invokeForRequest(webRequest, mavContainer, providedArgs);
//获取方法的参数值
Object[] args = getMethodArgumentValues(request, mavContainer, providedArgs);
🌔 3、参数解析器 HandlerMethodArgumentResolver
- 要执行目标方法之前,我们需要知道这个方法有哪些参数,它们的值是什么
- SpringMVC目标方法能写多少种参数类型,就取决于参数解析器
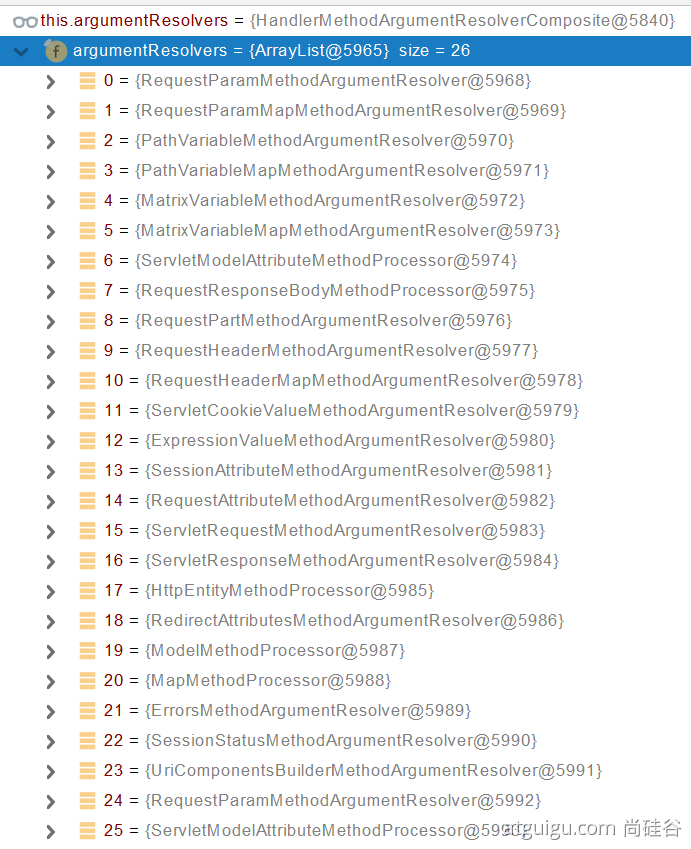
- 底层通过调用resolveArgument判断,这个方法是否支持当前的解析器解析其中的参数
- 支持就说明有对应的参数,反之则无

- 支持就说明有对应的参数,反之则无
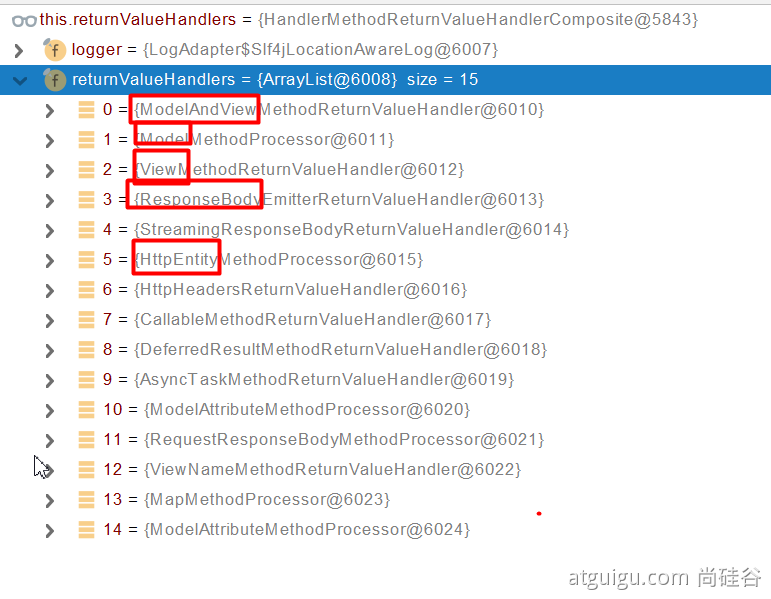
🌔 4、返回值处理器
- 通过下面这张图我们可以大概了解一下都会返回什么
🌔 5、如何确定目标方法每一个参数的值
- 在源码中是这样描述的
============InvocableHandlerMethod==========================
protected Object[] getMethodArgumentValues(NativeWebRequest request, @Nullable ModelAndViewContainer mavContainer,
			Object... providedArgs) throws Exception {

		MethodParameter[] parameters = getMethodParameters();
		if (ObjectUtils.isEmpty(parameters)) {
			return EMPTY_ARGS;
		}

		Object[] args = new Object[parameters.length];
		for (int i = 0; i < parameters.length; i++) {
			MethodParameter parameter = parameters[i];
			parameter.initParameterNameDiscovery(this.parameterNameDiscoverer);
			args[i] = findProvidedArgument(parameter, providedArgs);
			if (args[i] != null) {
				continue;
			}
			if (!this.resolvers.supportsParameter(parameter)) {
				throw new IllegalStateException(formatArgumentError(parameter, "No suitable resolver"));
			}
			try {
				args[i] = this.resolvers.resolveArgument(parameter, mavContainer, request, this.dataBinderFactory);
			}
			catch (Exception ex) {
				// Leave stack trace for later, exception may actually be resolved and handled...
				if (logger.isDebugEnabled()) {
					String exMsg = ex.getMessage();
					if (exMsg != null && !exMsg.contains(parameter.getExecutable().toGenericString())) {
						logger.debug(formatArgumentError(parameter, exMsg));
					}
				}
				throw ex;
			}
		}
		return args;
	}
- 挨个判断所有解析器是否支持解析这个参数
	@Nullable
	private HandlerMethodArgumentResolver getArgumentResolver(MethodParameter parameter) {
		HandlerMethodArgumentResolver result = this.argumentResolverCache.get(parameter);
		if (result == null) {
			for (HandlerMethodArgumentResolver resolver : this.argumentResolvers) {
				if (resolver.supportsParameter(parameter)) {
					result = resolver;
					this.argumentResolverCache.put(parameter, result);
					break;
				}
			}
		}
		return result;
	}
- 然后调用各自 HandlerMethodArgumentResolver 的 resolveArgument 方法即可
- 对于自定义类型参数,会封装成 POJO
public static boolean isSimpleValueType(Class<?> type) {
		return (Void.class != type && void.class != type &&
				(ClassUtils.isPrimitiveOrWrapper(type) ||
				Enum.class.isAssignableFrom(type) ||
				CharSequence.class.isAssignableFrom(type) ||
				Number.class.isAssignableFrom(type) ||
				Date.class.isAssignableFrom(type) ||
				Temporal.class.isAssignableFrom(type) ||
				URI.class == type ||
				URL.class == type ||
				Locale.class == type ||
				Class.class == type));
	}
@Override
	@Nullable
	public final Object resolveArgument(MethodParameter parameter, @Nullable ModelAndViewContainer mavContainer,
			NativeWebRequest webRequest, @Nullable WebDataBinderFactory binderFactory) throws Exception {

		Assert.state(mavContainer != null, "ModelAttributeMethodProcessor requires ModelAndViewContainer");
		Assert.state(binderFactory != null, "ModelAttributeMethodProcessor requires WebDataBinderFactory");

		String name = ModelFactory.getNameForParameter(parameter);
		ModelAttribute ann = parameter.getParameterAnnotation(ModelAttribute.class);
		if (ann != null) {
			mavContainer.setBinding(name, ann.binding());
		}

		Object attribute = null;
		BindingResult bindingResult = null;

		if (mavContainer.containsAttribute(name)) {
			attribute = mavContainer.getModel().get(name);
		}
		else {
			// Create attribute instance
			try {
				attribute = createAttribute(name, parameter, binderFactory, webRequest);
			}
			catch (BindException ex) {
				if (isBindExceptionRequired(parameter)) {
					// No BindingResult parameter -> fail with BindException
					throw ex;
				}
				// Otherwise, expose null/empty value and associated BindingResult
				if (parameter.getParameterType() == Optional.class) {
					attribute = Optional.empty();
				}
				bindingResult = ex.getBindingResult();
			}
		}

		if (bindingResult == null) {
			// Bean property binding and validation;
			// skipped in case of binding failure on construction.
			WebDataBinder binder = binderFactory.createBinder(webRequest, attribute, name);
			if (binder.getTarget() != null) {
				if (!mavContainer.isBindingDisabled(name)) {
					bindRequestParameters(binder, webRequest);
				}
				validateIfApplicable(binder, parameter);
				if (binder.getBindingResult().hasErrors() && isBindExceptionRequired(binder, parameter)) {
					throw new BindException(binder.getBindingResult());
				}
			}
			// Value type adaptation, also covering java.util.Optional
			if (!parameter.getParameterType().isInstance(attribute)) {
				attribute = binder.convertIfNecessary(binder.getTarget(), parameter.getParameterType(), parameter);
			}
			bindingResult = binder.getBindingResult();
		}

		// Add resolved attribute and BindingResult at the end of the model
		Map<String, Object> bindingResultModel = bindingResult.getModel();
		mavContainer.removeAttributes(bindingResultModel);
		mavContainer.addAllAttributes(bindingResultModel);

		return attribute;
	}
-
WebDataBinder binder = binderFactory.createBinder(webRequest, attribute, name);
-
WebDataBinder :web数据绑定器,将请求参数的值绑定到指定的JavaBean里面
-
WebDataBinder 利用它里面的 Converters 将请求数据转成指定的数据类型。再次封装到JavaBean中
-
GenericConversionService:在设置每一个值的时候,找它里面的所有converter那个可以将这个数据类型(request带来参数的字符串)转换到指定的类型(JavaBean – Integer)
byte – > file -
@FunctionalInterfacepublic interface Converter<S, T>
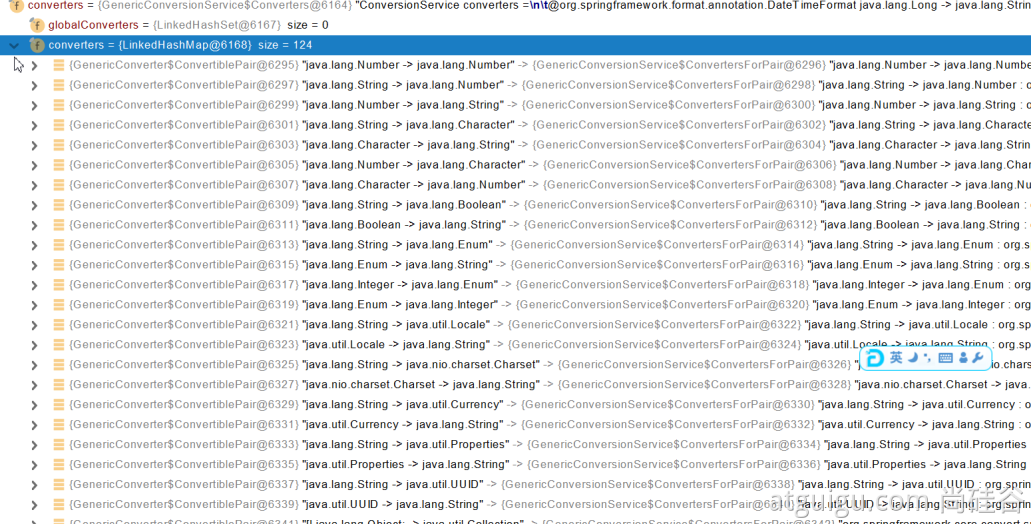
- 未来我们可以给WebDataBinder里面放自己的Converter;
- private static final class StringToNumber implements Converter<String, T>
- 自定义 Converter
    //1、WebMvcConfigurer定制化SpringMVC的功能
    @Bean
    public WebMvcConfigurer webMvcConfigurer(){
        return new WebMvcConfigurer() {
            @Override
            public void configurePathMatch(PathMatchConfigurer configurer) {
                UrlPathHelper urlPathHelper = new UrlPathHelper();
                // 不移除;后面的内容。矩阵变量功能就可以生效
                urlPathHelper.setRemoveSemicolonContent(false);
                configurer.setUrlPathHelper(urlPathHelper);
            }

            @Override
            public void addFormatters(FormatterRegistry registry) {
                registry.addConverter(new Converter<String, Pet>() {

                    @Override
                    public Pet convert(String source) {
                        // 啊猫,3
                        if(!StringUtils.isEmpty(source)){
                            Pet pet = new Pet();
                            String[] split = source.split(",");
                            pet.setName(split[0]);
                            pet.setAge(Integer.parseInt(split[1]));
                            return pet;
                        }
                        return null;
                    }
                });
            }
        };
    }
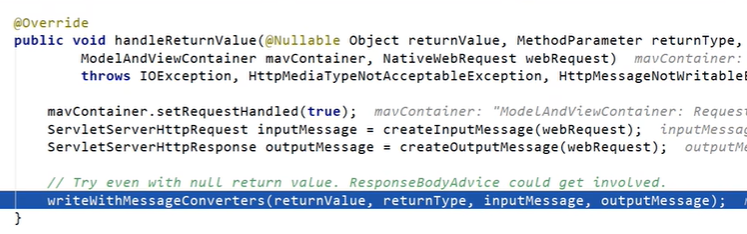
🌔 6、在目标方法执行完成后
-
将所有的数据都放在 ModelAndViewContainer;包含要去的页面地址View。还包含Model数据
🌔 7、最后派发处理结果 -
processDispatchResult(processedRequest, response, mappedHandler, mv, dispatchException);
-
renderMergedOutputModel(mergedModel, getRequestToExpose(request), response);
InternalResourceView:
@Override
	protected void renderMergedOutputModel(
			Map<String, Object> model, HttpServletRequest request, HttpServletResponse response) throws Exception {

		// Expose the model object as request attributes.
		exposeModelAsRequestAttributes(model, request);

		// Expose helpers as request attributes, if any.
		exposeHelpers(request);

		// Determine the path for the request dispatcher.
		String dispatcherPath = prepareForRendering(request, response);

		// Obtain a RequestDispatcher for the target resource (typically a JSP).
		RequestDispatcher rd = getRequestDispatcher(request, dispatcherPath);
		if (rd == null) {
			throw new ServletException("Could not get RequestDispatcher for [" + getUrl() +
					"]: Check that the corresponding file exists within your web application archive!");
		}

		// If already included or response already committed, perform include, else forward.
		if (useInclude(request, response)) {
			response.setContentType(getContentType());
			if (logger.isDebugEnabled()) {
				logger.debug("Including [" + getUrl() + "]");
			}
			rd.include(request, response);
		}

		else {
			// Note: The forwarded resource is supposed to determine the content type itself.
			if (logger.isDebugEnabled()) {
				logger.debug("Forwarding to [" + getUrl() + "]");
			}
			rd.forward(request, response);
		}
	}
暴露模型作为请求域属性
// Expose the model object as request attributes.
		exposeModelAsRequestAttributes(model, request);
protected void exposeModelAsRequestAttributes(Map<String, Object> model,
			HttpServletRequest request) throws Exception {

    //model中的所有数据遍历挨个放在请求域中
		model.forEach((name, value) -> {
			if (value != null) {
				request.setAttribute(name, value);
			}
			else {
				request.removeAttribute(name);
			}
		});
	}

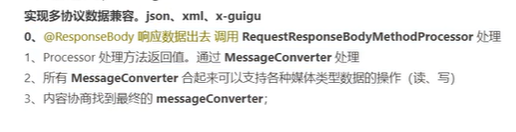
2.3、数据响应与内容协商
- 响应数据用于开发一些前后端分离的项目
🌔 1、我们如何实现让浏览器响应JSON数据呢?
- 我们需要引入 web-start 场景,因为里面包含了json的开发场景
- json开发场景引入相关依赖 jackson
- 下面是web场景的依赖:
<dependency> <groupId>org.springframework.boot</groupId> <artifactId>spring-boot-starter-web</artifactId> </dependency> - 下面是Json场景的依赖:
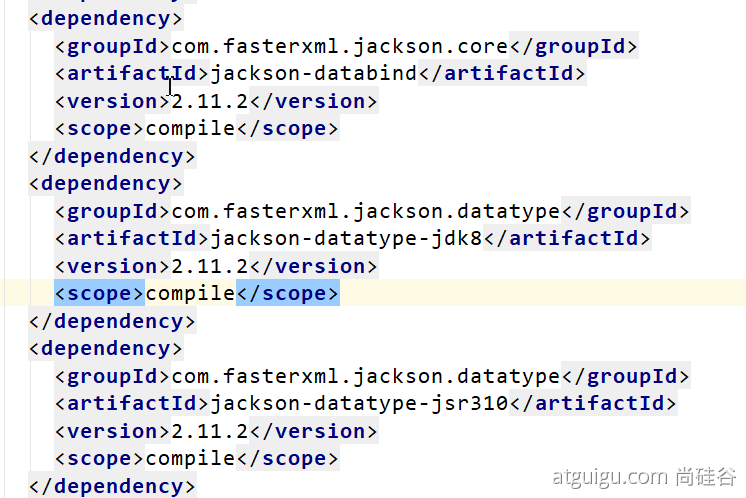
<dependency> <groupId>org.springframework.boot</groupId> <artifactId>spring-boot-starter-json</artifactId> <version>2.3.4.RELEASE</version> <scope>compile</scope> </dependency> - 下面是JSON场景里面关联到的JSON依赖(部分)
- 完成环境依赖导入后,我们需要在控制器方法上添加 @ResponseBody 注解
- 将方法的返回值,以特定的格式写入到response的body区域,进而将数据返回给客户端
🌔 2、引出返回值解析器的概念:
- 在SpringMVC的底层,对于返回值的解析也是采用返回值解析器
- 等待返回值返回后进行处理
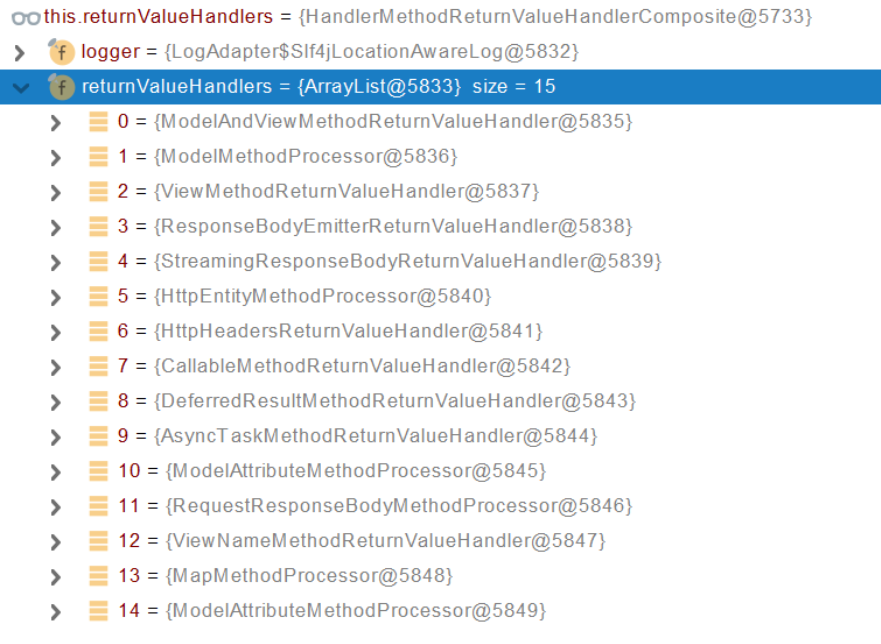
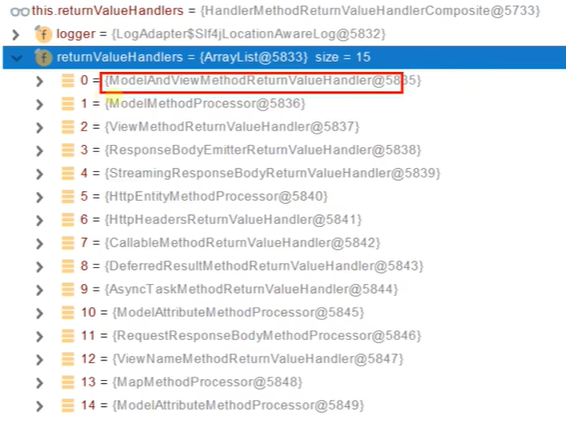
- 返回值解析器被放到 invocableMethod 可执行方法里 【返回值解析器总共有15个】
- 调用下面这个方法进行请求处理

- 利用doInvoke反射执行目标方法,得到了返回值 【我们指定返回的person对象】

- 有返回值,并且返回的不是一个字符串,调用handleReturnValue下面的这个处理返回值
try {
			this.returnValueHandlers.handleReturnValue(
					returnValue, getReturnValueType(returnValue), mavContainer, webRequest);
		}
@Override public void handleReturnValue(@Nullable Object returnValue, MethodParameter returnType, ModelAndViewContainer mavContainer, NativeWebRequest webRequest) throws Exception { HandlerMethodReturnValueHandler handler = selectHandler(returnValue, returnType); if (handler == null) { throw new IllegalArgumentException("Unknown return value type: " + returnType.getParameterType().getName()); } handler.handleReturnValue(returnValue, returnType, mavContainer, webRequest); }
- 调用下面这个方法进行请求处理
🌔 3、那么具体是怎么处理的呢?
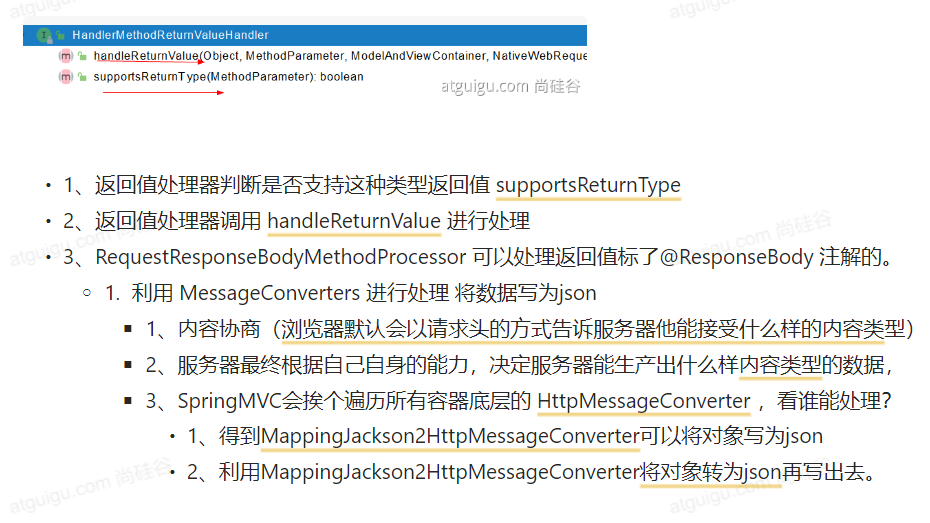
(1)先获取返回值和返回值类型,找那个返回值处理器能处理,找到了(handler不为空)就用它处理返回值
	@Override
	public void handleReturnValue(@Nullable Object returnValue, MethodParameter returnType,
			ModelAndViewContainer mavContainer, NativeWebRequest webRequest) throws Exception {

		HandlerMethodReturnValueHandler handler = selectHandler(returnValue, returnType);
		if (handler == null) {
			throw new IllegalArgumentException("Unknown return value type: " + returnType.getParameterType().getName());
		}
		handler.handleReturnValue(returnValue, returnType, mavContainer, webRequest);
	}
-
判断是不是异步的返回值
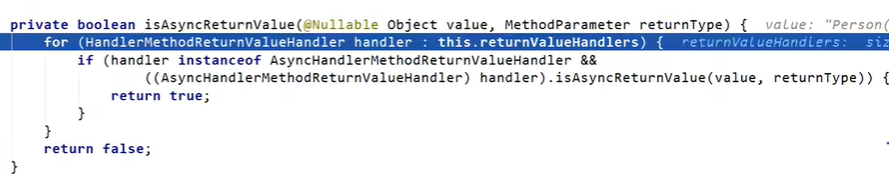
- 用supportReturnType判断是否支持,就是通过类型进行判断

总共有15种返回值解析器
- 用supportReturnType判断是否支持,就是通过类型进行判断
- 支持,就调用handleReturnValue处理
🌔 4、SpringMVC到底支持哪些返回值
- callable是判断异步的
- 有标了@ModelAttribute&&不是字符串(是个对象才行)
- @ResponseBody 注解 —> RequestResponseBodyMethodProcessor;用这个处理器
ModelAndView
Model
View
ResponseEntity
ResponseBodyEmitter
StreamingResponseBody
HttpEntity
HttpHeaders
Callable
DeferredResult
ListenableFuture
CompletionStage
WebAsyncTask
有 @ModelAttribute 且为对象类型的
@ResponseBody 注解 ---> RequestResponseBodyMethodProcessor;
🌔 5、分析RequestResponseBodyMethodProcessor是如何处理的?
- 内容协商就是遍历所有的MessageConverter最终找到一个能处理这个媒体类型数据的
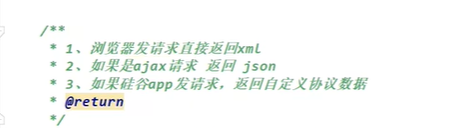
- 内容协商的目的是 在不同的情况下,能够返回不同的内容【我们以xml和jackson为例】
- 支持json我们用的是jackson的工具包,想支持xml我们需要引入对应的依赖 【下面是xml对应的依赖】
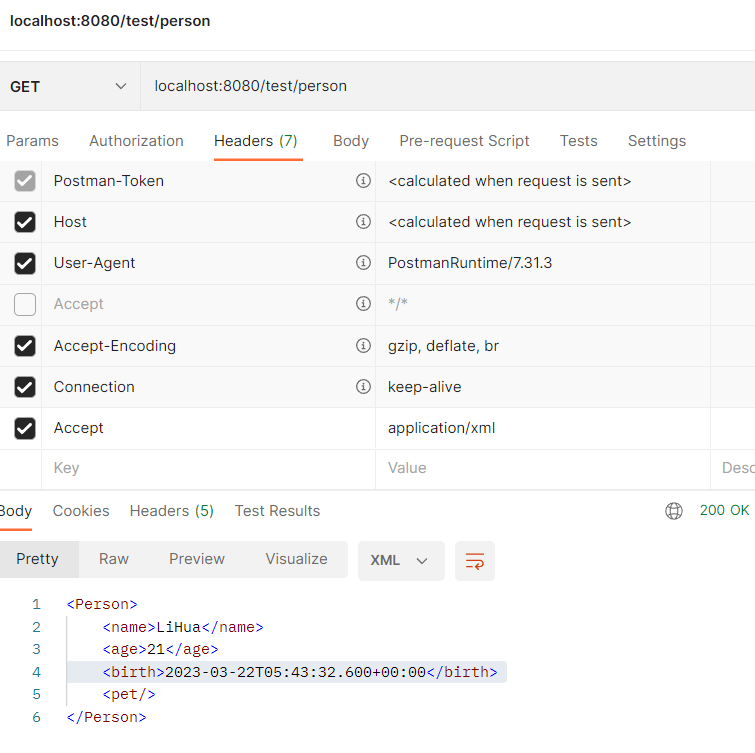
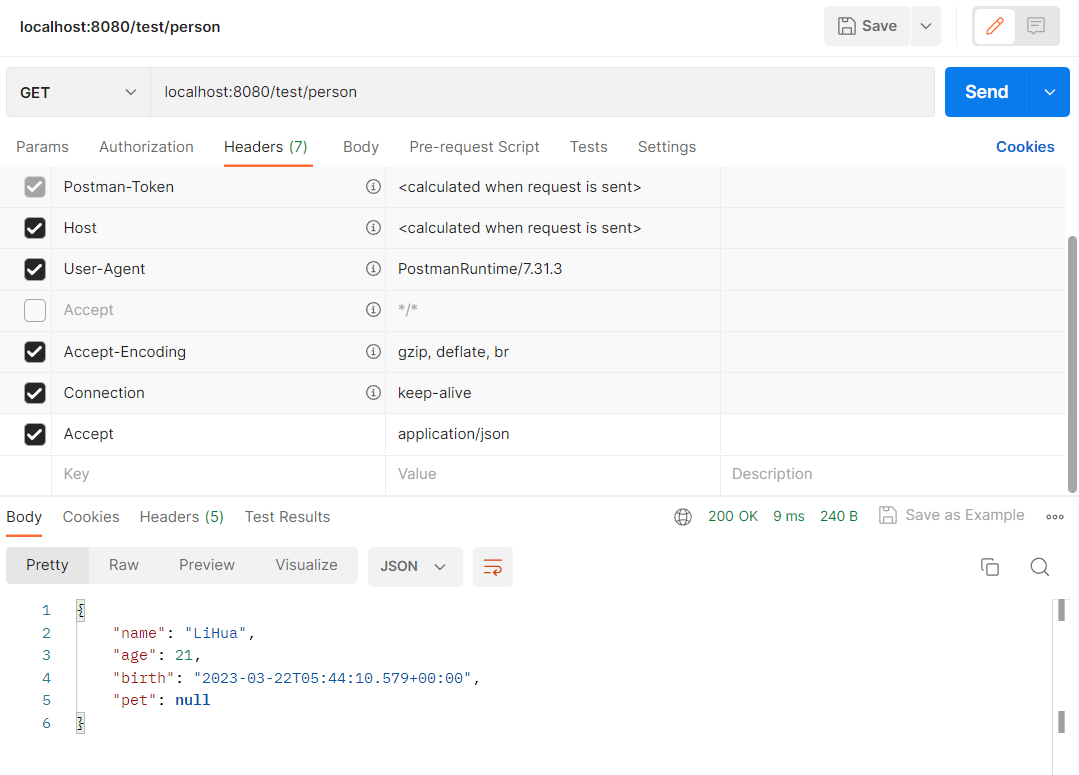
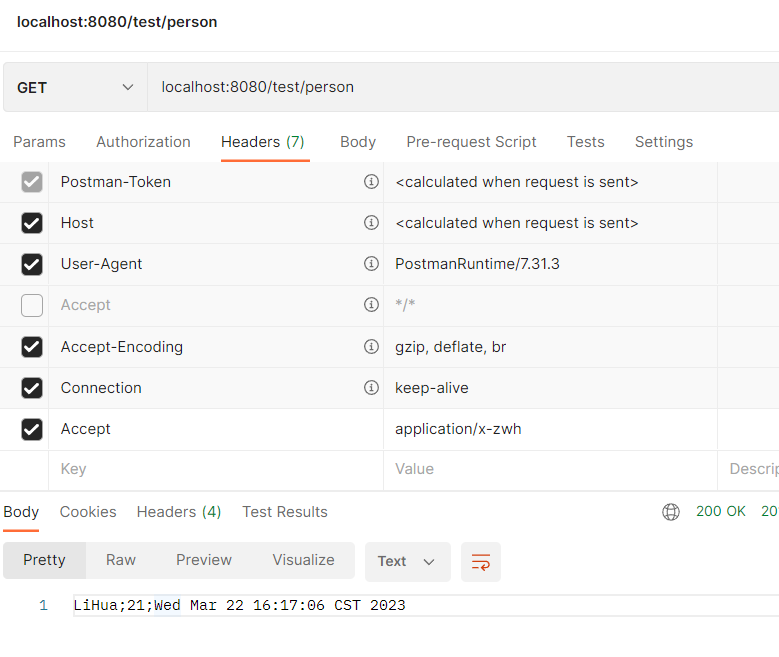
<dependency> <groupId>com.fasterxml.jackson.dataformat</groupId> <artifactId>jackson-dataformat-xml</artifactId> </dependency> - 使用postman发送请求时,
*/*代表能接受所有请求 【postman用于模拟浏览器发送请求】- accept请求头用于告诉浏览器我们接收什么样的数据:
- application/json 接收的是json格式的数据
- application/xml 接收的事xml格式的数据
- 这就是在SpringMVC底层提供的非常方便的协商功能
- accept请求头用于告诉浏览器我们接收什么样的数据:
演示一下我们使用PostMan模拟浏览器发送请求
🌔 6、说一下内容协商的原理是什么?
-
先找到@ResponseBody调用的Handler处理器
-
拿到返回值先判断是不是资源类型,接下来是内容协商的核心环节【判断当前响应头中是否已经有确定的媒体类型。MediaType】
- 没有前置的拦截过程,就不会有媒体类型,有媒体类型说明已经被处理了
- 没有就新创建,有的话就用之前的媒体类型
- 没有前置的拦截过程,就不会有媒体类型,有媒体类型说明已经被处理了
-
然后获取客户端(PostMan、浏览器)支持接收的内容类型。(获取客户端Accept请求头字段)
- 使用请求头的策略contentNegotiationManager来解析我们的媒体类型

HeaderContentNegotiationStrategy 确定客户端可以接收的内容类型

- 使用请求头的策略contentNegotiationManager来解析我们的媒体类型
-
遍历循环所有当前系统的 MessageConverter,看谁支持操作这个对象(Person)
-
找到支持操作Person的converter,把converter支持的媒体类型统计出来。【获得一个集合】
-
客户端需要【application/xml】。服务端能力【10种、json、xml】
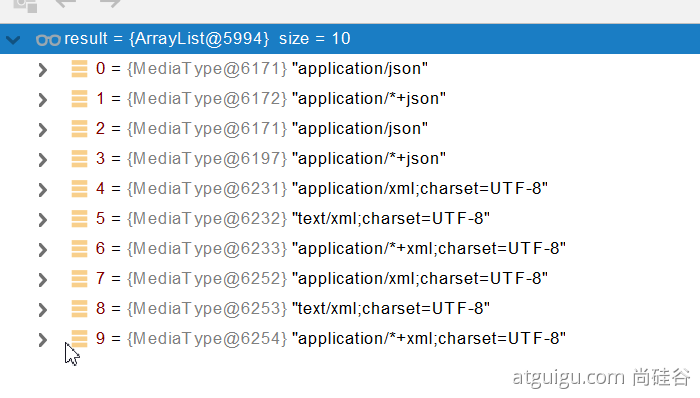
-
进行内容协商的最佳匹配媒体类型 【双层for循环进行最佳匹配】

-
用 支持 将对象转为 最佳匹配媒体类型 的converter。调用它进行转化【前俩支持Person -> JSON、后俩支持Person -> XML】

-
导入了jackson处理xml的包,xml的converter就会自动进来
WebMvcConfigurationSupport
jackson2XmlPresent = ClassUtils.isPresent("com.fasterxml.jackson.dataformat.xml.XmlMapper", classLoader);

if (jackson2XmlPresent) {
			Jackson2ObjectMapperBuilder builder = Jackson2ObjectMapperBuilder.xml();
			if (this.applicationContext != null) {
				builder.applicationContext(this.applicationContext);
			}
			messageConverters.add(new MappingJackson2XmlHttpMessageConverter(builder.build()));
		}
- canRead 如果能读就将传递过来的消息读成我们指定的类型,如果canWrite就把我们返回的数据写到我们的响应里面
🌔 7、自定义 MessageConverter
- 正常的处理流程:
-
有些场景需要我们自定义MessageConverter
-
方案一:设计三个方法,让这三种不同的请求的请求路径不一样
-
方案二:就要说到如何自定义converter了
-
我们要定义一个类实现 HttpMessageConverter 接口,在接口中指定规则
package com.atguigu.boot.converter; import com.atguigu.boot.bean.Person; import org.springframework.http.HttpInputMessage; import org.springframework.http.HttpOutputMessage; import org.springframework.http.MediaType; import org.springframework.http.converter.HttpMessageConverter; import org.springframework.http.converter.HttpMessageNotReadableException; import org.springframework.http.converter.HttpMessageNotWritableException; import java.io.IOException; import java.io.OutputStream; import java.util.List; /** * @author Bonbons * @version 1.0 */ public class MyMessageConverter implements HttpMessageConverter<Person> { @Override public boolean canRead(Class<?> aClass, MediaType mediaType) { //读我们指的是通过@RequestBody注解作为参数携带过来的数据,此处我们不关心读 return false; } @Override public boolean canWrite(Class<?> aClass, MediaType mediaType) { //返回值类型是Person类型就能写 return aClass.isAssignableFrom(Person.class); } /** * 服务器要统计MessageConverter能写出哪些类型[兼容的媒体类型] * 我们通过parseMediaTypes将我们自定义类型传递进去 * @return */ @Override public List<MediaType> getSupportedMediaTypes() { return MediaType.parseMediaTypes("application/x-zwh"); } @Override public Person read(Class<? extends Person> aClass, HttpInputMessage httpInputMessage) throws IOException, HttpMessageNotReadableException { return null; } @Override public void write(Person person, MediaType mediaType, HttpOutputMessage httpOutputMessage) throws IOException, HttpMessageNotWritableException { //将我们Person中的数据拼装成一个用分号分隔的字符串 String data = person.getName() + ";" + person.getAge() + ";" + person.getBirth(); //通过输出流将我们的数据写出去 OutputStream body = httpOutputMessage.getBody(); body.write(data.getBytes()); } } -
接下来要到我们的配置类中,重写 extendsMessageConverters 方法
@Override
 public void extendMessageConverters(List<HttpMessageConverter<?>> converters) {
 	converters.add(new MyMessageConverter());
 }
-
-
此时已经可以处理我们自定义请求,此处我通过 PostMan 模拟 【测试成功】
我们需要注意一点:重写那个方法要写在配置类的 WebMvcConfigurer 中
 @Bean
    public WebMvcConfigurer webMvcConfigurer(){
        return new WebMvcConfigurer() {

            @Override
            public void extendMessageConverters(List<HttpMessageConverter<?>> converters) {

            }
        }
    }
🌔 8、如何以参数的方式进行内容协商
-
我们知道,协商策略分为两种:
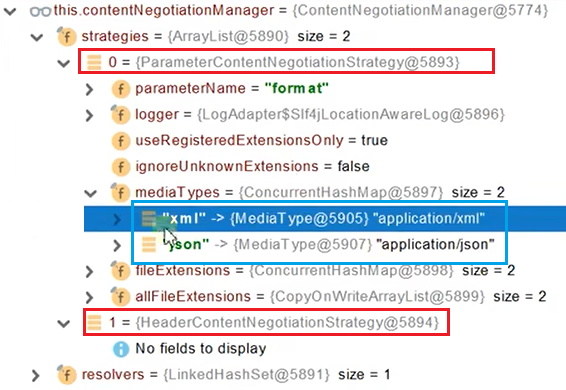
- 一种是基于参数的:在地址栏后添加
?format=指定的类型【默认可以为json、xml】

- 另一种是基于请求头的:设置请求头的accept属性值,上面介绍了通过自定义MessageConverter实现请求头处理自定义的协商策略
- 一种是基于参数的:在地址栏后添加
-
那么我们是否可以采用基于参数的形式制定自定义协商策略呢?
- 在配置类中自定义WebMvcConfigurer
-
重写 configureContentNegotiation 方法配置协商功能
@Bean
public WebMvcConfigurer webMvcConfigurer(){
	return new WebMvcConfigurer() {
	@Override
	public void configureContentNegotiation(ContentNegotiationConfigurer configurer) {
		Map<String, MediaType> mediaTypes = new HashMap<>();
		//向集合中添加策略
		mediaTypes.put("xml", MediaType.APPLICATION_ATOM_XML);
		mediaTypes.put("json", MediaType.APPLICATION_JSON);
		mediaTypes.put("gg", MediaType.parseMediaType("application/x-guigu"));
		//指定支持哪些参数对应的媒体类型
		ParameterContentNegotiationStrategy parameterStrategy = new ParameterContentNegotiationStrategy(mediaTypes);
		configurer.strategies(Arrays.asList(parameterStrategy));
	}
};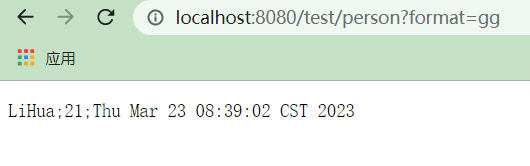
-
- 在配置类中自定义WebMvcConfigurer
-
如果我们现在不进行处理,那么基于请求头的协商策略就会失效(accept无论为什么都会以json的形式返回)
-
我们需要在自定义的协商策略中,添加基于请求头的协商策略
-
也就是将上面这段重写的方法替换为
@Override
public void configureContentNegotiation(ContentNegotiationConfigurer configurer) {
	Map<String, MediaType> mediaTypes = new HashMap<>();
	//向集合中添加策略
	mediaTypes.put("xml", MediaType.APPLICATION_ATOM_XML);
	mediaTypes.put("json", MediaType.APPLICATION_JSON);
	mediaTypes.put("gg", MediaType.parseMediaType("application/x-guigu"));
	//指定支持哪些参数对应的媒体类型
	ParameterContentNegotiationStrategy parameterStrategy = new ParameterContentNegotiationStrategy(mediaTypes);

	//添加基于请求头的协商策略
	HeaderContentNegotiationStrategy headerStrategy = new HeaderContentNegotiationStrategy();
	configurer.strategies(Arrays.asList(parameterStrategy, headerStrategy));
}
-
-
几个注意事项:
- 在PostMan中模拟发起请求测试我们的自定义策略时,accept 字段属性值赋值的不是gg而是完成的策略名

- 对于基于参数的协商策略,我们可以将 format 修改为我们指定的字段【只需在上面我们重写的方法中,利用参数协商对象的setParamrterName方法】

- 在PostMan中模拟发起请求测试我们的自定义策略时,accept 字段属性值赋值的不是gg而是完成的策略名


 3069
3069


 被折叠的 条评论
为什么被折叠?
被折叠的 条评论
为什么被折叠?
 到【灌水乐园】发言


