


SpringBoot
1. SpringBoot自动配置

@SpringBootApplication
@SpringBootConfiguration
@EnableAutoConfiguration
@ComponentScan(excludeFilters = {
    @Filter(type = FilterType.CUSTOM,classes = {TypeExcludeFilter.class}), 			         @Filter(type = FilterType.CUSTOM,classes =														 {AutoConfigurationExcludeFilter.class})}
              )
public @interface SpringBootApplication{}
1.1 @SpringBootConfiguration
@Configuration
public @interface SpringBootConfiguration {
    @AliasFor(
        annotation = Configuration.class
    )
    boolean proxyBeanMethods() default true;
}
@Configuration:代表当前是一个配置类
1.2 @EnableAutoConfiguration
@AutoConfigurationPackage
@Import({AutoConfigurationImportSelector.class})
public @interface EnableAutoConfiguration {
    String ENABLED_OVERRIDE_PROPERTY = "spring.boot.enableautoconfiguration";

    Class<?>[] exclude() default {};

    String[] excludeName() default {};
}
1.2.1 @AutoConfigurationPackage
@Import({Registrar.class})
public @interface AutoConfigurationPackage {
    String[] basePackages() default {};

    Class<?>[] basePackageClasses() default {};
}
@AutoConfigurationPackage:自动配置包
@Import:给容器中导入一个组件(Registrar.class),利用Registrar给容器中导入一系列组件;
registerBeanDefinitions(AnnotationMetadata metadata, BeanDefinitionRegistry registry)方法中metadata代表注解的元信息,我们这个这个注解是
@AutoConfigurationPackage;registerBeanDefinitions方法体的内部有一行代码getPackageNames()代表获取元注解的包信息,所以我们拿到的包信息就是Springboot的main方法的包路径;
public class AutoConfigurationPackages{
        static class Registrar implements ImportBeanDefinitionRegistrar, DeterminableImports {
        Registrar() {
        }

        public void registerBeanDefinitions(AnnotationMetadata metadata, BeanDefinitionRegistry registry) {
            AutoConfigurationPackages.register(registry, (String[])(new AutoConfigurationPackages.PackageImports(metadata)).getPackageNames().toArray(new String[0]));
        }

        public Set<Object> determineImports(AnnotationMetadata metadata) {
            return Collections.singleton(new AutoConfigurationPackages.PackageImports(metadata));
        }
    }
}
所以,@Import 注解最终实现的结果就是将启动类路径下的包和子包,全部扫描进容器中;(全部扫描不意味着全部加载,能够被加载需要满足加载所需的条件)
1.2.2 @Import({AutoConfigurationImportSelector.class})
step1:
public class AutoConfigurationImportSelector{
        public String[] selectImports(AnnotationMetadata annotationMetadata) {
        if (!this.isEnabled(annotationMetadata)) {
            return NO_IMPORTS;
        } else {
            AutoConfigurationImportSelector.AutoConfigurationEntry autoConfigurationEntry = this.getAutoConfigurationEntry(annotationMetadata);
            return StringUtils.toStringArray(autoConfigurationEntry.getConfigurations());
        }
    }
}
step2:
利用 this.getAutoConfigurationEntry(annotationMetadata);给容器中批量导入一些组件
public class AutoConfigurationImportSelector{
    	protected AutoConfigurationEntry getAutoConfigurationEntry(AutoConfigurationMetadata autoConfigurationMetadata,
			AnnotationMetadata annotationMetadata) {
		if (!isEnabled(annotationMetadata)) {
			return EMPTY_ENTRY;
		}
		AnnotationAttributes attributes = getAttributes(annotationMetadata);
            //获取所有候选的配置
		List<String> configurations = getCandidateConfigurations(annotationMetadata, attributes);
            //移除重复的配置
		configurations = removeDuplicates(configurations);
		Set<String> exclusions = getExclusions(annotationMetadata, attributes);
            //校验不符合要求的配置
		checkExcludedClasses(configurations, exclusions);
		configurations.removeAll(exclusions);
		configurations = filter(configurations, autoConfigurationMetadata);
		fireAutoConfigurationImportEvents(configurations, exclusions);
            //返回符合条件的配置
		return new AutoConfigurationEntry(configurations, exclusions);
	}
}
step3:
getCandidateConfigurations(annotationMetadata, attributes);获取所有导入到容器中的配置类,(全部导入不意味着全部加载,能够被加载需要满足加载所需的条件)
public class AutoConfigurationImportSelector{
    	protected List<String> getCandidateConfigurations(AnnotationMetadata metadata, AnnotationAttributes attributes) {
		List<String> configurations = SpringFactoriesLoader.loadFactoryNames(getSpringFactoriesLoaderFactoryClass(),
				getBeanClassLoader());
		Assert.notEmpty(configurations, "No auto configuration classes found in META-INF/spring.factories. If you "
				+ "are using a custom packaging, make sure that file is correct.");
		return configurations;
	}

    protected Class<?> getSpringFactoriesLoaderFactoryClass() {
		return EnableAutoConfiguration.class;
	}
    protected ClassLoader getBeanClassLoader() {
		return this.beanClassLoader;
	}
}
step4:
SpringFactoriesLoader.loadFactoryNames()
    public static List<String> loadFactoryNames(Class<?> factoryType, @Nullable ClassLoader classLoader) {
        String factoryTypeName = factoryType.getName();
        return (List)loadSpringFactories(classLoader).getOrDefault(factoryTypeName, Collections.emptyList());
    }
getOrDefault()
public class LinkedMultiValueMap<K, V> implements MultiValueMap<K, V>{}
public interface MultiValueMap<K, V> extends Map<K, List<V>> {}
public class Map{
    default V getOrDefault(Object key, V defaultValue) {
        V v;
        return (((v = get(key)) != null) || containsKey(key))
            ? v
            : defaultValue;
    }
}
step5:
loadSpringFactories()
private static Map<String, List<String>> loadSpringFactories(@Nullable ClassLoader classLoader) {
        MultiValueMap<String, String> result = (MultiValueMap)cache.get(classLoader);
        if (result != null) {
            return result;
        } else {
            try {
                Enumeration<URL> urls = classLoader != null ? classLoader.getResources("META-INF/spring.factories") : ClassLoader.getSystemResources("META-INF/spring.factories");
                LinkedMultiValueMap result = new LinkedMultiValueMap();

                while(urls.hasMoreElements()) {
                    URL url = (URL)urls.nextElement();
                    UrlResource resource = new UrlResource(url);
                    Properties properties = PropertiesLoaderUtils.loadProperties(resource);
                    Iterator var6 = properties.entrySet().iterator();

                    while(var6.hasNext()) {
                        Entry<?, ?> entry = (Entry)var6.next();
                        String factoryTypeName = ((String)entry.getKey()).trim();
                        String[] var9 = StringUtils.commaDelimitedListToStringArray((String)entry.getValue());
                        int var10 = var9.length;

                        for(int var11 = 0; var11 < var10; ++var11) {
                            String factoryImplementationName = var9[var11];
                            result.add(factoryTypeName, factoryImplementationName.trim());
                        }
                    }
                }

                cache.put(classLoader, result);
                return result;
            } catch (IOException var13) {
                throw new IllegalArgumentException("Unable to load factories from location [META-INF/spring.factories]", var13);
            }
        }
    }

# Auto Configure
org.springframework.boot.autoconfigure.EnableAutoConfiguration=\
org.springframework.boot.autoconfigure.admin.SpringApplicationAdminJmxAutoConfiguration,\
//.........
org.springframework.boot.autoconfigure.webservices.WebServicesAutoConfiguration,\
org.springframework.boot.autoconfigure.webservices.client.WebServiceTemplateAutoConfiguration
step6:加载到全部需加载的配置后,回到step2,对配置进行条件判断,判断是否能够成功加载;
1.3 @ComponentScan
@ComponentScan:指定扫描的包路径
2. SpringBoot对于MVC的自动配置
2.1 静态资源
官方文档:https://docs.spring.io/spring-boot/docs/current/reference/html/web.html#web.servlet.spring-mvc.static-content
默认情况下,Spring Boot 从类路径中名为
/static(或/public或/resources或/META-INF/resources)的目录或从ServletContext. 它使用ResourceHttpRequestHandler来自 Spring MVC 的方法,因此您可以通过添加自己的方法WebMvcConfigurer并覆盖该addResourceHandlers方法来修改该行为。在独立的 Web 应用程序中,容器中的默认 servlet 也被启用并充当后备,
ServletContext如果 Spring 决定不处理它,则从根目录提供内容。大多数情况下,这不会发生(除非你修改了默认的 MVC 配置),因为 Spring 总是可以通过DispatcherServlet.默认情况下,资源映射在 上
/**,但您可以使用该spring.mvc.static-path-pattern属性对其进行调整。例如,将所有资源重新定位到/resources/**可以实现如下:spring.mvc.static-path-pattern=/resources/**您还可以使用该
spring.web.resources.static-locations属性自定义静态资源位置(将默认值替换为目录位置列表)。根 servlet 上下文路径"/"也会自动添加为位置。
2.1.1 静态资源的访问原理
Q:静态资源的访问和Controller层的调用顺序是怎么样的?(当Controller层有和静态资源同名的路径,会访问Controller 还是静态资源?)先访问Controller,然后再访问静态资源;
Q:如何修改默认的静态资源访问路径?spring.resources.static-locations=classpath:/wddong
2.1.2 静态资源的访问前缀
spring.mvc.static-path-pattern=/resources/**
# 访问方式为 当前项目+ `/resources` + 静态资源名 = 静态资源
2.1.3 静态资源的配置原理
类的包路径:\repository\org\springframework\boot\spring-boot-autoconfigure\2.2.13.RELEASE\spring-boot-autoconfigure-2.2.13.RELEASE-sources.jar!\org\springframework\boot\autoconfigure\web\servlet\WebMvcAutoConfiguration.java
@Configuration(proxyBeanMethods = false)
@ConditionalOnWebApplication(type = Type.SERVLET)
@ConditionalOnClass({ Servlet.class, DispatcherServlet.class, WebMvcConfigurer.class })
@ConditionalOnMissingBean(WebMvcConfigurationSupport.class)
@AutoConfigureOrder(Ordered.HIGHEST_PRECEDENCE + 10)
@AutoConfigureAfter({ DispatcherServletAutoConfiguration.class, TaskExecutionAutoConfiguration.class,
		ValidationAutoConfiguration.class })
public class WebMvcAutoConfiguration {

    @Configuration(proxyBeanMethods = false)
	@Import(EnableWebMvcConfiguration.class)
	@EnableConfigurationProperties({ WebMvcProperties.class, ResourceProperties.class })
	@Order(0)
	public static class WebMvcAutoConfigurationAdapter implements WebMvcConfigurer {}
}
WebMvcProperties与配置文件中的spring.mvc进行了绑定;
ResourceProperties与配置文件中的spring.resources进行了绑定;
spring:
  mvc:
    static-path-pattern: /wddong/**

  resources:
    static-locations: classpath:/wddong
    cache:
      period: 100
@ConfigurationProperties(prefix = "spring.mvc")
public class WebMvcProperties {
    private String staticPathPattern = "/**";
}
@ConfigurationProperties(prefix = "spring.resources", ignoreUnknownFields = false)
public class ResourceProperties {
    	private static final String[] CLASSPATH_RESOURCE_LOCATIONS = { "classpath:/META-INF/resources/",
			"classpath:/resources/", "classpath:/static/", "classpath:/public/" };
}
WebMvcAutoConfiguration 中的静态内部类WebMvcAutoConfigurationAdapter只有一个有参构造器;并且为
@Configuration 被Spring管理,意味着方法的形参值都是从Spring中获取;
@Configuration(proxyBeanMethods = false)
@Import(EnableWebMvcConfiguration.class)
@EnableConfigurationProperties({ WebMvcProperties.class, ResourceProperties.class })
@Order(0)
public static class WebMvcAutoConfigurationAdapter implements WebMvcConfigurer {

		private final WebMvcProperties mvcProperties;

		private final ListableBeanFactory beanFactory;

		private final ObjectProvider<HttpMessageConverters> messageConvertersProvider;

		public WebMvcAutoConfigurationAdapter(WebMvcProperties mvcProperties, ListableBeanFactory beanFactory,
				ObjectProvider<HttpMessageConverters> messageConvertersProvider) {
			this.mvcProperties = mvcProperties;
			this.beanFactory = beanFactory;
			this.messageConvertersProvider = messageConvertersProvider;
		}
}
WebMvcAutoConfiguration 中的静态内部类EnableWebMvcConfiguration只有一个有参构造器;同理如上;
	@Configuration(proxyBeanMethods = false)
	public static class EnableWebMvcConfiguration extends DelegatingWebMvcConfiguration implements ResourceLoaderAware {
        //有参构造方法
        public EnableWebMvcConfiguration(ResourceProperties resourceProperties,
				ObjectProvider<WebMvcProperties> mvcPropertiesProvider,
				ObjectProvider<WebMvcRegistrations> mvcRegistrationsProvider,
				ObjectProvider<ResourceHandlerRegistrationCustomizer> resourceHandlerRegistrationCustomizerProvider,
				ListableBeanFactory beanFactory) {
			this.resourceProperties = resourceProperties;
			this.mvcProperties = mvcPropertiesProvider.getIfAvailable();
			this.mvcRegistrations = mvcRegistrationsProvider.getIfUnique();
			this.resourceHandlerRegistrationCustomizer = resourceHandlerRegistrationCustomizerProvider.getIfAvailable();
			this.beanFactory = beanFactory;
		}

        //资源处理的方法
        @Override
		protected void addResourceHandlers(ResourceHandlerRegistry registry) {
			super.addResourceHandlers(registry);
			if (!this.resourceProperties.isAddMappings()) {
				logger.debug("Default resource handling disabled");
				return;
			}
			addResourceHandler(registry, "/webjars/**", "classpath:/META-INF/resources/webjars/");
			addResourceHandler(registry, this.mvcProperties.getStaticPathPattern(),
					this.resourceProperties.getStaticLocations());

		}
    }
2.1.4 静态资源的处理规则
public static class EnableWebMvcConfiguration {
    private final ResourceProperties resourceProperties;

    @Override
		protected void addResourceHandlers(ResourceHandlerRegistry registry) {
            //调用父类方法,添加资源处理器
			super.addResourceHandlers(registry);
            //resourceProperties为上文中,提到的映射 配置文件中的spring.resources属性
            //判断配置文件中的isAddMappings,当配置文件中配置isAddMappings=false;下面的代码不执行
			if (!this.resourceProperties.isAddMappings()) {
				logger.debug("Default resource handling disabled");
				return;
			}
            //webjars的相关规则
			addResourceHandler(registry, "/webjars/**", "classpath:/META-INF/resources/webjars/");
            //mvcProperties为上文中,提到的映射 配置文件中的spring.mvc属性
			addResourceHandler(registry, this.mvcProperties.getStaticPathPattern(),
					this.resourceProperties.getStaticLocations());
			//resourceProperties为上文中,提到的映射 配置文件中的spring.resources属性
		}

		private void addResourceHandler(ResourceHandlerRegistry registry, String pattern, String... locations) {
			if (registry.hasMappingForPattern(pattern)) {
				return;
			}
			ResourceHandlerRegistration registration = registry.addResourceHandler(pattern);
			registration.addResourceLocations(locations);
			//设置缓存时间
            registration.setCachePeriod(getSeconds(this.resourceProperties.getCache().getPeriod()));
			registration.setCacheControl(this.resourceProperties.getCache().getCachecontrol().toHttpCacheControl());
			customizeResourceHandlerRegistration(registration);
			this.autoConfiguredResourceHandlers.add(pattern);
		}
}
addResourceHandlers()解析:
step1:调用父类方法,添加资源处理器
step2:resourceProperties对应为ResourceProperties类,ResourceProperties从配置文件spring.resources中获取属性;判断配置文件中的isAddMappings,当配置文件中配置isAddMappings=false;下面的代码不执行
step3:配置webjars的相关规则;
step4:获取mvcProperties的相关配置;mvcProperties对应为WebMvcProperties类,WebMvcProperties从配置文件spring.mvc中获取属性getStaticLocations();当配置文件中没有配置static-locations的相关信息时,加载的即为系统默认的配置,如下图;
step5:当配置文件中配置有static-locations的相关信息时,加载的配置的文件信息,替换系统默认的配置;

2.1.5 欢迎页配置
SpringBoot如何自动配置欢迎页为index.html
public static class EnableWebMvcConfiguration{
    @Bean
    public WelcomePageHandlerMapping welcomePageHandlerMapping(ApplicationContext applicationContext,FormattingConversionService mvcConversionService, ResourceUrlProvider mvcResourceUrlProvider) {
        WelcomePageHandlerMapping welcomePageHandlerMapping = new WelcomePageHandlerMapping(
            new TemplateAvailabilityProviders(applicationContext), applicationContext, getWelcomePage(),
            this.mvcProperties.getStaticPathPattern());
        welcomePageHandlerMapping.setInterceptors(getInterceptors(mvcConversionService, mvcResourceUrlProvider));
        welcomePageHandlerMapping.setCorsConfigurations(getCorsConfigurations());
        return welcomePageHandlerMapping;
		}
}

final class WelcomePageHandlerMapping{
    	WelcomePageHandlerMapping(TemplateAvailabilityProviders templateAvailabilityProviders,
			ApplicationContext applicationContext, Resource welcomePage, String staticPathPattern) {
		if (welcomePage != null && "/**".equals(staticPathPattern)) {
			logger.info("Adding welcome page: " + welcomePage);
			setRootViewName("forward:index.html");
		}
		else if (welcomeTemplateExists(templateAvailabilityProviders, applicationContext)) {
			logger.info("Adding welcome page template: index");
			setRootViewName("index");
		}
	}
}
3. SpringBoot中配置文件的加载位置及顺序
3.1 配置文件的加载位置
- classpath 根路径
- classpath 根路径下的 config 目录
- jar 包当前目录
- jar 包当前目录的 config 目录
- /config 子目录的直接子目录
3.2 配置文件的加载顺序
- 当前 jar 包内部的 application.properties 和 application.yml
- 当前 jar 包内部的 application-{profile}.properties 和 application-{profile}.yml
- 引用的外部 jar 包的 application.properties 和 application.yml
- 引用的外部 jar 包的 application-{profile}.properties 和 application-{profile}.yml
同一种类型的.yml的配置文件加载顺序优先于.properties的配置文件
3.3 bootstrap和application的比较
bootstrap (.yml 或者 .properties),application (.yml 或者 .properties);
在 Spring Boot 中有两种上下文,一种是 bootstrap, 另外一种是 application, bootstrap 是应用程序的父上下文,也就是说 bootstrap 加载优先于 applicaton。
加载位置和加载顺序均为数字编号,先被加载的配置会被后续加载的同名配置所覆盖
4. SpringBoot内嵌Tomcat的流程
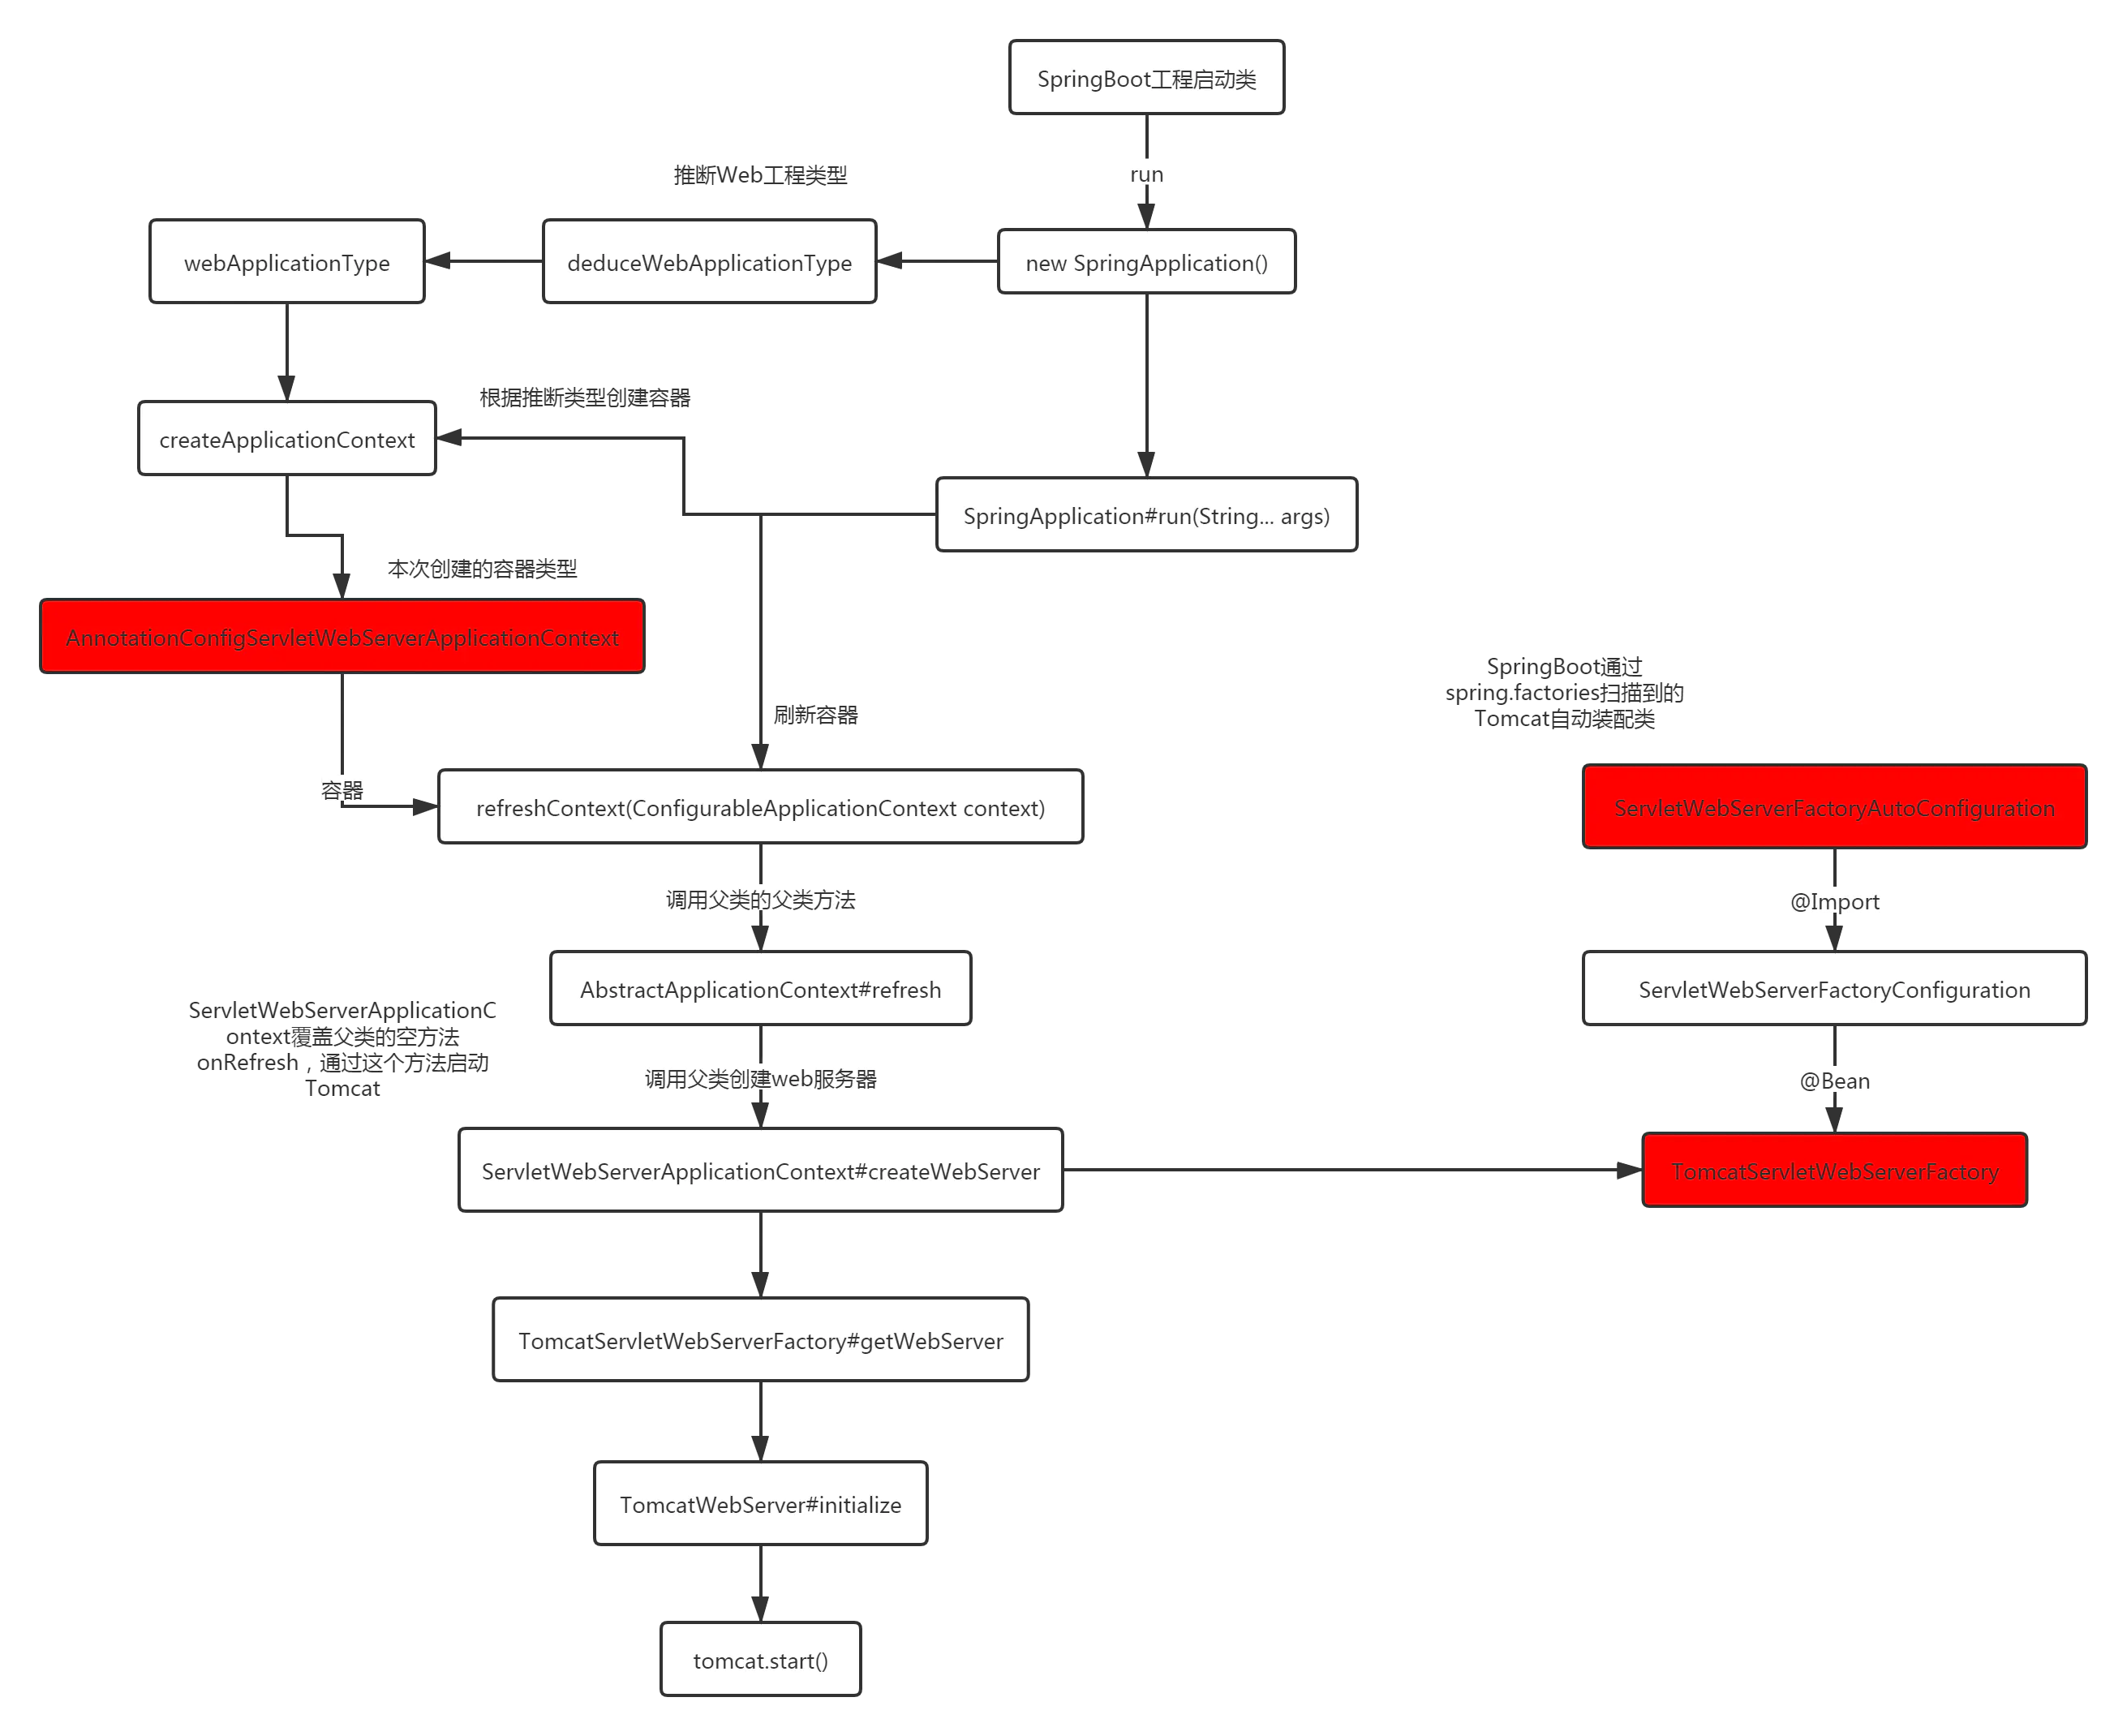
通过代码详细分析上图的流程
@SpringBootApplication
public class Application {
    public static void main(String[] args) {
        SpringApplication.run(Application.class, args);
    }
}
//根据run方法得到以下
public static ConfigurableApplicationContext run(Class<?> primarySource, String... args) {
        return run(new Class[]{primarySource}, args);
}
//再次跟进run方法得到以下
public static ConfigurableApplicationContext run(Class<?>[] primarySources, String[] args) {
    return (new SpringApplication(primarySources)).run(args);
}
分为了两部分part1:(new SpringApplication(primarySources))
``part2:.run(args),首先看part1`
//part1部分
public SpringApplication(Class<?>... primarySources) {
        this((ResourceLoader)null, primarySources);
    }
//本方法内部推断了当前Web应用类型以及启动类
public SpringApplication(ResourceLoader resourceLoader, Class<?>... primarySources) {
    ....
    //推断当前web容器类型
    this.webApplicationType = WebApplicationType.deduceFromClasspath();
    ....
    // 推断当前工程主启动类
    this.mainApplicationClass = this.deduceMainApplicationClass();
}
//可以看到SpringApplication构造方法通过 WebApplicationType.deduceFromClasspath 方法确定Web容器的类型webApplicationType(NONE,SERVLET,REACTIVE;最终会得到这三种类型其中一种)
接下来看part2:.run(args)
public ConfigurableApplicationContext run(String... args) {
    StopWatch stopWatch = new StopWatch();
    stopWatch.start();
    ConfigurableApplicationContext context = null;
    .....

        try {
            ...
                //创建ApplicationContext容器
                context = this.createApplicationContext();
            ...
                this.prepareContext(context, environment, listeners, applicationArguments, printedBanner);
            //刷新容器
            this.refreshContext(context);
            ....
        } catch (Throwable var10) {
            this.handleRunFailure(context, var10, exceptionReporters, listeners);
            throw new IllegalStateException(var10);
        }
    .....
}
注意看refreshContext(刷新容器的方法)
    private void refreshContext(ConfigurableApplicationContext context) {
        refresh(context);
        if (this.registerShutdownHook) {
            try {
                context.registerShutdownHook();
            } catch (AccessControlException ex) {
                // Not allowed in some environments.
            }
        }
    }
里面调用的refresh(),如果对Spring的启动流程有了解的话,应该知道Spring启动过程中,最重要的就是AbstractApplicationContext#refresh()过程,在这个方法中Spring执行了BeanFactory的初始化,Bean的实例化、属性填充、初始化操作等等重要的操作
 @Override
    public void refresh() throws BeansException, IllegalStateException {
        synchronized (this.startupShutdownMonitor) {
            ....
            try {
                // Allows post-processing of the bean factory in context subclasses.
                postProcessBeanFactory(beanFactory);
                ....
                // Initialize other special beans in specific context subclasses.
                onRefresh();
                ....
            } catch (BeansException ex) {
               ...
            } finally {
                ...
            }
        }
    }
}
//两个方法在spring中均是空实现。
protected void postProcessBeanFactory(ConfigurableListableBeanFactory beanFactory) {
}
protected void onRefresh() throws BeansException {
}
如上spring的refresh方法,其他的模板方法已省略,保留了两个spring交给子类个性化定制的方法。
在step2中。构造SpringApplicaton时,已经推断出当前Web工程类型,当开始执行#run方法时,会根据不同类型的Web项目创建不同类型的ApplicationContext。然后接着会执行 this.refreshContext(context);刷新容器的方法,所以上面模板方法,会调用子类中个性化定制的方法。所以确定好子类,找到子类的实现方法就好了。
//part2中创建ApplicationContext容器
// context = this.createApplicationContext();

// 根据deduceWebApplicationType推断出来的webApplicationType
// 选择不同类型的ApplicationContext创建
public static final String DEFAULT_REACTIVE_WEB_CONTEXT_CLASS = "org.springframework.boot.web.reactive.context.AnnotationConfigReactiveWebServerApplicationContext";

protected ConfigurableApplicationContext createApplicationContext() {
    Class<?> contextClass = this.applicationContextClass;
    if (contextClass == null) {
        try {
            //根据前面得到的webApplicationType创建ApplicationContext类型、
            switch (this.webApplicationType) {
                case SERVLET:
                    // 本文将会根据此行代码创建容器对象
                    // 类型:AnnotationConfigServletWebServerApplicationContext
                    // 继承自:ServletWebServerApplicationContext
                    contextClass = Class.forName(DEFAULT_WEB_CONTEXT_CLASS);
                    break;
                case REACTIVE:
                    contextClass = Class.forName(DEFAULT_REACTIVE_WEB_CONTEXT_CLASS);
                    break;
                default:
                    contextClass = Class.forName(DEFAULT_CONTEXT_CLASS);
            }
        } catch (ClassNotFoundException ex) {
            // ... 省略异常处理
        }
    }
    return (ConfigurableApplicationContext) BeanUtils.instantiateClass(contextClass);
}
接着执行refreshContext方法,来到前面根据webApplicationType创建的容器类ServletWebServerApplicationContext。找到对应的实现。
public class ServletWebServerApplicationContext
            extends GenericWebApplicationContext
            implements ConfigurableWebServerApplicationContext {

    // 重点是这里,它重写了AbstractApplicationContext的onRefresh
    // 并且在这类创建了一个web服务器
    @Override
    protected void onRefresh() {
        super.onRefresh();
        try {
            createWebServer();
        } catch (Throwable ex) {
        }
    }

    private void createWebServer() {
        WebServer webServer = this.webServer;
        ServletContext servletContext = getServletContext();
        if (webServer == null && servletContext == null) {
            // 通过Spring.factories配置自动装配类
            // ServletWebServerFactoryAutoConfiguration
            // 该类通过Import引入ServletWebServerFactoryConfiguration#EmbeddedTomcat
            ServletWebServerFactory factory = getWebServerFactory();
            this.webServer = factory.getWebServer(getSelfInitializer());
        } else if (servletContext != null) {
            try {
                getSelfInitializer().onStartup(servletContext);
            } catch (ServletException ex) {
            }
        }
        initPropertySources();
    }
}
进入到TomcatServletWebServerFactory,可以看到如下启动内置Tomcat的过程
public class TomcatServletWebServerFactory
            extends AbstractServletWebServerFactory
            implements ConfigurableTomcatWebServerFactory, ResourceLoaderAware {

    @Override
    public WebServer getWebServer(ServletContextInitializer... initializers) {
        Tomcat tomcat = new Tomcat();
        File baseDir = (this.baseDirectory != null ? this.baseDirectory
                : createTempDir("tomcat"));
        tomcat.setBaseDir(baseDir.getAbsolutePath());
        Connector connector = new Connector(this.protocol);
        tomcat.getService().addConnector(connector);
        customizeConnector(connector);
        tomcat.setConnector(connector);
        tomcat.getHost().setAutoDeploy(false);
        configureEngine(tomcat.getEngine());
        for (Connector additionalConnector : this.additionalTomcatConnectors) {
            tomcat.getService().addConnector(additionalConnector);
        }
        prepareContext(tomcat.getHost(), initializers);
        return getTomcatWebServer(tomcat);
    }

    protected TomcatWebServer getTomcatWebServer(Tomcat tomcat) {
        // 启动Tomcat
        return new TomcatWebServer(tomcat, getPort() >= 0);
    }
}
public class TomcatWebServer implements WebServer {

    public TomcatWebServer(Tomcat tomcat, boolean autoStart) {
        Assert.notNull(tomcat, "Tomcat Server must not be null");
        this.tomcat = tomcat;
        this.autoStart = autoStart;
        initialize();
    }

    private void initialize() throws WebServerException {
        synchronized (this.monitor) {
            try {
                ...
                // Start the server to trigger initialization listeners
                this.tomcat.start();   // 启动Tomcat
                // We can re-throw failure exception directly in the main thread
                rethrowDeferredStartupExceptions();
                ....

                // Unlike Jetty, all Tomcat threads are daemon threads. We create a
                // blocking non-daemon to stop immediate shutdown
                // 阻塞当前Tomcat线程,否则Tomcat就直接退出了
                startDaemonAwaitThread();
            } catch (Exception ex) {
                stopSilently();
                throw new WebServerException("Unable to start embedded Tomcat", ex);
            }
        }
    }
}
至此,Tomcat继承Spring的AbstractApplicationContext类,覆盖它的模板方法onRefresh,SpringBoot在自身启动的过程中,启动了内置的Tomcat服务器


 7855
7855


 被折叠的 条评论
为什么被折叠?
被折叠的 条评论
为什么被折叠?
 到【灌水乐园】发言


