


事务管理案例
前言
这篇文章介绍vue组件基础的一个小案例!
案例用到的知识点如下:
① vite 创建项目
② 组件的封装与注册
③ props
④ 样式绑定
⑤ 计算属性
⑥ 自定义事件
⑦ 组件上的 v-model
废话不多说,直接上刺刀!!
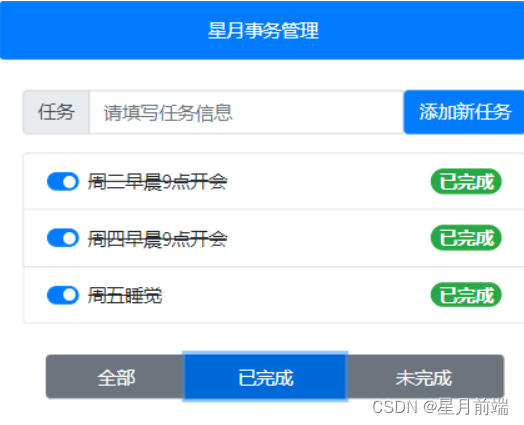
演示:
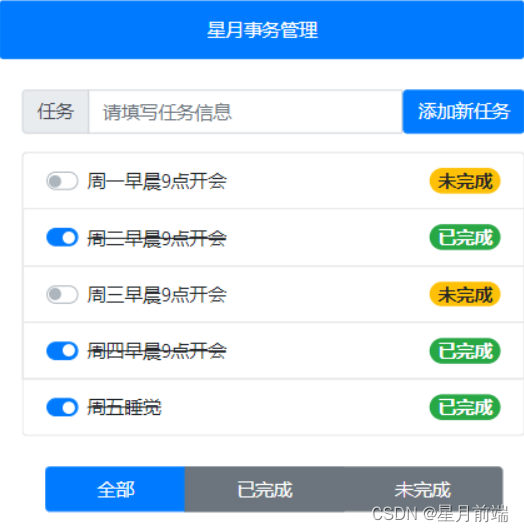
可以实现添加新事物以及切换状态
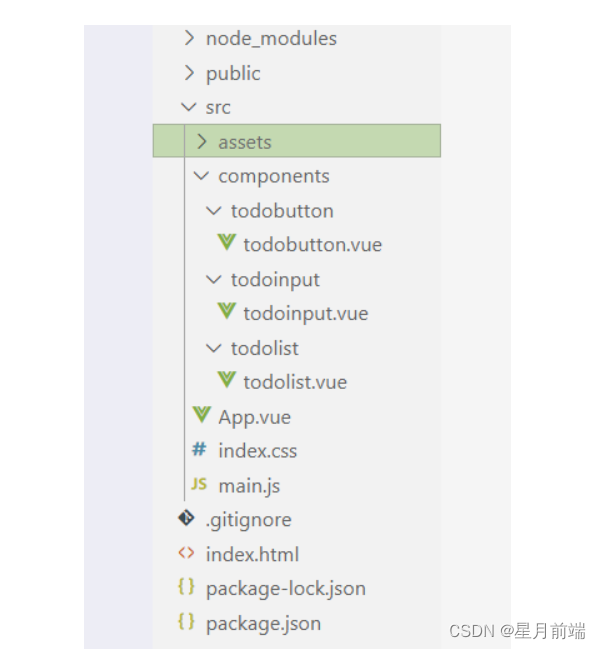
项目结构如图:
初始化项目
- 在终端运行以下的命令,初始化 vite 项目:
npm init vite-app todos
- 使用 vscode 打开项目,并安装依赖项:
npm install
- 安装 less 语法相关的依赖项:
npm i less -D
- 重置 index.css 中的全局样式如下:
:root {
 	font-size: 12px;
 }
body {
 	padding: 8px;
 }
在终端运行以下的命令,把项目运行起来:
npm run dev
主要代码:
main.js
import { createApp } from 'vue'
import App from './App.vue'

// 导入bootstrap
import './assets/css/bootstrap.css'
import './index.css'

createApp(App).mount('#app')
根组件:app.vue
<template>
  <ul class="list-group container">
    <li class="list-group-item active" aria-current="true">星月事务管理</li>
  </ul>
<div class="container container1">
  <todoInput @add="getadd"></todoInput>
  <todo-list :list="taskList"></todo-list>
  <todoButton :addb="mbstatus" @addb="onsta" v-model:addb="onsta"></todoButton>
</div>
</template>

<script>
import todoList from './components/todolist/todolist.vue'
import todoInput from './components/todoinput/todoinput.vue'
import todoButton from './components/todobutton/todobutton.vue'

export default {
  name: 'MyApp',
  components:{
    todoList,
    todoInput,
    todoButton
  },
  data() {
    return{
      nextid:6,
      mbstatus:0,
      todoList:[
        { id:1,task:'周一早晨9点开会',done:false },
        { id:2,task:'周二早晨9点开会',done:true },
        { id:3,task:'周三早晨9点开会',done:false },
        { id:4,task:'周四早晨9点开会',done:true },
        { id:5,task:'周五睡觉',done:true },
      ]
    }
  },
  methods:{
    // 把输入框的信息添加到todolist中
    getadd(e){
      this.todoList.push({
        id:this.nextid,
        task:e,
        done:false
      })
      this.nextid++
    },
    // 接收子组件传递的状态,并赋值给按钮的状态,实现按钮的切换
    onsta(e){
      // console.log(e)
      this.mbstatus = e
    }
  },
  computed:{
    taskList(){
      // if ---else方法
      // if(this.mbstatus === 0) {
      //   return this.todoList
      // }else if(this.mbstatus === 1){
      //   return this.todoList.filter(x=>x.done)
      // }else{
      //   return this.todoList.filter(x=>!x.done)
      // }

      // switch --- case 方法
      switch(this.mbstatus){
        case 0: {
          return this.todoList
        }
        case 1:{
          return this.todoList.filter(x=>x.done)
        }
        case 2:{
          return this.todoList.filter(x=>!x.done)
        }
      }
    }
  }
}
</script>
<style lang="less" scoped>
.list-group{
  max-width: 400px;
  text-align: center;
}
.container1{
  margin-top: 20px;
}
</style>
页面切换状态的按钮组件:todobutton.vue
<template>
<div class="btn-group container" role="group" aria-label="Basic example">
  <button type="button" class="btn" :class="addb===0?'btn-primary':'btn-secondary'" @click="onsta(0)">全部</button>
  <button type="button" class="btn" :class="addb===1?'btn-primary':'btn-secondary'" @click="onsta(1)">已完成</button>
  <button type="button" class="btn" :class="addb===2?'btn-primary':'btn-secondary'" @click="onsta(2)">未完成</button>
</div>
</template>

<script>
export default {
  name:'TodoButton',
  // 自定义需要绑定的事件addb
  emits:['addb'],
  props:{
    addb:{
      type:Number,
      required:true,
      default:0
    }
  },
  methods:{
    // 把当前点击按钮的状态传递给app父组件
    // 通过$emit自定义事件子传父,实现双向绑定
    onsta(e){
      // console.log(e)
      if(e === this.addb)return
      this.$emit('addb',e)
    }
  }
}
</script>

<style lang="less" scoped>
.btn-group{
  max-width: 400px;
  margin-top: 20px;
  text-align: center;
}
</style>
添加新事务部分组件:todoinput.vue
<template>
  <div class="input-group mb-3">
    <div class="input-group-prepend">
      <span class="input-group-text" id="inputGroup-sizing-default">任务</span>
    </div>
    <input type="text" class="form-control" placeholder="请填写任务信息" v-model="taskName" />
    <button type="button" class="btn btn-primary" @click="addtask">添加新任务</button>
  </div>
</template>

<script>
export default {
  name:'TodoInput',
  emits:['add'],
  data(){
    return{
      taskName:''
    }
  },
  methods:{
    addtask(){
      if(!this.taskName)return alert('事件名字不能为空!')
      this.$emit('add',this.taskName)
      this.taskName = ''
    }
  }
}
</script>

<style lang="less" scoped>
  .input-group{
    max-width: 400px;
  }
</style>
渲染事务列表组件:todolist.vue
<template>
<ul class="list-group">
  <li class="list-group-item d-flex justify-content-between align-items-center" v-for="item in list" :key="item.id">
    <div class="custom-control custom-switch">
      <input type="checkbox" class="custom-control-input" :id="item.id" v-model="item.done">
      <label class="custom-control-label" :for="item.id" :class="item.done ?'ftdelete':''">{{ item.task }}</label>
    </div>
    <span class="badge badge-success badge-pill" v-if="item.done">已完成</span>
    <span class="badge badge-warning badge-pill" v-else>未完成</span>
  </li>
</ul>
</template>

<script>
export default {
  name:'todoList',
  data(){
    return{
      ftdelete:'ftdelete'
    }
  },
  props:{
    list:{
      type:Array,
      required:true,
      default:[]
    }
  },
  // created(){
  //   this.list.forEach(e=>{
  //     // console.log(e)
  //     if( e.done === true ){
  //       e.done = false
  //     }else{
  //       e.done = true
  //     }
  //   })
  // }
}
</script>

<style lang="less" scoped>
.list-group{
  max-width: 400px;
  .ftdelete{
    text-decoration: line-through;
  }
}
</style>
完整源码打包在gitee:
https://gitee.com/xingyueqianduan/shiwudemo
写在最后
✨个人笔记博客✨
星月前端博客
http://blog.yhxweb.top/
✨原创不易,还希望各位大佬支持一下
👍 点赞,你的认可是我创作的动力!
⭐️ 收藏,你的青睐是我努力的方向!
✏️评论,你的意见是我进步的财富!


 1336
1336


 被折叠的 条评论
为什么被折叠?
被折叠的 条评论
为什么被折叠?
 到【灌水乐园】发言


