


。
- 1.总体设计(General design)
- 2.DNN与YOLOv7 (DNN vs. YOLOv7)
- 3.客户端的实现(Client-side implementations)
- ①.拍摄预览图对预览图进行处理使用DNN推演得到结果(Take a preview image, process the preview image, and use DNN deduction to get the result)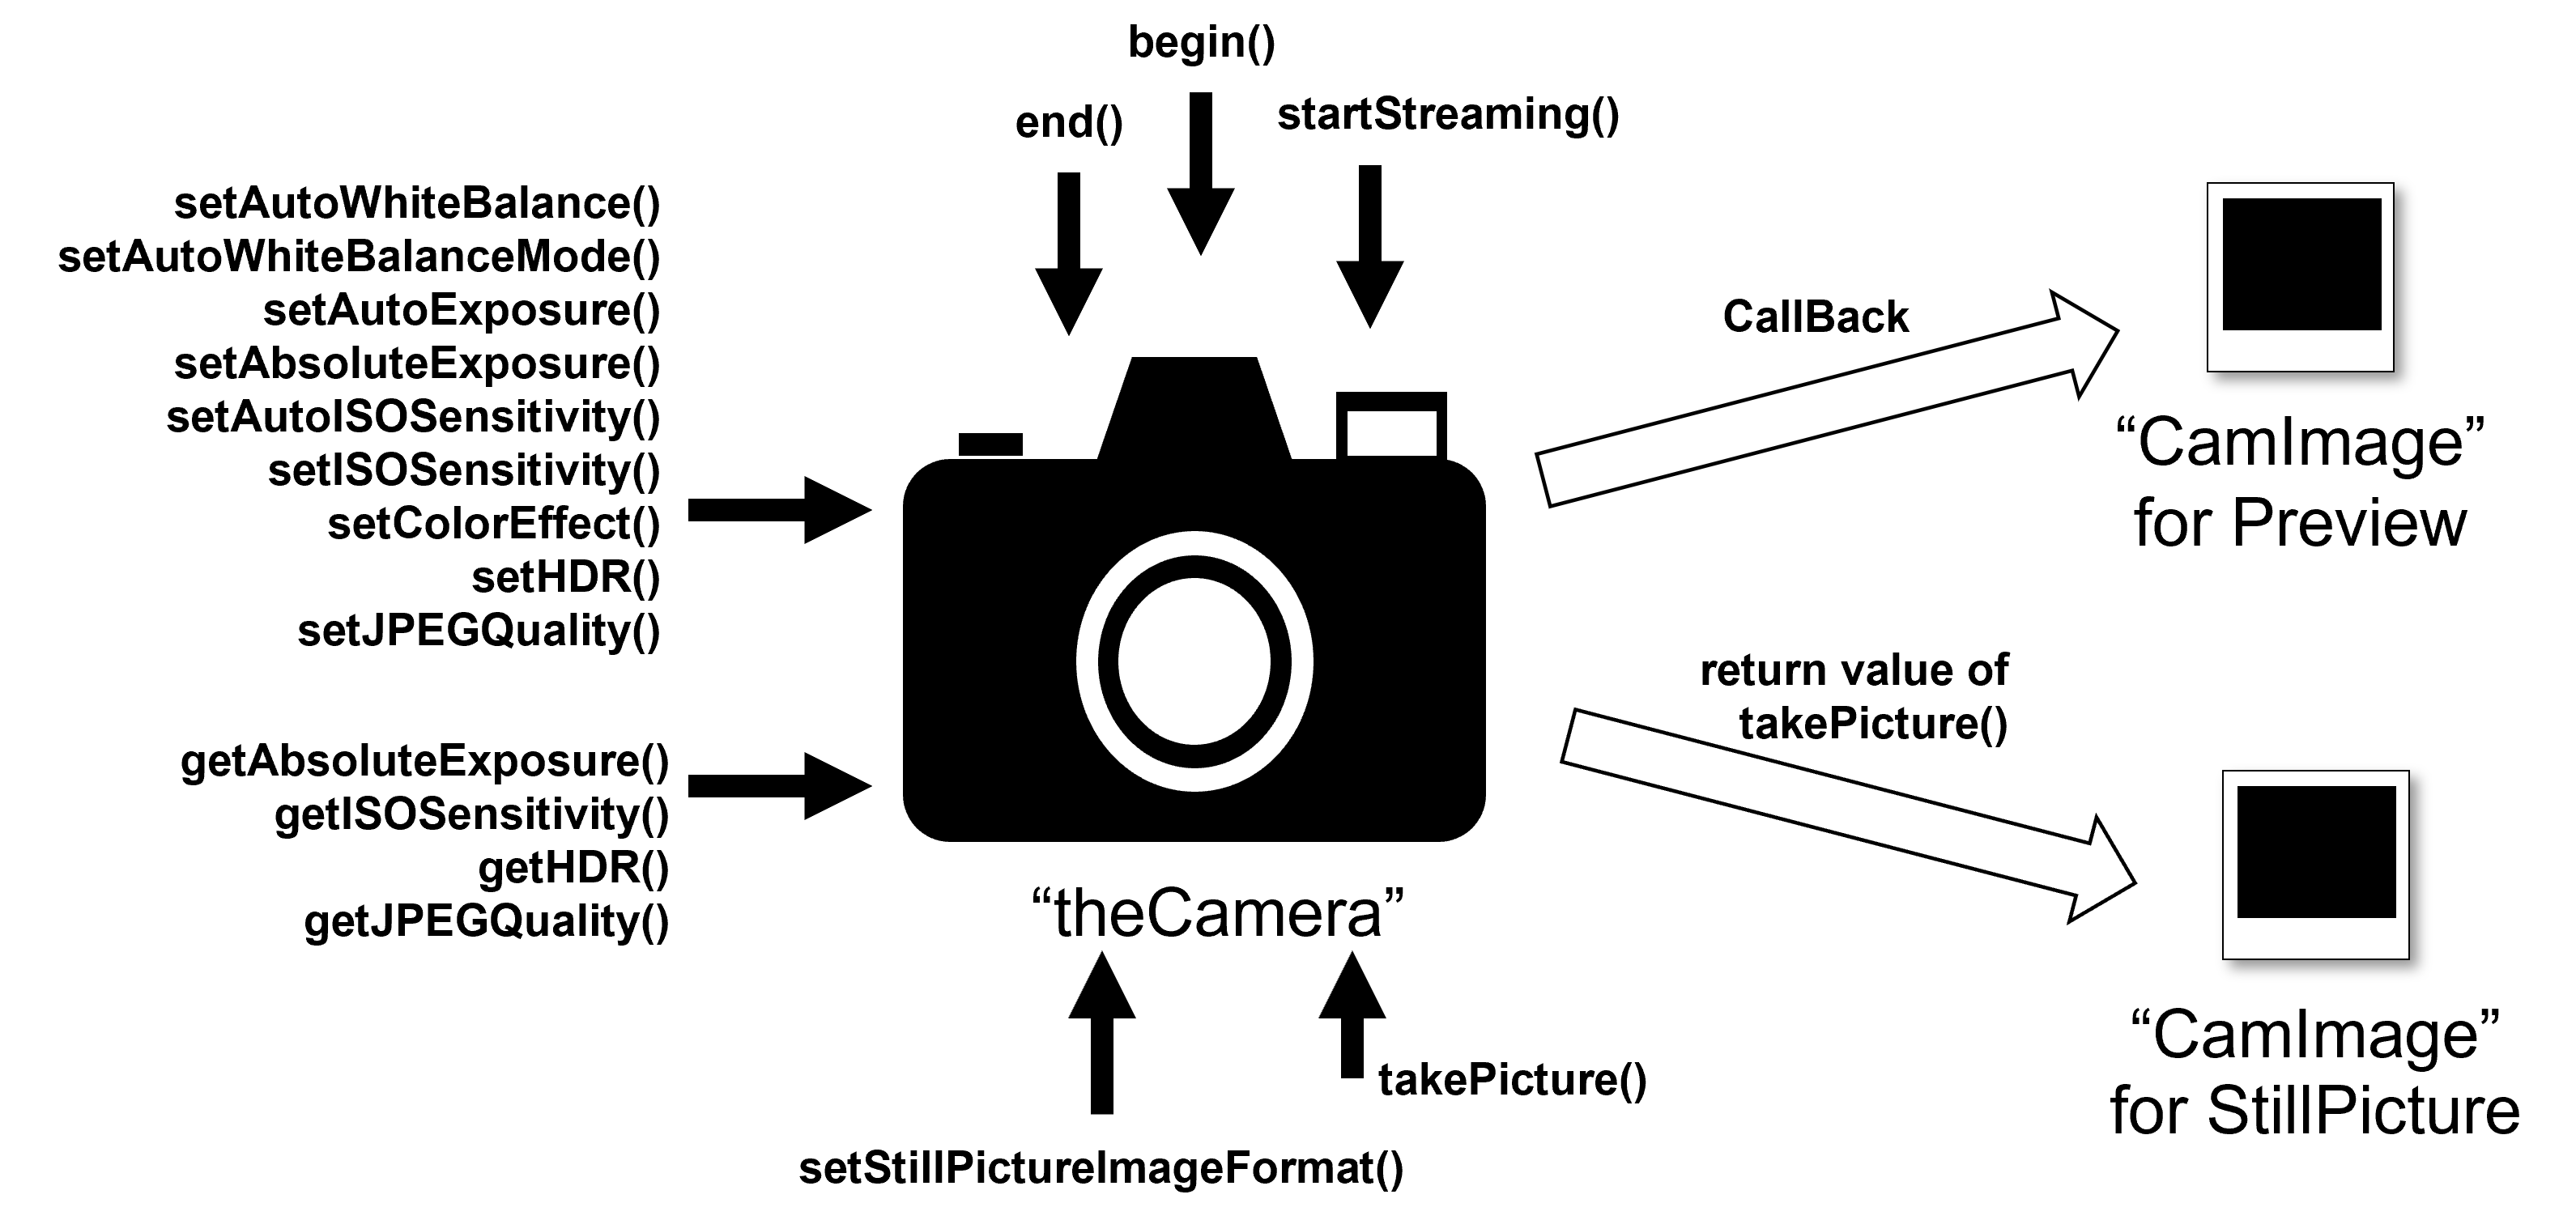
- ②达到发送要求后发送高分辨率图片至服务端(After the sending requirements are met, the high-resolution image is sent to the server)
- 3.服务端(Server-side)
- 4.控制模块(Control module)
- 5.与1.0版本区别(It is different from version 1.0)
1.0版本链接: https://blog.csdn.net/qq_62975494/article/details/136594177
1.总体设计(General design)
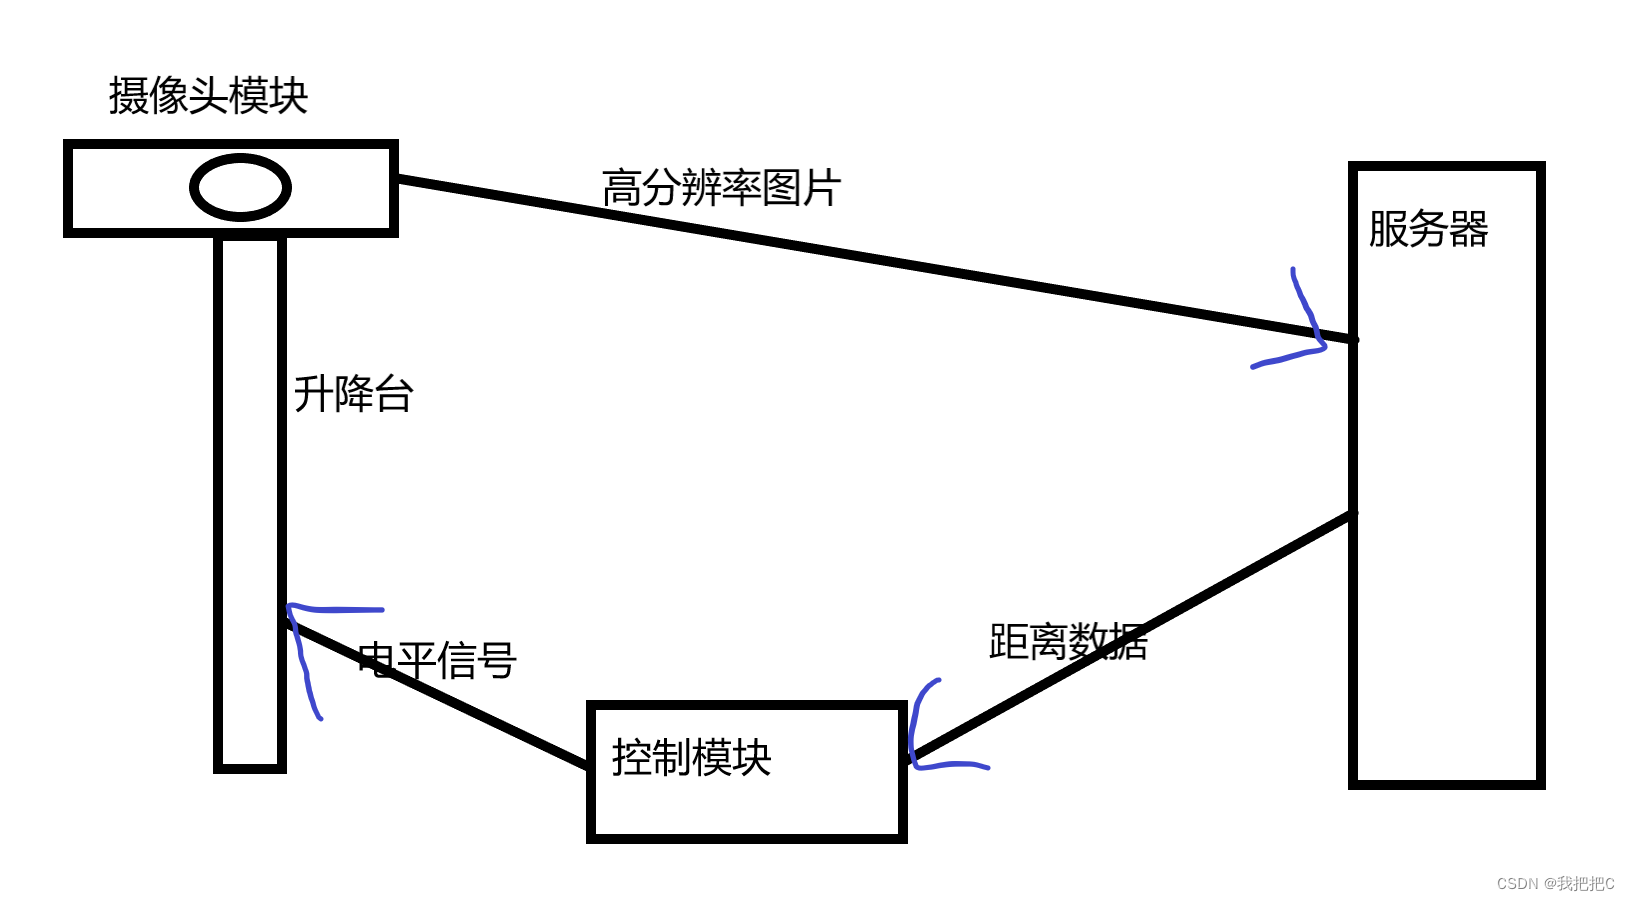
①首先通过索尼摄像头上获取预览图片进行DNN推演
②当推演结果达到我们设置的值时发送高分辨率图片至服务器
③服务器通过yolov7对眼睛在图片中的具体坐标进行识别
④通过单目视觉法计算真实距离并将数据发送至控制模块
⑤控制模块处理数据将其转换为电平信号控制升降台
(1) First of all, get the preview picture on the Sony camera for DNN deduction
(2) When the deduction result reaches the value we set, we send a high-resolution image to the server
(3) The server recognizes the specific coordinates of the eyes in the picture through yolov7
(4) The real distance is calculated by the monocular vision method and the data is sent to the control module
(5) The control module processes the data and converts it into a level signal to control the lifting table
2.DNN与YOLOv7 (DNN vs. YOLOv7)
一.YOLOv7
yolov7训练自己的数据集-gpu版—Yolov7 trains its own dataset - GPU version: https://blog.csdn.net/qq_62975494/article/details/136594177
二.DNN
因为我们要使用DNN来识别图片中是否有人并且索尼Spresense主板算例有限所以我们使用二分类模型
Because we want to use DNNs to identify if there is a person in the picture, and the Sony Spresense motherboard has limited examples, we use a binary classification model
①数据集准备(Dataset preparation)
首先通过Spresense拍摄数据集图片
通过将预览图处理后变为2828的灰度图片作为数据集储存到sd卡中
First, a dataset image is taken through Spresense
The grayscale image that is processed and turned into a 2828 preview image is stored as a dataset in the SD card
#include <Camera.h>
#include <SDHCI.h>
#include <BmpImage.h>

#define lefttop_x  (145)
#define lefttop_y  (141)
#define rightbottom_x (200)
#define rightbottom_y (196)
#define out_width  (28)
#define out_height  (28)

SDClass SD;
BmpImage bmp;
char fname[16];

void saveGrayBmpImage(int width, int height, uint8_t* grayImg)
{
  static int g_counter = 0;  // file name
  sprintf(fname, "%d.bmp", g_counter);

  /* Remove the old file with the same file name as new created file,
   * and create new file.
   */
  if (SD.exists(fname)) SD.remove(fname);

  // Open file in write mode
  File bmpFile = SD.open(fname, FILE_WRITE);
  if (!bmpFile) {
    Serial.println("Fail to create file: " + String(fname));
    while(1);
  }

  // Generate bitmap image
  bmp.begin(BmpImage::BMP_IMAGE_GRAY8, out_width, out_height, grayImg);

  // Write bitmap
  bmpFile.write(bmp.getBmpBuff(), bmp.getBmpSize());
  bmpFile.close();
  bmp.end();
  ++g_counter;

  // Show file name
  Serial.println("Saved an image as " + String(fname));
}

void CamCB(CamImage img)
{
  // Check availability of the img instance
  if (!img.isAvailable()) {
    Serial.println("Image is not available. Try again");
    return;
  }

  // Clip and resize img to interest region
  CamImage small;
  CamErr err = img.clipAndResizeImageByHW(small, lefttop_x, lefttop_y,
                    rightbottom_x, rightbottom_y, out_height, out_width);
  if (!small.isAvailable()){
    Serial.println("Clip and Reize Error:" + String(err));
    return;
  }

  // Change image to greyscale map
  uint16_t* imgbuf = (uint16_t*)small.getImgBuff();
  uint8_t grayImg[out_width*out_height];
  for (int n = 0; n < out_width*out_height; ++n) {
    grayImg[n] = (uint8_t)(((imgbuf[n] & 0xf000) >> 8)
                         | ((imgbuf[n] & 0x00f0) >> 4));
  }

  // Save image in bmp format
  saveGrayBmpImage(out_width, out_height, grayImg);
}

void takeOnePicture() {

  // Set parameters about still picture.
  theCamera.setStillPictureImageFormat(
     CAM_IMGSIZE_QVGA_H,
     CAM_IMGSIZE_QVGA_V,
     CAM_IMAGE_PIX_FMT_JPG);

  // Take picture
  CamImage img = theCamera.takePicture();

  // Check availability of the img instance
  if (img.isAvailable())
    {
      // Create file name
      char filename[16] = {0};
      sprintf(filename, "region.jpg");

      /* Remove the old file with the same file name as new created file,
       * and create new file.
       */

      SD.remove(filename);
      File myFile = SD.open(filename, FILE_WRITE);
      myFile.write(img.getImgBuff(), img.getImgSize());
      myFile.close();
      Serial.println("Saved an image as " + String(filename));
    }
  else
    {
      /* The size of a picture may exceed the allocated memory size.
       * Then, allocate the larger memory size and/or decrease the size of a picture.
       * [How to allocate the larger memory]
       * - Decrease jpgbufsize_divisor specified by setStillPictureImageFormat()
       * - Increase the Memory size from Arduino IDE tools Menu
       * [How to decrease the size of a picture]
       * - Decrease the JPEG quality by setJPEGQuality()
       */

      Serial.println("Failed to take picture");
    }
}

void setup() {

  // Initialize serial port
  Serial.begin(115200);

  // Initialize SD card
  while (!SD.begin()) {
    Serial.println("Insert SD card");
  }

  // Initialize camera
  theCamera.begin();
  theCamera.startStreaming(true, CamCB);
  Serial.println("CamCB started");

  // Take picture to define interest region
  takeOnePicture();
}

void loop() {
  // put your main code here, to run repeatedly:
}
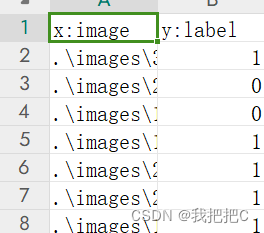
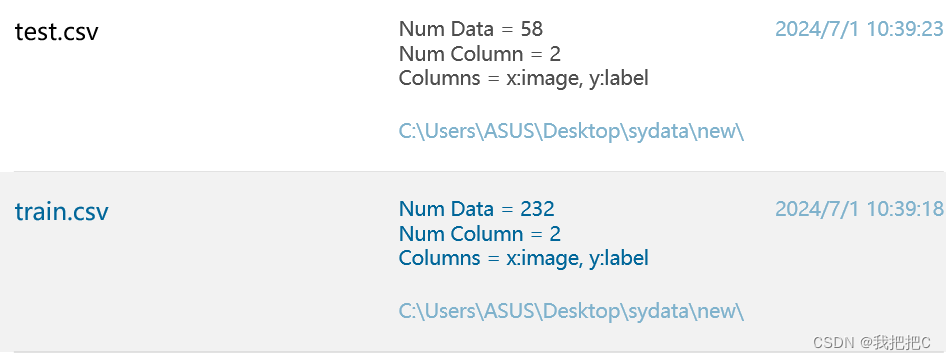
然后我们对数据集进行标注标注的文件类型为csv文件对每个图片进行标注
Then, we label the dataset with a csv file type, and label each image
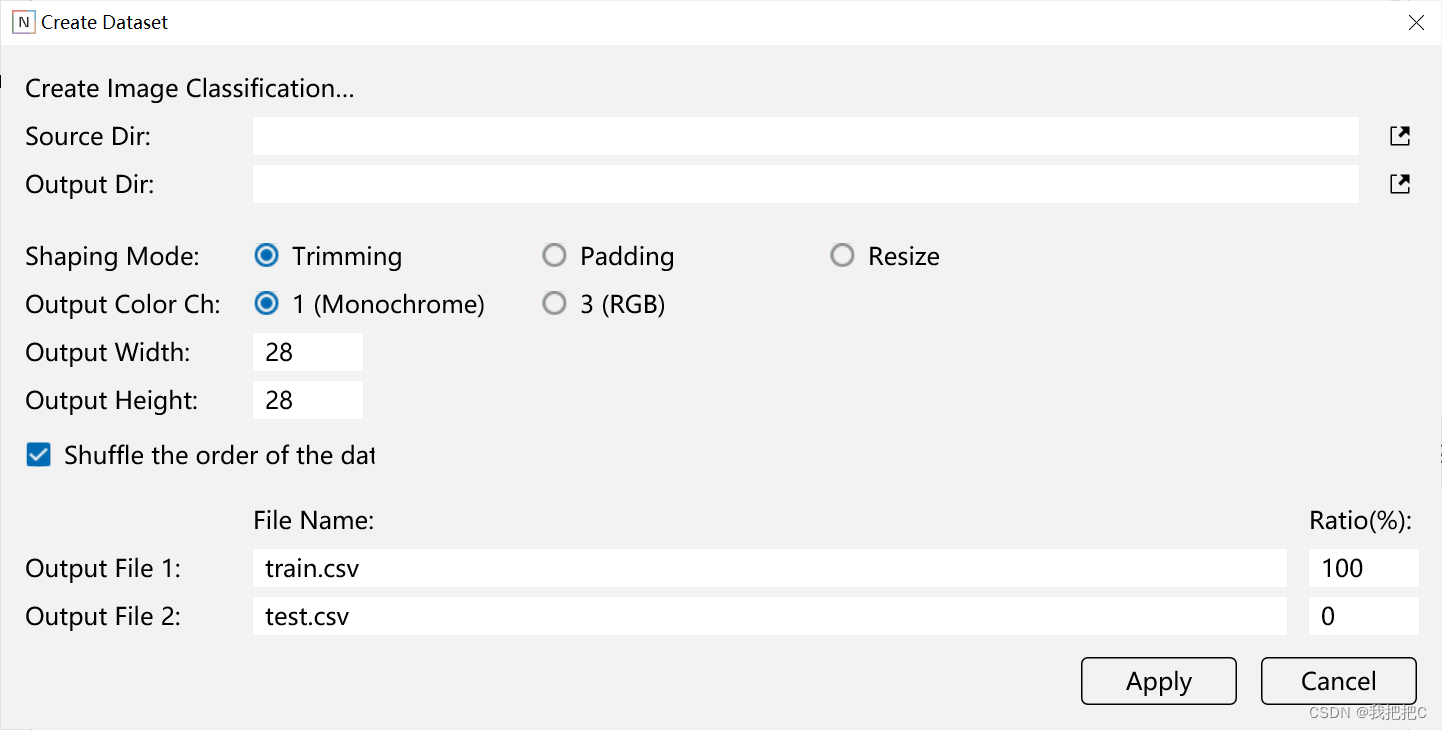
数据集打乱以及分离我们使用索尼提供的神经网络控制台(nnc)
Dataset scrambling and separationWe use the Neural Network Console (NNC) provided by Sony
②模型设计(Model design)
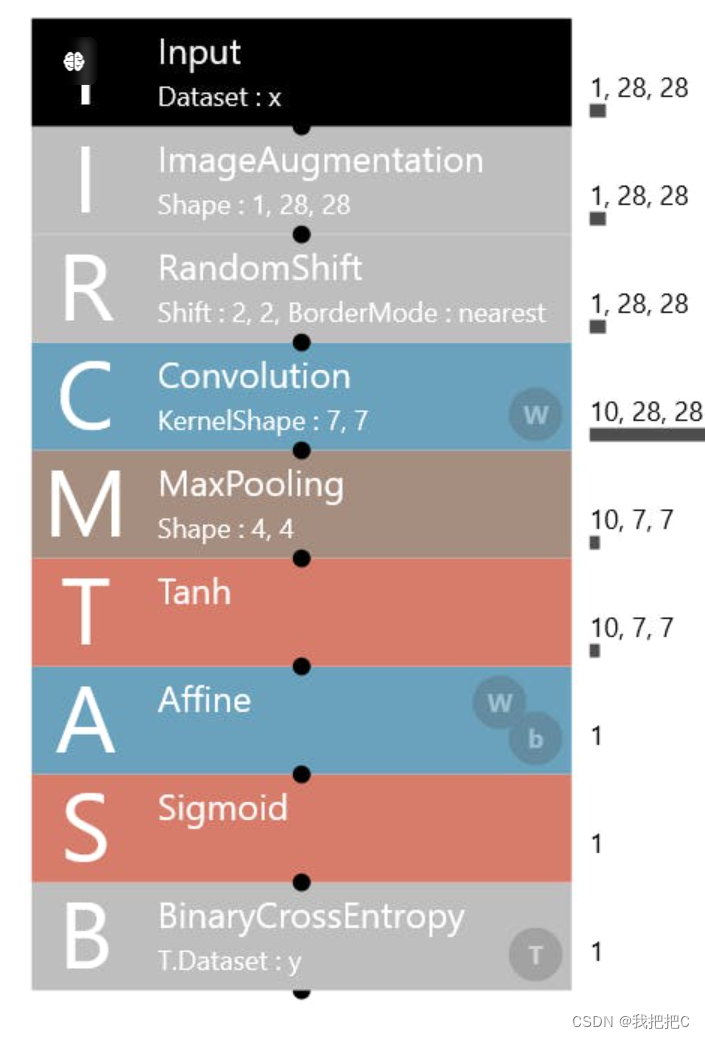
- 输入层(数据集:x):这个层代表输入数据集,用字母“x”表示。它的维度是1, 28, 28,通常对应着28x28像素的灰度图像。
- 图像增强层:该层执行水平和垂直方向上各2个像素的随机平移,采用最近邻插值方法。其目的是通过引入图像的变化来增加输入数据的多样性,使模型对不同的变化更具鲁棒性。
- 卷积层(核形状:7, 7):此层应用卷积运算,核形状为7x7。卷积层的主要功能是从输入图像中提取特征。
- 最大池化层(形状:4, 4):最大池化层会缩小输入图像的尺寸,这里为4x4。它有助于减少计算复杂性和降低空间维度,同时保留重要的特征。
- 双曲正切激活函数层(Tanh):这是一个非线性激活函数,用于在神经网络中引入非线性特性,使得模型能够学习更复杂的模式。
- 全连接层(权重 w 和偏置 b):全连接层将所有输入节点连接到输出节点,权重 w 和偏置 b 是训练过程中需要优化的参数。
- Sigmoid激活函数层:Sigmoid函数是一种常用的激活函数,用于将输出映射到0-1之间,适合分类问题。
- 二元交叉熵损失层(数据集:y):这是评估模型预测结果与真实标签之间差异的一种损失函数,用于训练过程中的反向传播算法。
总的来说,这个架构是一个简单的卷积神经网络(CNN),用于处理图像数据。它首先通过图像增强增加数据多样性,接着通过卷积层和最大池化层提取特征,再经过全连接层和激活函数进行特征融合和变换,最后使用二元交叉熵作为损失函数进行训练。
- Input Layer (Dataset: x): This layer represents the input dataset and is denoted by the letter “x”. Its dimensions are 1, 28, 28, which usually correspond to a grayscale image of 28x28 pixels.
- Image Enhancement Layer: This layer performs random translation of 2 pixels in the horizontal and vertical directions, using the nearest neighbor interpolation method. The aim is to increase the diversity of the input data by introducing variations in the image, making the model more robust to different variations.
- Convolutional layer (kernel shape: 7, 7): This layer applies convolutional operations and the kernel shape is 7x7. The main function of a convolutional layer is to extract features from the input image.
- Maximum Pooling Layer (Shapes: 4, 4): The maximum pooling layer reduces the size of the input image, in this case 4x4. It helps to reduce computational complexity and spatial dimensions while preserving important features.
- Hyperbolic tangent activation function layer (Tanh): This is a nonlinear activation function that introduces nonlinear features into a neural network that allows the model to learn more complex patterns.
- Fully connected layer (weight w and bias b): The fully connected layer connects all input nodes to output nodes, and weight w and bias b are the parameters that need to be optimized during training.
- Sigmoid Activation Function Layer: The Sigmoid function is a commonly used activation function that maps the output between 0-1 and is suitable for classification problems.
- Binary Cross-Entropy Loss Layer (Dataset: Y): This is a loss function that evaluates the difference between the model’s prediction and the real label, and is used for the backpropagation algorithm during training.
Overall, this architecture is a simple convolutional neural network (CNN) for processing image data. It first increases the data diversity through image enhancement, then extracts features through the convolutional layer and the maximum pooling layer, then performs feature fusion and transformation through the fully connected layer and activation function, and finally uses binary cross-entropy as the loss function for training.
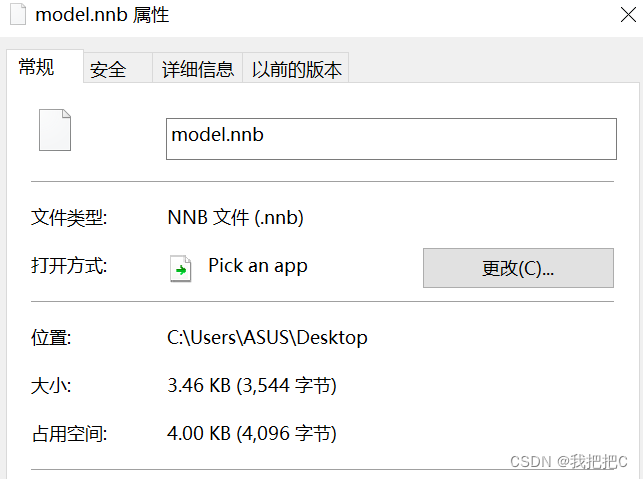
③导出训练结果(Export the training results)
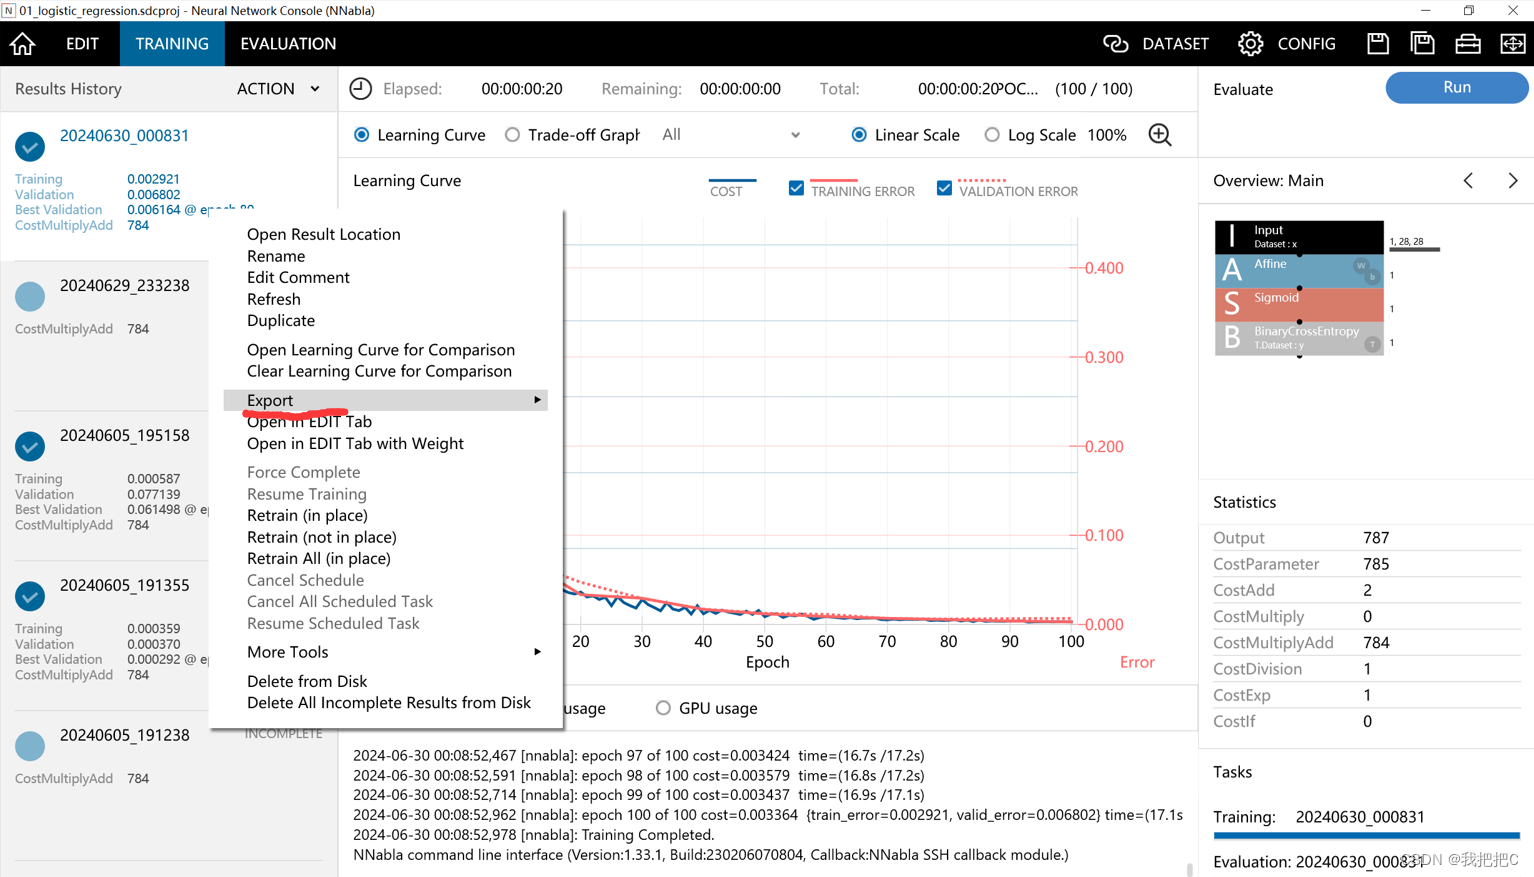
导出.nnb文件类型(Export .nnb file type)
3.客户端的实现(Client-side implementations)
客户端代码详解-----Detailed explanation of client code: https://blog.csdn.net/qq_62975494/article/details/140111475
我们使用索尼Spresense开发板作为客户端
①拍摄预览图对预览图进行处理使用DNN推演得到结果
②达到发送要求后发送高分辨率图片至服务端
We use the Sony Spresense development board as the client
(1) Take a preview image, process the preview image, and use DNN deduction to get the result
(2) Send high-resolution images to the server after meeting the sending requirements
①.拍摄预览图对预览图进行处理使用DNN推演得到结果(Take a preview image, process the preview image, and use DNN deduction to get the result)
这是一张索尼Spresense cameras库示例图
如果我们想要对预览图进行处理需要先通过begin()开启和设置预览图然后使用startStreaming(true,callBack())对callBack()函数进行注册当有新帧被捕获时将会被传递至CallBack()函数进行处理
CallBack()函数如下
Here’s an example image of Sony’s Spresense cameras library
If we want to process the preview, we need to open and set the preview image with begin(), and then use startStreaming(true,callBack()) to register the callBack() function, and when a new frame is captured, it will be passed to the CallBack() function for processing
The CallBack() function is as follows
void CamCB(CamImage img)
{
  // Check availability of the img instance
  unsigned long currentTime = millis();
  if (currentTime - previousCaptureTime >= captureInterval) {

  if (!img.isAvailable()) {
    Serial.println("Image is not available. Try again");
    return;
  }
  // Clip and resize img to interest region
  CamImage small;
  CamErr err = img.clipAndResizeImageByHW(small, lefttop_x, lefttop_y,
                    rightbottom_x, rightbottom_y, out_height, out_width);
  if (!small.isAvailable()){
    Serial.println("Clip and Reize Error:" + String(err));
    return;
  }

  // Change image to greyscale map
  uint16_t* imgbuf = (uint16_t*)small.getImgBuff();
  float *dnnbuf = input.data();
  int n = 0;
  for (n = 0; n < out_height*out_width; ++n) {
    dnnbuf[n] = (float)(((imgbuf[n] & 0xf000) >> 8)
                      | ((imgbuf[n] & 0x00f0) >> 4)) / 255.0; // Normalize
  }

  // Inference
  dnnrt.inputVariable(input, 0);
  dnnrt.forward();
  DNNVariable output = dnnrt.outputVariable(0);

  int index = output.maxIndex();

    Serial.print("First action recognized!");
    Serial.println(output[index]);
    //更新标志位
    //下面的条件自己定义
    //
   }
②达到发送要求后发送高分辨率图片至服务端(After the sending requirements are met, the high-resolution image is sent to the server)
当推演的结果集达到设置的结果集时我们将设置静止拍摄模式
如果将数据作为照片检索, Spresense Camera可以获取高分辨率JPEG压缩图像。
首先,对theCamera执行"设置胶片"的过程。 执行此操作的方法函数是setStillPictureImageFormat()。 使用此方法函数设置静止图像(照片)的图片大小和像素格式。
When the deduced result set reaches the set result set, we will set the still shooting mode
If the data is retrieved as a photo, Spresense Camera can acquire high-resolution JPEG compressed images.
First, perform the “Set Up Film” process for theCamera. The method function that does this is setStillPictureImageFormat(). Use this method function to set the picture size and pixel format for a still image (photo).
setStillPictureImageFormat(int width, int height, CAM_IMAGE_PIX_FMT fmt = CAM_IMAGE_PIX_FMT_JPEG)
1.loop()
功能:循环执行主要逻辑,当 imageSending 标记为真时,设置相机的静态图像格式为 QUADVGA 分辨率并采用 JPG 格式,然后捕获一张图片。一旦图片可用,就获取其大小,通过 sendImageDataWithHeader() 函数发送图片数据,并在成功发送后将 imageSending 设为假。
•关键步骤:
- 设置相机图像格式。
- 捕获图像。
- 检查并发送图像数据。
Purpose: Executes the primary logic in a loop, setting the camera’s still picture format to QUADVGA with JPG format when imageSending is true, capturing an image, and upon image availability, retrieving its size, sending the image data via sendImageDataWithHeader(), and setting imageSending to false upon successful transmission.
•Key Steps:
- Configure camera image format.
- Capture an image.
- Check and send image data.
void loop() {

  // put your main code here, to run repeatedly:
  if(imageSending){
     Serial.println("Setting still picture format...");
    if (theCamera.setStillPictureImageFormat(
            CAM_IMGSIZE_QUADVGA_H,
            CAM_IMGSIZE_QUADVGA_V,
            CAM_IMAGE_PIX_FMT_JPG) != CAM_ERR_SUCCESS) {
        Serial.println("Setting still picture format failed!");
    }


    Serial.println("Taking picture...");
        CamImage img = theCamera.takePicture();
        while(1){
        if (img.isAvailable()) {
            Serial.print("Image size: ");
            Serial.println(img.getImgSize());

            sendImageDataWithHeader(img.getImgBuff(), img.getImgSize());
            imageSending = false;
            break;
        } else {
            Serial.println("Failed to capture image.");
        }
    }
  }
}
2.hostToNetworkLong(uint32_t value)
•功能:将主机字节序的32位整数转换为网络字节序,确保不同平台间数据的一致性。
•过程:通过位移操作重新排列字节顺序。
•Purpose: Converts a 32-bit integer from host byte order to network byte order, ensuring compatibility across platforms.
•Process: Rearranges the byte order through bitwise shifts.
uint32_t hostToNetworkLong(uint32_t value) {
    return (value << 24) |
           ((value << 8) & 0x00FF0000) |
           ((value >> 8) & 0x0000FF00) |
           (value >> 24);
}
3.sendImageDataWithHeader(const uint8_t* imageData, size_t dataSize)
•功能:为图像数据添加长度头(转换为网络字节序),然后调用 sendImageDataOverSerial() 函数发送数据。
•步骤: 1. 转换数据大小为网络字节序。2. 通过串口发送数据长度。3. 发送实际的图像数据。
Purpose: Adds a length header (in network byte order) to the image data and then calls sendImageDataOverSerial() to transmit the data.
•Steps: 1. Converts the data size to network byte order.2. Sends the data length over the serial interface.3. Transmits the actual image data.
void sendImageDataWithHeader(const uint8_t* imageData, size_t dataSize) {
    // 添加包头,例如使用长度信息
    uint32_t length = hostToNetworkLong(dataSize); // 网络序转换,确保大小端一致性
    Serial2.write(reinterpret_cast<const uint8_t*>(&length), sizeof(length))
    // 发送数据
    sendImageDataOverSerial(imageData, dataSize);
    // 可以选择添加包尾,如特定的结束字符或序列,但在这里假设长度信息足够标识数据包
}
4.sendImageDataOverSerial(const uint8_t* imageData, size_t dataSize)
•功能:将图像数据分块发送通过串行接口,以适应可能的缓冲区大小限制或传输速率要求。
•实现: 1. 设置每块数据的最大大小为512字节。2. 循环遍历图像数据,每次发送一个数据块。3. 在每次发送之后暂停一小段时间,可能为了防止数据溢出或控制发送速率。4. 发送完毕后打印确认信息。
•Purpose: Sends the image data in chunks over the serial interface, accommodating potential buffer size limitations or transmission rate requirements.
•Implementation: 1. Sets a maximum chunk size of 512 bytes.2. Iterates through the image data, sending one chunk at a time.3. Pauses briefly after each send, potentially to avoid overflow or control the transmission speed.4. Prints a confirmation message once all data has been sent.
void sendImageDataOverSerial(const uint8_t* imageData, size_t dataSize) {
    const size_t chunkSize = 512;
    for (size_t offset = 0; offset < dataSize; offset += chunkSize) {
        size_t bytesToSend = min(chunkSize, dataSize - offset);
        Serial2.write(imageData + offset, bytesToSend);
        delay(10); // 根据串口传输速率调整
    }
    Serial.println("Image data sent over Serial1.");
}
3.服务端(Server-side)
服务端主要用于接收数据以及使用yolov7对数据进行处理然后通过单目算法测出距离和发送给控制模块
The server is mainly used to receive data and use yolov7 to process the data, and then measure the distance through the monocular algorithm and send it to the control module
服务端代码详解—Detailed explanation of server-side code: https://blog.csdn.net/qq_62975494/article/details/140113388
①数据接收端(Data receiver)
用于接收从客户端传输来的高分辨率图片并更新标志位告诉算法模块有新数据需要识别
It is used to receive a high-resolution image transmitted from the client and update the flag to tell the algorithm module that there is new data to be recognized
②算法模块(Algorithm module)
主要包括使用yolov7精确给出眼睛在照片中的具体坐标然后使用单目算法将坐标距离转换位真实距离发送至控制模块
It mainly includes using yolov7 to accurately give the specific coordinates of the eye in the photo, and then using the monocular algorithm to send the real distance of the coordinate distance conversion bit to the control module
4.控制模块(Control module)
主要用于接收服务端返回的距离数据然后将其转换为高低电平输出来控制升降杆
It is mainly used to receive the distance data returned by the server, and then convert it into a high-low level output to control the lifting lever
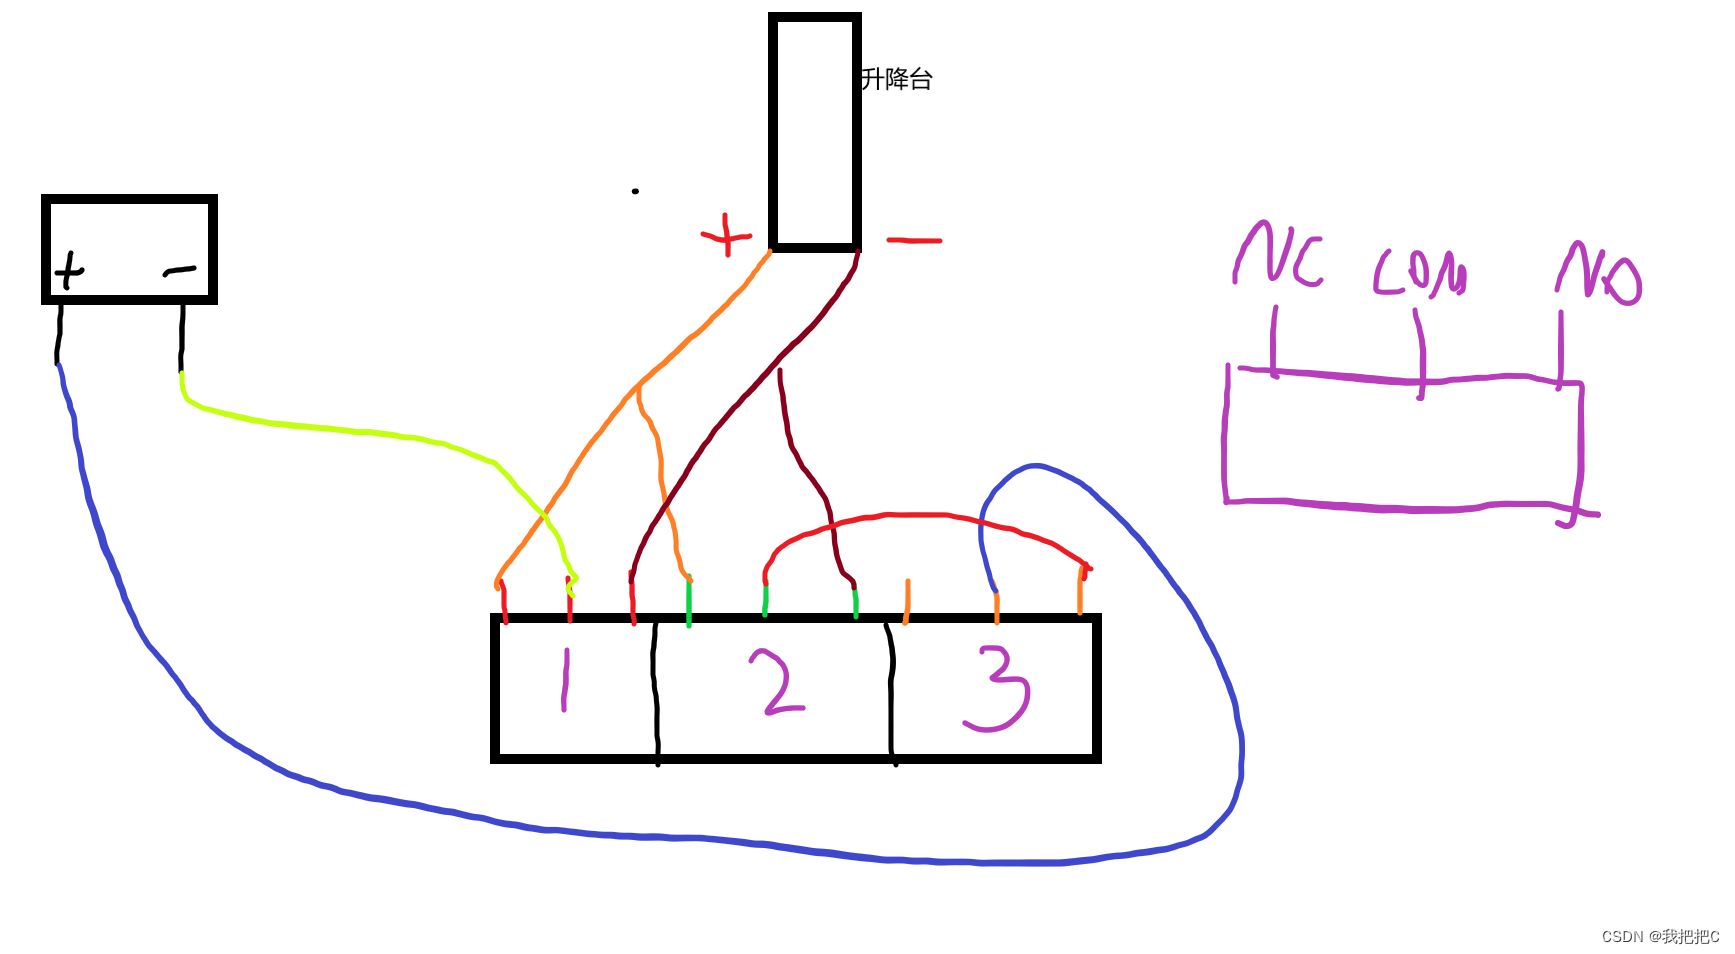
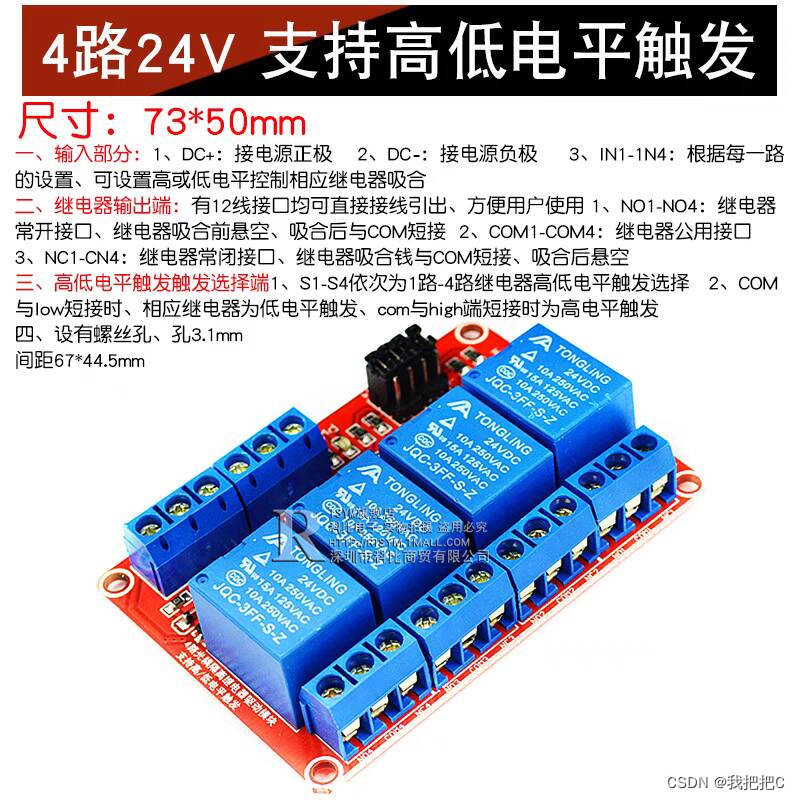
我们使用一个四路继电器来控制升降杆的电源
We use a four-way relay to control the power supply of the lifting pole
5.与1.0版本区别(It is different from version 1.0)
1.0版本链接: https://blog.csdn.net/qq_62975494/article/details/136594177
由云计算模式更改位边缘计算我们将大部分计算直接在索尼Spresense开发板上直接完成
更换了索尼Spresense专业摄像头功耗更低照片质量更高发热更低
Changing the bit of edge computing from the cloud computing model, we will do most of the computing directly on the Sony Spresense development board
Replaced the Sony Spresense professional camera, which consumes less power and has higher photo quality and lower heat


 485
485

 被折叠的 条评论
为什么被折叠?
被折叠的 条评论
为什么被折叠?
 到【灌水乐园】发言


