


本文采用spring boot快速创建项目
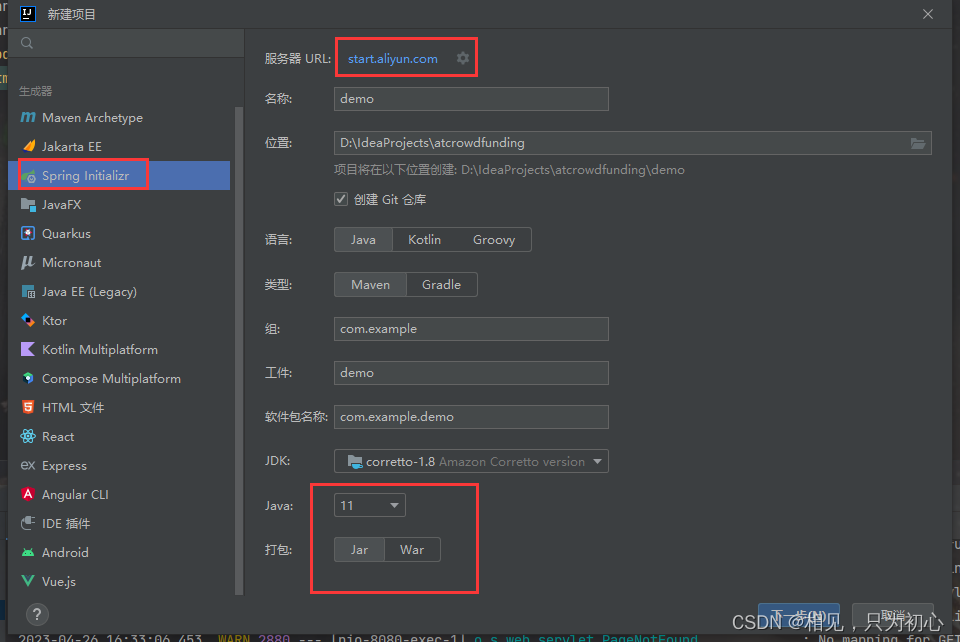
1. idea打开Spring Initializr
这里服务器url换成阿里云的更快,注意更换jdk版本和打包方式
2. 之后选择需要的依赖即可
3. 进入项目第一步先把配置文件搞好
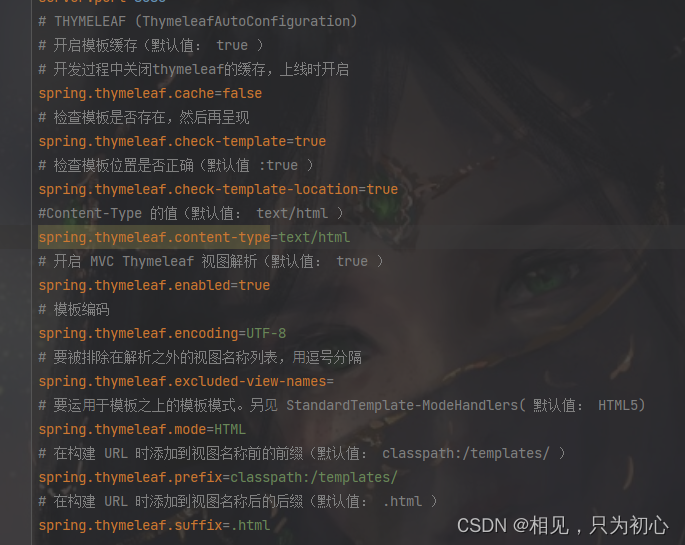
如果选择了模板引擎,先把引擎的缓存关掉,其他的不变
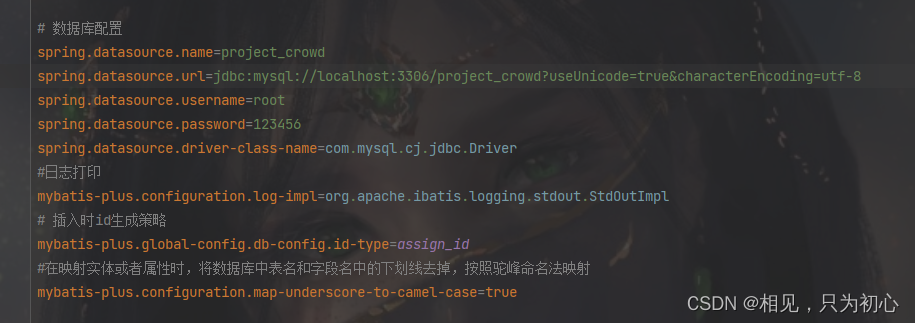
我的是MySQL8.0,持久层使用的是Mybatis-Plus
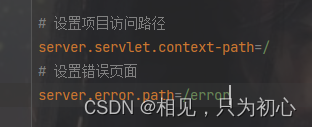
项目访问的一些配置
以下是application.properties的全部内容
# 应用服务 WEB 访问端口
server.port=8080
# THYMELEAF (ThymeleafAutoConfiguration)
# 开启模板缓存(默认值: true )
# 开发过程中关闭thymeleaf的缓存,上线时开启
spring.thymeleaf.cache=false
# 检查模板是否存在,然后再呈现
spring.thymeleaf.check-template=true
# 检查模板位置是否正确(默认值 :true )
spring.thymeleaf.check-template-location=true
#Content-Type 的值(默认值: text/html )
spring.thymeleaf.content-type=text/html
# 开启 MVC Thymeleaf 视图解析(默认值: true )
spring.thymeleaf.enabled=true
# 模板编码
spring.thymeleaf.encoding=UTF-8
# 要被排除在解析之外的视图名称列表,⽤逗号分隔
spring.thymeleaf.excluded-view-names=
# 要运⽤于模板之上的模板模式。另⻅ StandardTemplate-ModeHandlers( 默认值: HTML5)
spring.thymeleaf.mode=HTML
# 在构建 URL 时添加到视图名称前的前缀(默认值: classpath:/templates/ )
spring.thymeleaf.prefix=classpath:/templates/
# 在构建 URL 时添加到视图名称后的后缀(默认值: .html )
spring.thymeleaf.suffix=.html

# 数据库配置
spring.datasource.name=project_crowd
spring.datasource.url=jdbc:mysql://localhost:3306/project_crowd?useUnicode=true&characterEncoding=utf-8
spring.datasource.username=root
spring.datasource.password=123456
spring.datasource.driver-class-name=com.mysql.cj.jdbc.Driver
#日志打印
mybatis-plus.configuration.log-impl=org.apache.ibatis.logging.stdout.StdOutImpl
# 插入时id生成策略
mybatis-plus.global-config.db-config.id-type=assign_id
#在映射实体或者属性时,将数据库中表名和字段名中的下划线去掉,按照驼峰命名法映射
mybatis-plus.configuration.map-underscore-to-camel-case=true

#安全配置
spring.security.user.name=admin
spring.security.user.password=123456
spring.security.user.roles=ADMIN

# 设置项目访问路径
server.servlet.context-path=/
# 设置错误页面
server.error.path=/error
springMVC的配置,注意这个不配置很有可能出现页面访问出错。
这里的静态资源映射可以通过下面这条命令在配置文件中配置,但是只能配置一个映射源,所以一般还是要通过代码进行复杂的配置。
spring.resources.static-locations=classpath:/static/
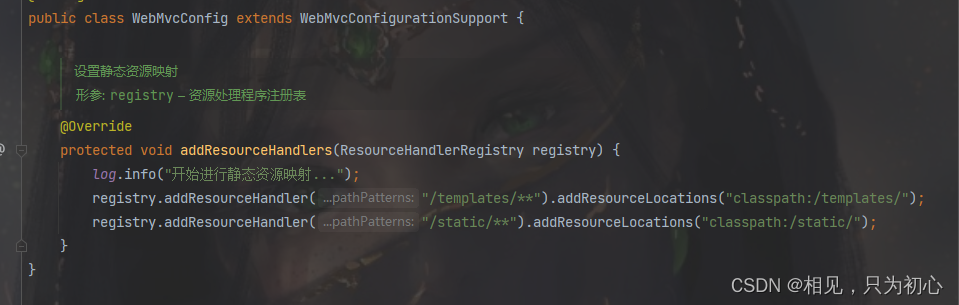
package com.drs.config;

import lombok.extern.slf4j.Slf4j;
import org.springframework.context.annotation.Configuration;
import org.springframework.web.servlet.config.annotation.ResourceHandlerRegistry;
import org.springframework.web.servlet.config.annotation.WebMvcConfigurationSupport;

/**
 * @author Jasmine-drs
 * @date 2022/5/20 9:53
 */
@Slf4j
@Configuration
public class WebMvcConfig extends WebMvcConfigurationSupport {

    /**
     * 设置静态资源映射
     *
     * @param registry 资源处理程序注册表
     */
    @Override
    protected void addResourceHandlers(ResourceHandlerRegistry registry) {
        log.info("开始进行静态资源映射...");
        registry.addResourceHandler("/templates/**").addResourceLocations("classpath:/templates/");
        registry.addResourceHandler("/static/**").addResourceLocations("classpath:/static/");
    }
}
mybatis-plus的分页配置和自动填充配置
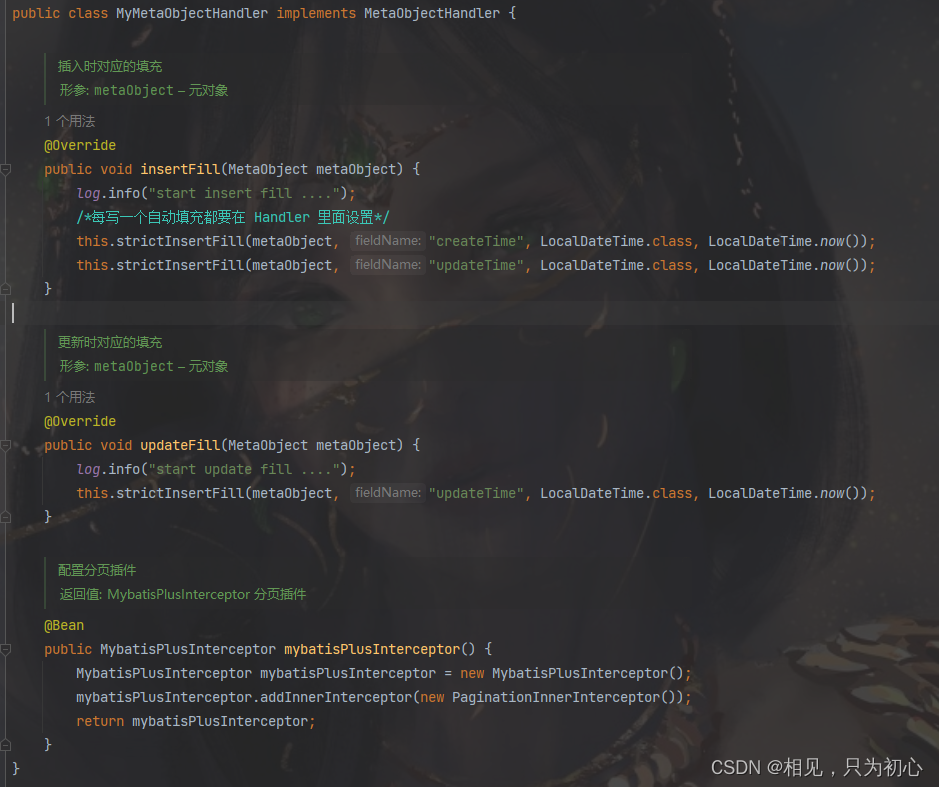
package com.drs.config;

import com.baomidou.mybatisplus.core.handlers.MetaObjectHandler;
import com.baomidou.mybatisplus.extension.plugins.MybatisPlusInterceptor;
import com.baomidou.mybatisplus.extension.plugins.inner.PaginationInnerInterceptor;
import lombok.extern.slf4j.Slf4j;
import org.apache.ibatis.reflection.MetaObject;
import org.springframework.context.annotation.Bean;
import org.springframework.stereotype.Component;

import java.time.LocalDateTime;

/**
 * 自动填充设置
 *
 * @author Jasmine-drs
 * @date 2022/5/21 14:59
 */
@Component // 把处理器添加到IOC容器中
@Slf4j
public class MyMetaObjectHandler implements MetaObjectHandler {

    /**
     * 插入时对应的填充
     * @param metaObject 元对象
     */
    @Override
    public void insertFill(MetaObject metaObject) {
        log.info("start insert fill ....");
        /*每写一个自动填充都要在 Handler 里面设置*/
        this.strictInsertFill(metaObject, "createTime", LocalDateTime.class, LocalDateTime.now());
        this.strictInsertFill(metaObject, "updateTime", LocalDateTime.class, LocalDateTime.now());
    }

    /**
     * 更新时对应的填充
     * @param metaObject 元对象
     */
    @Override
    public void updateFill(MetaObject metaObject) {
        log.info("start update fill ....");
        this.strictInsertFill(metaObject, "updateTime", LocalDateTime.class, LocalDateTime.now());
    }

    /**
     * 配置分页插件
     * @return MybatisPlusInterceptor 分页插件
     */
    @Bean
    public MybatisPlusInterceptor mybatisPlusInterceptor() {
        MybatisPlusInterceptor mybatisPlusInterceptor = new MybatisPlusInterceptor();
        mybatisPlusInterceptor.addInnerInterceptor(new PaginationInnerInterceptor());
        return mybatisPlusInterceptor;
    }
}
swagger的一些配置
package com.drs.config;

import org.springframework.context.annotation.Bean;
import org.springframework.context.annotation.Configuration;
import springfox.documentation.builders.ApiInfoBuilder;
import springfox.documentation.builders.PathSelectors;
import springfox.documentation.builders.RequestHandlerSelectors;
import springfox.documentation.service.Contact;
import springfox.documentation.spi.DocumentationType;
import springfox.documentation.spring.web.plugins.Docket;
import springfox.documentation.swagger2.annotations.EnableSwagger2;

/**
 * @author Jasmine-drs
 * @date 2022/11/2 21:30
 */
@Configuration
@EnableSwagger2
public class Knife4jConfiguration {

    @Bean(value = "dockerBean")
    public Docket dockerBean() {
        //指定使用Swagger2规范
        return new Docket(DocumentationType.SWAGGER_2)
                .apiInfo(new ApiInfoBuilder()
                        //描述字段支持Markdown语法
                        .description("# 产值系统接口文档")
                        .termsOfServiceUrl("https://doc.xiaominfo.com/")
                        .contact(new Contact("后端二组","http://localhost:8080/xxxx","xxxxxx@xx.com"))
                        .version("1.0")
                        .build())
                //分组名称
                .groupName("用户服务")
                .select()
                //这里指定Controller扫描包路径
                .apis(RequestHandlerSelectors.basePackage("com.shangxuan.outputvalue.controller"))
                .paths(PathSelectors.any())
                .build();
    }
}


 453
453


 被折叠的 条评论
为什么被折叠?
被折叠的 条评论
为什么被折叠?
 到【灌水乐园】发言


