


VUE+ElementUI
1、什么是ElementUI?
ElementUI 是一个基于 Vue 2.0 的桌面端组件库。它提供了一系列丰富的组件和功能,如布局、表单、导航、数据展示等,帮助开发者快速构建 Vue.js 应用。ElementUI 的设计和实现遵循了清晰和直观的 API 设计原则,使得开发者能够快速上手并使用。同时,ElementUI 也提供了全面的主题定制能力,可以满足各种定制化需求。
2、演示
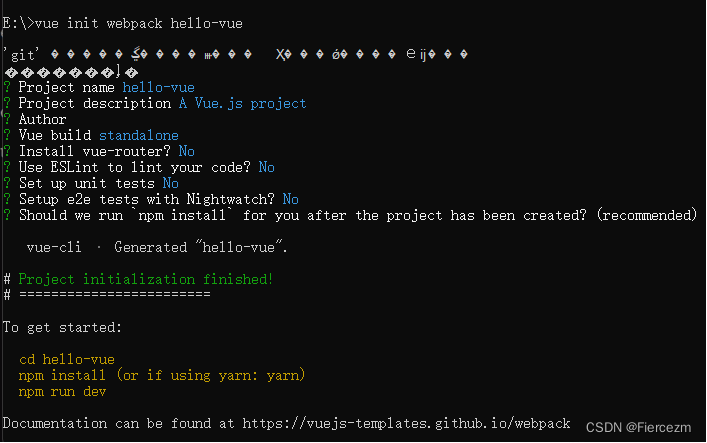
新建初始化一个叫hello-vue的vue项目,进入工程目录E:/
- 初始化hello-vue
vue init webpack hello-vue
-
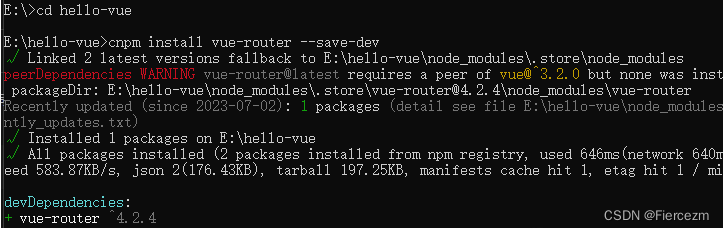
安装依赖,需要安装vue-router、element-ui、sass-loader和node-sass四个插件。
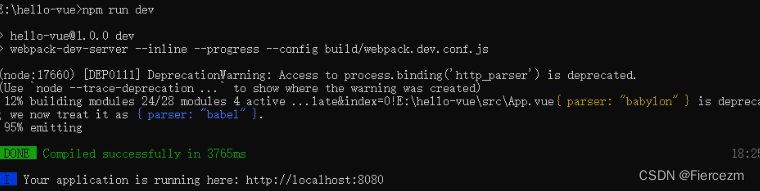
#安装vue-router
cnpm install vue-router --save-dev
#安装element-ui
cnpm i element-ui -S
#安装所有依赖
cnpm install
#安装sass加载器
cnpm install sass-loader node-sass --save-dev
#启动测试
npm run dev

-
使用idea打开此项目,删掉无用的内容。在src下新建view专门存放视图性的组件,有交互的页面,component中专门存放功能组件。
在view目录下创建Login.vue
Login.vue
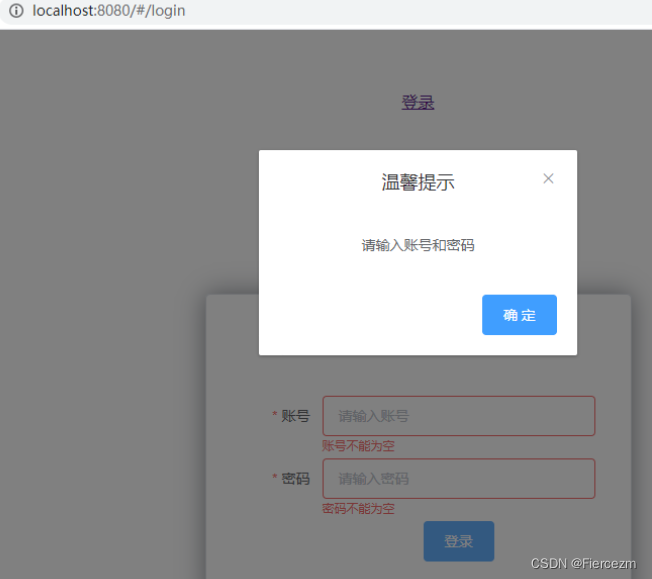
<template>
  <div>
    <el-form ref="loginForm" :model="form" :rules="rules" label-width="80px" class="login-box">
      <h3 class="login-title">欢迎登录</h3>
      <el-form-item label="账号" prop="username">
        <el-input type="text" placeholder="请输入账号" v-model="form.username"/>
      </el-form-item>
      <el-form-item label="密码" prop="password">
        <el-input type="password" placeholder="请输入密码" v-model="form.password"/>
      </el-form-item>
      <el-form-item>
        <el-button type="primary" v-on:click="onSubmit('loginForm')">登录</el-button>
      </el-form-item>
    </el-form>

    <el-dialog title="温馨提示" :visible.sync="dialogVisiable" width="30%" :before-close="handleClose">
      <span>请输入账号和密码</span>
      <span slot="footer" class="dialog-footer">
          <el-button type="primary" @click="dialogVisible = false">确定</el-button>
        </span>
    </el-dialog>
  </div>
</template>

<script>
export default {
  name: 'Login',
  data () {
    return {
      form: {
        username: '',
        password: ''
      },
      // 表单验证,需要在 el-form-item 元素中增加prop属性
      rules: {
        username: [
          {required: true, message: '账号不可为空', trigger: 'blur'}
        ],
        password: [
          {required: true, message: '密码不可为空', tigger: 'blur'}
        ]
      },

      // 对话框显示和隐藏
      dialogVisible: false
    }
  },
  methods: {
    onSubmit (formName) {
      // 为表单绑定验证功能
      this.$refs[formName].validate((valid) => {
        if (valid) {
          // 使用vue-router路由到指定界面,该方式称为编程式导航
          this.$router.push('/main')
        } else {
          this.dialogVisible = true
          return false
        }
      })
    }
  }
}
</script>

<style lang="scss" scoped>
.login-box{
  border:1px solid #DCDFE6;
  width: 350px;
  margin:180px auto;
  padding: 35px 35px 15px 35px;
  border-radius: 5px;
  -webkit-border-radius: 5px;
  -moz-border-radius: 5px;
  box-shadow: 0 0 25px #909399;
}
.login-title{
  text-align:center;
  margin: 0 auto 40px auto;
  color: #303133;
}
</style>
Main.vue
<template>
  <h1>首页</h1>
</template>

<script>
export default {
  name: 'Main'
}
</script>

<style scoped>

</style>
main…js
import Vue from 'vue'
import App from './App'
import router from './router'
import ElementUI from 'element-ui'
import 'element-ui/lib/theme-chalk/index.css'

Vue.use(router)
Vue.use(ElementUI)
Vue.config.productionTip = false

/* eslint-disable no-new */
new Vue({
  el: '#app',
  router,
  render: h => h(App)
})
router目录中配置路由转发配置index.js
import Vue from 'vue'
import Router from 'vue-router'
import Login from '../view/Login'
import Main from '../view/Main'

Vue.use(Router)

export default new Router({
  routes: [
    {
      path: '/login',
      name: 'login',
      component: Login
    },
    {
      path: '/main',
      name: 'main',
      component: Main
    }
  ]
})
App.vue
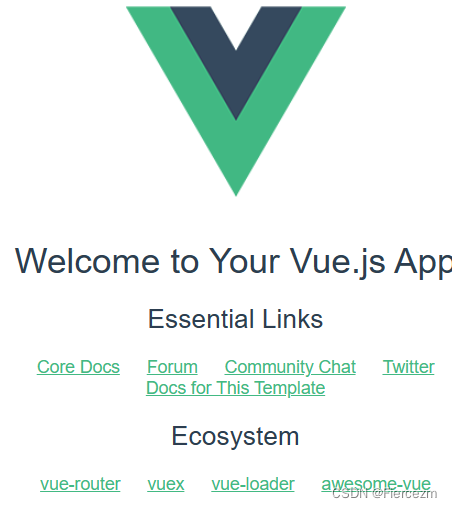
<template>
  <div id="app">
    <router-link to="/login">登录</router-link>
    <router-link to="/main">首页</router-link>
    <router-view></router-view>
  </div>
</template>

<script>
export default {
  name: 'App'
}
</script>

<style>
#app {
  font-family: 'Avenir', Helvetica, Arial, sans-serif;
  -webkit-font-smoothing: antialiased;
  -moz-osx-font-smoothing: grayscale;
  text-align: center;
  color: #2c3e50;
  margin-top: 60px;
}
</style>
打开终端npm run dev运行起来
3、路由嵌套
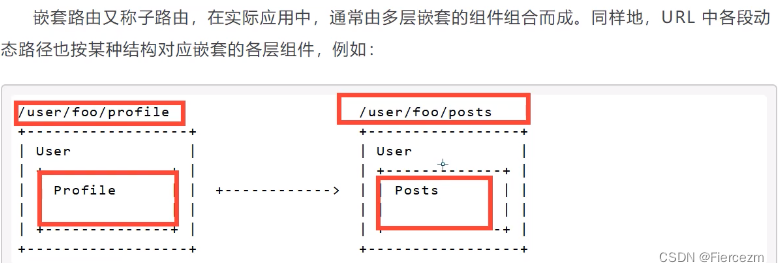
在view/user下新建Profile.vue和List.vue分别代表用户个人信息和用户列表。
Profile.vue
<template>
<h1>个人信息</h1>
</template>

<script>
export default {
  name: 'UserProfile'
}
</script>

<style scoped>

</style>
List.vue
<template>
<h1>用户列表</h1>
</template>

<script>
export default {
  name: 'UserList'
}
</script>

<style scoped>

</style>
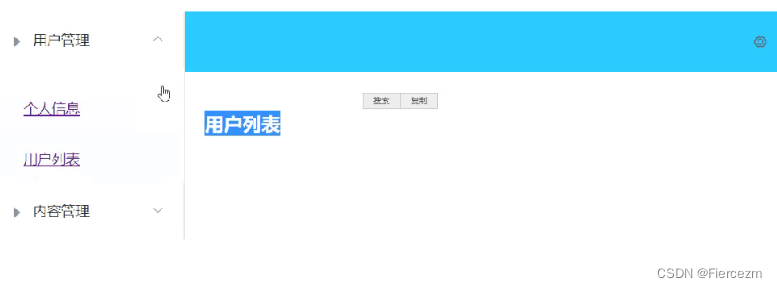
去Main.vue中修改首页视图,使用 ElementUI 布局容器组件
Main.vue
<template>
  <div>
    <el-container>
      <el-aside width="200px">
        <el-menu :default-openeds="['1']">
          <el-submenu index="1">
            <template slot="title"><i class="el-icon-caret-right"></i>用户管理</template>
            <el-menu-item-group>
              <el-menu-item index="1-1">
                <!--插入的地方-->
                <router-link to="/user/profile">个人信息</router-link>
              </el-menu-item>
              <el-menu-item index="1-2">
                <!--插入的地方-->
                <router-link to="/user/list">用户列表</router-link>
              </el-menu-item>
            </el-menu-item-group>
          </el-submenu>
          <el-submenu index="2">
            <template slot="title"><i class="el-icon-caret-right"></i>内容管理</template>
            <el-menu-item-group>
              <el-menu-item index="2-1">分类管理</el-menu-item>
              <el-menu-item index="2-2">内容列表</el-menu-item>
            </el-menu-item-group>
          </el-submenu>
        </el-menu>
      </el-aside>

      <el-container>
        <el-header style="text-align: right; font-size: 12px">
          <el-dropdown>
            <i class="el-icon-setting" style="margin-right: 15px"></i>
            <el-dropdown-menu slot="dropdown">
              <el-dropdown-item>个人信息</el-dropdown-item>
              <el-dropdown-item>退出登录</el-dropdown-item>
            </el-dropdown-menu>
          </el-dropdown>
        </el-header>
        <el-main>
          <!--在这里展示视图-->
          <router-view />
        </el-main>
      </el-container>
    </el-container>
  </div>
</template>
<script>
export default {
  name: 'Main'
}
</script>
<style scoped lang="scss">
.el-header {
  background-color: #B3C0D1;
  color: #333;
  line-height: 60px;
}
.el-aside {
  color: #333;
}
</style>
由于添加了新的组件,所以去配置子路由index.js
index.js
import Vue from 'vue'
import Router from 'vue-router'
import Login from '../view/Login'
import Main from '../view/Main'

import UserList from '../view/user/List'
import UserProfile from '../view/user/Profile'

Vue.use(Router)

export default new Router({
  routes: [
    {
      path: '/login',
      name: 'login',
      component: Login,
      children:[
        {path: '/user/profile',component: UserProfile},
        {path: '/user/list',component: UserList}
      ]
    },
    {
      path: '/main',
      name: 'main',
      component: Main
    }
  ]
})
由于是热部署,所以直接刷新即可更新页面,main首页
4、参数传递与重定向
前面做的个人信息部分应该是不同的人有专属的个人信息页,那么在请求到main首页时就应该携带参数使之跳转到指定的页面。
<router-link to="/user/profile">个人信息</router-link>
改为:
 <router-link to="{name: '/user/profile',params: {id: 1}}">个人信息</router-link>
这里name代表组件名,params代表要携带的参数。
然后到路由配置中修改,加上参数id
children:[
        {path: '/user/profile:id',name:UserProfile,component: UserProfile},
        {path: '/user/list',component: UserList}
      ]
在Profile.vue中接收参数{{$route.params.id}},注意:所有的元素必须在根节点下,只能有一个div标签将其他元素包起来
<template>
  <div>
    <h1>个人信息</h1>
    {{$route.params.id}}
  </div>

</template>
使用props 减少耦合
修改路由配置 , 主要在router下的index.js中的路由属性中增加了 props: true 属性
{path: '/user/profile/:id', name:'UserProfile', component: UserProfile, props: true}
在Profile.vue接收参数为目标组件增加 props 属性
<template>
  <div>
    <h1>个人信息</h1>
    {{id}}
  </div>

</template>

<script>
export default {
  props: ['id'],
  name: 'UserProfile'
}
</script>
<style scoped>
</style>
重定向
Vue 中的重定向是作用在路径不同但组件相同的情况
在index.js中配置重定向的路径,关键词:redirect
{
      path: '/main',
      name: 'main',
      component: Main
    },
    {
      path: '/goHome',
      redirect: '/main'
    }
在Main.vue的侧边栏中加入重定向
<el-menu-item index="1-3">
    <router-link to="/goHome">返回首页</router-link>
</el-menu-item>
5、404和路由钩子
两种路由模式
-
hash: 路径带 # 号,如: http://localhost/#/login
-
history:路径不带 # 符号,如 http://localhost/login
改成history模式的
export default new Router({
  mode: 'history',
  routes: []
  });
404页面
在view/下创建NotFound.vue
<template>
<div>
  <h1>404你的页面走丢了</h1>
</div>
</template>

<script>
export default {
  name: 'NotFound'
}
</script>

<style scoped>

</style>
配到路由里面index.js
  {
      path: '*',
      component: NotFound
    }
随便请求一个路径

路由钩子与异步请求
- beforeRouteEnter:在进入路由前执行
- beforeRouteLeave:在离开路由前执行
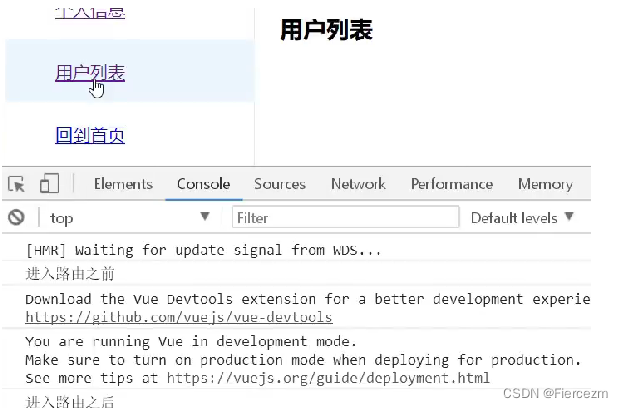
进入个人信息页面之前和离开个人信息页面,Profile.vue
Profile.vue
<script>
    export default {
        name: "UserProfile",
        beforeRouteEnter: (to, from, next) => {
            console.log("进入路由之前");
            next();
        },
        beforeRouteLeave: (to, from, next) => {
            console.log("进入路由之后");
            next();
        }
    }
</script>
参数说明:
-
to:路由将要跳转的路径信息
-
from:路径跳转前的路径信息
-
next:路由的控制参数
-
next() 跳入下一个页面
-
next(’/path’) 改变路由的跳转方向,使其跳到另一个路由
-
next(false) 返回原来的页面
-
next((vm)=>{}) 仅在 beforeRouteEnter 中可用,vm 是组件实例
在钩子函数中进行异步请求
-
安装Axios
cnpm install --save vue-axios
-
Main.js中引用Axios
import axios from 'axios'
import VueAxios from 'vue-axios'
Vue.use(VueAxios, axios)
在进入路由之前进行处理异步请求
<script>
    export default {
        name: "UserProfile",
        beforeRouteEnter: (to, from, next) => {
            console.log("准备进入个人信息页");
            next(vm => {
                //进入路由之前执行getData方法
                vm.getData()
            });
        },
        beforeRouteLeave: (to, from, next) => {
            console.log("准备离开个人信息页");
            next();
        },
        //axios
        methods: {
            getData: function () {
                this.axios({
                    method: 'get',
                    url: 'http://localhost:8080/static/mock/data.json'
                }).then(function (response) {
                    console.log(response)
                })
            }
        }
    }
</script>
og(“准备进入个人信息页”);
next(vm => {
//进入路由之前执行getData方法
vm.getData()
});
},
beforeRouteLeave: (to, from, next) => {
console.log(“准备离开个人信息页”);
next();
},
//axios
methods: {
getData: function () {
this.axios({
method: ‘get’,
url: ‘http://localhost:8080/static/mock/data.json’
}).then(function (response) {
console.log(response)
})
}
}
}


 2807
2807


 被折叠的 条评论
为什么被折叠?
被折叠的 条评论
为什么被折叠?
 到【灌水乐园】发言


