


SpringBoot任务
1、异步任务
在Java应用中,绝大多数情况下都是通过同步的方式来实现交互处理的;但是在处理与第三方系统交互的时候,容易造成响应迟缓的情况,之前大部分都是使用多线程来完成此类任务,springboot内置了@Async来解决这个问题。
写一个AsyncService让进程等待3秒
@Service
public class AsyncService {
    public void hello(){
        try {
            Thread.sleep(3000);
        } catch (InterruptedException e) {
            e.printStackTrace();
        }
        System.out.println("正在处理数据中...");
    }
}
在controller中调用它
@RestController
public class AsyncController {
    @Autowired
    AsyncService asyncService;
    @RequestMapping("/hello")
    public String hi(){
        asyncService.hello();
        return "OK";
    }

}
访问hello它会转圈3秒之后才返回ok

当用户去访问时它那3秒的转圈就会让人很反感,会觉得你这网站太慢了,怎么解决,使用springboot的两个注解。
-
在异步方法上打上注解@Async,告诉Spring这是一个异步方法;
@Service public class AsyncService { //告诉Spring这是一个异步方法 @Async public void hello(){ try { Thread.sleep(3000); } catch (InterruptedException e) { e.printStackTrace(); } System.out.println("正在处理数据中..."); } } -
然后在main方法上开启Async,打上@EnableAsync 开启异步注解功能
@EnableAsync  //开启异步注解功能
@SpringBootApplication
public class SpringBoot07TaskApplication {

    public static void main(String[] args) {
        SpringApplication.run(SpringBoot07TaskApplication.class, args);
    }

}
这样再访问刚才的hello就是秒刷新,而后台还在处理它的3秒
2、定时任务
两个接口
- TaskScheduler 任务调度者
- TaskExcutor 任务执行者
两个注解
- @EnableScheduling 开启定时功能的注解
- @Scheduled 什么时候执行
cron表达式: *秒(0~59) *分钟(0~59) *小时(0~23) *日期(1~32) *月份(1~12) *周(0~6,0是星期天)
-
先在main方法上开启定时功能
@EnableAsync //开启异步注解功能 @EnableScheduling //开启定时功能 @SpringBootApplication public class SpringBoot07TaskApplication { public static void main(String[] args) { SpringApplication.run(SpringBoot07TaskApplication.class, args); } } -
再创建ScheduledService
@Service
public class ScheduledService {
	//每天的下午3点32执行
    @Scheduled(cron = "0 32 15 * * *")
    public void hello(){
        System.out.println("hello方法被执行了····");
    }
}

3、邮件发送
先导依赖
<!--javax.mail-->
<dependency>
    <groupId>org.springframework.boot</groupId>
    <artifactId>spring-boot-starter-mail</artifactId>
</dependency>
这里使用qq邮箱,去qq邮箱打开POP3/SMTP服务,获得一个授权码代替qq密码

去配置文件中配置用户名(邮箱账号),密码就是刚才生成的授权码,主机就是smtp.qq.com,开启加密验证
spring.mail.username=3339332352@qq.com
spring.mail.password=xxxxxxxx
spring.mail.host=smtp.qq.com
#开启加密验证
spring.mail.properties.mail.smtp.ssl.enable=true
去单元测试发送消息,给自己发送消息。
@SpringBootTest
class SpringBoot07TaskApplicationTests {
    @Autowired
    JavaMailSenderImpl mailSender;
    @Test
    void contextLoads() {
        //给自己发送一个简单的邮件
        SimpleMailMessage message = new SimpleMailMessage();
        message.setSubject("嗨嗨嗨,这是个测试消息");
        message.setText("邮件任务学习");
        message.setTo("3339332352@qq.com");
        message.setFrom("3339332352@qq.com");
        mailSender.send(message);
    }

}

接下来写一个复杂的,可以上传html就相当于正文中编辑好的文字加上格式,加粗变色之类的。
添加附件上传,可以上传图片或者文档啥的。
@Test
void contextLoads1() throws MessagingException {
//一个复杂的邮件,发送图片和html
MimeMessage mimeMessage = mailSender.createMimeMessage();
//组装
MimeMessageHelper helper = new MimeMessageHelper(mimeMessage, true);
//正文
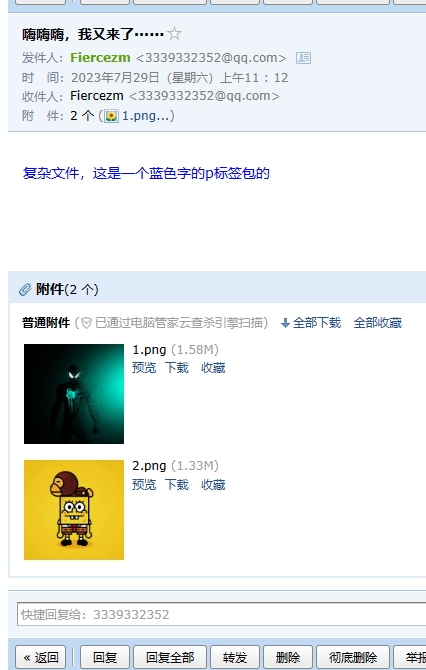
helper.setSubject("嗨嗨嗨,我又来了······");
helper.setText("<p style='color:blue'>复杂文件,这是一个蓝色字的p标签包的</p>",true);
//添加附件,搞俩图片
helper.addAttachment("1.png",new File("E:\\idea-background\\1018472.jpg"));
helper.addAttachment("2.png",new File("E:\\idea-background\\1023796.jpg"));
helper.setTo("3339332352@qq.com");
helper.setFrom("3339332352@qq.com");
mailSender.send(mimeMessage);
}


 133
133


 被折叠的 条评论
为什么被折叠?
被折叠的 条评论
为什么被折叠?
 到【灌水乐园】发言


