


jQuery框架
jQuery是一个快速的、简洁的JavaScript框架(库),它会封装很多JavaScript中常用的功能代码,提供了一个简洁的JS设计模式
- 优化HTML文档操作(优化DOM操作)
- 事件处理
- 动画设计
- Ajax
要使用JQ我们需要引入对应的库文件做支持
<script src="js/jquery-3.5.1.min.js"></script>
下载jQuery库文件:
**jQuery官网:**https://jquery.com/
jQuery3.5.1链接:https://pan.baidu.com/s/1OtZlCek-1t3ZKgfoPiwuAw?pwd=6666 提取码:6666
jQuery基础语法
由三个部分组成
1、启动符:$ ,如果该符号在语言中已经作为关键字或者预留字使用,可以替换成 jQuery
2、选择器【用来选择需要操作的JQ元素】
3、方法【对元素进行操作】
jQuery选择器
$("h1")   //document.querySelectorAll()
$(".tit")
jQuery事件
jQuery事件是把DOM当中常用的事件进行了一个封装,成了一个方法来调用
$(".tit").click(function(){
    //回调函数就是当你的事件触发的时候要执行的事情
})
| 鼠标事件 | 键盘事件 | 表单事件 | 文档/窗口事件 |
|---|---|---|---|
| click | keypress | submit | load |
| dblclick | keydown | change | resize |
| mouseenter | keyup | focus | scroll |
| mouseleave | blur | unload | |
| hover |
对于不常用的事件,jQ提供了一个on方法来实现绑定
$("#btn").on("click",function(){
    console.log("呵呵呵呵")
})
jQuery事件委托
jQuery事件委托通过on方法实现
<ul class="ul1">
    <li>1</li>
    <li class="active">2</li>
    <li>3</li>
    <li>4</li>
    <li>5</li>
</ul>
<script>
    $(".ul1").on("click","li.active",function(){
        console.log(new Date());
    })
</script>
jQuery事件移除
jQuery使用off方法
$("css选择器").off("事件类型",函数名)
//如果没有写函数名,就移除所有
jQuery单次事件
//原生写法
document.querySelector("#btn").addEventListener("click",function(){
	console.log("我被点了");
	document.querySelector("#btn").removeEventListener("click",arguments.callee)
})

//jQ写法
$("#btn").one("click",function(){
	console.log("我被点了")
})
jQuery动画方法
1、show() / hide() / toggle() 执行元素的显示隐藏
注意:toggle方法有版本兼容的问题,如果要使用toggle简易采用1.7.2一下的版本
2、slideUp() / slideDown() / slideToggle() 元素执行上下滑动
3、fadeIn() / fadeOut() / fadeTo(speed,opacity) / fadeToggle() 渐隐渐显
4、animate() 自定义动画方法
$(".switch").click(function(){
    $(".box").animate({
        "width":"500px",
        "height":"500px"
    },2000,function(){
        console.log("我完了")
    })
})
jQuery css方法
1、addClass() 在选中的元素上添加一个类
2、removeClass() 在选中的元素上删除一个类
3、toggleClass() 在选中的元素上替换一个类
4、css() 这个方法可以在获取的元素中任意添加或者获取样式
获取样式
var a = $(".box").css("width");
设置样式
$(".box").hover(function(){
    $(this).css({
        width:"500px",
        height:"500px"
    })
},function(){
    $(this).css({
        width:"300px",
        height:"300px"
    })
})
jQuery属性方法
1、html() 等价原生DOM中的innerHTML属性
$(".box").html("<h1>哈哈</h1>")  //传参表示赋值
$(".box").html()   //取值
2、text() 等价原生DOM中的innerText属性
3、val() 对表单的value属性进行操作
以上三个传参就是赋值,不传参就是取值
4、attr() 操作标签属性
$("input").attr("type");
$("input").attr("type","password")   //注意低版本无法设置type属性
5、removeAttr() 移除一个属性
6、prop() 对标签的单属性进行操作
$("input").prop("checked",false)
jQuery的尺寸方法
1、width() / height() 获取盒子的content大小
2、innerWidth() / innerHeight() 获取盒子的content+padding的大小
3、outerWidth() / outerHeight()获取盒子的content+padding+border的大小
5、outerWidth(true) / outerHeight(true)获取盒子的content+padding+border+margin的大小
文档就绪函数
<!DOCTYPE html>
<html>
	<head>
		<meta charset="utf-8">
		<title></title>
		<script src="js/jquery-3.5.1.min.js"></script>
		<script>
			$("#btn").click(function(){
				console.log("haha")
			})
		</script>
	</head>
	<body>
		<button id="btn">按钮</button>
	</body>
</html>
代码分析:
上面的代码当中,按钮是不会有事件触发的,因为它是先绑定的事件,再加载的DOM元素,再绑定事件的时候DOM元素还没有加载出来
在原生JS中window中有一个事件onload,它代表所有元素已经加载完毕才会触发,所以我们可以使用这个事件
<!DOCTYPE html>
<html>
	<head>
		<meta charset="utf-8">
		<title></title>
		<script src="js/jquery-3.5.1.min.js"></script>
		<script>
			window.onload = function(){
				$("#btn").click(function(){
					console.log("haha")
				})
			}
		</script>
	</head>
	<body>
		<button id="btn">按钮</button>
	</body>
</html>
代码分析:
这些写其实不太好,因为它是将所有的元素加载完毕之后才会触发,如果一个页面上所有的元素已经加载好了,但是任然有一些大图片或者一些其他外部资源没有加载好,这个时候onload是不会触发的,这个从用户体验角度来讲不太好
优化一下
document.addEventListener("DOMContentLoaded",function(){
    $("#btn").click(function(){
        console.log("haha")
    })
})
代码分析:
上面的写法就更优化了,把对象改成document,通过触发事件DOMContentLoaded 从而不需要等待DOM以外的东西加载好就可以触发
而上面这套写法,在JQ当中有一个专门函数叫做文档就绪函数
$(document).ready(function(){
    $("#btn").click(function(){
        console.log("haha")
    })
})
进一步简化
$(function(){
    $("#btn").click(function(){
        console.log("haha")
    })
})
Ajax方法
我们自己封装过一套ajax请求,JQ也有自己封装的
$.ajax({
	async:true,               //是否异步,默认false
	type:"get",               //请求方法,默认是get
	url:"",                   //请求地址
	dataType:"json",          //返回的数据类型,如果是json则自动反序列化
	success:function(data){
		//请求成功时,执行的回调,data相当于xhr对象中的response
	},
	error:function(err){
		//请求失败时执行的回调,err错误信息
	}
})
简化了一下
$.get(url,function(data){

})
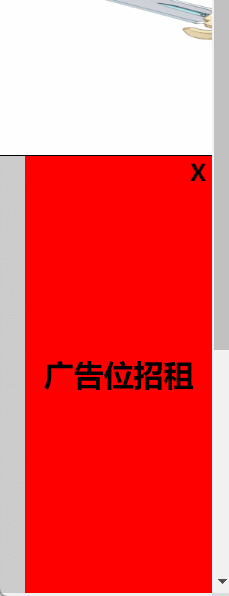
jQuery实战小功能:
常见的广告,点击即消失:
广告一般采用的时固定定位,会随着滑动,一起滑动。
<div class="rightBottom">
    <h2>广告位招租 <a onclick="del()">X</a></h2>
</div>
.rightBottom{
    height: 350px;
    width: 150px;
    position: fixed;
    background-color: red;
    right: 0;
}
.rightBottom a{
    position: fixed;
    top: 210px;
    right: 5px;
    font-size: large;
    height: 50px;
}
.rightBottom h2{
    text-align: center;
    line-height: 350px;
}
我们用jQuery实现点击消失,
//删除广告
function del() {
    $(".rightBottom").hide()
}
我们这里用$ 获取到广告所在的元素,当点击X时,触发hide()隐藏方法。
鼠标悬停出现下拉图片:
事先准备好要下拉出现的图片:
<div class="table">
    <div class="avatar">
        移到我这里
    </div>
    <div class="avatar1">
        <img src="./img/22091QFQGN6-0-lp.jpg">
    </div>
</div>
.table{
    width: 300px;
    height: 600px;
    background-color: #c833a0;
}
.avatar{
    width: 100px;
    height: 50px;
    margin: auto;
    background-color: blue;
}
.avatar1 img{
    width: 100px;
    height: 200px;
    margin-left: 100px;
    /*先将图片隐藏*/
    display: none;
}
这里我们使用jQuery的mouseenter(鼠标移入) mouserout(鼠标移除) slideDown(下滑),slideUp(上滑)。
//向下弹出信息
$(".avatar").mouseenter(function () {
    $(".avatar1 img").slideDown().css("display", "block");
})
//向上弹回信息
$(".avatar").mouseout(function () {
    $(".avatar1 img").slideUp();
})
当我们将鼠标移入就会显示出图片:
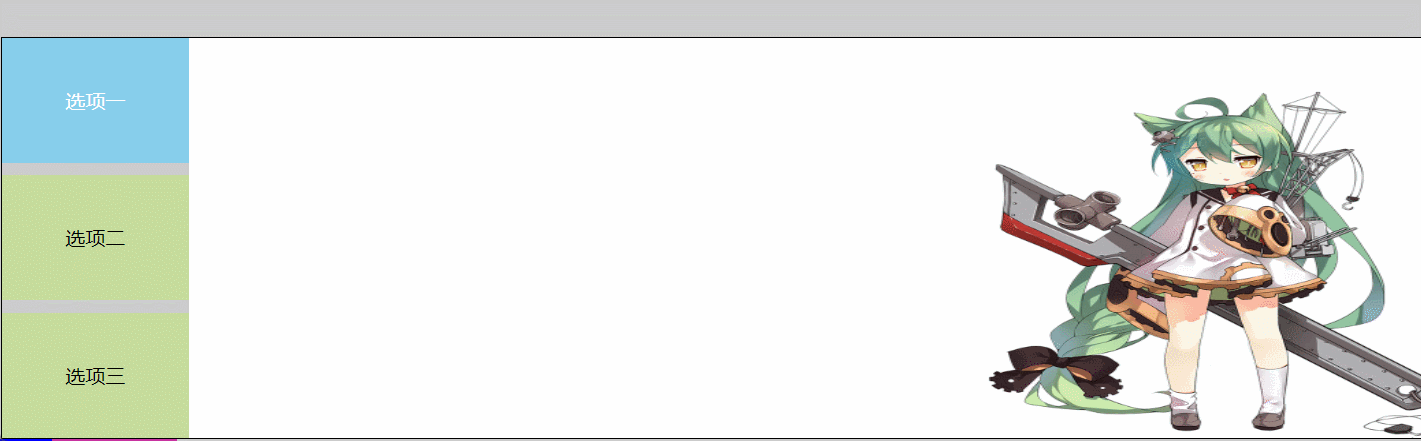
选项卡:
<div class="container clearfix">
<div class="left fixLeft">
    <!-- 默认选中第一个标签 -->
    <div class="creative content">选项一</div>
    <div class="content content2">选项二</div>
    <div class="content">选项三</div>
</div>
<div class="right clearfix">
    <div class="imgContent fixRight">
        <!-- 默认选中第一张图 -->
        <img src="./img/5ad84013361bd.jpg" alt="" class="show">
        <img src="./img/5ad840133c288.jpg" alt="">
        <img src="./img/5b5f2f313af2b.jpg" alt="">
    </div>
</div>
</div>
* {
    margin: 0;
    padding: 0;
}

a {
    color: #000;
    text-decoration: none;
}

ul {
    list-style: none;
}

.fixLeft {
    float: left;
}

.fixRight {
    float: left;
}

.clearfix:after {
    content: '';
    display: block;
    clear: both;
}
.container {
    width: 1200px;
    margin: 0 auto;
    background-color: #ccc;
    height: 320px;
    margin-top: 50px;
    border: #000 solid 1px;
}
.left .content{
    width: 150px;
    height: 100px;
    background-color: rgb(198, 220, 156);
    line-height: 100px;
    text-align: center;
}
.content2{
    margin: 10px 0;
}
img{
    width: 1050px;
    height: 320px;
    display: none;
}
body{
    background-color: #ccc;
}

/* 展示下一张图片 */
.show{
    display: block;
}
/* 显示下一个选项 */
.creative{
    color: white;
}
我们先用$获取到所有左侧导航数组,通过遍历,当我们鼠标移动到某个导航时,就获取到当前的索引值,再将所有的导航目录的样式全部变为一般样式,当鼠标悬停到某个导航时,再添加creative高亮样式,图也是同理,每一个导航都对应着一张图片,通过if判断筛选出符合的图片,再将所有的图片的样式全部none,并且在选中的图片加上显示show样式。
$(".content").each(function () {
    $(this).mouseover(function () {
        var index = $(this).index();
        $(".content").removeClass("creative").css("background-color", "rgb(198, 220, 156)");
        $(this).addClass("creative").css("background-color", "skyblue");
        $(".imgContent img").each(function () {
            if ($(this).index() == index) {
                $(".imgContent img").removeClass("show");
                $(this).addClass("show");
            }
        })
    })
})
加强版: 当我们不去指向导航时,也让图片和菜单自动选中更替,这里我们就要用到setTimeout()定时,总共3张图片,我们就让他们隔一段时间,出现0 1 2(注意:数组索引是从0开始的)即可。我们再通过0,1,2找到对应的图片和导航,并赋予样式。
//定时轮播图
function add(i = -1) {
    if (i == 2) {
        i = 0;
        setTimeout("add(" + i + ")", 2000);
    } else {
        i++;
        setTimeout("add(" + i + ")", 2000);
    }
    console.log(i);
    var imgs = $(".imgContent img");
    var contents = $(".content");
    $(".imgContent img").removeClass("show");
    $(".content").removeClass("creative").css("background-color", "rgb(198, 220, 156)");
    imgs.eq(i).addClass("show");
    contents.eq(i).addClass("creative").css("background-color", "skyblue");
}
add();

这时我们不去滑动也能实现图片自动播放。
源码:
HTML:
<!DOCTYPE html>
<html lang="en">

<head>
    <meta charset="UTF-8">
    <meta name="viewport" content="width=device-width, initial-scale=1.0">
    <title>Document</title>
    <link rel="stylesheet" href="../jQuery/day2.css">
    <script src="../jquery-3.5.1.min.js"></script>
</head>

<body>
    <div class="container clearfix">
        <div class="left fixLeft">
            <!-- 默认选中第一个标签 -->
            <div class="creative content">选项一</div>
            <div class="content content2">选项二</div>
            <div class="content">选项三</div>
        </div>
        <div class="right clearfix">
            <div class="imgContent fixRight">
                <!-- 默认选中第一张图 -->
                <img src="./img/5b7595e3e915e.jpg" alt="" class="show">
                <img src="./img/5ad840133c288.jpg" alt="">
                <img src="./img/5b5f2f313af2b.jpg" alt="">
            </div>
        </div>
    </div>
    <div class="rightBottom">
        <h2>广告位招租 <a onclick="del()">X</a></h2>
    </div>
    <div class="table">
        <div class="avatar">
            移到我这里
        </div>
        <div class="avatar1">
            <img src="./img/22091QFQGN6-0-lp.jpg">
        </div>
    </div>

    <script>
        $(".content").each(function () {
            $(this).mouseover(function () {
                var index = $(this).index();
                $(".content").removeClass("creative").css("background-color", "rgb(198, 220, 156)");
                $(this).addClass("creative").css("background-color", "skyblue");
                $(".imgContent img").each(function () {
                    if ($(this).index() == index) {
                        $(".imgContent img").removeClass("show");
                        $(this).addClass("show");
                    }
                })
            })
        })
        //删除广告
        function del() {
            $(".rightBottom").hide()
        }

        //向下弹出信息
        $(".avatar").mouseenter(function () {
            $(".avatar1 img").slideDown().css("display", "block");
        })
        //向上弹回信息
        $(".avatar").mouseout(function () {
            $(".avatar1 img").slideUp();
        })

        //定时轮播图
        function add(i = -1) {
            if (i == 2) {
                i = 0;
                setTimeout("add(" + i + ")", 2000);
            } else {
                i++;
                setTimeout("add(" + i + ")", 2000);
            }
            console.log(i);
            var imgs = $(".imgContent img");
            var contents = $(".content");
            $(".imgContent img").removeClass("show");
            $(".content").removeClass("creative").css("background-color", "rgb(198, 220, 156)");
            imgs.eq(i).addClass("show");
            contents.eq(i).addClass("creative").css("background-color", "skyblue");
        }
        add();
    </script>
</body>

</html>
CSS
* {
    margin: 0;
    padding: 0;
}

a {
    color: #000;
    text-decoration: none;
}

ul {
    list-style: none;
}

.fixLeft {
    float: left;
}

.fixRight {
    float: left;
}

.clearfix:after {
    content: '';
    display: block;
    clear: both;
}
.container {
    width: 1200px;
    margin: 0 auto;
    background-color: #ccc;
    height: 320px;
    margin-top: 50px;
    border: #000 solid 1px;
}
.left .content{
    width: 150px;
    height: 100px;
    background-color: rgb(198, 220, 156);
    line-height: 100px;
    text-align: center;
}
.content2{
    margin: 10px 0;
}
img{
    width: 1050px;
    height: 320px;
    display: none;
}
body{
    background-color: #ccc;
}

/* 展示下一张图片 */
.show{
    display: block;
}
/* 显示下一个选项 */
.creative{
    color: white;
}
.rightBottom{
    height: 350px;
    width: 150px;
    position: fixed;
    background-color: red;
    right: 0;
}
.table{
    width: 300px;
    height: 600px;
    background-color: #c833a0;
}
.rightBottom a{
    position: fixed;
    top: 210px;
    right: 5px;
    font-size: large;
    height: 50px;
}
.rightBottom h2{
    text-align: center;
    line-height: 350px;
}
.avatar{
    width: 100px;
    height: 50px;
    margin: auto;
    background-color: blue;
}
.avatar1 img{
    width: 100px;
    height: 200px;
    margin-left: 100px;
}


 1047
1047


 被折叠的 条评论
为什么被折叠?
被折叠的 条评论
为什么被折叠?
 到【灌水乐园】发言


