


目录
一、yum仓库
1. yum仓库介绍
1.1 简介
yum是一个基于RPM包(是Red-Hat Package Manager红帽软件包管理器的缩写)构建的软件更新机制,能够自动解决软件包之间的依赖关系。解决了日常工作中的大量查找安装依赖包的时间。
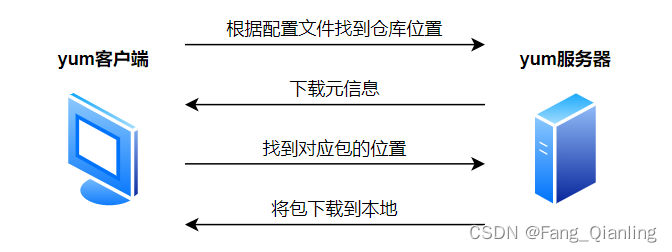
1.2 实现过程

yum实现需要安装包:
- 光驱自带,挂载提供软件包
- 网络下载到本地
- 直接通过网络
yum需要依赖于环境,依赖于服务端和客户端,允许跨网络 :
服务器:
- RPM包 (Packages文件夹中)
- 元数据(repodata文件夹:目录(软件的目录),软件的依赖关系,软件的位置)
客户端的配置文件中:
- baseurl=地址一定要写到这两个文件夹 repodata packages 的上级目录
最终形成两个文件夹Packages (包文件夹一般取名packages)和 repodata(元数据文件夹)
仓库类型:
- 光盘的仓库基本仓库,比较常用的
- epel扩展仓库,比较新
1.3 实现安装服务
2. yum配置文件及命令
2.1 yum配置文件
2.1.1 yum主配置文件
位置:/etc/yum.conf
[root@localhost ~]# vim /etc/yum.conf
  1 [main]
  2 cachedir=/var/cache/yum/$basearch/$releasever
#yum下载的RPM包的缓存目录,$basearch代表硬件架构,$releasever系统版本比如7
  3 keepcache=0                   #是否保存缓存:0代表不保存,1代表保存
  4 debuglevel=2                  #调试级别
  5 logfile=/var/log/yum.log      #日志文件位置
  6 exactarch=1                   #是否允许不同版本的rpm安装
  7 obsoletes=1                   #update的一个参数是否可以允许旧版本的运行
  8 gpgcheck=1                    #验证秘钥
  9 plugins=1                     #是否允许插件:1代表可以
 10 installonly_limit=5           #保存几个内核:5代表5个
 11 bugtracker_url=http://bugs.centos.org/set_project.php?project_id=23&ref=http://bugs.centos.org/bug_report_pag    e.php?category=yum
 12 distroverpkg=centos-release

yum的repo配置文件中可用的变量:
$releasever: 当前OS的发行版的主版本号,如:8,7,6
$arch: CPU架构,如:aarch64, i586, i686,x86_64等
$basearch:系统基础平台;i386, x86_64
$contentdir:表示目录,比如:centos-8,centos-7
$YUM0-$YUM9:自定义变量
2.1.2 仓库设置文件
位置:/etc/yum.repos.d/*.repo
[root@localhost ~]# ls /etc/yum.repos.d/
CentOS-Base.repo  CentOS-Debuginfo.repo  CentOS-Media.repo    CentOS-Vault.repo
CentOS-CR.repo    CentOS-fasttrack.repo  CentOS-Sources.repo
#这里默认的yum仓库是centos官方的yum源,需要联网才可以使用
2.1.3 日志文件
[root@localhost ~]# cat /var/log/yum.log
Jan 16 10:02:07 Installed: vsftpd-3.0.2-29.el7_9.x86_64
#查看日志文件
2.2 yum命令详解
| 命令 | 不加关键字 | 加入关键词、软件包、软件包组 |
|---|---|---|
| yum list | 显示所有可用包 | 单个的可安装包 |
| yum info | 显示所有可用包的信息 | 单个具体的信息 |
| yum search | \ | 模糊查找所有的相关信息 |
| yum provides | \ | 精确查找 |
| yum grouplist | 显示所有可用包组 | 显示具体的包组 |
| yum groupinfo | 显示所有的包组具体信息 | 显示具体的包组的具体信息 |
| yum install | \ | 安装具体软件包 |
| yum groupinstall | \ | 安装具体软件包组 |
| yum update | 所有软件升级 | 具体软件升级 |
| yum group update | 所有包组升级 | 具体包组升级 |
| yum remove | \ | 卸载具体软件 |
| yum groupremove | \ | 卸载具体包组软件 |
| yum history | 查看当前yum操作历史 | \ |
| yum history undo | 加入序号卸载序号里安装的软件 | \ |
| yum history redo | 加入序号重新执行序号里的操作 | \ |
2.2.1 查询
yum list [软件名]:显示可用的安装包,如不加软件名是显示所有的可用包
[root@localhost ~]# yum list *httpd*
#包含httpd的软件包
yum info [软件名]:显示安装包详细信息
[root@localhost ~]# yum info httpd
已加载插件:fastestmirror, langpacks
Loading mirror speeds from cached hostfile
 * base: mirrors.ustc.edu.cn
 * extras: mirrors.ustc.edu.cn
 * updates: mirrors.ustc.edu.cn
可安装的软件包
名称    :httpd
架构    :x86_64
版本    :2.4.6
发布    :99.el7.centos.1
大小    :2.7 M
源    :updates/7/x86_64
简介    : Apache HTTP Server
网址    :http://httpd.apache.org/
协议    : ASL 2.0
描述    : The Apache HTTP Server is a powerful, efficient, and extensible
         : web server.
yum search <关键词>:根据关键字查找软件安装包,相当于你只知道这个包里的某个关键字会全部给你匹配出来
[root@localhost ~]# yum search ftp
已加载插件:fastestmirror, langpacks
Loading mirror speeds from cached hostfile
 * base: mirrors.ustc.edu.cn
 * extras: mirrors.ustc.edu.cn
 * updates: mirrors.ustc.edu.cn
=============================================== N/S matched: ftp ================================================
ftp.x86_64 : The standard UNIX FTP (File Transfer Protocol) client
lftp-scripts.noarch : Scripts for lftp
syslinux-tftpboot.noarch : SYSLINUX modules in /var/lib/tftpboot, available for network booting
tftp.x86_64 : The client for the Trivial File Transfer Protocol (TFTP)
tftp-server.x86_64 : The server for the Trivial File Transfer Protocol (TFTP)
vsftpd.x86_64 : Very Secure Ftp Daemon
vsftpd-sysvinit.x86_64 : SysV initscript for vsftpd daemon
curl.x86_64 : A utility for getting files from remote servers (FTP, HTTP, and others)
lftp.i686 : A sophisticated file transfer program
lftp.x86_64 : A sophisticated file transfer program
wget.x86_64 : A utility for retrieving files using the HTTP or FTP protocols
yum provides <关键词>:知道某个命令却不知道具体的包可以用此命令查找
[root@localhost ~]# yum provides httpd
已加载插件:fastestmirror, langpacks
Loading mirror speeds from cached hostfile
 * base: mirrors.ustc.edu.cn
 * extras: mirrors.ustc.edu.cn
 * updates: mirrors.ustc.edu.cn
httpd-2.4.6-95.el7.centos.x86_64 : Apache HTTP Server
源    :base
yum grouplist [包组名] :安装包组的查询,不加包组名就是显示所有
yum groupinfo <包组名>:不加包组名显示全部
2.2.2 yum安装升级
yum install [软件名]
[root@localhost ~]# yum install httpd
#安装软件包,yum install安装http服务
yum groupinstall <包组名>
[root@localhost ~]# yum group install gnome desktop -y
#包组安装,安装可视化界面
yum updata:更新包组,可以单个也可以全部后面加具体包组名称就是单个更新,不加就是全部更新;但首先要有更新的包组库否则也无法更新。
yum groupdata:组包更新和单个安装包更新差不多
2.2.3 软件卸载
yum remove <软件名>:卸载已安装的软件必须加软件名
yum groupremove <包组名>:同软件包卸载
yum history:查看历史的使用记录
[root@localhost ~]# yum history
已加载插件:fastestmirror, langpacks
ID     | 登录用户                 | 日期和时间       | 操作           | 变更数
-------------------------------------------------------------------------------
     3 | root <root>              | 2024-01-16 15:04 | Install        |    5
     2 | root <root>              | 2024-01-16 10:02 | Install        |    1
     1 | 系统 <空>                | 2024-01-09 21:30 | Install        | 1318
选择ID,可以使用yum history undo 3进行卸载,这样对比remove好处是可以将所有的依赖都删除
案例:将ID3卸载
[root@localhost ~]# yum history undo 3
已加载插件:fastestmirror, langpacks
Undoing transaction 3, from Tue Jan 16 15:04:42 2024
    依赖安装 apr-1.4.8-7.el7.x86_64                   @base
    依赖安装 apr-util-1.5.2-6.el7_9.1.x86_64          @updates
    安装 httpd-2.4.6-99.el7.centos.1.x86_64       @updates
    依赖安装 httpd-tools-2.4.6-99.el7.centos.1.x86_64 @updates
    依赖安装 mailcap-2.1.41-2.el7.noarch              @base
正在解决依赖关系
--> 正在检查事务
---> 软件包 apr.x86_64.0.1.4.8-7.el7 将被 删除
---> 软件包 apr-util.x86_64.0.1.5.2-6.el7_9.1 将被 删除
---> 软件包 httpd.x86_64.0.2.4.6-99.el7.centos.1 将被 删除
---> 软件包 httpd-tools.x86_64.0.2.4.6-99.el7.centos.1 将被 删除
---> 软件包 mailcap.noarch.0.2.1.41-2.el7 将被 删除
……

[root@localhost yum.repos.d]# yum history info 3
#查看第三次具体安装了什么
再次使用yum history查看多了一条4记录是卸载记录
[root@localhost ~]# yum history
已加载插件:fastestmirror, langpacks
ID     | 登录用户                 | 日期和时间       | 操作           | 变更数
-------------------------------------------------------------------------------
     4 | root <root>              | 2024-01-16 15:07 | Erase          |    5
     3 | root <root>              | 2024-01-16 15:04 | Install        |    5
     2 | root <root>              | 2024-01-16 10:02 | Install        |    1
     1 | 系统 <空>                | 2024-01-09 21:30 | Install        | 1318
history list
如果后悔卸载可以使用两种方式:
yum history redo 3 (重新安装一遍
yum history undo 4(反悔卸载等于重新安装一遍)
3. 搭建仓库的方式
软件仓库的提供方式 FTP服务:
- ftp://ip地址/站点里路径
- HTTP服务:http://域名或者ip地址/站点里的路径
- 本地目录:file://绝对路径 (file:///mnt 此处第三个/为根目录)
3.1 搭建本地yum仓库
Linux配置本地yum仓库及编译安装nginx-CSDN博客
3.2 搭建阿里云仓库 (http方式外网环境)
[root@localhost ~]# systemctl stop firewalld
[root@localhost ~]# setenforce 0
[root@localhost ~]# cd /etc/yum.repos.d/
[root@localhost yum.repos.d]# mkdir bak
[root@localhost yum.repos.d]# mv *.repo bak/
[root@localhost yum.repos.d]# vim ali.repo
[ali]
name=aliyun
baseurl=https://mirrors.aliyun.com/centos/7/os/x86_64/
gpgcheck=0
[root@localhost yum.repos.d]# yum clean all
[root@localhost yum.repos.d]# yum makecache
[root@localhost yum.repos.d]# yum repolist
已加载插件:fastestmirror, langpacks
Loading mirror speeds from cached hostfile
源标识                                               源名称                                                状态
ali                                                  aliyun                                                10,072
repolist: 10,072
3.3 ftp方式搭建云仓库
3.4 http方式搭建
先前搭建yum仓库相关已做过介绍,这里就不做赘述 。
二、nfs共享
1. 简介
NFS(Network File System 网络文件服务)文件系统(软件)文件的权限NFS是一种基于TCP/IP 传输的网络文件系统协议,最初由Sun公司开发。 通过使用NFS协议,客户机可以像访问本地目录一样访问远程服务器中的共享资源NFS也是NAS存储设备必然支持的一种协议。
2. 原理
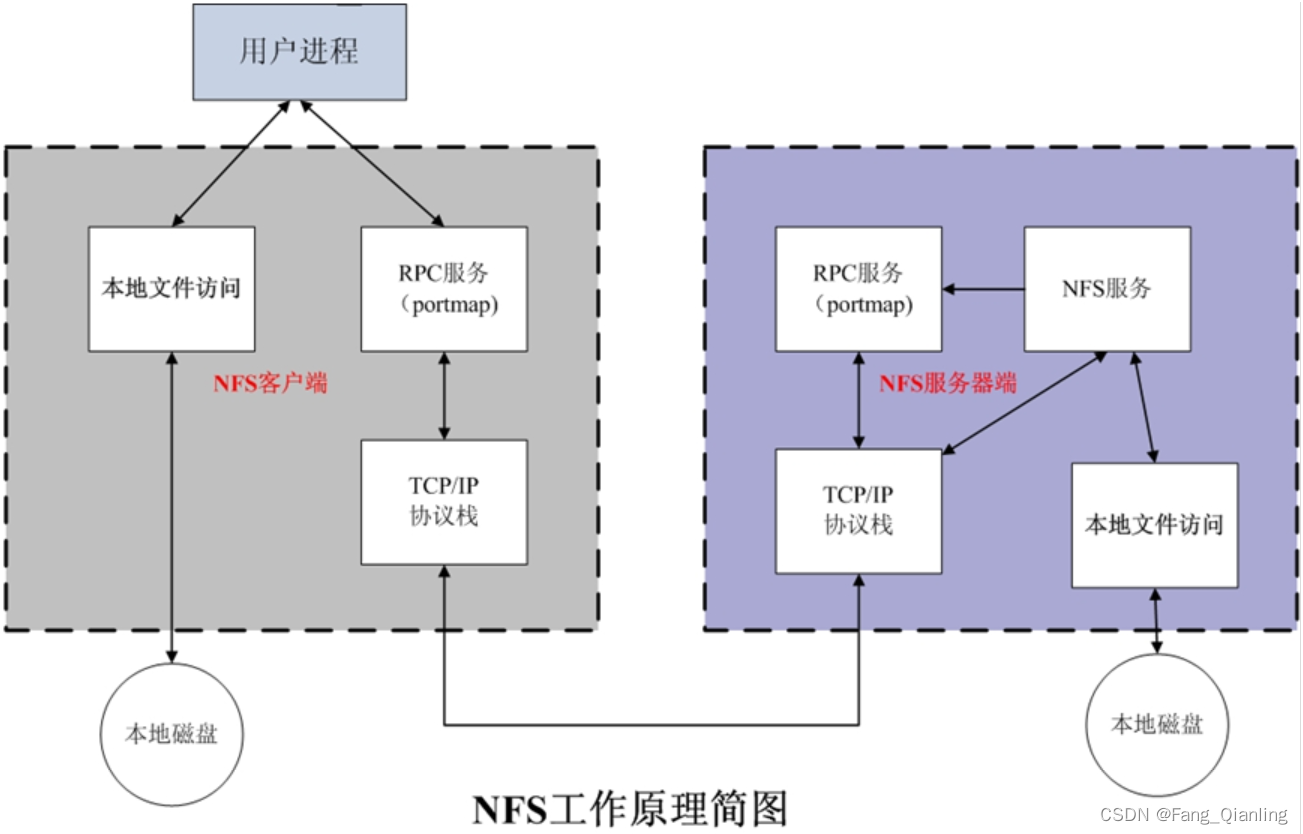
当客户端通过网络协议连接服务端,由于NFS服务端口号是随机的,所以要先连rpcbind这个程序(固定端口号111),然后通过rpcbind再连接NFS服务端。每当NFS服务启动时会报告自己的端口号给rpcbind。
3. NFS软件介绍
软件包:nfs-utils(包括服务器端和客户端);相关软件包:rpcbind(必须)。二者存在依赖关系。nfs端口号不固定,RPC端口号111。
4. NFS共享配置文件格式
主配置文件:/etc/exports
共享目录     主机,可以访问的主机地址(权限)
/share       *
#wildcards:主机名通配,例如:*.magedu.com,IP不可以
 netgroups:NIS域的主机组,@group_name
每个条目指定目录导出到的哪些主机,及相关的权限和选项:
默认选项:(ro,sync,root_squash,no_all_squash)
ro,rw 只读和读写
async 异步,数据变化后不立即写磁盘,先写入到缓冲区中,过一段时间再写入磁盘,性能高,安全性低
sync(1.0.0后为默认)同步,数据在请求时立即写入共享存储磁盘,性能低,安全性高
root_squash (默认)远程root映射为nfsnobody,UID为65534,CentOS8 为nobody,CentOS
7以前的版本为nfsnobody
no_root_squash 远程root映射成NFS服务器的root用户
all_squash 所有远程用户(包括root)都变成nfsnobody,CentOS8 为nobody
no_all_squash (默认)保留共享文件的UID和GID
anonuid和anongid 指明匿名用户映射为特定用户UID和组GID,而非nobody,可配合all_squash使用
/data/nfs1 *(rw,all_squash,anonuid=1002,anongid=1002)
5. 搭建过程
服务端创建共享目录,服务端挂载共享目录:
服务端:
[root@localhost ~]# systemctl stop firewalld.service
[root@localhost ~]# setenforce 0
[root@localhost ~]# rpm -q nfs-utils
nfs-utils-1.3.0-0.48.el7.x86_64
[root@localhost ~]# rpm -q rpcbind
rpcbind-0.2.0-42.el7.x86_64
[root@localhost ~]# systemctl start rpcbind   #开启rpcbind即可,会呼叫nfs
[root@localhost ~]# mkdir /share
[root@localhost ~]# cp /etc/passwd /share
[root@localhost ~]# vim /etc/exports
/share  *
[root@localhost ~]# exportfs -r               #重新加载配置文件
[root@localhost ~]# exportfs -v               #显示本机服务端的共享目录
/share        	<world>(ro,sync,wdelay,hide,no_subtree_check,sec=sys,secure,root_squash,no_all_squash)
[root@localhost ~]# systemctl start nfs

客户端:
[root@localhost ~]# systemctl stop firewalld.service
[root@localhost ~]# setenforce 0
[root@localhost ~]# systemctl start rpcbind
[root@localhost ~]# showmount -e 192.168.190.100  #查看服务端共享文件目录
Export list for 192.168.190.100:
/share *
[root@localhost ~]# mount 192.168.190.100:/share /mnt
[root@localhost ~]# df -h | grep mnt
192.168.190.100:/share    50G  3.3G   47G    7% /mnt
[root@localhost ~]# ls /mnt
passwd
客户端创建文件:
服务端:
[root@localhost ~]# vim /etc/exports
/share      *(rw)                                  #添加读写权限
[root@localhost ~]# chmod 777 /share/              #给文件夹添加读写权限
[root@localhost ~]# ll -d /share/
drwxrwxrwx. 2 root root 20 1月  16 17:58 /share/
[root@localhost ~]# exportfs -r

客户端:
[root@localhost mnt]# touch 1.txt
[root@localhost mnt]# ls
1.txt  passwd
超级管理员root用户削权:
服务端:
[root@localhost ~]# cd /share/
[root@localhost share]# ll
总用量 4
-rw-r--r--. 1 nfsnobody nfsnobody    0 1月  16 18:02 1.txt  #客户端root创建用户显示nfsnobody
-rw-r--r--. 1 root      root      2101 1月  16 17:58 passwd

客户端:
[root@localhost mnt]# su fql
[fql@localhost mnt]$ ls
1.txt  passwd
[fql@localhost mnt]$ touch 2.txt

服务端:
[root@localhost share]# ll
总用量 4
-rw-r--r--. 1 nfsnobody nfsnobody    0 1月  16 18:02 1.txt
-rw-rw-r--. 1 fql       fql          0 1月  16 18:08 2.txt #普通用户fql创建文件的用户依然是fql
-rw-r--r--. 1 root      root      2101 1月  16 17:58 passwd
#由此可见,nfs共享超级管理员创建的文件会被削权
取消root用户压榨削权:
服务端:
[root@localhost share]# exportfs -v
/share        	<world>(rw,sync,wdelay,hide,no_subtree_check,sec=sys,secure,root_squash,no_all_squash)
[root@localhost share]# vim /etc/exports
/share      *(rw,no_root_squash)
#no_root_squash代表关闭将root用户映射成匿名用户,取消削权

客户端:
[root@localhost mnt]# touch 3.txt

服务端:
[root@localhost share]# ll
总用量 4
-rw-r--r--. 1 nfsnobody nfsnobody    0 1月  16 18:02 1.txt
-rw-rw-r--. 1 fql       fql          0 1月  16 18:08 2.txt
-rw-r--r--. 1 nfsnobody nfsnobody    0 1月  16 18:16 3.txt
-rw-r--r--. 1 root      root      2101 1月  16 17:58 passwd   #文件属主root
指明匿名用户映射为特定用户UID和组GID,而非nobody:
服务端:
[root@localhost share]# useradd -u 1002 lisi
[root@localhost share]# passwd lisi
/share      *(rw,anonuid=1002,anongid=1002)
[root@localhost share]# vim /etc/exports
share      *(rw,all_squash,anonuid=1002,anongid=1002)
[root@localhost share]# exportfs -r
[root@localhost share]# exportfs -v
/share        	<world>(rw,sync,wdelay,hide,no_subtree_check,anonuid=1002,anongid=1002,sec=sys,secure,root_squash,all_squash)

客户端:
[root@localhost mnt]# touch 4.txt
[root@localhost mnt]# su fql
[fql@localhost mnt]$ touch 5.txt

服务端:
[root@localhost share]# ll
总用量 4
-rw-r--r--. 1 nfsnobody nfsnobody    0 1月  16 18:02 1.txt
-rw-rw-r--. 1 fql       fql          0 1月  16 18:08 2.txt
-rw-r--r--. 1 nfsnobody nfsnobody    0 1月  16 18:16 3.txt
-rw-r--r--. 1 lisi      lisi         0 1月  16 18:33 4.txt       #任何用户压榨成属主lisi
-rw-rw-r--. 1 lisi      lisi         0 1月  16 18:33 5.txt       #任何用户压榨成属主lisi
-rw-r--r--. 1 root      root      2101 1月  16 17:58 passwd
三、工作环境常见问题
1. 自行打包后建立元数据
#将新软件以“rpm”结尾的安装包移动到规定目录下,软件包找开发要,模拟将tree的安装包放到规定目录下,在建立元数据
[root@localhost ~]# mount /dev/sr0 /mnt/
mount: /dev/sr0 写保护,将以只读方式挂载
[root@localhost ~]# cd /mnt
[root@localhost mnt]# ls
CentOS_BuildTag  EULA  images    LiveOS    repodata              RPM-GPG-KEY-CentOS-Testing-7
EFI              GPL   isolinux  Packages  RPM-GPG-KEY-CentOS-7  TRANS.TBL
[root@localhost mnt]# mkdir -p /data/tree/Packages
[root@localhost mnt]# cp /mnt/Packages/tree-1.6.0-10.el7.x86_64.rpm /data/tree/Packages/
[root@localhost tree]# cd /data/tree/Packages/
[root@localhost Packages]# ls
tree-1.6.0-10.el7.x86_64.rpm
[root@localhost Packages]# cd ../../
[root@localhost data]# createrepo -v tree
[root@localhost data]# cd /etc/yum.repos.d/
[root@localhost yum.repos.d]# mkdir bak
[root@localhost yum.repos.d]# mv *.repo bak
[root@localhost yum.repos.d]# vim tree.repo
[tree]
name=tree
baseurl=file:///data/tree
gpgcheck=0
[root@localhost yum.repos.d]#yum clean all
[root@localhost yum.repos.d]#yum makecache
[root@localhost yum.repos.d]#yum list
[root@localhost ~]#yum install -y tree
2. epel源本地
适用场景:没有外网又想使用这个epel源
[root@localhost ~]#yum install epel-release -y
#安装epel源,生成epel仓库文件
[root@localhost ~]# reposync -r epel -p /data/
#下载同步epel源,根据epel仓库文件去找目录
3. 离线安装软件
[root@localhost ~]# yum install nginx --downloadonly --downloaddir=/data/
--downloadonly #只下载相关包默认至某一目录
--downloaddir=绝对目录路径 #下载到某一目录
[root@localhost ~]# ls /data
epel nginx-filesystem-1.20.1-10.el7.noarch.rpm
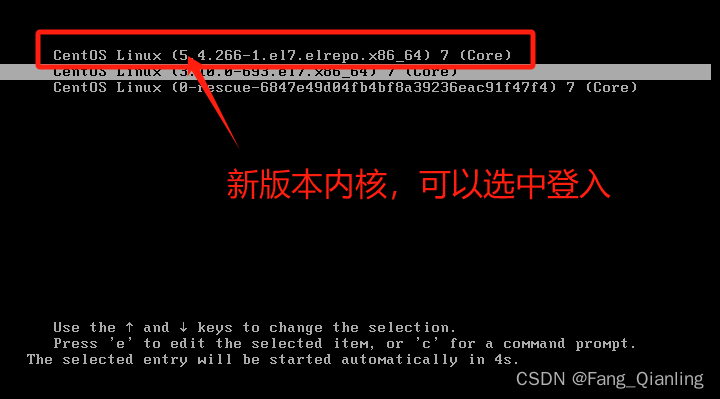
nginx-1.20.1-10.el7.x86_64.rpm openssl11-libs-1.1.1k-6.el7.x86_64.rpm4. 升级内核
[root@localhost ~]# yum install https://www.elrepo.org/elrepo-release-7.0-4.el7.elrepo.noarch.rpm -y
[root@localhost ~]# cd /etc/yum.repos.d/
[root@localhost yum.repos.d]# ls
CentOS-Base.repo  CentOS-Debuginfo.repo  CentOS-Media.repo    CentOS-Vault.repo  epel.repo
CentOS-CR.repo    CentOS-fasttrack.repo  CentOS-Sources.repo  elrepo.repo        epel-testing.repo
[root@localhost yum.repos.d]# vim elrepo.repo
28 [elrepo-kernel]
35 enabled=1            #将仓库配置文件的内核库打开即可
[root@localhost ~]# uname -r
3.10.0-693.el7.x86_64
[root@localhost yum.repos.d]# yum list *kernel*
#查看其他内核版本,然后安装其他内核版本即可
[root@localhost yum.repos.d]# yum install -y kernel-lt.x86_64
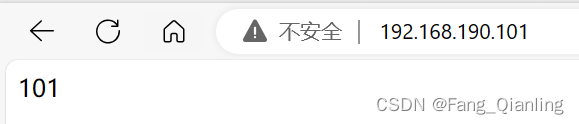
5. 访问不同服务器获得相同的数据
环境:服务器1:192.168.190.101,服务器2:192.168.190.102,nfs存储服务器:192.168.190.100
nfs存储服务端:
[root@localhost ~]# systemctl stop firewalld.service
[root@localhost ~]# setenforce 0
[root@localhost ~]# yum install -y httpd
[root@localhost ~]# cd /var/www/html
[root@localhost html]# vim index.html
fql

服务器1:
[root@localhost ~]# systemctl stop firewalld.service
[root@localhost ~]# setenforce 0
[root@localhost ~]# yum install -y httpd
[root@localhost ~]# cd /var/www/html
[root@localhost html]# vim index.html
101

服务器2:
[root@localhost ~]# systemctl stop firewalld.service
[root@localhost ~]# setenforce 0
[root@localhost ~]# yum install -y httpd
[root@localhost ~]# cd /var/www/html
[root@localhost html]# vim index.html
102
此时,访问各自服务器只能看见对应内容:

挂载:
nfs存储服务端:
[root@localhost ~]# systemctl stop firewalld
[root@localhost ~]# setenforce 0
[root@localhost ~]# mkdir /data
[root@localhost ~]# cd /data
[root@localhost data]# vim index.html
100
[root@localhost data]# vim /etc/exports
/data  *
[root@localhost ~]# systemctl start rpcbind
[root@localhost ~]# systemctl start nfs
[root@localhost data]# exportfs -r
[root@localhost data]# exportfs -v

服务器1:
[root@localhost html]# mount 192.168.190.100:/data /var/www/html/

服务器2:
[root@localhost html]# mount 192.168.190.100:/data /var/www/html/
实现访问多个服务器获得同样的数据:


 962
962


 被折叠的 条评论
为什么被折叠?
被折叠的 条评论
为什么被折叠?
 到【灌水乐园】发言


