


ex8
简答问题
1. OCP开闭原则
* 什么是OCP?
OCP是软件七大开发原则当中最基本的一个原则:开闭原则
对什么开?对扩展开放。
对什么闭?对修改关闭。
* OCP原则是最核心的,最基本的,其他的六个原则都是为这个原则服务的。
* OCP开闭原则的核心是什么?
只要你在扩展系统功能的时候,没有修改以前写好的代码,那么你就是符合OCP原则的。
反之,如果在扩展系统功能的时候,你修改了之前的代码,那么这个设计是失败的,违背OCP原则。
* 当进行系统功能扩展的时候,如果动了之前稳定的程序,修改了之前的程序,之前所有程序都需要进行重新测试。这是不想看到的,因为非常麻烦。
2. 依赖倒置原则(DIP原则)
* 什么是依赖倒置原则?
面向接口编程,面向抽象编程,不要面向具体编程。
* 依赖倒置原则的目的?
降低程序的耦合度,提高扩展力。
* 什么叫做符合依赖倒置?
上 不依赖 下,就是符合。
* 什么叫做违背依赖倒置?
上 依赖 下,就是违背。
只要“下”一改动,“上”就受到牵连。
3. 当前程序的设计,显然既违背OCP,又违背DIP,怎么办?
可以采用“控制反转”这种编程思想来解决这个问题。
4. 什么是控制反转?
控制反转:IoC(Inversion of Control)
反转是什么呢?
反转的是两件事:
第一件事:我不在程序中采用硬编码的方式来new对象了。(new对象我不管了,new对象的权利交出去了。)
第二件事:我不在程序中采用硬编码的方式来维护对象的关系了。(对象之间关系的维护权,我也不管了,交出去了。)
控制反转:是一种编程思想。或者叫做一种新型的设计模式。由于出现的比较新,没有被纳入GoF23种设计模式范围内。
5. Spring框架
* Spring框架实现了控制反转IoC这种思想
Spring框架可以帮你new对象。
Spring框架可以帮你维护对象和对象之间的关系。
* Spring是一个实现了IoC思想的容器。
* 控制反转的实现方式有多种,其中比较重要的叫做:依赖注入(Dependency Injection,简称DI)。
* 控制反转是思想。依赖注入是这种思想的具体实现。
* 依赖注入DI,又包括常见的两种方式:
第一种:set注入(执行set方法给属性赋值)
第二种:构造方法注入(执行构造方法给属性赋值)
* 依赖注入 中 “依赖”是什么意思? “注入”是什么意思?
依赖:A对象和B对象的关系。
注入:是一种手段,通过这种手段,可以让A对象和B对象产生关系。
依赖注入:对象A和对象B之间的关系,靠注入的手段来维护。而注入包括:set注入和构造注入。
6. 注意术语:
OCP:开闭原则(开发原则)
DIP:依赖倒置原则(开发原则)
IoC:控制反转(一种思想,一种新型的设计模式)
DI:依赖注入(控制反转思想的具体实现方式)
注入:简单类型用value,非简单用ref
7.简单类型包括哪些呢?可以通过Spring的源码来分析一下:BeanUtils类
注意:Date类型,时间格式不能随便写,会报错
 public static boolean isSimpleValueType(Class<?> type) {
        return (Void.class != type && void.class != type &&        基本数据类型和对应的包装类
                (ClassUtils.isPrimitiveOrWrapper(type) ||
                Enum.class.isAssignableFrom(type) ||                枚举
                CharSequence.class.isAssignableFrom(type) ||               String和CharSequence子类
                Number.class.isAssignableFrom(type) ||        数组
                Date.class.isAssignableFrom(type) ||        日期
                Temporal.class.isAssignableFrom(type) ||        java8提供的 时间和时区
                URI.class == type ||                        URI
                URL.class == type ||                        URL
                Locale.class == type ||                语言类
                Class.class == type));                Class
    }
8.p命名空间注入的实现原理(了解)
p命名空间注入是基于setter方法的,所以需要对应的属性提供setter方法。简化set注入
删除set方法会报错。
c命名空间注入是基于构造方法的,所有必须提供构造方法。简化构造注入的。
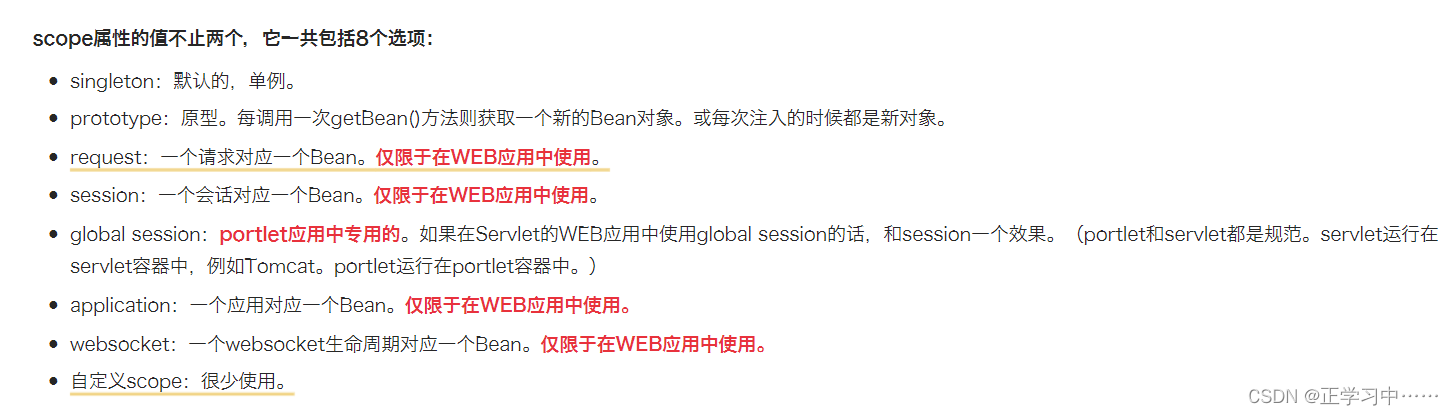
9.Bean的作用域---其他scope(了解)
至少能说出前四个
10.GoF之工厂模式(了解,常用的,出现过得要知道)
- 设计模式:一种可以被重复利用的解决方案。
- GoF(Gang of Four),中文名——四人组。
- 《Design Patterns: Elements of Reusable Object-Oriented Software》(即《设计模式》一书),1995年由 Erich Gamma、Richard Helm、Ralph Johnson 和 John Vlissides 合著。这几位作者常被称为"四人组(Gang of Four)"。
- 该书中描述了23种设计模式。我们平常所说的设计模式就是指这23种设计模式。
- 不过除了GoF23种设计模式之外,还有其它的设计模式,比如:JavaEE的设计模式(DAO模式、MVC模式等)。
- GoF23种设计模式可分为三大类:
-
- 创建型(5个):解决对象创建问题。
-
-
- 单例模式
- 工厂方法模式
- 抽象工厂模式
- 建造者模式
- 原型模式
-
-
- 结构型(7个):一些类或对象组合在一起的经典结构。
-
-
- 代理模式
- 装饰模式
- 适配器模式
- 组合模式
- 享元模式
- 外观模式
- 桥接模式
-
-
- 行为型(11个):解决类或对象之间的交互问题。
-
-
- 策略模式
- 模板方法模式
- 责任链模式
- 观察者模式
- 迭代子模式
- 命令模式
- 备忘录模式
- 状态模式
- 访问者模式
- 中介者模式
- 解释器模式
-
- 工厂模式是解决对象创建问题的,所以工厂模式属于创建型设计模式。这里为什么学习工厂模式呢?这是因为Spring框架底层使用了大量的工厂模式。
11.工厂模式的三种形态
工厂模式通常有三种形态: 要会背下来
- 第一种:简单工厂模式(Simple Factory):不属于23种设计模式之一。简单工厂模式又叫做:静态 工厂方法模式。简单工厂模式是工厂方法模式的一种特殊实现。
第一种其实是工厂方法模式中的特例,他不是23种设计模式之中的。
- 第二种:工厂方法模式(Factory Method):是23种设计模式之一。
- 第三种:抽象工厂模式(Abstract Factory):是23种设计模式之一。
12.简单工厂
设计模式之:简单工厂模式 Simple Factory Pattern
1. 简单工厂模式是工厂方法模式的一种特殊实现,又被称为:静态工厂方法模式。
2. 简单工厂模式解决什么问题呢?
优点:客户端程序不需要关心对象的创建细节,需要哪个对象时,只需要向工厂索要即可,初步实现了责任的分离。
客户端只负责“消费”,工厂负责“生产”。生产和消费分离。
3. 简单工厂模式中的角色:
* 抽象产品角色
* 具体产品角色
* 工厂类角色
4. 简单工厂模式的缺点?
缺点一:假设现在需要扩展一个新的产品,WeaponFactory工厂类的代码是需要修改的,显然违背了OCP原则。
缺点二:工厂类的责任比较重大,不能出现任何问题,因为这个工厂类负责所有产品的生产,称为全能类,或者有人把它叫做上帝类。
这个工厂类一旦出问题,整个系统必然全部瘫痪。(不要把所有鸡蛋放到一个篮子里面哦。)
13.工厂方法模式
工厂方法模式:Factory Method Pattern
1. 工厂方法模式可以解决简单工厂模式当中的OCP问题。
怎么解决的?一个工厂对应生产一种产品。
这样工厂就不是全能类了,不是上帝类了。
另外,也可以符合OCP原则。
2. 工厂方法模式中的角色:
* 抽象产品角色 Weapon
* 具体产品角色 Dagger Gun
* 抽象工厂角色 WeaponFactory
* 具体工厂角色 DaggerFactory GunFactory
3. 工厂方法模式的优点:
当你扩展一个产品的时候,符合OCP原则,因为只需要添加两个类,一个类是具体产品类,一个类是具体工厂类。都是添加类,没有修改之前的代码,所以符合OCP。
● 一个调用者想创建一个对象,只要知道其名称就可以了。
● 扩展性高,如果想增加一个产品,只要扩展一个工厂类就可以。
● 屏蔽产品的具体实现,调用者只关心产品的接口。
4. 工厂方法模式的缺点:
每次增加一个产品时,都需要增加一个具体类和对象实现工厂,使得系统中类的个数成倍增加,
在一定程度上增加了系统的复杂度,同时也增加了系统具体类的依赖。这并不是什么好事。
14.抽象工厂模式(在spring不做具体讲述)
代码笔记
Spring对IoC的实现
1.级联属性赋值(了解)
使用级联属性赋值需要注意两点:
1.配置顺序不能颠倒。
2。clazz必须提供get方法
<bean id="studentBean" class="com.neuedu.spring6.bean.Student">
        <property name="name" value="张三"/>
        <property name="clazz" ref="clazzBean"/>    <----不能调换位置
        <property name="clazz.name" value="高三二班"/>   <----不能调换位置
    </bean>
    <bean id="clazzBean" class="com.neuedu.spring6.bean.Clazz"/>
2.Set注入
注入简单类型和非简单类型
 <!--    声明定义Bean-->
    <bean id="rderDaoBean" class="com.neuedu.spring6.dao.OrderDao"/>
    <bean id="orderServiceBean" class="com.neuedu.spring6.service.OrderService">
<!--        使用ref属性引入,注入外部bean-->
        <property name="orderDao" ref="rderDaoBean"/>
    </bean>

<!--    测试简单类型-->
     <bean id="svt" class="com.neuedu.spring6.bean.SimpleValueType">
         <property name="age" value="20"/>
         <property name="age2" value="12"/>
         <property name="username" value="张三"/>
         <property name="season" value="SPRING"/>
         <property name="clazz" value="java.lang.String"/>
         <property name="birth" value="Sat Sep 09 19:56:38 CST 2023"/>
     </bean>
注入Set、Map、List、Properties
注意:Properties的key和value只能是String类型
注入属性类对象 ,Properties本质上也是一个Map集合
Properties的父类Hashtable,Hashtable实现Map接口
虽然这个也是Map集合,但是和Map的注入方式有点像,但是不同
实体类:
package com.neuedu.spring6.bean;

import java.util.List;
import java.util.Map;
import java.util.Properties;
import java.util.Set;

public class Person {
//    注入List
    private List<String> names;
//    注入Set
    private Set<String> address;
//    注入Map
    private Map<Integer,String> phones;
//    注入属性类对象 ,Properties本质上也是一个Map集合
//    Properties的父类Hashtable,Hashtable实现Map接口
//    虽然这个也是Map集合,但是和Map的注入方式有点像,但是不同
//    特点:Properties的key和value只能是String类型
    private Properties properties;

    public void setProperties(Properties properties) {
        this.properties = properties;
    }

    public void setPhones(Map<Integer, String> phones) {
        this.phones = phones;
    }

    public void setNames(List<String> names) {
        this.names = names;
    }

    public void setAddress(Set<String> address) {
        this.address = address;
    }

    @Override
    public String toString() {
        return "Person{" +
                "names=" + names +
                ", address=" + address +
                ", phones=" + phones +
                ", properties=" + properties +
                '}';
    }
}
配置文件:
<?xml version="1.0" encoding="UTF-8"?>
<beans xmlns="http://www.springframework.org/schema/beans"
       xmlns:xsi="http://www.w3.org/2001/XMLSchema-instance"
       xsi:schemaLocation="http://www.springframework.org/schema/beans http://www.springframework.org/schema/beans/spring-beans.xsd">
    <bean id="personBean" class="com.neuedu.spring6.bean.Person">
        <property name="properties" >
<!--            注入Properties属性类对象-->
            <props>
                <prop key="driver">com.mysql.cj.jdbc.Driver</prop>
                <prop key="url">jdbc:musql://localhost:3306/spring6</prop>
                <prop key="username">root</prop>
                <prop key="password">root</prop>
            </props>
        </property>

        <property name="phones">
<!--            注入Map-->
            <map>
<!--                如果key 和 value 不是简单类型-->
<!--                <entry key-ref="" value-ref=""/>-->

<!--                简单类型-->
                <entry key="1" value="110"/>
                <entry key="2" value="120"/>
                <entry key="3" value="119"/>
            </map>
        </property>

        <property name="names">
<!--            注入List-->
            <list>
                <value>张三</value>
                <value>张1</value>
                <value>张2</value>
                <value>张2</value>
                <value>张3</value>
            </list>
        </property>

        <property name="address">
<!--            注入Set-->
            <set>
                <value>bj1</value>
                <value>bj2</value>
                <value>bj3</value>
                <value>bj3</value>
            </set>
        </property>
    </bean>
</beans>
注入null和空字符串
注入空字符串使用:<value/> 或者 value=""
注入null使用:<null/> 或者 不为该属性赋值
<bean id="catBean" class="com.neuedu.spring6.bean.Cat">
<!-- 注入null-->
<!-- 方法1:不写-->
<!-- 方法2:手动注入null-->
<property name="age">
<null></null>
</property>
<!-- 注入空字符串""-->
<!-- 方法1:赋值""-->
<property name="name" value=""/>
<!-- 方法2-->
<property name="name">
<value/>
</property>
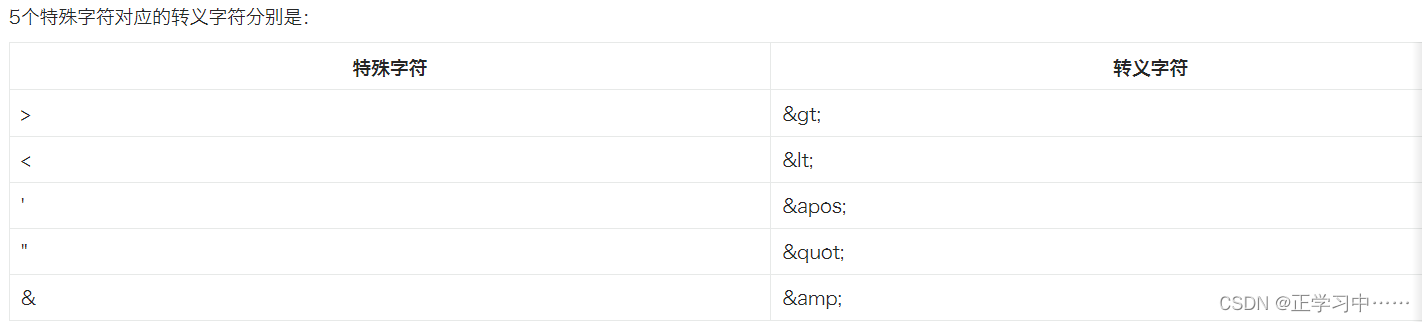
</bean>注入的值包含特殊符号
XML中有5个特殊字符,分别是:<、>、'、"、&
以上5个特殊符号在XML中会被特殊对待,会被当做XML语法的一部分进行解析,如果这些特殊符号直接出现在注入的字符串当中,会报错。
<bean id="mathBean" class="com.neuedu.spring6.bean.MathBean">
<!-- 第一种方法:使用实体符号替换特殊符号-->
<property name="result" value="2<3"/>
<!-- 第二种方法:使用<![CDATA[]]>-->
<property name="result">
<!-- 只能使用value标签-->
<value><![CDATA[ 2 < 3]]></value>
</property>
</bean>3.p命名空间注入
第一步:在spring配置文件头部添加p命名空xmlns:p="http://www.springframework.org/schema/p"
第二步:使用 p:属性名="属性值"
<?xml version="1.0" encoding="UTF-8"?>
<beans xmlns="http://www.springframework.org/schema/beans"
       xmlns:xsi="http://www.w3.org/2001/XMLSchema-instance"
       xmlns:p="http://www.springframework.org/schema/p"
       xsi:schemaLocation="http://www.springframework.org/schema/beans http://www.springframework.org/schema/beans/spring-beans.xsd">
<!--
    第一步:在spring配置文件头部添加p命名空间xmlns:p="http://www.springframework.org/schema/p"
    第二步:使用 p:属性名="属性值"
-->
    <bean id="dogBean" class="com.neuedu.spring6.bean.Dog" p:name="小花" p:age="12" p:birth-ref="birthBean"/>
<!--    这里是获取当前系统时间-->
    <bean id="birthBean" class="java.util.Date"/>
</beans>
4.c命名空间注入
第一步:在spring的配置文件头部添加xmlns:c="http://www.springframework.org/schema/c"
第二步:可以使用下标和名称两种,进行构造注入
<?xml version="1.0" encoding="UTF-8"?>
<beans xmlns="http://www.springframework.org/schema/beans"
       xmlns:xsi="http://www.w3.org/2001/XMLSchema-instance"
       xmlns:c="http://www.springframework.org/schema/c"
       xsi:schemaLocation="http://www.springframework.org/schema/beans http://www.springframework.org/schema/beans/spring-beans.xsd">
<!--
    第一步:在spring的配置文件头部添加xmlns:c="http://www.springframework.org/schema/c"
    第二步:使用
-->
    <bean id="peopleBena" class="com.neuedu.spring6.bean.People" c:_0="张三" c:_1="11" c:_2="true"></bean>
    <bean id="peopleBean" class="com.neuedu.spring6.bean.People" c:name="123" c:age="12" c:sex="false"></bean>
</beans>
5.util命名空间
使用util命名空间可以让配置复用。
在头部加入这两行代码:
xmlns:util="http://www.springframework.org/schema/util"
http://www.springframework.org/schema/util http://www.springframework.org/schema/util/spring-util.xsd">
<?xml version="1.0" encoding="UTF-8"?>
<beans xmlns="http://www.springframework.org/schema/beans"
       xmlns:xsi="http://www.w3.org/2001/XMLSchema-instance"
       xmlns:util="http://www.springframework.org/schema/util"
       xsi:schemaLocation="http://www.springframework.org/schema/beans http://www.springframework.org/schema/beans/spring-beans.xsd
                           http://www.springframework.org/schema/util http://www.springframework.org/schema/util/spring-util.xsd">

    <util:properties id="prop">
        <prop key="driver">com.mysql.cj.jdbc.Driver</prop>
        <prop key="url">jdbc:mysql://localhost:3306/spring</prop>
        <prop key="username">root</prop>
        <prop key="password">123456</prop>
    </util:properties>

    <bean id="dataSource1" class="com.powernode.spring6.beans.MyDataSource1">
        <property name="properties" ref="prop"/>
    </bean>

    <bean id="dataSource2" class="com.powernode.spring6.beans.MyDataSource2">
        <property name="properties" ref="prop"/>
    </bean>
</beans>
6.基于XML的自动装配
名称和类型自动装配都是基于set方法注入的。
根据名称装配,被装配Bean的id是装配对象类中set方法去掉set首字母小写。
根据类型装配,测试用构造方法注入,会报错。用set不会报错。
Service:
public class OrderService {
    private OrderDao orderDao;

    public void setOrderDao(OrderDao orderDao) {
        this.orderDao = orderDao;
    }

    public void generate(){
        orderDao.insert();
    }
}
Dao:
public class OrderDao {
    private static final Logger logger = LoggerFactory.getLogger(OrderDao.class);
    public void insert(){
        logger.info("订单正在生成");
    }
}配置文件正常写法:
    <bean id="orderService" class="com.neuedu.spring6.service.OrderService">
        <property name="orderDao" ref="sdfasdffsdf"/>
    </bean>
<bean id="sdfasdffsdf" class="com.neuedu.spring6.dao.OrderDao"/>配置文件根据名字自动装配:
被注入的对象bean的id不能随便写,Service类中,set方法把set去掉,首字母小写
如果是idea自动生成的代码,其实就是和属性名相同
<!--    根据名字进行自动装配-->
    <bean id="orderService" class="com.neuedu.spring6.service.OrderService" autowire="byName"></bean>
<!--    id一般也叫做Bean的名称。-->
    <bean id="orderDao" class="com.neuedu.spring6.dao.OrderDao"/>
配置文件根据类型自动装配:
如果被注入的类有 有参构造 一定要把有参构造删除,这样就会自用生成无参构造,有了无参构造,这样就可以创建对象了。
根据类型的装配不是通过构造方法注入,是基于set注入的,所以一定要给属性添加set方法。
根据类型装配也有缺陷,这种类型的bean不能有多个,会报错
<!--    根据类型进行装配-->
<!--    VipDao、UserDao就是类型-->
    <bean class="com.neuedu.spring6.dao.VipDao"></bean>
    <bean id="x" class="com.neuedu.spring6.dao.UserDao"></bean>
<!--    根据类型自动装配,这种类型只能有一个-->
<!--    <bean id="y" class="com.neuedu.spring6.dao.UserDao"></bean>-->
    <bean id="cs" class="com.neuedu.spring6.service.CustomerService" autowire="byType"></bean>
spring引入外部属性配置文件
注意细节:${username} 名字和系统名重复,默认先加载系统的名称,所以在.properties文件中加入了jdbc.前缀,取值的时候${jdbc.username}
第一步:引入context命名空间
第二步:使用标签context:property-placeholder的location属性指定属性配置文件的路径,location默认从根路径中加载文件
第三步:${key}
----------------.properties文件----------
jdbc.driverClass=com.mysql.cj.jdbc.Driver
jdbc.url=jdbc:mysql://localhost:3306/spring6
jdbc.username=root
jdbc.password=root
<?xml version="1.0" encoding="UTF-8"?>
<beans xmlns="http://www.springframework.org/schema/beans"
xmlns:xsi="http://www.w3.org/2001/XMLSchema-instance"
xmlns:context="http://www.springframework.org/schema/context"
xsi:schemaLocation="http://www.springframework.org/schema/beans http://www.springframework.org/schema/beans/spring-beans.xsd
http://www.springframework.org/schema/context http://www.springframework.org/schema/context/spring-context.xsd">
<!--
引入外部的properties文件
第一步:引入context命名空间
第二步:使用标签context:property-placeholder的location属性指定属性配置文件的路径,
location默认从根路径中加载文件
-->
<context:property-placeholder location="jdbc.properties"/>
<!-- 配置数据源-->
<bean id="ds" class="com.neuedu.spring6.jdbc.MyDataSource">
<!-- 怎么取值呢?第三步:${key}-->
<property name="driver" value="${jdbc.driverClass}"></property>
<property name="url" value="${jdbc.url}"></property>
<property name="username" value="${jdbc.username}"></property>
<property name="password" value="${jdbc.password}"></property>
</bean>
</beans>Bean的作用域
singleton和prototype
ApplicationContext applicationContext = new ClassPathXmlApplicationContext("spring-scope.xml"); <------------这个叫程序的上下文,单例,默认时,执行程序上下文就会创建对象,永远是这一个对象。
SpringBean sb = applicationContext.getBean("sb", SpringBean.class); <-----当设置scope=prototype时,执行getBean()时才会创建,会创建一个新的对象。
实体类:
public class SpringBean {
    public SpringBean(){
        System.out.println("SpringBean的无参构造方法执行了!!!");
    }
}
配置文件:
<?xml version="1.0" encoding="UTF-8"?>
<beans xmlns="http://www.springframework.org/schema/beans"
       xmlns:xsi="http://www.w3.org/2001/XMLSchema-instance"
       xsi:schemaLocation="http://www.springframework.org/schema/beans http://www.springframework.org/schema/beans/spring-beans.xsd">
<!--
        目前来说:scope属性有两个值
            第一个值:singleton 单例(默认情况下就是单例)
            第二个值:prototype 原型/多例
-->
    <bean id="sb" class="com.neuedu.spring6.bean.SpringBean" scope="prototype"></bean>
</beans>
测试用例:
@Test
    public void testBeanScope(){
        /**
         * 1.Spring默认情况下是如何管理这个Bean的
         *      默认情况下Bean是单例的(单例:Singleton)
         *      在Spring上下文初始化的时候实例化
         *      每一次调用getBean()方法的时候,都返回那个单例的对象
         * 2.当将bean的scope属性设置为prototype:
         *      bean是多例的。
         *      spring上下文初始化的时候并不会初始化这些prototype的bean。
         *      每一次调用getBean()方法的时候,实例该bean对象。
         *      prototype翻译为:原型
         */
        ApplicationContext applicationContext = new ClassPathXmlApplicationContext("spring-scope.xml");
        SpringBean sb = applicationContext.getBean("sb", SpringBean.class);
        System.out.println(sb);
        SpringBean sb2 = applicationContext.getBean("sb", SpringBean.class);
        System.out.println(sb2);
    }
其他scope
至少能说出前四个

自定义scope
GoF工厂模式
https://www.yuque.com/dujubin/ltckqu/kipzgd?singleDoc# 《Spring6》 密码:mg9b
Bean的实例化方式
<?xml version="1.0" encoding="UTF-8"?>
<beans xmlns="http://www.springframework.org/schema/beans"
       xmlns:xsi="http://www.w3.org/2001/XMLSchema-instance"
       xsi:schemaLocation="http://www.springframework.org/schema/beans http://www.springframework.org/schema/beans/spring-beans.xsd">
<!--    Spring提供的实例化方式,第一种:在spring配置文件中直接配置类全路径,spring会自动调用该类的无参构造方法-->
    <bean id="sb" class="com.neuedu.spring6.bean.SpringBean"/>
<!--    Spring提供的实例化方式,第二种:通过简单工厂模式。你需要在spring配置文件中告诉spring框架,调用哪个类的哪个方法获取Bean-->
<!--    factory-method 属性指定的是工厂类中的静态方法,也就是告诉Spring框架,调用这个方法可以获取Bean-->
    <bean id="starBean" class="com.neuedu.spring6.bean.StarFactory" factory-method="get"/>
<!--    Spring提供的实例化方式,第三种:通过方法工厂模式。通过 factory-bean属性+ factory-method属性共同完成-->
<!--        告诉Spring框架,调用哪个对象的哪个方法来获取Bean-->
    <bean id="gunFactory" class="com.neuedu.spring6.bean.GunFactory"/>
<!--    factory-bean告诉spring哪个对象  factory-method哪个方法-->
    <bean id="gun" factory-bean="gunFactory" factory-method="get"/>
<!--        Spring提供的实例化方法,第四种:通过factory接口来实现-->
<!--        这种方式实际上就是第三种方式的简化。-->
<!--        由于你编写的类实现了FactoryBean接口,所以这个类是一个特殊的类,不需要你再手动的指定factory-bean和method-->
    <bean id="person" class="com.neuedu.spring6.bean.PersonFactoryBean"/>
</beans>


 8万+
8万+

 被折叠的 条评论
为什么被折叠?
被折叠的 条评论
为什么被折叠?
 到【灌水乐园】发言


