


论文名称:基于生成扩散先验的图像复原
论文地址:https://arxiv.org/abs/2308.15070
代码地址 https://github.com/XPixelGroup/DiffBIR
论文摘要
我们提出了 DiffBIR,它利用预训练的文本到图像扩散模型来解决盲图像恢复问题。我们的框架采用两级管道。在第一阶段,我们预训练跨多种退化的恢复模块,以提高现实场景中的泛化能力。第二阶段利用潜在扩散模型的生成能力,实现逼真的图像恢复。具体来说,我们引入了一个单射调制子网络——LAControlNet来进行微调,而预训练的Stable Diffusion则是为了保持其生成能力。最后,我们引入了一个可控模块,通过在推理过程中的去噪过程中引入潜在图像引导,允许用户平衡质量和保真度。大量的实验证明了它在合成和真实数据集上的盲图像超分辨率和盲人面部恢复任务方面优于最先进的方法。
01安装环境
阅读模型中readme.md给出的设备安装的指示,
:gear:Installation(设备安装)
# clone this repo
git clone https://github.com/XPixelGroup/DiffBIR.git
cd DiffBIR
# create an environment with python >= 3.9
conda create -n diffbir python=3.9
conda activate diffbir
pip install -r requirements.txt
Note the installation is only compatible with Linux users. If you are working on different platforms, please check xOS Installation.(说明仅支持Linux用户安装。如果你在不同的平台上工作,请检查xOS安装。)
我将逐行的介绍,上面的各行。
01 git clone 需要下载git的软件,官网是这个Git (git-scm.com),下载可能需要翻墙。安装教程很多。或者你直接再github上下载,这个比较方便。
02 cd DiffBIR 这个是设置命令行当前路径,先不用他。
03 conda create -n diffbir python=3.9这个命令。我们打开anaconda prompt,在其中创建一个名称为diffbir,python版本为3.9的环境,这个环境默认在C盘,我一般创建在其他盘的conda环境中,。
conda create --prefix=D:\an\anaconda\envs\diffbir python=3.904激活环境,这两种都应该可以的
conda activate D:\an\anaconda\envs\diffbir2conda activate diffbir05找到模型的路径,设为当前命令行使用的路径。
cd D:\learn\txhf\DiffBIR-main再输入以下盘符,会出来D盘路径
D:
具体展示如下
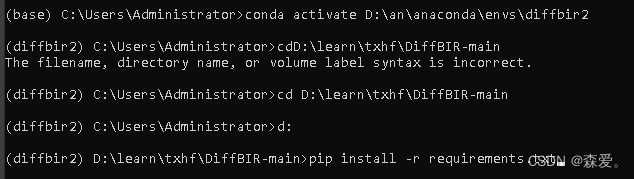
06 接着,安装依赖包就可以了。
pip install -r requirements.txt07这个可能发生报错,这个triton可能是在linux系统下的,window安装不了,我们先省略。
(diffbir) D:\learn\txhf\DiffBIR-main>pip install triton==2.0.0
Looking in indexes: https://pypi.tuna.tsinghua.edu.cn/simple
ERROR: Could not find a version that satisfies the requirement triton==2.0.0 (from versions: none)
ERROR: No matching distribution found for triton==2.0.0
08其他包安装,然后他如果没有什么包就pip install+包的名称安装
02数据准备
Data Preparation(数据准备)
Generate file list of training set and validation set.(生成训练集和验证集的文件列表。)
python scripts/make_file_list.py \
--img_folder [hq_dir_path] \
--val_size [validation_set_size] \
--save_folder [save_dir_path] \
--follow_links
This script will collect all image files in
img_folderand split them into training set and validation set automatically. You will get two file lists insave_folder, each line in a file list contains an absolute path of an image file:(该脚本将收集img_folder中的所有图像文件,并将它们自动划分为训练集和验证集。你将在save_folder中得到两个文件列表,文件列表中的每一行都包含图像文件的绝对路径:)
其中我们运行的代码是python scripts/make_file_list.py,其他是参数的配置文件。
--img_folder数据存放路径,我的路径在DiffBIR-main\dataset路径下
--val_size验证集的数据,设置多少张验证 这个自己设置小于总图像数,
--save_folder生成list文件保存地址 创建一个在DiffBIR-main路径下的文件夹。
python scripts/make_file_list.py --img_folder dataset/RICE1 --val_size 500 --save_folder results --follow_links
运行代码后生成了数据集训练和验证的文件地址的list。

03模型训练
Degradation Details(衰退的细节)
For general image restoration, we first train both the stage1 and stage2 model under codeformer degradation to enhance the generative capacity of the stage2 model. In order to improve the ability for degradation removal, we train another stage1 model under Real-ESRGAN degradation and utilize it during inference.
For face image restoration, we adopt the degradation model used in DifFace for training and directly utilize the SwinIR model released by them as our stage1 model.
对于一般的图像恢复,首先在codeformer退化下训练stage1和stage2模型,以增强stage2模型的生成能力。为了提高退化去除的能力,在Real-ESRGAN退化下训练另一个stage1模型,并在推理过程中利用它。
在人脸图像恢复方面,我们采用DifFace中使用的退化模型进行训练,并直接使用他们发布的SwinIR模型作为stage1模型。
我们首先选择第一种stage1进行训练,
Configure training set and validation set.
For general image restoration, fill in the following configuration files with appropriate values.
- training set and validation set for CodeFormer degradation.
- training set and validation set for Real-ESRGAN degradation.
For face image restoration, fill in the face training set and validation set configuration files with appropriate values.
配置训练集和验证集。
对于一般的图像恢复,请使用适当的值填充以下配置文件。
CodeFormer退化的训练集和验证集。
Real-ESRGAN退化的训练集和验证集。
对于人脸图像恢复,用适当的值填充人脸训练集和验证集配置文件。
我们选择第一种CodeFormer进行训练,我们分别点击training set and validation set,分别找到训练和验证的yaml配置文件,路径分别在
configs/dataset/general_deg_codeformer_train.yaml
configs/dataset/general_deg_codeformer_val.yaml
两个yaml文件相同,只对于一个进行介绍 在ymal中,
dataset:
  target: dataset.codeformer.CodeformerDataset
  params:
    # Path to the file list.
    file_list:
    out_size: 512
    crop_type: center
    use_hflip: False

    blur_kernel_size: 41
    kernel_list: ['iso', 'aniso']
    kernel_prob: [0.5, 0.5]
    blur_sigma: [0.1, 12]
    downsample_range: [1, 12]
    noise_range: [0, 15]
    jpeg_range: [30, 100]

data_loader:
  batch_size: 16
  shuffle: true
  num_workers: 16
  drop_last: true

batch_transform:
  target: dataset.batch_transform.IdentityBatchTransform
这些参数是用于配置训练和验证数据集的参数,以及数据加载和批处理过程的参数。下面是每个参数的解释:
file_list:文件列表的路径,用于指定训练或验证集中图像文件的位置。
out_size:输出图像的大小,通常是指图像的宽度和高度。在这里,设置为512表示输出图像的宽度和高度均为512像素。
crop_type:裁剪类型,指定了如何裁剪图像以匹配指定的输出大小。在这里,设置为"center"表示从图像中心裁剪出指定大小的图像。
use_hflip:是否使用水平翻转(水平镜像)增强技术。在这里,设置为False表示不使用水平翻转。
blur_kernel_size:模糊核大小,用于模糊操作的核大小。
kernel_list:模糊核列表,包含不同类型的模糊核,例如各向同性和各向异性。
kernel_prob:模糊核概率,指定每种模糊核的使用概率。
blur_sigma:模糊标准差,用于模糊操作的标准差参数范围。
downsample_range:下采样范围,指定图像下采样的比例范围。
noise_range:噪声范围,指定添加噪声的范围。
jpeg_range:JPEG压缩范围,指定JPEG压缩的质量范围。
batch_size:批量大小,指定每个批次中包含的图像数量。
shuffle:是否对数据进行洗牌,以随机顺序加载数据。
num_workers:用于数据加载的工作线程数量。
drop_last:是否丢弃最后一个不完整的批次(当样本总数不能被批量大小整除时)。
batch_transform:批次转换器,用于对批次中的图像进行转换。在这里,设置为IdentityBatchTransform表示不对批次进行任何转换。
我填的参数
dataset:
  target: dataset.codeformer.CodeformerDataset
  params:
    # Path to the file list.
    file_list: results/train.list
    out_size: 512
    crop_type: center
    use_hflip: False

    blur_kernel_size: 41
    kernel_list: ['iso', 'aniso']
    kernel_prob: [0.5, 0.5]
    blur_sigma: [0.1, 12]
    downsample_range: [1, 12]
    noise_range: [0, 15]
    jpeg_range: [30, 100]

data_loader:
  batch_size: 1
  shuffle: true
  num_workers: 16
  drop_last: true

batch_transform:
  target: dataset.batch_transform.IdentityBatchTransform
这些参数配置完后,进行训练代码文件配置
Train Stage1 Model(训练一阶段模型)
Configure training-related information.(配置培训相关信息。)
Fill in the configuration file of training with appropriate values.(用适当的值填写培训的配置文件。)
Start training.(开始训练。)
python train.py --config [training_config_path]:bulb::Checkpoints of SwinIR will be used in training stage2 model.(SwinIR的检查点将用于训练阶段2模型。)
训练的代码为python train.py --config [training_config_path],其中训练的配置文件有两个,分别为configs/train_cldm.yaml和configs/train_swinir.yaml。我们选择train_cldm.yaml进行训练。
以下是configs/train_cldm.yaml的配置文件
data:
  target: dataset.data_module.BIRDataModule
  params:
    # Path to training set configuration file.
    train_config:
    # Path to validation set configuration file.
    val_config:

model:
  # You can set learning rate in the following configuration file.
  config: configs/model/cldm.yaml
  # Path to the checkpoints or weights you want to resume. At the begining,
  # this should be set to the initial weights created by scripts/make_stage2_init_weight.py.
  resume:

lightning:
  seed: 231

  trainer:
    accelerator: ddp
    precision: 32
    # Indices of GPUs used for training.
    gpus: [0, 1, 2, 3, 4, 5]
    # Path to save logs and checkpoints.
    default_root_dir:
    # Max number of training steps (batches).
    max_steps: 25001
    # Validation frequency in terms of training steps.
    val_check_interval: 500
    log_every_n_steps: 50
    # Accumulate gradients from multiple batches so as to increase batch size.
    accumulate_grad_batches: 1

  callbacks:
    - target: model.callbacks.ImageLogger
      params:
        # Log frequency of image logger.
        log_every_n_steps: 1000
        max_images_each_step: 4
        log_images_kwargs: ~

    - target: model.callbacks.ModelCheckpoint
      params:
        # Frequency of saving checkpoints.
        every_n_train_steps: 5000
        save_top_k: -1
        filename: "{step}"
各行的介绍
data:
- target:指定数据模块,即用于加载和处理训练和验证数据的模块。
- params:
- train_config:训练集配置文件的路径,用于指定训练集的配置信息。
- val_config:验证集配置文件的路径,用于指定验证集的配置信息。
model:
- config:模型配置文件的路径,用于指定模型的配置信息,例如网络结构、超参数等。
- resume:指定恢复训练时的检查点或权重文件的路径。
lightning:
- seed:随机种子,用于设置随机数生成器的种子,以确保结果的可复现性。
- trainer:
- accelerator:指定加速器类型,例如使用多GPU的分布式数据并行(DDP)。
- precision:指定训练过程中使用的浮点精度,通常设置为32位浮点数。
- gpus:指定用于训练的GPU索引列表。
- default_root_dir:指定保存日志和检查点的根目录路径。
- max_steps:指定最大的训练步数(批次数)。
- val_check_interval:指定在训练步数间隔多少步后进行一次验证。
- log_every_n_steps:指定每隔多少步记录一次日志。
- accumulate_grad_batches:指定梯度累积的批次数,以增加批次大小。
callbacks:回调函数列表,用于在训练过程中执行特定的操作。
- ImageLogger:图像日志记录器,用于记录训练过程中的图像。
- ModelCheckpoint:模型检查点,用于保存训练过程中的模型检查点。
- every_n_train_steps:指定保存检查点的训练步数间隔。
- save_top_k:指定保存最佳模型的数量,设置为-1表示保存所有模型。
- filename:指定保存检查点文件的命名规则。
CodeFormer:
-
- 退化的训练集和验证集:在CodeFormer中,退化的训练集和验证集通常是指通过对原始高分辨率图像应用一种或多种退化操作(如模糊、降噪、压缩等)而生成的低质量图像。这些低质量图像被用作模型训练和评估的输入。训练集用于训练模型参数,验证集则用于调整超参数、验证模型的性能等。
-
Real-ESRGAN:
- 退化的训练集和验证集:Real-ESRGAN是一种针对超分辨率重建任务的方法,通常也需要退化的训练集和验证集。这些集合包含了原始高分辨率图像及其相应的低分辨率版本,通常通过下采样等操作得到。这些低分辨率图像用于训练模型,而高分辨率图像则用于验证模型性能和进行评估。
参数设为最低,最后也没有跑起来,一直显示cuda不够用。如果cuda足够的话应该可以运行


 1147
1147


 被折叠的 条评论
为什么被折叠?
被折叠的 条评论
为什么被折叠?
 到【灌水乐园】发言


