


目录
1. 简介unordered_set与unordered_map
- 在C++库中,除开map与set这两个关联式容器外,还存在着另外两个此类容器,unordered_set,unordered_map。
- unordered中文释义为无序的,这也正是这一对容器使用时的表征特点,这一对容器分别对应set与map,即K模型与KV模型的存储数据结点。
- 那么,除开使用迭代器遍历时,其内存储数据无序外,这一对容器与map与set容器有何不同,为什么要在已有map与set的情况下,再向库中加入这一对乍看功能冗余且劣于原本map与set的容器呢?我们来看下面的一组对照试验。
- unordered_set与unordered_map其的关键性常用接口与使用和map,set相同,不同的是其只支持正向迭代器且多了一些桶,负载因子相关的接口。
#include <iostream>
using namespace std;
#include <unordered_set>
#include <set>
#include <stdlib.h>
#include <time.h>
#include <vector>

int main()
{
	const int N = 1000000;
	vector<int> data(N);
	set<int> s;
	unordered_set<int> us;
	srand((unsigned int)time(NULL));

	for (int i = 0; i < N; i++)
	{
		//data.push_back(rand());//重复数据多
		//data.push_back(rand() + i);//重复数据少
		data.push_back(i);//有序数据
	}

	//插入
	int begin1 = clock();
	for (auto e : data)
	{
		s.insert(e);
	}
	int end1 = clock();

	int begin2 = clock();
	for (auto e : data)
	{
		us.insert(e);
	}
	int end2 = clock();

	cout << "insert number:" << s.size() << endl << endl;

	//查找
	int begin3 = clock();
	for (auto e : data)
	{
		s.find(e);
	}
	int end3 = clock();

	int begin4 = clock();
	for (auto e : data)
	{
		us.find(e);
	}
	int end4 = clock();

	int begin5 = clock();
	for (auto e : data)
	{
		s.erase(e);
	}
	int end5 = clock();

	int begin6 = clock();
	for (auto e : data)
	{
		us.erase(e);
	}
	int end6 = clock();

	cout << "set Insert:" << end1 - begin1 << endl;
	cout << "unordered Insert:" << end2 - begin2 << endl << endl;

	cout << "set Find:" << end3 - begin3 << endl;
	cout << "unordered Find:" << end4 - begin4 << endl << endl;

	cout << "set Erase:" << end5 - begin5 << endl;
	cout << "unordered Erase:" << end6 - begin6 << endl << endl;

	return 0;
}
运行结果:
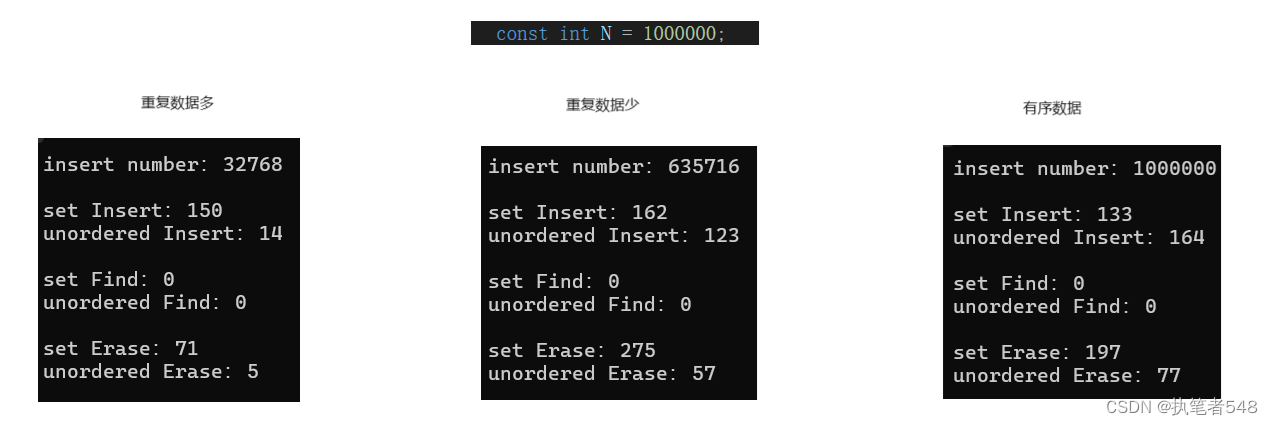
- 由运行结果可得
<1> 当数据无序时在重复数据较多的情况下,unordered系列的容器,插入删除效率更高
<2> 当数据无序但重复数据较少的情况下,两种类型的容器,两者插入数据效率仿佛
<3> 当数据有序时,红黑树系列的容器插入效率更高- 在日常的应用场景中,很少出现有序数据情况,虽然map,set有着遍历自得有序这一优势,但关联式容器的主要功能为映射关系与快速查询,其他优点尽是附带优势。所以,unordered系列容器的加入与学习是必要的。
2. 哈希表(散列)
2.1 哈希表的引入
- 在初阶数据结构的学习中,我们学习了一种排序方式,叫做基数排序,其使用数组下标表示需排序数据,下标对应的元素代表相应数据的出现次数。以此映射数据并排序,时间复杂度只有O(n)。
- 基数排序创建的数据存储数组,除可以用于数据排序外,我们不难发现其用来查询一个数据在或不再,可以通过访问下标对应数据直接得到,查询效率及其高。
- 这一为排序所创建的存储数组,就是一个简单的哈希表,我们也称之为散列,即数据并非连续而是散列在一段连续的空间中。
- 哈希表中的哈希,是指一种数据结构的设计思想,为通过某种映射关系为存储数据创建一个key值,其的映射关系不一,但都可以通过key值找到唯一对应的一个数据,且使得数据散列在存储空间中。
- 上述的存储结构为常见哈希表结构的一种,我们称之为直接定址法哈希表,但此种哈希表其使用上存在诸多限制,当存储数据的范围跨度较大时,就会使得空间浪费十分严重。接下来,我们来学习几种在其基础上进行优化具有实用价值的常用哈希表结构。
2.2 闭散列的除留余数法
2.2.1 前置知识补充与描述
- 除留余数法:为了解决存储数据大小范围跨度过大的问题,我们不再直接使用存储数据左key值映射,而是通过存储数据除以哈希表大小得到的余数做key值。这样就能将所有数据集中映射至一块指定大小的空间中。
- 哈希冲突/哈希碰撞:取余数做key值的方式虽然能够使得数据映射到一块指定空间中,并大幅度减少空间的浪费,可是这也会产生一个无法避免的问题,那就是不同数据的经过取余得到的余数可能相同,如此就会导致同一key值映射多个数据,使得无法进行需要的存储与查询。这一问题就被称为哈希碰撞。
- 线性探测与二次探测:哈希碰撞的解决存在多种方法策略,这里我们简单了解两种常用方式
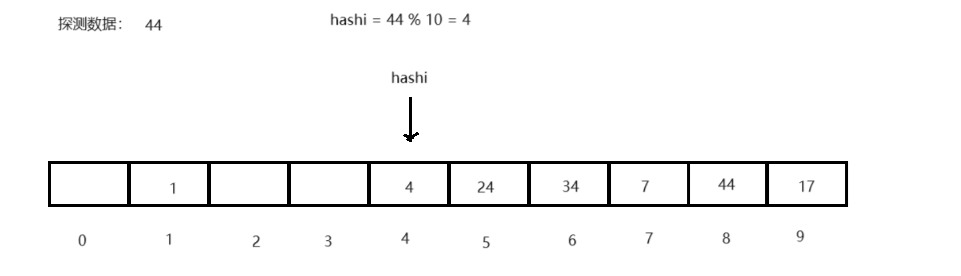
<1> 线性探测:当前key值对应数据位被占用时,向后遍历(hashi + i),直至找到为空的数据位再将数据存入,而探测查询时,也以线性逻辑搜索直至遍历至空,则代表查询数据不存在,越界回绕。
<2> 二次探测:当前key指对数据位被占用时,当前key值依次加正整数的平方(hashi + i 2 i^2 i2)直至遍历至空存入,探测查询时,依次逻辑或至空结束,越界回绕。- 补充:
<1> 负载因子:哈希表中存储数据个数与哈希表长度的比值,一般控制在0.7左右,若负载因子超过,进行扩容
<2> 线性探测容易导致数据的拥堵与踩踏,二次探测的方式为对此的优化
<3> 处理非数字类型数据,将其转换为size_t类型后,再进行key值映射,采用仿函数的方式
2.2.2 闭散列哈希表实现
- 哈希表结构
//结点状态
enum State
{
	EMPTY,//可插入,查询结束
	EXIST,//不可插入,向后查询
	DELETE//可插入,向后查询
};

//数据结点
template<class K, class V>
struct HashNode
{
	pair<K, V> _kv;
	State _state;

	HashNode(const pair<K, V>& kv = make_pair(K(), V()))
		:_kv(kv)
		,_state(EMPTY)
	{}
};

//哈希表
template<class K, class V, class hash = HashFunc<K>>
class HashTable
{
	typedef HashNode<K, V> HashNode;
	typedef Hash_iterator<K, V, hash> iterator;
public:
	HashTable(size_t n = 10)
	{
		_table.resize(n);
	}

	//迭代器相关
	iterator begin();

	iterator end();

	//查找
	HashNode* Find(const K key);

	//插入
	bool Insert(const pair<K, V>& kv);

	//删除
	bool Erase(const K key);

private:
	vector<HashNode> _table;//结点
	size_t n = 0;//存储数据个数
	hash hs;//仿函数,处理key值
};
- 操作实现
//查找
HashNode* Find(const K key)
{
	int hashi = hs(key) % _table.size();

	while (_table[hashi]._state != EMPTY)
	{
		if (_table[hashi]._state == EXIST && hs(_table[hashi]._kv.first) == hs(key))
		{
			return &_table[hashi];
		}

		hashi++;
		hashi %= _table.size();
	}

	return nullptr;
}

//插入
bool Insert(const pair<K, V>& kv)
{
	//扩容,类型转换
	//重新建立映射关系,插入(现代写法)
	if ((double)n / (double)_table.size() >= 0.7)
	{
		HashTable<K, V, hash> newtable(_table.size() * 2);
		//迭代器
		for (auto& e : _table)
		{
			newtable.Insert(e._kv);
		}

		_table.swap(newtable._table);
	}

	//找到要插入的位置
	int hashi = hs(kv.first) % _table.size();
	//线性探测
	while (_table[hashi]._state == EXIST)
	{
		if (_table[hashi]._kv.first == kv.first)
		{
			return false;
		}

		//可能越界,需要回绕
		hashi++;
		hashi %= _table.size();
	}

	//插入,单参数的构造函数支持隐式类型转换
	_table[hashi] = kv;
	_table[hashi]._state = EXIST;
	n++;

	return true;
}

//删除
bool Erase(const K key)
{
	//将要删除结点的状态改为delete
	int hashi = key % _table.size();

	//复用find
	HashNode* ret = Find(key);
	if (ret)
	{
		ret->_state = DELETE;
		n--;

		return true;
	}
	else
	{
		return false;
	}
}
- 迭代器相关接口
iterator begin()
{
	for (size_t i = 0; i < _table.size(); i++)
	{
		HashNode* cur = _table[i];
		if (cur)
		{
			return iterator(cur, this);
		}
	}

	return end();//补
}

iterator end()
{
	return iterator(nullptr, this);
}
- key指出,类型转换仿函数
//仿函数
template<class K>//数字类型
struct HashFunc
{
	size_t operator()(const K& key)
	{
		return (size_t)key;
	}
};

//string类型全特化,常用
template<>
struct HashFunc<string>
{
	size_t operator()(string str)
	{
		size_t key = 0;
		for (auto e : str)
		{
			key += e;
			key *= 131;
		}

		return key;
	}
};

//其他类型,自定义类型
struct Date
{
	int _year;
	int _month;
	int _day;
};

struct HashDate
{
	size_t operator()(const Date& d)
	{
		size_t key = 0;
		key += d._day;
		key *= 131;//科学建议值

		key += d._month;
		key *= 131;

		key += d._year;
		key *= 131;

		return key;
	}
};

struct Person
{
	int name;
	int id;//有唯一项用唯一项,无唯一项,乘权值拼接
	int add;
	int tel;
	int sex;
};
2.3 开散列的哈希桶
2.3.1 结构描述
- 除留余数法后线性探测的存储方式会导致数据的拥堵踩踏,随着数据存储数量的增加,踩踏与拥挤的现象会越来越频繁,二次探测的优化也仅仅只是饮鸩止渴。
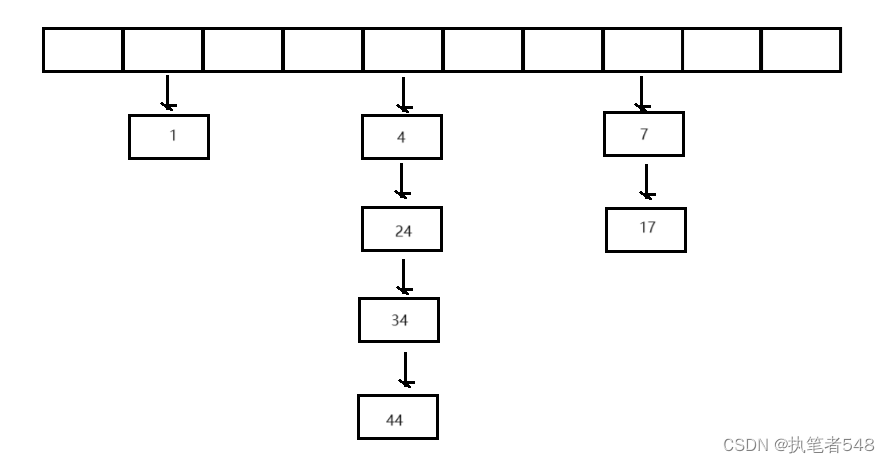
- 由此,我们来学习一种新的哈希结构也是使用最广泛的一种,其存储方式为:
顺序表中存储链表指针,相同key值的数据构造成链表结构的数据结点,挂入同一链表中,此种数据结构就被称为哈希桶
2.3.2 开散列哈希桶实现
- 哈希桶结构
//数据结点
template <class K, class V>
struct HashNode
{
	pair<K, V> _kv;
	HashNode<K, V>* _next;

	HashNode(const pair<K, V>& kv)
		:_kv(kv)
		,_next(nullptr)
	{}
};

//哈希桶结构
template <class K, class V, class hash = HashFunc<K>>
class HashTable
{
	typedef HashNode<K, V, hash> HashNode;
public:

	//构造
	HashTable(size_t n = 10)
	{
		_table.resize(n, nullptr);
		_n = 0;
	}

	//析构
	~HashTable()
	{
		for (size_t i = 0; i < _table.size(); i++)
		{
			HashNode* cur = _table[i];
			while (cur)
			{
				HashNode* next = cur->_next;
				delete cur;
				cur = next;
			}

			_table[i] = nullptr;
		}
	}

private:
	vector<HashNode*> _table;
	size_t _n;//插入数据个数,计算负载因子与扩容
	hash hs;//非数字类型,key值处理

	friend struct iterator;//迭代器会需要访问存储数据的vector
};
- 操作实现
//插入
bool Insert(const pair<K, V>& kv)
{
	//不支持键值冗余
	if (Find(kv.first))
		return false;

	//何时扩容,负载因子到1就扩容,插入数据个数
	if (_n == _table.size())
	{
		vector<HashNode*> newtable(2 * _table.size());

		//不再重新申请创建结点,而是搬运
		for (size_t i = 0; i < _table.size(); i++)
		{
			HashNode* cur = _table[i];
			while (cur)
			{
				HashNode* next = cur->_next;
				size_t hashi = hs(cur->_kv.first) % newtable.size();
				cur->_next = newtable[hashi];
				newtable[hashi] = cur;

				cur = next;
			}

			_table[i] = nullptr;
		}

		_table.swap(newtable);
	}

	//计算插入位置
	size_t hashi = hs(kv.first) % _table.size();

	//头插
	HashNode* newnode = new HashNode(kv);
	newnode->_next = _table[hashi];
	_table[hashi] = newnode;
	_n++;

	return true;
}

//查找
HashNode* Find(const K& key)
{
	for (size_t i = 0; i < _table.size(); i++)
	{
		HashNode* cur = _table[i];
		while (cur)
		{
			if (cur->_kv.first == key)
			{
				return cur;
			}

			cur = cur->_next;
		}
	}

	return nullptr;
}

//删除
bool Erase(const K& key)
{
	size_t hashi = hs(key) % _table.size();
	HashNode* cur = _table[hashi];
	HashNode* prev = nullptr;

	while (cur)
	{
		if (cur->_kv.first == key)
		{
			if (prev)
			{
				prev->_next = cur->_next;
			}
			else
			{
				_table[hashi] = cur->_next;
			}
			delete cur;
			_n--;

			return true;
		}

		prev = cur;
		cur = cur->_next;
	}

	return false;
}
2.3.3 哈希桶的迭代器与key值处理仿函数
- 迭代器结构
//将迭代器代码写于哈希桶之前
//迭代器与哈希桶存在互相引用,添加前置声明
template<class K, class V, class hash>
class HashTable;

template<class K, class V, class hash = HashFunc<K>>
struct Hash_iterator
{
	typedef HashNode<K, V> HN;
	typedef HashTable<K, V, hash> HT;
	typedef Hash_iterator Self;
	HN* _node;
	HT* _ht;
	hash hs;

	Hash_iterator(HN* node, HT* ht)
		:_node(node)
		,_ht(ht)
	{}

	//前置++
	Self& operator++();

	V& operator*();

	pair<K, V>* operator->();

	bool operator!=(const Self& it);

};
- 操作实现
//前置++
Self& operator++()
{
	if (_node->_next)
	{
		_node = _node->_next;
	}
	else
	{
		size_t hashi = hs(_node->_kv.first) % _ht->_table.size() + 1;
		_node = nullptr;//注

		while (hashi < _ht->_table.size())
		{
			if (_ht->_table[hashi])
			{
				_node = _ht->_table[hashi];
				break;
			}

			hashi++;
		}

		//后续没有元素,越界
		//_node = _ht->_table[hashi];
	}

	return *this;
}

V& operator*()
{
	return _node->_kv.second;
}

pair<K, V>* operator->()
{
	return &_node->_kv;
}

bool operator!=(const Self& it)
{
	return _node != it._node;
}
- 缺省的key值处理仿函数
template<class K>
struct HashFunc
{
	size_t operator()(const K& key)
	{
		return (size_t)key;
	}
};

//特化,常用string类型
template<>
struct HashFunc<string>
{
	size_t operator()(const string& str)
	{
		size_t key = 0;
		for (auto e : str)
		{
			key += e;
			key *= 131;
		}

		return key;
	}
};
3. unordered_set与unordered_map的封装
3.1 哈希桶的细节调整
- 使用哈希桶unordered_set与unordered_map的封装方式与红黑树封装map,set相似,调整模板参数,使得仅用一套模板即可封装出u_map与u_set,具体操作如下:
- 数据结点结构的调整
template <class T>//改
struct HashNode
{
	T _kv;
	HashNode<T>* _next;

	HashNode(const T& kv)
		:_kv(kv)
		,_next(nullptr)
	{}
};
- 迭代器结构的调整
template<class K, class T, class KeyOfT, class hash = HashFunc<K>>
struct Hash_iterator
{
	typedef HashNode<T> HN;
	typedef HashTable<K, T, KeyOfT, hash> HT;
	typedef Hash_iterator Self;
	HN* _node;
	HT* _ht;
	hash hs;
	KeyOfT kot;

	//其后细节随之调整
};
- 哈希桶结构的调整
//将hash模板参数的缺省值提维
template <class K, class T, class KeyOfT, class hash>
class HashTable
{
	typedef HashNode<T> HashNode;
	typedef Hash_iterator<K, T, KeyOfT, hash> iterator;
private:
	vector<HashNode*> _table;
	size_t _n;
	hash hs;
	KeyOfT kot;

	friend struct iterator;

public:
	//其他内部方法细节随之调整

	//为适配上层unordered_map的operator[],返回值与实现细节做调整
	pair<iterator, bool> Insert(const T& kv);

	iterator Find(const K& key);
};
3.2 具体封装
- unordered_set
//缺省提维的原因
//并非直接使用哈希桶,而是通过us,um来间接使用**
template<class K, class hash = HashFunc<K>>
class myordered_set
{
	struct KeyOfT
	{
		K operator()(const K& key)
		{
			return key;
		}
	};
	typedef Hash_iterator<K, K, KeyOfT, hash> iterator;
	typedef HashNode<K> HashNode;
public:

	iterator begin()
	{
		return _ht.begin();
	}

	iterator end()
	{
		return _ht.end();
	}

	pair<iterator, bool> Insert(const K& key)
	{
		return _ht.Insert(key);
	}

	iterator Find(const K& key)
	{
		return _ht.Find(key);
	}

	bool Erase(const K& key)
	{
		return _ht.Erase(key);
	}
private:
	HashTable<K, K, KeyOfT, hash> _ht;
};
- unordered_map
template<class K, class V, class hash = HashFunc<K>>
class myordered_map
{
	struct KeyOfT
	{
		K operator()(const pair<K, V>& kv)
		{
			return kv.first;
		}
	};
	typedef Hash_iterator<K, pair<K, V>, KeyOfT, hash> iterator;
	typedef HashNode<pair<K, V>> HashNode;
public:

	iterator begin()
	{
		return _ht.begin();
	}

	iterator end()
	{
		return _ht.end();
	}

	pair<iterator, bool> Insert(const pair<K, V>& kv)
	{
		return _ht.Insert(kv);
	}

	iterator Find(const K& key)
	{
		return _ht.Find(key);
	}

	V& operator[](const K& key)
	{
		pair<iterator, bool> ret = Insert(make_pair(key, V()));

		return (ret.first)->second;
	}

	bool Erase(const K& key)
	{
		return _ht.Erase(key);
	}

private:
	HashTable<K, pair<K, V>, KeyOfT, hash> _ht;
};


 238
238


 被折叠的 条评论
为什么被折叠?
被折叠的 条评论
为什么被折叠?
 到【灌水乐园】发言


