


序
Netty的影响力以及使用场景就不用多说了, 去年10月份后,就着手研究Netty源码,之前研究过Spring源码,MyBatis源码,java.util.concurrent源码,tomcat源码,发现一个特点,之前的源码都好打断点调试,而Netty的源码就没有那么容易打断点了,因为Netty中使用了大量的线程,很容易将任务添加到执行器中 , 而执行器是什么呢? NioEventLoop又是什么呢 ?他们在代码中出现非常困扰着我,刚学习Netty的时候,打断点都不知道怎样打,就像无头苍蝇一样乱撞,没有办法,没有思绪,因此去网上找书,最终找到了《Netty源码剖析与应用》这本书,当然中途还看过其他的书,但目前没有什么印象了,但是我看过的书籍中,我觉得写得最好的还是《Netty源码剖析与应用》,如果你也在学习Netty,我建议这本书也是必看的书籍,刚开始看时, 确实觉得这本书写得非常好,但例子少,之前研究Spring源码时读过一本书, 《Spring源码深度解析》我觉得这本书的写作方式是非常让人喜欢的,通过例子的方式来分析Spring源码,可能不同的源码,去阅读和写作的方式可能也不一样吧,因此没有过多柯求的地方, 言归正传,《Netty源码剖析与应用》这本书例子少,但里面的理论知识写得非常好,但对于初学者来说,就觉得里面遍地是黄金,但又不知从何拾起的感觉,我看了两遍,就觉得学习到了,但又感觉什么没有学习到,原因是里面的知识点是零碎的,在我们的对Netty的认知体系中没有形成知识网,因此没有办法,这个时候又想办法学习了《netty高并发-张龙》课程, 同时从网上学习了《C-1100:图灵Java四期(腾讯课堂2021)》 Netty相关的知识,从中学习到Netty使用的大量例子,同时开阔了自己的视野,明确了自己的学习方向,因此就从一个简单的例子出发,打断点研究Netty的源码,当然,中途发现Netty自己重写了ThreadLocal 叫FastThreadLocal,因此写了一篇 《Netty源码性能分析 - ThreadLocal PK FastThreadLocal》博客 , 发现Netty为了提升性能,并没有用jdk自带的队列,因此对Netty中使用的队列又做了研究 , 因此写了《Netty源码性能分析MpscChunkedArrayQueue & MpscUnboundedArrayQueue & MpscArrayQueue & MpscLinkedAtomicQueue》 这篇博客 , 发现Netty的消息机制很牛逼 ,因此写了 《Netty 之 DefaultPromise 源码解析》 这篇博客 , 在源码解析到 读取字节这一块时,发现Netty内存管理这一块的代码也写得非常好,因此写了《Netty源码解析之内存管理-PooledByteBufAllocator-PoolArena》这篇博客,而Netty为了提升性能,不用jdk的ByteBuffer来做为内部数据传输,而是自己写了一套ByteBuf来来传输数据,因此写了《Netty缓冲区ByteBuf源码解析》这篇博客来分析,在分配内存时,发现Netty每次都智能的创建ByteBuf容量大小,因此写了《RecvByteBufAllocator内存分配计算》这篇博客来分析,通过不断的遇到问题,然后去分析问题,经过半年的努力,终于Netty的学习和研究也接近尾声,有人可能觉得,你研究个Netty源码需要半年? 但工作中的人应该知道,在工作之余再静下心来去研究源码是一件多么困难的事情,这也不说了,至少我觉得现在对Netty的源码也不再陌生,对Netty的使用也得心应手,同时如果去开发Netty的插件,我觉得也不是什么难的事情了。 因此此时我自信满满,如果你也在学习Netty,不管你的学习方法如何,学习途径如何,但最终也要达到自信满满的效果,这个不是为了面试用,而是让自己都觉得自己对Netty的源码从心底里感觉自信。 话不多说了,先来看第一个例子,我们从这个例子开始,深入研究Netty的源码,而Netty主线源码研究分为《Netty 源码解析(上)》 和《Netty 源码解析(下)》两篇,当然有兴趣可以看完,即使没有从中学习到知识,也希望能得到启发吧。
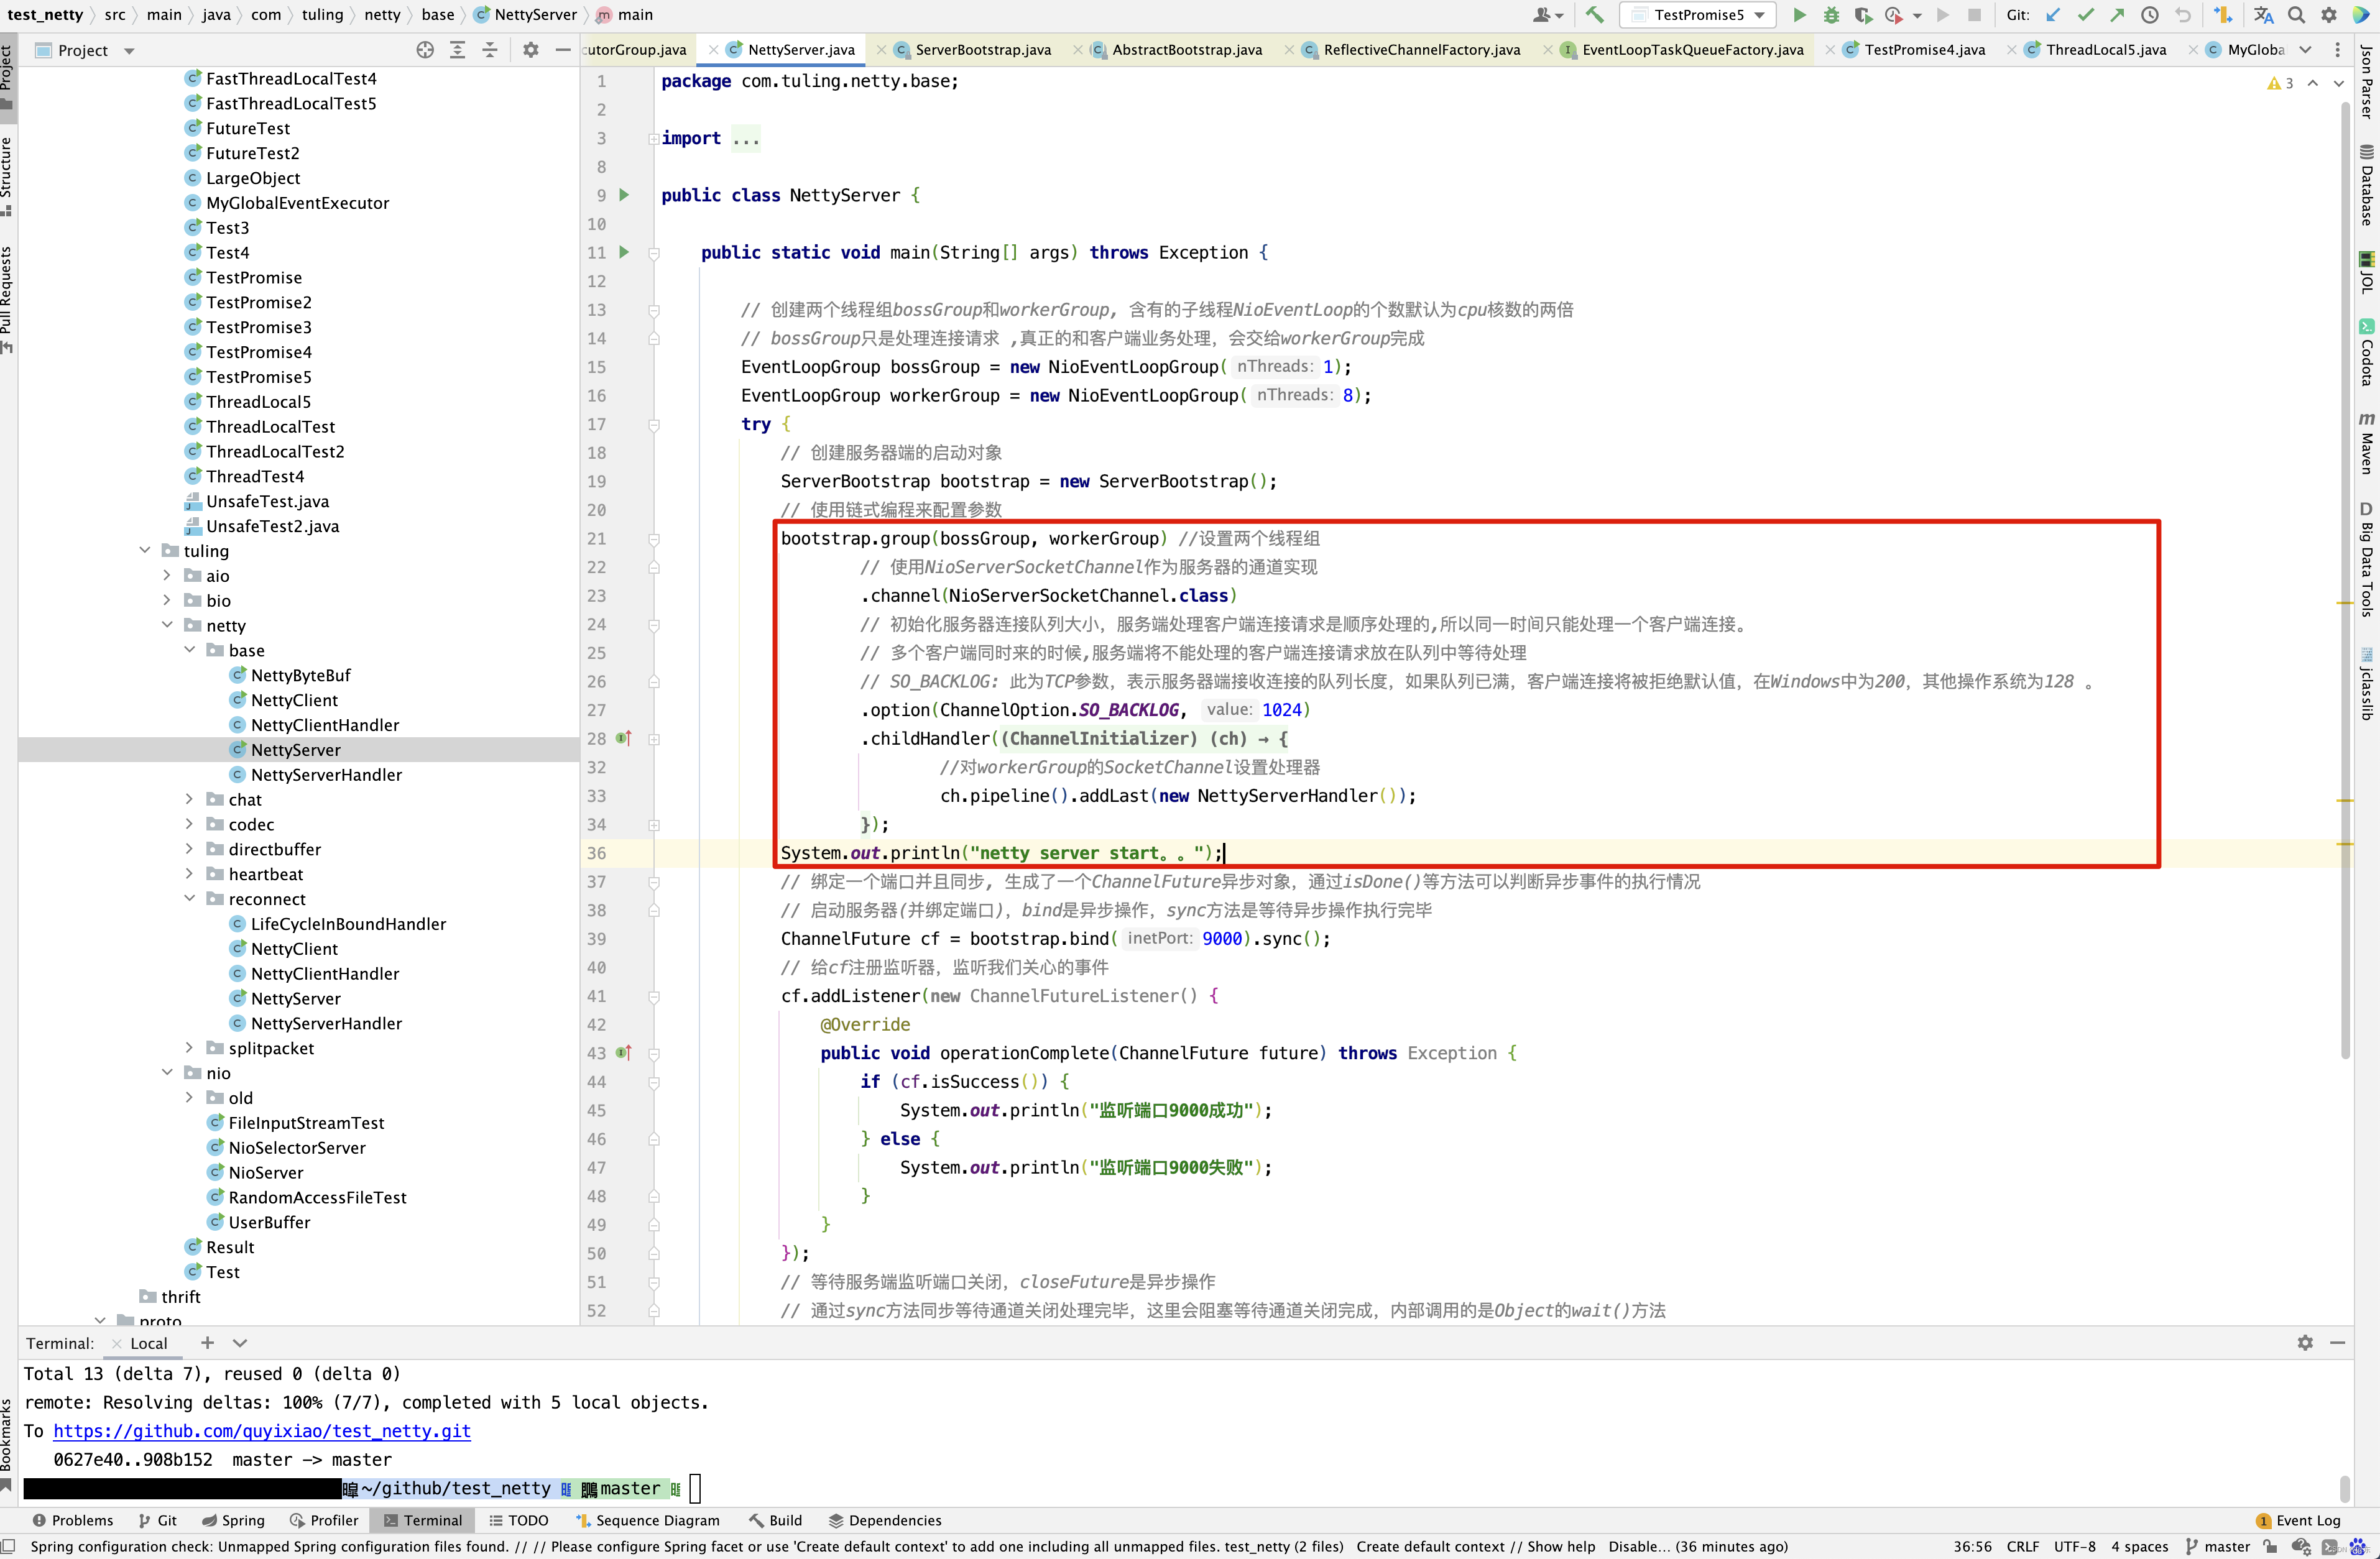
先来看服务端代码
public class NettyServer {

    public static void main(String[] args) throws Exception {
        // 创建两个线程组bossGroup和workerGroup, 含有的子线程NioEventLoop的个数默认为cpu核数的两倍
        // bossGroup只是处理连接请求 ,真正的和客户端业务处理,会交给workerGroup完成
        EventLoopGroup bossGroup = new NioEventLoopGroup(3);
        EventLoopGroup workerGroup = new NioEventLoopGroup(8);
        try {
            // 创建服务器端的启动对象
            ServerBootstrap bootstrap = new ServerBootstrap();
            // 使用链式编程来配置参数
            bootstrap.group(bossGroup, workerGroup) //设置两个线程组
                    // 使用NioServerSocketChannel作为服务器的通道实现
                    .channel(NioServerSocketChannel.class)
                    // 初始化服务器连接队列大小,服务端处理客户端连接请求是顺序处理的,所以同一时间只能处理一个客户端连接。
                    // 多个客户端同时来的时候,服务端将不能处理的客户端连接请求放在队列中等待处理
                    // SO_BACKLOG: 此为TCP参数,表示服务器端接收连接的队列长度,如果队列已满,客户端连接将被拒绝默认值,在Windows中为200,其他操作系统为128 。
                    .option(ChannelOption.SO_BACKLOG, 1024)
                    .childHandler(new ChannelInitializer<SocketChannel>() {//创建通道初始化对象,设置初始化参数,在 SocketChannel 建立起来之前执行

                        @Override
                        protected void initChannel(SocketChannel ch) throws Exception {
                            //对workerGroup的SocketChannel设置处理器
                            ch.pipeline().addLast(new NettyServerHandler());
                        }
                    });
            System.out.println("netty server start。。");
            // 绑定一个端口并且同步, 生成了一个ChannelFuture异步对象,通过isDone()等方法可以判断异步事件的执行情况
            // 启动服务器(并绑定端口),bind是异步操作,sync方法是等待异步操作执行完毕
            ChannelFuture cf = bootstrap.bind(9000).sync();
            // 给cf注册监听器,监听我们关心的事件
            cf.addListener(new ChannelFutureListener() {
                @Override
                public void operationComplete(ChannelFuture future) throws Exception {
                    if (cf.isSuccess()) {
                        System.out.println("监听端口9000成功");
                    } else {
                        System.out.println("监听端口9000失败");
                    }
                }
            });
            // 等待服务端监听端口关闭,closeFuture是异步操作
            // 通过sync方法同步等待通道关闭处理完毕,这里会阻塞等待通道关闭完成,内部调用的是Object的wait()方法
            cf.channel().closeFuture().sync();
        } finally {
            bossGroup.shutdownGracefully();
            workerGroup.shutdownGracefully();
        }
    }
}
NettyServerHandler
/**
 * 自定义Handler需要继承netty规定好的某个HandlerAdapter(规范)
 */
public class NettyServerHandler extends ChannelInboundHandlerAdapter {

    /**
     * 当客户端连接服务器完成就会触发该方法
     *
     * @param ctx
     * @throws Exception
     */
    @Override
    public void channelActive(ChannelHandlerContext ctx) {
        System.out.println("客户端连接通道建立完成");
    }

    /**
     * 读取客户端发送的数据
     *
     * @param ctx 上下文对象, 含有通道channel,管道pipeline
     * @param msg 就是客户端发送的数据
     * @throws Exception
     */
    @Override
    public void channelRead(ChannelHandlerContext ctx, Object msg) {
        //Channel channel = ctx.channel();
        //ChannelPipeline pipeline = ctx.pipeline(); //本质是一个双向链接, 出站入站
        //将 msg 转成一个 ByteBuf,类似NIO 的 ByteBuffer
        ByteBuf buf = (ByteBuf) msg;
        System.out.println("收到客户端的消息:" + buf.toString(CharsetUtil.UTF_8));
    }

    /**
     * 数据读取完毕处理方法
     *
     * @param ctx
     * @throws Exception
     */
    @Override
    public void channelReadComplete(ChannelHandlerContext ctx) {
        ByteBuf buf = Unpooled.copiedBuffer("HelloClient".getBytes(CharsetUtil.UTF_8));
        ctx.writeAndFlush(buf);
    }

    /**
     * 处理异常, 一般是需要关闭通道
     *
     * @param ctx
     * @param cause
     * @throws Exception
     */
    @Override
    public void exceptionCaught(ChannelHandlerContext ctx, Throwable cause) {
        ctx.close();
    }
}
6.3 详解Bootstrap启动器类
Bootstrap 类是Netty 提供了一个使得的工厂类,可以通过它来完成Netty 的客户端或者服务器端的Netty组装,以及Netty 程序的初始化,当然Netty 的官方解释是,完全可以不用这个Bootstrap启动类,但是,一点点的手动去创建通道,完成各种设置和启动,并且注册到EventLoop这个过程非常麻烦,通常情况下,还是使用这个使得的Bootstrap工具类会效率更高。
Netty中,有两个启动器类,分别用在服务器和客户端,如下图6-7所示 。
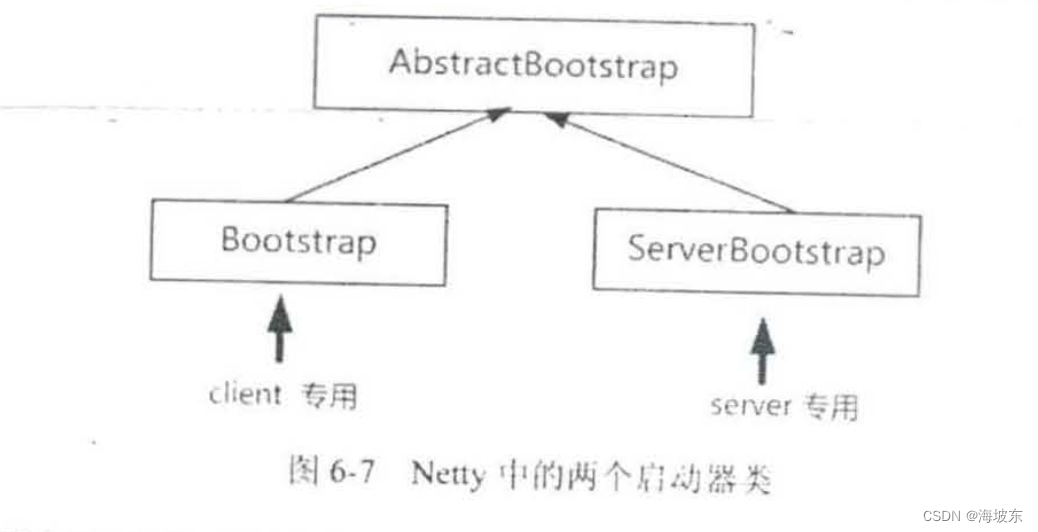
这两个启动器仅仅是使用地方不同,它们大致的配置和使用方法都是相同的,下面以ServerBootstrap 服务器启动类作为重点的介绍对象 。
在介绍ServerBootstrap 的服务器启动流程之前,首先介绍一下,涉及到的两个基本概念,父类通道,EventLoopGroup线程组(事件循环线程组)。
6.3.1 父子通道
在Netty 中,每一个NioSocketchannel 通道所土法的是Java NIO 通道,再往下就是对应的操作系统底层socket描述符,理论上来说,操作系统底层的socket描述符分为两类。
- 连接监听类型,连接监听类型的socket 描述符,放在服务器端,它负责接收客户端的套接字连接,在服务器端,一个连接监听类型,的socket描述符可以接受(Accept ) 成千上万的传输类的socket描述符。
- 传输数据类型,数据传输类的socket描述符负责传输数据,现一条TCP的Socket 传输链路,在服务器和客户端,都分别会有一个与之相应的数据传输类型socket描述符。
在Netty 中,异步非阻塞的服务器端监听通道NioServerSocketChannel ,封装在Linux 底层描述符,是连接监听类型,socket描述符,而NioSocketChannel异步非阻塞TCP Socket 传输通道,封装在底层的Linux描述符,是数据传输类型的socket描述符。
在Netty中,将有接收关系的NioServerSocketChannel和NioSocketChannel ,叫作父子通道,其中,NioServerSocketChannel 负责服务器连接监听和接收,也叫父通道(ParentChannel) , 对应每一个接收到的NioSocketChannel 传输类通道,也叫子通道ChildChannel 。
6.3.2 EventLoopGroup 线程组
Netty 中的Reactor 反应器模式,肯定不是单线程版本的反应器模式,而是多线程版本的反应器模式,Netty 的多线程版本的反应器模式是如何实现的呢?
在Netty 中,一个EventLoop相当于一个子反应器(SubReactor) , 大家已经知道,一个NioEventLoop子反应器拥有一个线程,同时拥有一个Java NIO选择器, Netty 是如何组织外层的反应器的呢? 答案是使用了EventLoopGroup线程组,多个EventLoop线程组成了一个EventLoopGroup线程组。
反过来说,Netty 的EventLoopGroup 线程组就是一个多线程版本的反应器,而其中单EventLoop线程对应于一个子反应器(SubReactor)。
Netty 的程序开发不会直接使用单个EventLoop线程,而是使用EventLoopGroup线程组,EventLoopGroup的构造函数有一个参数,用于指定内部的线程数,在构造器初始化时, 会按照传入的线程数量,在内部构造多个Thread 线程和多个EventLoop子反应器(一个线程对应一个EventLoop子反应器),进行多线程的IO 事件查询和分发。
如果使用了EventLoopGroup的无参数的构造函数,没有传入线程数或者传入的线程数为0 ,那么EventLoopGroup 内部的线程数到底是多少呢?默认的EventLoopGroup的内部线程数为最大可用CPU 处理数量的2倍 ,假设,电脑使用的是4核的CPU, 那么在内部会启动8个EventLoop 线程,相当于8个子反应器(SubReactor)实例。
从前文可知,为了及时接受(Accept) 到新连接,在服务器端,一般有两个独立的反应器,一个反应器负责新连接的监听和接受,另一个反应器负责IO 事件处理,对应到Netty 服务器程序中,则是设置两个EventLoopGroup 线程组,一个EventLoop负责新连接的监听和接受,一个EventLoopGroup负责IO事件的处理。
那么,两个反应器如何分工的呢? 负责新连接的监听和接受EventLoopGroup线程组,查询父通道的IO事件,有点像负责招工的包工头, 因此,可以形象的称为 “包工头”(Boss)线程组, 另一个EventLoopGroup线程组负责查询所有的子通道的IO 事件,并且执行Handler处理器中的业务处理,例如,数据的输入和输出 (有点像搬砖),这个线程组可以形象的称为"工人"(Worker)线程组。
6.3.3 Bootstrap的启动流程
Bootstrap的启动流程,也就是Netty组件的组装,配置, 以及Netty 服务器或者客户端的启动流程,在本节中对启动流程进行了梳理,大致分成8个步骤,本书仅仅演示了是服务器端启动器的使用,用到了启动器类为ServerBootstrap ,正式使用前,首先创建一个服务器端的启动器实例。
// 创建一个服务器端的启动器
ServerBootstrap b = new ServerBootstrap();
接下来,结合前面的NettyDiscardServer服务器的程序代码,给大家详细的介绍一下Bootstrap启动流程中精彩的8人步骤 。
第1步,创建反应器线程组,并赋值给ServerBootstrap 启动器实例。
// 创建反应器线程组
// boss线程组
EventLoopGroup bossLoopGroup = new NioEventLoopGroup(1);
// worker线程组
EventLoopGroup workerLoopGroup = new NioEventLoopGroup();
// 设置反应器线程组
b.group(bossLoopGroup, workerLoopGroup);
在设置反应器线程组之前,创建了两个NioEventLoopGroup线程组,一个负责处理连接监听的IO 事件,名为bossLoopGroup ,另一个负责数据的IO事件和Handler 业务处理,名为workerLoopGroup 。
在线程组创建完之后,就可以配置给启动器实例, 调用的方法是b.group(bossGroup , workerGroup) ,它一次性的给启动器配置了两大线程组。
不一定非得配置两个线程组,可以仅配置一个EventLoopGroup反应器线程组, 具体的配置方法是调用b.group(workerGroup),在这种模式下,连接监听IO 事件和数据传输IO事件可能被挤到在了同一个线程中处理, 这样会带来一定的风险,新连接的接受被更加耗时的数据传输或者业务处理所阻塞 。
在服务器端,建议设置成两个线程组的工作模式 。
第2步,设置通道的IO类型。
Netty 不止支持Java NIO ,也支持阻塞式OIO(也称为BIO,Block-IO,即阻塞式IO) ,下面配置的是Java NIO 类型的通道顾炎武,方法如下 :
// 2 设置NIO 类型的通道
b.channel(NioServerSocketChannel.class);
如果确实需要指定Bootstrap的IO 类型为BIO,那么这里配置上Netty 的OioServerSocketChannel.class类即可, 由于Nio的优势巨大,通常不会在Netty 中使用BIO 。
第3步,设置监听端口
b.localAddress(new InetSocketAddress(port));
第4步,设置传输通道的配置选项
b.option(ChannelOption.SO_KEEPALIVE,true);
b.option(ChannelOption.ALLOCATOR,PooledByteBufAllocator.DEFAULT);
这里用到了Bootstrap的option()选项的设置方法,对于服务器的Bootstrap而言,这个方法的作用是,给父通道(Parent Channel) 接收连接通道设置一些选项。
如果要给子通道(Child Channel) 设置一些通道选项,则需要用另外的childOption()设置方法 。
可以设置哪些通道选项呢(ChannelOption)呢?在上面的代码中, 设置了一个底层的TCP相关的选项ChannelOption.SO_KEEPALIVE,该选项表示,是否开启了TCP底层的心跳机制,true为开启,false为关闭。
第5步,装配子通道的Pipeline流水线
上一节介绍到,每一个通道的子通道,都用一条ChannelPipeline流水线,它的内部有一又向链表,装配流水线的方式是:将业务处理ChannelHandler实例加入到双向链表中。
装配子通道的Handler流水线调用childHandler()方法,传递一个ChannelInitializer通道的初始化类的实例,在父通道成功接收到一个连接 ,并创建成功一个子通道后,就会初始化子通道,这里配置了ChannelInitializer实例就会被调用 。
在ChannelInitalizer通道初始化类的实例中,有一个initChannel()初始化方法,在子通道创建后被执行到,向子通道流水线增加业务处理器。
// 5 装配子通道流水线
b.childHandler(new ChannelInitializer<SocketChannel>(){
// 有一个连接达到会创建一个通道的子通道,并初始化
protected void initChannel(SocketChannel ch) throws Exception(){
// 流水线管理子通道中的Handler业务处理器
// 向通道流水线添加一个Handler 业务处理器
ch.pipeline().addLast(new NettyDiscardHandler());
}
})
为什么仅装配子通道的流水线呢? 而不需要装配父通道的流水线呢? 原因是: 父通道也就是NioServerSocketChannel 连接接受通道,它的内部业务处理是固定的,接受新连接后,创建子通道然后初始化子通道,所以不需要特别的配置,如果需要完成特殊的业务处理,可以使用ServerBootstrap的handler(ChannelHandler handler)方法,为父通道设置ChannelInitializer初始化器。
说明一下,ChannelInitializer处理器有一个泛型参数SocketChannel,它代表需要通道类型,这个类型需要和前面的启动器中设置的通道类型,一一对应起来 。
第6步,开始绑定服务器新连接的监听端口
// 开始绑定端,通过调用sync()同步方法阻塞直到绑定成功
ChannelFuture channelFuture = b.bind().sync() ;
System.out.println(“服务器启动成功,监听端口:” + channelFuture.channel().localAddress());
这个方法很简单,b.bind()方法的功能,返回一个端口绑定Netty 的异步任务channelFuture,在这里,并没有给channelFuture异步任务增加回调监听器,而是阻塞channelFuture异步任务 ,直到端口绑定任务执行完成 。
在Netty中,所有的IO 操作都是异步执行的,这就意味着任何一个IO 操作会立刻返回,在返回的时候,异步任务还没有真正的执行,什么时候执行完成呢? Netty中的IO 操作,都会返回异步任务实例ChannelFuture实例,通过自我阻塞一直到ChannelFuture异步任务执行完成或者 ChannelFuture增加事件监听器两种方式,以获得Netty 中的IO操作真正的结果,上面使用了第一种。 到这里,服务器正式启动。
第7步,自我阻塞,直到通道关闭
// 7 等待通道关闭
// 自我阻塞,直到通道壮志凌云的异步任务结束
ChannelFuture closeFuture = channelFuture.channel().closeFuture() ;
closeFuture.sync();
如果要阻塞的当前线程直到通道关闭,可以使用通道的closeFuture()方法,以获取通道关闭的异步任务,当通道被关闭时, closeFuture实例的sync()方法会返回 。
第8步,关闭EventLoopGroup
Reactor 反应器线程组,同时会关闭内部的subReactor子反应器线程,也会关闭内部的Selector 选择器,内部的轮询线程以及负责查询的所有子通道,在子通道关闭后,会释放掉底层的资源,如TCP Socket文件描述符等。
6.3.4 ChannelOption 通道选项
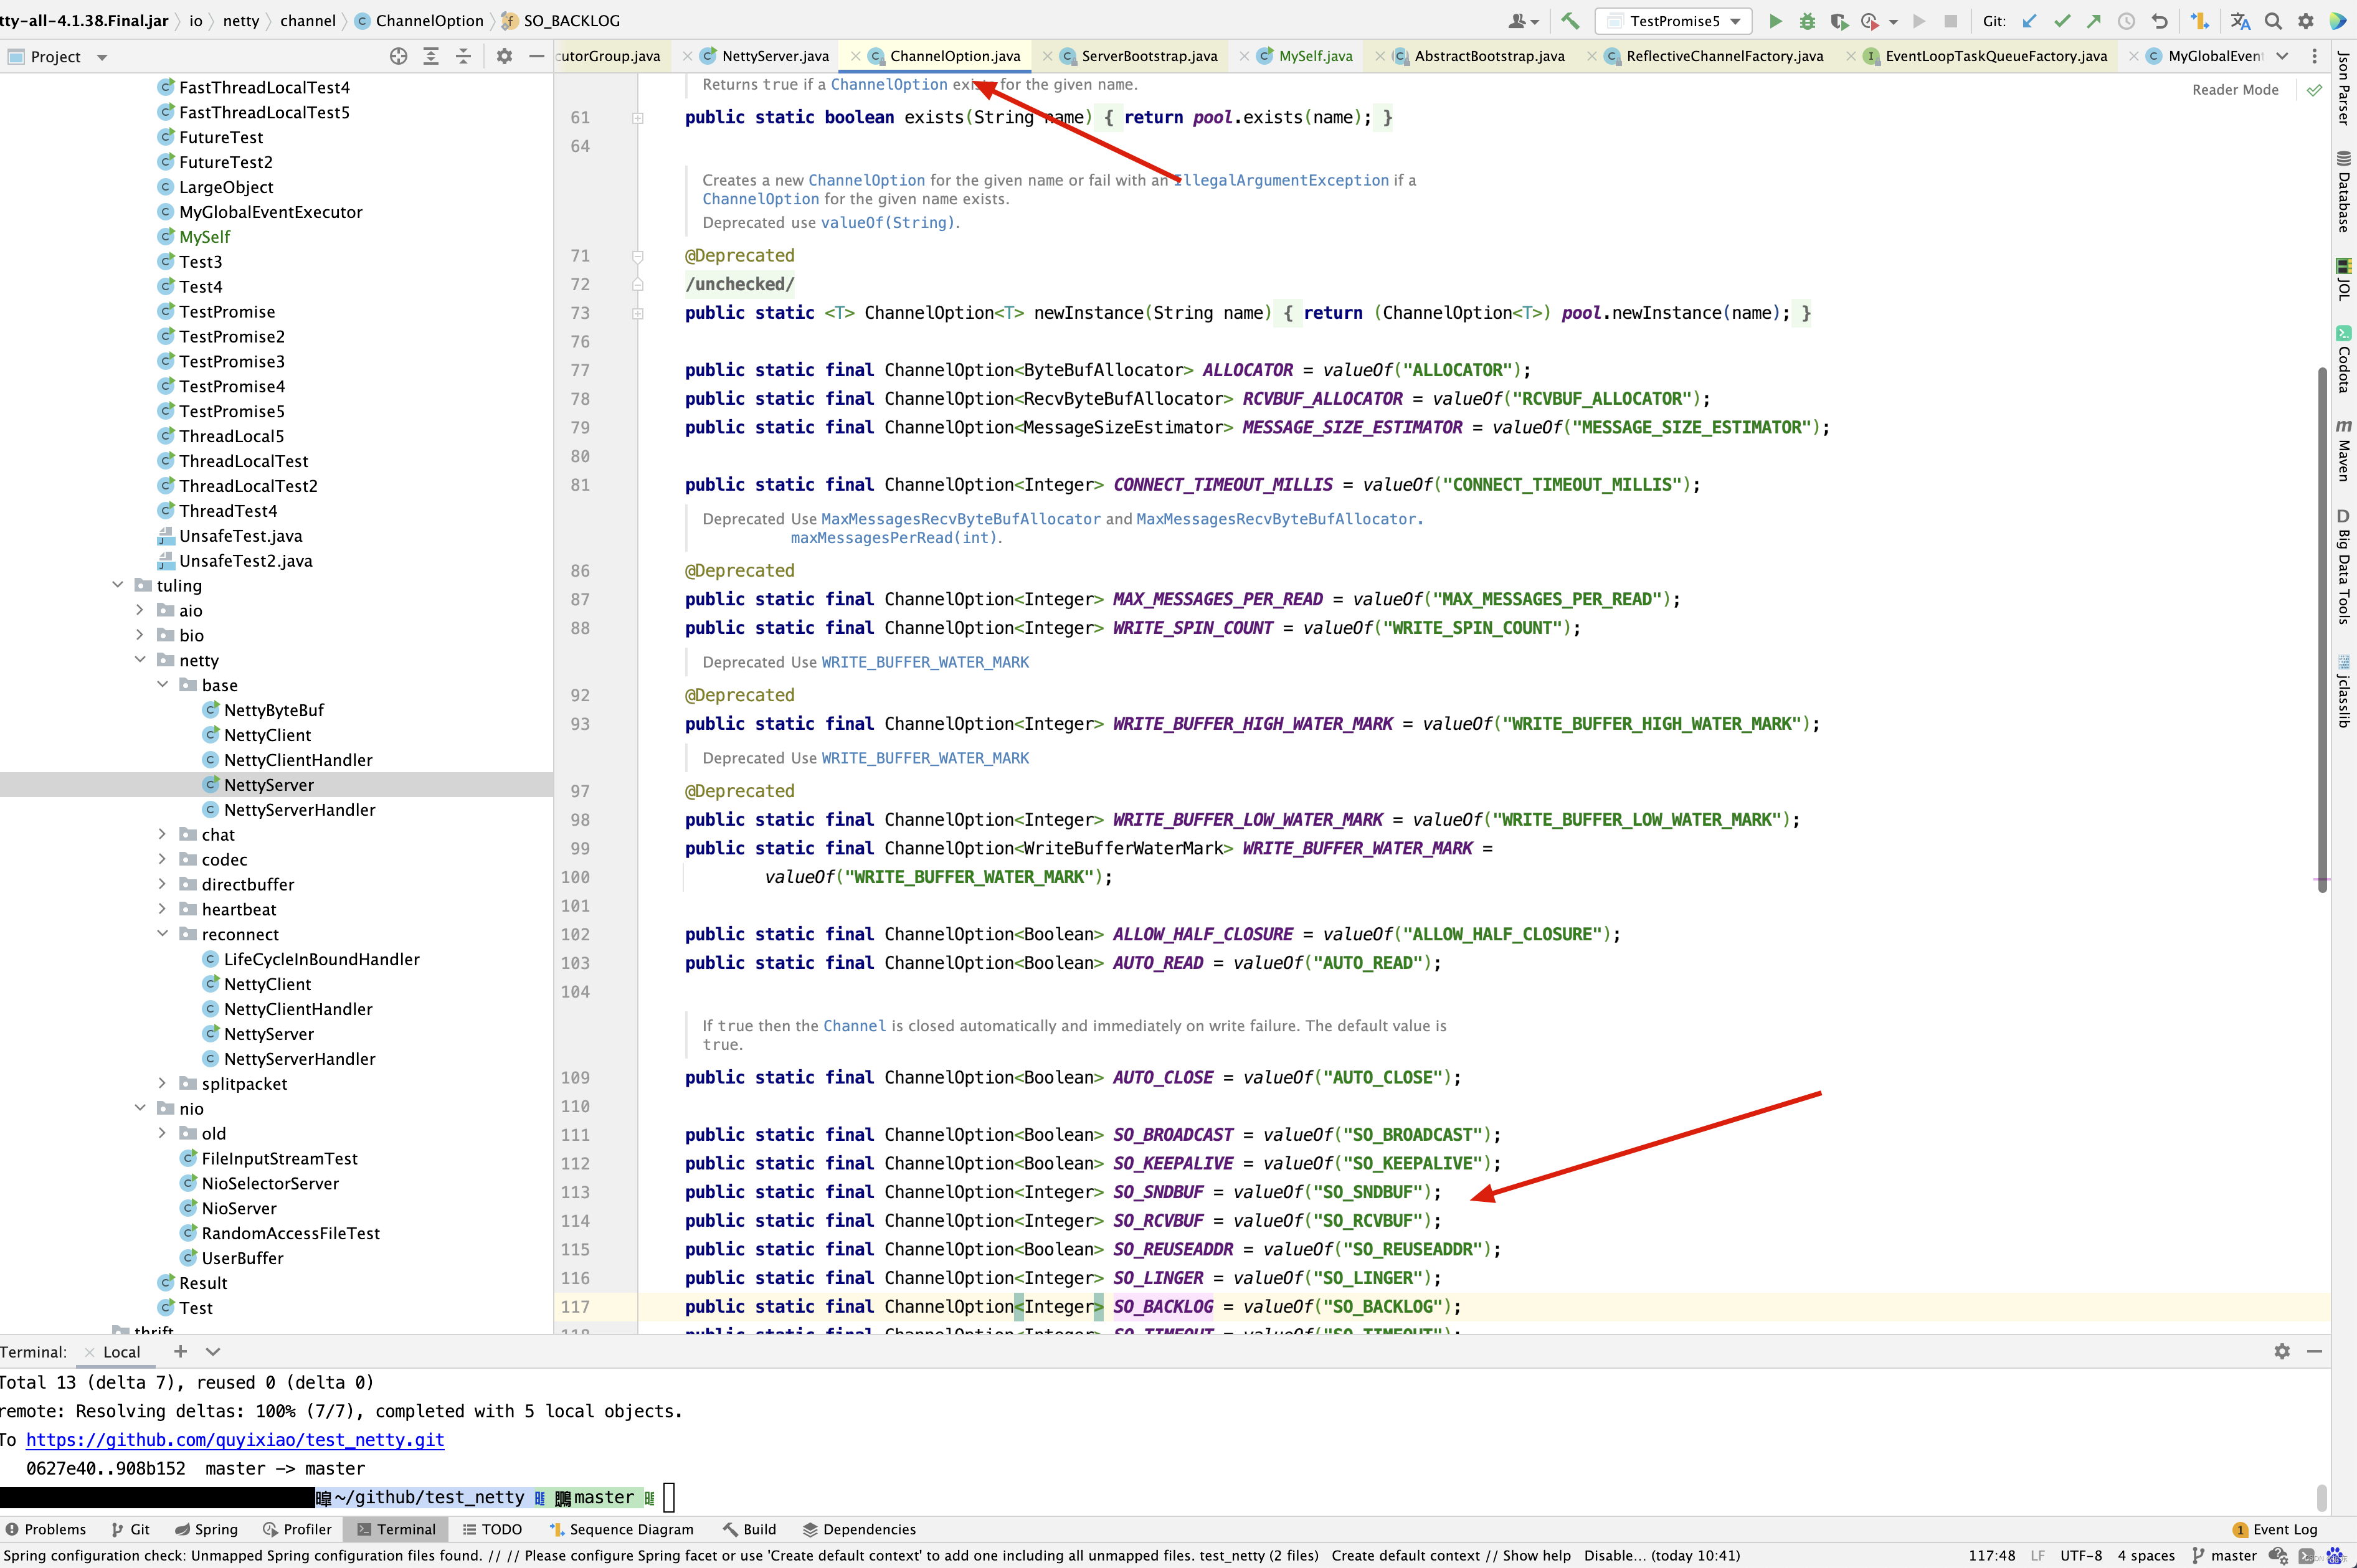
无论是对于 NioServerSocketChannel父通道类型,还是对于 NioSocketChannel子通道类型,都可以设置一系列的ChannelOption选项,在ChannelOption 类中,定义了一大票通道选项,下面介绍一些常见的选项。
- SO_REVBUF,SO_SNDBUF
此为TCP参数,每个TCP socket(套接字)在内核中都有一个发送缓冲区和一个接收缓冲区,这两个选项就用来设置TCP 连接的两个缓冲区大小的,TCP 的全双工作模式以及TCP滑动容器便 是依赖于这两个独立的缓冲区及其填充的状态 。
- TCP_NODELAY
此为TCP参数,表示立即发送数据,默认值为True(Netty的默认为True,而操作系统默认为False),该值用于设置Nagle算法的启用,该算法将小的碎片数据连接成更大的报文(或数据包),来最小化所发送的报文数量,如果需要发送一些较小的报文,则需要禁用该算法,Netty 默认禁用该算法,从而最小化报文传输的延时。
说明一下,这个参数的值,与是否开启Nagle算法是相反的,设置为true表示关闭,设置为false表示开启,通俗地讲, 如果要求高实时性,有数据发送时就立刻发送,就设置为true,如果需要减少发送次数和减少网络交互次数,就设置为false。
- SO_KEEPALIVE
此为TCP 参数,表示底层的TCP 协议的心跳机制,true为连接保持心跳,默认为false,启用该功能,TCP 会主动探测空闲连接的有效性,可以将此功能视为TCP的心跳机制,需要注意的是,默认的心跳间隔是7200s 即2小时,Netty 默认关闭该功能 。
- SO_REFSEADDR
此为TCP参数,设置为true时表示地址复用,默认值为false,有四种情况需要用到这个参数设置 。
- 当有一个相同的本地地址和端口的socket1处于TIME_WAIT状态时,而我们希望启动程序的socket2要占用该地址和端口,例如在重启服务且保持先前的端口时。
- 有多块网上或用IP Alias技术的机器在同一个端口启动多个进程,但每个进程绑定的本地IP地址不能相同 。
- 单个进程绑定相同的端口到多个socket(套接字)上,但每个socket绑定的IP地址不同 。
- 完全相同的地址和端口重复绑定,但这里只用UDP的多播,不用于TCP 。
- SO_LINGER
此为TCP参数,表示关闭socket的延迟时间,默认值为-1,表示禁用该功能,-1 表示socket.close()方法立即返回,但操作系统底层会将发送到缓冲区全部发送到对端,0 表示socket.close()方法立即返回,操作系统放弃发送缓冲区的数据,操作系统放弃发送缓冲区的数据,直接向对端发送RST包,对端收到复位错误,非0整数值表示调用socket.close()方法的线程被阻塞,直到延迟时间到来,发送缓冲区中的数据发送完毕,若超时,则对端会收到复位错误 。
- SO_BACKLOG
此为TCP参数,表示服务器端接收连接的队列长度,如果队列已满,客户端连接将被拒绝默认值,在Windows中为200,其他操作系统为128 。
- SO_BROADCAST
此为TCP参数,表示设置广播模式 。
6.4 详解Channel 通道
先介绍一下,在使用Channel 通道的过程中所涉及的主要成员方法,然后,为大家介绍一下Netty 所提供的一个专门的单元测试通道–EmbeddedChannel(嵌入式通道)。
6.4.1 Channel通道的主要成员和方法
在Netty中,通道是其中的一个核心的概念之一,代表着网络连接,通道是通信的主题,由它负责同对端进行网络通信,可以写入数据到对端,也可以从对端读取数据 。
protected AbstractChannel(Channel parent) {
    this.parent = parent;                           // 父通道
    id = newId();
    unsafe = newUnsafe();                           // 底层的NIO通道,完成的实际的IO操作
    pipeline = newChannelPipeline();                // 一条通道,拥有一条流水线
}
AbstractChannel内部有一个pipeline属性,表示处理器的流水线,Netty 在对通道进行初始化的时候,将pipeline属性初始化为DefaultChannelPipeline的实例, 这段代码也表明,每个通道拥有一条ChannelPipeline处理器流水线 。
AbstractChannel内部有一个parent属性,表示通道的父通道,对于连接监听通道(如NIOServerSocketChannel实例)来说,其父亲通道为null,而对于每一条传输通道(如NioSocketChannel实例),其parent属性的值为接收到该连接的服务器连接监听通道 。
几乎所有的通道实现类都继承了AbstractChannel抽象类,都拥有上面的parent和pipeline两个属性成员。
再来看一下,在通道接口中所定义的几个重要的方法 。
方法1,ChannelFuture connect(SocketAddress address);
此方法的作用为:连接远程服务器,方法的参数为远程服务器地址,调用后会立即返回,返回值为负责连接操作的异步任务ChannelFuture,此方法在客户端的传输通道中使用。
方法2,ChannelFuture bind(SocketAddress address)
此方法的作用为,连接远程服务器,方法的参数为远程服务器地址,调用后会立即返回,返回值为负责连接操作的异步任务ChannelFuture,此方法在客户端传输通道中使用。
方法3,ChannelFuture close()
此方法的作用为:关闭通道连接,返回连接关闭的ChannelFuture异步任务,如果需要在连接正式关闭后执行其他操作,则需要为异步任务设置回调方法,或者调用ChannelFuture异步任务sync()方法来阻塞当前线程,一直等到通道关闭的异步任务执行完毕 。
方法4,channel read()
此方法的作用为,读取通道数据,并且启动入站处理,具体来说,内部的Java NIO Channel通道读取数据,然后启动内部的Pipeline流水线,开启数据读取的入站处理, 此方法的返回通道自身用于链式调用 。
方法5 ChannelFuture write(Object o )
此方法的作用为,启程出站流水线处理, 把处理后的最终数据写到底层Java NIO 通道 , 此方法的返回值为出站处理异步处理任务 。
方法6 Channel flush()
此方法的作用为,将缓冲区中的数据立即写出到对端,并不是每一次write操作都是将数据直接写出到对端,write操作的作用在大部分情况下仅仅是写入到操作系统缓冲区,操作系统将会根据缓冲区的情况,决定什么时候把数据写到对端,而执行flush()方法方始将缓冲区的数据写到对端 。
上面的6种方法 ,仅仅是比较常见的方法,在Channel 接口中以及各种通道的实例同中,还定义了大量的通道操作方法 , 在一般的日常开发中在,如果需要用到,请直接查询 Netty API 文档或Netty 源代码 。
这些理论知识在之前的博客中已经说明了,但我觉得太重要了,在这里又重复一遍,对源码的阅读是有很大帮助的。
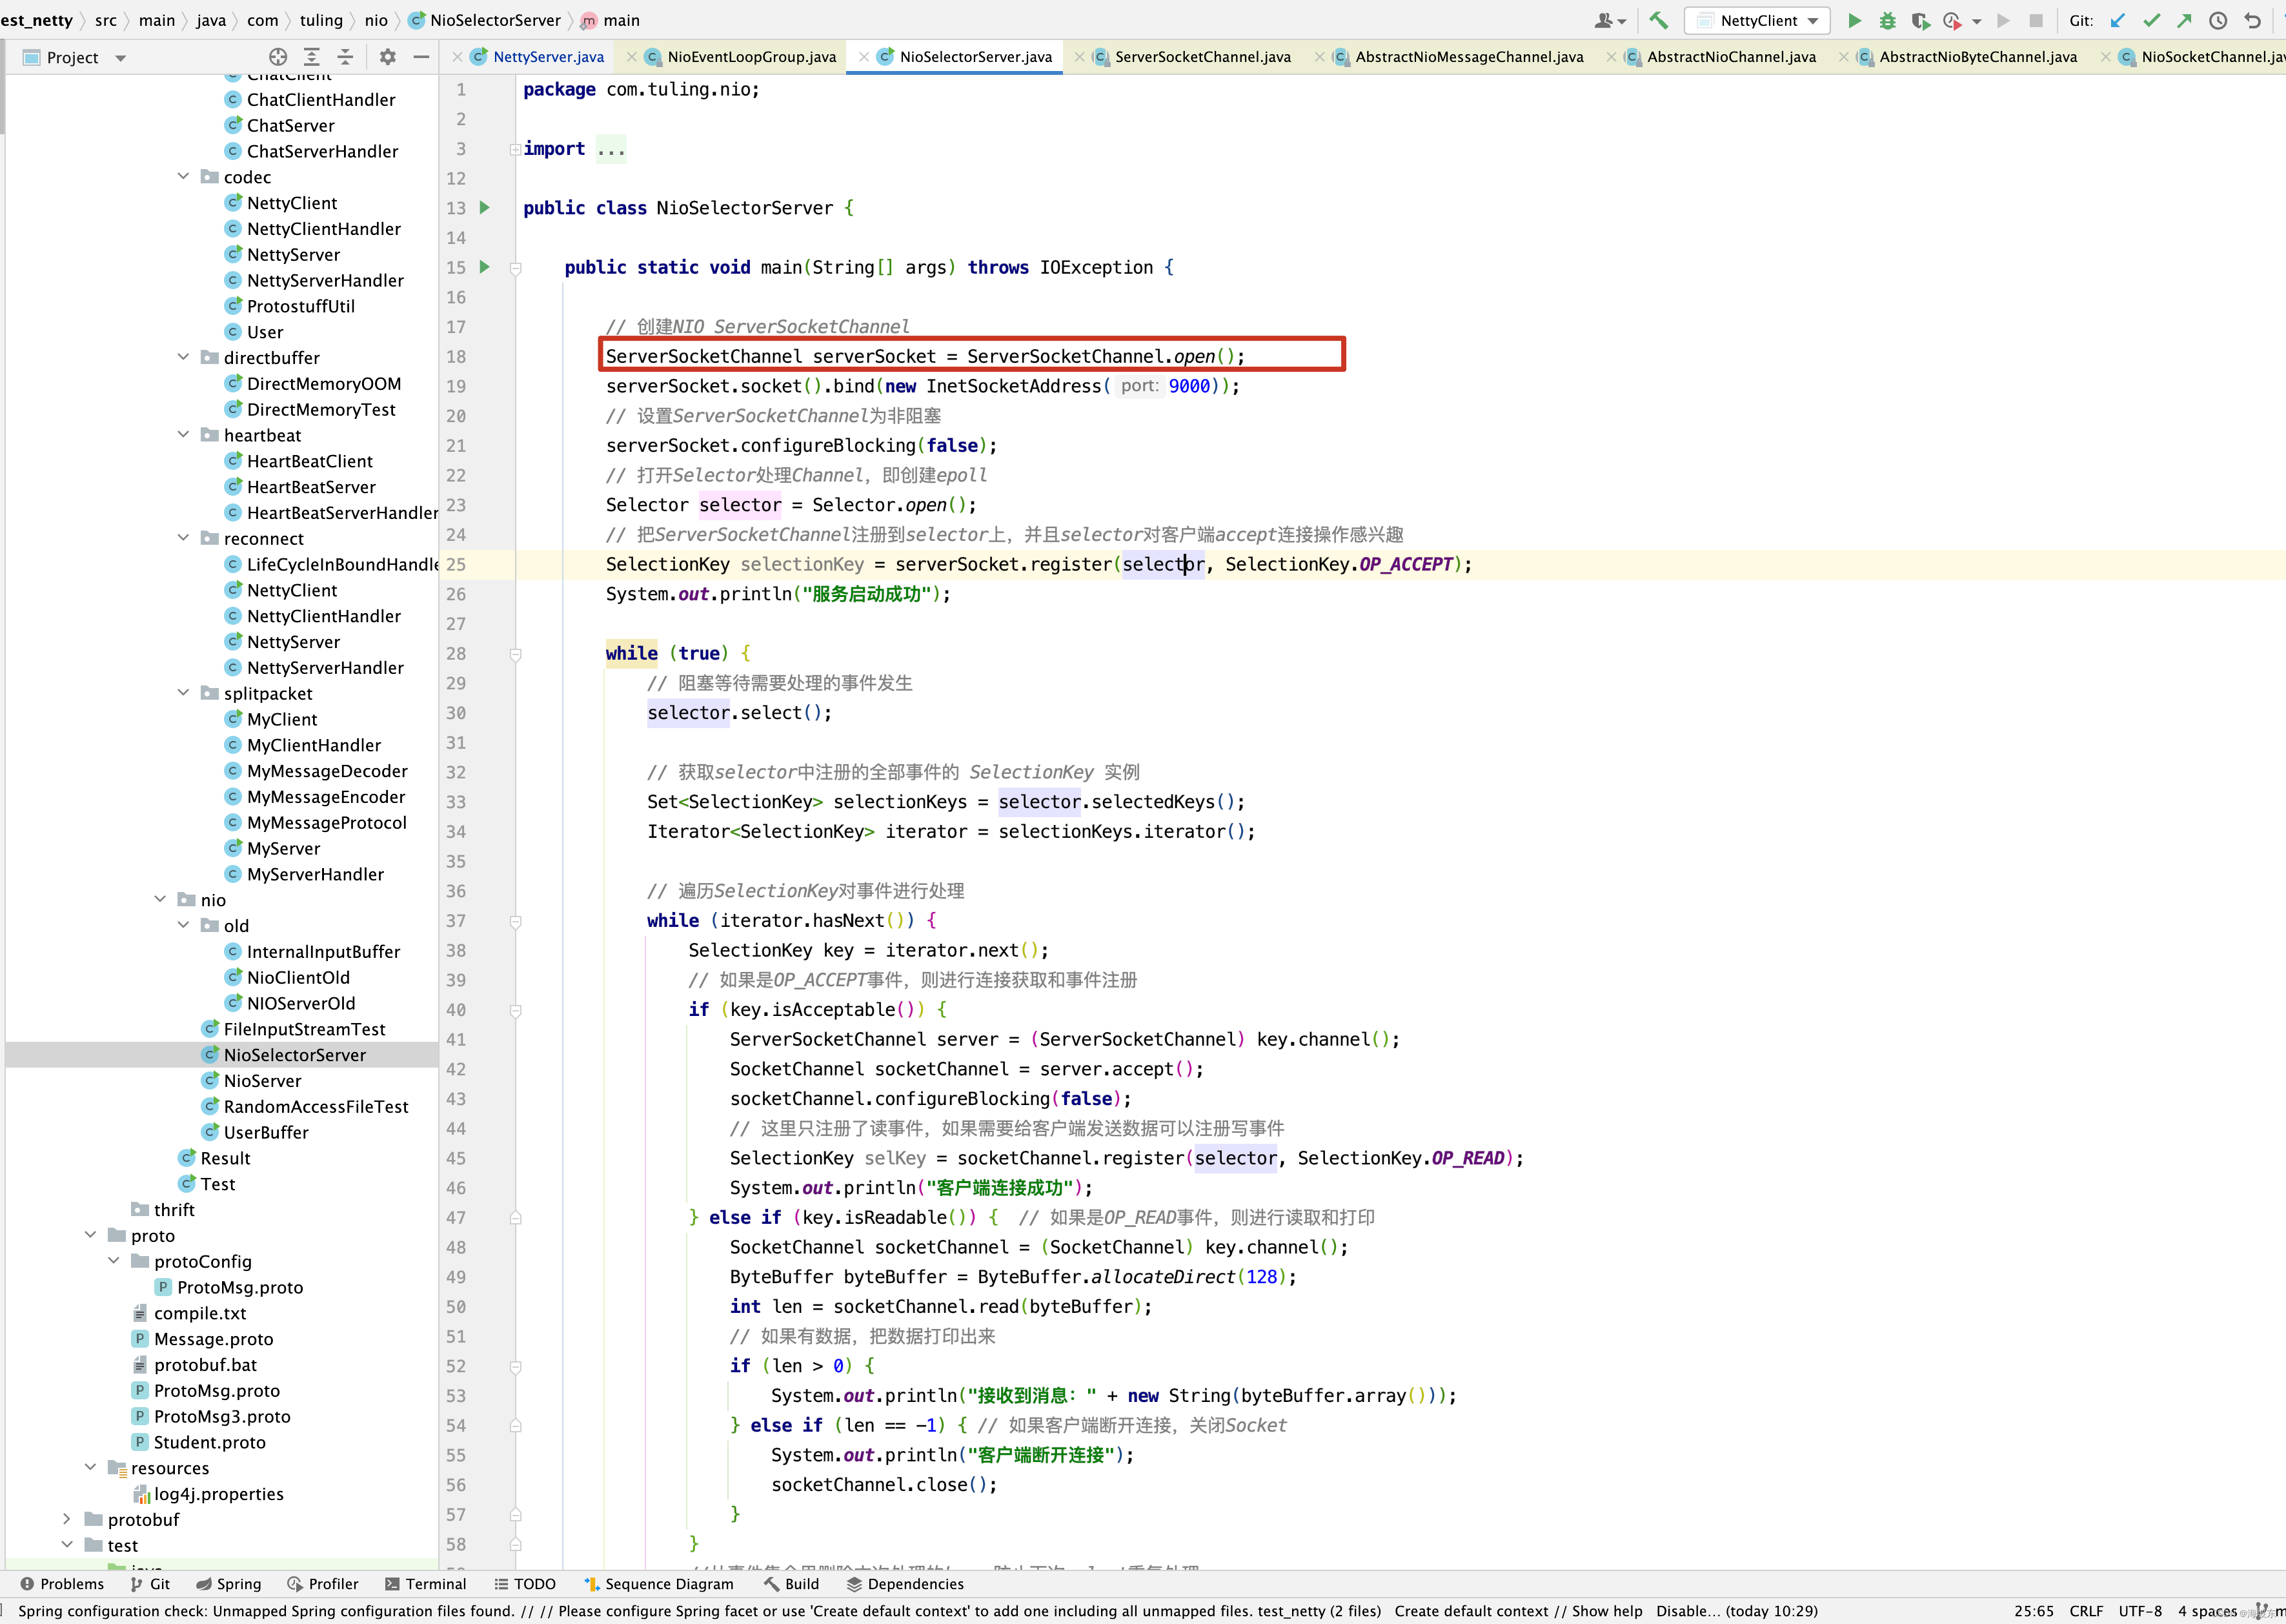
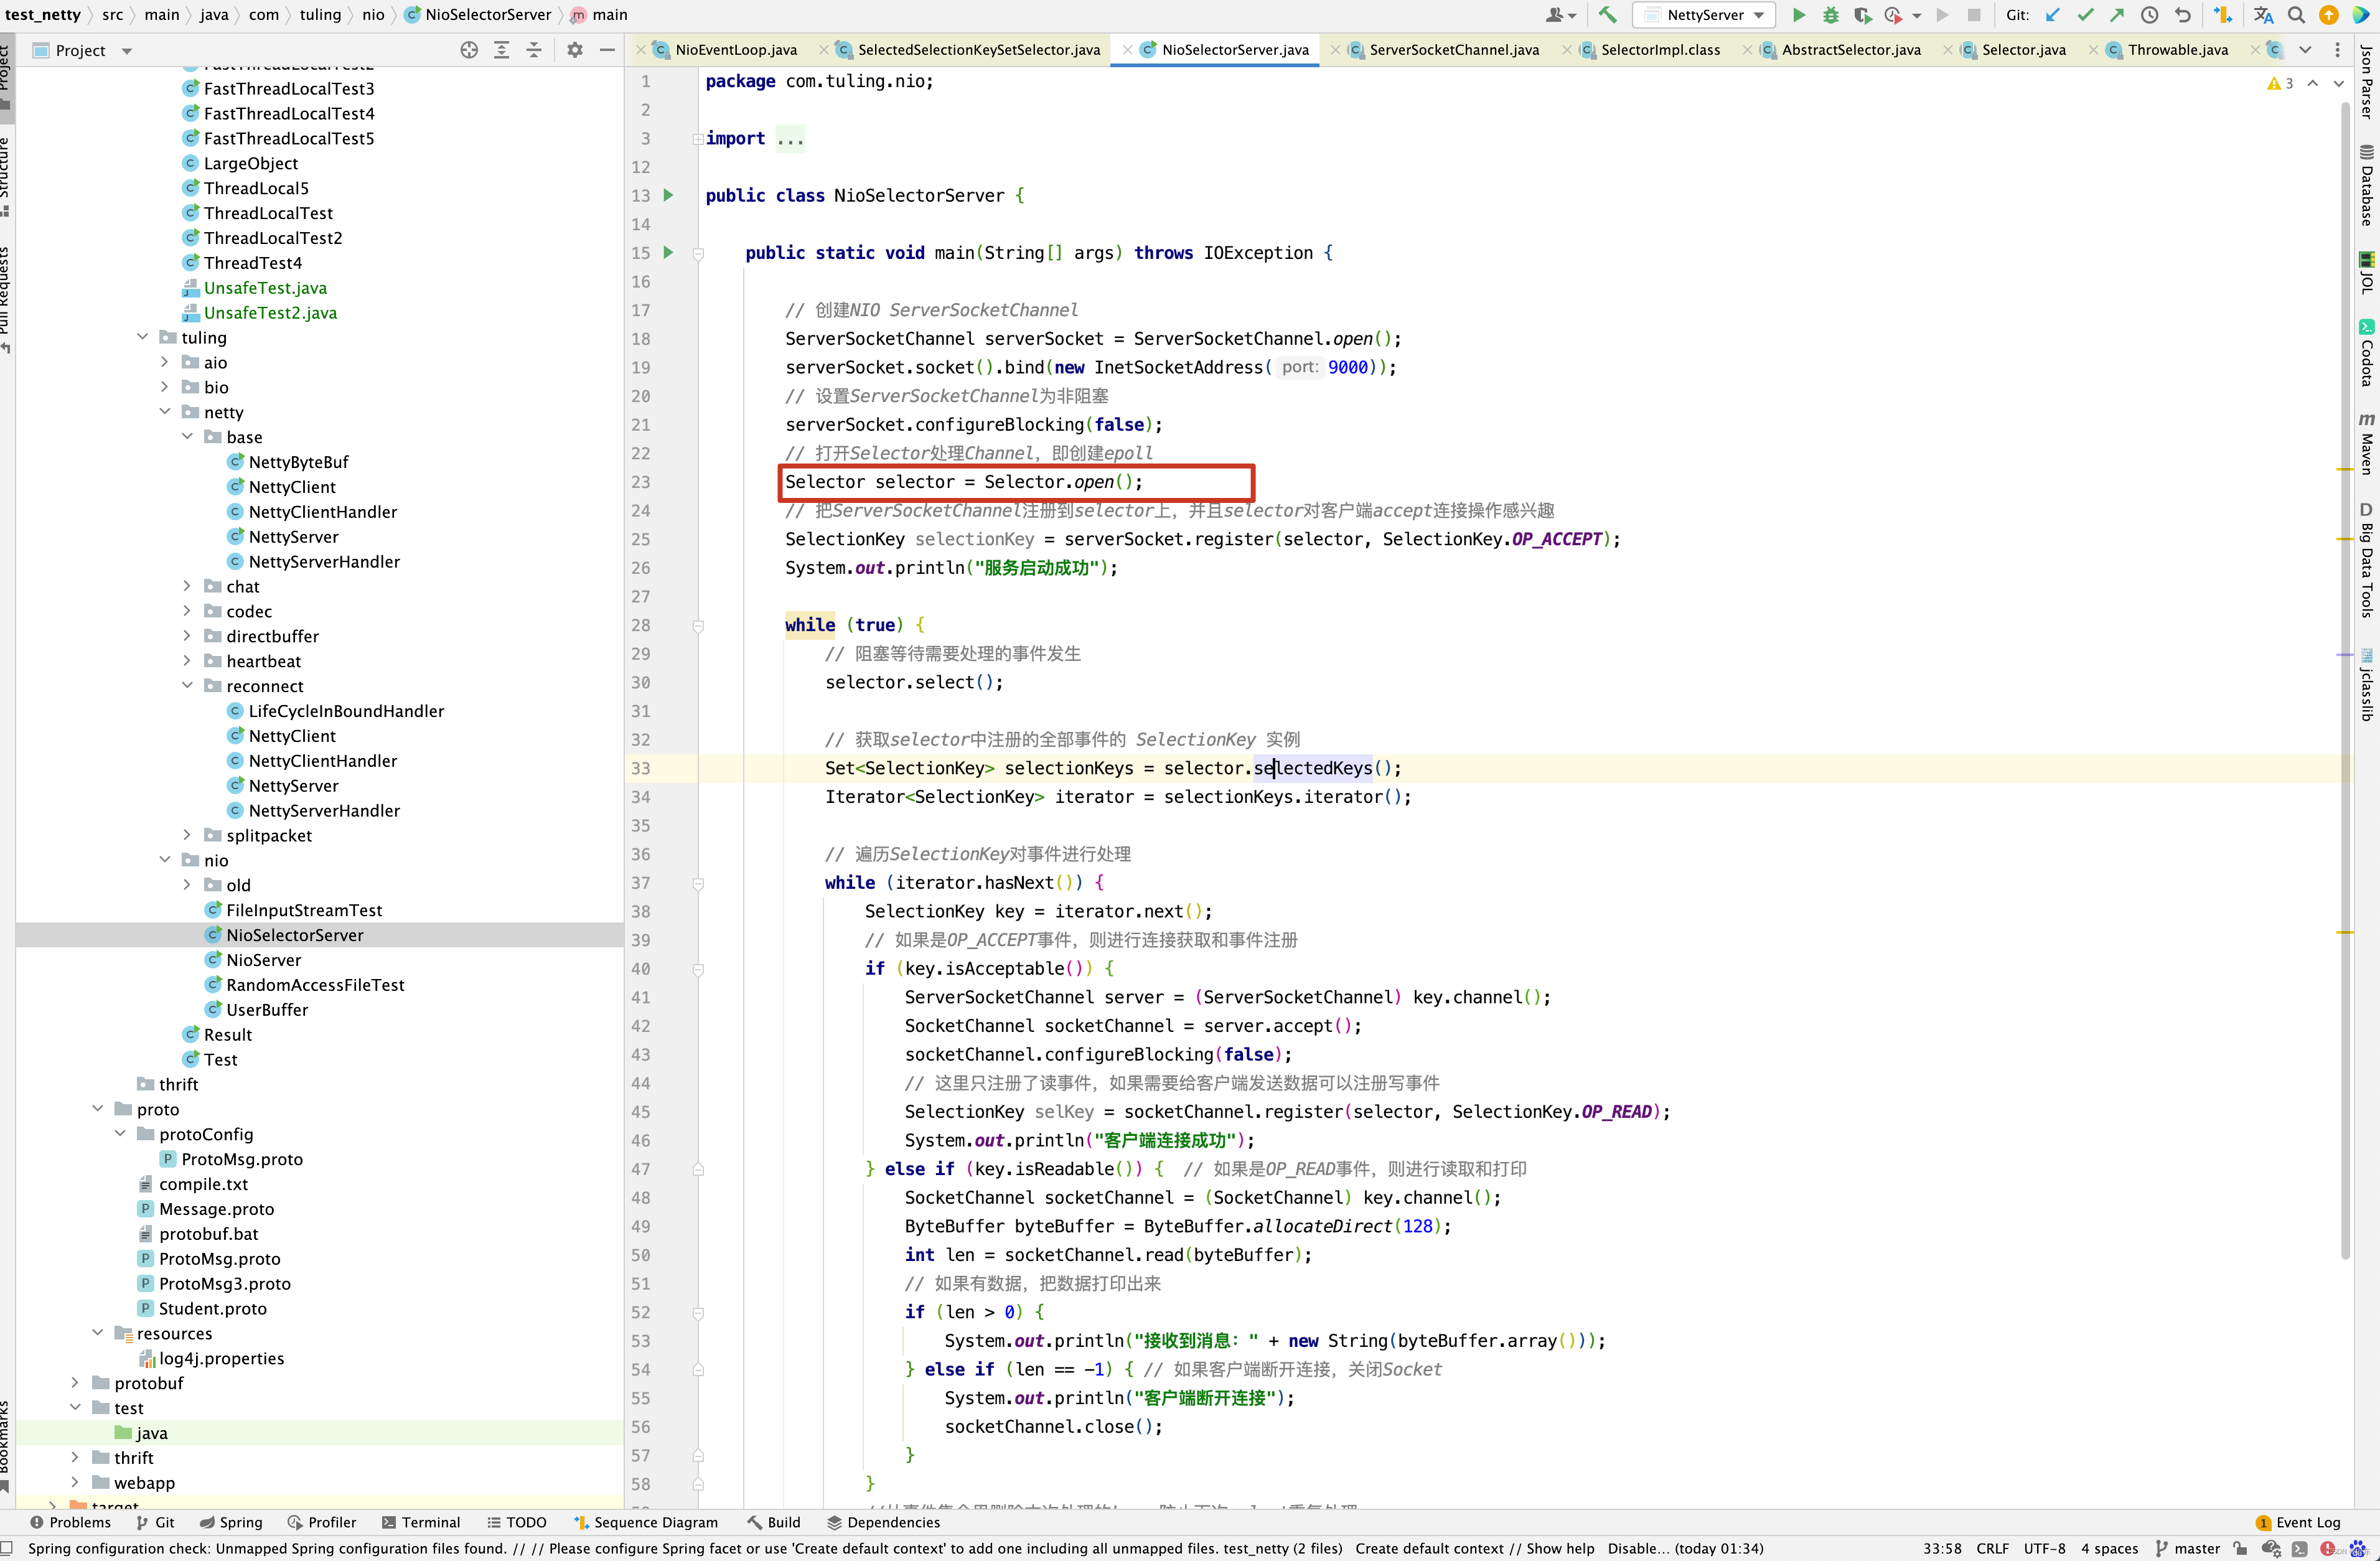
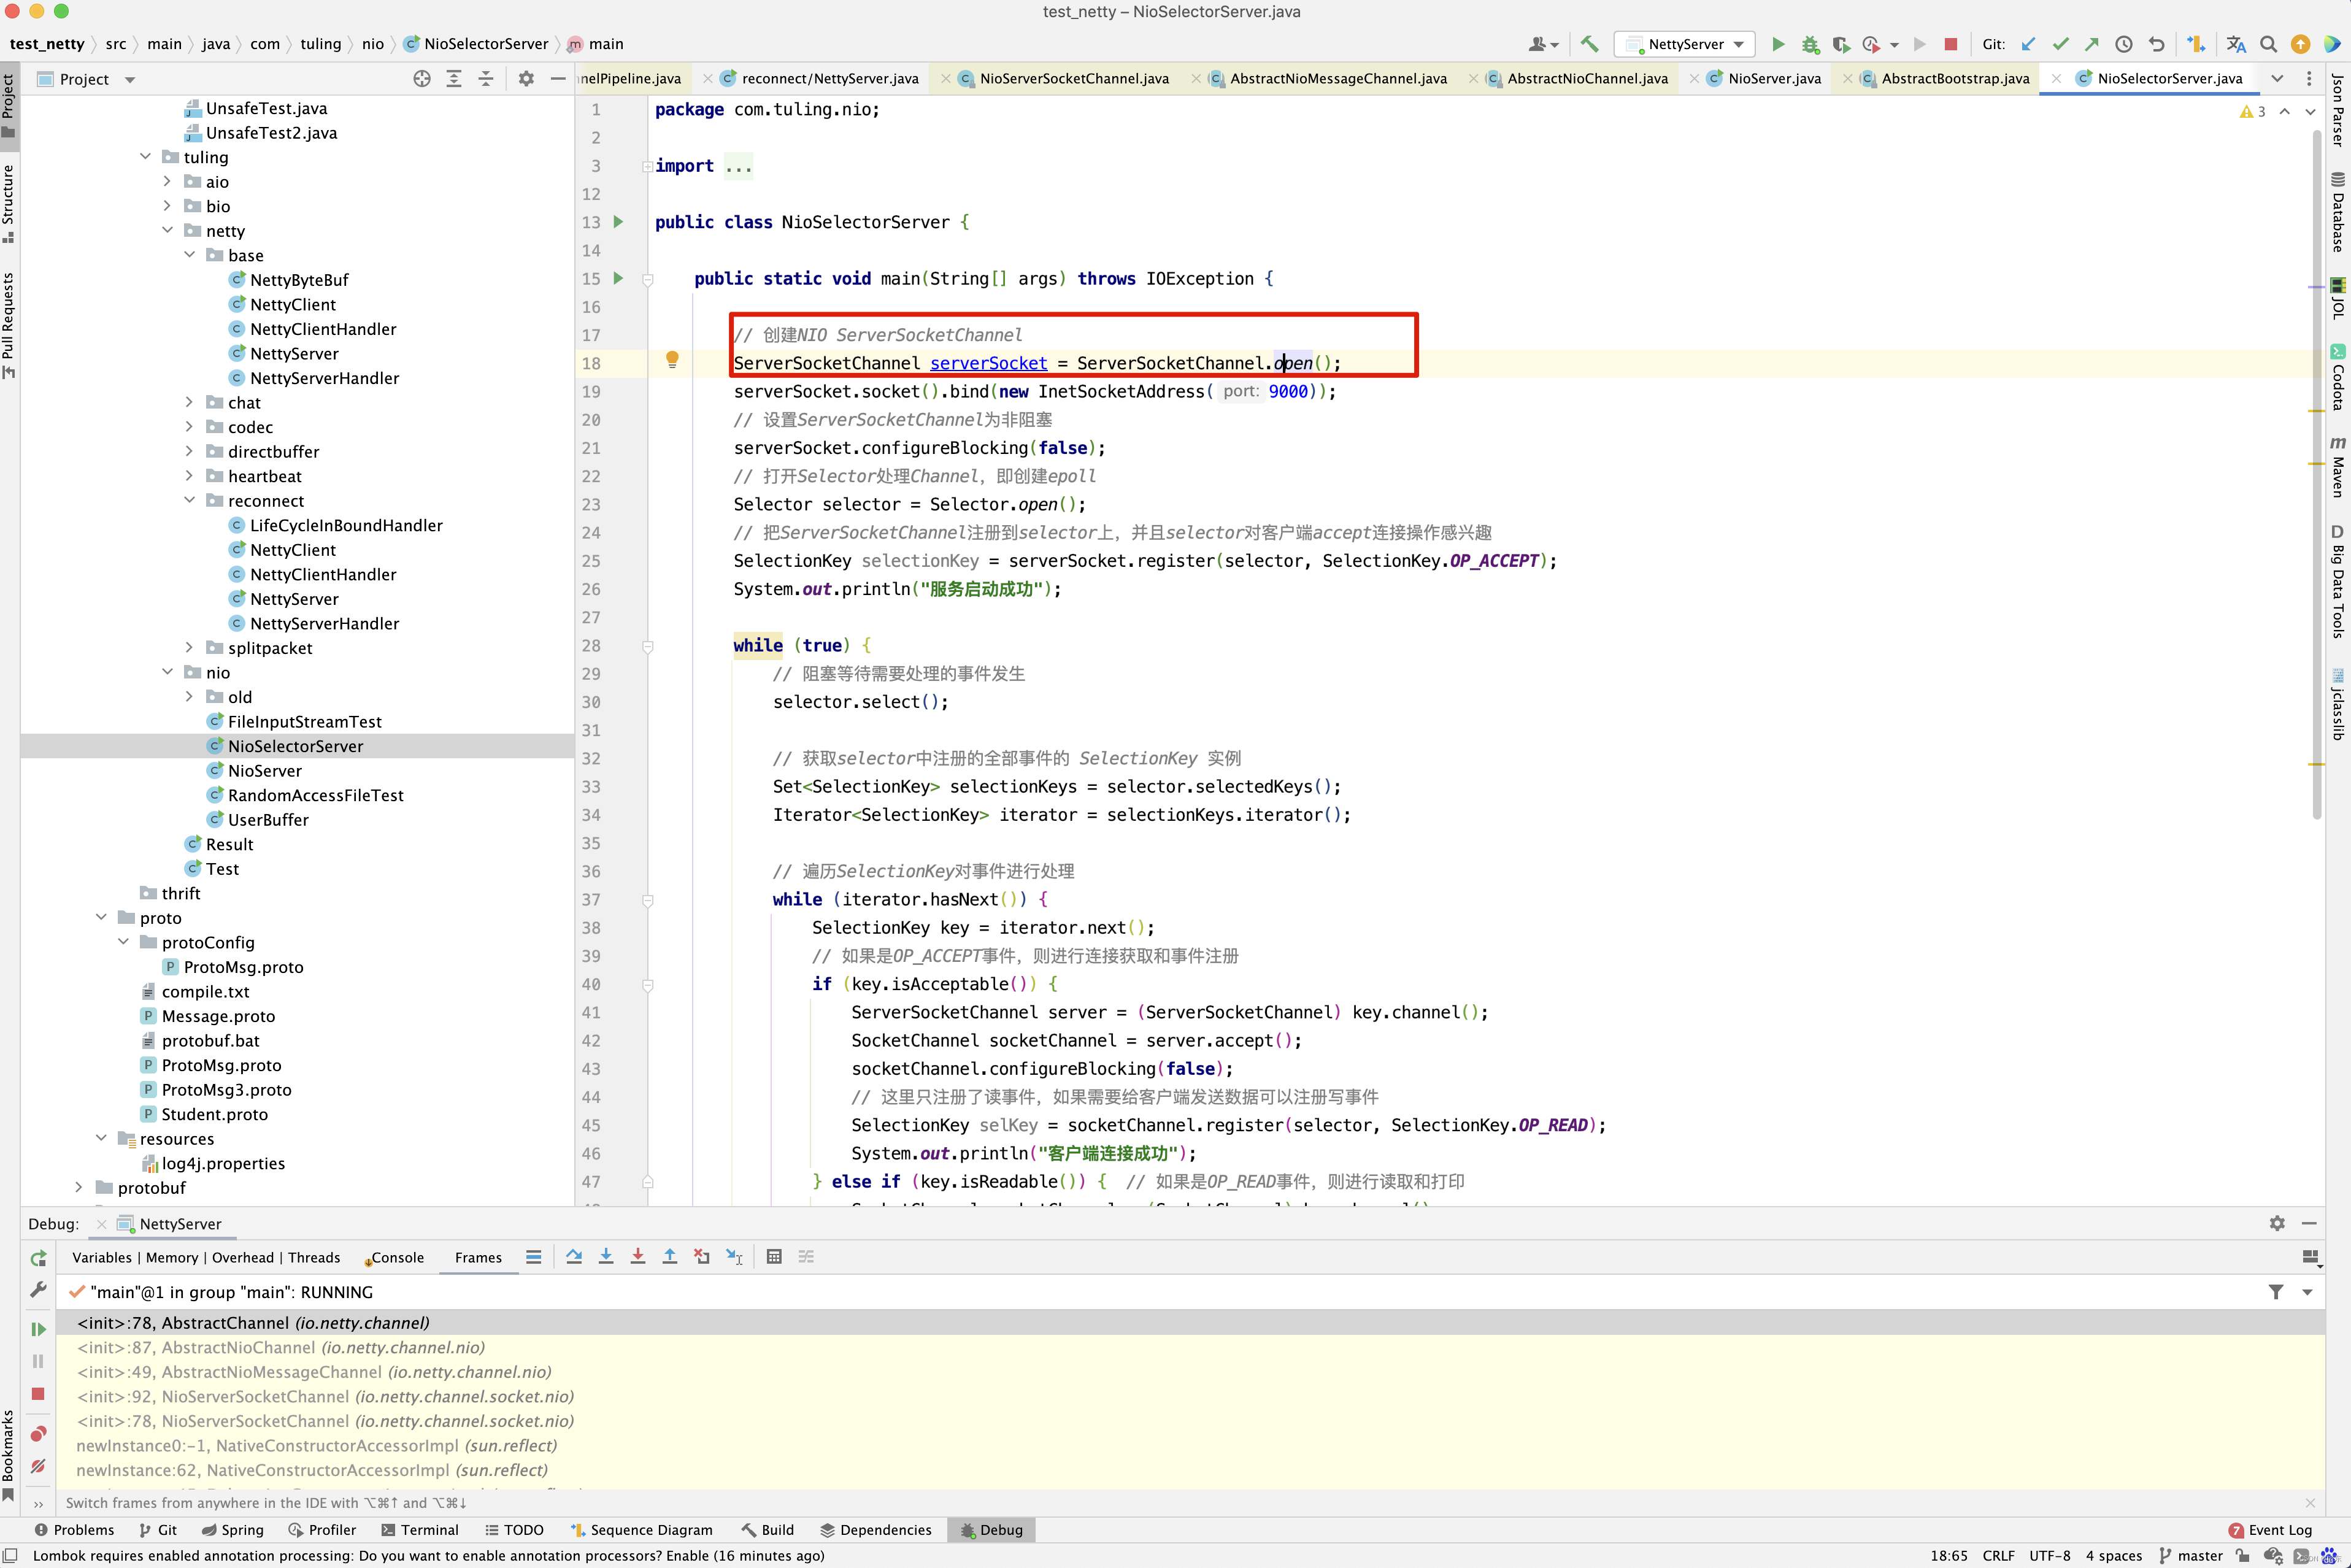
在之前的博客中分享过一个多路复用的例子,在这篇博客中,拿那个例子来分析,怎样分析呢?因为万变不离其中,Netty的内部源码也是由IO多路复用的例子演变而来,只要能从源码中找到例子中的代码,也就能弄懂Netty 的大体架构了。 将例子罢出来。
public class NioSelectorServer {

    public static void main(String[] args) throws IOException {
        // 创建NIO ServerSocketChannel
        ServerSocketChannel serverSocket = ServerSocketChannel.open();
        serverSocket.socket().bind(new InetSocketAddress(9000));
        // 设置ServerSocketChannel为非阻塞
        serverSocket.configureBlocking(false);
        // 打开Selector处理Channel,即创建epoll
        Selector selector = Selector.open();
        // 把ServerSocketChannel注册到selector上,并且selector对客户端accept连接操作感兴趣
        SelectionKey selectionKey = serverSocket.register(selector, SelectionKey.OP_ACCEPT);
        System.out.println("服务启动成功");
        while (true) {
            // 阻塞等待需要处理的事件发生
            selector.select();

            // 获取selector中注册的全部事件的 SelectionKey 实例
            Set<SelectionKey> selectionKeys = selector.selectedKeys();
            Iterator<SelectionKey> iterator = selectionKeys.iterator();

            // 遍历SelectionKey对事件进行处理
            while (iterator.hasNext()) {
                SelectionKey key = iterator.next();
                // 如果是OP_ACCEPT事件,则进行连接获取和事件注册
                if (key.isAcceptable()) {
                    ServerSocketChannel server = (ServerSocketChannel) key.channel();
                    SocketChannel socketChannel = server.accept();
                    socketChannel.configureBlocking(false);
                    // 这里只注册了读事件,如果需要给客户端发送数据可以注册写事件
                    SelectionKey selKey = socketChannel.register(selector, SelectionKey.OP_READ);
                    System.out.println("客户端连接成功");
                } else if (key.isReadable()) {  // 如果是OP_READ事件,则进行读取和打印
                    SocketChannel socketChannel = (SocketChannel) key.channel();
                    ByteBuffer byteBuffer = ByteBuffer.allocateDirect(128);
                    int len = socketChannel.read(byteBuffer);
                    // 如果有数据,把数据打印出来
                    if (len > 0) {
                        System.out.println("接收到消息:" + new String(byteBuffer.array()));
                    } else if (len == -1) { // 如果客户端断开连接,关闭Socket
                        System.out.println("客户端断开连接");
                        socketChannel.close();
                    }
                }
                //从事件集合里删除本次处理的key,防止下次select重复处理
                iterator.remove();
            }
        }
    }
}
先来看NioEventLoopGroup的构造函数 。
public NioEventLoopGroup(int nThreads) {
    this(nThreads, (Executor) null);
}
从这里可以看到,NioEventLoopGroup的构造函数的 Executor参数默认值为空。
public NioEventLoopGroup(int nThreads, Executor executor) {
    this(nThreads, executor, SelectorProvider.provider());
}
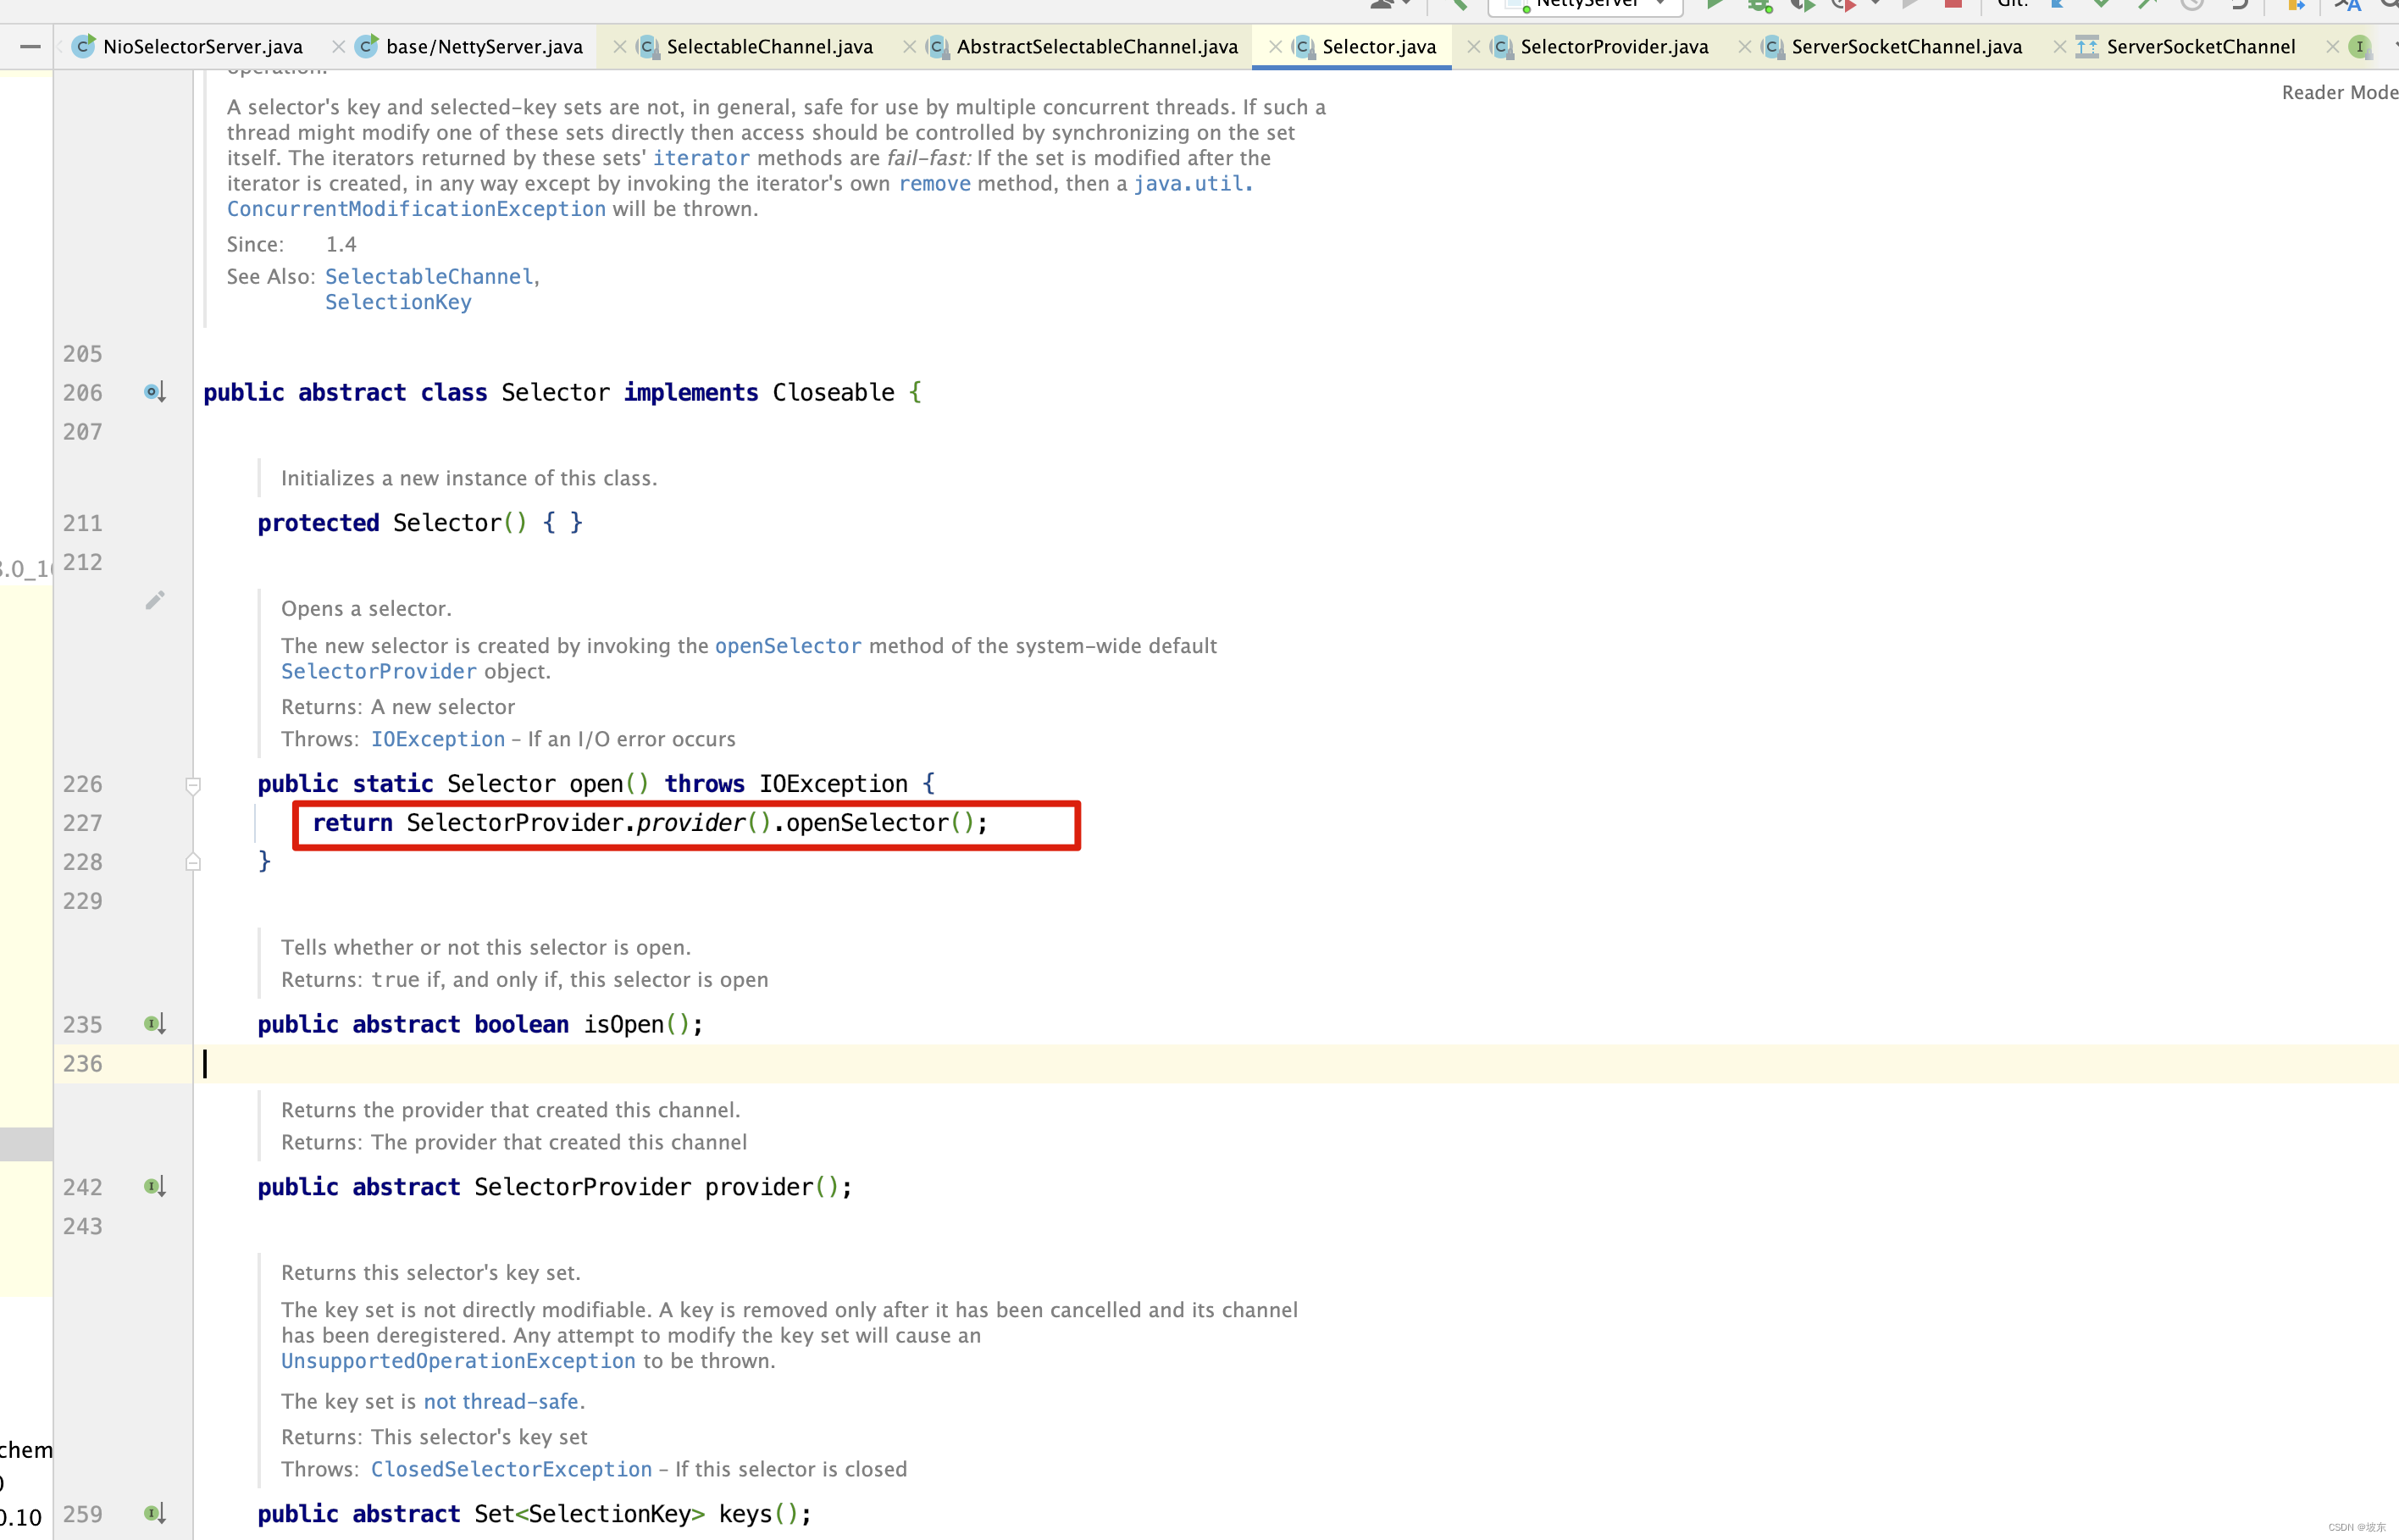
大家可能觉得SelectorProvider.provider()这个是什么东西 ?回头看一下NioSelectorServer的ServerSocketChannel serverSocket = ServerSocketChannel.open();这一行代码,
进入ServerSocketChannel的open()方法。
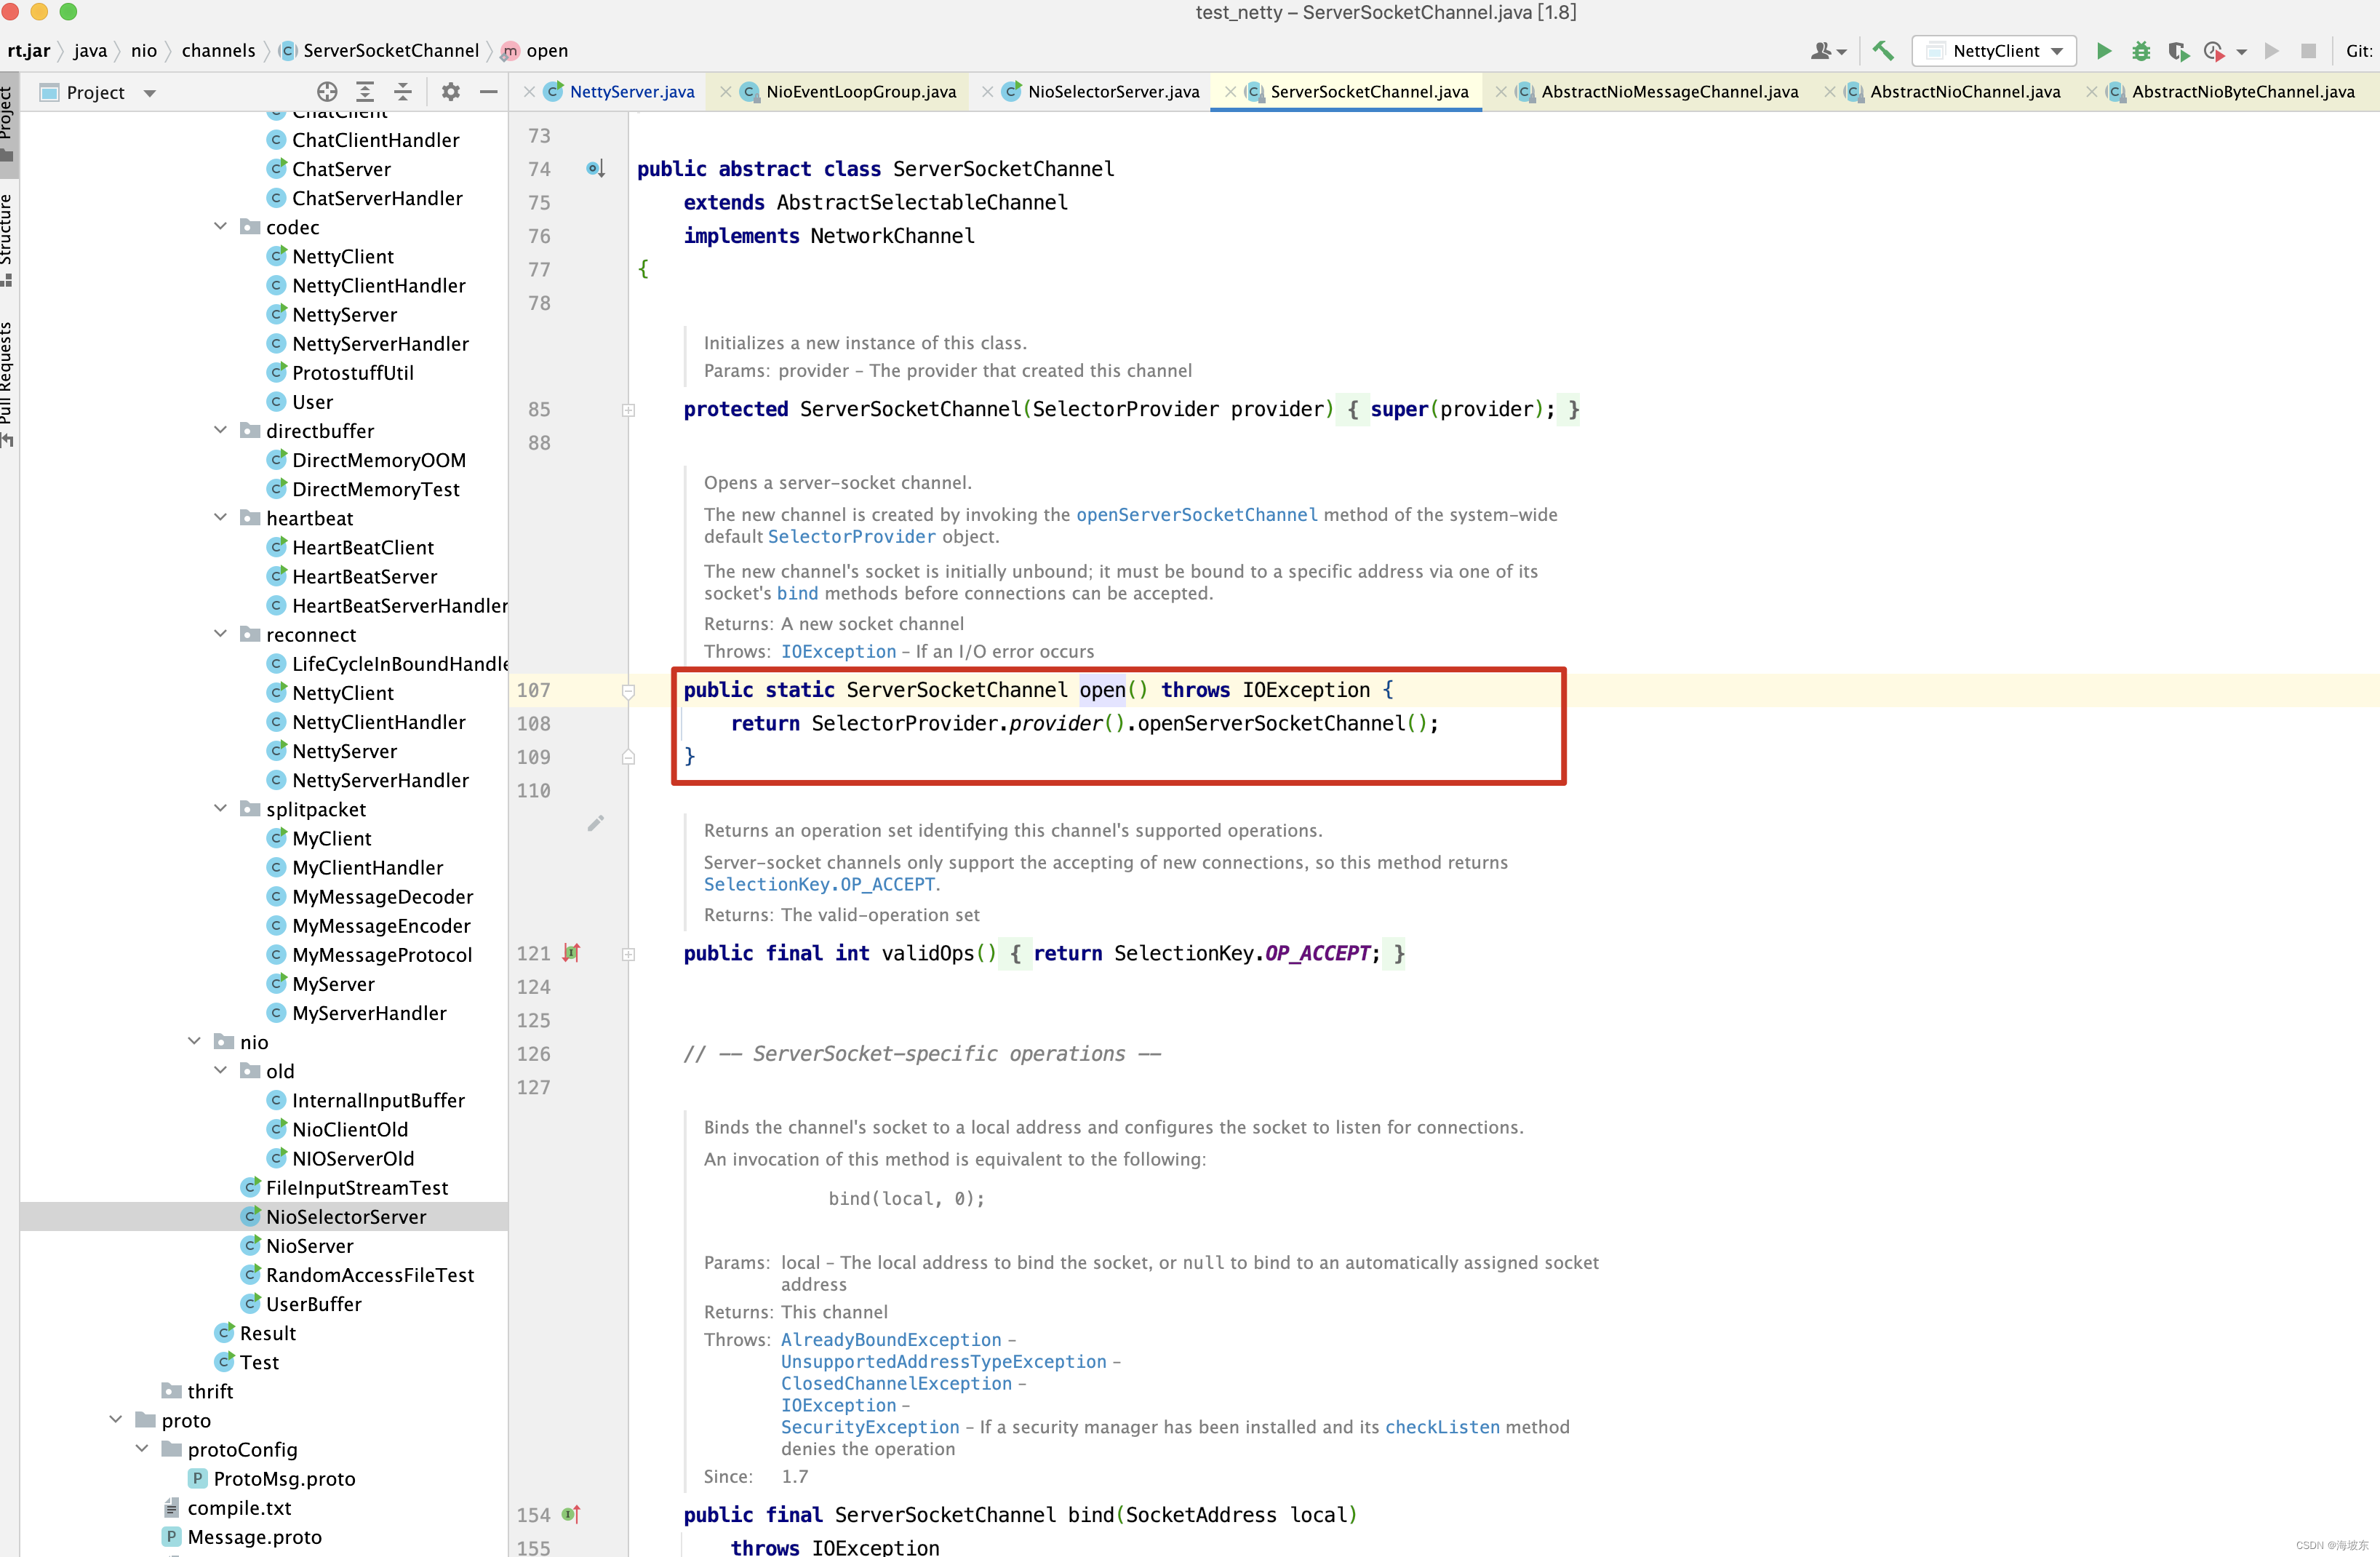
发现熟悉没有,创建ServerSocketChannel需要用到 SelectorProvider.provider(),而provider()方法的内部又是如何实现呢?
public static SelectorProvider provider() {
    synchronized (lock) {
        if (provider != null)
            return provider;
        return AccessController.doPrivileged(
            new PrivilegedAction<SelectorProvider>() {
                public SelectorProvider run() {
                        if (loadProviderFromProperty())
                            return provider;
                        if (loadProviderAsService())
                            return provider;
                        provider = sun.nio.ch.DefaultSelectorProvider.create();
                        return provider;
                    }
                });
    }
}
其中 provider = sun.nio.ch.DefaultSelectorProvider.create()会根据操作系统来返回不同的实现类, Windows平台返回 WindowsSelectorProvider; 而 if(provider!=null)return provider保证了整个Server程序中只有一个WindowsSelectorProvider对象,看WindowsSelectorProvider.openSelector() 代码 。
public AbstractSelector openSelector() throws IOException(){
	return new WindowsSelectorImpl(this);
}
new WindowsSelectorImpl() 的代码如下:
WindowsSelectorImpl(SelectorProvider sp) throws IOException {
	super(sp);
	pollWrapper = new PollArrayWrapper(INIT_CAP);
	wakeupPipe = Pipe.open();
	wakeupSourceFd = ((SelChImpl) wakeupPipe.source()).getFDVal();
	// Disable the Nagle algorithm so that the wakeup is more immediate
	SinkChannelImpl sink = (SinkChannelImpl)wakeupPipe.sink() ;
	(sink.sc).socket().setTcpNoDelay(true);
	wakeupSinkFd = ((SelChImpl)sink).getFDVal();
	pollWrapper.addWakeupSocket(wakeupSourceDf,0);
}
其中Pipe.open()是关键,这个方法在调用过程如下 。
public static Pipe open() throws IOException {
	return  SelectorProvider.provider().openPipe() ;
}
在SelectorProvider中,代码如下
public Pipe openPipe() throws IOException{
	return new PipeImpl(this);
}
再看一下PipeImpl()代码
PipeImpl(SelectorProvider var1) {
    long var2 = IOUtil.makePipe(true);
    int var4 = (int)(var2 >>> 32);
    int var5 = (int)var2;
    FileDescriptor var6 = new FileDescriptor();
    IOUtil.setfdVal(var6, var4);
    this.source = new SourceChannelImpl(var1, var6);
    FileDescriptor var7 = new FileDescriptor();
    IOUtil.setfdVal(var7, var5);
    this.sink = new SinkChannelImpl(var1, var7);
}
其中IOUtil.makePipe(true);是一个本地方法
static native long makePipe(boolean var0);
/**
Returns two file descriptors for a pipe encoded in a long The read end of the pipe is returned in the high 32 bits while the write end is returned in the low 32 bits.
*/
static native _org makePipe(boolean blocking);
static native long makePipe(boolean var0);
具体实现代码如下 :
JNIEXPORT jlong JNICALL  Java_sun_nio_ch_IOUtil_makePipe(JNIEnv * env , jobject  this,jboolean blocking ){
	int fd[2];
	if(pipe(cf) < 0 ){
		JNU_ThrowIOExceptionWithLastError(env , "Pipe failed");
		return 0 ;
	}
	if(blocking == JNI_FALSE){
		if((confiureBlocking(fd[0[ , JNI_FALSE) < 0 )
				|| (configureBlocking(fd[1],JNI_FALSE) < 0 )){
				JNU_ThrowIOExceptionWithLastError(env, "Configure blocking failed ");
				close(fd[0]);
				close(fd[1]);
				return 0 ;
		}
	}
	return ((jlong) fd[0] << 32 ) | (jlong) fd[1] ;
}

static int configureBlocking(int fd , jboolean blocking){
	int flags = fcntl(fd,F_GETFL);
	int newflags = blocking? (flags ~ O_NONBLOCK) : (flags | O_NONBBLOCK) ;
	return (flags == newflags) ? 0 : fcntl(fd,F_SETFL,newflags);
}
正如下面这段注释所描述的内容 。
/**
- Returns two file descriptors for a pipe encoded in a long . the read end of the pipe is returned in the high 32 bits, while the write end is returned in the slo 32 bits。
*/
pollWrapper.addWakeupSocket(wakeupSourceFd,0);
这行代码把返回的Pipe的write端的FD放在pollWrapper中,后面会发现这么做的是为了实现Selector的wakeup();
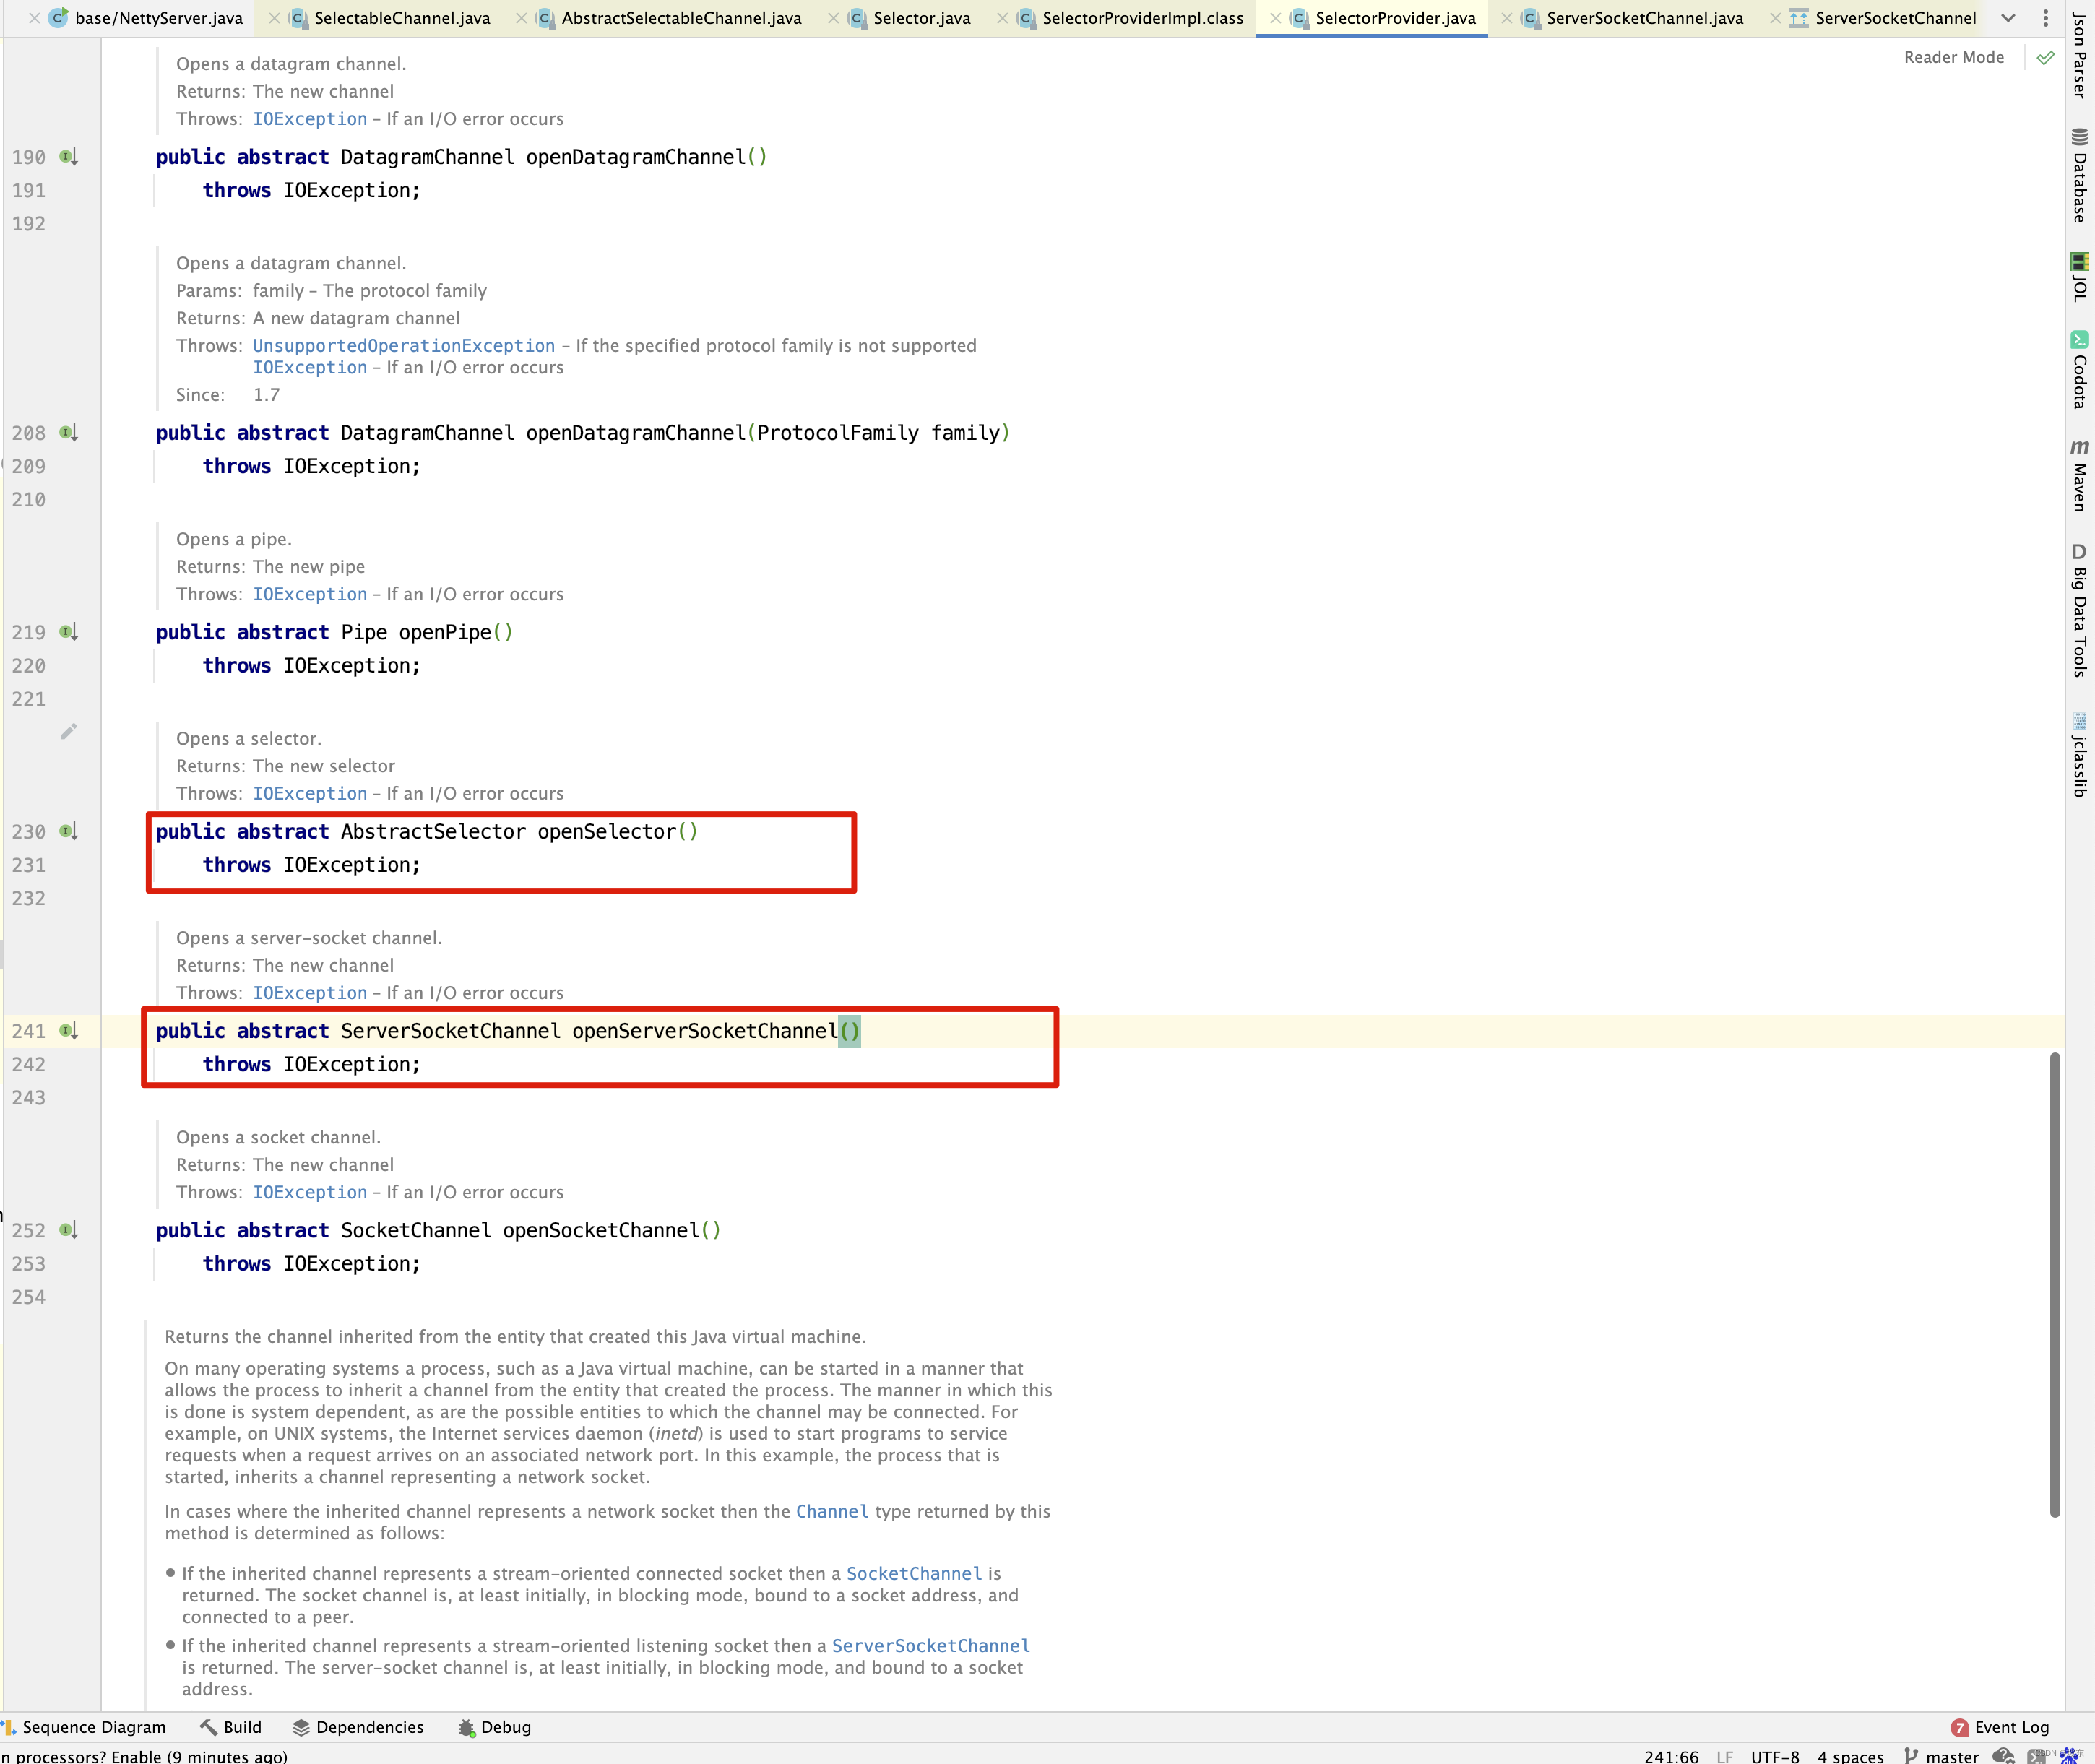
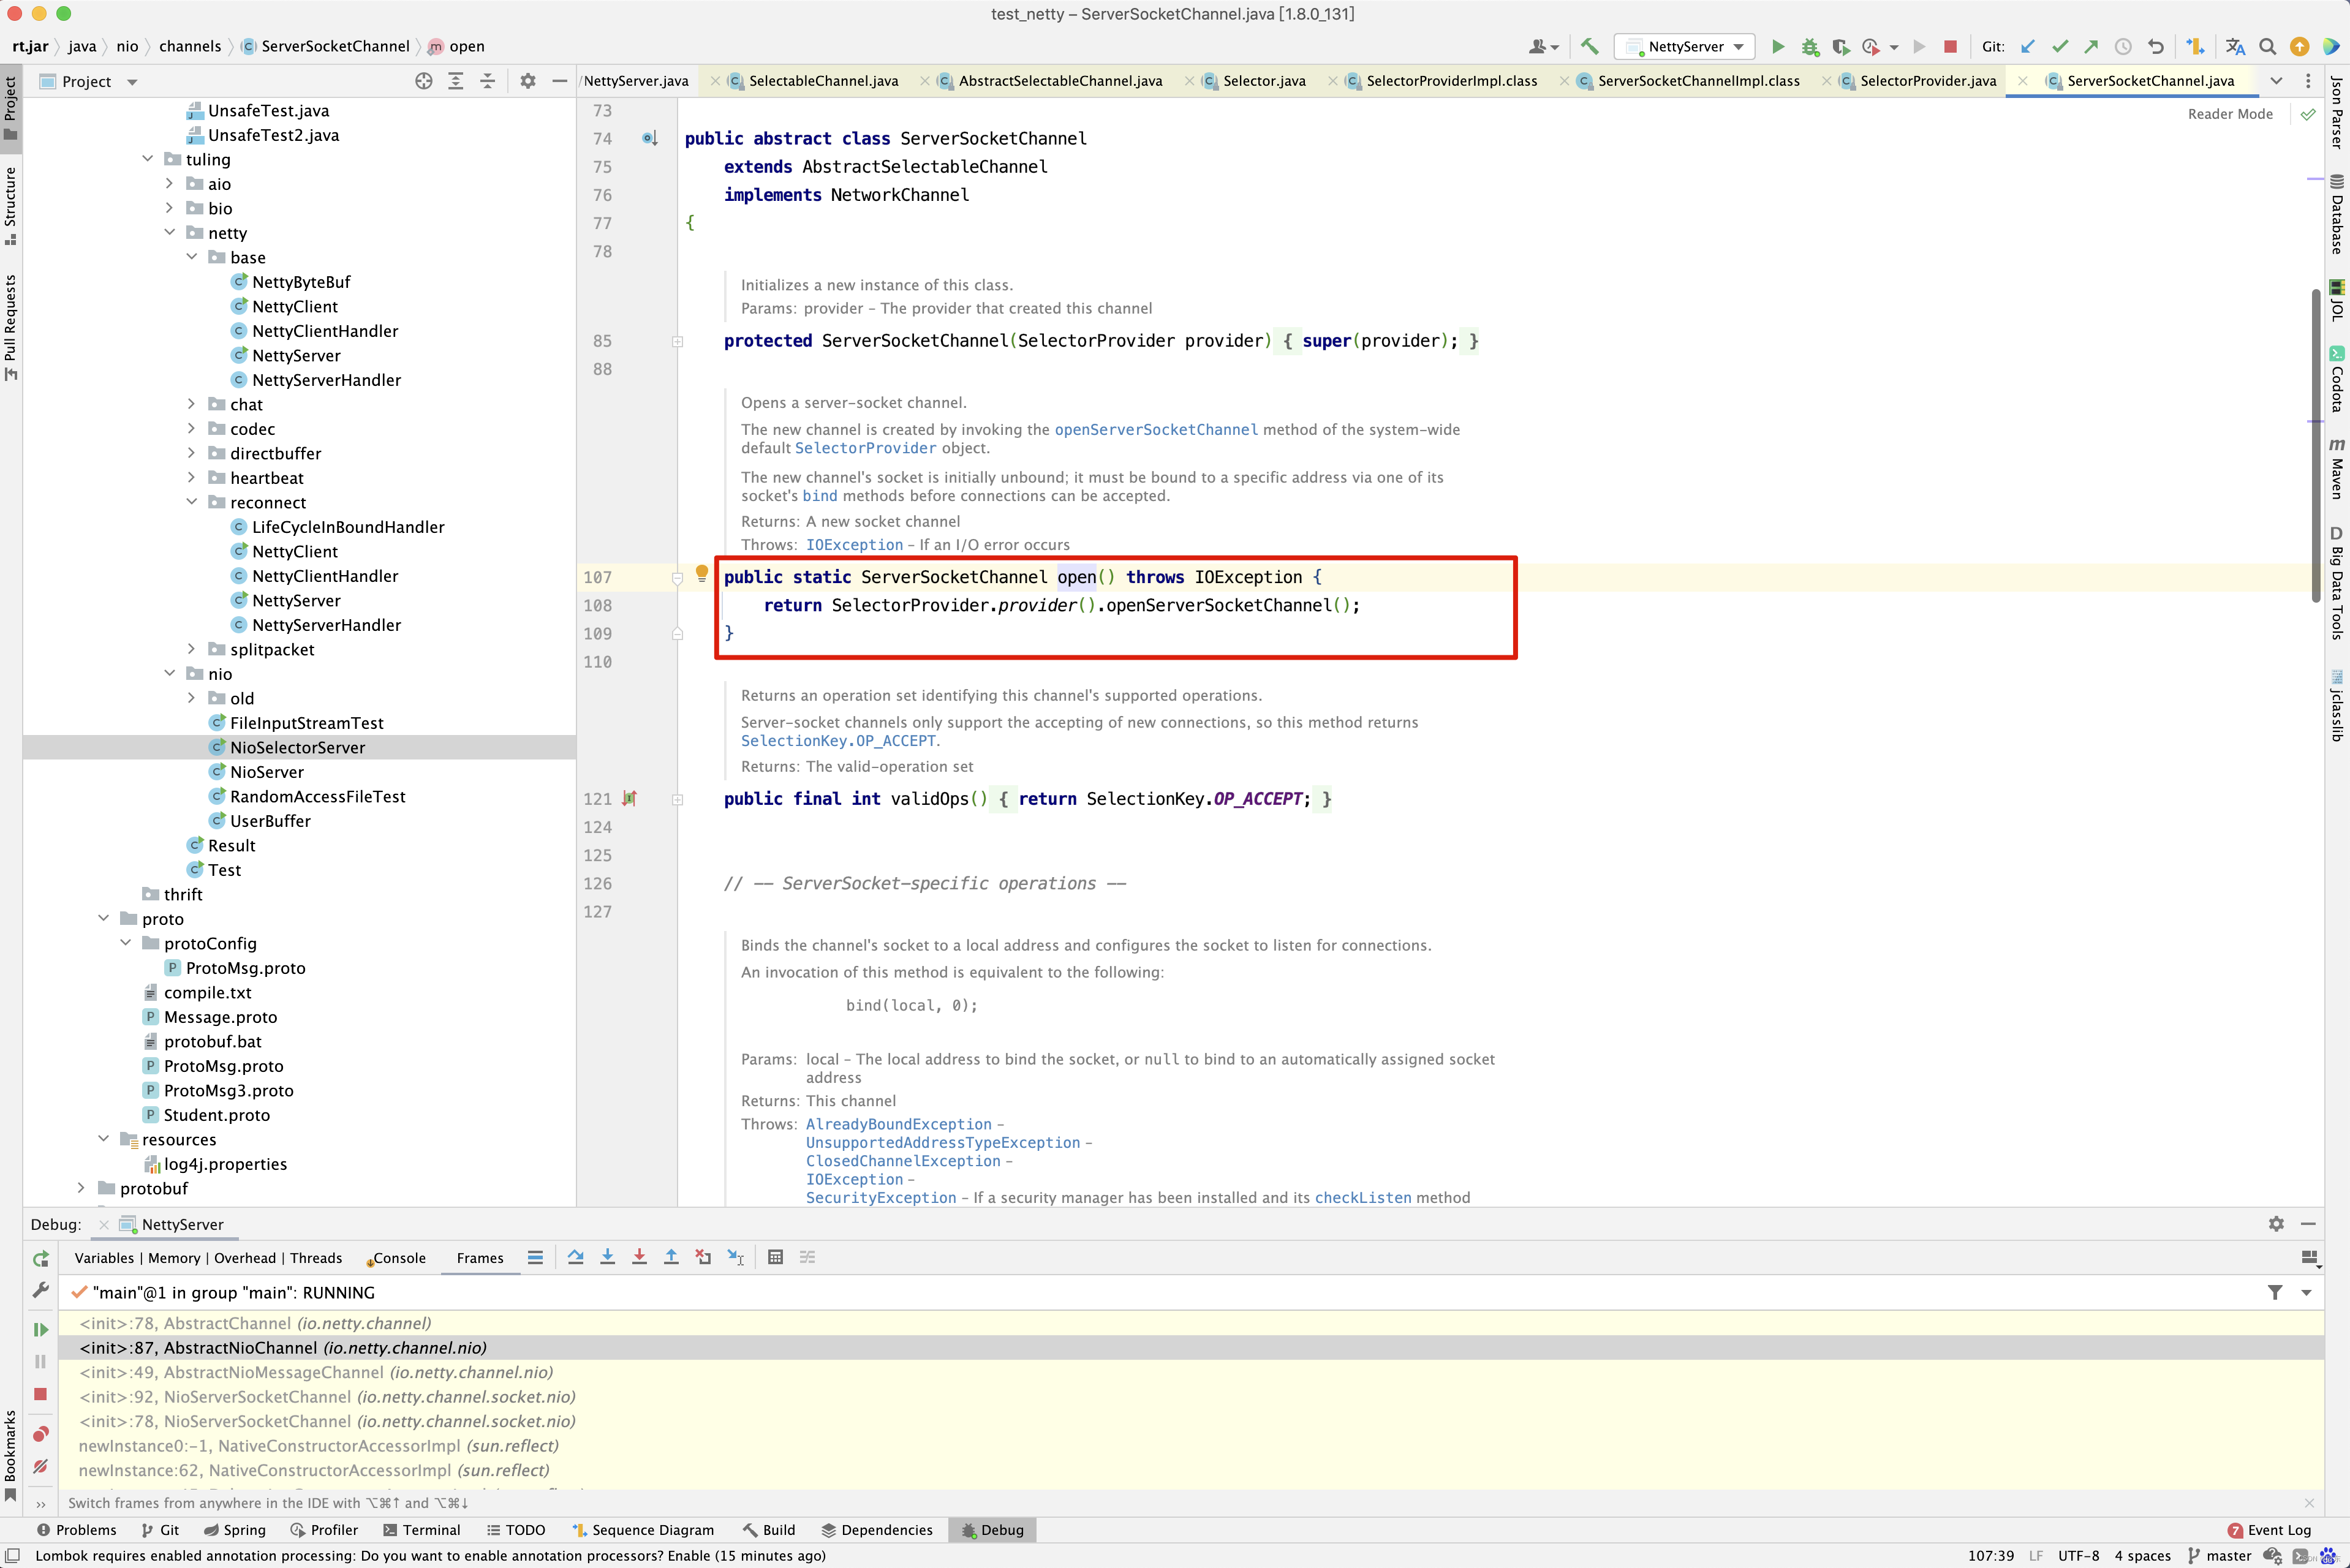
ServerSocketChannel.open() 的实现代码如下。
public static ServerSocketChannel open() throws IOException {
    return SelectorProvider.provider().openServerSocketChannel();
}
SelectProvider的实现代码如下
public ServerSocketChannel openServerSocketChannel() throws IOException {
    return new ServerSocketChannelImpl(this);
}
可见ServerSocketChannel也有WindowsSelectorImpl 的引用 。
ServerSocketChannelImpl(SelectorProvider var1) throws IOException {
    super(var1);
    this.fd = Net.serverSocket(true);
    this.fdVal = IOUtil.fdVal(this.fd);
    this.state = 0;
}
然后通过serverSocket.register(selector, SelectionKey.OP_ACCEPT);把Selector和Channel 绑定在一起, 也就是把新建ServerSocketChannel时创建的FD 与Selector绑定在一起。
到此,Server 端已经启动完成,主要创建以下对象 。
- WindowsSelectorProvider :为单例对象,实际上是调用操作系统的API 。
- WindowsSelectorImpl 中包含了如下内容 。
- pollWrapper : 保存Selector上注册的FD, 包括pipe的write端FD 和 ServerSocketChannel 所用的FD 。
- wakeupPipe : 通道 其实就是两个FD,一个是Read端的, 一个是write端的)。
下面来看看Selector的select()方法,selector.select()主要调用WindowsSelectorImpl中的doSelect()方法 。
protected in doSelect( long timeout) throws IOException {
	if(channelArray == null){
		throw new ClosedSelectorException();
	}
	this.timeout = timeout ;// set selector timeout
	processDeregisterQueue() ;
	if(iterruptTriggered){
		resetWakeupSocket();
		return 0 ;
	}
	adjustThreadsCount();
	finishedLock.reset();
	startLock.startThreads();
	try{
		begin();
		try{
			subSelector.poll();
		}catch(IOException e ){
			finishLock.setException(e);
		}
		if(threads.size() > 0 ){
			finishLock.waitForHelperThreads();
		}
	}finally{
		end ();
	}
	finishLock.checkForExceptoin();
	processDeregisterQueue();
	int updated = updateSelectedKeys();
	resetWakeupSocket();
	return updated ;
}
其中subSelector.poll()是核心,也就是轮询pollWrapper中保存的FD , 具体实现是调用 native方法的poll0();
private int poll() throws IOException{
	return poll0(pollWrapper.pollArrayAddress, Math.min(totalChannels, MAX_SELLECTABLE_FDS), readFds, writeFds,exceptFds, timeout);
}

private native int poll0(int pollAddress,int numfds,itn [] readFds,itn [] writeFds, int [] exceptFds ,long timeout);


// the first element of each array is the number of selected sockets
// Other elements are file descriptors of selected sockets
private final int [] readFds = new int [MAX_SELECTABLE_FDS + 1 ] ; // 保存发生read的FD
private final int [] writeFds = new int[MAX_SELECTABLE_FDS + 1 ] ; // 保存发生write 的FD
private final int [] exceptFds = new int [MAX_SELECTABLE_FDS + 1 ] ; // 保存发生在except 的FD
poll0()会监听pollWrapper中的FD 有没有数据进出, 这会造成I/O 阻塞,直到有数据读写事件发生,比如,由于 pollWrapper 中保存的也有ServerSocketChannel 的FD ,所以只要ClientSocket发一份数据到ServerSocket ,那么poll0()就会返回,又由于 pollWrapper 中保存的也有pipe的write端PD ,所以只要pipe的write端向FD 发送一份数据,也会造成poll0()返回, 如果这两种情况都没有发生,那么poll0()就会一直阻塞,也就是selector.select()会一直阻塞,如果有任何一种情况发生,那么selector.select()就会返回,所以在OperationServer的run()里要用while(true) ,这样就可以保证Selector接收数据并处理完后继续监听poll() 。
再来看WindowsSelectorImpl.Wakeup();
public Selector wakeup(){
	synchronized(interruptLock) {
		if(! interruptTriggered){
			setWakeupSocket();
			  interruptTriggered = true;
		}
	}
	return this;
}

private void setWakeupSocket(){
	setWakeupSocket0(wakeupSinkFd);
}

private native void  setWakeupSocket0(itn wakeupSinkFd);

JNIEXPORT void JNICALL
Java_sun_nio_ch_WindowsSelectorImpl_setWakeupSocket0(JNIENV * env ,jclass this ,jint scoutFd ){
	/**Write on byte into the pipe */
	const char byte = 1 ;
	send(scoutFd , &byte , 1 , 0 );
}
可见wakeup()是通过pipe的write端send(soutFd, &byte , 1 ,0 ) 发送一个字节 1 , 来唤醒 poll()的所以在需要的时候就可以调用selector.wakeup()来唤醒Selector 。
继续接着NioEventLoopGroup的构造函数来看。
public NioEventLoopGroup(int nThreads, Executor executor, final SelectorProvider selectorProvider,
                         final SelectStrategyFactory selectStrategyFactory) {
    super(nThreads, executor, selectorProvider, selectStrategyFactory, RejectedExecutionHandlers.reject());
}


public NioEventLoopGroup(int nThreads, Executor executor, final SelectorProvider selectorProvider,
                         final SelectStrategyFactory selectStrategyFactory) {
    super(nThreads, executor, selectorProvider, selectStrategyFactory, RejectedExecutionHandlers.reject());
}
这里会发现 ,当NioEventLoopGroup调用super()方法时,实际上调用的是MultithreadEventLoopGroup类的构造函数,那他们之间的关系是什么呢?
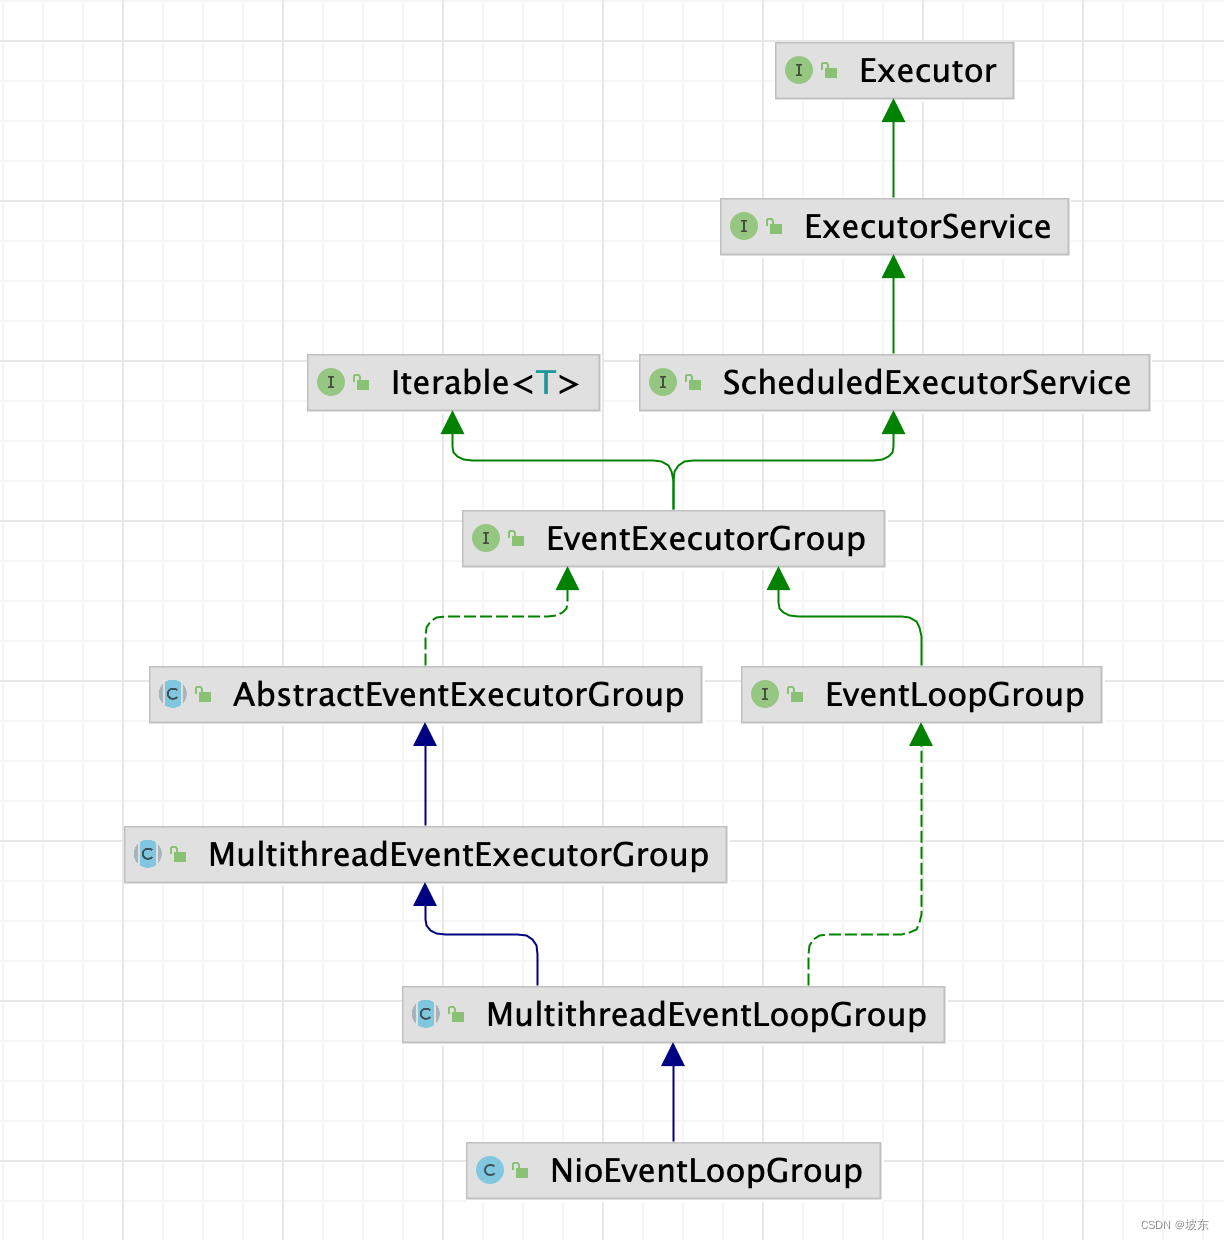
protected MultithreadEventLoopGroup(int nThreads, Executor executor, Object... args) {
    super(nThreads == 0 ? DEFAULT_EVENT_LOOP_THREADS : nThreads, executor, args);
}

private static final int DEFAULT_EVENT_LOOP_THREADS;

static {
    DEFAULT_EVENT_LOOP_THREADS = Math.max(1, SystemPropertyUtil.getInt(
            "io.netty.eventLoopThreads", NettyRuntime.availableProcessors() * 2));

    if (logger.isDebugEnabled()) {
        logger.debug("-Dio.netty.eventLoopThreads: {}", DEFAULT_EVENT_LOOP_THREADS);
    }
}
在这里需要注意DEFAULT_EVENT_LOOP_THREADS这个变量,当我们不传nThreads值时,也没有配置io.netty.eventLoopThreads变量,默认nThreads的值为NettyRuntime.availableProcessors() * 2 ,处理器个数的两倍,继续看MultithreadEventExecutorGroup的构造函数。
protected MultithreadEventExecutorGroup(int nThreads, Executor executor, Object... args) {
    this(nThreads, executor, DefaultEventExecutorChooserFactory.INSTANCE, args);
}
当然DefaultEventExecutorChooserFactory.INSTANCE 默认是DefaultEventExecutorChooserFactory,后面用到再来分析 。 进入MultithreadEventExecutorGroup的构造方法 。
protected MultithreadEventExecutorGroup(int nThreads, Executor executor,
                                        EventExecutorChooserFactory chooserFactory, Object... args) {
    // 如果线程数小于等于0,则抛出异常
    if (nThreads <= 0) {
        throw new IllegalArgumentException(String.format("nThreads: %d (expected: > 0)", nThreads));
    }

    if (executor == null) {
        executor = new ThreadPerTaskExecutor(newDefaultThreadFactory());
    }

    children = new EventExecutor[nThreads];

    for (int i = 0; i < nThreads; i ++) {
        boolean success = false;
        try {
            children[i] = newChild(executor, args);
            success = true;
        } catch (Exception e) {
            // TODO: Think about if this is a good exception type
            throw new IllegalStateException("failed to create a child event loop", e);
        } finally {
            if (!success) {
                for (int j = 0; j < i; j ++) {
                    children[j].shutdownGracefully();
                }

                for (int j = 0; j < i; j ++) {
                    EventExecutor e = children[j];
                    try {
                        while (!e.isTerminated()) {
                            e.awaitTermination(Integer.MAX_VALUE, TimeUnit.SECONDS);
                        }
                    } catch (InterruptedException interrupted) {
                        // Let the caller handle the interruption.
                        Thread.currentThread().interrupt();
                        break;
                    }
                }
            }
        }
    }

    chooser = chooserFactory.newChooser(children);

    final FutureListener<Object> terminationListener = new FutureListener<Object>() {
        @Override
        public void operationComplete(Future<Object> future) throws Exception {
            if (terminatedChildren.incrementAndGet() == children.length) {
                terminationFuture.setSuccess(null);
            }
        }
    };

    for (EventExecutor e: children) {
        e.terminationFuture().addListener(terminationListener);
    }

    Set<EventExecutor> childrenSet = new LinkedHashSet<EventExecutor>(children.length);
    Collections.addAll(childrenSet, children);
    readonlyChildren = Collections.unmodifiableSet(childrenSet);
}
先来看executor = new ThreadPerTaskExecutor(newDefaultThreadFactory());
这一行代码,当executor为空时,会默认创建ThreadPerTaskExecutor作为executor,而ThreadPerTaskExecutor的代码如下
public final class ThreadPerTaskExecutor implements Executor {
    private final ThreadFactory threadFactory;

    public ThreadPerTaskExecutor(ThreadFactory threadFactory) {
        if (threadFactory == null) {
            throw new NullPointerException("threadFactory");
        }
        this.threadFactory = threadFactory;
    }

    @Override
    public void execute(Runnable command) {
        threadFactory.newThread(command).start();
    }
}
从ThreadPerTaskExecutor的源码中,我们看到了什么呢?传入了一个线程工厂threadFactory,每一次执行execute()方法时,会调用
threadFactory.newThread(command) 返回一个线程,并且调用线程的start()方法启动线程,这个和线程池相似,但是有区分 。
先来看一个例子,线程池的使用。
ThreadPoolExecutor executor =  new ThreadPoolExecutor(0, Integer.MAX_VALUE,
        60L, TimeUnit.SECONDS,
        new SynchronousQueue<Runnable>());

executor.submit(new Runnable() {
    @Override
    public void run() {
        System.out.println("111111");
    }
});
接下来看,线程池是如何调用的。
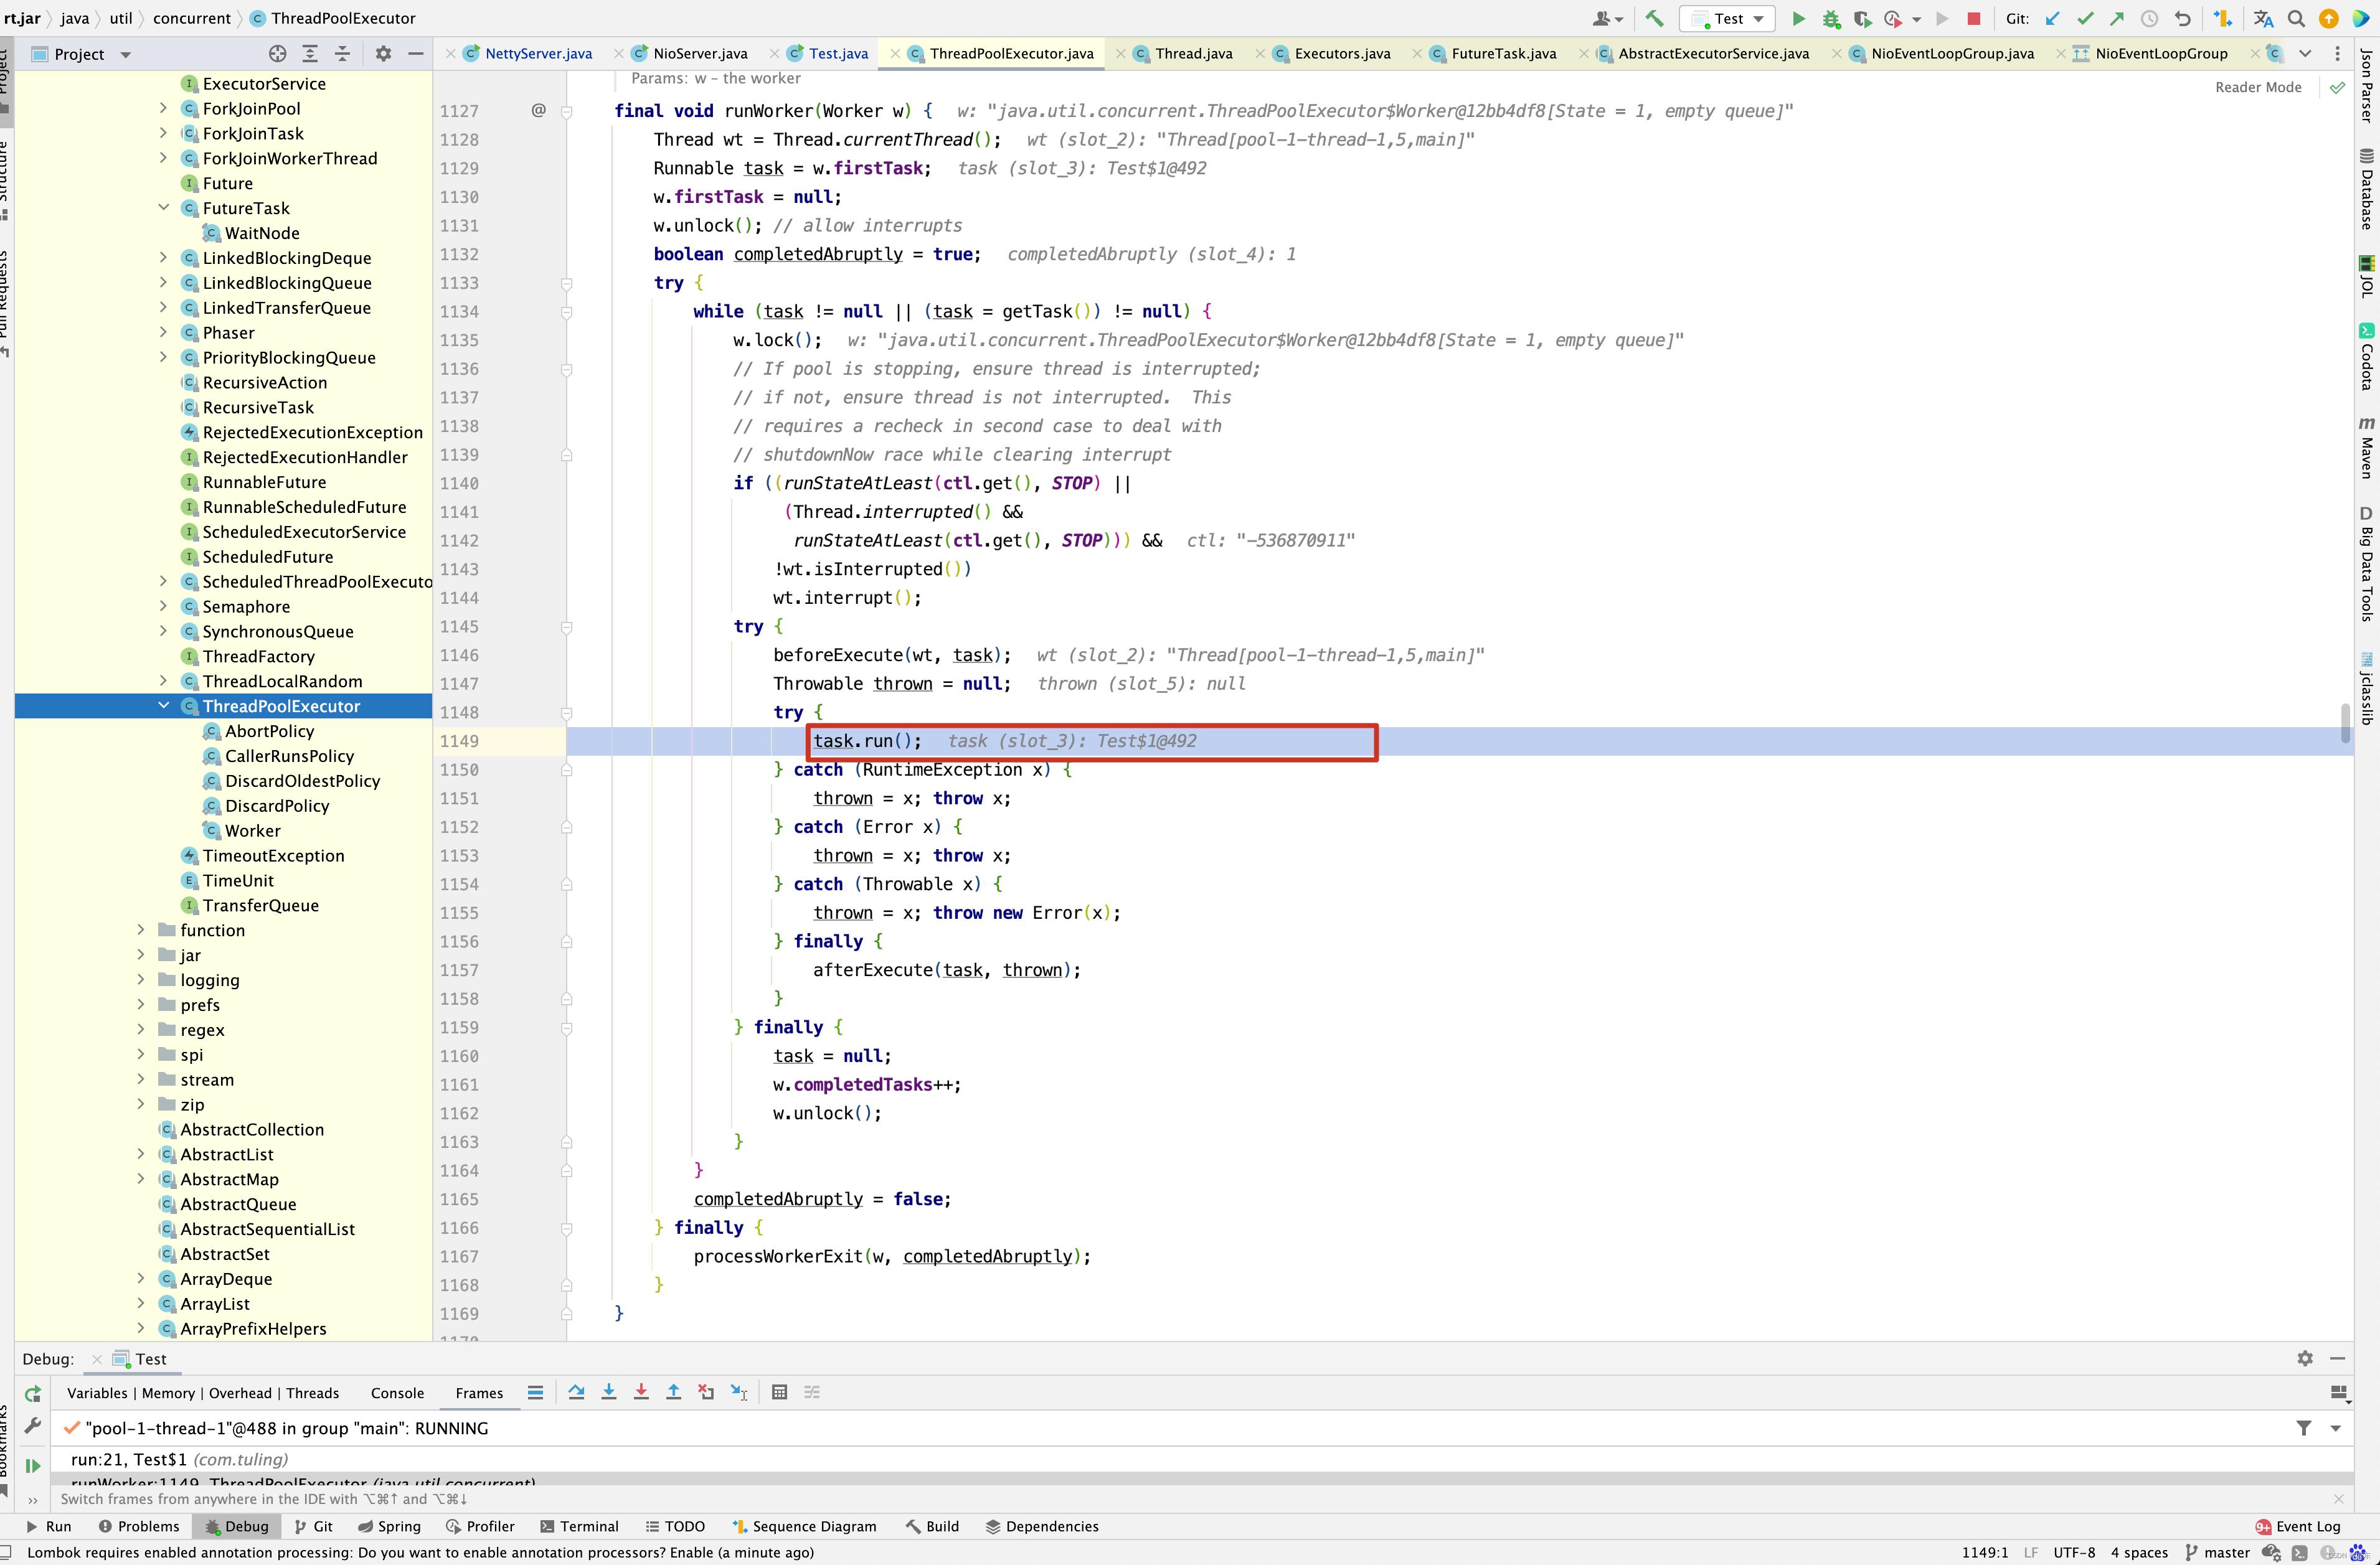
上述代码中有两段代码需要注意,如下
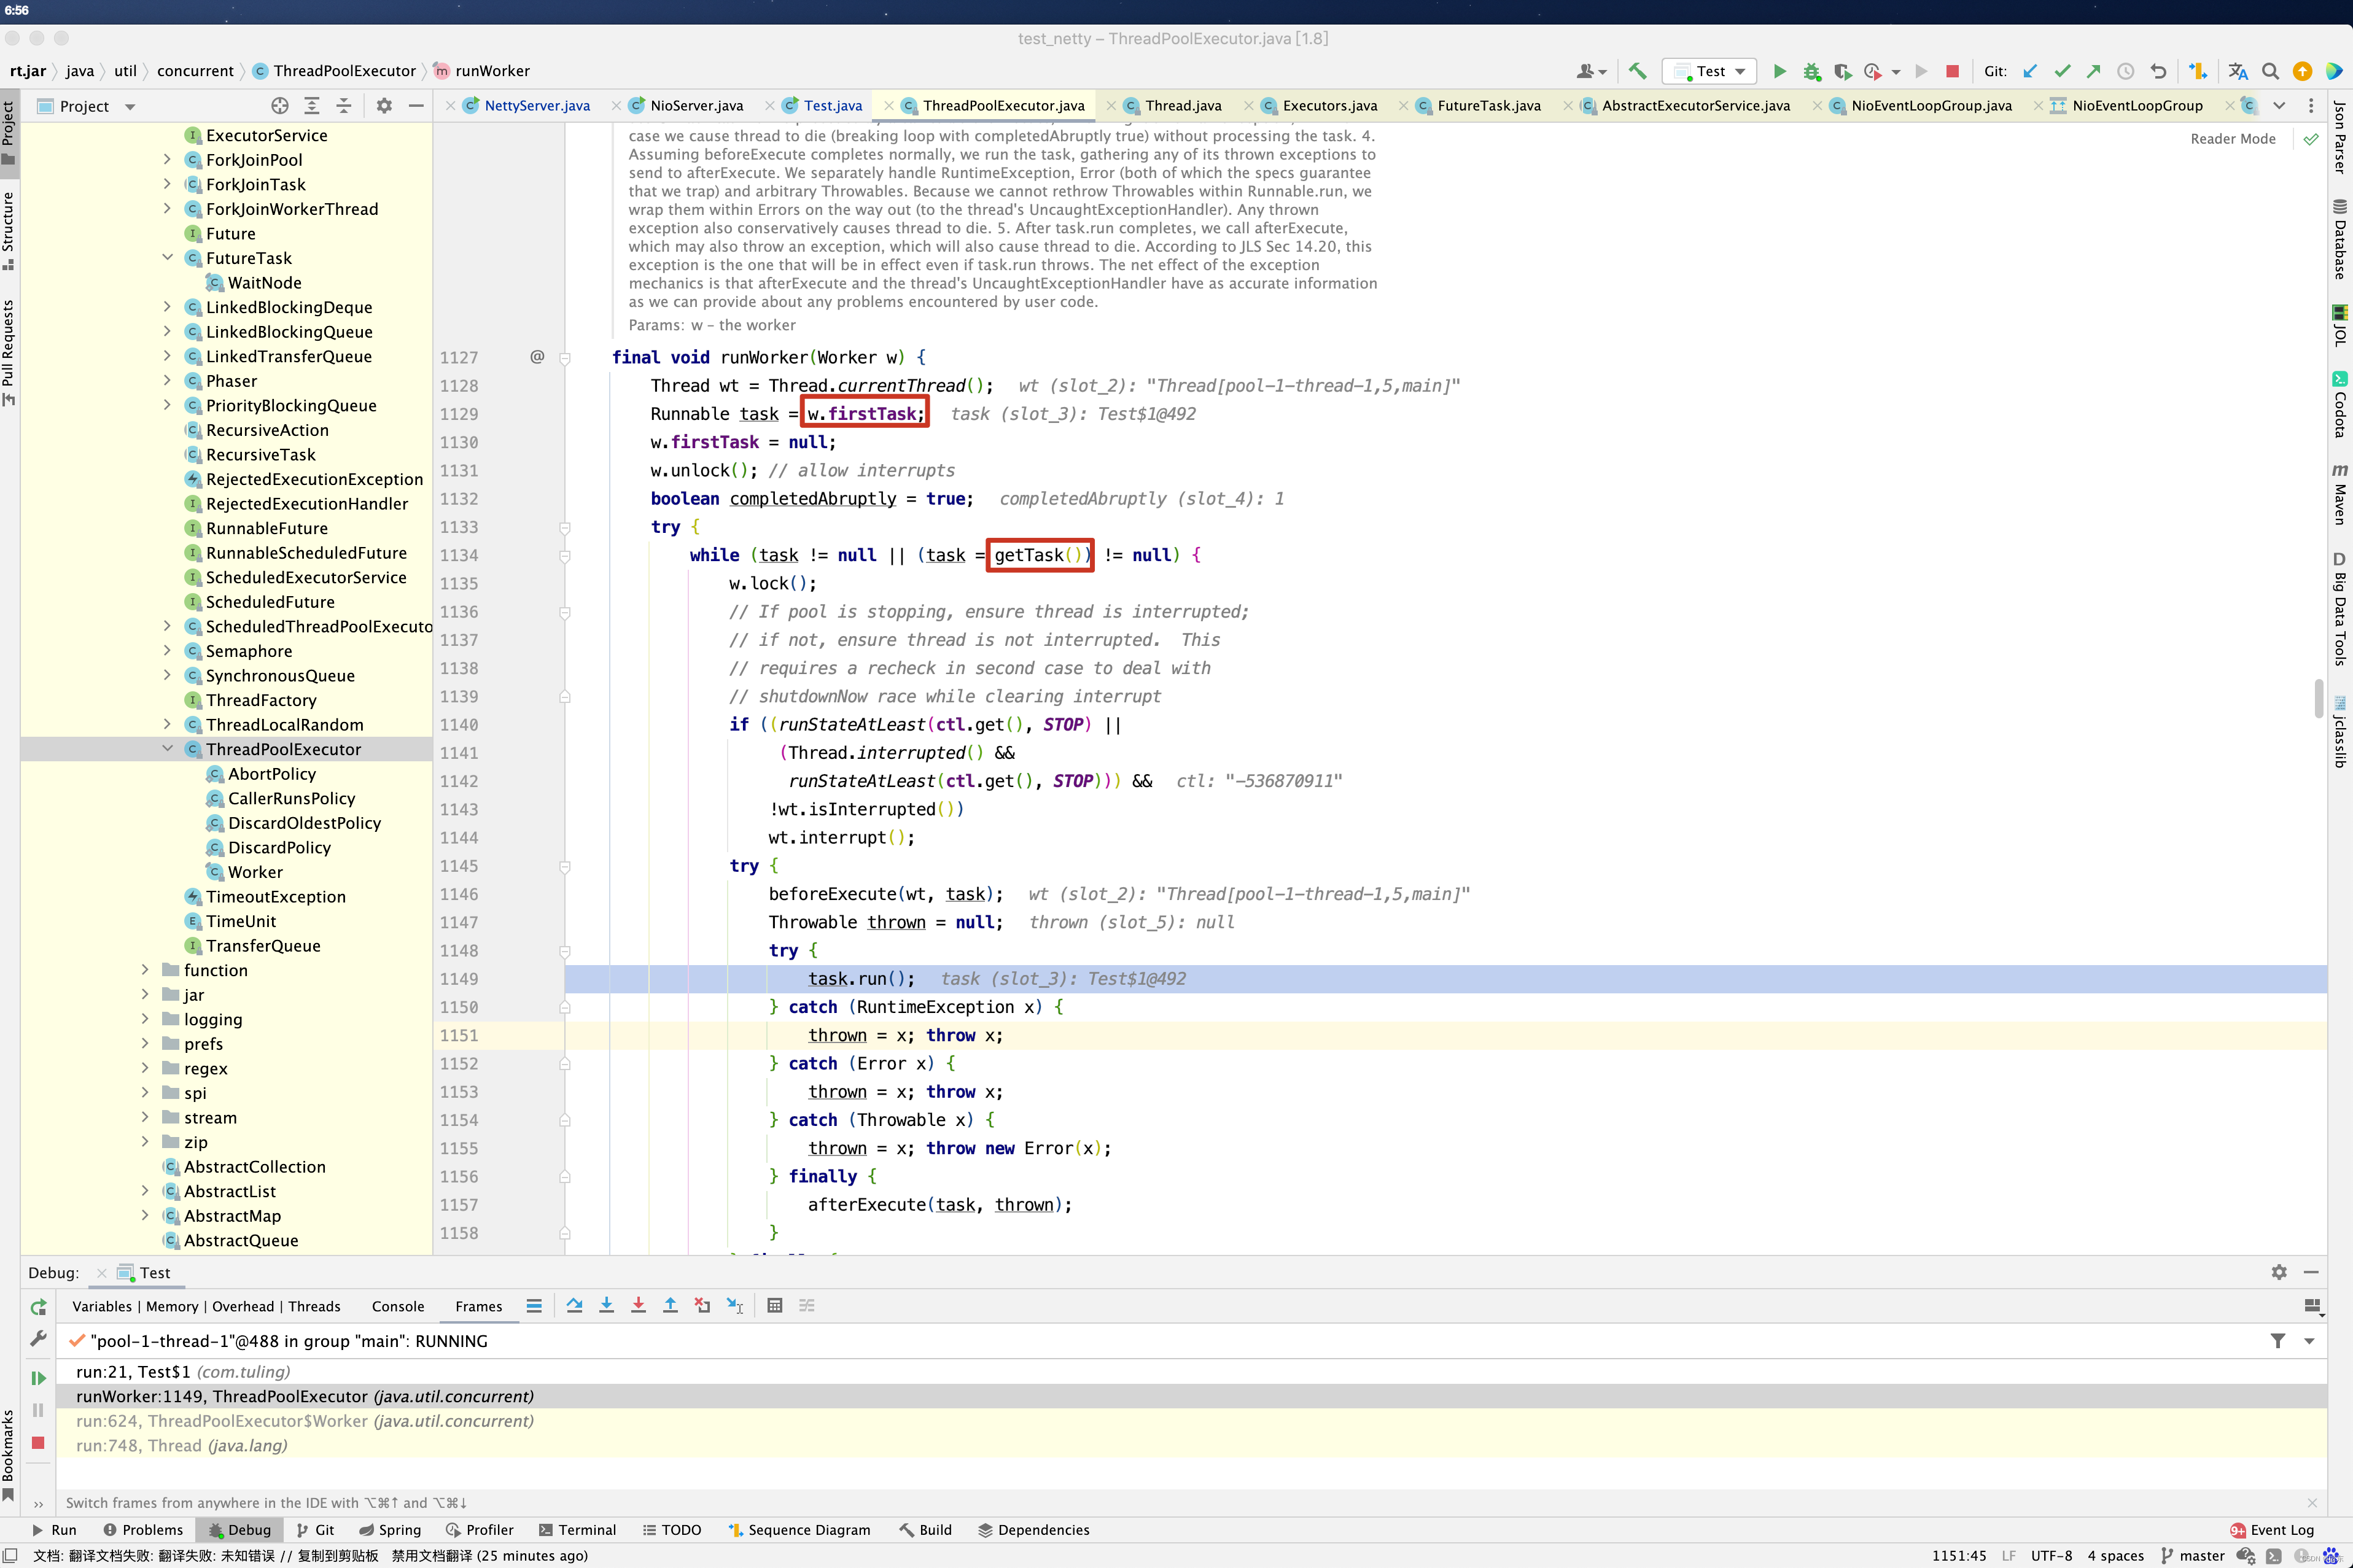
一个是w.firstTask,另外一个是getTask(),这两个代码段有何意义呢?我们需要从线程池的原理来分析,当线程池中的线程未达到核心线程数时,此时向线程池中添加新任务,此时线程池会创建一个新的线程,而这个新的任务被存储在w.firstTask中,新创建的线程会调用任务的run()方法,当执行完第一个任务后,如果此时有新任务加到线程池中,刚刚创建的线程是不会接收新加的任务的,只会调用getTask()方法从等待队列中获取任务,如果没有获取任务,则阻塞等待,如果获取到新任务,则会调用任务的run()方法,这就是上述代码的大概原理 。
那使用 threadFactory.newThread(command).start();有什么特点呢?threadFactory又是什么呢?从上面的代码得知,threadFactory来源于newDefaultThreadFactory()方法,接下来看newDefaultThreadFactory()方法的内部实现。
protected ThreadFactory newDefaultThreadFactory() {
    return new DefaultThreadFactory(getClass());
}

public DefaultThreadFactory(Class<?> poolType) {
    this(poolType, false, Thread.NORM_PRIORITY);
}

public DefaultThreadFactory(Class<?> poolType, boolean daemon, int priority) {
    this(toPoolName(poolType), daemon, priority);
}

public DefaultThreadFactory(String poolName, boolean daemon, int priority) {
    this(poolName, daemon, priority, System.getSecurityManager() == null ?
            Thread.currentThread().getThreadGroup() : System.getSecurityManager().getThreadGroup());
}

public DefaultThreadFactory(String poolName, boolean daemon, int priority, ThreadGroup threadGroup) {
    if (poolName == null) {
        throw new NullPointerException("poolName");
    }
    if (priority < Thread.MIN_PRIORITY || priority > Thread.MAX_PRIORITY) {
        throw new IllegalArgumentException(
                "priority: " + priority + " (expected: Thread.MIN_PRIORITY <= priority <= Thread.MAX_PRIORITY)");
    }

    prefix = poolName + '-' + poolId.incrementAndGet() + '-';
    this.daemon = daemon;
    this.priority = priority;
    this.threadGroup = threadGroup;
}
其实上面代码也很简单,设置是否是daemon线程,线程优先级,线程组等。接下来看其newThread()方法。
public Thread newThread(Runnable r) {
    Thread t = newThread(FastThreadLocalRunnable.wrap(r), prefix + nextId.incrementAndGet());
    try {
        if (t.isDaemon() != daemon) {
            t.setDaemon(daemon);
        }

        if (t.getPriority() != priority) {
            t.setPriority(priority);
        }
    } catch (Exception ignored) {

    }
    return t;
}

protected Thread newThread(Runnable r, String name) {
    return new FastThreadLocalThread(threadGroup, r, name);
}
上面需要注意的是FastThreadLocalRunnable.wrap ( r )这一行代码 。
static Runnable wrap(Runnable runnable) {
    return runnable instanceof FastThreadLocalRunnable ? runnable : new FastThreadLocalRunnable(runnable);
}
这一行代码中,如果runnable是FastThreadLocalRunnable类型的,则不做包装,否则创建new FastThreadLocalRunnable()包装已有的Runnable 。 那FastThreadLocalRunnable run()方法特点是什么呢?请看run()方法 。
public void run() {
    try {
        runnable.run();
    } finally {
        FastThreadLocal.removeAll();
    }
}
这里有一个FastThreadLocal.removeAll()方法,这又是什么鬼,在之前的 Netty源码性能分析 - ThreadLocal PK FastThreadLocal 博客中,对FastThreadLocal源码做了详细分析,感兴趣可以去看看,这里就不再赘述。
接下来看,ThreadPerTaskExecutor的结构 。
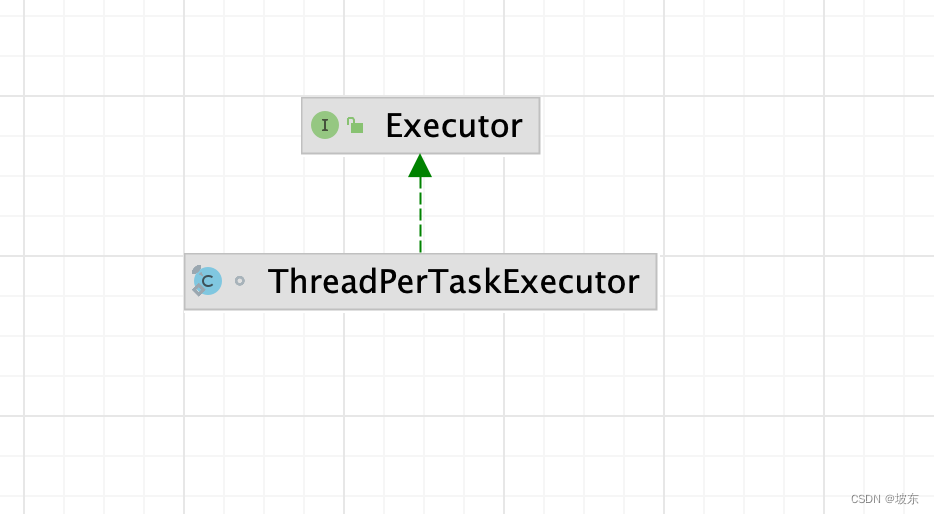
public interface Executor {
    void execute(Runnable command);
}

static final class ThreadPerTaskExecutor implements Executor {
    public void execute(Runnable r) { new Thread(r).start(); }
}
这里大家应该清楚了,调用ThreadPerTaskExecutor的execute实际上是新启动了一个线程,系统会调用r.run()方法,而r又被包装成FastThreadLocalRunnable,当r的run方法调用完毕,会触发FastThreadLocal.removeAll()的调用,这样就完美的衔接好了,在FastThreadLocalRunnable使用过程中,可以使用线程中的共享变量FastThreadLocal,在调用完run()方法后,FastThreadLocal变量及其对应的值又被清理干净了,这样极大的提升了线程范围内共享变量的使用速度,在调用结束后调用removeAll()方法,又避免了内存泄漏 。
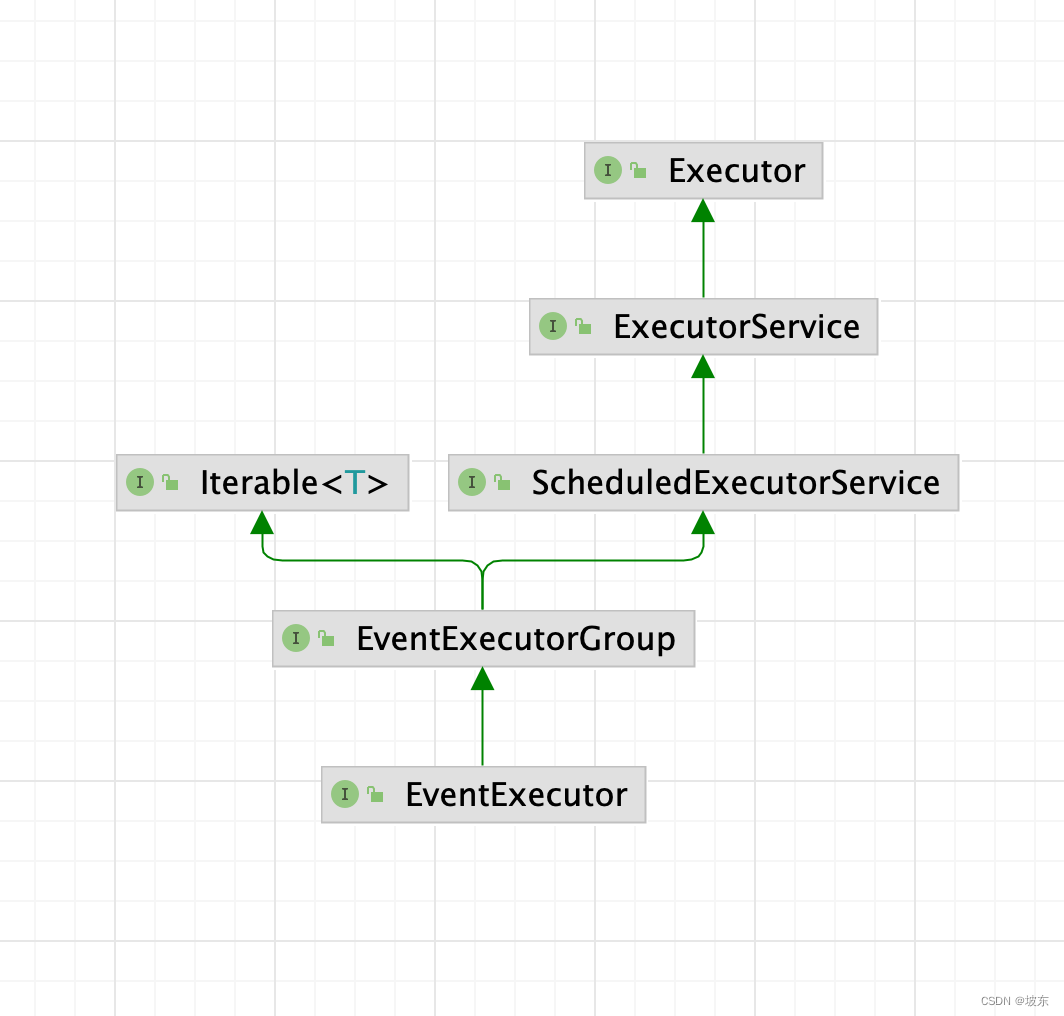
接下来看children = new EventExecutor[nThreads];这一行代码,注意EventExecutor与Executor之间的关系 。
接下来看newChild()方法 。
protected EventLoop newChild(Executor executor, Object... args) throws Exception {
    EventLoopTaskQueueFactory queueFactory = args.length == 4 ? (EventLoopTaskQueueFactory) args[3] : null;
    return new NioEventLoop(this, executor, (SelectorProvider) args[0],
        ((SelectStrategyFactory) args[1]).newSelectStrategy(), (RejectedExecutionHandler) args[2], queueFactory);
}
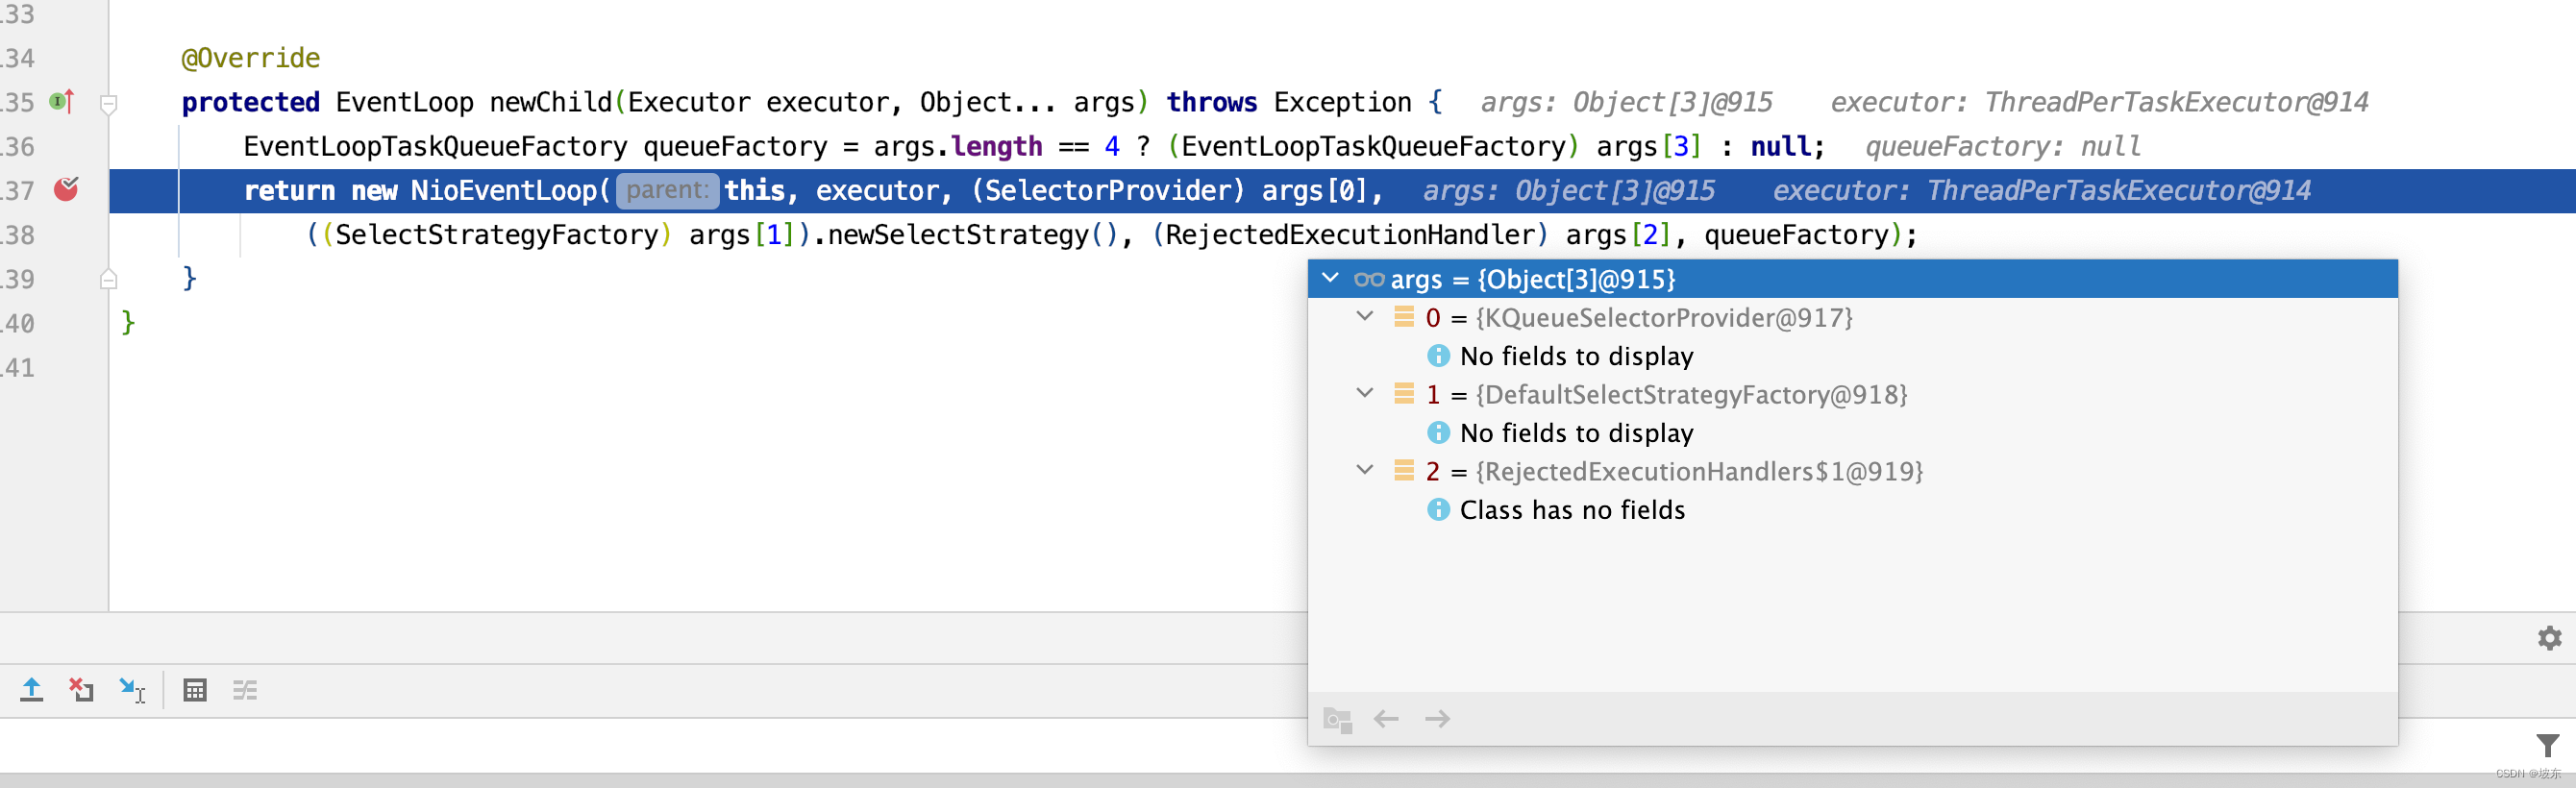
因为我的是mac系统,当然SelectorProvider.provider()返回的是KQueueSelectorProvider,第二个参数 默认为DefaultSelectStrategyFactory.INSTANCE,而第三个参数默认为RejectedExecutionHandlers.reject() 方法返回值,从NioEventLoopGroup的构造函数调用中可得知。 接下来继续NioEventLoop的构造函数调用 。
NioEventLoop(NioEventLoopGroup parent, Executor executor, SelectorProvider selectorProvider,
             SelectStrategy strategy, RejectedExecutionHandler rejectedExecutionHandler,
             EventLoopTaskQueueFactory queueFactory) {
    super(parent, executor, false, newTaskQueue(queueFactory), newTaskQueue(queueFactory),
            rejectedExecutionHandler);
    if (selectorProvider == null) {
        throw new NullPointerException("selectorProvider");
    }
    if (strategy == null) {
        throw new NullPointerException("selectStrategy");
    }
    provider = selectorProvider;
    final SelectorTuple selectorTuple = openSelector();
    selector = selectorTuple.selector;
    unwrappedSelector = selectorTuple.unwrappedSelector;
    selectStrategy = strategy;
}
看到NioEventLoop构造函数,就想知道NioEventLoop和其他类之间的结构关系,那和其他类之间的结构关系是什么呢?
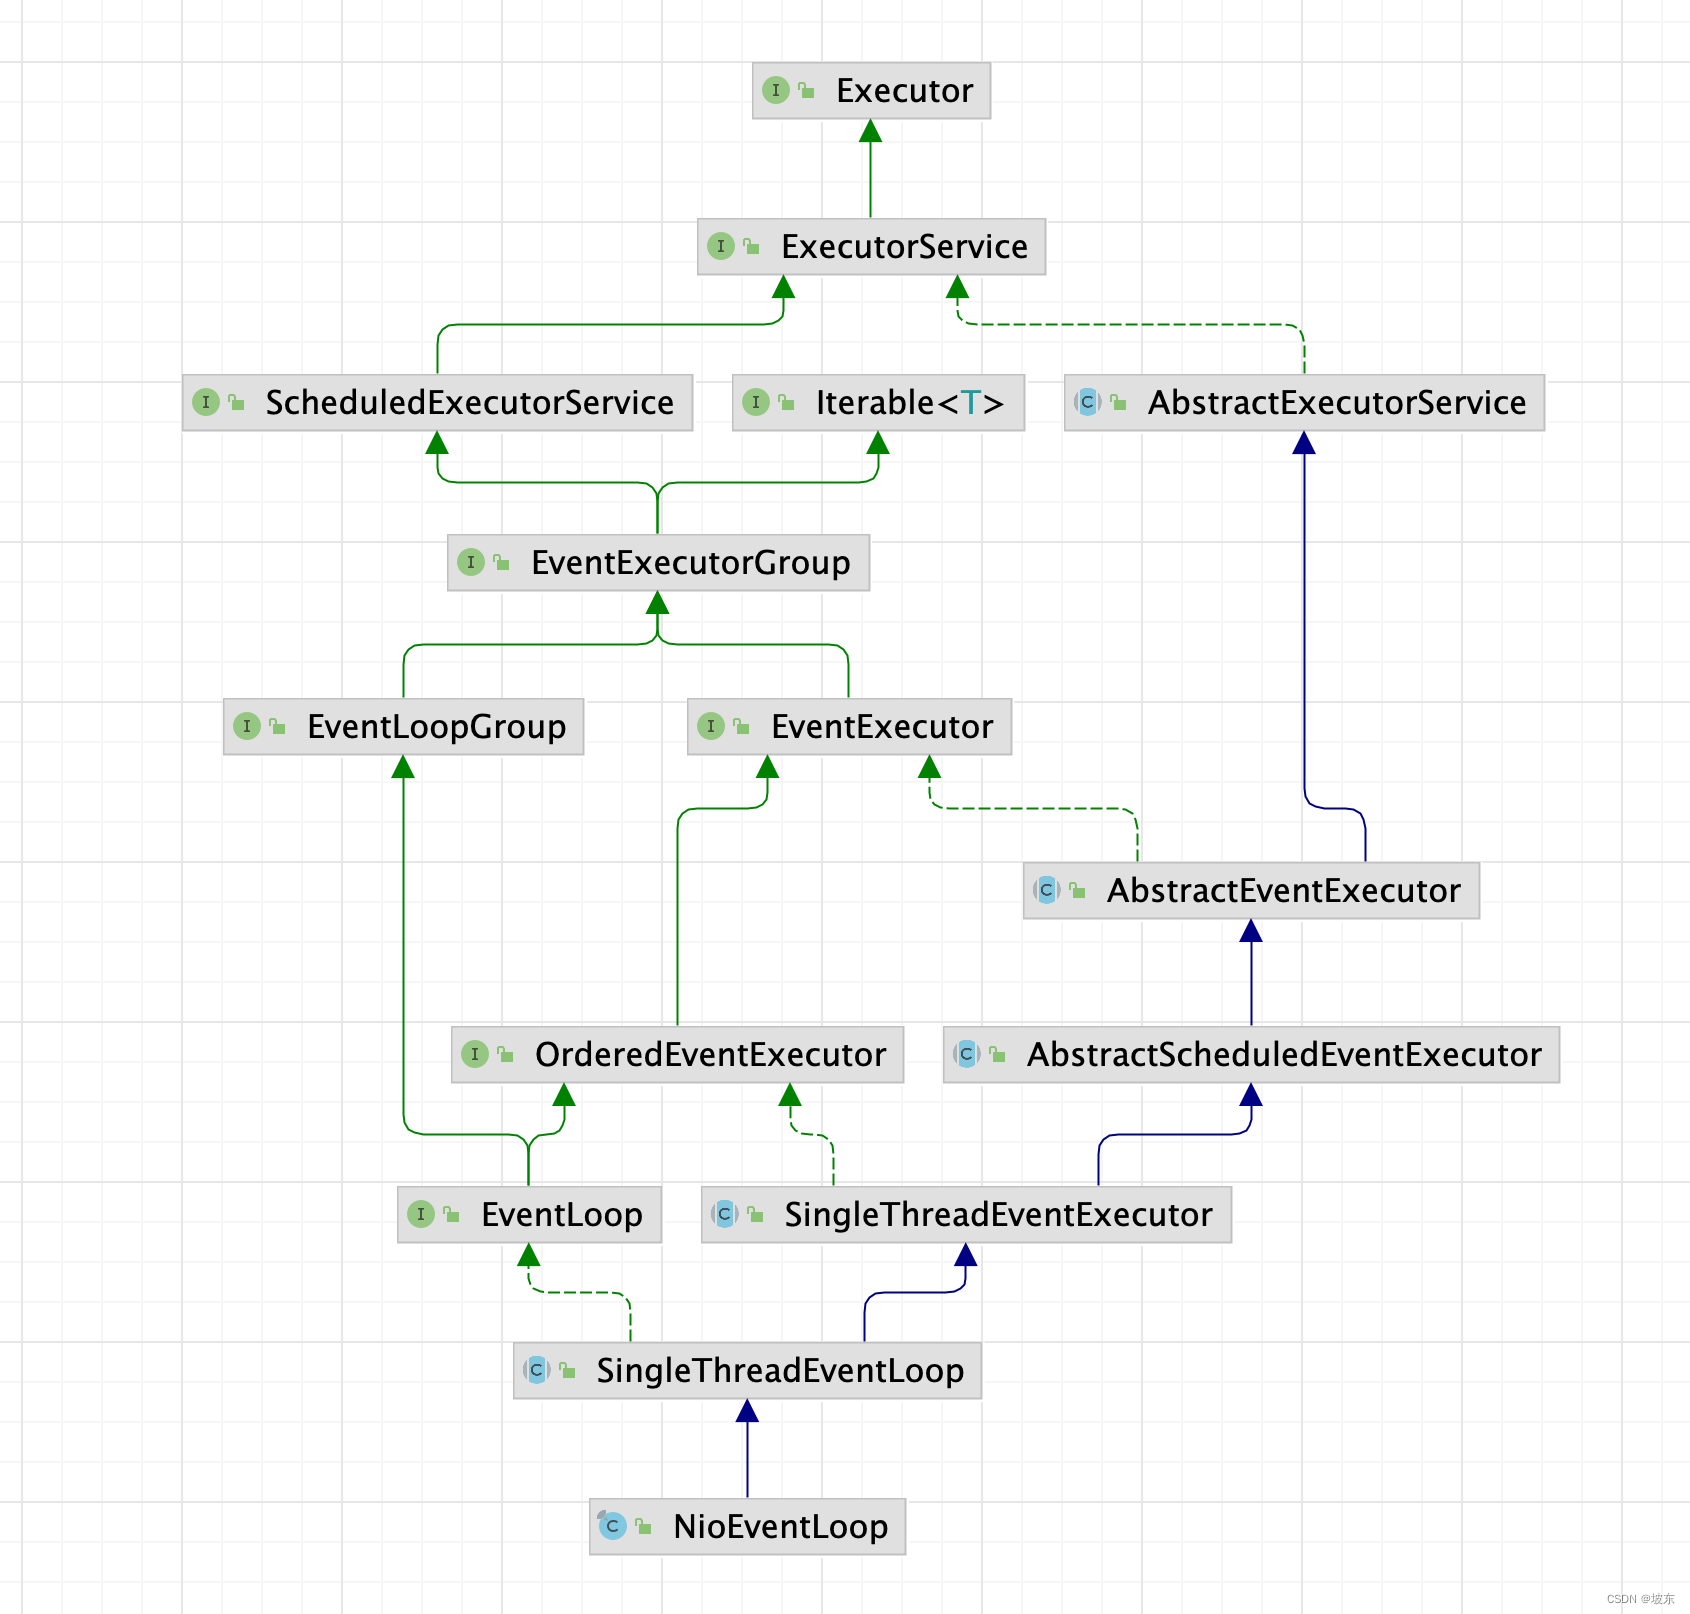
我的天,好复杂的样子。先有个大概的印象,看到具体代码时再来分析 。 从newChild() 方法中得知,NioEventLoop构造方法中,parent即创建NioEventLoop的NioEventLoopGroup,接下来看newTaskQueue()方法 。
protected static final int DEFAULT_MAX_PENDING_TASKS = Math.max(16,
		SystemPropertyUtil.getInt("io.netty.eventLoop.maxPendingTasks", Integer.MAX_VALUE));

private static Queue<Runnable> newTaskQueue(
        EventLoopTaskQueueFactory queueFactory) {
    if (queueFactory == null) {
    	// DEFAULT_MAX_PENDING_TASKS默认值为Integer.MAX_VALUE
        return newTaskQueue0(DEFAULT_MAX_PENDING_TASKS);
    }
    return queueFactory.newTaskQueue(DEFAULT_MAX_PENDING_TASKS);
}
默认情况下EventLoopTaskQueueFactory为空,因此会进入newTaskQueue0()方法。
private static Queue<Runnable> newTaskQueue0(int maxPendingTasks) {
    // This event loop never calls takeTask()
    return maxPendingTasks == Integer.MAX_VALUE ? PlatformDependent.<Runnable>newMpscQueue()
            : PlatformDependent.<Runnable>newMpscQueue(maxPendingTasks);
}
默认情况下DEFAULT_MAX_PENDING_TASKS为Integer.MAX_VALUE,因此在newTaskQueue0()方法中,调用的是newMpscQueue()方法 。
private static final class Mpsc {
    private static final boolean USE_MPSC_CHUNKED_ARRAY_QUEUE;

    private Mpsc() {
    }

    static {
        Object unsafe = null;
        if (hasUnsafe()) {
            // jctools goes through its own process of initializing unsafe; of
            // course, this requires permissions which might not be granted to calling code, so we
            // must mark this block as privileged too
            unsafe = AccessController.doPrivileged(new PrivilegedAction<Object>() {
                @Override
                public Object run() {
                    // force JCTools to initialize unsafe
                    return UnsafeAccess.UNSAFE;
                }
            });
        }

        if (unsafe == null) {
            logger.debug("org.jctools-core.MpscChunkedArrayQueue: unavailable");
            USE_MPSC_CHUNKED_ARRAY_QUEUE = false;
        } else {
            logger.debug("org.jctools-core.MpscChunkedArrayQueue: available");
            USE_MPSC_CHUNKED_ARRAY_QUEUE = true;
        }
    }

    static <T> Queue<T> newMpscQueue(final int maxCapacity) {
        // Calculate the max capacity which can not be bigger then MAX_ALLOWED_MPSC_CAPACITY.
        // This is forced by the MpscChunkedArrayQueue implementation as will try to round it
        // up to the next power of two and so will overflow otherwise.
        final int capacity = max(min(maxCapacity, MAX_ALLOWED_MPSC_CAPACITY), MIN_MAX_MPSC_CAPACITY);
        return USE_MPSC_CHUNKED_ARRAY_QUEUE ? new MpscChunkedArrayQueue<T>(MPSC_CHUNK_SIZE, capacity)
                                            : new MpscGrowableAtomicArrayQueue<T>(MPSC_CHUNK_SIZE, capacity);
    }

    static <T> Queue<T> newMpscQueue() {
        return USE_MPSC_CHUNKED_ARRAY_QUEUE ? new MpscUnboundedArrayQueue<T>(MPSC_CHUNK_SIZE)
                                            : new MpscUnboundedAtomicArrayQueue<T>(MPSC_CHUNK_SIZE);

}
看到这里,大家可能晕了,这是什么意思,创建一个队列都这么难吗? 像MpscChunkedArrayQueue和MpscUnboundedArrayQueue两种队列的原理在 Netty源码性能分析MpscChunkedArrayQueue & MpscUnboundedArrayQueue & MpscArrayQueue & MpscLinkedAtomicQueue 博客中做了详细的分析,知道了MpscChunkedArrayQueue队列的底层存储结构是一个可扩容的数组,而MpscUnboundedArrayQueue是不可扩容的数组,因此才有newTaskQueue0()方法中的判断,如果maxPendingTasks == Integer.MAX_VALUE,则创建一个固定长度大小的数组来存储队列中的元素,如果 maxPendingTasks != Integer.MAX_VALUE,则创建一个可扩容数组来存储队列中的元素,他们的底层都是基于数组实现。 再来理解newMpscQueue()方法中的两行代码。
private static final int MPSC_CHUNK_SIZE = 1024;
private static final int MIN_MAX_MPSC_CAPACITY = MPSC_CHUNK_SIZE * 2;
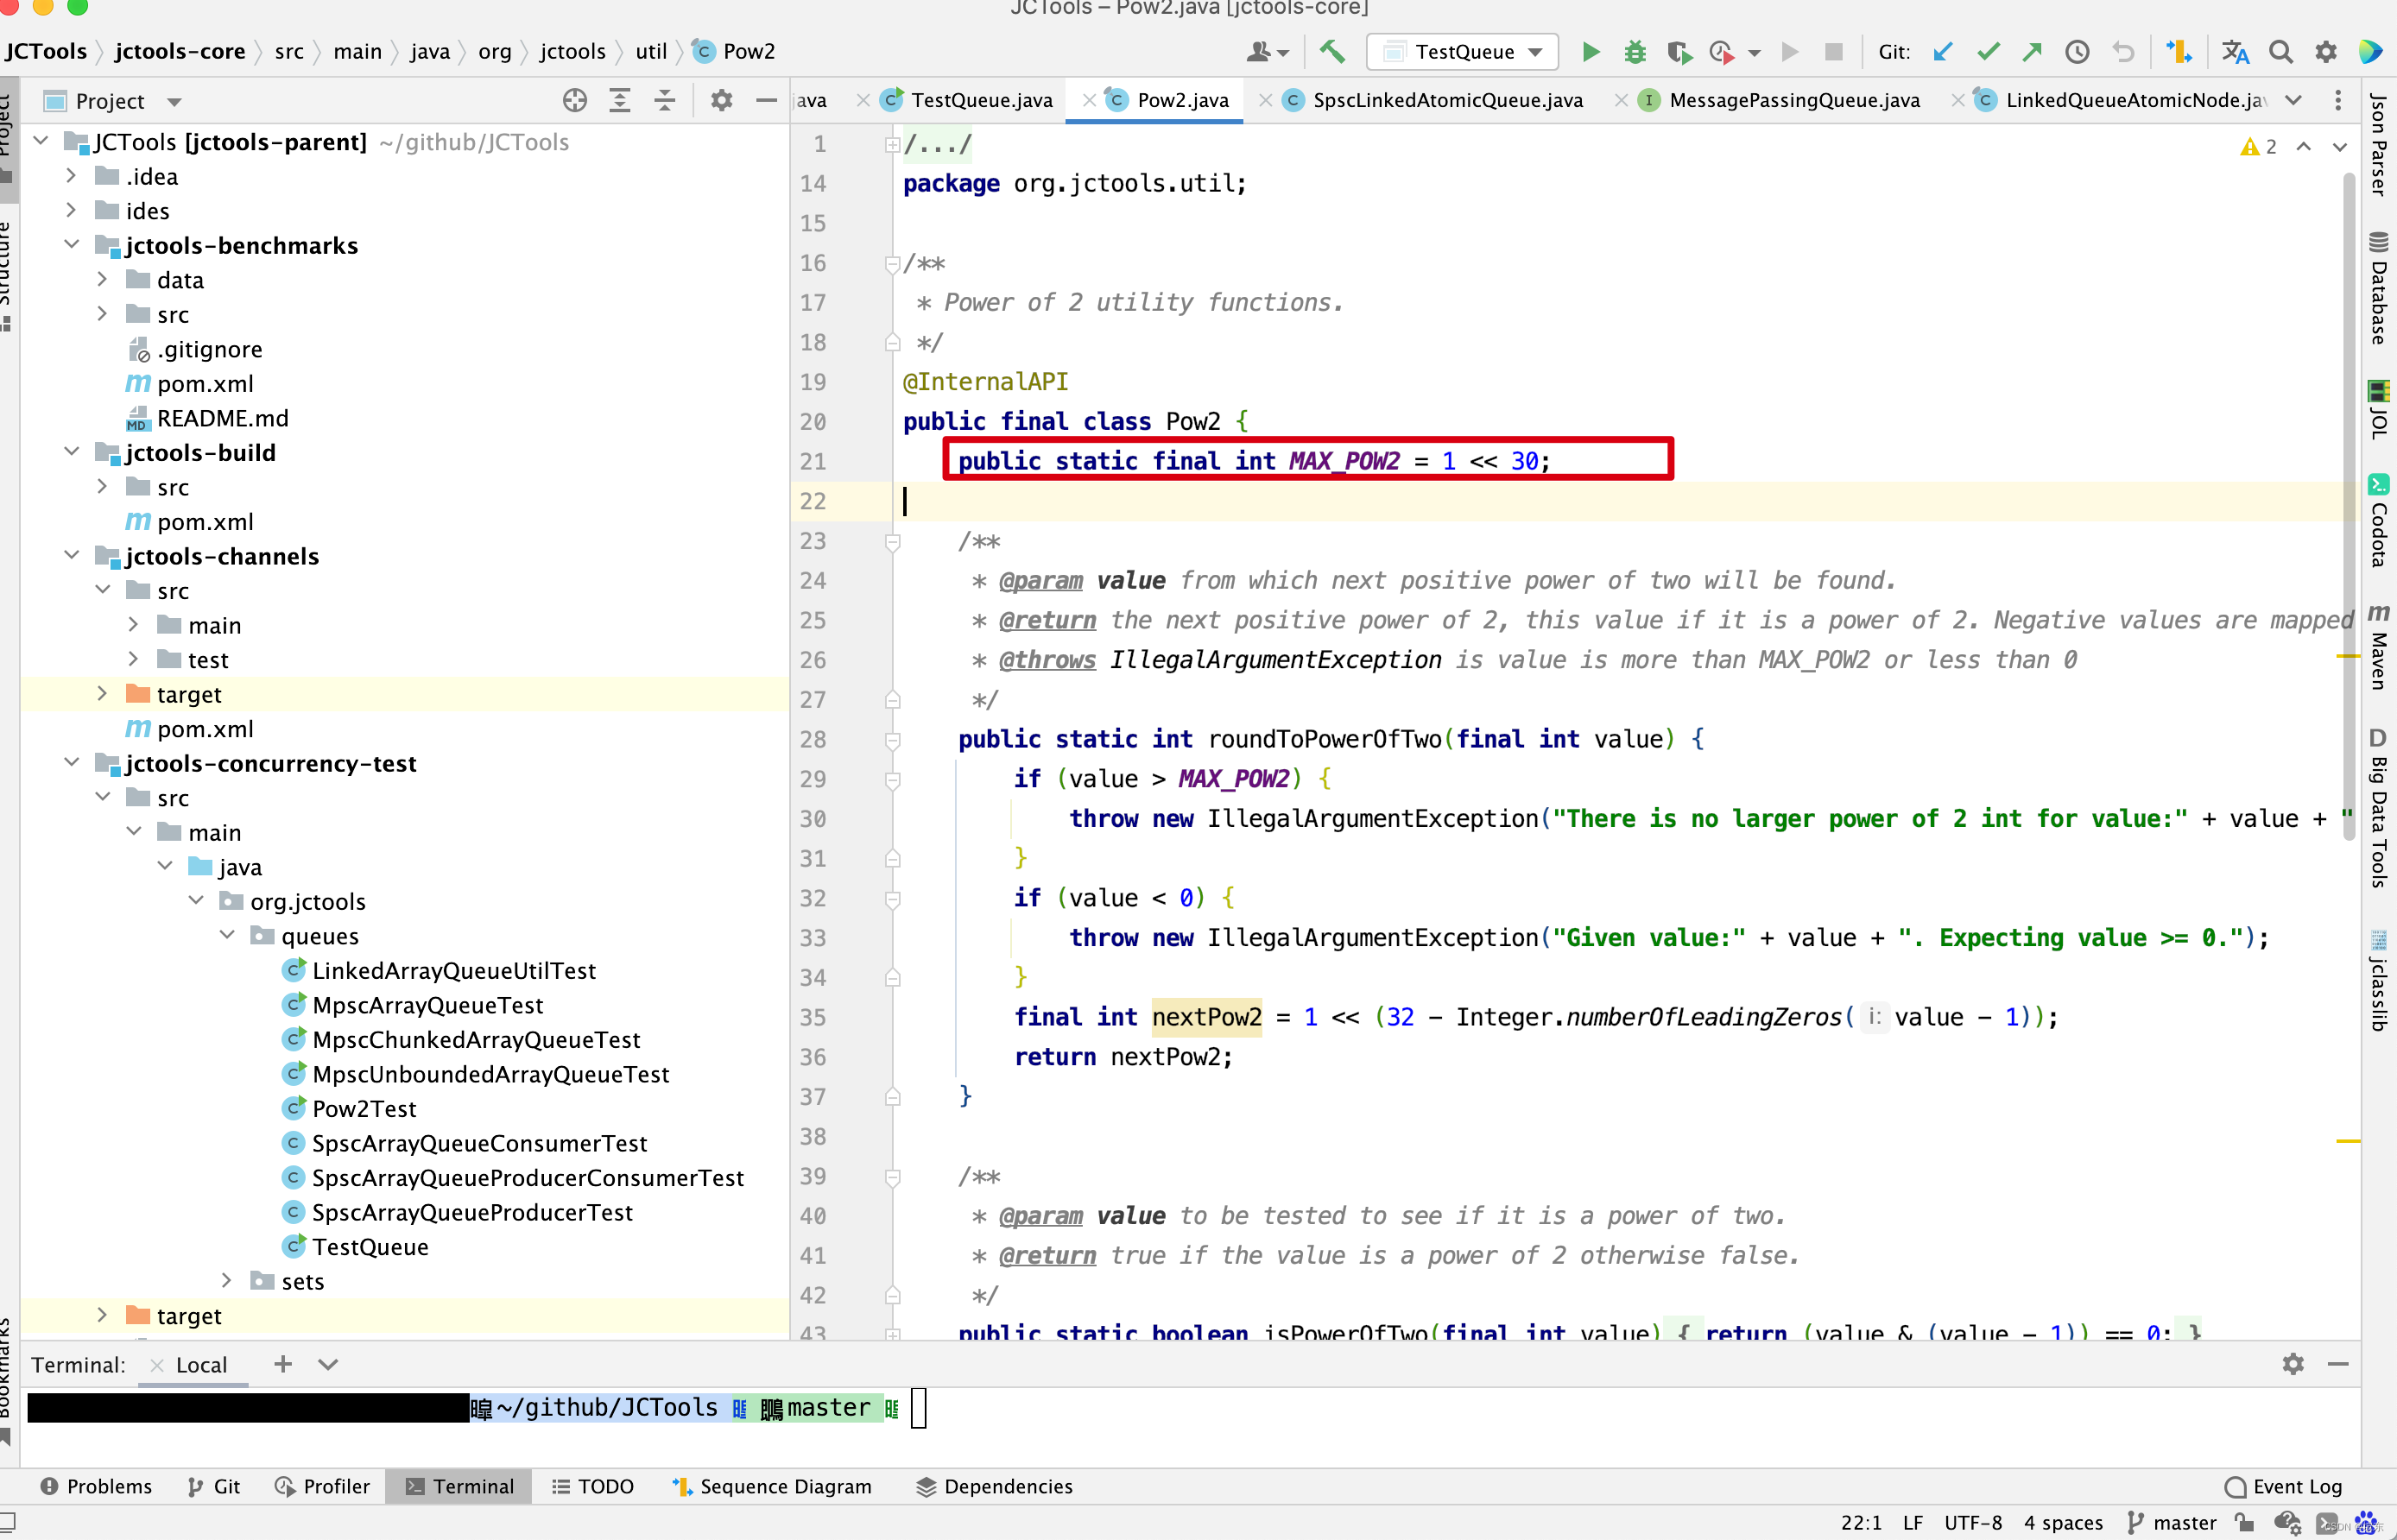
private static final int MAX_ALLOWED_MPSC_CAPACITY = Pow2.MAX_POW2;
final int capacity = max(min(maxCapacity, MAX_ALLOWED_MPSC_CAPACITY), MIN_MAX_MPSC_CAPACITY);
return USE_MPSC_CHUNKED_ARRAY_QUEUE ?
new MpscChunkedArrayQueue<T>(MPSC_CHUNK_SIZE, capacity)
: new MpscGrowableAtomicArrayQueue<T>(MPSC_CHUNK_SIZE, capacity);
首先USE_MPSC_CHUNKED_ARRAY_QUEUE默认值为true,后面再来分析,先看capacity的值,首先确定MAX_ALLOWED_MPSC_CAPACITY的值,从JCtools源码中可以看出,它的值为1 << 30 。
再确定MIN_MAX_MPSC_CAPACITY的值为2048,因此capacity = max(min(maxCapacity, 2^30 ), 2048),如果传入的值大于2048,并且小于2^30,则取传入的值,如果小于2048,则取2048。这一行代码 new MpscChunkedArrayQueue<T>(MPSC_CHUNK_SIZE, capacity)就好理解了,我们从之前的博客中知道MpscChunkedArrayQueue的数组结构如下。
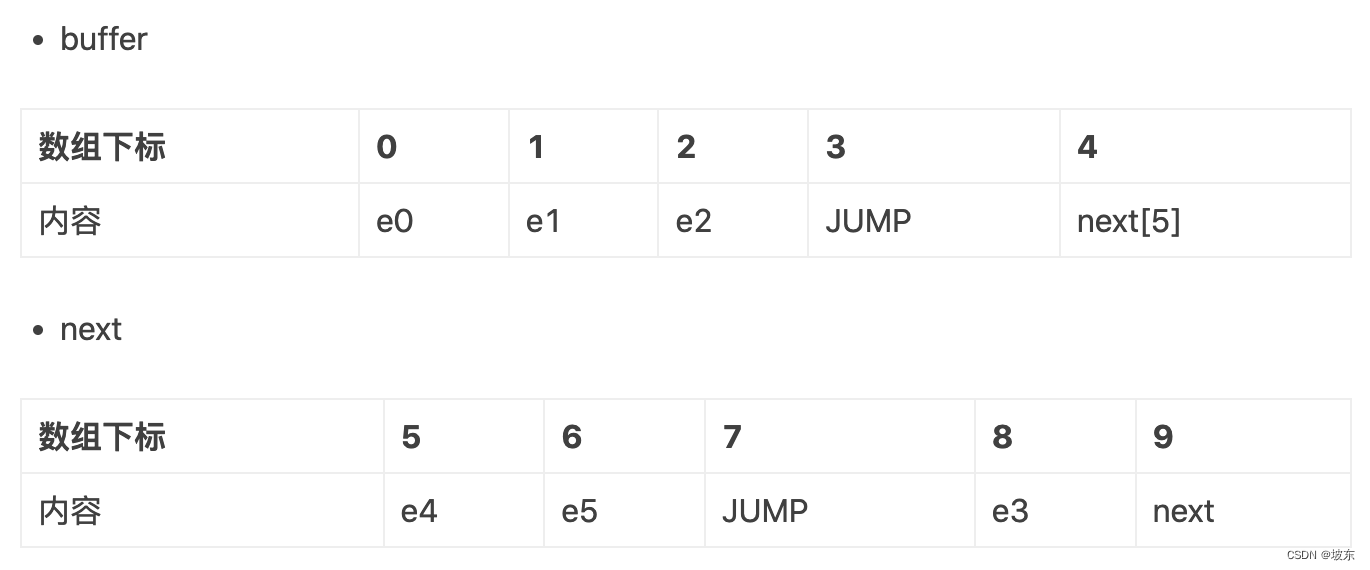
因此MpscChunkedArrayQueue<T>(1024, capacity) 会创建一个单个数组容量大小为1024,且队列中最大容量为capacity的队列,例如从上图中得知,buffer的数组长度为1024,而buffer,next … 所有数组中最大可存储元素个数为capacity,也就是说,在队列中元素没有被消费的情况下,最多可加入队列元素个数为capacity。
我们再来分析USE_MPSC_CHUNKED_ARRAY_QUEUE的值,从Mpsc的源码中可以看出,如果hasUnsafe()方法返回值为false,则USE_MPSC_CHUNKED_ARRAY_QUEUE为false,如果为hasUnsafe()方法返回值为true,则USE_MPSC_CHUNKED_ARRAY_QUEUE为true,为什么这么做呢? 从之前的博客中分析得出,MpscGrowableAtomicArrayQueue相对于MpscChunkedArrayQueue而言,新数组创建时,每一次数组的长度 = 原数组容量2倍 -1 ,而MpscChunkedArrayQueue和原数组大小一样,还有就是存储元素的数组不一样, MpscChunkedArrayQueue用普通数组存储,而MpscGrowableAtomicArrayQueue用AtomicReferenceArray数组,什么原因导致使用不特性的队列呢?进入hasUnsafe()方法 。
private static final Throwable UNSAFE_UNAVAILABILITY_CAUSE = unsafeUnavailabilityCause0();

public static boolean hasUnsafe() {
    return UNSAFE_UNAVAILABILITY_CAUSE == null;
}

private static Throwable unsafeUnavailabilityCause0() {
	// 如果是dalvik虚拟机或 aliyun-vm,则不支持
    if (isAndroid()) {
        logger.debug("sun.misc.Unsafe: unavailable (Android)");
        return new UnsupportedOperationException("sun.misc.Unsafe: unavailable (Android)");

	// IKVM 也不支持 sun.misc.Unsafe: unavailable
    if (isIkvmDotNet()) {
        logger.debug("sun.misc.Unsafe: unavailable (IKVM.NET)");
        return new UnsupportedOperationException("sun.misc.Unsafe: unavailable (IKVM.NET)");
    }
    Throwable cause = PlatformDependent0.getUnsafeUnavailabilityCause();
    if (cause != null) {
        return cause;
    }

    try {
        boolean hasUnsafe = PlatformDependent0.hasUnsafe();
        logger.debug("sun.misc.Unsafe: {}", hasUnsafe ? "available" : "unavailable");
        return hasUnsafe ? null : PlatformDependent0.getUnsafeUnavailabilityCause();
    } catch (Throwable t) {
        logger.trace("Could not determine if Unsafe is available", t);
        // Probably failed to initialize PlatformDependent0.
        return new UnsupportedOperationException("Could not determine if Unsafe is available", t);
    }
}

public static Throwable getUnsafeUnavailabilityCause() {
    return UNSAFE_UNAVAILABILITY_CAUSE;
}

static boolean hasUnsafe() {
    return UNSAFE != null;
}
从上述代码中,如果发现UNSAFE_UNAVAILABILITY_CAUSE !=null 或 Unsafe初始化为空,则证明使用Unsafe时会有异常,因此hasUnsafe()将返回false,接下来看什么情况下UNSAFE_UNAVAILABILITY_CAUSE不为空,也就是什么情况下,初始化或使用Unsafe会有异常。
final class PlatformDependent0 {
    private static final InternalLogger logger = InternalLoggerFactory.getInstance(PlatformDependent0.class);
    private static final long ADDRESS_FIELD_OFFSET;
    private static final long BYTE_ARRAY_BASE_OFFSET;
    private static final Constructor<?> DIRECT_BUFFER_CONSTRUCTOR;
    private static final Throwable EXPLICIT_NO_UNSAFE_CAUSE = explicitNoUnsafeCause0();
    private static final Method ALLOCATE_ARRAY_METHOD;
    private static final int JAVA_VERSION = javaVersion0();
    private static final boolean IS_ANDROID = isAndroid0();

    private static final Throwable UNSAFE_UNAVAILABILITY_CAUSE;
    private static final Object INTERNAL_UNSAFE;
    private static final boolean IS_EXPLICIT_TRY_REFLECTION_SET_ACCESSIBLE = explicitTryReflectionSetAccessible0();

    static final Unsafe UNSAFE;

    // constants borrowed from murmur3
    static final int HASH_CODE_ASCII_SEED = 0xc2b2ae35;
    static final int HASH_CODE_C1 = 0xcc9e2d51;
    static final int HASH_CODE_C2 = 0x1b873593;

    /**
     * Limits the number of bytes to copy per {@link Unsafe#copyMemory(long, long, long)} to allow safepoint polling
     * during a large copy.
     */
    private static final long UNSAFE_COPY_THRESHOLD = 1024L * 1024L;

    private static final boolean UNALIGNED;

    static {
        final ByteBuffer direct;
        Field addressField = null;
        Method allocateArrayMethod = null;
        Throwable unsafeUnavailabilityCause = null;
        Unsafe unsafe;
        Object internalUnsafe = null;

        if ((unsafeUnavailabilityCause = EXPLICIT_NO_UNSAFE_CAUSE) != null) {
            direct = null;
            addressField = null;
            unsafe = null;
            internalUnsafe = null;
        } else {
            direct = ByteBuffer.allocateDirect(1);
            // attempt to access field Unsafe#theUnsafe
            final Object maybeUnsafe = AccessController.doPrivileged(new PrivilegedAction<Object>() {
                @Override
                public Object run() {
                    try {
                        final Field unsafeField = Unsafe.class.getDeclaredField("theUnsafe");
                        // We always want to try using Unsafe as the access still works on java9 as well and
                        // we need it for out native-transports and many optimizations.
                        Throwable cause = ReflectionUtil.trySetAccessible(unsafeField, false);
                        if (cause != null) {
                            return cause;
                        }
                        // the unsafe instance
                        return unsafeField.get(null);
                    } catch (NoSuchFieldException e) {
                        return e;
                    } catch (SecurityException e) {
                        return e;
                    } catch (IllegalAccessException e) {
                        return e;
                    } catch (NoClassDefFoundError e) {
                        // Also catch NoClassDefFoundError in case someone uses for example OSGI and it made
                        // Unsafe unloadable.
                        return e;
                    }
                }
            });

            // the conditional check here can not be replaced with checking that maybeUnsafe
            // is an instanceof Unsafe and reversing the if and else blocks; this is because an
            // instanceof check against Unsafe will trigger a class load and we might not have
            // the runtime permission accessClassInPackage.sun.misc
            if (maybeUnsafe instanceof Throwable) {
                unsafe = null;
                unsafeUnavailabilityCause = (Throwable) maybeUnsafe;
                logger.debug("sun.misc.Unsafe.theUnsafe: unavailable", (Throwable) maybeUnsafe);
            } else {
                unsafe = (Unsafe) maybeUnsafe;
                logger.debug("sun.misc.Unsafe.theUnsafe: available");
            }

            // ensure the unsafe supports all necessary methods to work around the mistake in the latest OpenJDK
            // https://github.com/netty/netty/issues/1061
            // http://www.mail-archive.com/jdk6-dev@openjdk.java.net/msg00698.html
            if (unsafe != null) {
                final Unsafe finalUnsafe = unsafe;
                final Object maybeException = AccessController.doPrivileged(new PrivilegedAction<Object>() {
                    @Override
                    public Object run() {
                        try {
                            finalUnsafe.getClass().getDeclaredMethod(
                                    "copyMemory", Object.class, long.class, Object.class, long.class, long.class);
                            return null;
                        } catch (NoSuchMethodException e) {
                            return e;
                        } catch (SecurityException e) {
                            return e;
                        }
                    }
                });

                if (maybeException == null) {
                    logger.debug("sun.misc.Unsafe.copyMemory: available");
                } else {
                    // Unsafe.copyMemory(Object, long, Object, long, long) unavailable.
                    unsafe = null;
                    unsafeUnavailabilityCause = (Throwable) maybeException;
                    logger.debug("sun.misc.Unsafe.copyMemory: unavailable", (Throwable) maybeException);
                }
            }

            if (unsafe != null) {
                final Unsafe finalUnsafe = unsafe;
                // attempt to access field Buffer#address
                final Object maybeAddressField = AccessController.doPrivileged(new PrivilegedAction<Object>() {
                    @Override
                    public Object run() {
                        try {
                            final Field field = Buffer.class.getDeclaredField("address");
                            // Use Unsafe to read value of the address field. This way it will not fail on JDK9+ which
                            // will forbid changing the access level via reflection.
                            final long offset = finalUnsafe.objectFieldOffset(field);
                            final long address = finalUnsafe.getLong(direct, offset);

                            // if direct really is a direct buffer, address will be non-zero
                            if (address == 0) {
                                return null;
                            }
                            return field;
                        } catch (NoSuchFieldException e) {
                            return e;
                        } catch (SecurityException e) {
                            return e;
                        }
                    }
                });

                if (maybeAddressField instanceof Field) {
                    addressField = (Field) maybeAddressField;
                    logger.debug("java.nio.Buffer.address: available");
                } else {
                    unsafeUnavailabilityCause = (Throwable) maybeAddressField;
                    logger.debug("java.nio.Buffer.address: unavailable", (Throwable) maybeAddressField);

                    // If we cannot access the address of a direct buffer, there's no point of using unsafe.
                    // Let's just pretend unsafe is unavailable for overall simplicity.
                    unsafe = null;
                }
            }

            if (unsafe != null) {
                // There are assumptions made where ever BYTE_ARRAY_BASE_OFFSET is used (equals, hashCodeAscii, and
                // primitive accessors) that arrayIndexScale == 1, and results are undefined if this is not the case.
                long byteArrayIndexScale = unsafe.arrayIndexScale(byte[].class);
                if (byteArrayIndexScale != 1) {
                    logger.debug("unsafe.arrayIndexScale is {} (expected: 1). Not using unsafe.", byteArrayIndexScale);
                    unsafeUnavailabilityCause = new UnsupportedOperationException("Unexpected unsafe.arrayIndexScale");
                    unsafe = null;
                }
            }
        }
        UNSAFE_UNAVAILABILITY_CAUSE = unsafeUnavailabilityCause;

        ...
}

public static Throwable trySetAccessible(AccessibleObject object, boolean checkAccessible) {
    if (checkAccessible && !PlatformDependent0.isExplicitTryReflectionSetAccessible()) {
        return new UnsupportedOperationException("Reflective setAccessible(true) disabled");
    }
    try {
        object.setAccessible(true);
        return null;
    } catch (SecurityException e) {
        return e;
    } catch (RuntimeException e) {
        return handleInaccessibleObjectException(e);
    }
}
上面4行加粗代码。
- object.setAccessible(true); 调用
final Field unsafeField = Unsafe.class.getDeclaredField("theUnsafe");
Throwable cause = ReflectionUtil.trySetAccessible(unsafeField, false);
因为获取Unsafe对象时,一般常情况下都是通过反射来获取的,如下
private static Unsafe reflectGetUnsafe() {
    try {
        Field field = Unsafe.class.getDeclaredField("theUnsafe");
        field.setAccessible(true);
        return (Unsafe) field.get(null);
    } catch (Exception e) {
        e.printStackTrace();
        return null;
    }
}
如果field.setAccessible(true)失败,则证明Unsafe实例获取失败,不能使用Unsafe来进行CAS操作。
- 复制内存方法copyMemory()调用
finalUnsafe.getClass().getDeclaredMethod(
    "copyMemory", Object.class, long.class, Object.class, long.class, long.class);
在后续中对于堆外内存,肯定会用到copyMemory()方法,如果Unsafe实例中没有copyMemory()方法,肯定证明Unsafe不可用。
- ByteBuffer的address字段获取
final Field field = Buffer.class.getDeclaredField("address");
final long offset = finalUnsafe.objectFieldOffset(field);
final long address = finalUnsafe.getLong(direct, offset);
使用Unsafe读取地址字段的值。这样,它不会在JDK9 + 上失败,JDK9 + 将禁止通过反射更改访问级别。
- Unsafe类中有很多以BASE_OFFSET结尾的常量,比如ARRAY_INT_BASE_OFFSET,ARRAY_BYTE_BASE_OFFSET等,这些常量值是通过arrayBaseOffset方法得到的。arrayBaseOffset方法是一个本地方法,可以获取数组第一个元素的偏移地址。Unsafe类中还有很多以INDEX_SCALE结尾的常量,比如 ARRAY_INT_INDEX_SCALE , ARRAY_BYTE_INDEX_SCALE等,这些常量值是通过arrayIndexScale方法得到的。arrayIndexScale方法也是一个本地方法,可以获取数组的转换因子,也就是数组中元素的增量地址。将arrayBaseOffset与arrayIndexScale配合使用,可以定位数组中每个元素在内存中的位置。
下面这行代码
long byteArrayIndexScale = unsafe.arrayIndexScale(byte[].class);
public static void main(String[] args) {
    Unsafe unsafe = reflectGetUnsafe();

    long byteArrayIndexScale = unsafe.arrayIndexScale(byte[].class);
    System.out.println(byteArrayIndexScale);

    long intArrayIndexScale = unsafe.arrayIndexScale(int[].class);
    System.out.println(intArrayIndexScale);

    long longArrayIndexScale = unsafe.arrayIndexScale(long[].class);
    System.out.println(longArrayIndexScale);
}

private static Unsafe reflectGetUnsafe() {
    try {
        Field field = Unsafe.class.getDeclaredField("theUnsafe");
        field.setAccessible(true);
        return (Unsafe) field.get(null);
    } catch (Exception e) {
        e.printStackTrace();
        return null;
    }
}
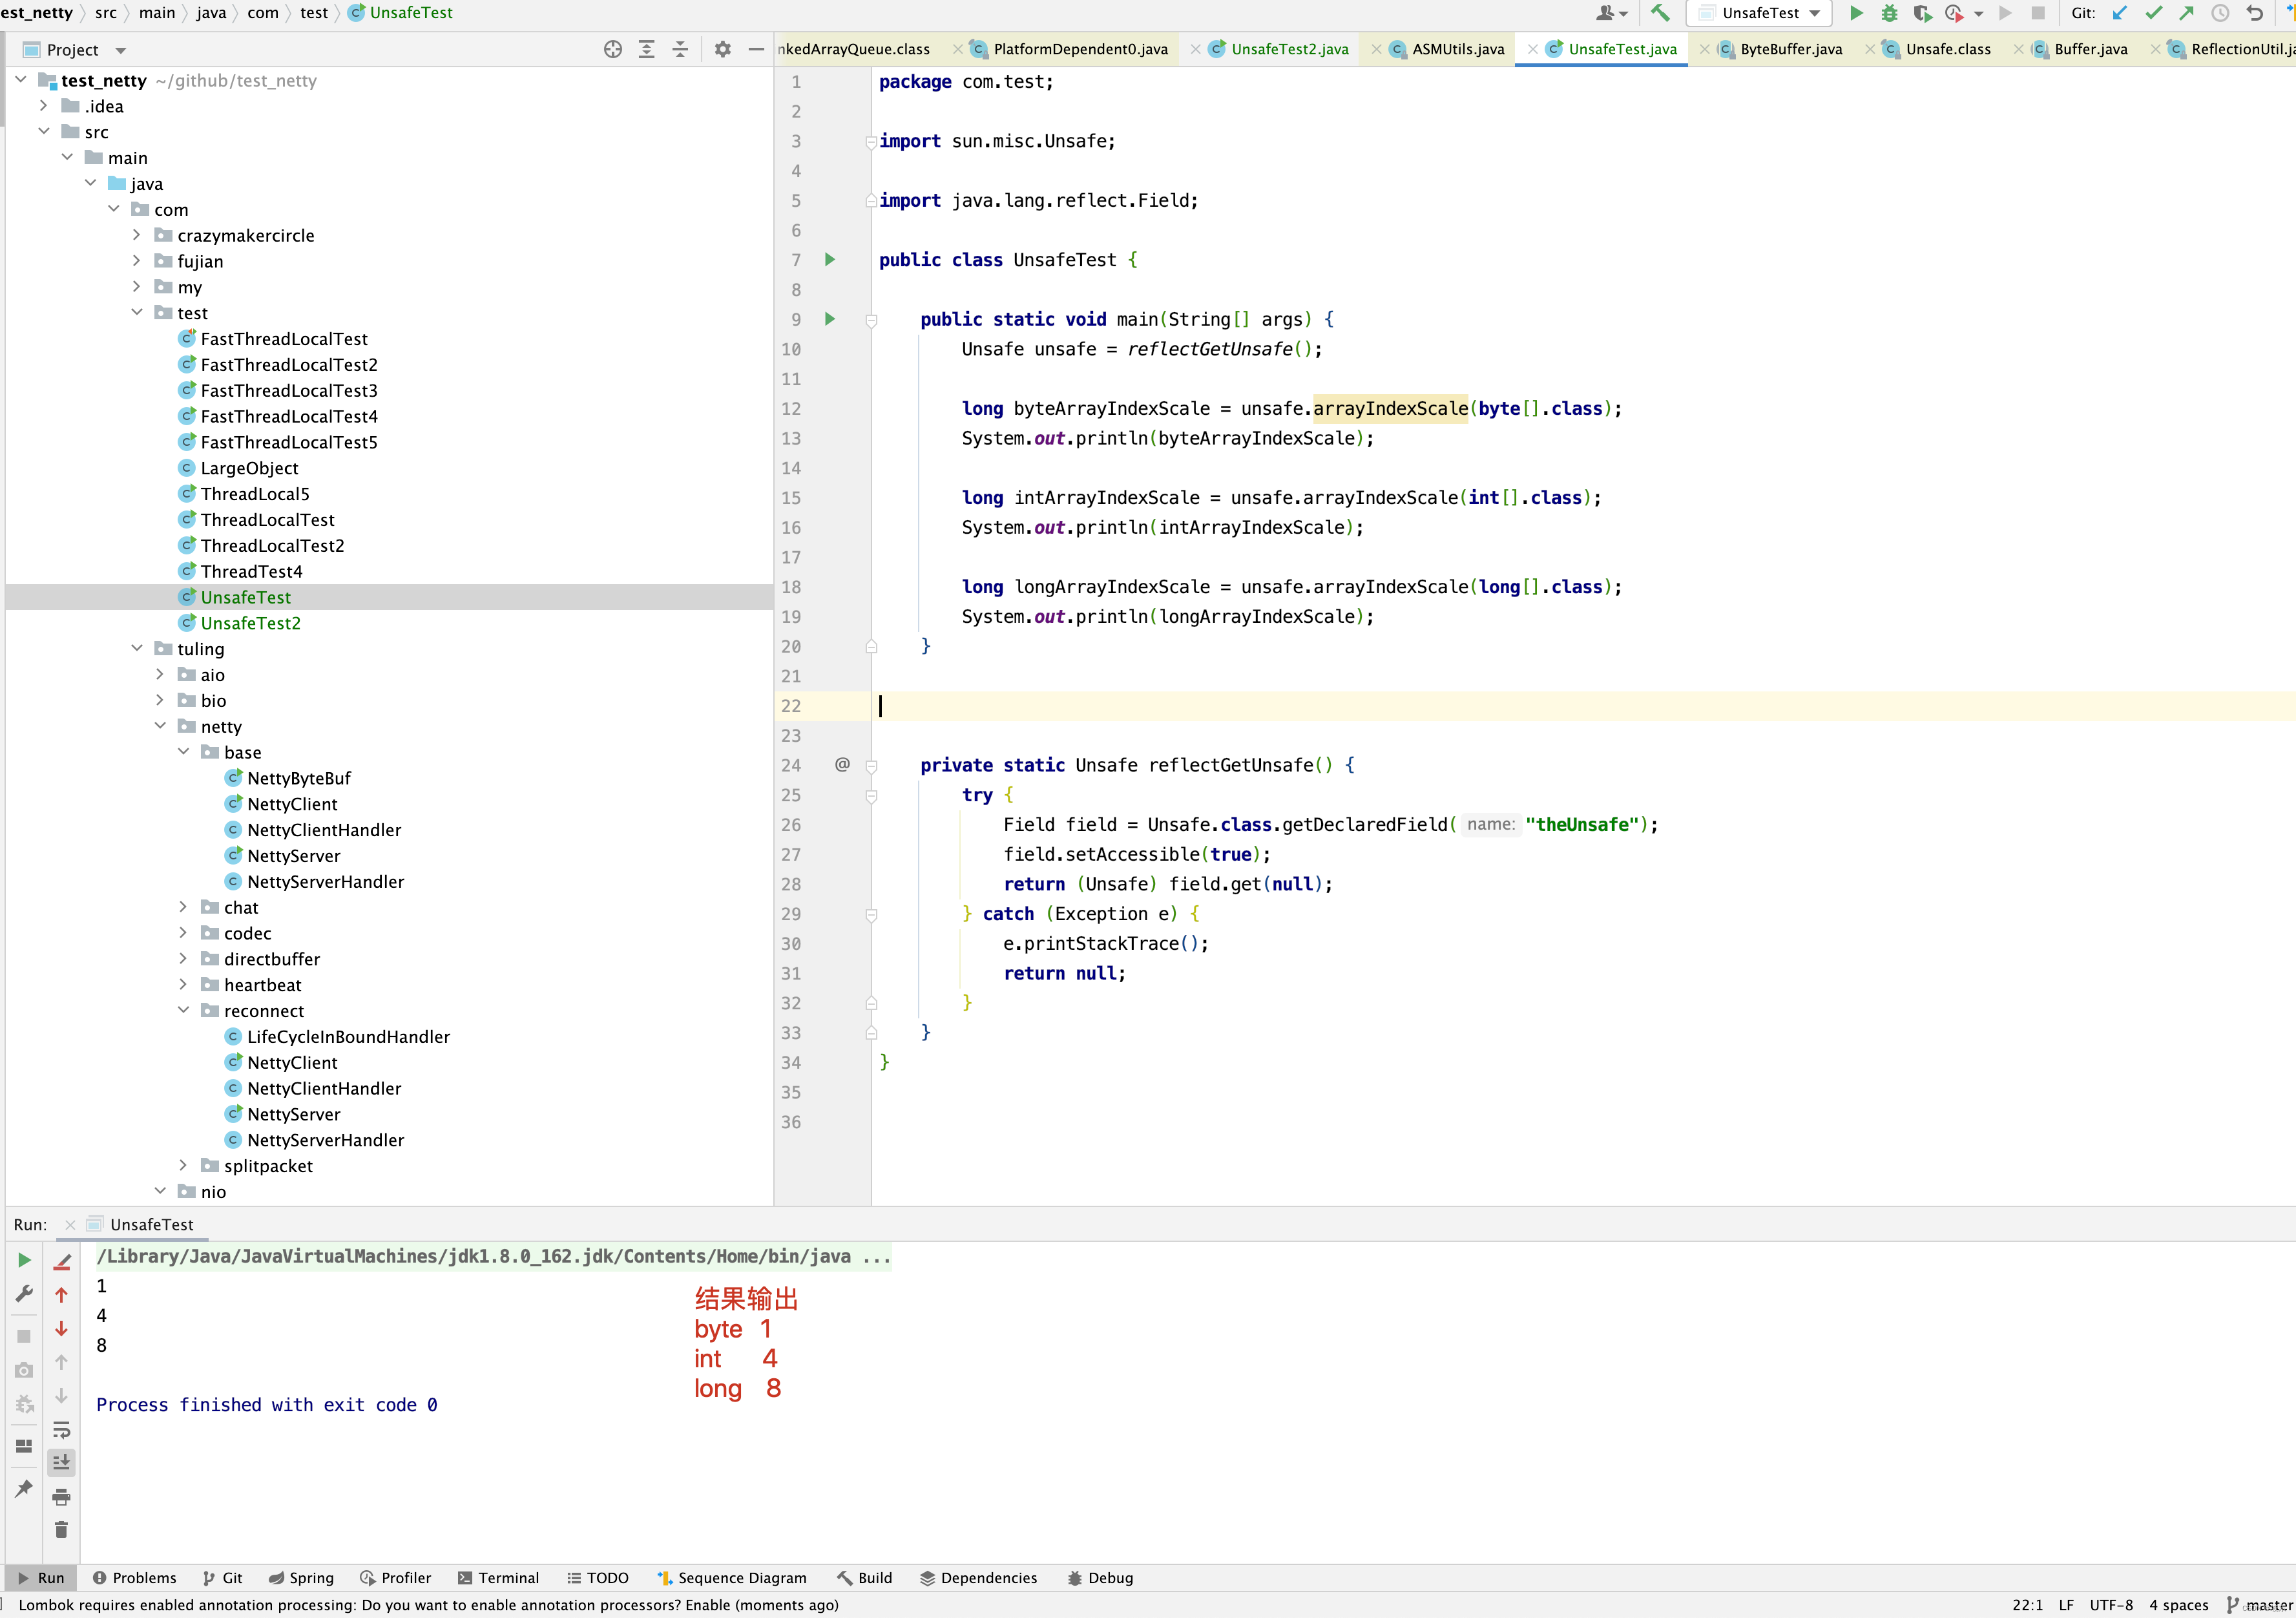
在这里主要是验证arrayIndexScale()获取byte数组的增量地址对不对,如果不对,则不能使用Unsafe。
看了这么多,那应该就明白newMpscQueue()方法代码的含义。带 Atomic 的类,是表示在 Netty 无法使用 Unsafe 的情况下使用 Atomic 原子类来做替代方案。为什么呢?相对于MpscChunkedArrayQueue而言,MpscGrowableAtomicArrayQueue使用了AtomicReferenceArray来存取队列中的元素,而MpscChunkedArrayQueue使用的是普通数组存取队列中元素,即使在不能使用Unsafe情况下,也能通过AtomicReferenceArray 保证对数组元素的操作的原子性。 那又为什么AtomicReferenceArray可以使用CAS操作数组中的元素,在Netty 程序中不能使用Unsafe来保证原子性呢?
在JDK 5之后,Java类库中才开始使用CAS操作,该操作由sun.misc.Unsafe类里面的 compareAndSwapInt()和compareAndSwapLong()等几个方法包装提供。HotSpot虚拟机在内部对这些方法做了特殊处理,即时编译出来的结果就是一条平台相关的处理器CAS指令,没有方法调用的过程, 或者可以认为是无条件内联进去了。不过由于Unsafe类在设计上就不是提供给用户程序调用的类(Unsafe::getUnsafe()的代码中限制了只有启动类加载器(Bootstrap ClassLoader)加载的Class才能访问它),因此在JDK 9之前只有Java类库可以使用CAS,譬如J.U.C包里面的整数原子类,其中的 compareAndSet()和getAndIncrement()等方法都使用了Unsafe类的CAS操作来实现。而如果用户程序也有用CAS操作的需求,那要么就采用反射手段突破Unsafe的访问限制,要么就只能通过Java类库API来间接使用它。直到JDK 9之后,Java类库才在VarHandle类里开放了面向用户程序使用的CAS操作。

接下来看openSelector()方法。
private SelectorTuple openSelector() {
    final Selector unwrappedSelector;
    try {
        unwrappedSelector = provider.openSelector();
    } catch (IOException e) {
        throw new ChannelException("failed to open a new selector", e);
    }

    if (DISABLE_KEY_SET_OPTIMIZATION) {
        return new SelectorTuple(unwrappedSelector);
    }

    Object maybeSelectorImplClass = AccessController.doPrivileged(new PrivilegedAction<Object>() {
        @Override
        public Object run() {
            try {
                return Class.forName(
                        "sun.nio.ch.SelectorImpl",
                        false,
                        PlatformDependent.getSystemClassLoader());
            } catch (Throwable cause) {
                return cause;
            }
        }
    });

	// 反射创建sun.nio.ch.SelectorImpl是否抛出异常
	// 创建出来的maybeSelectorImplClass类是否是Selector的子类
    if (!(maybeSelectorImplClass instanceof Class) ||
        // ensure the current selector implementation is what we can instrument.
        !((Class<?>) maybeSelectorImplClass).isAssignableFrom(unwrappedSelector.getClass())) {
        if (maybeSelectorImplClass instanceof Throwable) {
            Throwable t = (Throwable) maybeSelectorImplClass;
            logger.trace("failed to instrument a special java.util.Set into: {}", unwrappedSelector, t);
        }
        return new SelectorTuple(unwrappedSelector);
    }

    final Class<?> selectorImplClass = (Class<?>) maybeSelectorImplClass;
    final SelectedSelectionKeySet selectedKeySet = new SelectedSelectionKeySet();

    Object maybeException = AccessController.doPrivileged(new PrivilegedAction<Object>() {
        @Override
        public Object run() {
            try {
                Field selectedKeysField = selectorImplClass.getDeclaredField("selectedKeys");
                Field publicSelectedKeysField = selectorImplClass.getDeclaredField("publicSelectedKeys");
				// 如果是JDK 9 以上,并且在JDK外允许使用 Unsafe
				// 则使用CAS 设置SelectorImpl的selectedKeys和publicSelectedKeys属性
                if (PlatformDependent.javaVersion() >= 9 && PlatformDependent.hasUnsafe()) {
                    // Let us try to use sun.misc.Unsafe to replace the SelectionKeySet.
                    // This allows us to also do this in Java9+ without any extra flags.
                    long selectedKeysFieldOffset = PlatformDependent.objectFieldOffset(selectedKeysField);
                    long publicSelectedKeysFieldOffset =
                            PlatformDependent.objectFieldOffset(publicSelectedKeysField);

                    if (selectedKeysFieldOffset != -1 && publicSelectedKeysFieldOffset != -1) {
                        PlatformDependent.putObject(
                                unwrappedSelector, selectedKeysFieldOffset, selectedKeySet);
                        PlatformDependent.putObject(
                                unwrappedSelector, publicSelectedKeysFieldOffset, selectedKeySet);
                        return null;
                    }
                    // We could not retrieve the offset, lets try reflection as last-resort.
                }
				// 如果不是JDK 9 以上或在JDK外不允许使用 Unsafe
				// 则使用反射设置SelectorImpl的selectedKeys和publicSelectedKeys属性
                Throwable cause = ReflectionUtil.trySetAccessible(selectedKeysField, true);
                if (cause != null) {
                    return cause;
                }
                cause = ReflectionUtil.trySetAccessible(publicSelectedKeysField, true);
                if (cause != null) {
                    return cause;
                }

                selectedKeysField.set(unwrappedSelector, selectedKeySet);
                publicSelectedKeysField.set(unwrappedSelector, selectedKeySet);
                return null;
            } catch (NoSuchFieldException e) {
                return e;
            } catch (IllegalAccessException e) {
                return e;
            }
        }
    });

    if (maybeException instanceof Exception) {
        selectedKeys = null;
        Exception e = (Exception) maybeException;
        logger.trace("failed to instrument a special java.util.Set into: {}", unwrappedSelector, e);
        return new SelectorTuple(unwrappedSelector);
    }
    selectedKeys = selectedKeySet;
    logger.trace("instrumented a special java.util.Set into: {}", unwrappedSelector);
    return new SelectorTuple(unwrappedSelector,
                             new SelectedSelectionKeySetSelector(unwrappedSelector, selectedKeySet));
}

private static final class SelectorTuple {
    final Selector unwrappedSelector;
    final Selector selector;

    SelectorTuple(Selector unwrappedSelector, Selector selector) {
        this.unwrappedSelector = unwrappedSelector;
        this.selector = selector;
    }
}
可能大家觉得上面代码平平无奇,但还是有一点值得我们注意 ,加是加粗那行代码。 unwrappedSelector = provider.openSelector(); 这行代码有什么特别的地方吗?
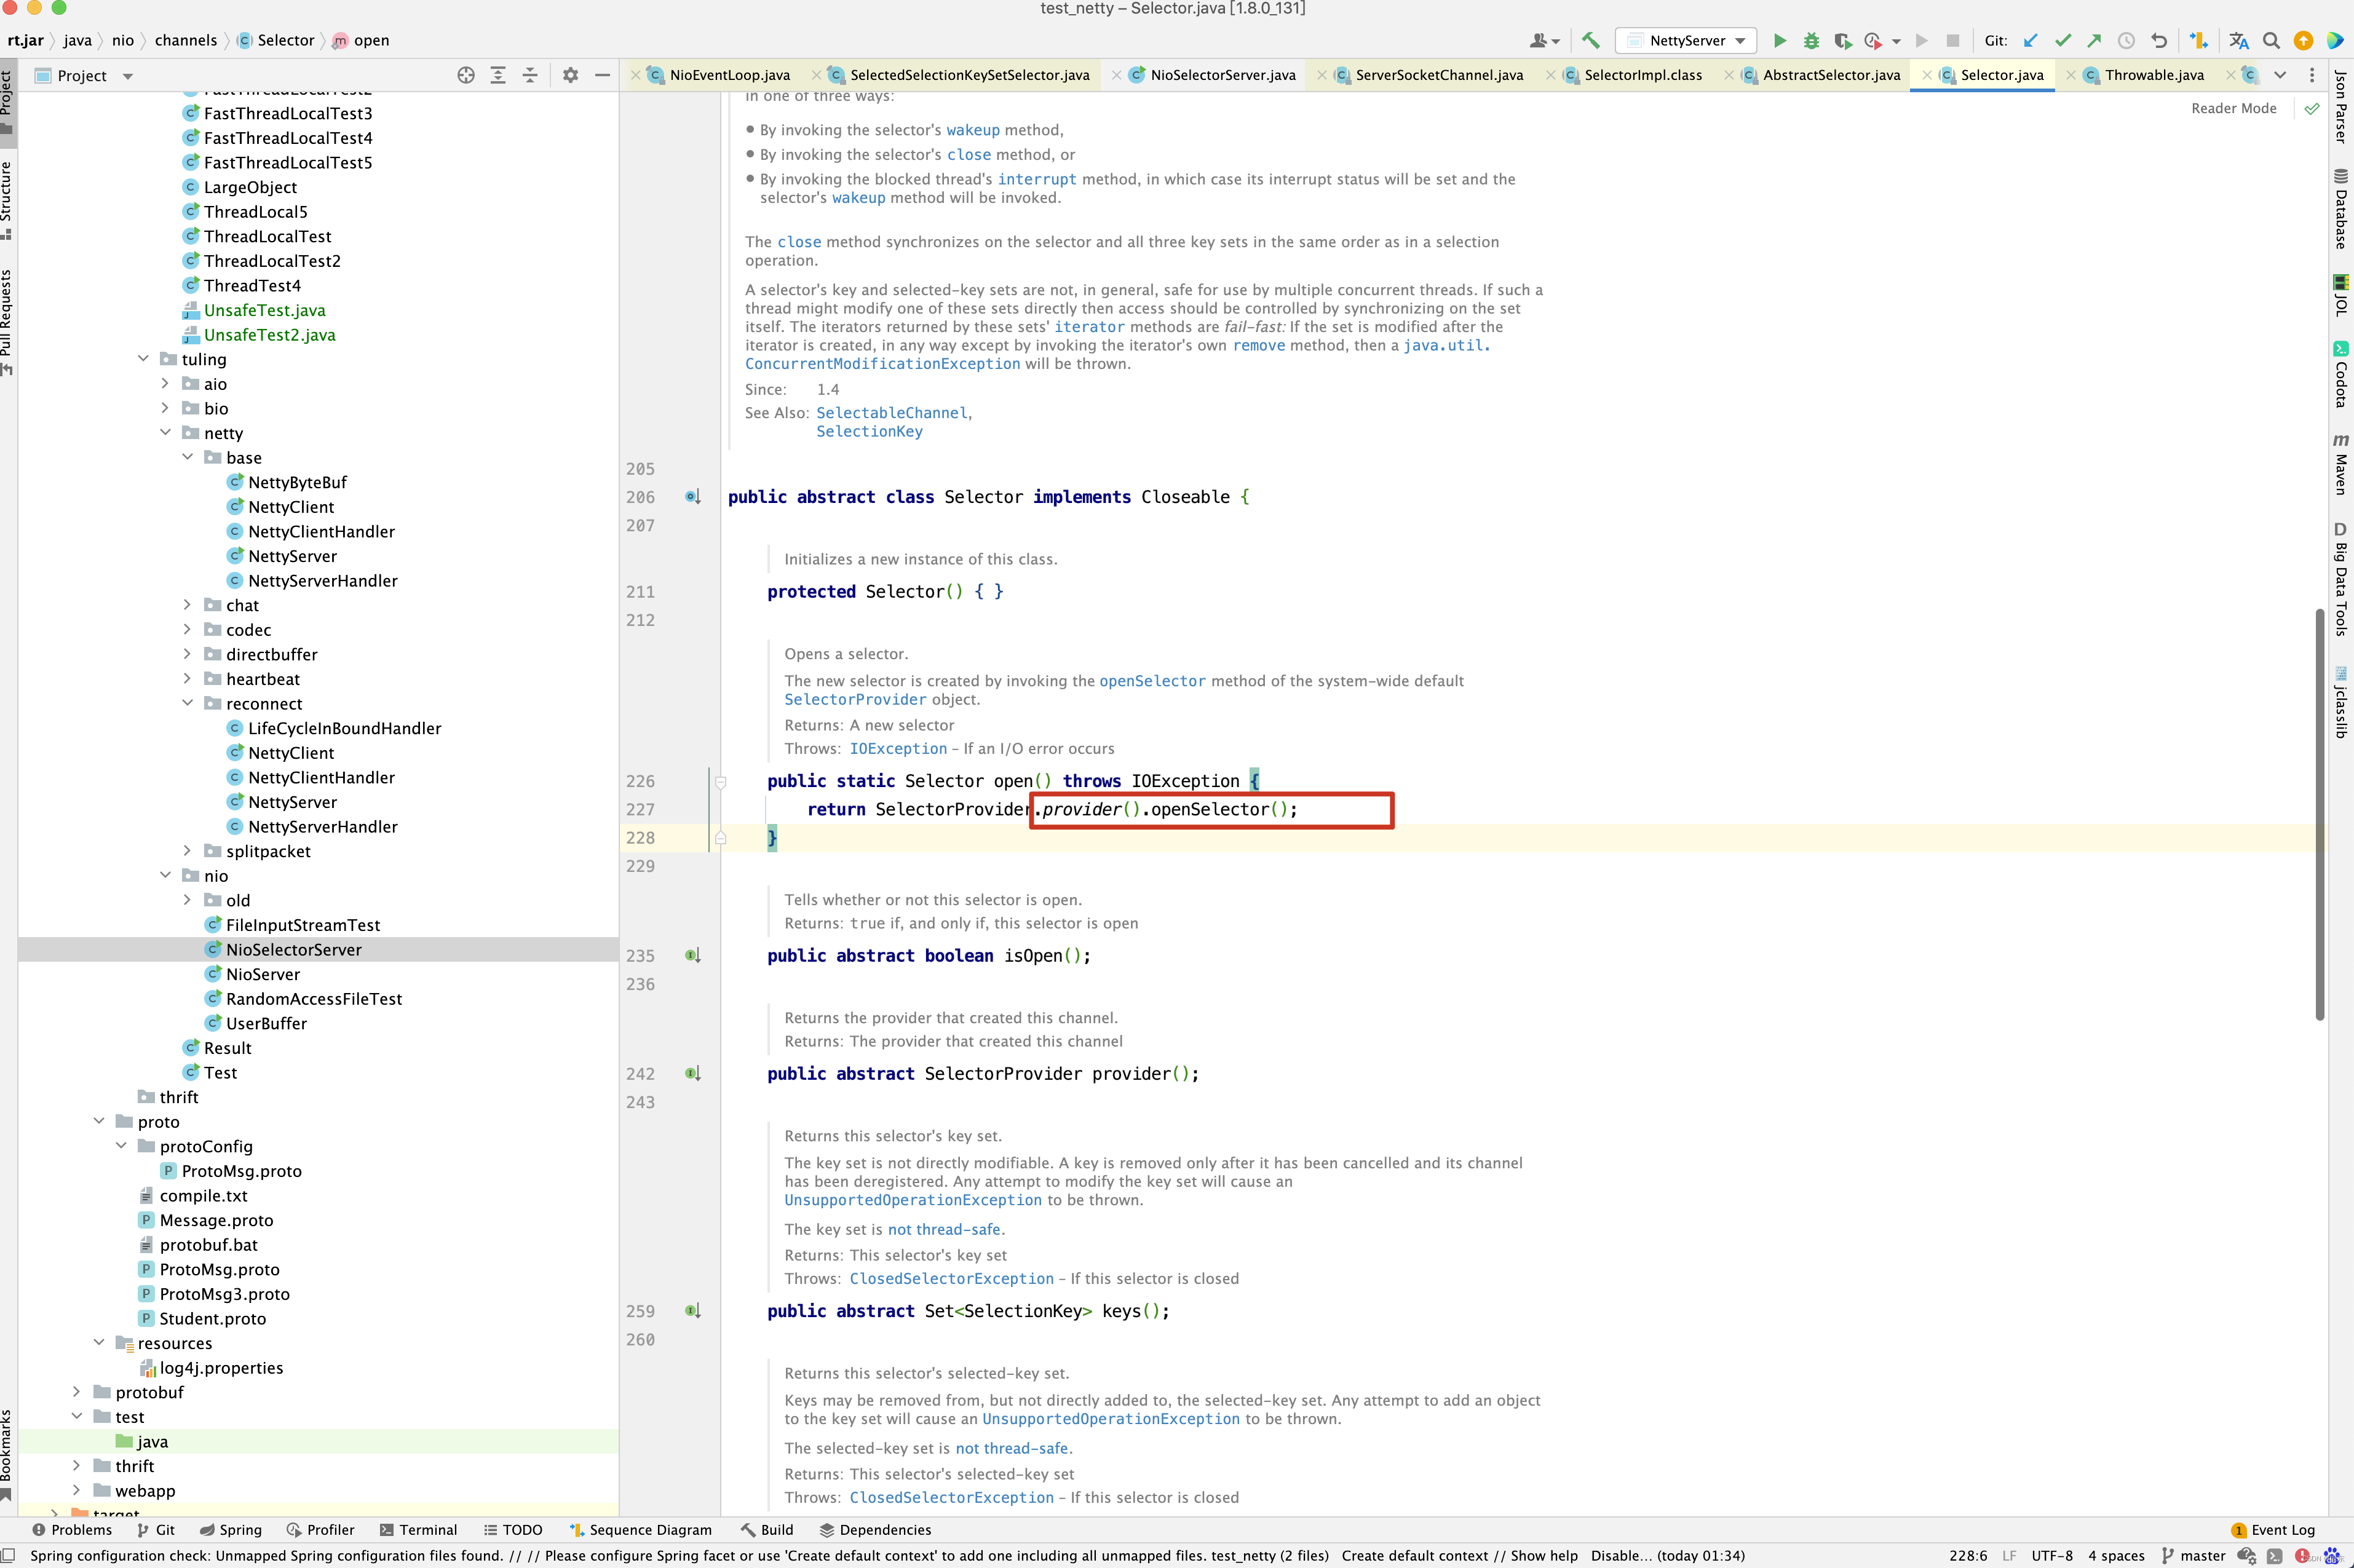
不就是Selector selector = Selector.open();这一行代码实现吗?当然接着就是为SelectorImpl的publicKeys和publicSelectedKeys这两个属性值赋值,JDK9 以上版本并且能够获取到Unsafe,则直接CAS操作publicKeys,publicSelectedKeys两个属性,否则通过反射为SelectorImpl的publicKeys和publicSelectedKeys属性赋值。 接下来看包装类SelectedSelectionKeySetSelector。先来看其类关系结构 。
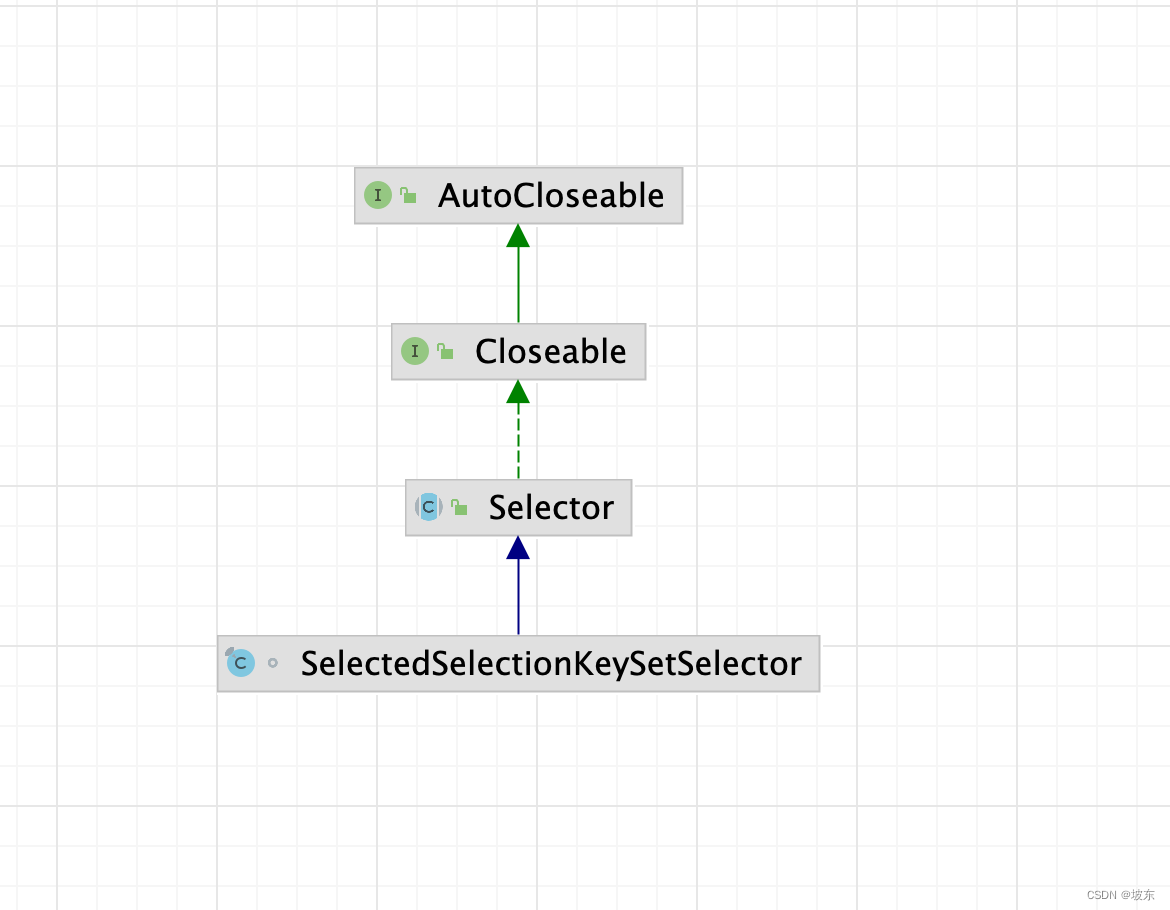
final class SelectedSelectionKeySetSelector extends Selector {
    private final SelectedSelectionKeySet selectionKeys;
    private final Selector delegate;

    SelectedSelectionKeySetSelector(Selector delegate, SelectedSelectionKeySet selectionKeys) {
        this.delegate = delegate;
        this.selectionKeys = selectionKeys;
    }

    @Override
    public boolean isOpen() {
        return delegate.isOpen();
    }

    @Override
    public SelectorProvider provider() {
        return delegate.provider();
    }

    @Override
    public Set<SelectionKey> keys() {
        return delegate.keys();
    }

    @Override
    public Set<SelectionKey> selectedKeys() {
        return delegate.selectedKeys();
    }

    @Override
    public int selectNow() throws IOException {
        selectionKeys.reset();
        return delegate.selectNow();
    }

    @Override
    public int select(long timeout) throws IOException {
        selectionKeys.reset();
        return delegate.select(timeout);
    }

    @Override
    public int select() throws IOException {
        selectionKeys.reset();
        return delegate.select();
    }

    @Override
    public Selector wakeup() {
        return delegate.wakeup();
    }

    @Override
    public void close() throws IOException {
        delegate.close();
    }
}
在SelectedSelectionKeySetSelector类中,delegate就是未包装的Selector,也就是unwrappedSelector = provider.openSelector();的返回值。这一点需要注意 。
接下来看MultithreadEventExecutorGroup的这几行代码分析 。
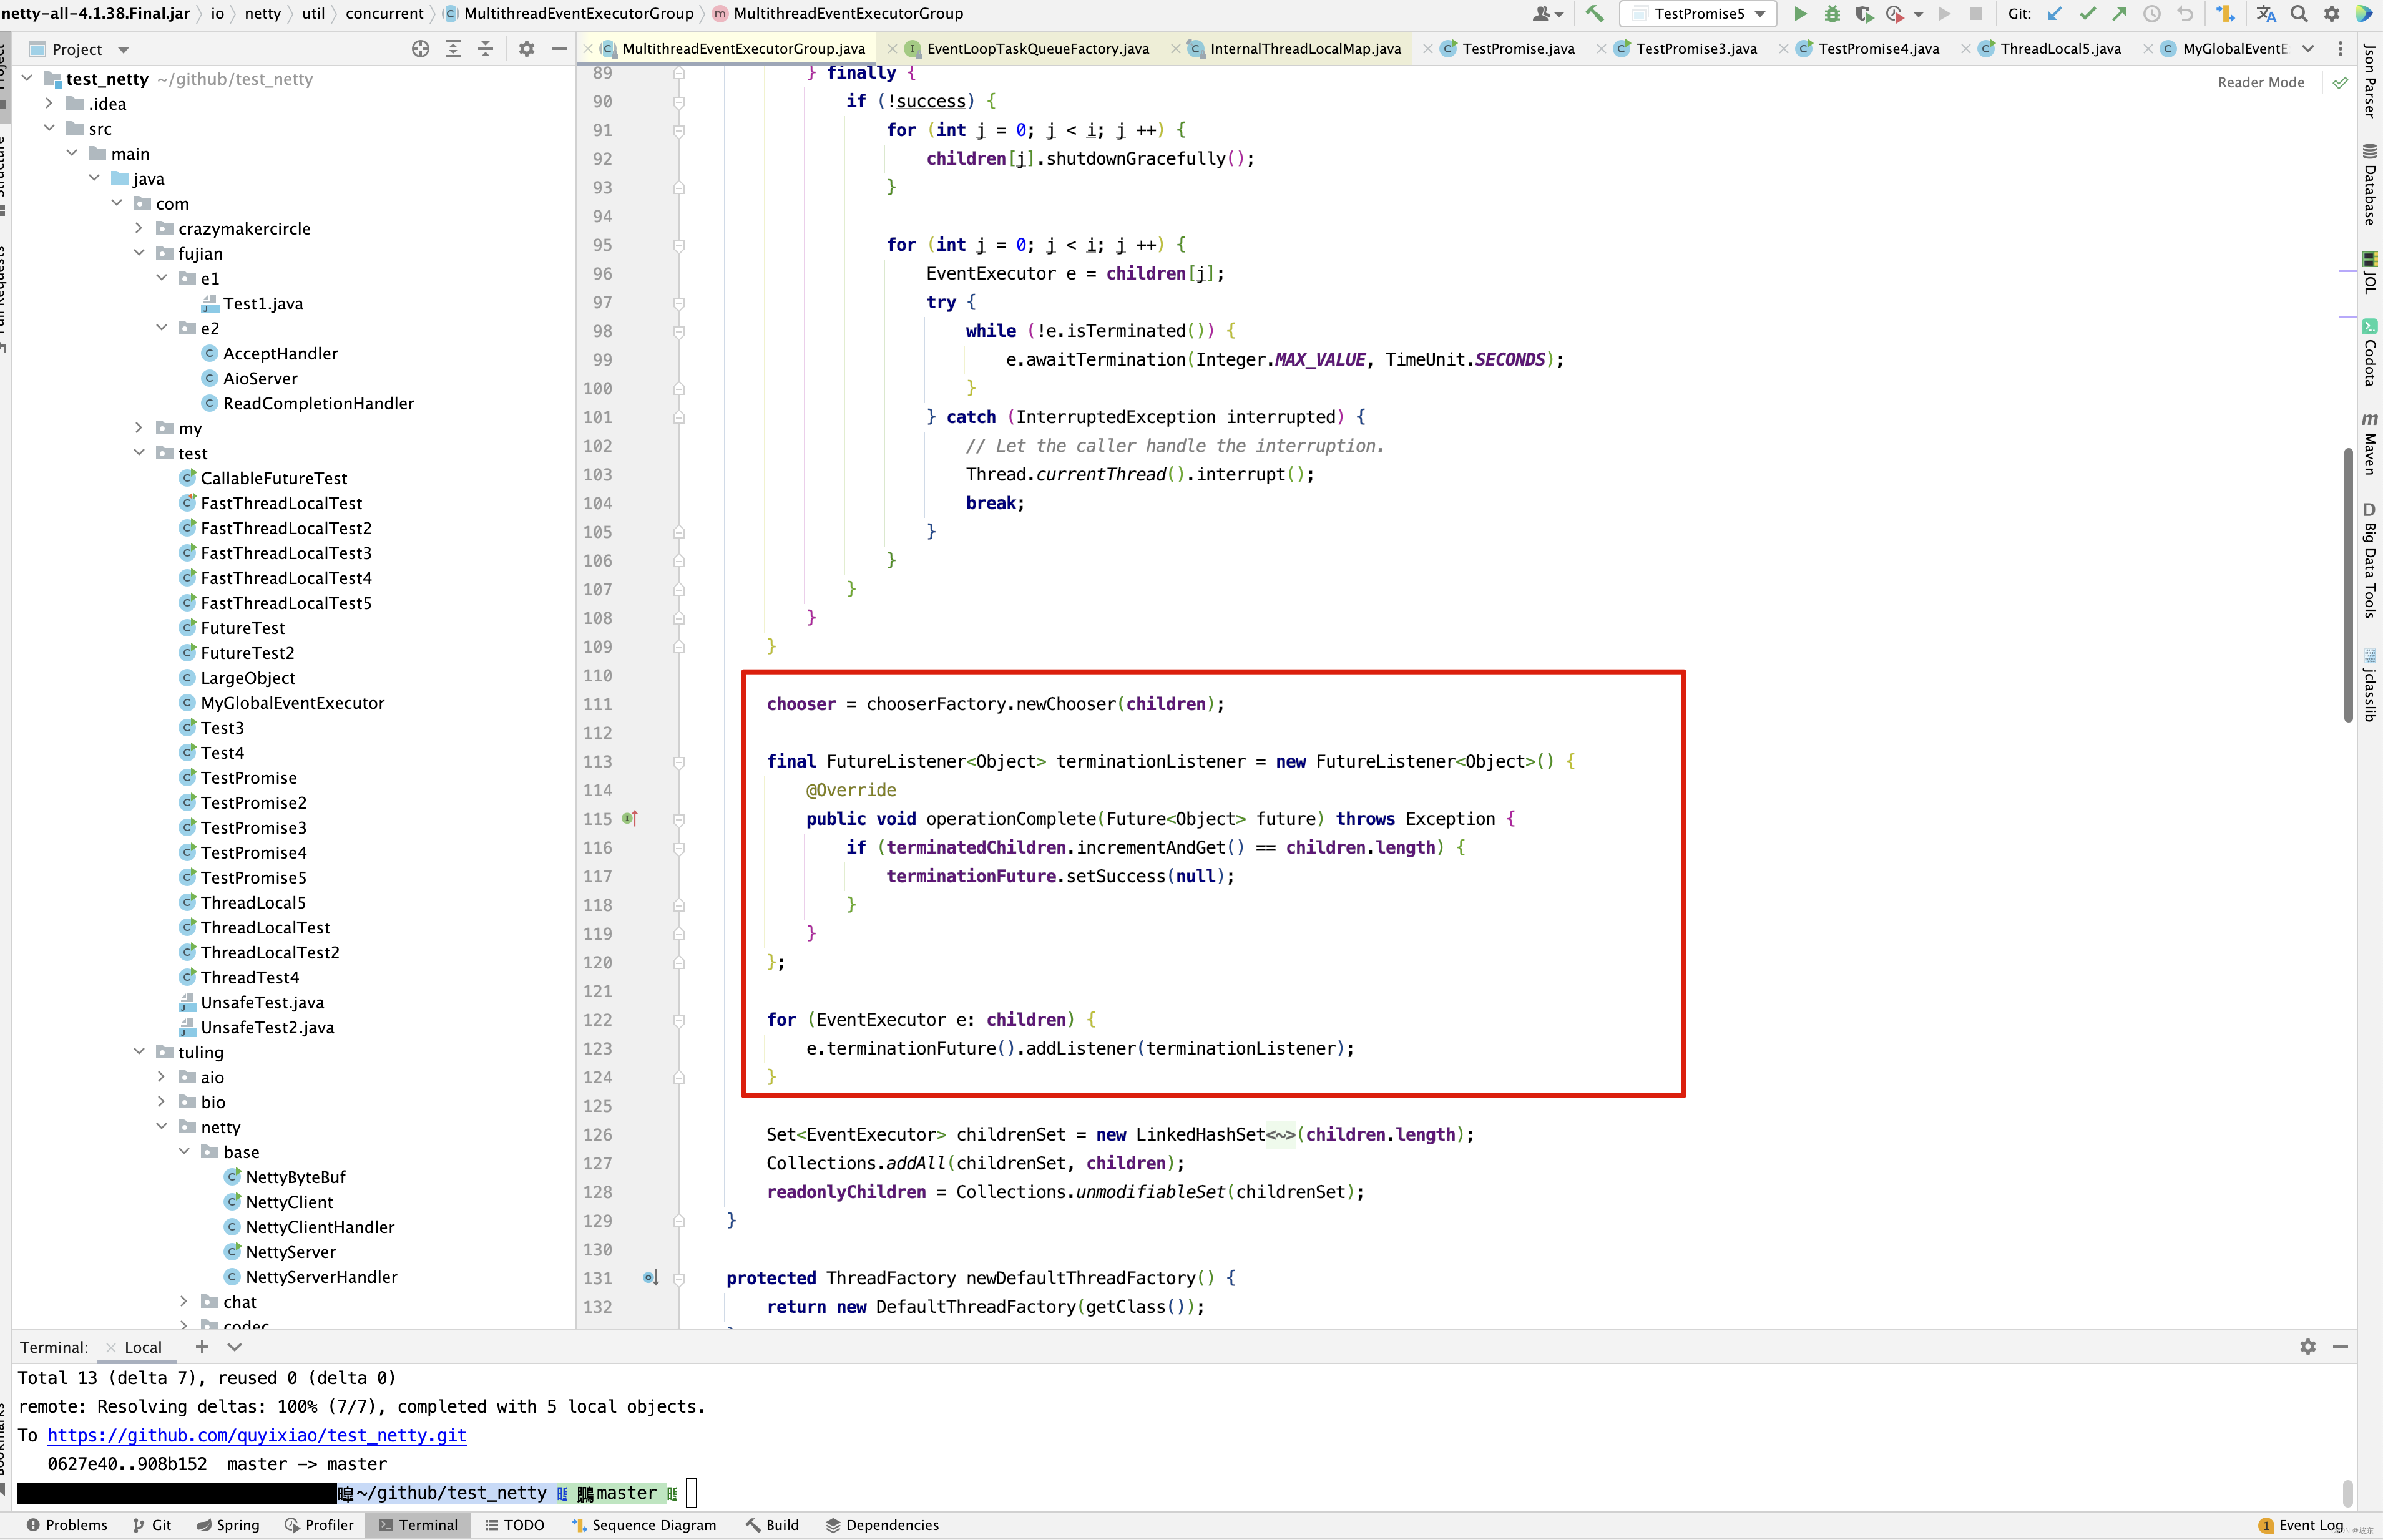
关于上述几行代码, 在另一篇博客 Netty 之 DefaultPromise 源码解析 做了具体的分析,有兴趣可以去看看。
接下来看分析ServerBootstrap的源码分析。
ServerBootstrap
接下来分析下面红框中的代码 。
首先看ServerBootstrap的构造方法。
public ServerBootstrap() { }
发现什么事情都没有做。 接下来看group代码。
public ServerBootstrap group(EventLoopGroup parentGroup, EventLoopGroup childGroup) {
    super.group(parentGroup);
    ObjectUtil.checkNotNull(childGroup, "childGroup");
    if (this.childGroup != null) {
        throw new IllegalStateException("childGroup set already");
    }
    this.childGroup = childGroup;
    return this;
}

public B group(EventLoopGroup group) {
    ObjectUtil.checkNotNull(group, "group");
    if (this.group != null) {
        throw new IllegalStateException("group set already");
    }
    this.group = group;
    return self();
}


private B self() {
    return (B) this;
}
group()方法调用只是将bossGroup和workerGroup分别设置到ServerBootstrap的group和childGroup属性中,但这里的级联调用还是很有意思的。
public class MySelf {

    public MySelf group(){
        return this;
    }

    public MySelf option(){
        return this;
    }

    public MySelf childOption(){
        return this;
    }
    public static void main(String[] args) {
        MySelf self = new MySelf();
        self.group()
                .option()
                .childOption();

    }

}
其实有个时候在想,如果Java中所有的setXXX()方法都这样写,在设置对象时,是不是更加方便一些呢? 当然,这是题外话,接着看.channel()方法的实现。
public B channel(Class<? extends C> channelClass) {
    return channelFactory(new ReflectiveChannelFactory<C>(
            ObjectUtil.checkNotNull(channelClass, "channelClass")
    ));
}
channel()方法中传入的是NioServerSocketChannel.class, 在这个方法中,其实就是初始化了一个ReflectiveChannelFactory的对象, channel()方法中用到了ReflectiveChannelFactory对象,看ReflectiveChannelFactory实现。
public class ReflectiveChannelFactory<T extends Channel> implements ChannelFactory<T> {

    private final Constructor<? extends T> constructor;

    public ReflectiveChannelFactory(Class<? extends T> clazz) {
        ObjectUtil.checkNotNull(clazz, "clazz");
        try {
            // 获取无参的构造函数
            this.constructor = clazz.getConstructor();
        } catch (NoSuchMethodException e) {
            throw new IllegalArgumentException("Class " + StringUtil.simpleClassName(clazz) +
                    " does not have a public non-arg constructor", e);
        }
    }

    @Override
    // 泛型T 代表不同的Channel
    public T newChannel() {
        try {
            // 使用反射技术创建channel
            return constructor.newInstance();
        } catch (Throwable t) {
            throw new ChannelException("Unable to create Channel from class " + constructor.getDeclaringClass(), t);
        }
    }
}
根据上面的代码提示,我们可以得出以下的结论
- Bootstrap中ChannelFactory实现类是ReflectChannelFactory .
- 通过channel()方法创建的Channel具体类型是NioSocketChannel。
此时我们知道constructor即为NioServerSocketChannel的构造器,而newChannel()调用,则会创建NioServerSocketChannel对象 。
public B channelFactory(io.netty.channel.ChannelFactory<? extends C> channelFactory) {
    return channelFactory((ChannelFactory<C>) channelFactory);
}


public B channelFactory(ChannelFactory<? extends C> channelFactory) {
    ObjectUtil.checkNotNull(channelFactory, "channelFactory");
    if (this.channelFactory != null) {
        throw new IllegalStateException("channelFactory set already");
    }

    this.channelFactory = channelFactory;
    return self();
}
channel()方法调用,实际上是创建了一个ReflectiveChannelFactory,并赋值给ServerBootstrap的channelFactory属性中,将来调用channelFactory的newChannel()方法,将反射创建NioServerSocketChannel对象 。 接下来看option方法调用 。
private final Map<ChannelOption<?>, Object> options = new LinkedHashMap<ChannelOption<?>, Object>();

public <T> B option(ChannelOption<T> option, T value) {
    ObjectUtil.checkNotNull(option, "option");
    if (value == null) {
        synchronized (options) {
            options.remove(option);
        }
    } else {
        synchronized (options) {
            options.put(option, value);
        }
    }
    return self();
}
从上述代码中可以看出,ServerBootstrap的options属性是一个LinkedHashMap对象,如果value为空,则直接将option从options中移除即可。当然ChannelOption是有很多的属性的,这些属性是什么含义呢?
public class ChannelOption<T> extends AbstractConstant<ChannelOption<T>> {


    // Netty全局参数, ByteBuf 的分配器,默认值为ByteBufAlloocator.DEFAULT,4.0版本为UnpooledByteBufAllocator。
    // 4.1 版本PooledByteBufAllocator,分别对应的字符串值为"unpooled" 和 "pooled"
    public static final ChannelOption<ByteBufAllocator> ALLOCATOR = valueOf("ALLOCATOR");
    // Netty 全局参数,用于Channel分配接收Buffer的分配器,默认值为AdaptiveRecvByteBufAllocator.DEFAULT,是一个自适应的接收缓冲区分配器。
    // 能根据接收的数据自动调节大小,可选值为FixedRecvByteBufAllocator
    // 固定大小的接收缓冲区分配器
    public static final ChannelOption<RecvByteBufAllocator> RCVBUF_ALLOCATOR = valueOf("RCVBUF_ALLOCATOR");
    // Netty全局参数,消息大小估算器,默认值为DefaultMessageSizeEstimator.DEFAULT。 估算ByteBuf,ByteBuffHolder和
    // 和FileRegion的大小,其中ByteBuf 和ByteBufHolder为实际大小,FileRegion
    // 估算值为0,该值估算的字节数在计算水位时使用,FileRegion为0
    // 可知FileRegion不影响高低水位
    public static final ChannelOption<MessageSizeEstimator> MESSAGE_SIZE_ESTIMATOR = valueOf("MESSAGE_SIZE_ESTIMATOR");
    // Netty全局参数,连接超时毫秒数,默认值为3000ms ,即30s
    public static final ChannelOption<Integer> CONNECT_TIMEOUT_MILLIS = valueOf("CONNECT_TIMEOUT_MILLIS");

    public static final ChannelOption<Integer> MAX_MESSAGES_PER_READ = valueOf("MAX_MESSAGES_PER_READ");
    public static final ChannelOption<Integer> WRITE_SPIN_COUNT = valueOf("WRITE_SPIN_COUNT");


    public static final ChannelOption<Integer> WRITE_BUFFER_HIGH_WATER_MARK = valueOf("WRITE_BUFFER_HIGH_WATER_MARK");

    public static final ChannelOption<Integer> WRITE_BUFFER_LOW_WATER_MARK = valueOf("WRITE_BUFFER_LOW_WATER_MARK");
    // Netty全局参数,设置某个连接上可以暂存的最大最小Buffer,若连接等待发送的数据量大于设置的值,则isWritable()会返回不可写
    // 这样,客户端可以不再发送,防止这个量不断的积压 , 最终可能让客户端挂掉
    public static final ChannelOption<WriteBufferWaterMark> WRITE_BUFFER_WATER_MARK = valueOf("WRITE_BUFFER_WATER_MARK");

    // Netty全局参数,一个连接远端关闭时本地端是否关闭,默认值为false,值为false时,连接自动关闭
    public static final ChannelOption<Boolean> ALLOW_HALF_CLOSURE = valueOf("ALLOW_HALF_CLOSURE");
    public static final ChannelOption<Boolean> AUTO_READ = valueOf("AUTO_READ");


    // Netty 全局参数,自动读取,默认值为true, Netty 只有在必要 的时候才设置关心相应的IO事件,对于读操作,需要
    // 调用channel.read()设置关心的I/O事件为OP_READ, 这样若有数据到达时才能读取以供用户处理
    public static final ChannelOption<Boolean> AUTO_CLOSE = valueOf("AUTO_CLOSE");

    public static final ChannelOption<Boolean> SO_BROADCAST = valueOf("SO_BROADCAST");
    public static final ChannelOption<Boolean> SO_KEEPALIVE = valueOf("SO_KEEPALIVE");
    // Socket 参数,用于设置接收数据的等待超时时间,单位为ms,默认值为0 ,表示无限等待
    public static final ChannelOption<Integer> SO_SNDBUF = valueOf("SO_SNDBUF");
    // Socket参数,TCP 数据接收缓冲区的大小,缓冲区即TCP 接收滑动窗口,Linux 操作系统可以使用命令
    // cat /proc/sys/net/ipv4/tcp_rmem 查询大小,一般情况下, 该值可由用户 任意时刻设置,但当设置值超过64KB
    // 时,需要在连接到远端之前设置
    public static final ChannelOption<Integer> SO_RCVBUF = valueOf("SO_RCVBUF");
    // Socket 参数,地址复用,默认值为false,有4种情况可以使用,1,当有一个有相同的本地地址和端口的Socket1处于TIME_WAIT状态时
    // 你希望启动的程序Socket2 要占用该地址和端口,比如重启服务且保持先前的端口,有多块网卡或用IP Alias技术的机器在同一端启动多个
    // 进程,但每个进程 绑定的本地IP地址可能不同, 单个进程绑定的相同的端口有多个Socket 上,但每个Socket绑定的IP地址可能不同 。
    // 4 完全相同的越来越和端口重新绑定,但这里只用于UDP的多皤,不用于TCP.
    public static final ChannelOption<Boolean> SO_REUSEADDR = valueOf("SO_REUSEADDR");
    // Socket参数,关闭Socket的延迟时间,默认值为-1, 表示禁用该功能,-1 表示socket.close()方法立即返回。但操作系统底层会将发送缓冲区
    // 的数据全部 发送到对端,0表示socket.close()方法立即返回,操作系统放弃发送缓冲区的数据直接向对端发送RST包, 对端收到复位
    // 错误,非0整数值表示调用socket.close()方法的线程被阻塞直到延迟时间到或缓冲区的数据发送完毕,若超时,则对端会收到复位错误。
    public static final ChannelOption<Integer> SO_LINGER = valueOf("SO_LINGER");
    public static final ChannelOption<Integer> SO_BACKLOG = valueOf("SO_BACKLOG");
    public static final ChannelOption<Integer> SO_TIMEOUT = valueOf("SO_TIMEOUT");

    public static final ChannelOption<Integer> IP_TOS = valueOf("IP_TOS");
    // IP 参数 , 对应的IP参数IP_MULTICAST_IF , 设置对应的地址为网卡多播模式
    public static final ChannelOption<InetAddress> IP_MULTICAST_ADDR = valueOf("IP_MULTICAST_ADDR");
    // IP 参数,对应的IP参数IP_MULTICAST2 , 同上,支持IP6
    public static final ChannelOption<NetworkInterface> IP_MULTICAST_IF = valueOf("IP_MULTICAST_IF");
    // IP 参数, 多播数据报Time-to-Live,即存活跳数
    public static final ChannelOption<Integer> IP_MULTICAST_TTL = valueOf("IP_MULTICAST_TTL");
    // IP 参数,对应的IP参数IP_MULTICAST_LOOP,设置本地回环接口的多播功能,
    // 由于IP_MULTICAST_LOOP返回true,表示关闭,所以,Netty 加后缀_DISABLED防止歧义
    public static final ChannelOption<Boolean> IP_MULTICAST_LOOP_DISABLED = valueOf("IP_MULTICAST_LOOP_DISABLED");

    // TCP 参数,表示立即发送数据,默认值为true (Netty 默认值为true 而操作系统默认值为false)该值设置Nagle算法的启动
    public static final ChannelOption<Boolean> TCP_NODELAY = valueOf("TCP_NODELAY");

    public static final ChannelOption<Boolean> DATAGRAM_CHANNEL_ACTIVE_ON_REGISTRATION =
            valueOf("DATAGRAM_CHANNEL_ACTIVE_ON_REGISTRATION");

    // 单线程执行ChannelPipeline中的事件,默认值为true,该值控制执行ChannelPipeline中执行ChannelHandler的线程。
    // 如果为true, 整个pipeline由一个线程执行,这样不需要进行线程切换以及线程同步,是Netty 4 的推荐做法,如为false
    // channelHandler 中处理过程会由Group中不同的线程执行
    public static final ChannelOption<Boolean> SINGLE_EVENTEXECUTOR_PER_GROUP =
            valueOf("SINGLE_EVENTEXECUTOR_PER_GROUP");


    private ChannelOption(int id, String name) {
        super(id, name);
    }

    protected ChannelOption(String name) {
        this(pool.nextId(), name);
    }

    public void validate(T value) {
        if (value == null) {
            throw new NullPointerException("value");
        }
    }
}
接下来看childHandler()方法调用 。 实际上也只是设置了ServerBootstrap的childHandler的属性值。
public ServerBootstrap childHandler(ChannelHandler childHandler) {
    this.childHandler = ObjectUtil.checkNotNull(childHandler, "childHandler");
    return this;
}
这些属性什么时候使用呢? 在后面的代码再来分析,接下来看ChannelFuture cf = bootstrap.bind(9000).sync();这一行代码 。
public ChannelFuture bind(int inetPort) {
    return bind(new InetSocketAddress(inetPort));
}

public ChannelFuture bind(SocketAddress localAddress) {
	// 较验group和channelFactory是否为空,如果为空,则抛出异常
    validate();
    return doBind(ObjectUtil.checkNotNull(localAddress, "localAddress"));
}

public B validate() {
    if (group == null) {
        throw new IllegalStateException("group not set");
    }
    if (channelFactory == null) {
        throw new IllegalStateException("channel or channelFactory not set");
    }
    return self();
}
bind()方法实现很简单,用端口构建出SocketAddress对象,在真正调用doBind()方法之前,较验group和channelFactory是否存在,如果不存在 ,则抛出异常。 接下来看doBind()方法的实现。
// AbstractBoostrap 与 ServerBootstrap 初 始 化 Channel 并 注 册 到 NioEventLoop线程上,以及端口绑定的核心源码解读如下:
private ChannelFuture doBind(final SocketAddress localAddress) {
    // 初始化Channel 并注册到NioEventLoop线程上
    final ChannelFuture regFuture = initAndRegister();
    final Channel channel = regFuture.channel();
    // 判断是否存在异常
    if (regFuture.cause() != null) {
        return regFuture;
    }

    if (regFuture.isDone()) {
        // At this point we know that the registration was complete and successful.
        // 将注册成功后需要绑定的端口由NioEventLoop线程去异步执行,此时需要创建ChannelPromise对象
        ChannelPromise promise = channel.newPromise();
        // 最终调用AbstractChannel的bind()方法
        doBind0(regFuture, channel, localAddress, promise);
        return promise;
    } else {
        // Registration future is almost always fulfilled already, but just in case it's not.
        // 由于注册操作由NioEventLoop线程去异步执行,因此可能会执行不完,此时需要返回 PendingRegistrationPromise 对象,及时将结果交互给主线程
        final PendingRegistrationPromise promise = new PendingRegistrationPromise(channel);
        // 加上注册监听器,注册动作完成后触发
        regFuture.addListener(new ChannelFutureListener() {
            @Override
            public void operationComplete(ChannelFuture future) throws Exception {
                Throwable cause = future.cause();
                if (cause != null) {
                    // Registration on the EventLoop failed so fail the ChannelPromise directly to not cause an
                    // IllegalStateException once we try to access the EventLoop of the Channel.
                    // 注册失败处理,响应给主线程
                    promise.setFailure(cause);
                } else {
                    // Registration was successful, so set the correct executor to use.
                    // See https://github.com/netty/netty/issues/2586
                    promise.registered();
                    // 只有成功后才能绑定
                    doBind0(regFuture, channel, localAddress, promise);
                }
            }
        });
        return promise;
    }
}
先来看initAndRegister()方法 。
final ChannelFuture initAndRegister() {
    Channel channel = null;
    try {
        // 根据serverBootstrap.channel(NioServerSocketChannel.class)反射创建NioServerSocketChannel对象
        channel = channelFactory.newChannel();
        // 初始化NioServerSocketChannel , 设置channel的参数,为Worker线程管理SocketChannel准备好参数及其Handlert处理链
        init(channel);
    } catch (Throwable t) {
        // 初始化处理失败, 创建DefaultChannelPromise实例,设置异常并返回
        if (channel != null) {
            // channel can be null if newChannel crashed (eg SocketException("too many open files"))
            channel.unsafe().closeForcibly();
            // as the Channel is not registered yet we need to force the usage of the GlobalEventExecutor
            return new DefaultChannelPromise(channel, GlobalEventExecutor.INSTANCE).setFailure(t);
        }
        // as the Channel is not registered yet we need to force the usage of the GlobalEventExecutor
        return new DefaultChannelPromise(new FailedChannel(), GlobalEventExecutor.INSTANCE).setFailure(t);
    }
    // 调用SingleThreadEventLoop 的register()方法 ,最终触发AbstractUnsafe的register
    // 这里的group()指的就是bossgroup
    ChannelFuture regFuture = config().group().register(channel);
    // 注册异常处理
    if (regFuture.cause() != null) {
        if (channel.isRegistered()) {
            channel.close();
        } else {
            channel.unsafe().closeForcibly();
        }
    }

    // If we are here and the promise is not failed, it's one of the following cases:
    // 1) If we attempted registration from the event loop, the registration has been completed at this point.
    //    i.e. It's safe to attempt bind() or connect() now because the channel has been registered.
    // 2) If we attempted registration from the other thread, the registration request has been successfully
    //    added to the event loop's task queue for later execution.
    //    i.e. It's safe to attempt bind() or connect() now:
    //         because bind() or connect() will be executed *after* the scheduled registration task is executed
    //         because register(), bind(), and connect() are all bound to the same thread.

    /**
     * 这段注释比较长,主要讲述Channel 注册成功后的一些操作,bind或connect 操作需要register完成后执行,此涉及线程切换,因为ServerBootStrap
     * 运行在主线程上,而register,bind,connect,需要在NioEventLoop 线程上执行,注释翻译如下
     * 如果程序到这里,则说明promise没有失败,可能发生以下情况
     * 1. 如果尝试将Channel注册到EventLoop上,则此时注册已经完成inEventLoop返回true,Channel已经注册成功,可以安全调用bind()或connect()方法
     * 2. 如果尝试注册到另一个线程上,即inEventLoop返回false, 则此时register语法已经完成添加到事件循环的任务队列中,现在同样可以尝试调用
     * bind() 或connect() ,因为register(),bind() 和connect() 都被绑定在同一个I/O 线程上,所以在执行完register Task后,bind()
     * 或connect()才会被执行
     */
    return regFuture;
}

public final EventLoopGroup group() {
    return bootstrap.group();
}
Channel的实例化过程其实就是调用ChannelFactory的newChannel()方法,而实例化Channel具体类型又和初始化Bootstrap时传入的channel()方法的参数有关,因此对于服务端的Bootstrap而言,创建Channel实例上是创建的NioServerSocketChannel。接下来进入NioServerSocketChannel的构造函数,看他做了哪些事情 。
private static final SelectorProvider DEFAULT_SELECTOR_PROVIDER = SelectorProvider.provider();

public NioServerSocketChannel() {
    this(newSocket(DEFAULT_SELECTOR_PROVIDER));
}
这里的代码比较关键,我们可以看到,在这个构造器中首先会调用newSocket()方法来打开一个新的Java NIO 的SocketChannel。
private static ServerSocketChannel newSocket(SelectorProvider provider) {
    try {
        /**
         *  Use the {@link SelectorProvider} to open {@link SocketChannel} and so remove condition in
         *  {@link SelectorProvider#provider()} which is called by each ServerSocketChannel.open() otherwise.
         *
         *  See <a href="https://github.com/netty/netty/issues/2308">#2308</a>.
         */
        return provider.openServerSocketChannel();
    } catch (IOException e) {
        throw new ChannelException(
                "Failed to open a server socket.", e);
    }
}

public NioServerSocketChannel(ServerSocketChannel channel) {
    super(null, channel, SelectionKey.OP_ACCEPT);
    config = new NioServerSocketChannelConfig(this, javaChannel().socket());
}
| 类名 | 解释 |
|---|---|
| NioSocketChannel | 异步非阻塞的客户端TCPSocket连接 |
| NioServerSocketChannel | 异步非阻塞的服务端TCP Socket连接 |
| NioDatagramChannel | 异步非阻塞的UDP连接 |
| NioSctpChannel | 异步的客户端SCTP (Stream Control Transmission Protocol ,流程控制传输协议)连接 |
| NIOSctpServerChannel | 异步是SCTP 服务端连接 |
| OioSocketChannel | 同步阻塞的客户端TCP Socket连接 |
| OioServerSocketChannel | 同步阻塞的服务端TCP Socket 连接 |
| OioDatagramChannel | 同步阻塞的UDP连接 |
| OioSctpChannel | 同步的SCTP服务端连接 |
| OioSctpServerChannel | 同步的客户端TCP Socket连接 |
在NioServerSocketChannel构造函数执行过程中, 通过SelectorProvider.provider.openServerSocketChannel()获取到ServerSocketChannel。大家有没有发现和Selector获取方式很像,看Selector的获取方式。
都是通过SelectorProvider.provider获取到的。
突然发现,这不就是ServerSocketChannel的创建嘛。
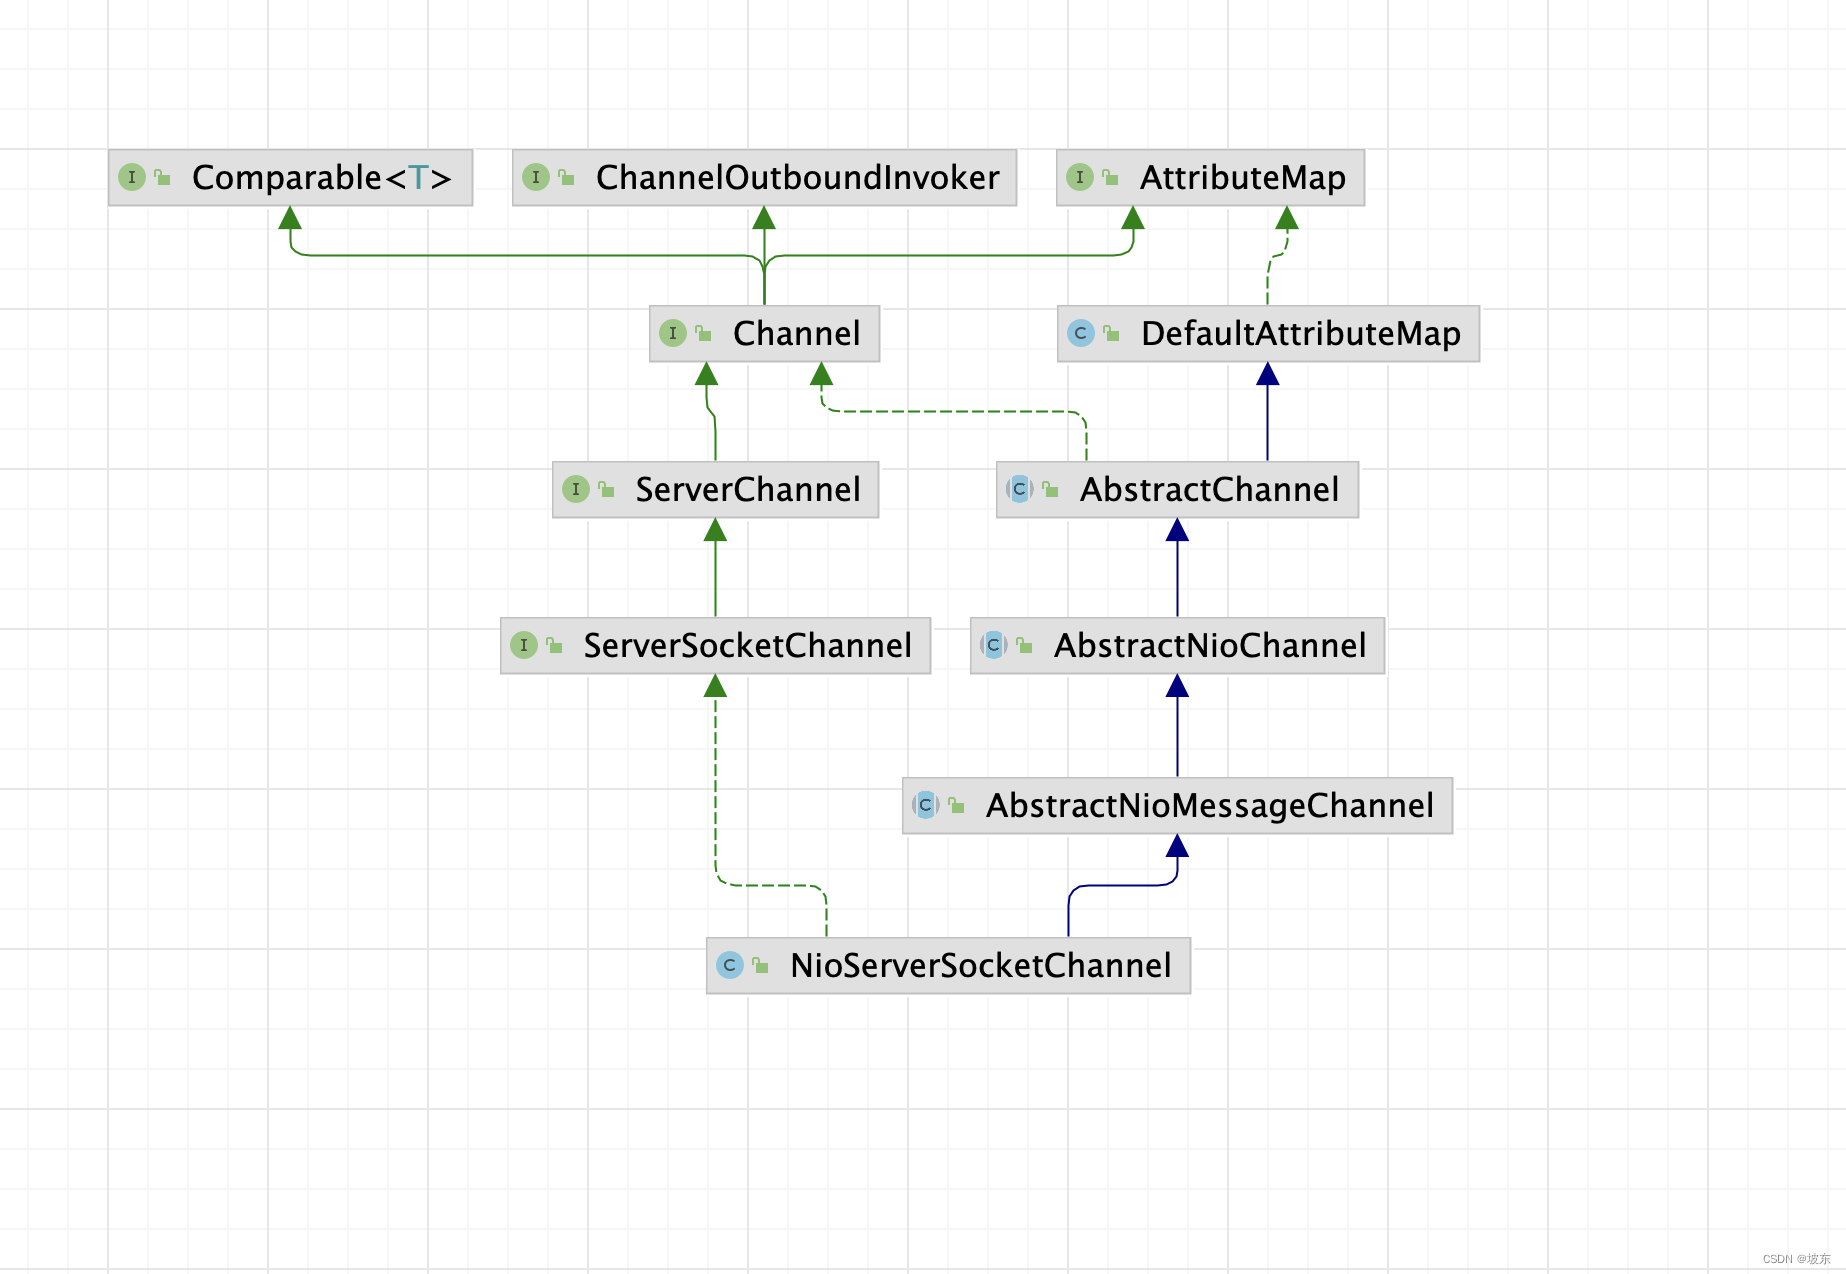
实际上返回的是一个ServerSocketChannelImpl对象。进入NioServerSocketChannel的父类方法 。
public abstract class AbstractNioChannel extends AbstractChannel {

    // AbstractNioChannel 也是一个抽象类, 不过它在AbstractChannel的基础上增加了一些属性和方法,AbstractChannel没有涉及到Nio的
    // 任何属性和具体的方法,包括AbstractUnsafe,AbstractNioChannel有以下3个重要的属性
    // 真正用到了NIO channel, SelectableChannel是java.nio.SocketChannel和java.nio.ServerSocketChannel公共的抽象类
    private final SelectableChannel ch;
    // 监听感兴趣的事件, readInterestOp用于区分当前Channel监听的事件类型
    protected final int readInterestOp;
    // 注册到Selector 后获取key, selectionKey 它是将SelectableChannel注册到Selector后的返回值,这些属性的定义可以看出
    // 在AbstractNioChannel中,已经将Netty的Channel 和java NIO的Channel 关联起来。
    volatile SelectionKey selectionKey;

	protected AbstractNioMessageChannel(Channel parent, SelectableChannel ch, int readInterestOp) {
	    super(parent, ch, readInterestOp);
	}

	protected AbstractNioChannel(Channel parent, SelectableChannel ch, int readInterestOp) {
	    super(parent);
	    this.ch = ch;
	    this.readInterestOp = readInterestOp;
	    try {
	    	// 设置ServerSocketChannel为非阻塞
	        ch.configureBlocking(false);
	    } catch (IOException e) {
	        try {
	            ch.close();
	        } catch (IOException e2) {
	            if (logger.isWarnEnabled()) {
	                logger.warn(
	                        "Failed to close a partially initialized socket.", e2);
	            }
	        }

	        throw new ChannelException("Failed to enter non-blocking mode.", e);
	    }
	}
接下会调用父类的AbstractChannel的构造函数,并传入实际参数readInterestOp=SelectionKey.OP_READ。
public abstract class AbstractChannel extends DefaultAttributeMap implements Channel {
    private static final InternalLogger logger = InternalLoggerFactory.getInstance(AbstractChannel.class);

    // AbstractChannel内部有一个parent属性, 表示通道的父通道,对于连接监听通道(如NioServerSocketChannel 实例)来说,其父亲通道的null
    // 而对于每一条传输通道,(如NioSocketChannel实例),其parent属性的值为接收到该连接的服务器连接的监听通道 。
    private final Channel parent;               // 父通道
    private final ChannelId id;
    // 实现具体的连接与读/写数据,如网络的读/写,链路关闭,发起连接等,命名为Unsafe表示不对外提供使用,并非不安全
    private final Unsafe unsafe;
    // 一个Handler容器,也可以将其理解为一个Handler链,Handler 主要处理数据的编/解码业务逻辑
    // AbstractChannel内部有一个pipeline属性,表示处理器的流水线, Netty在对通道进行初始化的时候,将pipeline属性初始化为DefaultChannelPipeline
    // 的实例, 这段代码也表明,每个通道拥有一条ChannelPipeline处理器流水线 。
    //
    private final DefaultChannelPipeline pipeline;
    private final VoidChannelPromise unsafeVoidPromise = new VoidChannelPromise(this, false);
    private final CloseFuture closeFuture = new CloseFuture(this);

    private volatile SocketAddress localAddress;
    private volatile SocketAddress remoteAddress;
    // 每个Channel 对应一条EventLoop线程
    private volatile EventLoop eventLoop;
    private volatile boolean registered;
    private boolean closeInitiated;
    private Throwable initialCloseCause;

    /** Cache for the string representation of this channel */
    private boolean strValActive;
    private String strVal;

    /**
     * Creates a new instance.
     * @param parent
     *        the parent of this channel. {@code null} if there's no parent.
     */
    protected AbstractChannel(Channel parent) {
        this.parent = parent;                           // 父通道
        id = newId();
        unsafe = newUnsafe();                  // 底层的NIO通道,完成的实际的IO操作
        pipeline = newChannelPipeline();                // 一条通道,拥有一条流水线
    }
    ...
}
Channel 是Netty 抽象出来对网络I/O进行读/写的相关接口,与NIO中的Channel接口相似,Channel的主要功能有网络I/O的读/写,客户端发起连接,主动关闭链接,关闭链接,获取通信双方的网络地址等,Channel接口下有一个重要的抽象类,AbstractChannel, 一些公共的基础方法都是达这个抽象类中实现。一些特定的功能可以通过各个不同的实现类去实现, 最大限度的实现功能和接口的重用。AbstractChannel融合了Netty的线程模型,事件驱动模型,但由于网络I/O模型及协议种类较多, 除了TCP协议,Netty还支持很多的其他连接协议,并且每种协议都有传统阻塞I/O和NIO(非阻塞I/O)版本的区别,不同的协议,不同的阻塞类型的连接有不同的Channel类型与之对应,因此AbstractChannel并没有与网络I/O直接相关的操作,每种阻塞与非阻塞Channel在AbstractChannel上都会继续抽象一层,如AbstractNioChannel,既是Netty 重新封装的EpollSocketChannel实现,其他非阻塞I/O Channel 的抽象层。
至此,NioSocketChannel就完成了初始化,我们可以稍微的总结一下NioServerSocketChannel初始化的所有工作内容。
- 调用NioServerSocket.newSocket(DEFAULT_SELECTOR_PROVIDER)打开一个新的java NioSocketChannel.
- 初始化AbstractChannel(Channel parent)对象并给属性赋值,具体赋值的属性如下 。
- id : 每个Channel 都会被分配一个唯一的id。
- parent : 属性值默认为null。
- unsafe: 通过调用newUnsafe()方法实例化一个Unsafe对象,它的类型是AbstractNioByteChannel.NioByteUnsafe 。
- pipeline:是通过调用new DefaultChannelPipeline(this) 新创建的实例。
- AbstractNIOChannel被赋值的属性如下
- ch : 被赋值为Java 原生的SocketChannel ,即NioSocketChannel的newSocket()方法返回的Java NioSocketChannel。
- readInterestOp : 被赋值的SelectionKey.OP_READ。
- ch : 被配置为非阻塞, 即调用ch.configureBlocking(false)方法 。
- NioSocketChannel 中被赋值的属性, config = new NioServerSocketChannelConfig(this, socket.socket());
interface Unsafe {
    RecvByteBufAllocator.Handle recvBufAllocHandle();
    SocketAddress localAddress();
    SocketAddress remoteAddress();
    void register(EventLoop eventLoop, ChannelPromise promise);
    void bind(SocketAddress localAddress, ChannelPromise promise);
    void connect(SocketAddress remoteAddress, SocketAddress localAddress, ChannelPromise promise);
    void disconnect(ChannelPromise promise);
    void close(ChannelPromise promise);
    void closeForcibly();
    void deregister(ChannelPromise promise);
    void beginRead();
    void write(Object msg, ChannelPromise promise);
    void flush();
    ChannelPromise voidPromise();
    ChannelOutboundBuffer outboundBuffer();
}
从上述代码中可以看出 , 这些方法其实都是与Java 底层相关的Socket 的操作相对应 。
继续回到AbstractChannel 的构造函数中, 这里调用了newUnsafe()方法获取一个新的Unsafe对象,而newUnsafe()方法在NioServerSocketChannel 中被重写了,代码如下 。
protected AbstractNioUnsafe newUnsafe() {
    return new NioMessageUnsafe();
}
在上面分析了NioServerSocketChannel的大体初始化过程,但是漏掉了一个关键的部分,即ChannelPipeline的初始化,在Pipeline的注释说明中写道“Each channel has its own pipeline and it is created automatically when a new channel is created”。 我们知道,在实例化一个Channel 时,必须被初始化为DefaultChannelPipeline实例,DefaultChannelPipeline构造器的代码如下 。
protected DefaultChannelPipeline newChannelPipeline() {
    return new DefaultChannelPipeline(this);
}


/**
 *                  |--------->Decorder1------> Decoder2------->|
 * HeadContext ---->|                                           |------> TailContext
 *           | <--- |                                           |<------|
 *                  |<-------Encoder1  <----- Encoder2 <--------|
 *
 * 图中的HeadContext和TailContext之间连接了各种编码器、解码器,形成了整个Handler链表,图中的箭头表示编码器和解码器的查
 * 找方向。Handler链表的头部和尾部都是在DefaultChannelPipeline的 构造方法中定义好的,具体代码如下:
 */
protected DefaultChannelPipeline(Channel channel) {
    this.channel = ObjectUtil.checkNotNull(channel, "channel");
    succeededFuture = new SucceededChannelFuture(channel, null);
    voidPromise =  new VoidChannelPromise(channel, true);

    tail = new TailContext(this);
    head = new HeadContext(this);

    head.next = tail;
    tail.prev = head;
}
DefaultChannelPipeline的构造函数要传入一个Channel ,而这个Channel 其实就是我们初始化的NioServerSocketChannel 对象,DefaultChannelPipeline会将这个NioSocketChannel对象保存在Channel 属性中, DefaultChannelPipeline中还有两个特殊的属性,Head 和Tail ,这两个属性是双向链表的头和尾, 这个链表是Netty 实现Pipeline的机制的关键,关于DefaultChannelPipeline中的双向链表及其所起的作用。后面再来分析 。 先来看HeadContext和TailContext的层次结构 。
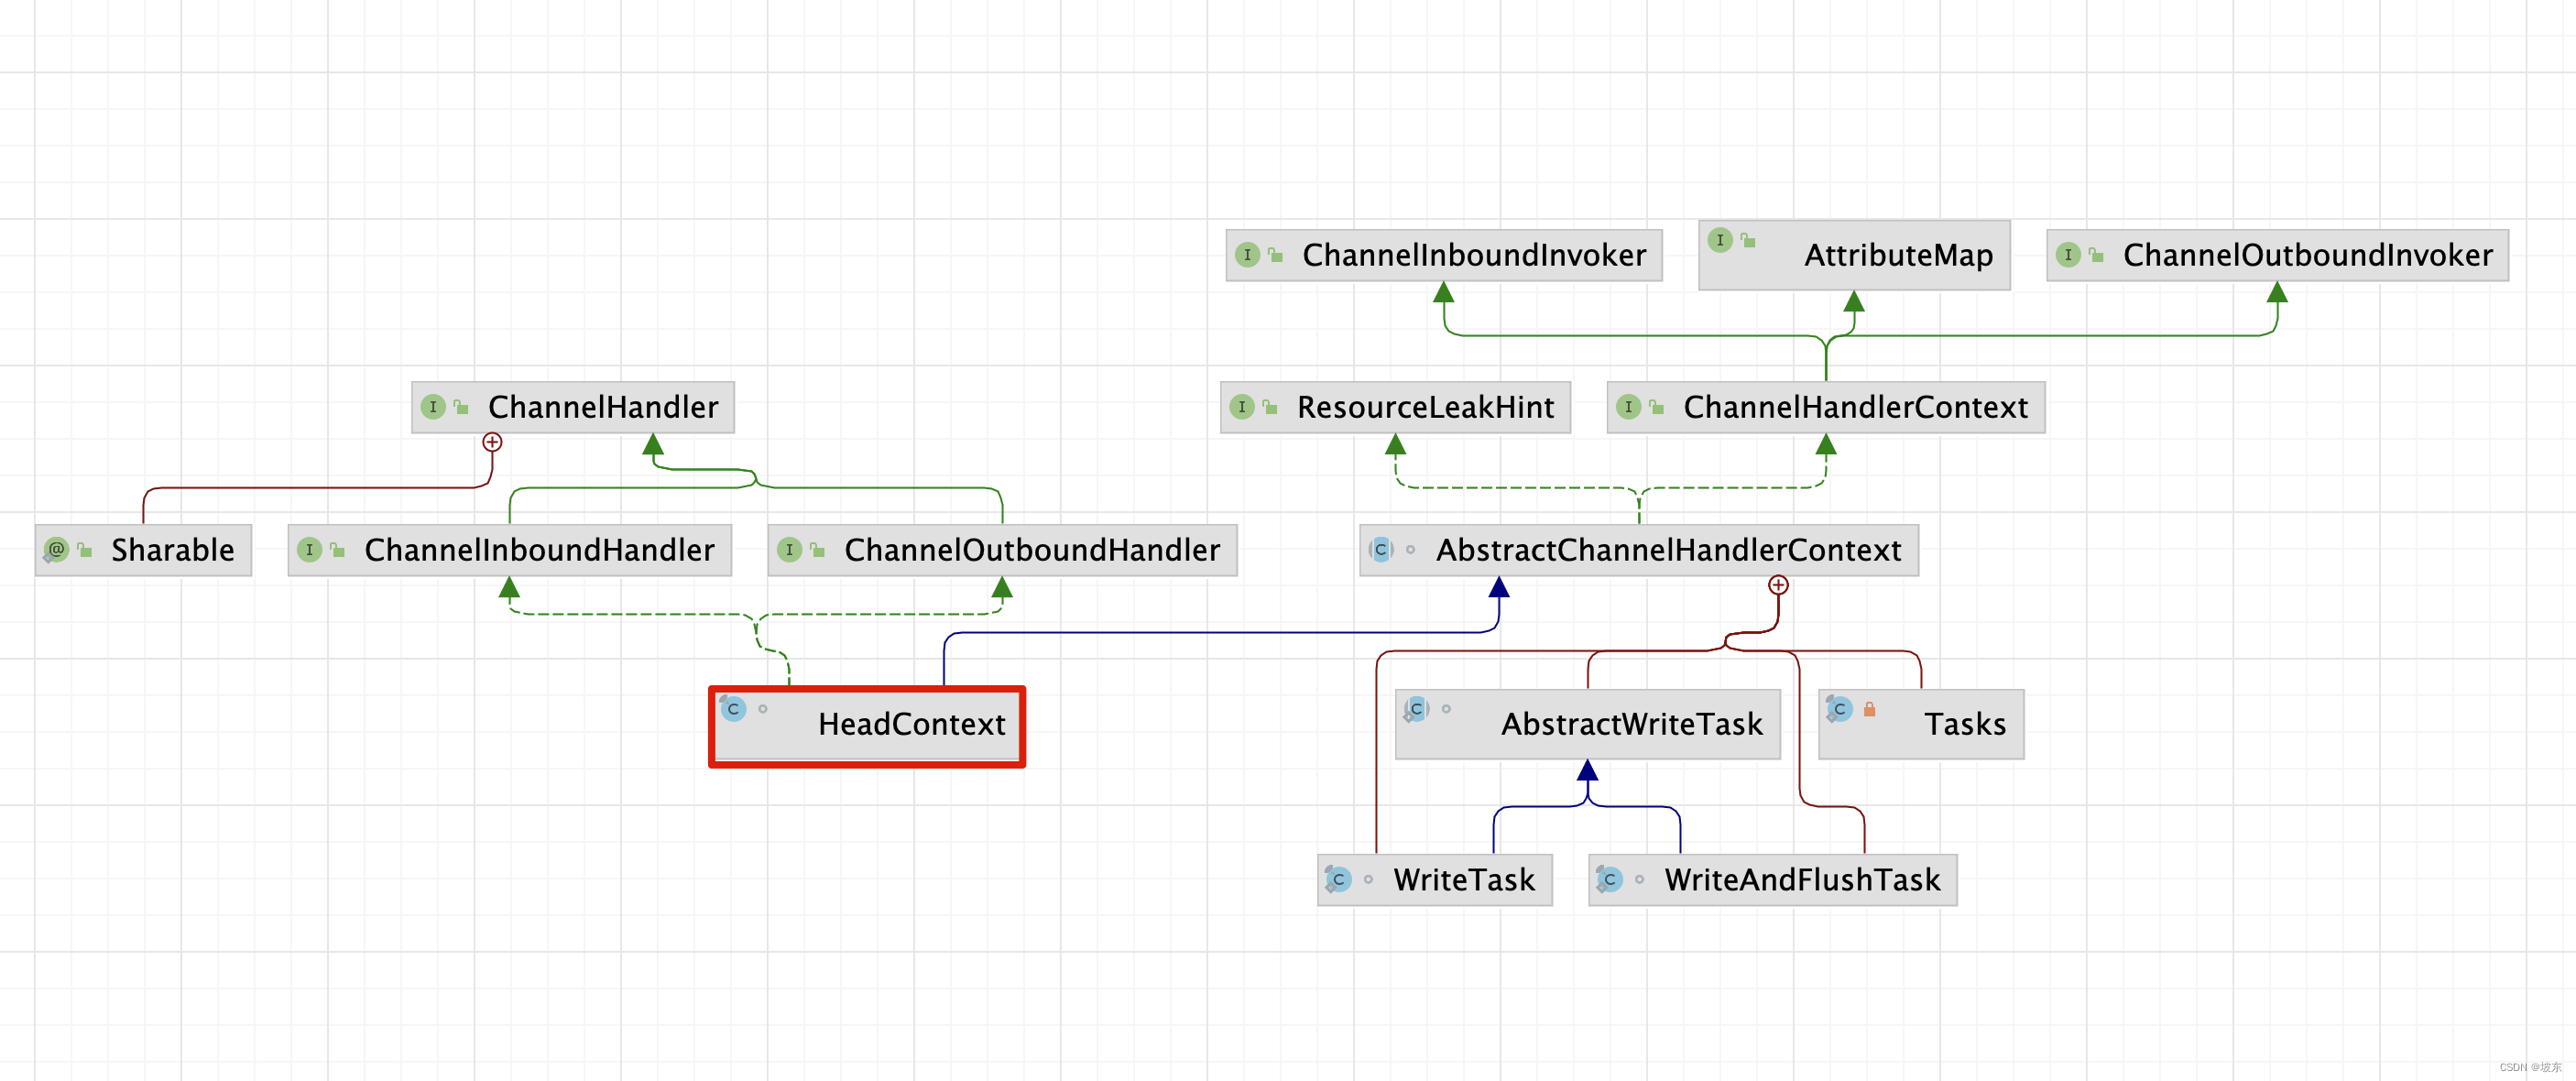
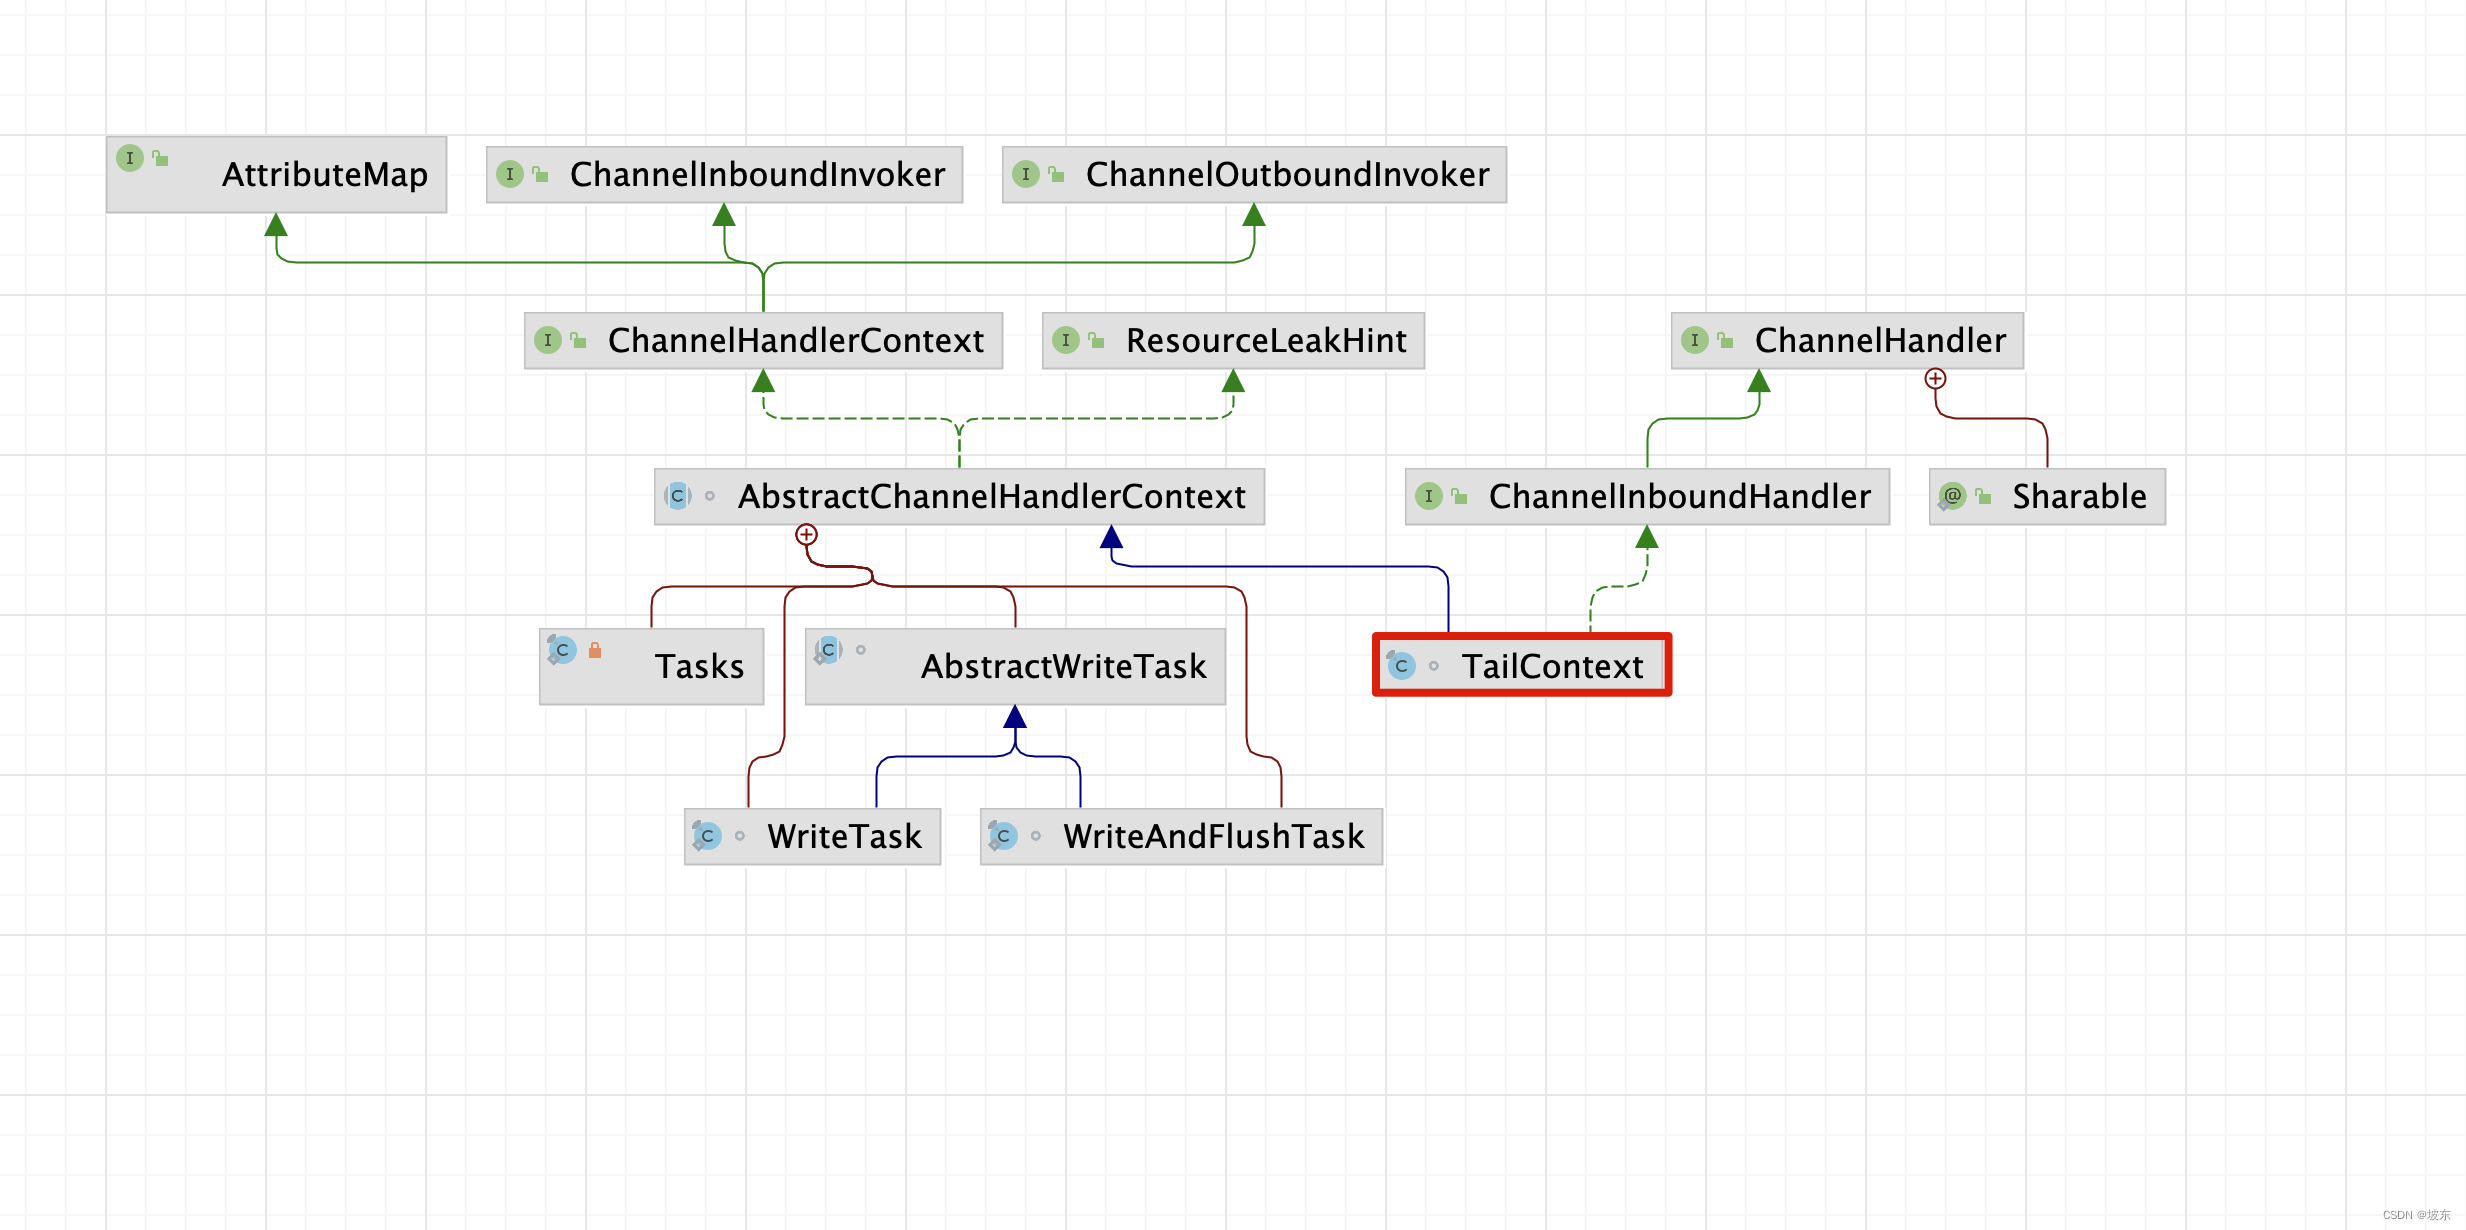
从head.next = tail 和 tail.prev = head 这两行代码,可以看出它是一个双向链表。
接着看initAndRegister的init()方法 。
void init(Channel channel) throws Exception {
    final Map<ChannelOption<?>, Object> options = options0();
    synchronized (options) {
        setChannelOptions(channel, options, logger);
    }

	// 关于属性设置这一块的源码,请看另外一篇博客
	// Netty之DefaultAttributeMap与AttributeKey的机制和原理
    final Map<AttributeKey<?>, Object> attrs = attrs0();
    synchronized (attrs) {
        for (Entry<AttributeKey<?>, Object> e: attrs.entrySet()) {
            @SuppressWarnings("unchecked")
            AttributeKey<Object> key = (AttributeKey<Object>) e.getKey();
            channel.attr(key).set(e.getValue());
        }
    }

    ChannelPipeline p = channel.pipeline();

    final EventLoopGroup currentChildGroup = childGroup;
    final ChannelHandler currentChildHandler = childHandler;
    final Entry<ChannelOption<?>, Object>[] currentChildOptions;
    final Entry<AttributeKey<?>, Object>[] currentChildAttrs;
    synchronized (childOptions) {
        currentChildOptions = childOptions.entrySet().toArray(newOptionArray(0));
    }
    synchronized (childAttrs) {
        currentChildAttrs = childAttrs.entrySet().toArray(newAttrArray(0));
    }

    p.addLast(new ChannelInitializer<Channel>() {
        @Override
        public void initChannel(final Channel ch) throws Exception {
            final ChannelPipeline pipeline = ch.pipeline();
            ChannelHandler handler = config.handler();
            if (handler != null) {
                pipeline.addLast(handler);
            }

            ch.eventLoop().execute(new Runnable() {
                @Override
                public void run() {
                    pipeline.addLast(new ServerBootstrapAcceptor(
                            ch, currentChildGroup, currentChildHandler, currentChildOptions, currentChildAttrs));
                }
            });
        }
    });
}
在上面代码initChannel(0方法中,首先通过handler()方法获取一个Handler ,如果获取的handler不为空,则添加pipeline中,然后添加一个ServerBootstrapAcceptor的实例,这里handler()方法中返回的是哪个对象呢?其实它返回的Handler 属性,而这个属性就是我们服务端的启动代码中设置 。
b.group(bossGroup, workerGroup) ;
这个时候,Pipeline中的Handler 情况如下图所示 。

根据对原来的客户端代码的分析,将Channel绑定到EventLoop(这里指的是NioServerSocketChannel绑定到bossGroup)后,会在Pipeline中触发fireChannelRegistered事件,接着会触发对ChannelInitializer的initChannel() 方法的调用,因此在绑定完成后,此时的Pipeline的内容如下所示 :

在我们分析bossGroup和workerGroup时,已经知道ServerBootstrapAcceptor的channelRead()方法中会为新建的Channel设置Handler 并注册到一个EventLoop 中。
public void channelRead(ChannelHandlerContext ctx, Object msg) {
    final Channel child = (Channel) msg;

    child.pipeline().addLast(childHandler);

    ...
    try {

        childGroup.register(child).addListener(new ChannelFutureListener() {
            @Override
            public void operationComplete(ChannelFuture future) throws Exception {
                if (!future.isSuccess()) {
                    forceClose(child, future.cause());
                }
            }
        });
    } catch (Throwable t) {
        forceClose(child, t);
    }
}
而这里的childHandler就是我们服务端启动代码中设置的Handler。
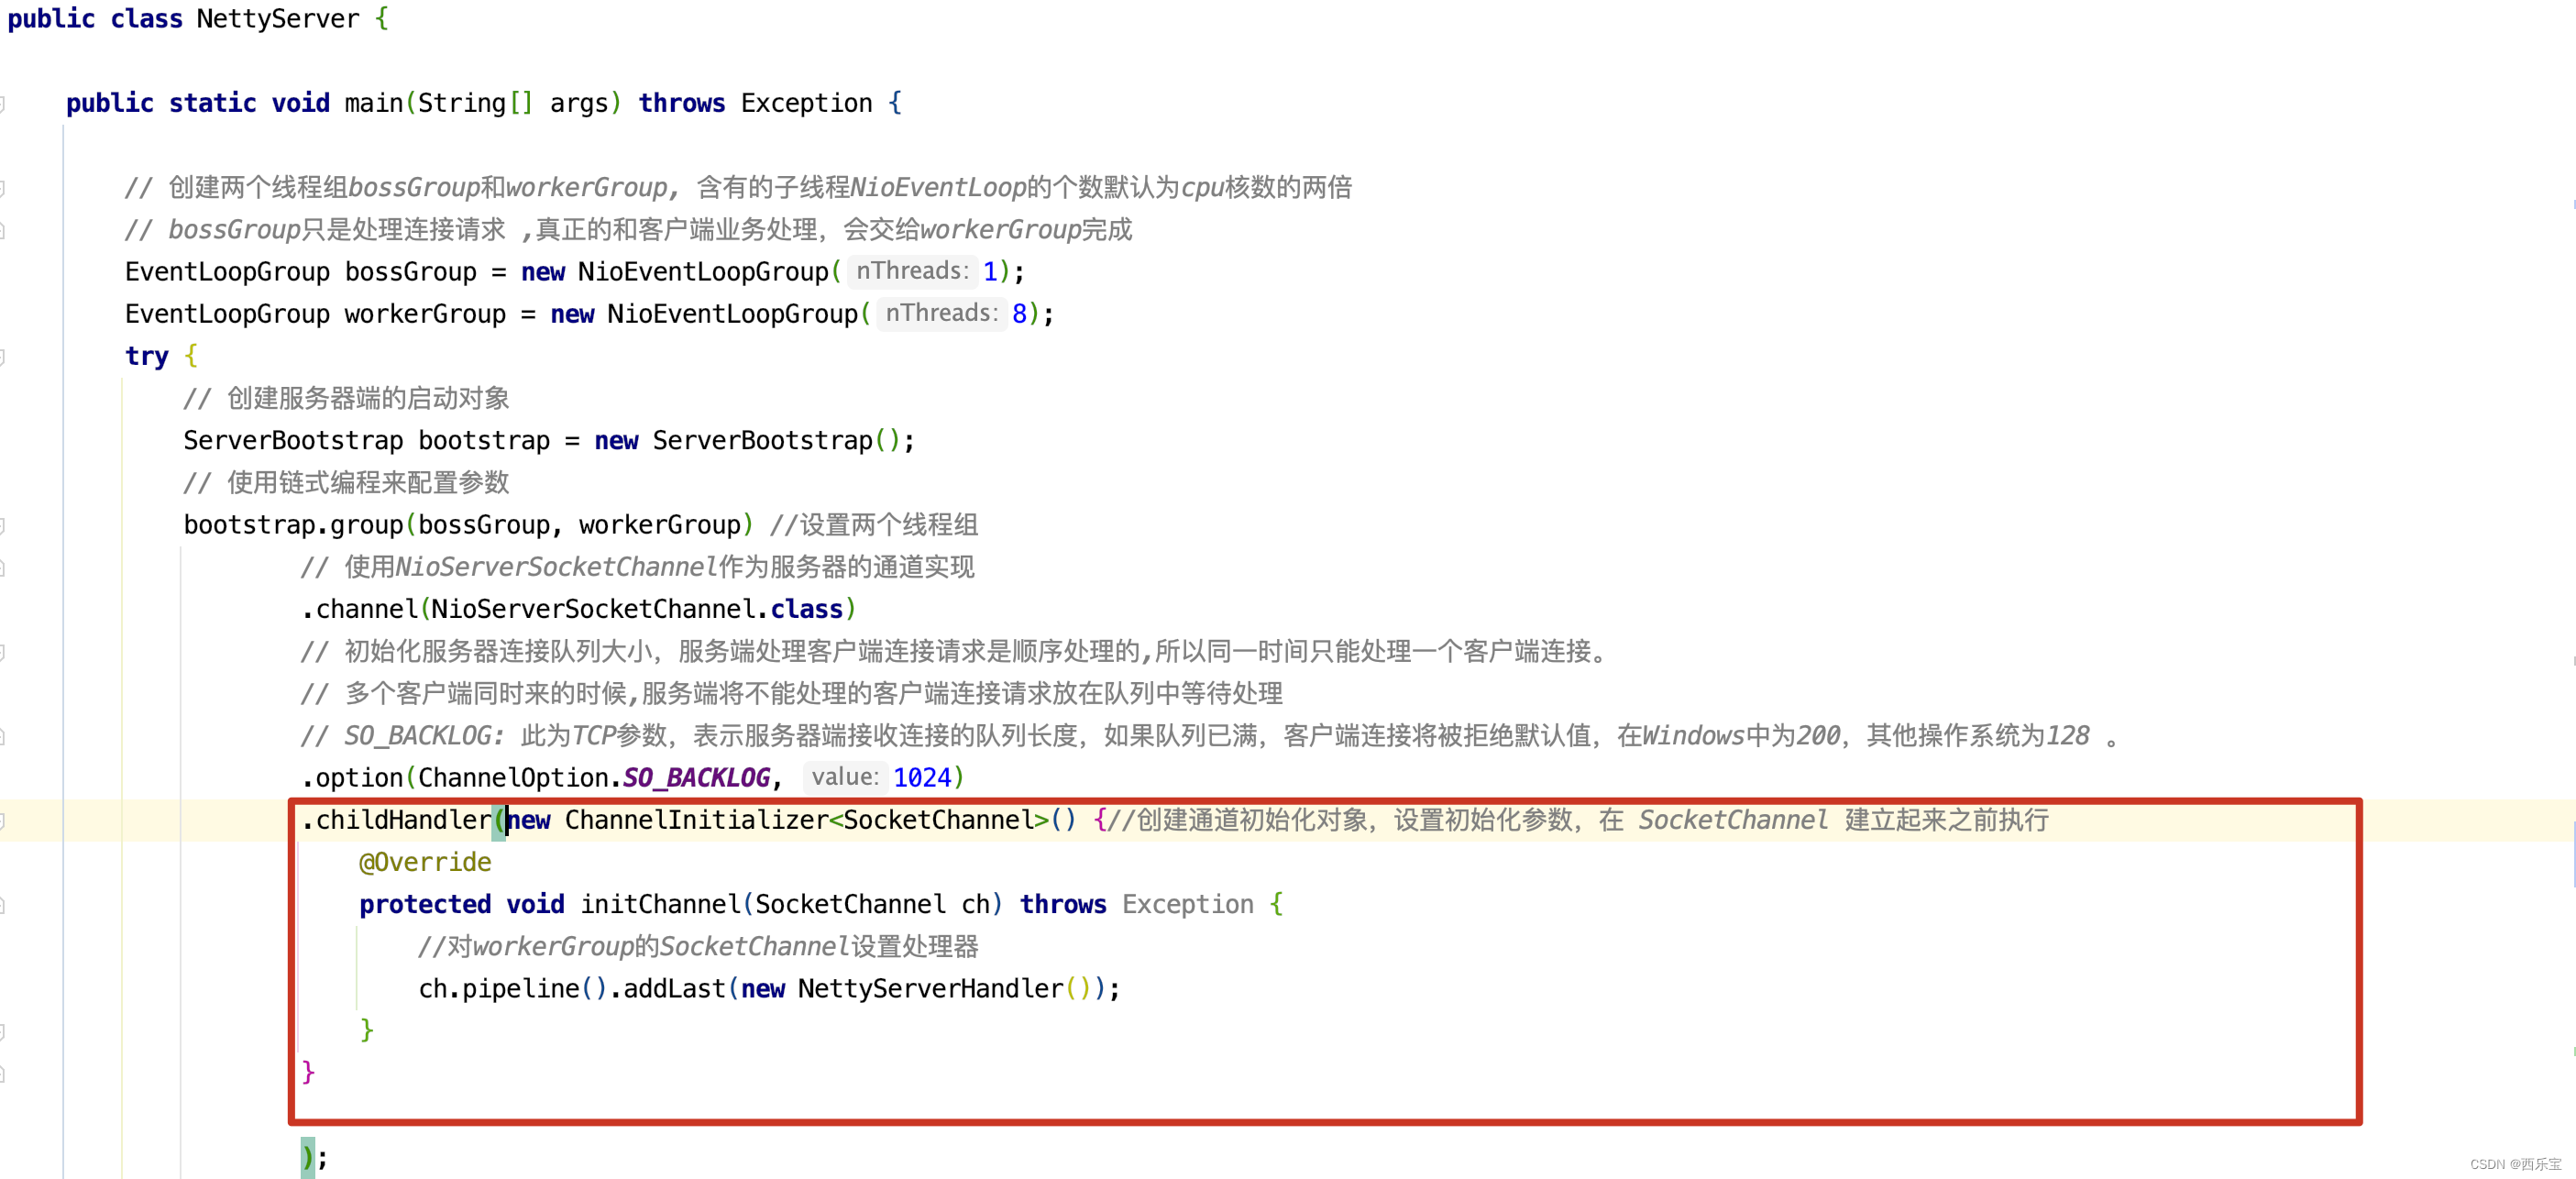
后续的步骤我们基本已经清楚了,在客户端连接Channel注册后,就会触发ChannelInitializer的initChannel()方法的调用,最后,我们总结一下服务端Handler与childHandler的区别与联系。
- 有服务端NioServerSocketChannel对象的pipeline中添加Handler对象和ServerBootstrapAcceptor对象 。
- 当有新的客户端连接请求时, 会调用ServerBootstrapAcceptor的channelRead()方法创建连接对应的NioSocketChannel对象,并将childHandler添加到NioSocketChannel 对应的pipeline中,而且将些Channel 绑定到wokerGroup 中的某个EventLoop。
- Handler 对象只有accept()阻塞阶段起作用,它主要处理客户端发送过来的连接请求。
- childHandler在客户端连接建立以后起作用,它负责客户端连接的I/O交互。
init()方法分为3步,先是option设置,再是attrs设置,最后构建ChannelInitializer()添加到流水线中。 先来看options的设置方法 。
static void setChannelOptions(
        Channel channel, Map<ChannelOption<?>, Object> options, InternalLogger logger) {
    for (Map.Entry<ChannelOption<?>, Object> e: options.entrySet()) {
        setChannelOption(channel, e.getKey(), e.getValue(), logger);
    }
}

private static void setChannelOption(
        Channel channel, ChannelOption<?> option, Object value, InternalLogger logger) {
    try {
        if (!channel.config().setOption((ChannelOption<Object>) option, value)) {
            logger.warn("Unknown channel option '{}' for channel '{}'", option, channel);
        }
    } catch (Throwable t) {
        logger.warn(
                "Failed to set channel option '{}' with value '{}' for channel '{}'", option, value, channel, t);
    }
}
运行到这里,我们首先要明白,channel 即为NioServerSocketChannel, config 为 NioServerSocketChannelConfig , option就是之前NettyServer中设置的option参数。
bootstrap.group(bossGroup, workerGroup)
    .channel(NioServerSocketChannel.class)
    .option(ChannelOption.SO_BACKLOG, 1024)
    .childHandler(new ChannelInitializer<SocketChannel>() {

        @Override
        protected void initChannel(SocketChannel ch) throws Exception {
            ch.pipeline().addLast(new LifeCycleInBoundHandler());
            ch.pipeline().addLast(new NettyServerHandler());
        }
    });
先看一下NioServerSocketChannelConfig的类关系图。

进入NioServerSocketChannelConfig的setOption()方法 。
public <T> boolean setOption(ChannelOption<T> option, T value) {
    if (PlatformDependent.javaVersion() >= 7 && option instanceof NioChannelOption) {
        return NioChannelOption.setOption(jdkChannel(), (NioChannelOption<T>) option, value);
    }
    return super.setOption(option, value);
}
setOption()方法内部分两种情况,如果Java 版本大于等于7 并且 ChannelOption是NioChannelOption时,则调用NioChannelOption的setOption()方法,这里不做分析,将来遇到具体的情况时再来分析。如果不满足则调用父类的DefaultServerSocketChannelConfig的setOption()方法 。
public <T> boolean setOption(ChannelOption<T> option, T value) {
    validate(option, value);
    if (option == SO_RCVBUF) {
        setReceiveBufferSize((Integer) value);
    } else if (option == SO_REUSEADDR) {
        setReuseAddress((Boolean) value);
    } else if (option == SO_BACKLOG) {
        setBacklog((Integer) value);
    } else {
        return super.setOption(option, value);
    }
    return true;
}

public ServerSocketChannelConfig setReceiveBufferSize(int receiveBufferSize) {
    try {
        javaSocket.setReceiveBufferSize(receiveBufferSize);
    } catch (SocketException e) {
        throw new ChannelException(e);
    }
    return this;
}
关于SO_RCVBUF,SO_REUSEADDR,SO_BACKLOG的作用,之前分析过,这里就不再赘述,大家发现一个规率没有,像这种系统参数,Netty直接调用rt.jar包的实现类来设置值,而对于像CONNECT_TIMEOUT_MILLIS这种参数,Netty 则直接保存到ChannelConfig的属性中,以供今后使用。请看父类DefaultChannelConfig的setOption()方法 。
public <T> boolean setOption(ChannelOption<T> option, T value) {
    validate(option, value);
    if (option == CONNECT_TIMEOUT_MILLIS) {
        setConnectTimeoutMillis((Integer) value);
    } else if (option == MAX_MESSAGES_PER_READ) {
        setMaxMessagesPerRead((Integer) value);
    } else if (option == WRITE_SPIN_COUNT) {
        setWriteSpinCount((Integer) value);
    } else if (option == ALLOCATOR) {
        setAllocator((ByteBufAllocator) value);
    } else if (option == RCVBUF_ALLOCATOR) {
        setRecvByteBufAllocator((RecvByteBufAllocator) value);
    } else if (option == AUTO_READ) {
        setAutoRead((Boolean) value);
    } else if (option == AUTO_CLOSE) {
        setAutoClose((Boolean) value);
    } else if (option == WRITE_BUFFER_HIGH_WATER_MARK) {
        setWriteBufferHighWaterMark((Integer) value);
    } else if (option == WRITE_BUFFER_LOW_WATER_MARK) {
        setWriteBufferLowWaterMark((Integer) value);
    } else if (option == WRITE_BUFFER_WATER_MARK) {
        setWriteBufferWaterMark((WriteBufferWaterMark) value);
    } else if (option == MESSAGE_SIZE_ESTIMATOR) {
        setMessageSizeEstimator((MessageSizeEstimator) value);
    } else if (option == SINGLE_EVENTEXECUTOR_PER_GROUP) {
        setPinEventExecutorPerGroup((Boolean) value);
    } else {
        return false;
    }
    return true;
}
这些参数相应的设置到DefaultChannelConfig的属性中,而这些参数的意义,还是在使用时再来分析了吧。 先记录一下。
接下来看 ServerBootstrapAcceptor的构造函数实现。
ServerBootstrapAcceptor(
        final Channel channel, EventLoopGroup childGroup, ChannelHandler childHandler,
        Entry<ChannelOption<?>, Object>[] childOptions, Entry<AttributeKey<?>, Object>[] childAttrs) {
    this.childGroup = childGroup;
    this.childHandler = childHandler;
    this.childOptions = childOptions;
    this.childAttrs = childAttrs;

    // Task which is scheduled to re-enable auto-read.
    // It's important to create this Runnable before we try to submit it as otherwise the URLClassLoader may
    // not be able to load the class because of the file limit it already reached.
    //
    // See https://github.com/netty/netty/issues/1328
    enableAutoReadTask = new Runnable() {
        @Override
        public void run() {
            channel.config().setAutoRead(true);
        }
    };
}
接下来看注册方法实现。
// 在有了Selector (NioEventLoop的成员)和ServerSocketChannel之后,我们需要将它们绑定起来,
// 也就是把ServerSocketChannel绑定到bossGroup 中的NioEventLoop(select)上
// 下面是具体的注册过程
public ChannelFuture register(Channel channel) {
    return next().register(channel);
}

public EventLoop next() {
    return (EventLoop) super.next();
}

public EventExecutor next() {
    return chooser.next();
}
好几个next()方法,都弄晕了,先明白chooser到底是什么 ?
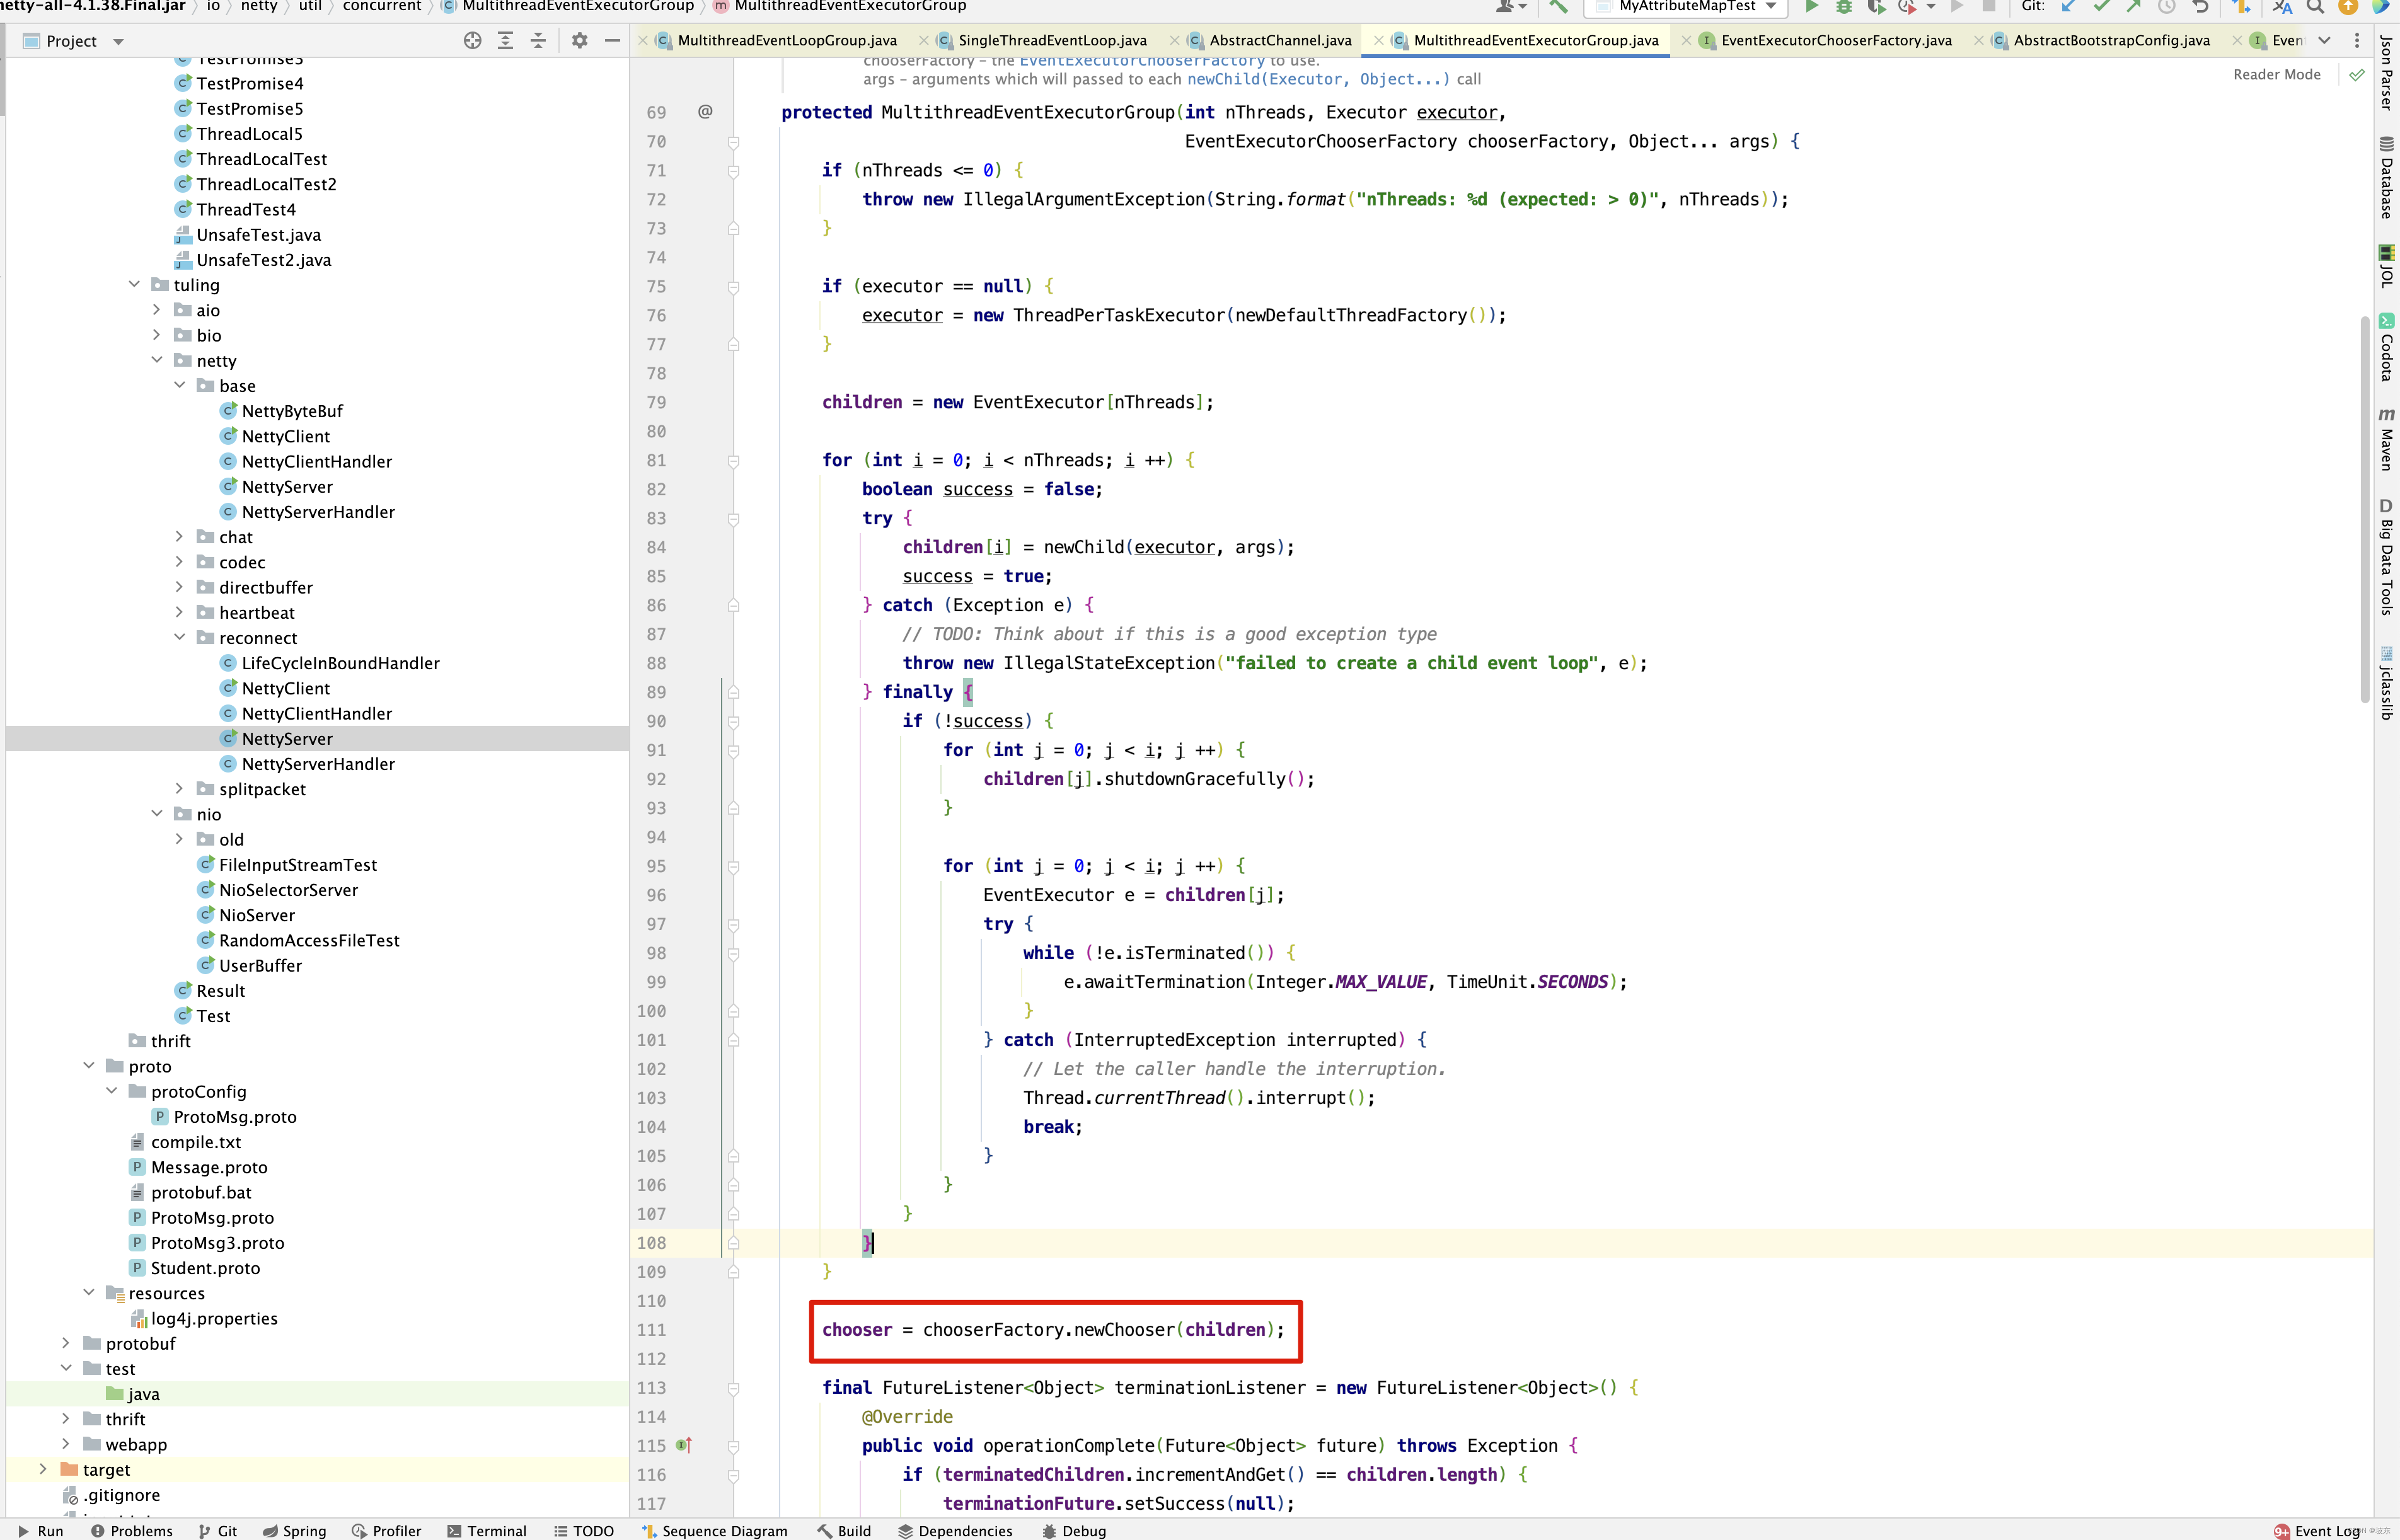
从之前的源码分析得知,EventExecutorChooserFactory的实现类为DefaultEventExecutorChooserFactory,而调用newChooser()方法,无非是轮询 children = new EventExecutor[nThreads]; 中的EventExecutor即可,只是在chooserFactory的内部根据数组children的长度是否为2的幂次方而采用不同的算法而已 。 【注意】大家发现没有,这里group()方法返回的实际上是bossGroup, 而next()方法只是从bossGroup中取出第1个NioEventGroup,并调用其注册方法,即使bossGroup中初始化NioEventLoop个数为CPU * 2 ,但实际上也只会调用bossGroup的第一个NioEventLoop的register()方法 ,当然网上也有这样的疑问?
当然,目前我也没有想到Netty开发者这样设计的原因,当然以后想到原因再来补充吧,或者有谁知道原因,告诉我,我再来补充这人疑问?
public ChannelFuture register(Channel channel) {
    return register(new DefaultChannelPromise(channel, this));
}

public ChannelFuture register(final ChannelPromise promise) {
    ObjectUtil.checkNotNull(promise, "promise");
    promise.channel().unsafe().register(this, promise);
    return promise;
}
下面这个register()方法中promise.channel()不就是channel嘛,将channel传入到DefaultChannelPromise中然后又取出来,再获取其unsafe()并调用他的register方法 。 那unsafe()是什么呢? 请看下图。
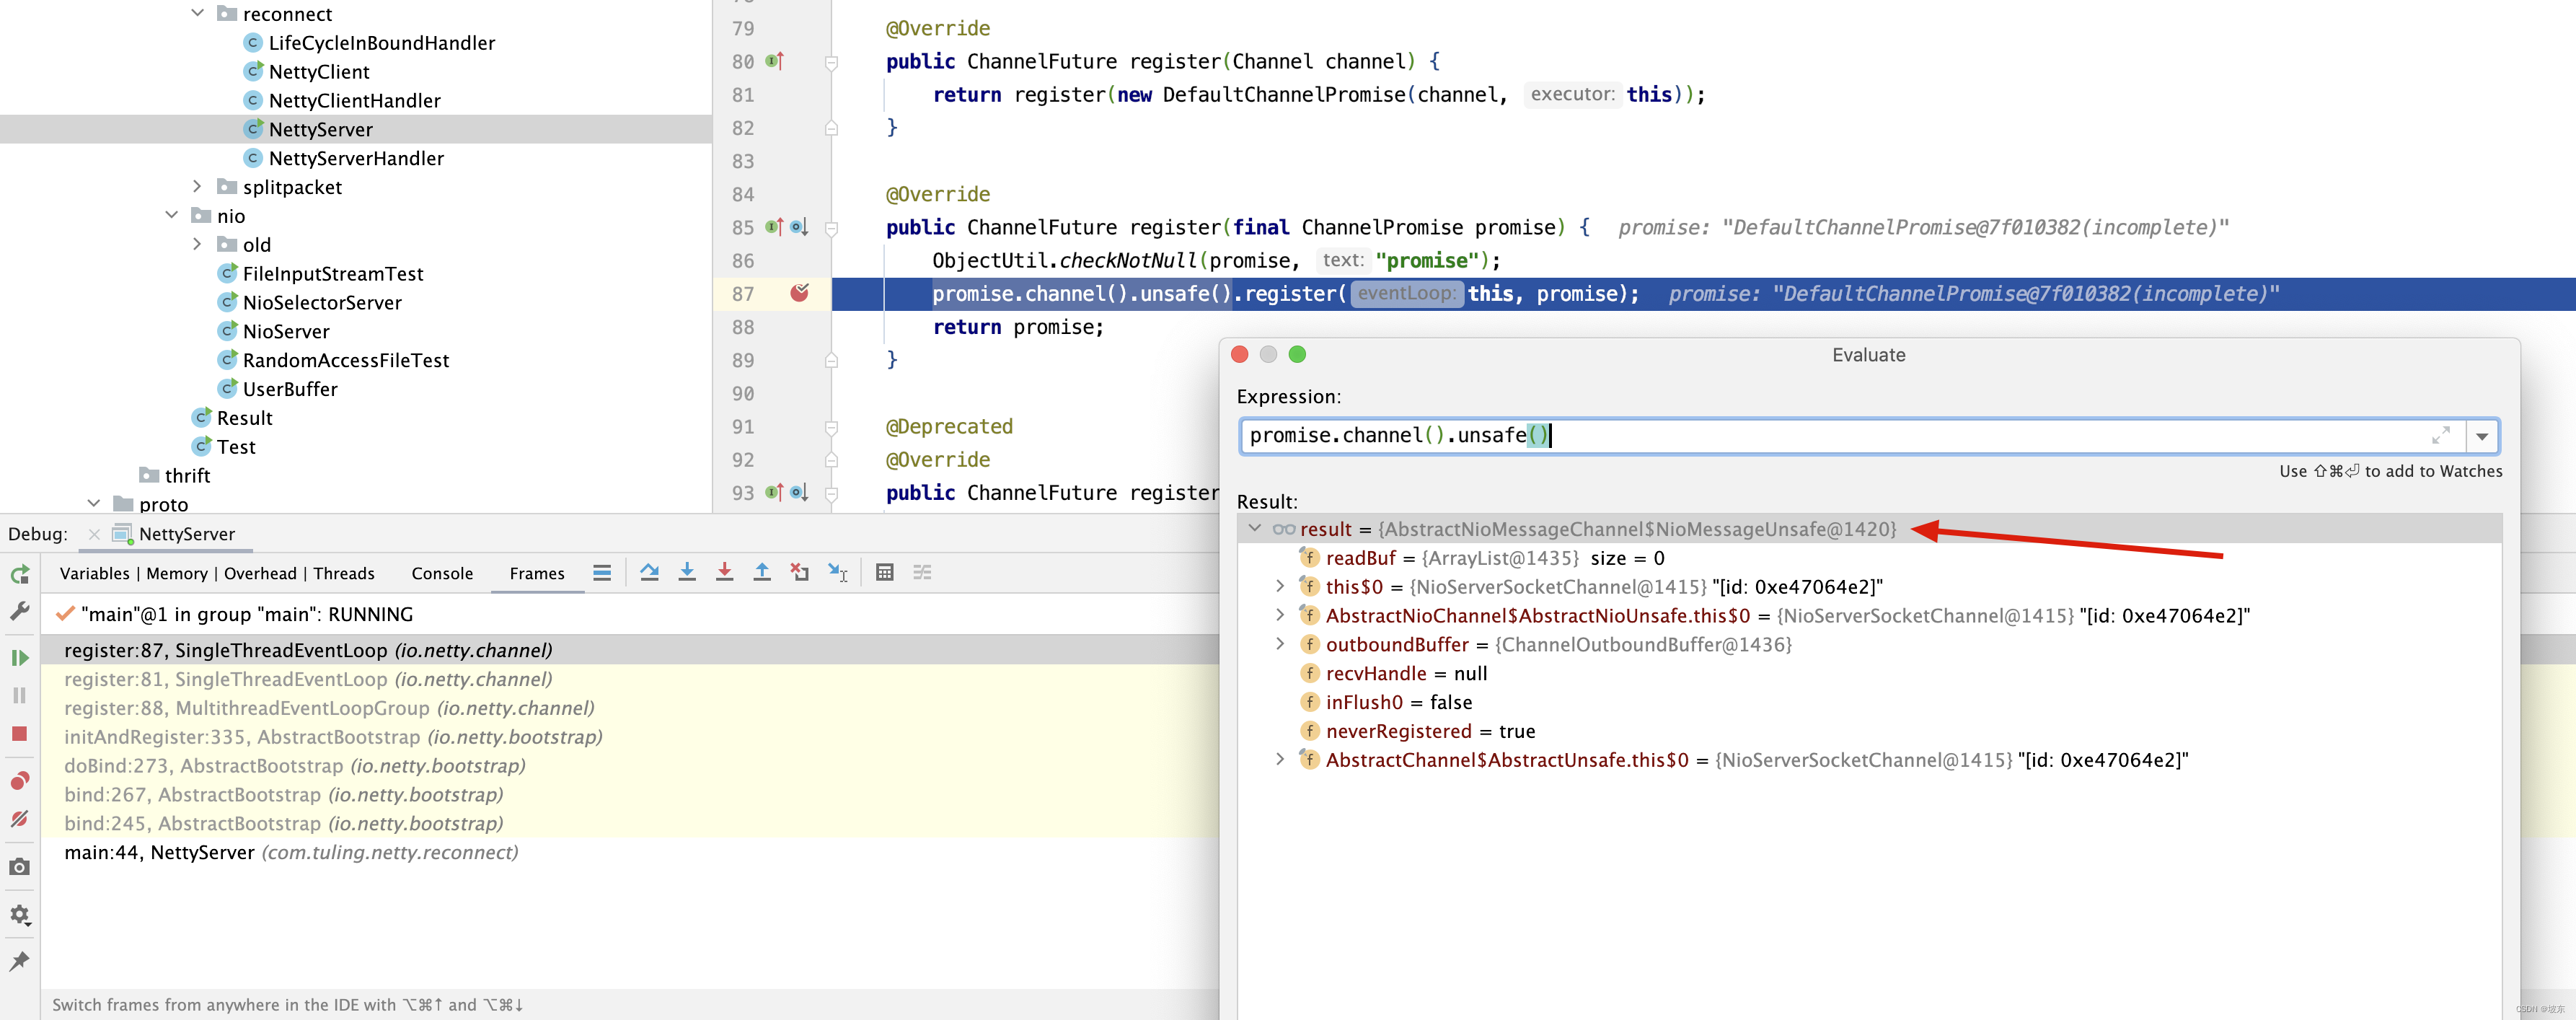
unsafe()在什么时候初始化的呢? 请看newUnsafe()方法 。而NioMessageUnsafe并没有实现register()方法,
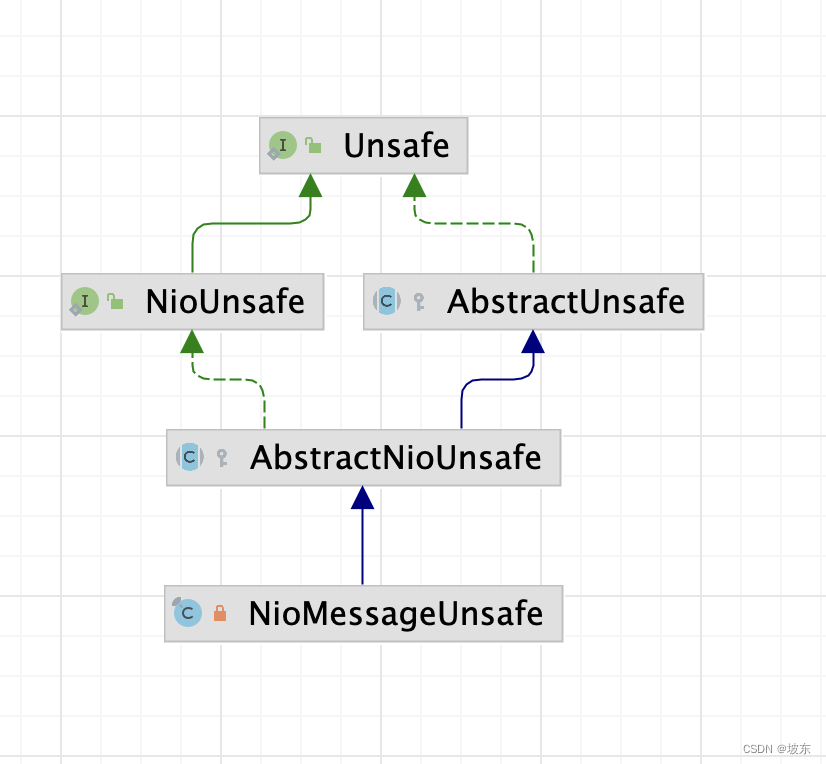
因此进入父类AbstractUnsafe的register()方法。
public final void register(EventLoop eventLoop, final ChannelPromise promise) {
    if (eventLoop == null) {
        throw new NullPointerException("eventLoop");
    }
    if (isRegistered()) {
        promise.setFailure(new IllegalStateException("registered to an event loop already"));
        return;
    }
    if (!isCompatible(eventLoop)) {
        promise.setFailure(
                new IllegalStateException("incompatible event loop type: " + eventLoop.getClass().getName()));
        return;
    }

    // 当将NioSocketChannel注册到Selector上时,有部分代码需要解 读,NioSocketChannel对应的NioEventLoop线程在未启动时,
    // eventLoop.inEventLoop()会返回false。若Worker的线程数为16,则 在前面16个NioSocketChannel注册时,都会把注册看作一个Task并添
    // 加到NioEventLoop的队列中,同时启动NioEventLoop队列,唤醒 Selector。这部分功能在AbstractUnsafe的register()方法中,具体 代码如下:

    AbstractChannel.this.eventLoop = eventLoop;

    if (eventLoop.inEventLoop()) {
        register0(promise);
    } else {
        try {
            eventLoop.execute(new Runnable() {
                @Override
                public void run() {
                    register0(promise);
                }
            });
        } catch (Throwable t) {
            logger.warn(
                    "Force-closing a channel whose registration task was not accepted by an event loop: {}",
                    AbstractChannel.this, t);
            closeForcibly();
            closeFuture.setClosed();
            safeSetFailure(promise, t);
        }
    }
}
在register()方法中,加粗代码eventLoop.inEventLoop()需要注意,其实在之前的博客 Netty 之 DefaultPromise 源码解析 做了详细的分析 。 不过关于eventLoop.inEventLoop()这行代码,我相信大家肯定还是晕,来看一个例子 。
public class InEventLoopTest {
    volatile Thread thread;
    private final TaskRunner taskRunner = new TaskRunner();

    private final AtomicBoolean started = new AtomicBoolean();

    public final BlockingQueue<Runnable> taskQueue = new LinkedBlockingQueue<Runnable>();

    public static void main(String[] args) {
        InEventLoopTest eventLoop = new InEventLoopTest();

        Thread thread1 = new Thread(new Runnable() {
            @Override
            public void run() {
                System.out.println(Thread.currentThread().getName() + " 执行任务2 ");
            }
        }, "线程1 ");

        Thread thread2 = new Thread(new Runnable() {
            @Override
            public void run() {
                System.out.println(Thread.currentThread().getName() + " 执行任务1 ");
                eventLoop.execute(thread1);
            }
        }, "线程2 ");
        eventLoop.execute(thread2);
    }

    public void execute(Runnable task) {
        if (task == null) {
            throw new NullPointerException("task");
        }
        addTask(task);
        if (!inEventLoop()) {
            startThread();
        } else {
            System.out.println(" 执行任务为同一线程,只将任务加入到队列中,并不会创建新的线程去执行 ");
        }
    }

    public void startThread() {
        if (started.compareAndSet(false, true)) {
            final Thread t = new Thread(new Runnable() {
                @Override
                public void run() {
                    taskRunner.run();
                }
            }, "执行任务线程");

            thread = t;
            t.start();
        }
    }

    public void addTask(Runnable task) {
        if (task == null) {
            throw new NullPointerException("task");
        }
        taskQueue.add(task);
    }

    public boolean inEventLoop() {
        return inEventLoop(Thread.currentThread());
    }

    public boolean inEventLoop(Thread thread) {
        return thread == this.thread;
    }


    final class TaskRunner implements Runnable {
        @Override
        public void run() {
            for (; ; ) {
                Runnable task = taskQueue.poll();
                if (task != null) {
                    try {
                        task.run();
                    } catch (Exception e) {
                        e.printStackTrace();
                    }
                    if (task != null) {
                        continue;
                    }
                }
                if (taskQueue.isEmpty()) {
                    boolean stopped = started.compareAndSet(true, false);
                    assert stopped;
                    if (taskQueue.isEmpty()) {
                        break;
                    }
                    if (!started.compareAndSet(false, true)) {
                        break;
                    }
                }
            }
        }
    }
}

执行结果:

执行任务线程 执行任务1
 执行任务为同一线程,只将任务加入到队列中,并不会创建新的线程去执行
执行任务线程 执行任务2
分析上面执行结果,主线程执行 thread2 ,此时因为InEventLoopTest的thread 为空,与主线程肯定不相等,inEventLoop()方法肯定返回false,因此将thread2加入到taskQueue队列的同时,调用startThread()方法创建新的线程来消费taskQueue队列中的任务。 而在线程2的内部,又调用了execute()方法来执行线程1的任务,因为执行任务的线程运行了thread2的run()方法 。而此时Thread.currentThread()即为执行任务的线程,因此inEventLoop()方法将返回true,即不会偿试创建新的线程来执行任务,只将任务添加到队列即可。 我相信通过这个例子,你应该对inEventLoop()方法有所理解 。 上面例子只是帮我们去理解inEventLoop()方法以及execute()方法,而真正execute()是如何实现的呢?
但还有一点值得注意,bossGroup启动时inEventLoop()方法返回false,为什么呢? 因为实际上执行eventLoop.inEventLoop()的线程是main线程,而inEventLoop()方法的内部如下
public boolean inEventLoop() {
    return inEventLoop(Thread.currentThread());
}

public boolean inEventLoop(Thread thread) {
    return thread == this.thread;
}
判断当前线程和EventLoop执行任务的线程是否是同一个,如果是同一个返回true,否则返回false,主线程第一次执行,没有创建执行任务的线程,返回false。
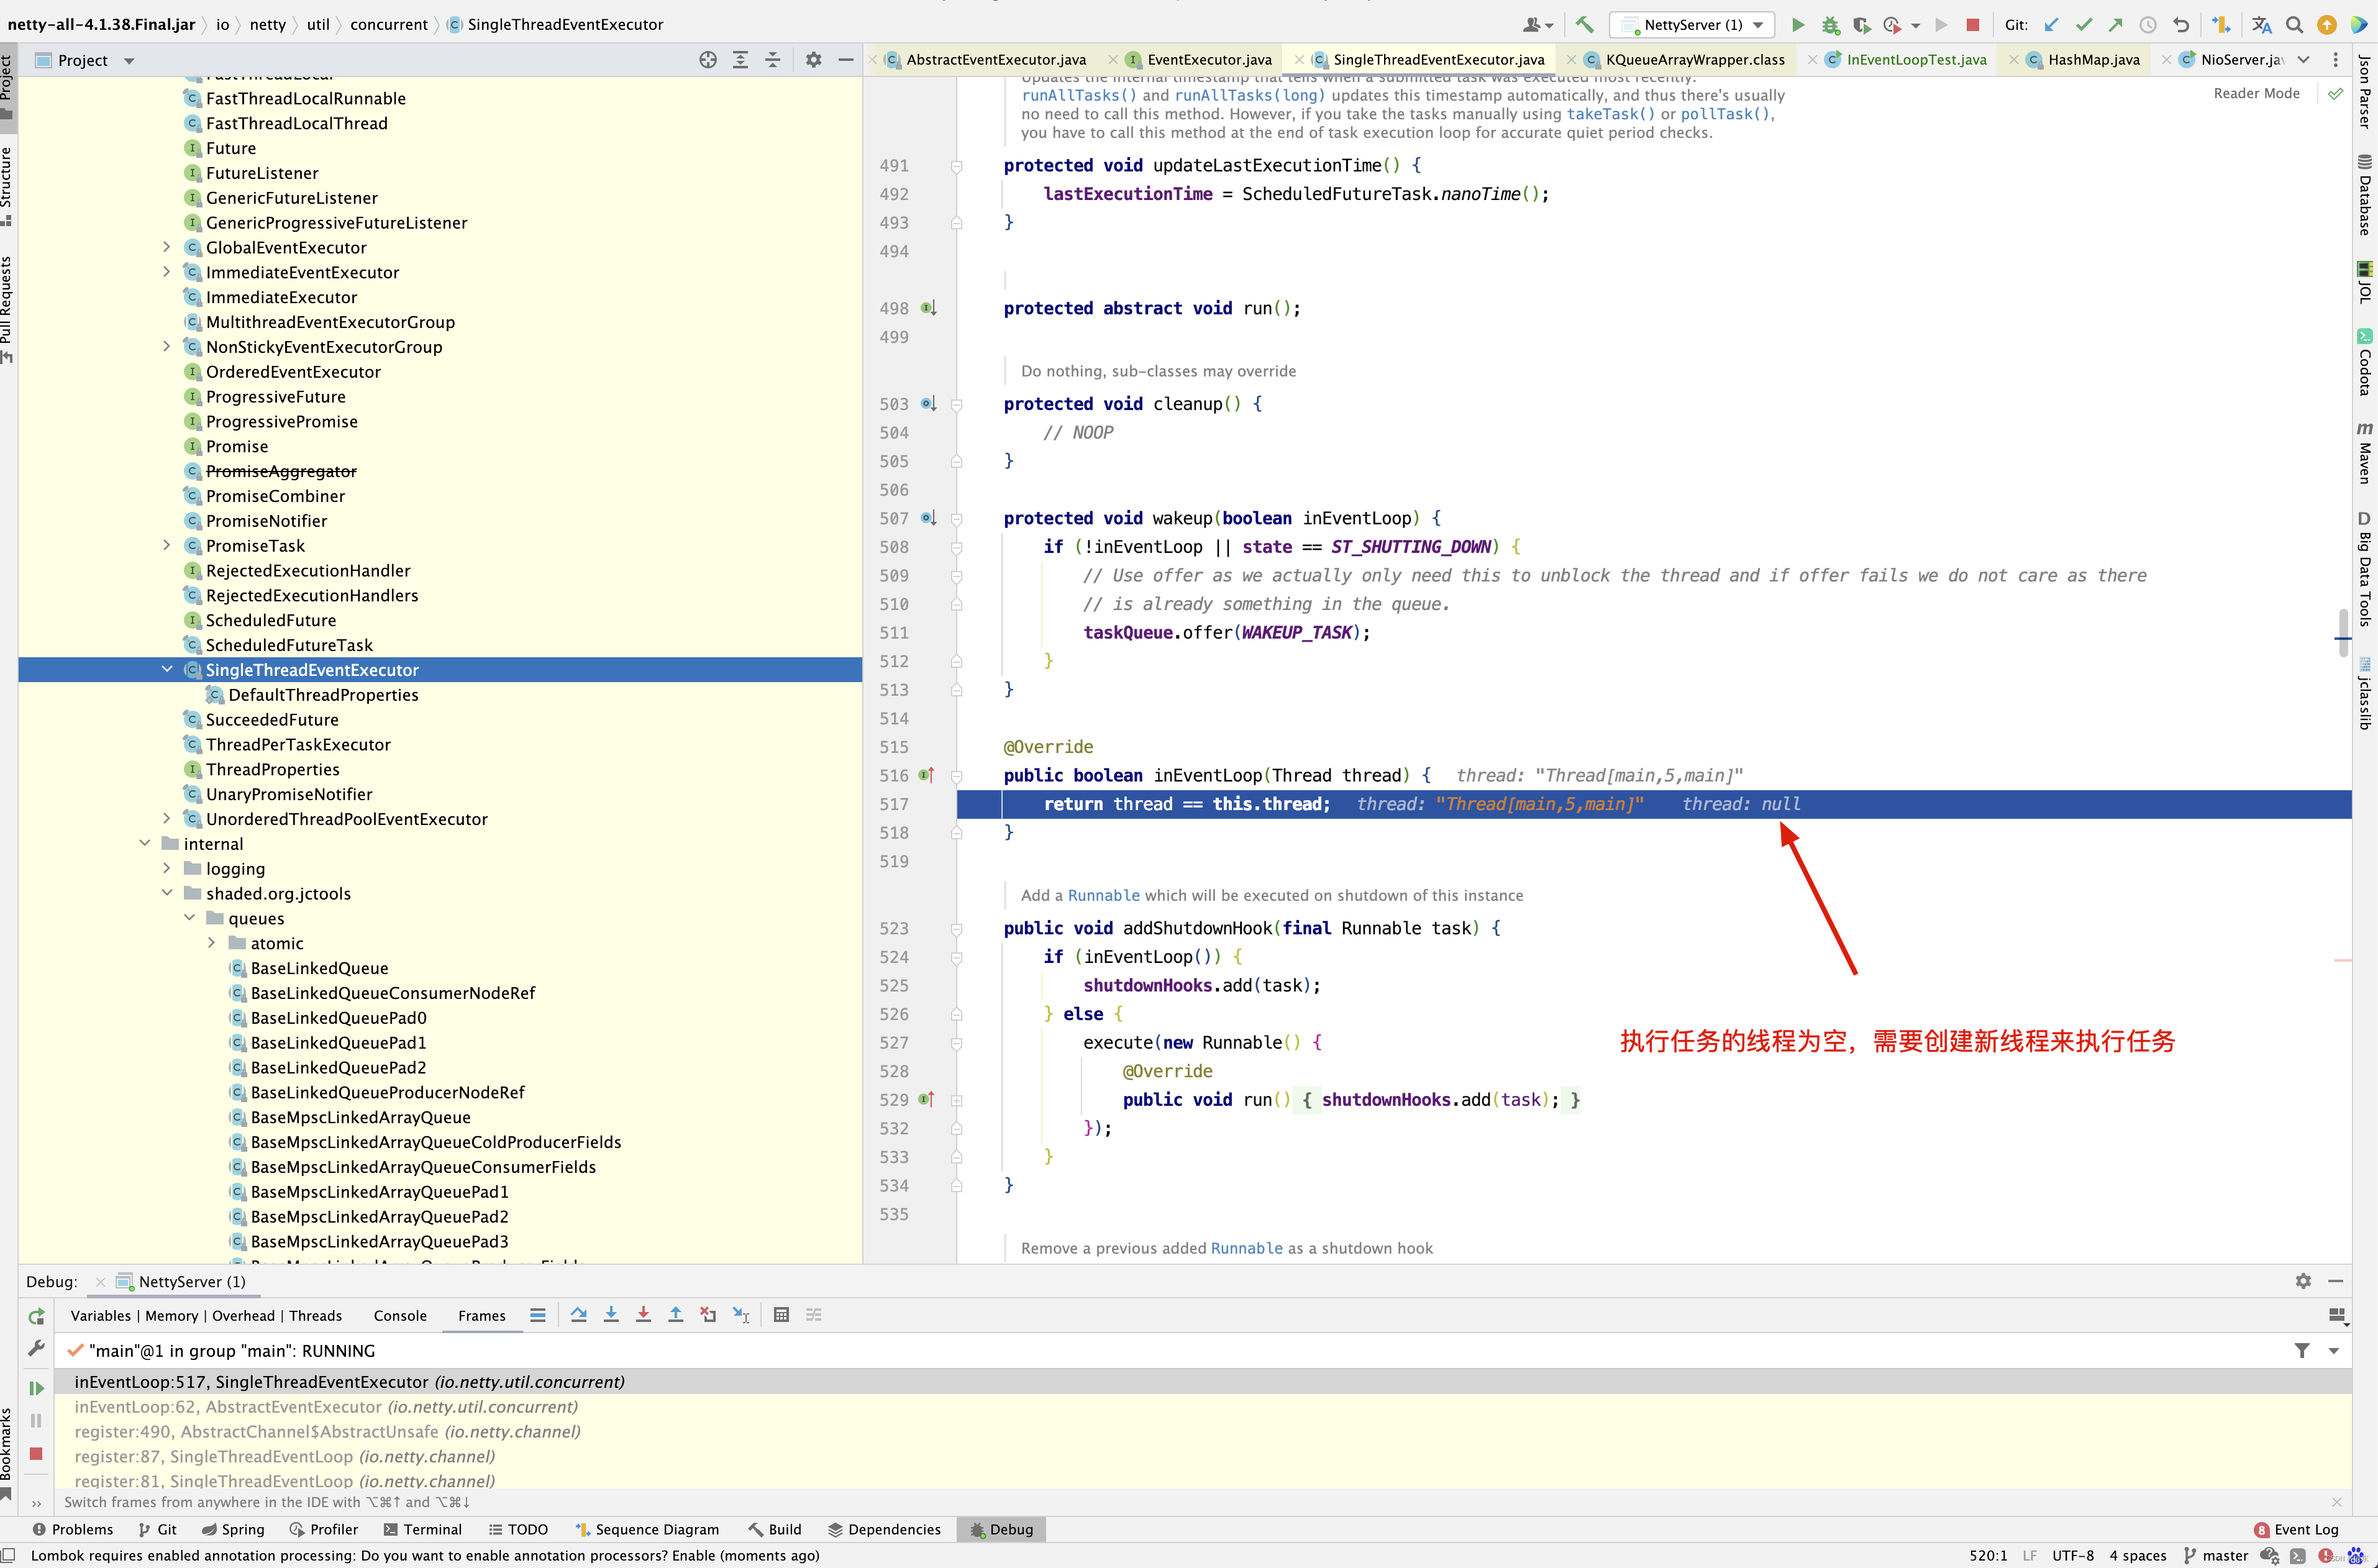
接下来进入eventLoop的execute()方法。
public void execute(Runnable task) {
    if (task == null) {
        throw new NullPointerException("task");
    }

    boolean inEventLoop = inEventLoop();
    // 将任务添加到taskQueue中
    addTask(task);
    // 可能存在并发,再次判断
    if (!inEventLoop) {
  		// 启动新线程去执行任务
        startThread();
        if (isShutdown()) {
            boolean reject = false;
            try {
                if (removeTask(task)) {
                    reject = true;
                }
            } catch (UnsupportedOperationException e) {
                // The task queue does not support removal so the best thing we can do is to just move on and
                // hope we will be able to pick-up the task before its completely terminated.
                // In worst case we will log on termination.
            }
            if (reject) {
                reject();
            }
        }
    }

    if (!addTaskWakesUp && wakesUpForTask(task)) {
        wakeup(inEventLoop);
    }
}
  用一句话来总节,当EventLoop的execute()方法的第一次被调用时,会触发startThread()方法的调用,进而启动EventLoop所对应的java 本地线程。

// 这段代码表示变量在wakenUp为false的情况下,会触发Selector的wakeup操作,再思考,若在添加任务时成功触发唤醒,那么为什么NioEventLoop
// 在调用select()方法后还要再次调用wakenUp呢?这段代码源码注释非常长,有点难以理解,具体如下
// 1. wakenUp唤醒动作可能在NioEventLoop线程运行的两个阶段被触发,第一阶段有可能在NioEventLoop线程运行于wakeUp.getAndSet(false)
// 与selector.select(timeoutMillis)之间,此时Selector.select能立刻返回,最新任务得到及时执行
// 第二个阶段可能在selector.select(timeoutMillis)与runAllTasks之间,此时在runAllTasks执行完本次任务后又添加了新任务,这些任务是无法被及时唤醒的
// 因此此时wakenUp为true, 其他的唤醒操作都会失败,从而导致这部分任务需要等待select超时后才会被执行。
// 这对于实时性要求很敲打程序来讲是无法接受的, 因此在selector.select(timeMillis)与runAllTasks中间加入了if(wakenUp.get()),即
// 若是唤醒动作,则预期唤醒一次,附上后续唤醒操作失败
// 2.但由于本书是Netty版本,在select()方法里, 调用hasTask()查看任务队列是否有任务,且在进入select()方法之前,会把wakenUp设置为false
// ,所以wakenUp.compareAndSet(false,true) 会成功,因此,当添加新任务时会调用selectNow()方法,不会等到超时才执行任务,此时无须
// 在select()方法后再次调用wakeup()方法
// 3. wakeup()方法操作耗时性能,因此建议在非复杂处理时,尽量不要开额外的线程
protected void wakeup(boolean inEventLoop) {
    if (!inEventLoop && wakenUp.compareAndSet(false, true)) {
        selector.wakeup();
    }
}
private static final int ST_NOT_STARTED = 1;
private static final int ST_STARTED = 2;
private static final int ST_SHUTTING_DOWN = 3;
private static final int ST_SHUTDOWN = 4;
private static final int ST_TERMINATED = 5;

private volatile int state = ST_NOT_STARTED;

private void startThread() {
	// state的默认状态为ST_NOT_STARTED
    if (state == ST_NOT_STARTED) {
    	// 将state状态设置为ST_STARTED,已启动状态
        if (STATE_UPDATER.compareAndSet(this, ST_NOT_STARTED, ST_STARTED)) {
            boolean success = false;
            try {
                doStartThread();
                success = true;
            } finally {
                if (!success) {
                    STATE_UPDATER.compareAndSet(this, ST_STARTED, ST_NOT_STARTED);
                }
            }
        }
    }
}
接下来进入doStartThread()方法 。
private void doStartThread() {
    assert thread == null;
    executor.execute(new Runnable() {
        @Override
        public void run() {
            thread = Thread.currentThread();
            if (interrupted) {
                thread.interrupt();
            }

            boolean success = false;
            updateLastExecutionTime();
            try {
                SingleThreadEventExecutor.this.run();
                success = true;
            } catch (Throwable t) {
                logger.warn("Unexpected exception from an event executor: ", t);
            } finally {
                for (;;) {
                    int oldState = state;
                    if (oldState >= ST_SHUTTING_DOWN || STATE_UPDATER.compareAndSet(
                            SingleThreadEventExecutor.this, oldState, ST_SHUTTING_DOWN)) {
                        break;
                    }
                }

                // Check if confirmShutdown() was called at the end of the loop.
                if (success && gracefulShutdownStartTime == 0) {
                    if (logger.isErrorEnabled()) {
                        logger.error("Buggy " + EventExecutor.class.getSimpleName() + " implementation; " +
                                SingleThreadEventExecutor.class.getSimpleName() + ".confirmShutdown() must " +
                                "be called before run() implementation terminates.");
                    }
                }

                try {
                    // Run all remaining tasks and shutdown hooks.
                    for (;;) {
                        if (confirmShutdown()) {
                            break;
                        }
                    }
                } finally {
                    try {
                        cleanup();
                    } finally {
                        // Lets remove all FastThreadLocals for the Thread as we are about to terminate and notify
                        // the future. The user may block on the future and once it unblocks the JVM may terminate
                        // and start unloading classes.
                        // See https://github.com/netty/netty/issues/6596.
                        FastThreadLocal.removeAll();

                        STATE_UPDATER.set(SingleThreadEventExecutor.this, ST_TERMINATED);
                        threadLock.countDown();
                        if (logger.isWarnEnabled() && !taskQueue.isEmpty()) {
                            logger.warn("An event executor terminated with " +
                                    "non-empty task queue (" + taskQueue.size() + ')');
                        }
                        terminationFuture.setSuccess(null);
                    }
                }
            }
        }
    });
}
上面这个方法的逻辑还是很简单的,不过有一点值得注意,就是executor是什么? 用 executor.execute()包装一下Runnable有什么用意是什么呢?
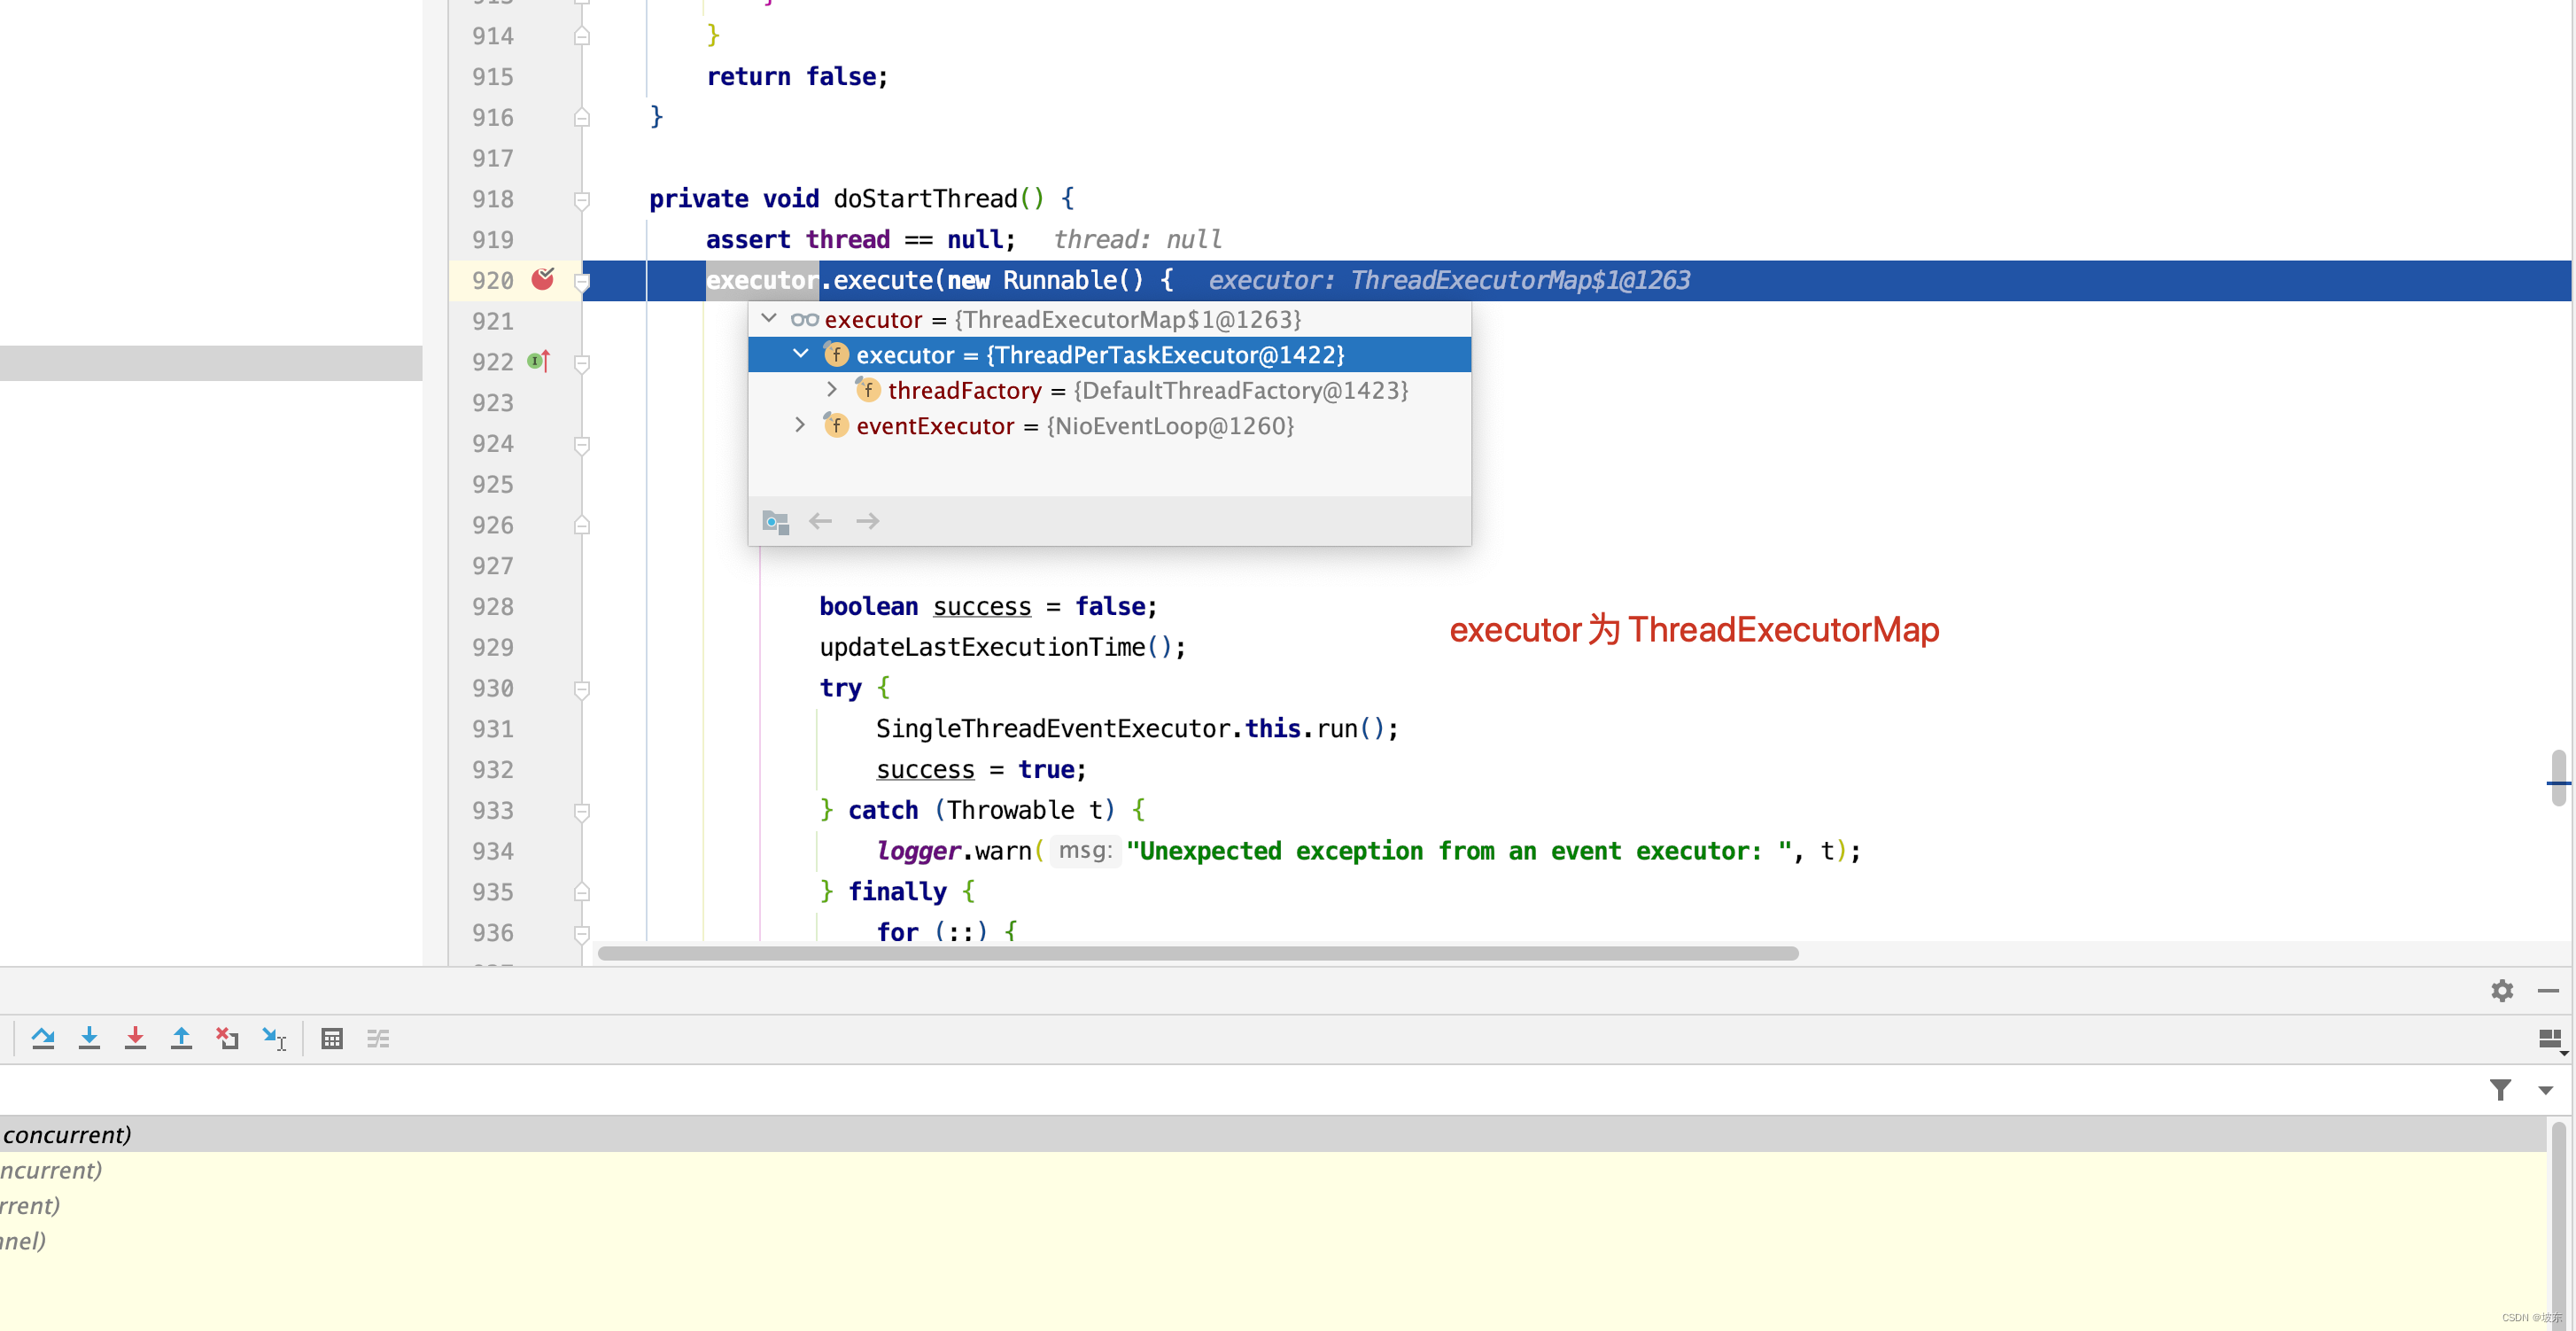
executor为ThreadExecutorMap ,那executor又是何时被初始化的呢?在SingleThreadEventExecutor构造方法中打断点 。
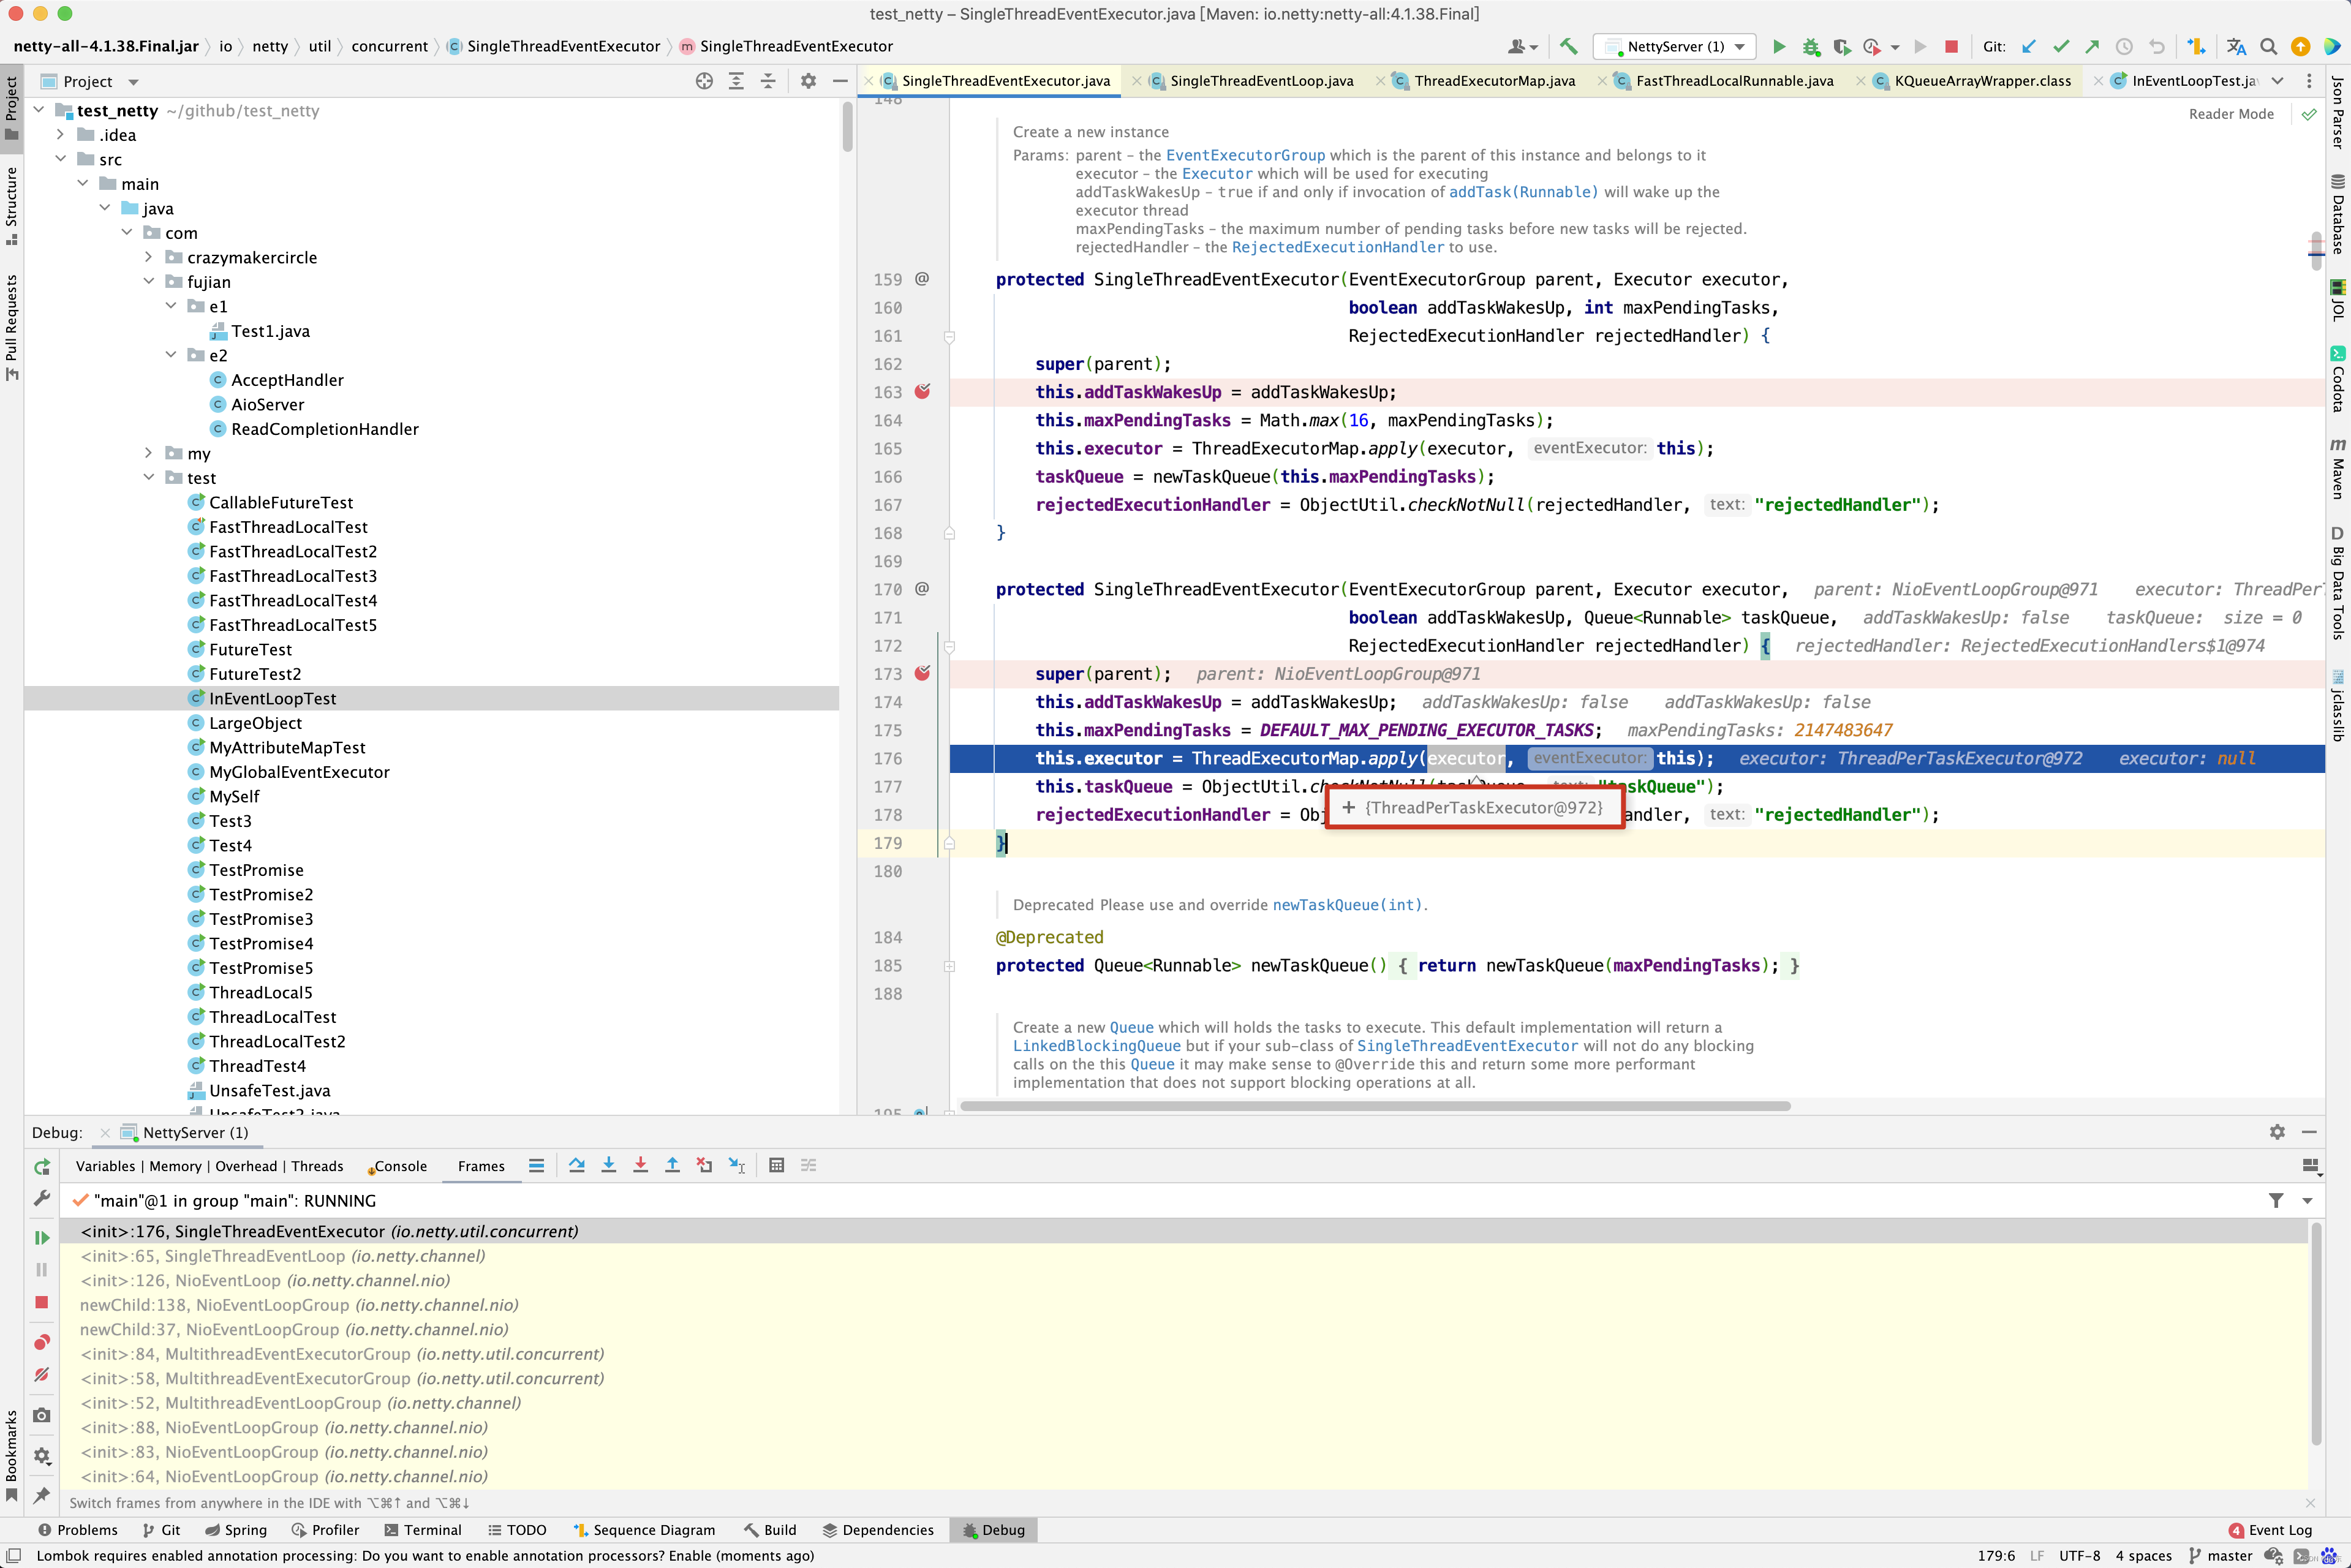
在SingleThreadEventExecutor的构造函数中 executor = ThreadExecutorMap.apply(executor, this);而apply()方法又传入了两个参数,第一个参数又是一个executor,第二个参数为NioEventLoop,那第一个参数又是哪里初始化的呢? 在MultithreadEventExecutorGroup的构造函数中找到了答案, 默认情况下为ThreadPerTaskExecutor
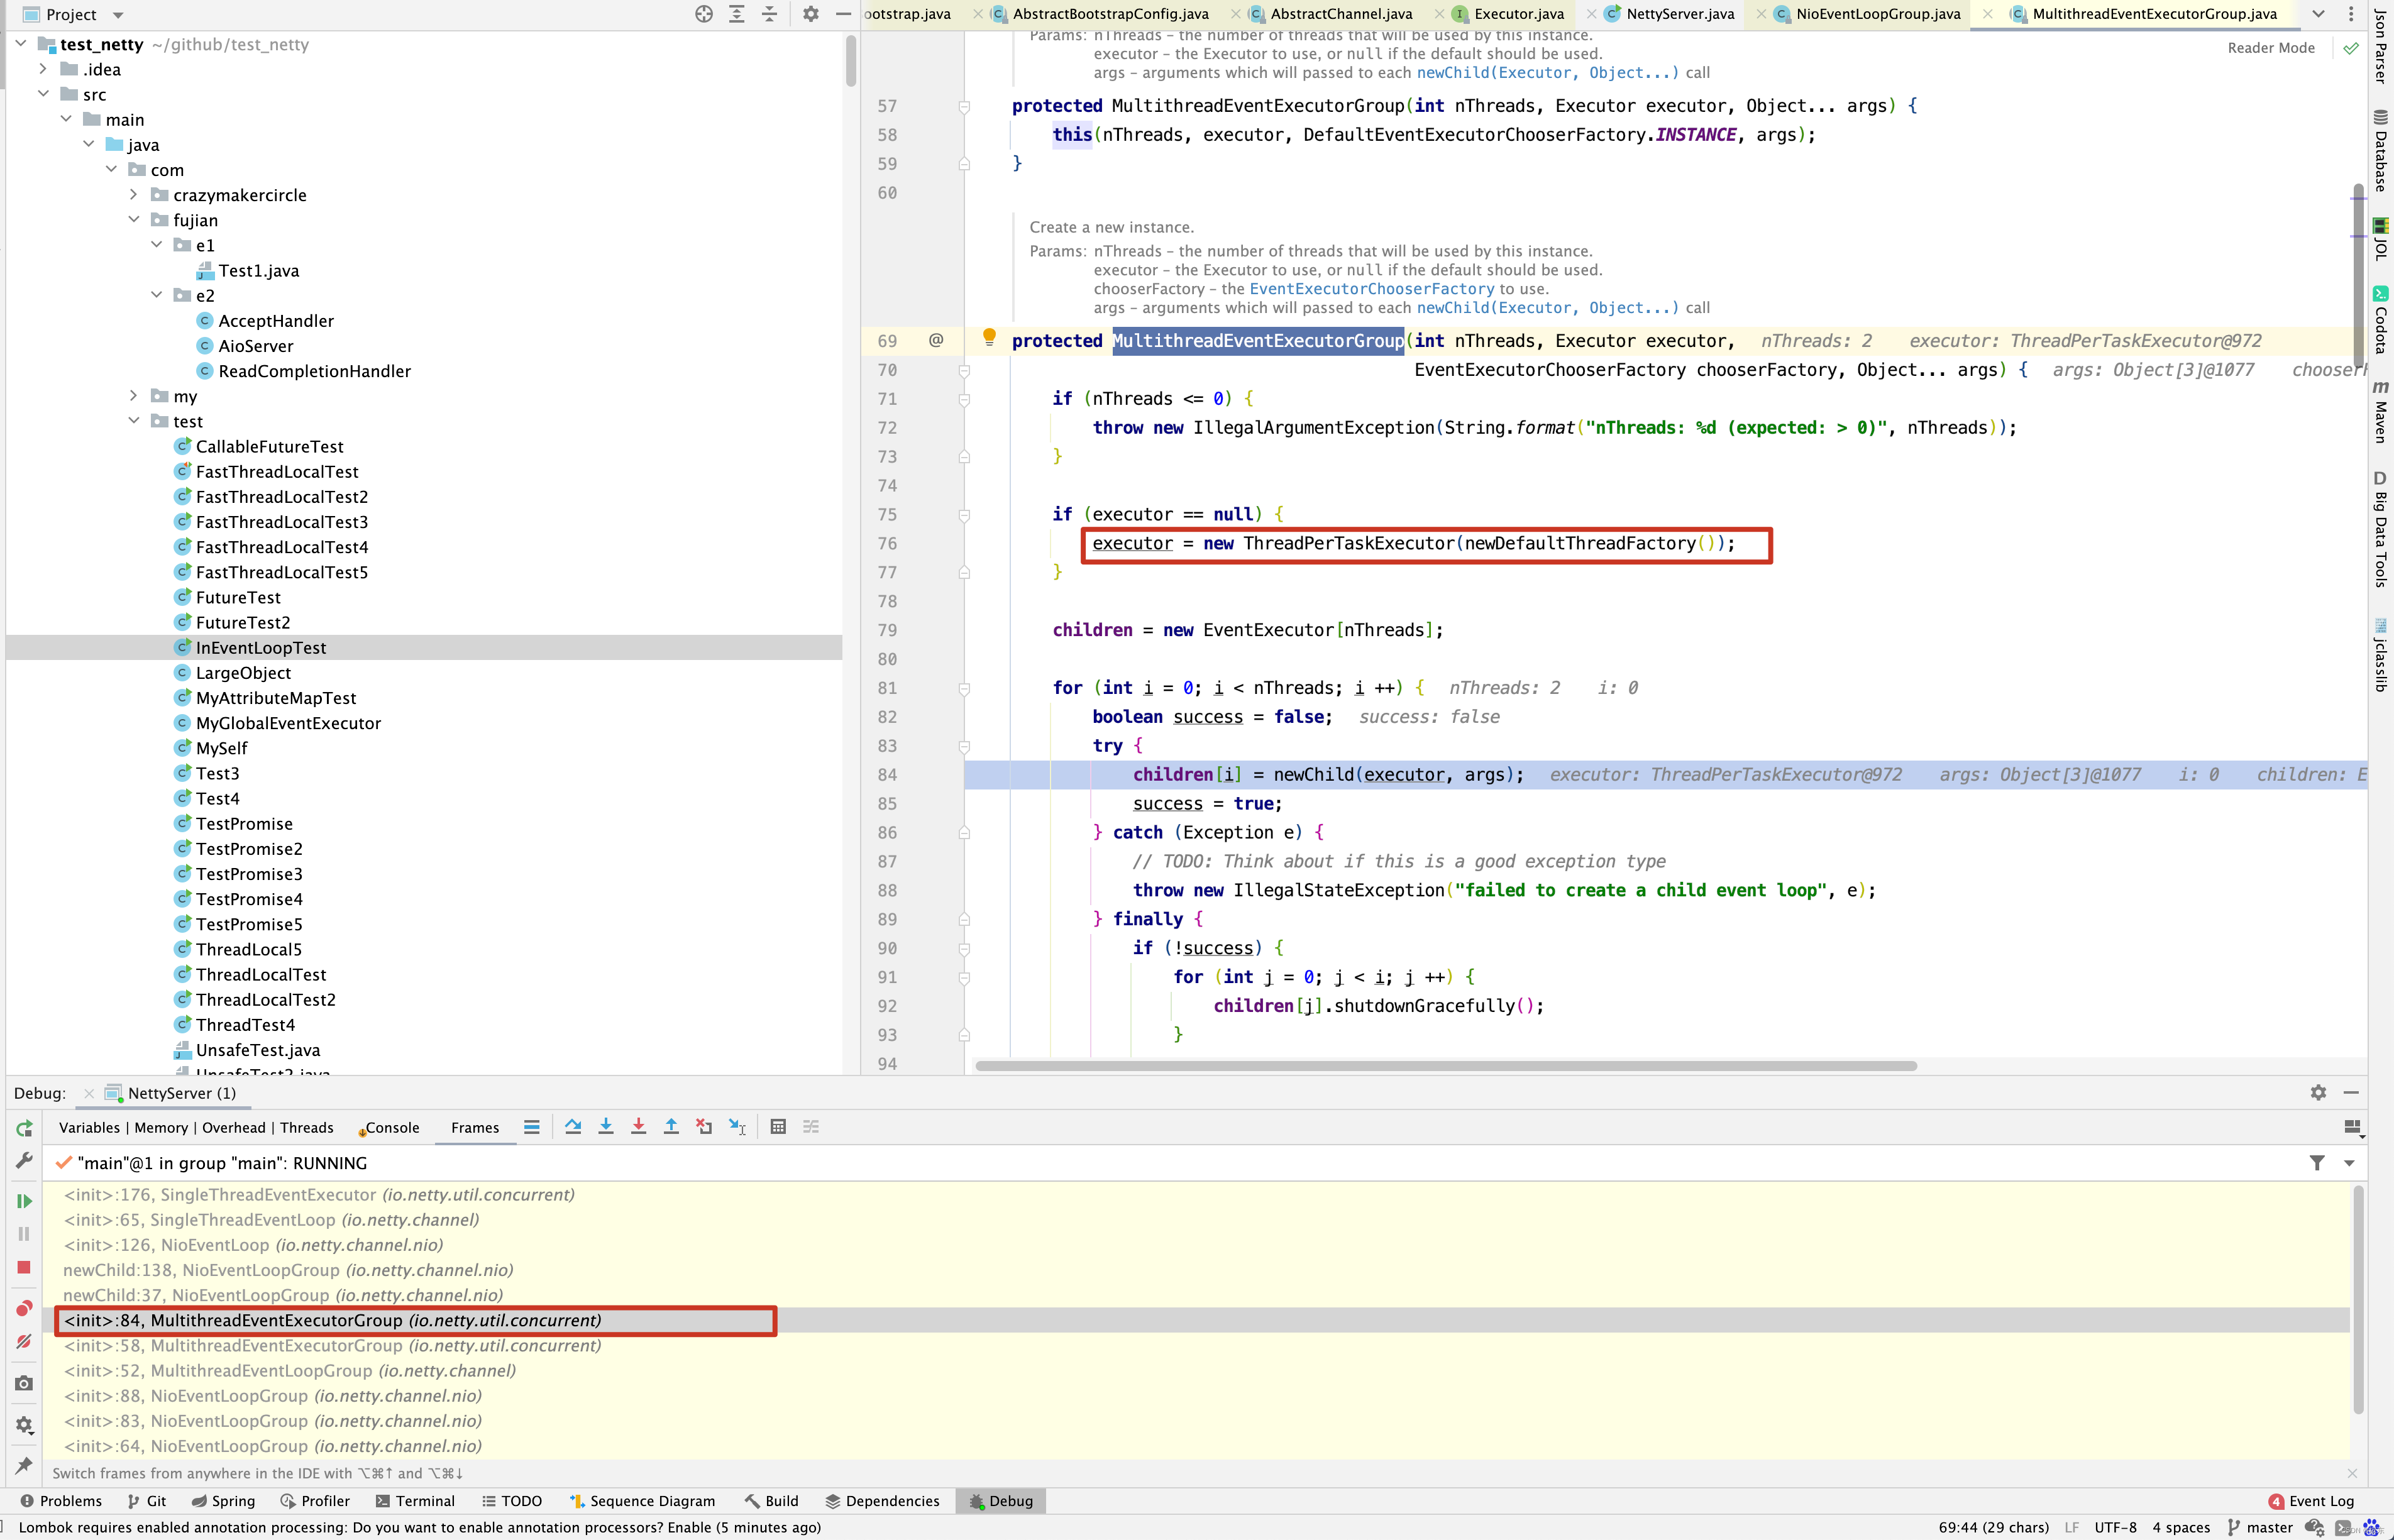
public final class ThreadPerTaskExecutor implements Executor {
    private final ThreadFactory threadFactory;

    public ThreadPerTaskExecutor(ThreadFactory threadFactory) {
        if (threadFactory == null) {
            throw new NullPointerException("threadFactory");
        }
        this.threadFactory = threadFactory;
    }

    @Override
    public void execute(Runnable command) {
    	// threadFactory的默认值为DefaultThreadFactory
        threadFactory.newThread(command).start();
    }
}
而ThreadPerTaskExecutor的ThreadFactory threadFactory由newDefaultThreadFactory()方法创建,看一下newDefaultThreadFactory()方法的实现。
protected ThreadFactory newDefaultThreadFactory() {
    return new DefaultThreadFactory(getClass());
}
而newDefaultThreadFactory()方法实际上创建了一个DefaultThreadFactory对象 。 接下来继续回到ThreadExecutorMap的apply()方法 。
public static Executor apply(final Executor executor, final EventExecutor eventExecutor) {
    ObjectUtil.checkNotNull(executor, "executor");
    ObjectUtil.checkNotNull(eventExecutor, "eventExecutor");
    return new Executor() {
        @Override
        public void execute(final Runnable command) {
        	// executor为ThreadPerTaskExecutor
            executor.execute(apply(command, eventExecutor));
        }
    };
}
因此在doStartThread()的execute()方法实际上是调用了ThreadPerTaskExecutor的execute()方法,但这里值得注意,在上述execute()方法中对command又用apply()方法做了一层包装。
public static Runnable apply(final Runnable command, final EventExecutor eventExecutor) {
    ObjectUtil.checkNotNull(command, "command");
    ObjectUtil.checkNotNull(eventExecutor, "eventExecutor");
    return new Runnable() {
        @Override
        public void run() {
            setCurrentEventExecutor(eventExecutor);
            try {
                command.run();
            } finally {
                setCurrentEventExecutor(null);
            }
        }
    };
}

private static final FastThreadLocal<EventExecutor> mappings = new FastThreadLocal<EventExecutor>();

private static void setCurrentEventExecutor(EventExecutor executor) {
    mappings.set(executor);
}
在run方法运行之前将NioEventLoop设置到ThreadLocal中,NioEventLoop 相当于整个任务在运行中的全局上下文,能从中获取,修改移除值 ,最终会调用execute()的这一行代码 threadFactory.newThread(command).start();
public Thread newThread(Runnable r) {
    Thread t = newThread(FastThreadLocalRunnable.wrap(r), prefix + nextId.incrementAndGet());
    try {
        if (t.isDaemon() != daemon) {
            t.setDaemon(daemon);
        }

        if (t.getPriority() != priority) {
            t.setPriority(priority);
        }
    } catch (Exception ignored) {

    }
    return t;
}
而在newThread()方法中,又对任务做了包装,看看FastThreadLocalRunnable.wrap ( r)方法的实现。
final class FastThreadLocalRunnable implements Runnable {
    private final Runnable runnable;

    private FastThreadLocalRunnable(Runnable runnable) {
        this.runnable = ObjectUtil.checkNotNull(runnable, "runnable");
    }

    @Override
    public void run() {
        try {
            runnable.run();
        } finally {
            FastThreadLocal.removeAll();
        }
    }

    static Runnable wrap(Runnable runnable) {
        return runnable instanceof FastThreadLocalRunnable ? runnable : new FastThreadLocalRunnable(runnable);
    }
}
在wrap()方法中, 最终任务被包装成了FastThreadLocalRunnable。 再来看threadFactory的newThread()方法,看其内部newThread()方法实现。
protected Thread newThread(Runnable r, String name) {
    return new FastThreadLocalThread(threadGroup, r, name);
}
看到没有,最终Thread被替换成了FastThreadLocalThread,Runnable被替换成了FastThreadLocalRunnable,而真正在执行FastThreadLocalRunnable的run()方法时,在finally中,会调用FastThreadLocal.removeAll()方法,将线程范围内ThreadLocal给清除掉。 那Netty 这样做的目的是什么呢? 其实也是为性能考虑, 之前写了一篇博客 Netty源码性能分析 - ThreadLocal PK FastThreadLocal ,关于ThreadLocal和FastThreadLocal的实现原理对比,有兴趣可以去看看。
接下来进入doStartThread()方法的内部SingleThreadEventExecutor.this.run();这一行代码的分析 。
// 最后回到NioEventLoop的run()方法,将前面的三个部分结合起来 , 首先调用select(boolean oldWakenup)方法轮询就绪的Channel
// 然后调用processSelectKeys()方法处理I/O事件,最后运行runAllTasks()方法处理任务队列,具体实现代码如下
protected void run() {
    for (;;) {
        try {
            try {
                // 根据是否有任务获取策略, 默认策略, 当有任务时,返回selector.selectNow()
                // 当无任务时,返回SelectStrategy.SELECT
                switch (selectStrategy.calculateStrategy(selectNowSupplier, hasTasks())) {
                    case SelectStrategy.CONTINUE:
                        continue;
                    case SelectStrategy.BUSY_WAIT:
                        // fall-through to SELECT since the busy-wait is not supported with NIO

                    case SelectStrategy.SELECT:
                        // 执行select()方法
                        select(wakenUp.getAndSet(false));

                        // 'wakenUp.compareAndSet(false, true)' is always evaluated
                        // before calling 'selector.wakeup()' to reduce the wake-up
                        // overhead. (Selector.wakeup() is an expensive operation.)
                        //
                        // However, there is a race condition in this approach.
                        // The race condition is triggered when 'wakenUp' is set to
                        // true too early.
                        //
                        // 'wakenUp' is set to true too early if:
                        // 1) Selector is waken up between 'wakenUp.set(false)' and
                        //    'selector.select(...)'. (BAD)
                        // 2) Selector is waken up between 'selector.select(...)' and
                        //    'if (wakenUp.get()) { ... }'. (OK)
                        //
                        // In the first case, 'wakenUp' is set to true and the
                        // following 'selector.select(...)' will wake up immediately.
                        // Until 'wakenUp' is set to false again in the next round,
                        // 'wakenUp.compareAndSet(false, true)' will fail, and therefore
                        // any attempt to wake up the Selector will fail, too, causing
                        // the following 'selector.select(...)' call to block
                        // unnecessarily.
                        //
                        // To fix this problem, we wake up the selector again if wakenUp
                        // is true immediately after selector.select(...).
                        // It is inefficient in that it wakes up the selector for both
                        // the first case (BAD - wake-up required) and the second case
                        // (OK - no wake-up required).
                        // 这进而的注释很长, 为何还要判断wakenUp.get()并去执行唤醒操作selector.wakeup(),这个唤醒操作
                        // 底层原理是构造一个感兴趣的就绪事件,让Selector 在调用select()方法时轮询到就绪事件并立刻返回
                        // WindowsSelectImpl的wakeup源码如下
                        // public Selector wakeup(){
                        //  synchronized(this.interruptLock){
                        //      if(!this.interruptTriggered){
                        //          this.selectWakeupSocket();
                        //          this.interruptTriggered = true ;
                        //      }
                        //      return this;
                        //  }
                        // }
                        // 由上述代码可以发现,多次同时调用wakeup()方法与调用一次没有区别,因为InterruptTriggered第一次调用后就为true
                        // ,后续再调用会立刻返回,在默认情况下,其他线程添加任务到taskQueue队列中后,会调用NioEventLoop的wakeup()方法
                    if (wakenUp.get()) {
                        selector.wakeup();
                    }
                    // fall through
                default:
                }
            } catch (IOException e) {
                // If we receive an IOException here its because the Selector is messed up. Let's rebuild
                // the selector and retry. https://github.com/netty/netty/issues/8566
                // 当出现I/O异常时需要重新构建Selector
                rebuildSelector0();
                handleLoopException(e);
                continue;
            }

            cancelledKeys = 0;
            needsToSelectAgain = false;
            final int ioRatio = this.ioRatio;
            if (ioRatio == 100) {
                try {
                    // I/O操作, 根据selectedKeys进行处理
                    processSelectedKeys();
                } finally {
                    // Ensure we always run tasks.
                    // 执行完所有的任务
                    runAllTasks();
                }
            } else {
                final long ioStartTime = System.nanoTime();
                try {
                    // I/O操作,根据selectedKeys进行处理
                    processSelectedKeys();
                } finally {
                    // Ensure we always run tasks.
                    final long ioTime = System.nanoTime() - ioStartTime;
                    // 按一定的比例执行任务,可能遗留一部分任务等待下次执行
                    runAllTasks(ioTime * (100 - ioRatio) / ioRatio);
                }
            }
        } catch (Throwable t) {
            handleLoopException(t);
        }
        // Always handle shutdown even if the loop processing threw an exception.
        try {
            if (isShuttingDown()) {
                closeAll();
                if (confirmShutdown()) {
                    return;
                }
            }
        } catch (Throwable t) {
            handleLoopException(t);
        }
    }
}
先来分析selectStrategy.calculateStrategy(selectNowSupplier, hasTasks())这一行代码。 先弄明白selectStrategy是什么 ? 同样可以追溯到NioEventLoop的构造函数中。 在其中打一个断点会发现。
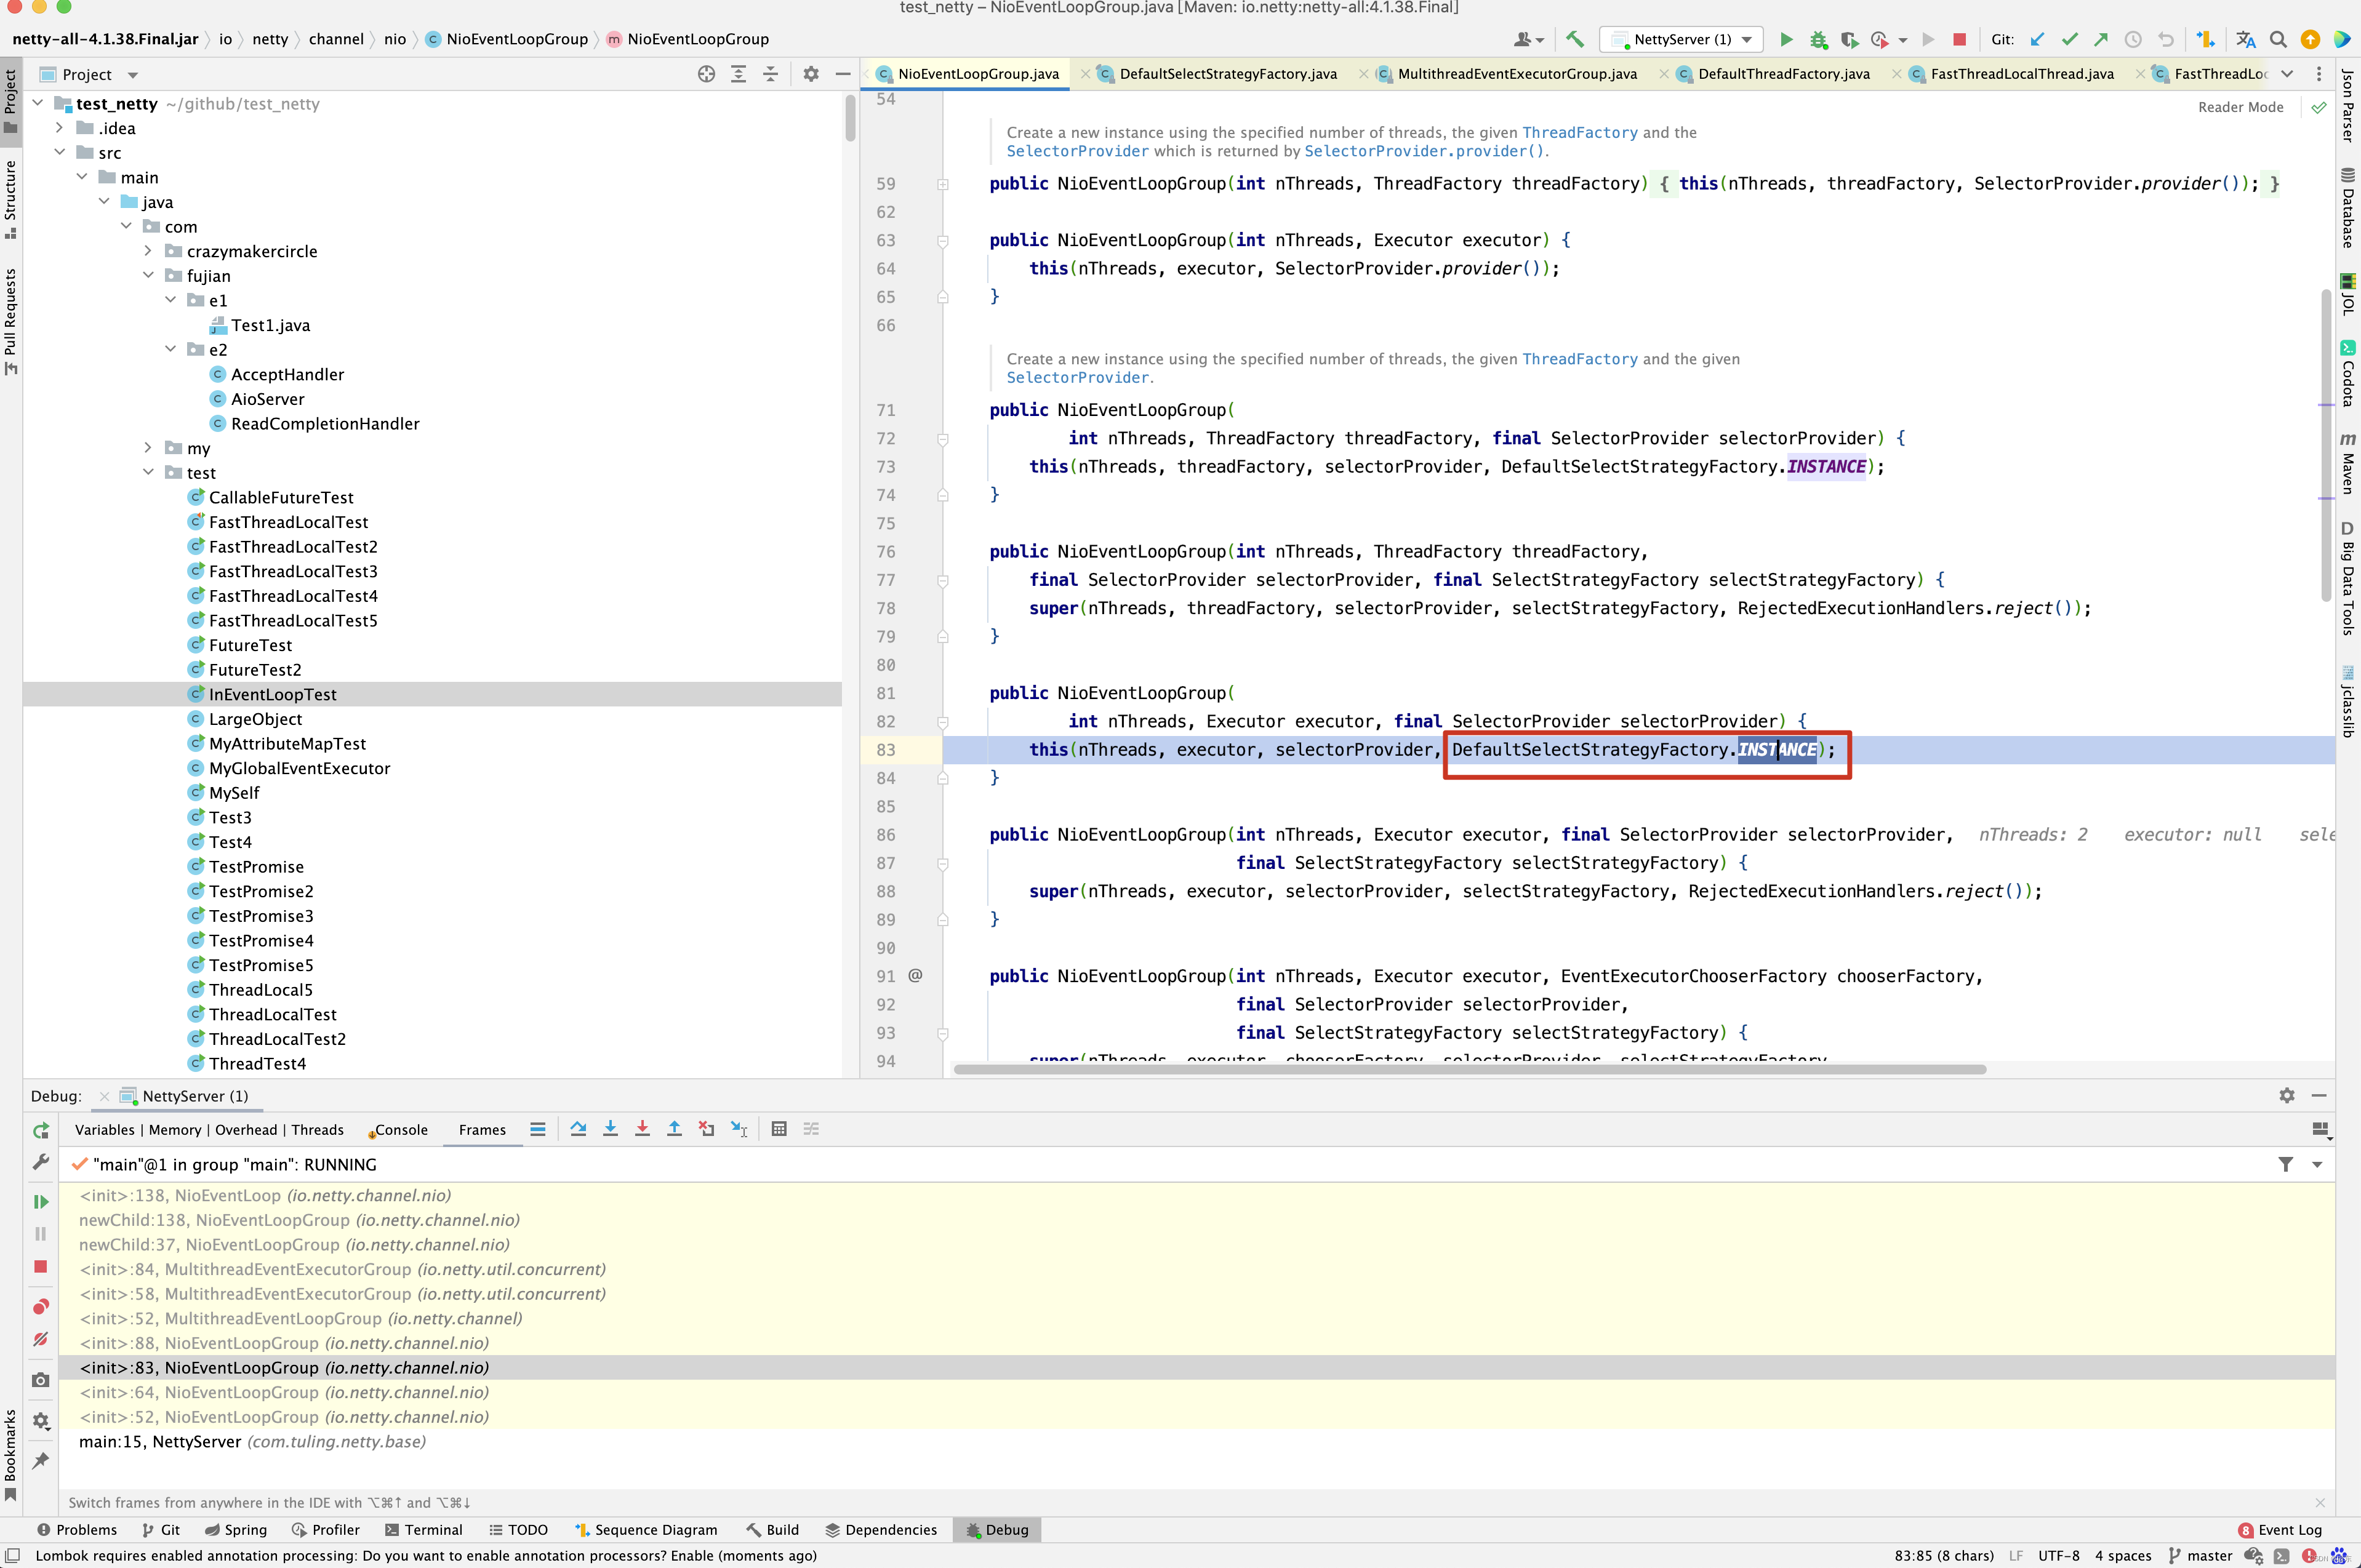
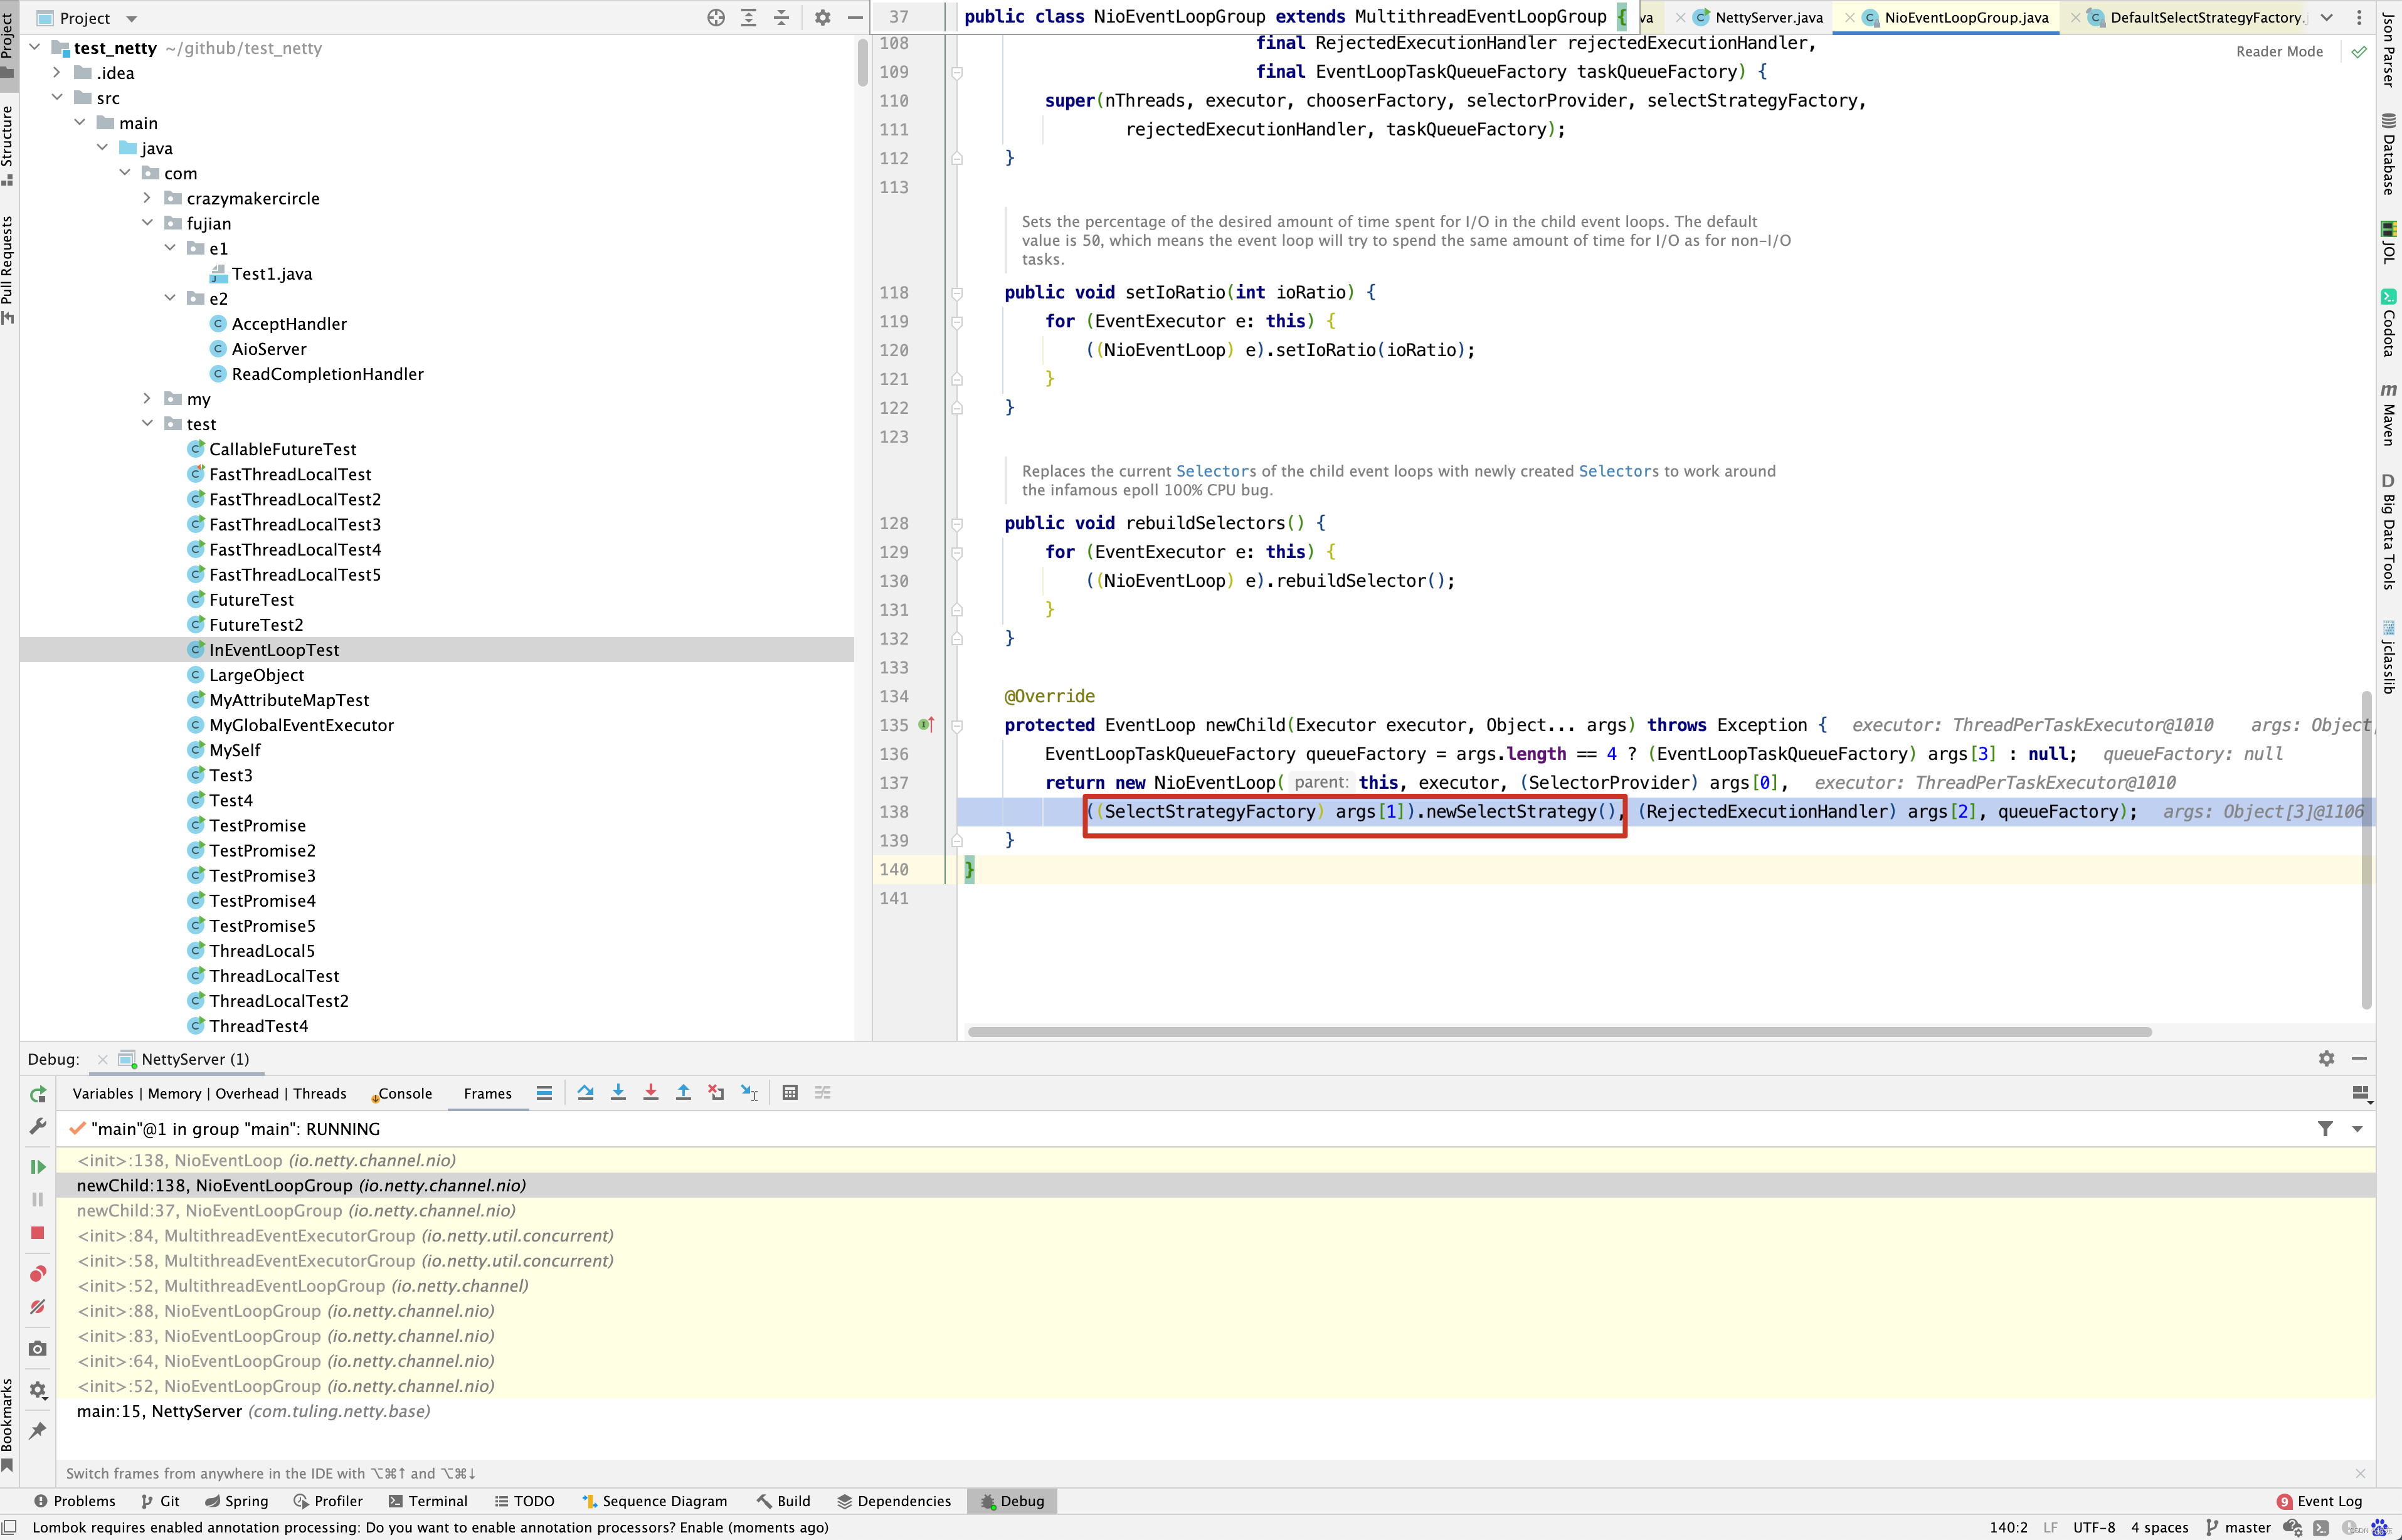
DefaultSelectStrategyFactory.INSTANCE为DefaultSelectStrategyFactory对象, 而newSelectStrategy()方法实际创建的是DefaultSelectStrategy对象。因此selectStrategy就是DefaultSelectStrategy对象。接下来进入他的calculateStrategy()方法。
public int calculateStrategy(IntSupplier selectSupplier, boolean hasTasks) throws Exception {
    return hasTasks ? selectSupplier.get() : SelectStrategy.SELECT;
}
当然,在calculateStrategy()方法中传入了两个参数,第一个参数为selectNowSupplier,而selectNowSupplier是NioEventLoop的属性。写法如下。
private final IntSupplier selectNowSupplier = new IntSupplier() {
    @Override
    public int get() throws Exception {
        return selectNow();
    }
};
第二个参数来源于hasTask()方法
protected boolean hasTasks() {
    return super.hasTasks() || !tailTasks.isEmpty();
}


protected boolean hasTasks() {
    assert inEventLoop();
    return !taskQueue.isEmpty();
}
hasTasks()方法中,只要队列中任务不为空,则返回true,而hasTasks为true,则会调用selectSupplier.get()方法,而get()方法的内部会调用selectNow(),接下来看selectNow()的实现。
int selectNow() throws IOException {
    try {
        return selector.selectNow();
    } finally {
        if (wakenUp.get()) {
            selector.wakeup();
        }
    }
}
在阅读源码之前,先来看看Selector相关的基础知识 。
Selector类中总共包含以下10个方法:
- open():创建一个Selector对象
- isOpen():是否是open状态,如果调用了close()方法则会返回false
- provider():获取当前Selector的Provider
- keys():如上文所述,获取当前channel注册在Selector上所有的key
- selectedKeys():获取当前channel就绪的事件列表
- selectNow():获取当前是否有事件就绪,该方法立即返回结果,不会阻塞;如果返回值>0,则代表存在一个或多个
- select(long timeout):selectNow的阻塞超时方法,超时时间内,有事件就绪时才会返回;否则超过时间也会返回
- select():selectNow的阻塞方法,直到有事件就绪时才会返回
- wakeup():调用该方法会时,阻塞在select()处的线程会立马返回;(ps:下面一句划重点)即使当前不存在线程阻塞在select()处,那么下一个执行* select()方法的线程也会立即返回结果,相当于执行了一次selectNow()方法
- close(): 用完Selector后调用其close()方法会关闭该Selector,且使注册到该Selector上的所有SelectionKey实例无效。channel本身并不会关闭。
当然啦,如果hasTasks返回false,则calculateStrategy()方法返回的是SelectStrategy.SELECT,如果返回的是SelectStrategy.SELECT,Netty的处理方式又是如何呢? 进入select()方法 。
private void select(boolean oldWakenUp) throws IOException {
    Selector selector = this.selector;
    try {
        int selectCnt = 0;
        // 获取当前系统时间(纳秒级)
        long currentTimeNanos = System.nanoTime();
        // 获取定时任务的触发时间
        long selectDeadLineNanos = currentTimeNanos + delayNanos(currentTimeNanos);
        // 死循环
        for (; ; ) {
            // 获取距离定时任务触发时间的时长 (四舍五入)
            long timeoutMillis = (selectDeadLineNanos - currentTimeNanos + 500000L) / 1000000L;
            // 已经触发或超时
            if (timeoutMillis <= 0) {
                // 若之前未执行过select ,则调用非阻塞的selectNow()方法
                if (selectCnt == 0) {
                    selector.selectNow();
                    selectCnt = 1;
                }
                // 跳出循环,去处理I/O事件和定时任务
                break;
            }
            // If a task was submitted when wakenUp value was true, the task didn't get a chance to call
            // Selector#wakeup. So we need to check task queue again before executing select operation.
            // If we don't, the task might be pended until select operation was timed out.
            // It might be pended until idle timeout if IdleStateHandler existed in pipeline.
            /***
             * 当任务队列中有任务,且唤醒标志为false时,需要调用selectNow()方法
             * 否则任务得不到及时处理,可能需要阻塞等待超时
             * 这段判断在Netty之后才加上的,检测到有任务,并未设置唤醒标识
             */
            if (hasTasks() && wakenUp.compareAndSet(false, true)) {
                selector.selectNow();
                selectCnt = 1;
                break;
            }

            // 阻塞检测就绪的Channel,除非有就绪的Channel
            // 或者遇到空轮询的问题,或者被其他线程唤醒
            // 否则只能等待timeoutMillis后自动醒来
            int selectedKeys = selector.select(timeoutMillis);
            // 检测次数加1 ,此参数主要用来判断是否有空轮询的
            selectCnt ++;
            // 若轮询到selectKeys不为0或  oldWakenUp 的参数为true
            // 或有线程设置 wakenUp 为true , 或任务队列和定时任务队列的值
            if (selectedKeys != 0 || oldWakenUp || wakenUp.get() || hasTasks() || hasScheduledTasks()) {
                // - Selected something,
                // - waken up by user, or
                // - the task queue has a pending task.
                // - a scheduled task is ready for processing
                break;
            }
            // 线程中断
            if (Thread.interrupted()) {
                // Thread was interrupted so reset selected keys and break so we not run into a busy loop.
                // As this is most likely a bug in the handler of the user or it's client library we will
                // also log it.
                //
                // See https://github.com/netty/netty/issues/2426
                if (logger.isDebugEnabled()) {
                    logger.debug("Selector.select() returned prematurely because " +
                            "Thread.currentThread().interrupt() was called. Use " +
                            "NioEventLoop.shutdownGracefully() to shutdown the NioEventLoop.");
                }
                selectCnt = 1;
                break;
            }

            long time = System.nanoTime();
            // 超时自动醒来,说明定时任务已经从队列中移除了
            if (time - TimeUnit.MILLISECONDS.toNanos(timeoutMillis) >= currentTimeNanos) {
                // timeoutMillis elapsed without anything selected.
                // 将selectCnt设置为1,在下次进入循环时直接跳出,无须调用
                selectCnt = 1;

            } else if ( //在timeoutMillis时间内,连续的select次数大于或等于512次并未跳出循环
                    SELECTOR_AUTO_REBUILD_THRESHOLD > 0 &&
                    selectCnt >= SELECTOR_AUTO_REBUILD_THRESHOLD) {
                // 此时进入空轮询,需要重新构建Selector,并跳出循环
                // The code exists in an extra method to ensure the method is not too big to inline as this
                // branch is not very likely to get hit very frequently.
                selector = selectRebuildSelector(selectCnt);
                selectCnt = 1;
                break;
            }
            // 当前系统时间更新(纳秒级)
            currentTimeNanos = time;
        }

        if (selectCnt > MIN_PREMATURE_SELECTOR_RETURNS) {
            if (logger.isDebugEnabled()) {
                logger.debug("Selector.select() returned prematurely {} times in a row for Selector {}.",
                        selectCnt - 1, selector);
            }
        }
    } catch (CancelledKeyException e) {
        if (logger.isDebugEnabled()) {
            logger.debug(CancelledKeyException.class.getSimpleName() + " raised by a Selector {} - JDK bug?",
                    selector, e);
        }
        // Harmless exception - log anyway
    }
}
select()方法中有一个空轮询的bug,先放一放,先来分析NioEventLoop的run()方法中。Netty为什么要添加下面加红框代码。它的用意是什么呢?同样将疑问留给后面再来分析 。
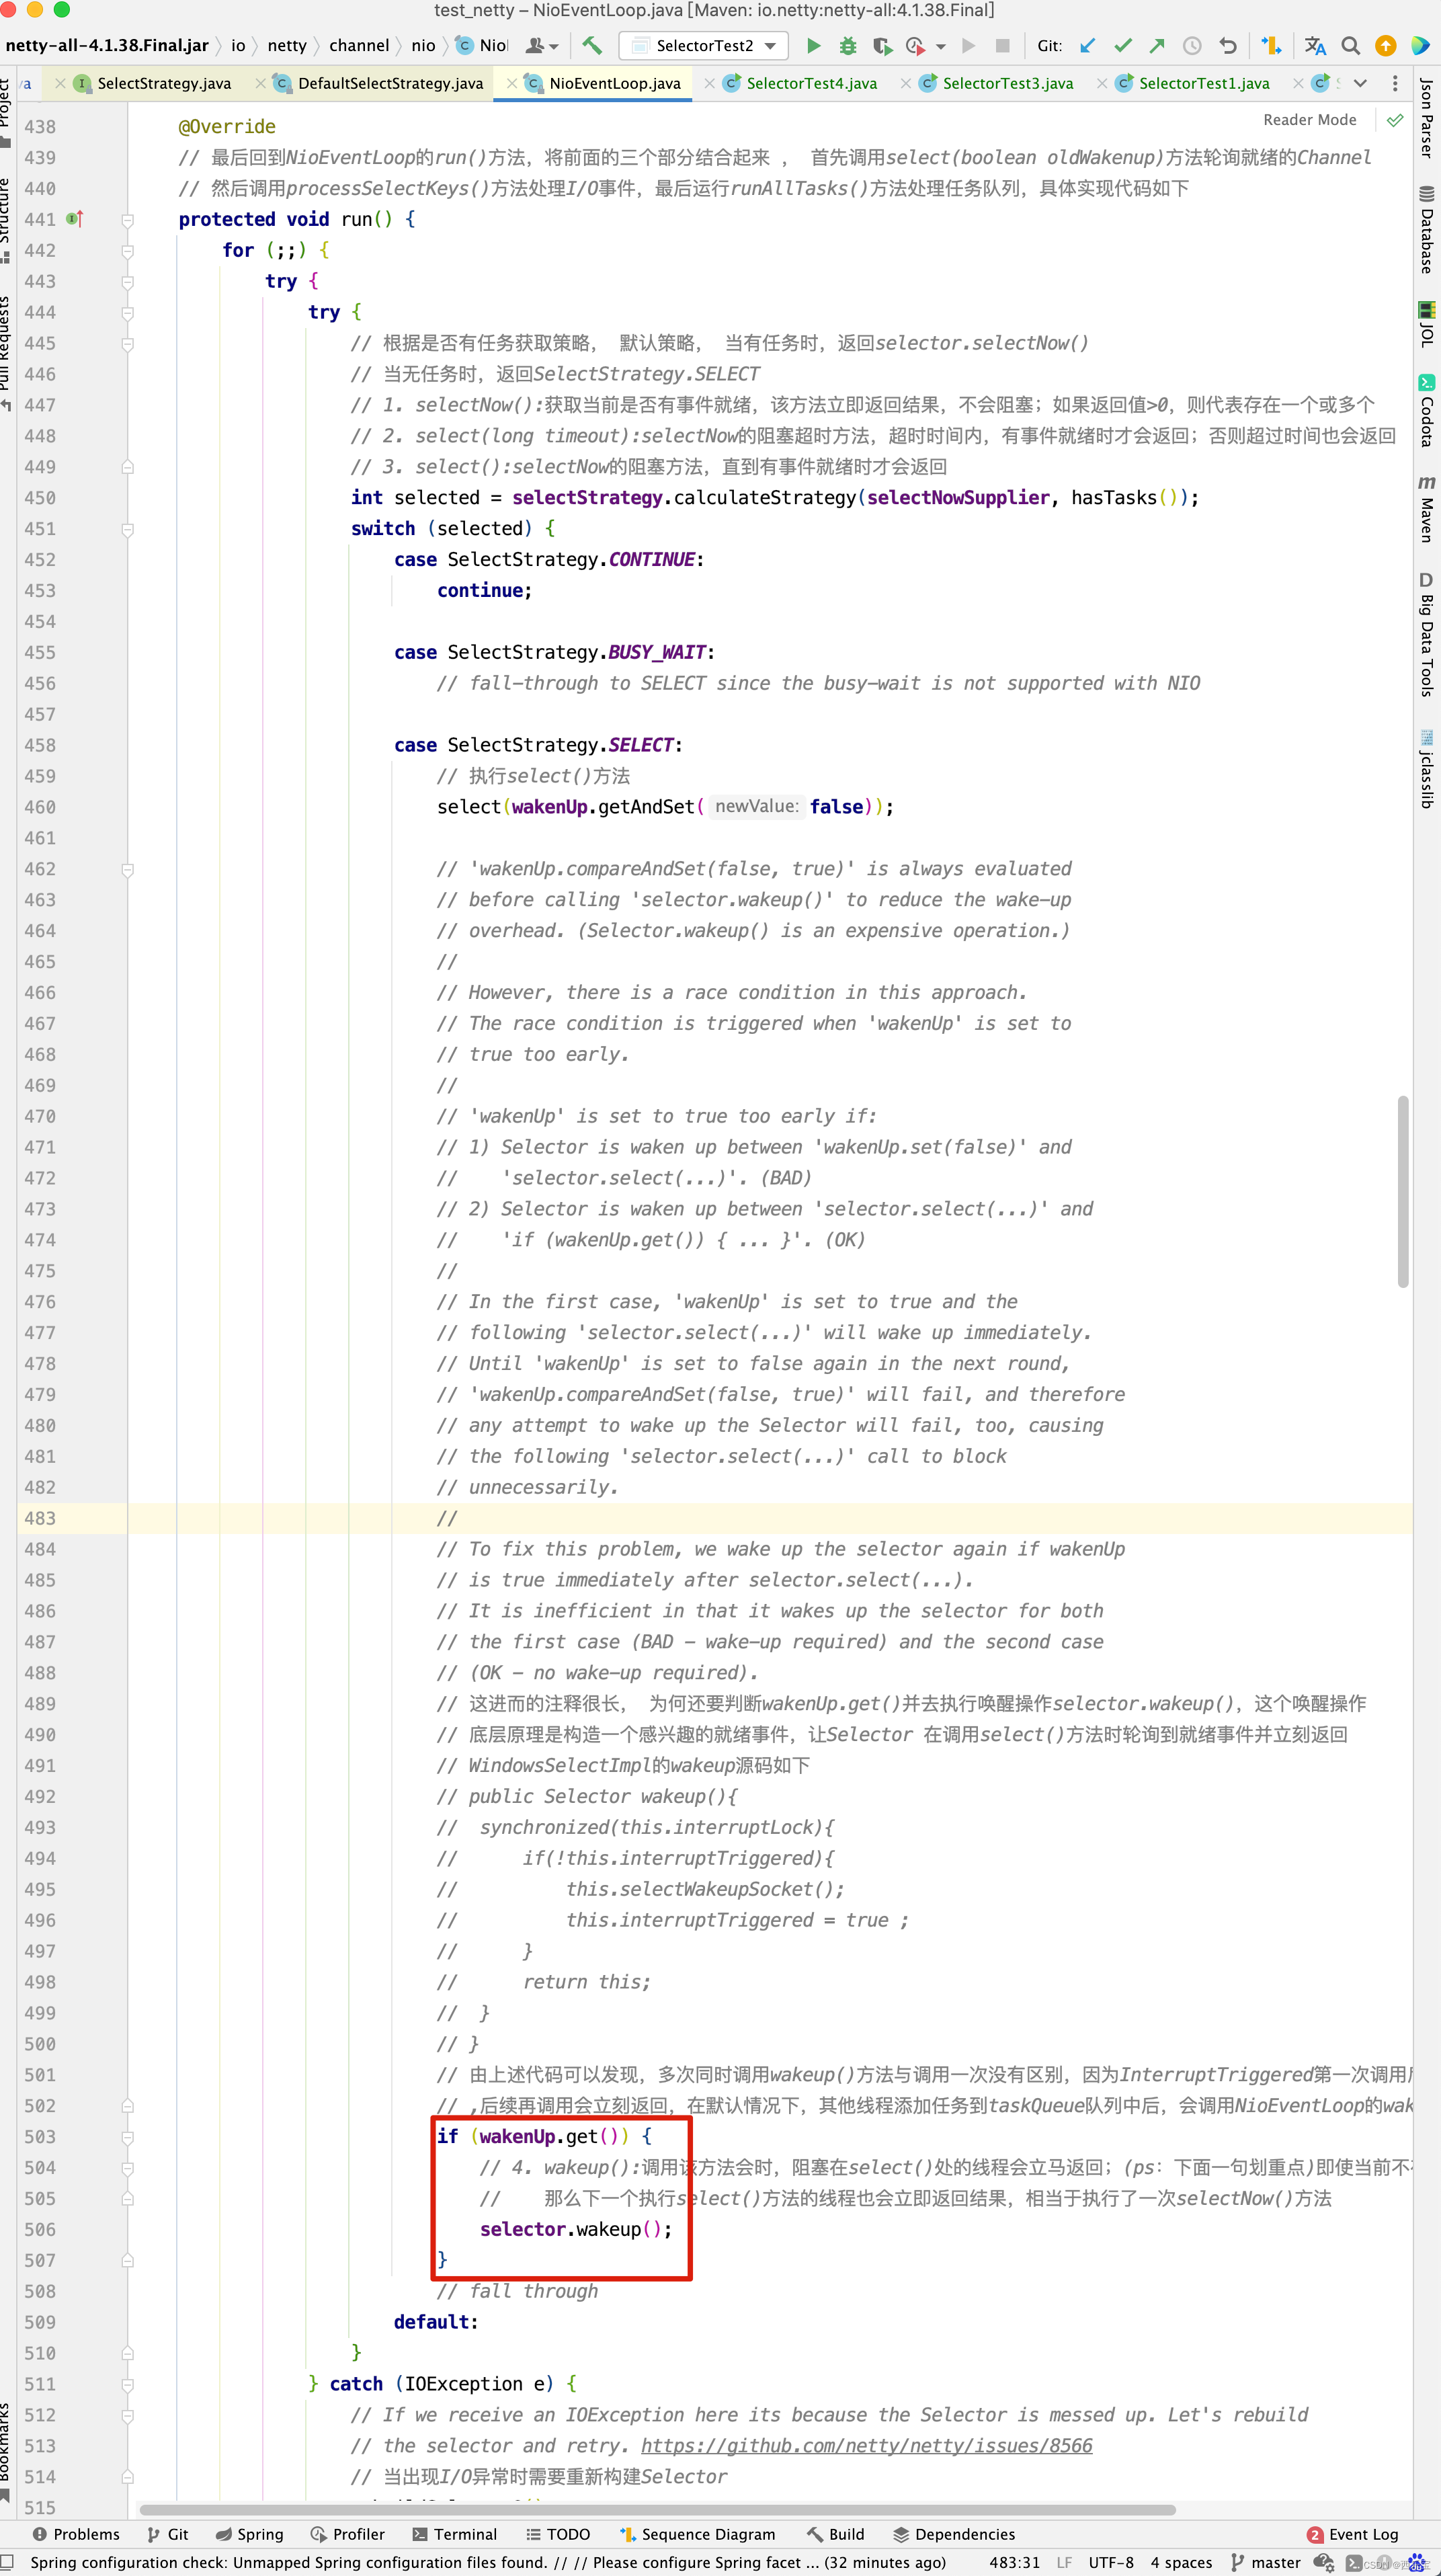
小插曲,分析这一块代码时,也花了几个小时,最终我自己被弄晕了,不知道Netty这样做的用意是什么?问题在于没有弄明白selector.wakeup()方法的真正使用,因此先通过几个例子来弄明白wakeup(), select(), selectNow() 的使用,再来分析这一块的源码 。 网上对wakeup()方法原理是这样说明的: NIO中的Selector封装了底层的系统调用,其中wakeup用于唤醒阻塞在select方法上的线程,它的实现很简单,在linux上就是创建一 个管道并加入poll的fd集合,wakeup就是往管道里写一个字节,那么阻塞的poll方法有数据可读就立即返回。wakeup方法的API还告诉我们,如果当前Selector没有阻塞在select方法上,那么本次 wakeup调用会在下一次select阻塞的时候生效,这个道理很简单,wakeup方法写入一个字节,下次poll等待的时候立即发现可读并返回,因 此不会阻塞。
例子1 :主线程调用selector.select(); 创建一个子线程,2秒后调用selector.wakeup()方法 。主线程被唤醒。
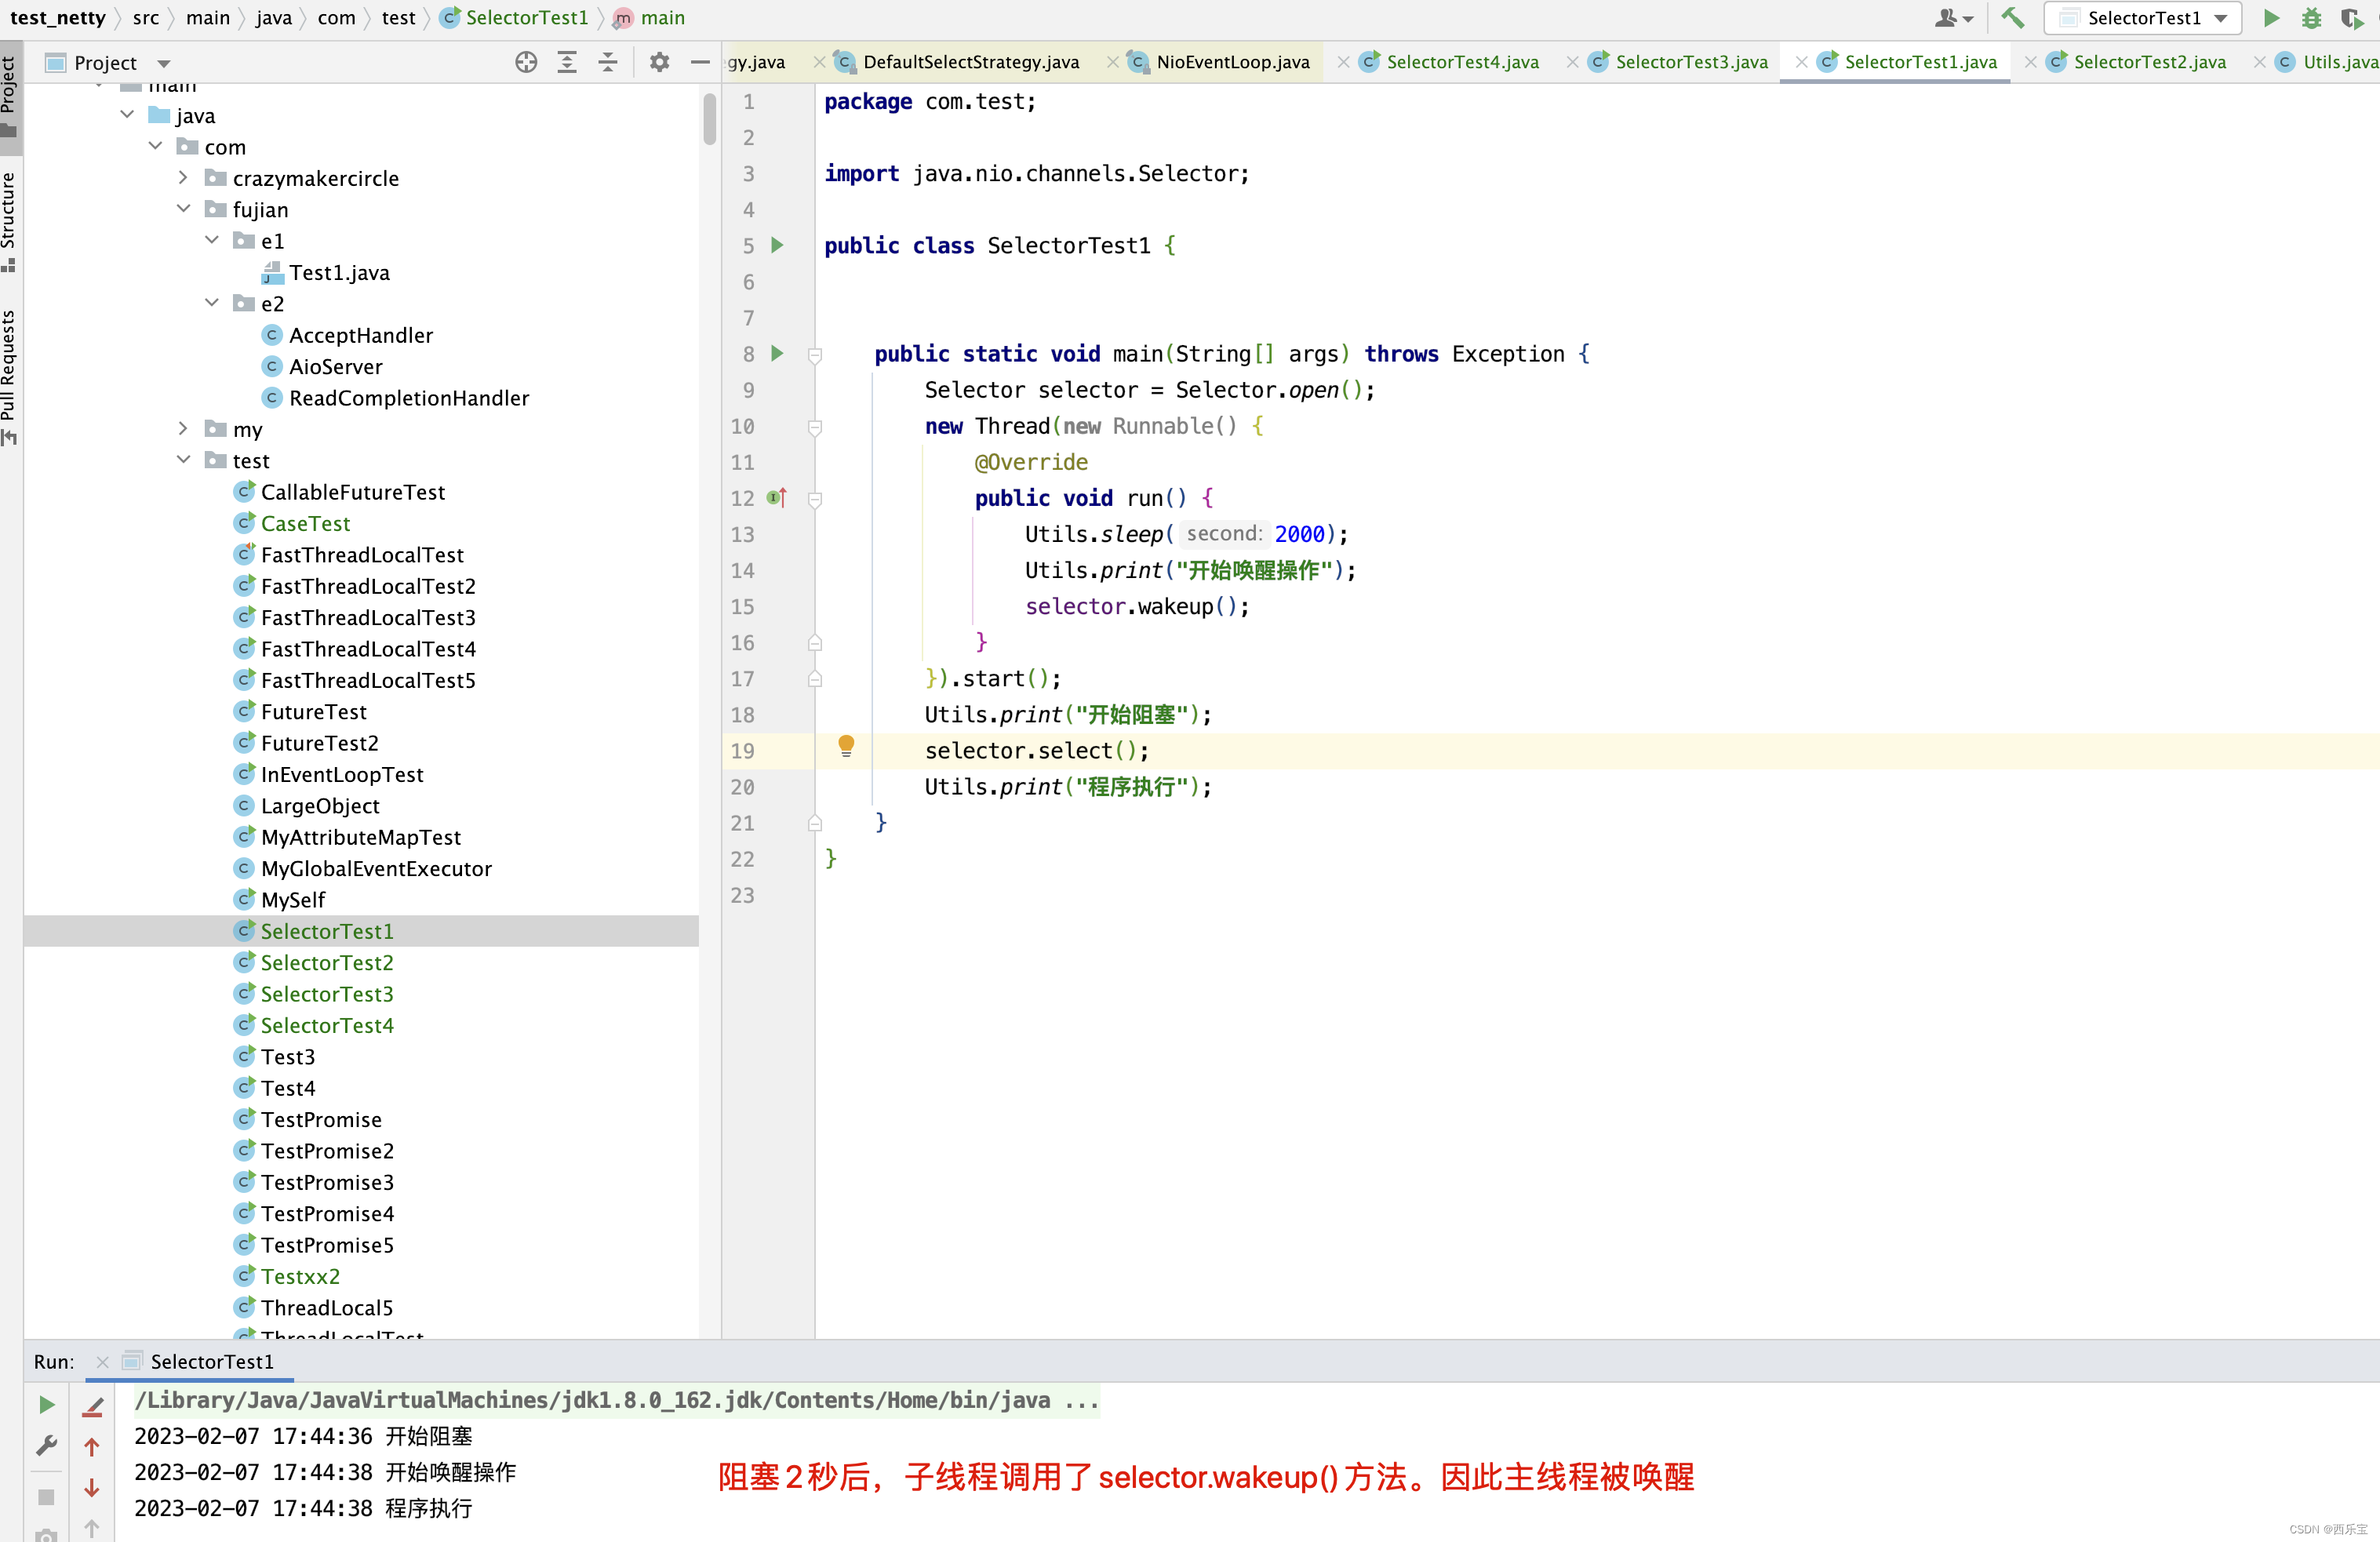
其实我的认知也是这样的,select()方法阻塞,wakeup()唤醒,因为这种认知也就决定了看不懂Netty源码。
例2 : 第一次select()方法前面调用了两次wakeup() ,当然调用一次效果也是一样, 第一次select()方法不阻塞,第二次select()方法阻塞 。
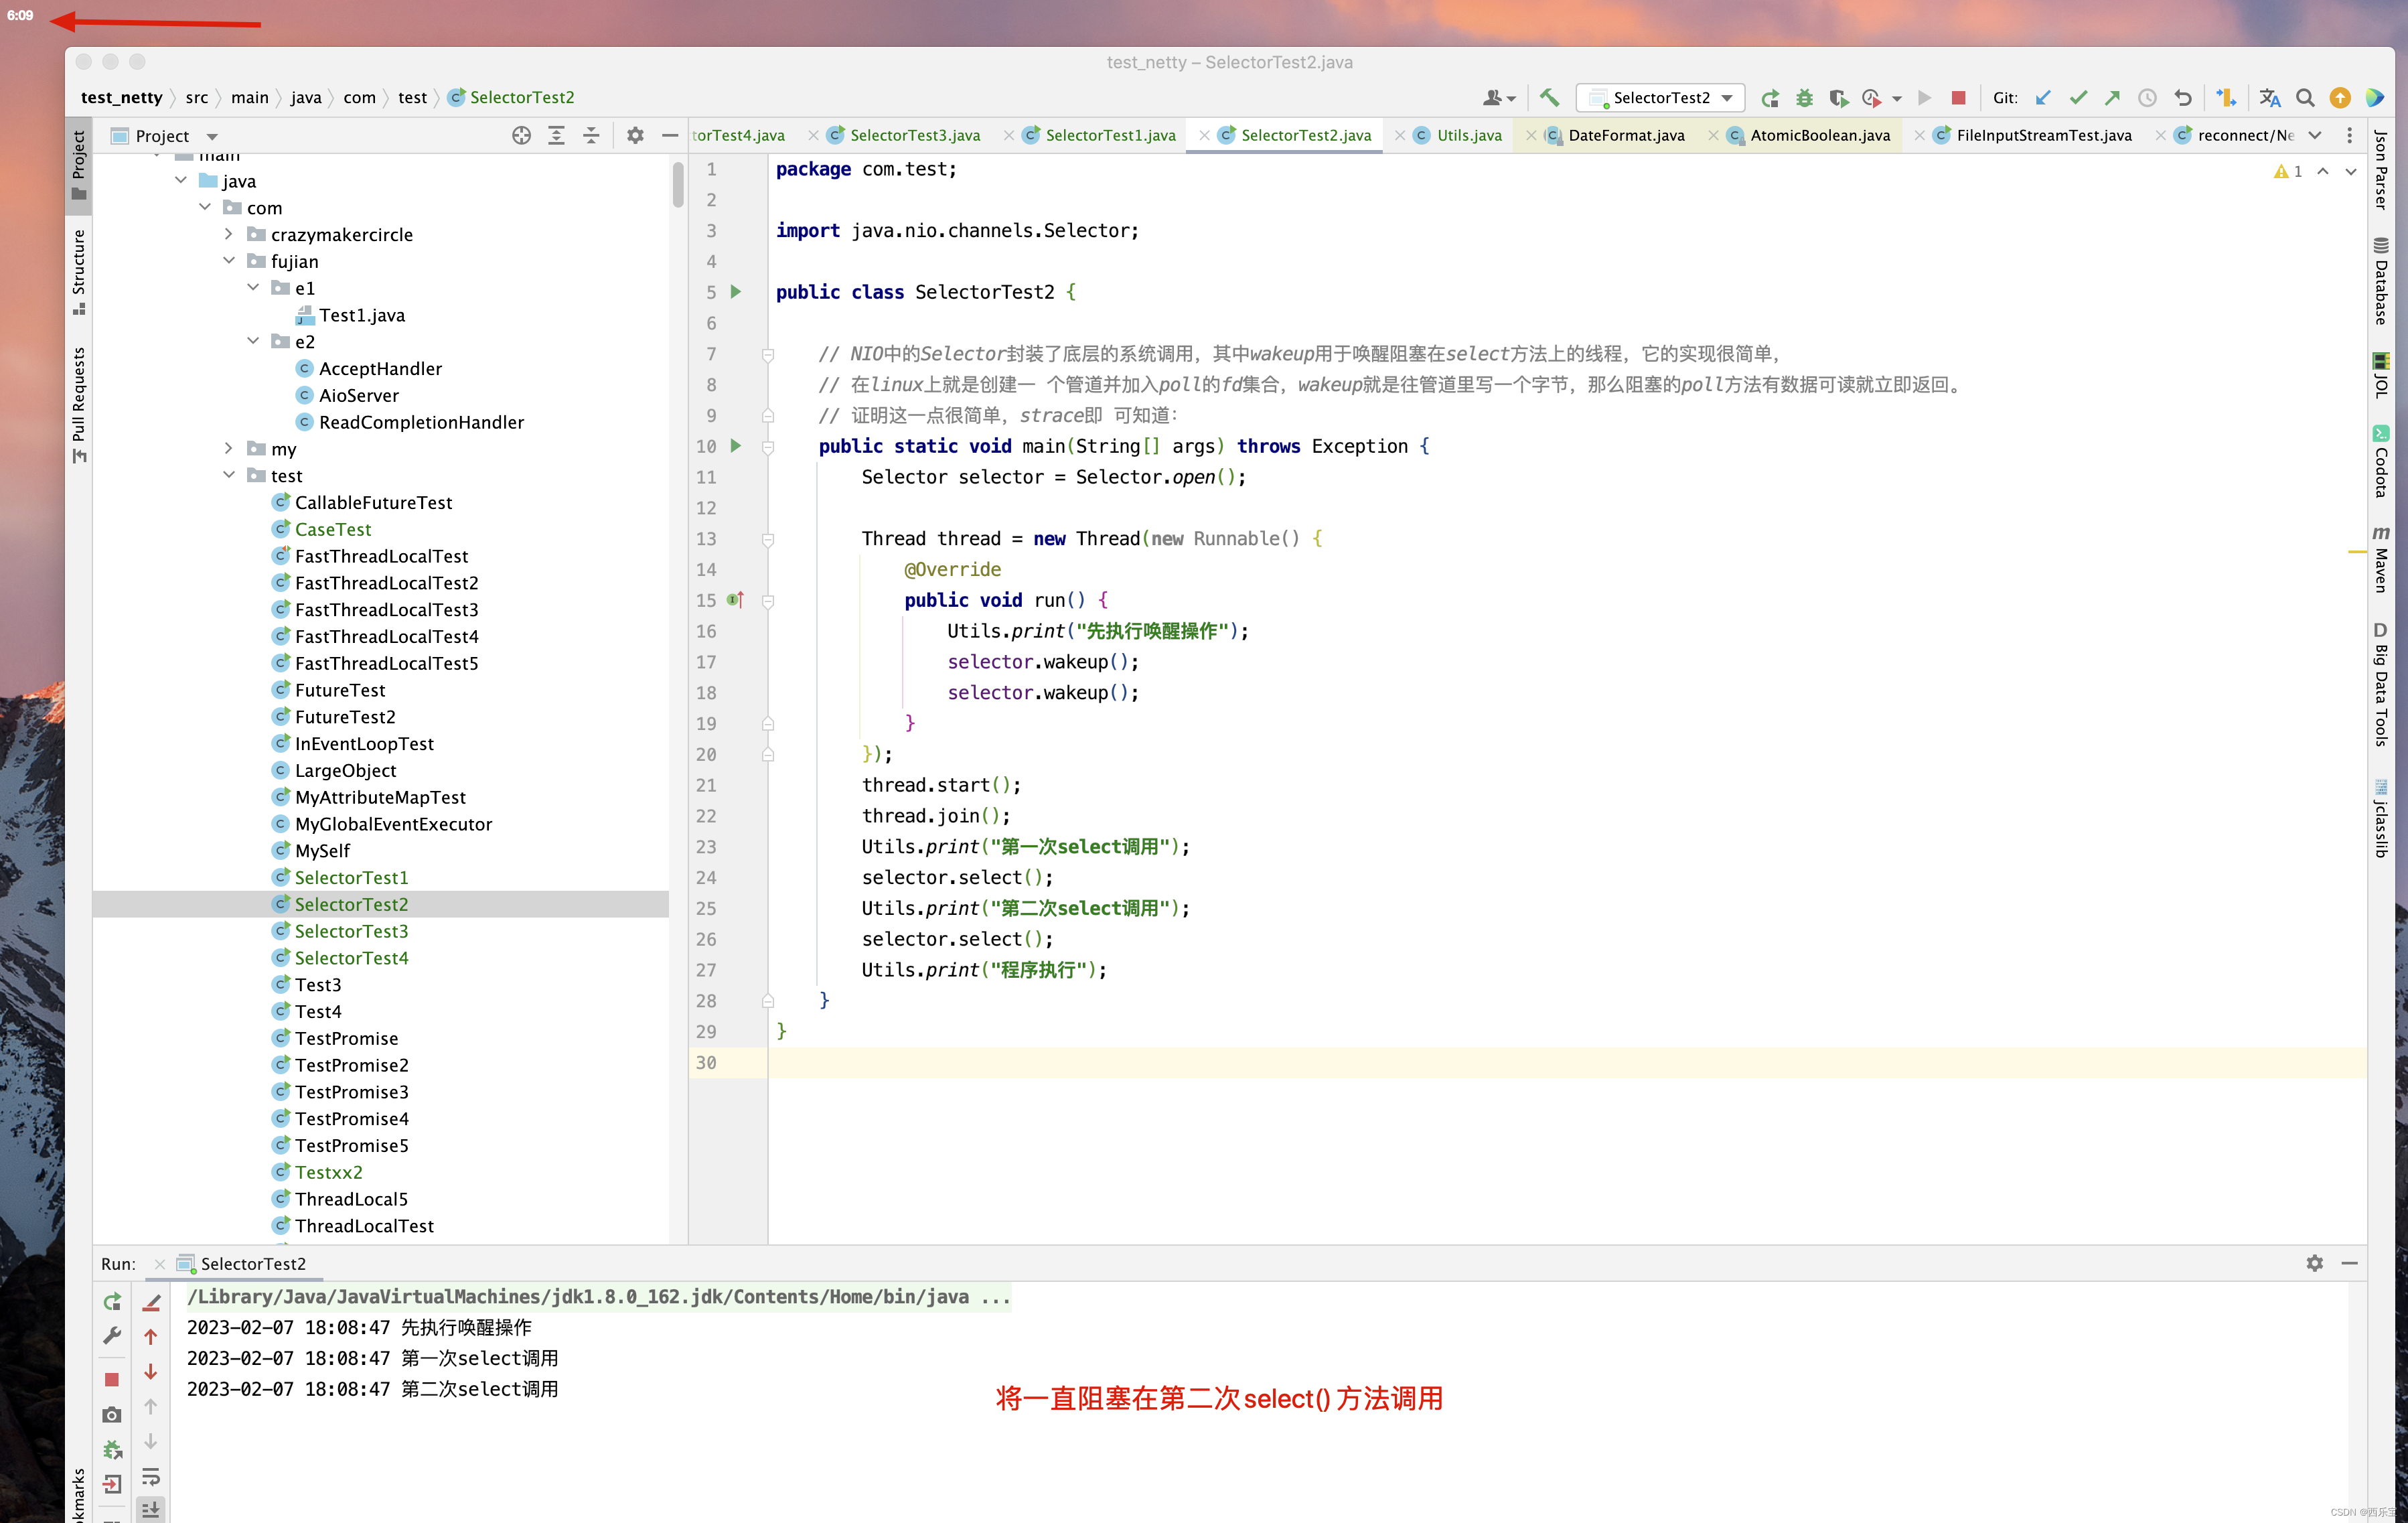
如果当前Selector没有阻塞在select方法上,那么本次 wakeup调用会在下一次select阻塞的时候生效,这个特性非常重要,也是看懂Netty源码的关键。
例3 : wakeup()方法对select(long timeout) 方法和对select()方法的影响一样。

例4:wakeup()方法调用,此时执行selectNow()方法,此时并不会唤醒selectNow()之后的select()方法 。
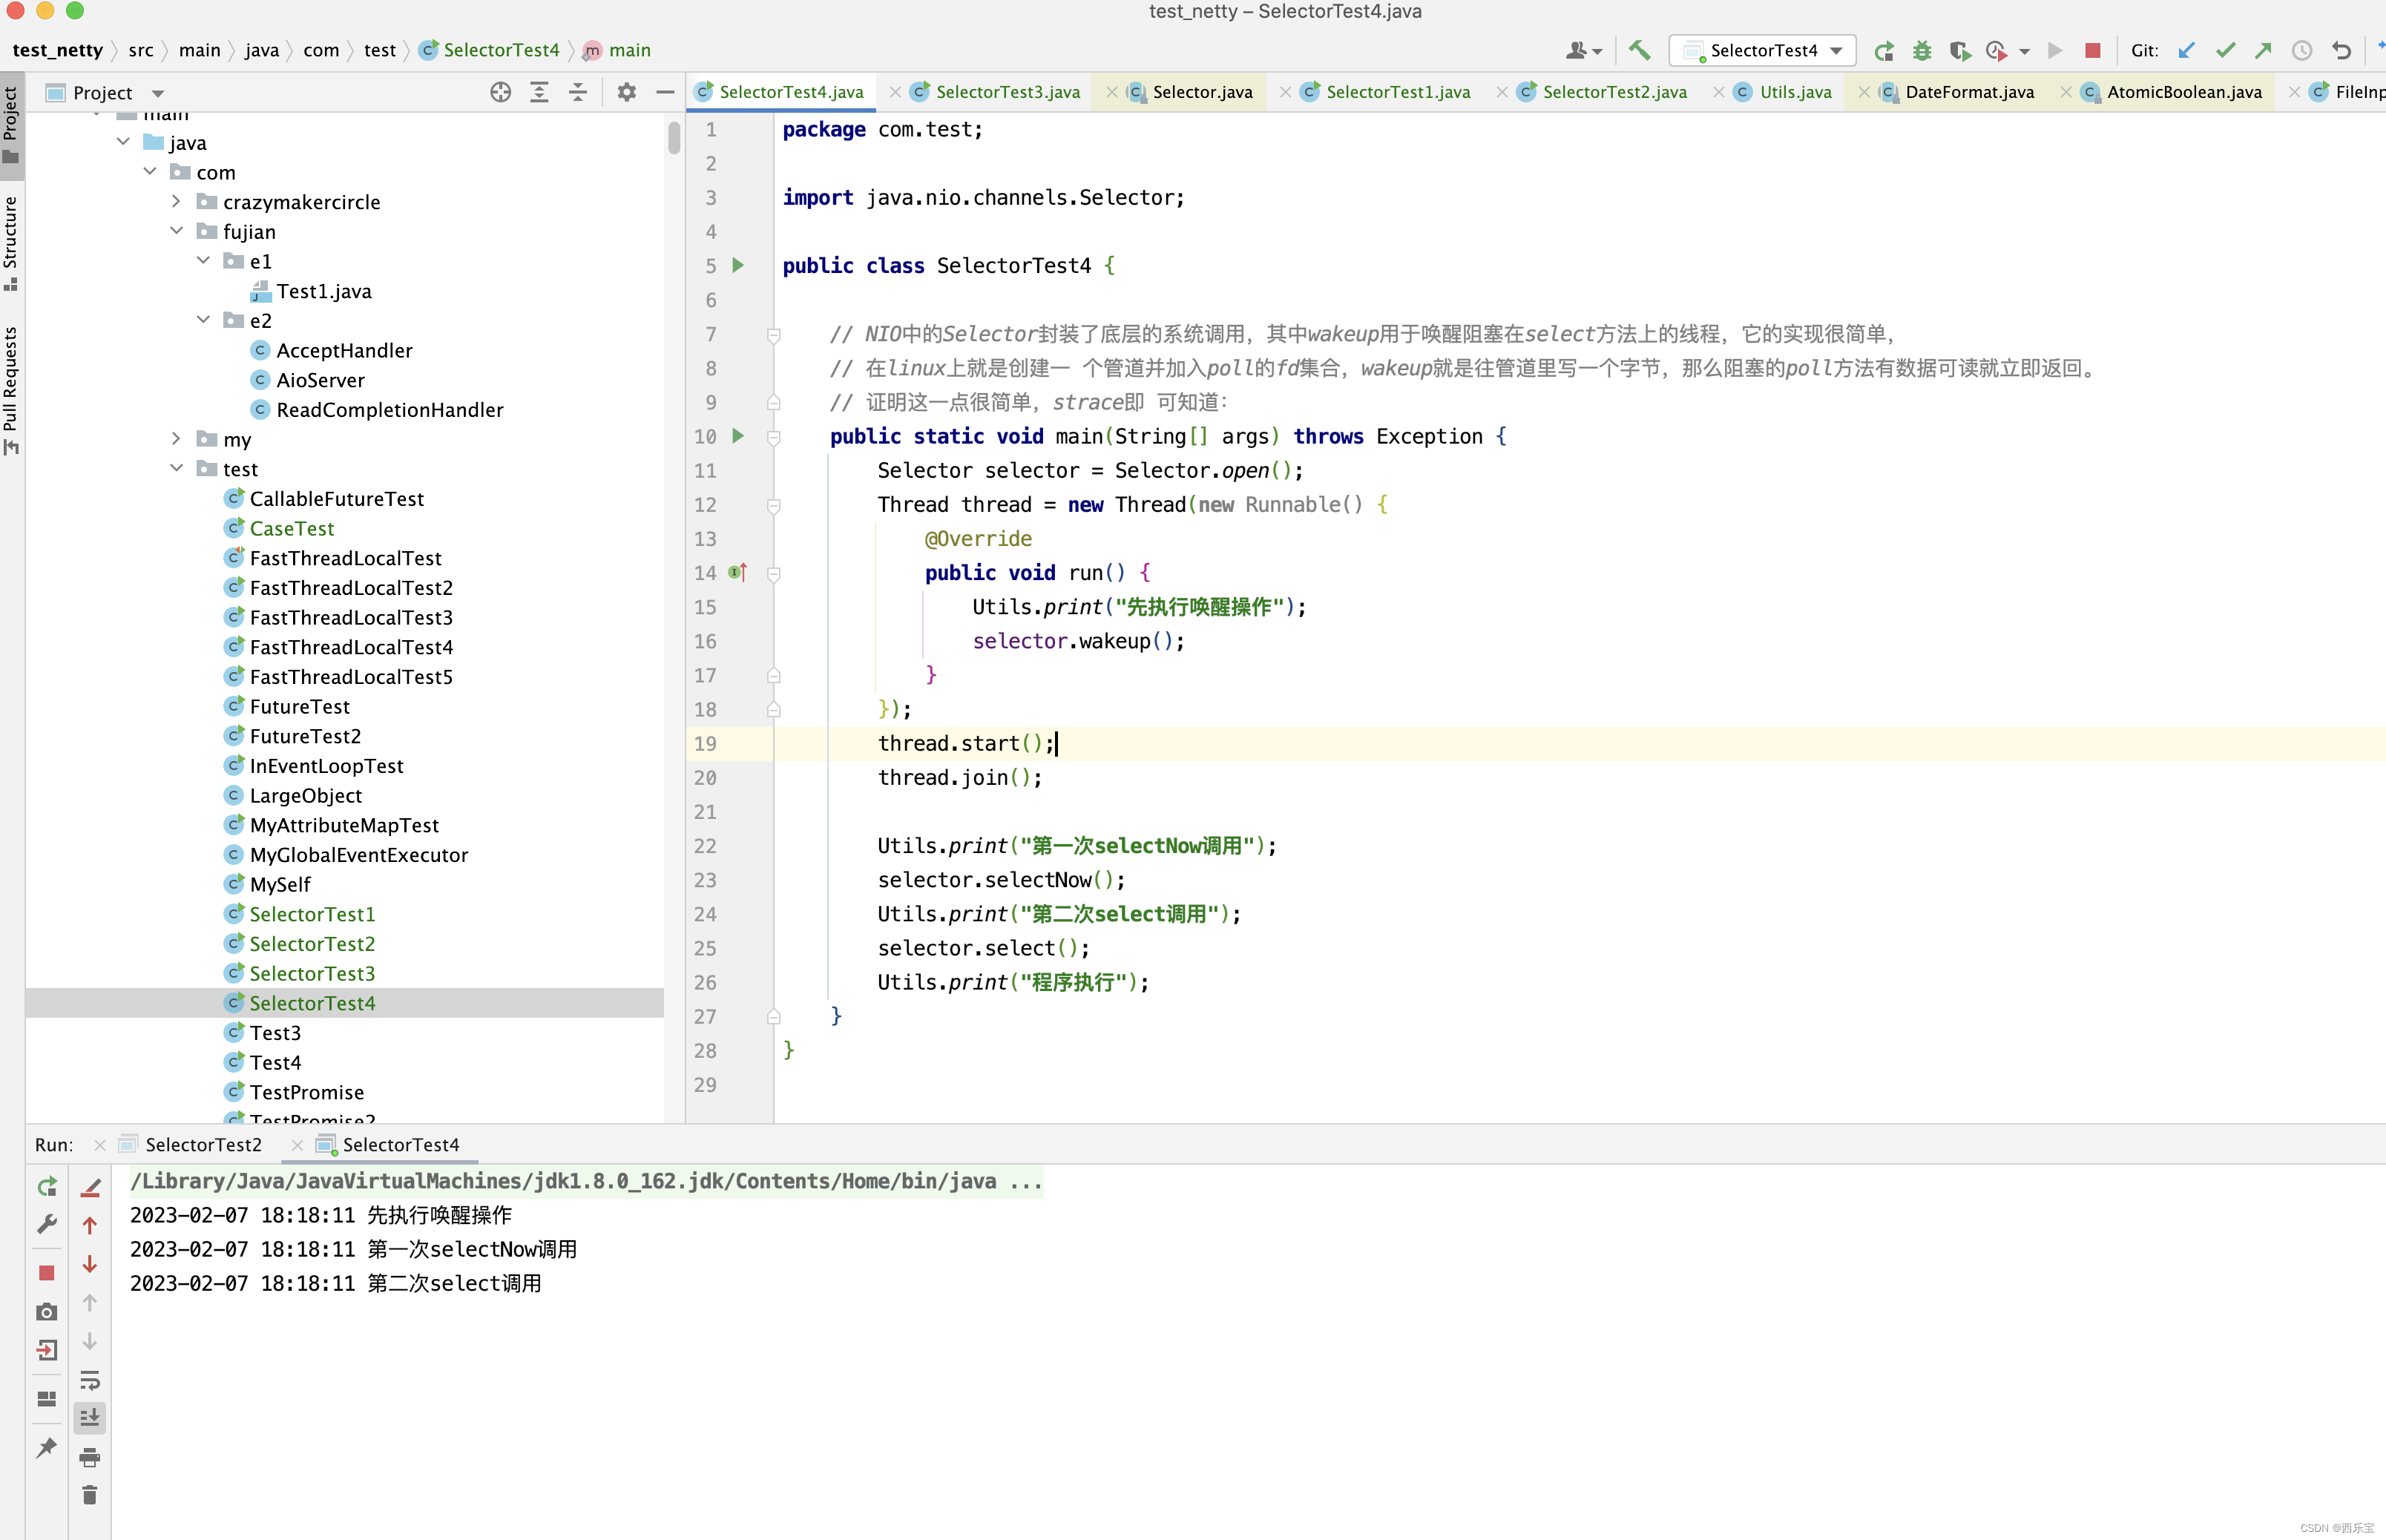
有了这4个例子为基础,再来分析select()方法应该会轻松很多 。 先来看wakenUp.getAndSet(false)这一行代码 。
public final boolean getAndSet(boolean newValue) {
    boolean prev;
    do {
        prev = get();
    } while (!compareAndSet(prev, newValue));
    return prev;
}
在getAndSet()方法中,不断的进行抢锁操作,只要一次抢到锁,wakenUp就被设置为false ,也就是说,在getAndSet()方法执行之后,进入select()方法,此时wakenUp的值一定是false。
接下来看什么时候会进入1中的代码块,又什么时候执行下面2中的代码。
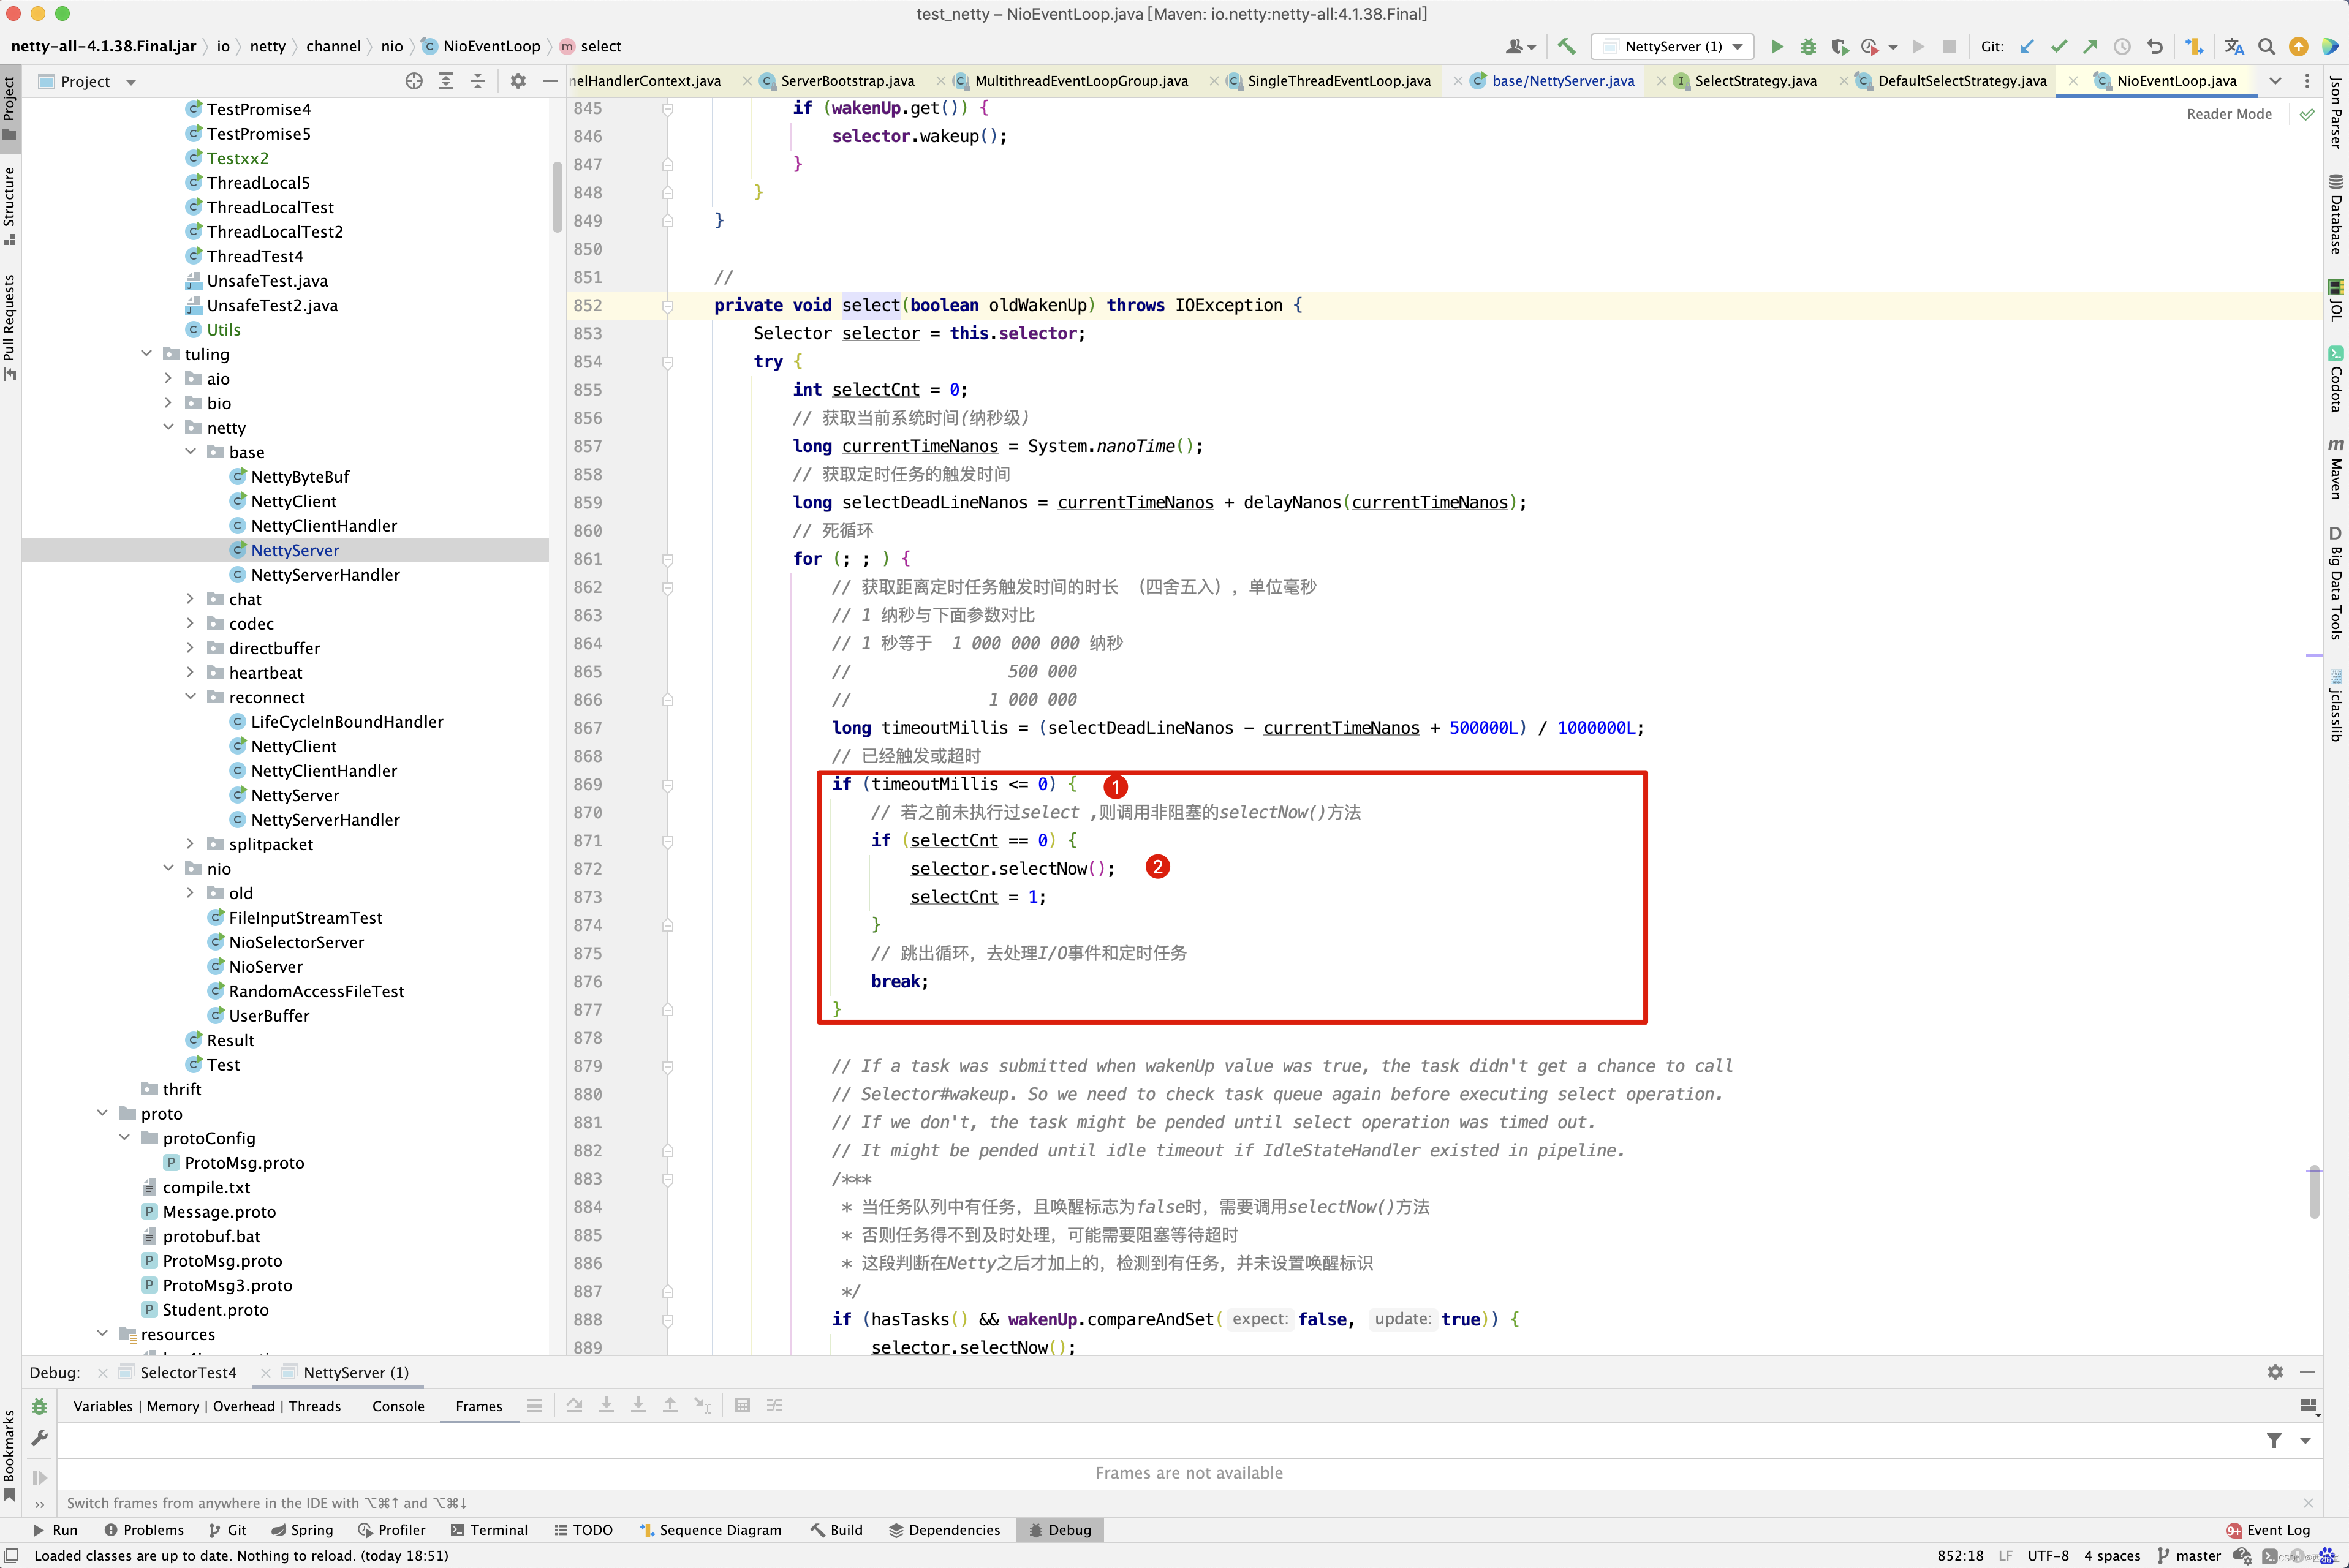
在分析上面提出的疑问之前,先来看一下currentTimeNanos, delayNanos()方法之间的关系 。 进入delayNanos()方法 。
private static final long SCHEDULE_PURGE_INTERVAL = TimeUnit.SECONDS.toNanos(1)

private static final long START_TIME = System.nanoTime();

protected long delayNanos(long currentTimeNanos) {
    ScheduledFutureTask<?> scheduledTask = peekScheduledTask();
    if (scheduledTask == null) {
        return SCHEDULE_PURGE_INTERVAL;
    }

    return scheduledTask.delayNanos(currentTimeNanos);
}


final ScheduledFutureTask<?> peekScheduledTask() {
    Queue<ScheduledFutureTask<?>> scheduledTaskQueue = this.scheduledTaskQueue;
    if (scheduledTaskQueue == null) {
        return null;
    }
    return scheduledTaskQueue.peek();
}


public long delayNanos(long currentTimeNanos) {
    return Math.max(0, deadlineNanos() - (currentTimeNanos - START_TIME));
}
delayNanos()方法分两种情况来考虑,如果this.scheduledTaskQueue中没有ScheduledFutureTask,和this.scheduledTaskQueue中有ScheduledFutureTask两种情况,如果scheduledTaskQueue没有ScheduledFutureTask,则返回的是SCHEDULE_PURGE_INTERVAL 默认值为1秒, 如果scheduledTaskQueue有ScheduledFutureTask 。
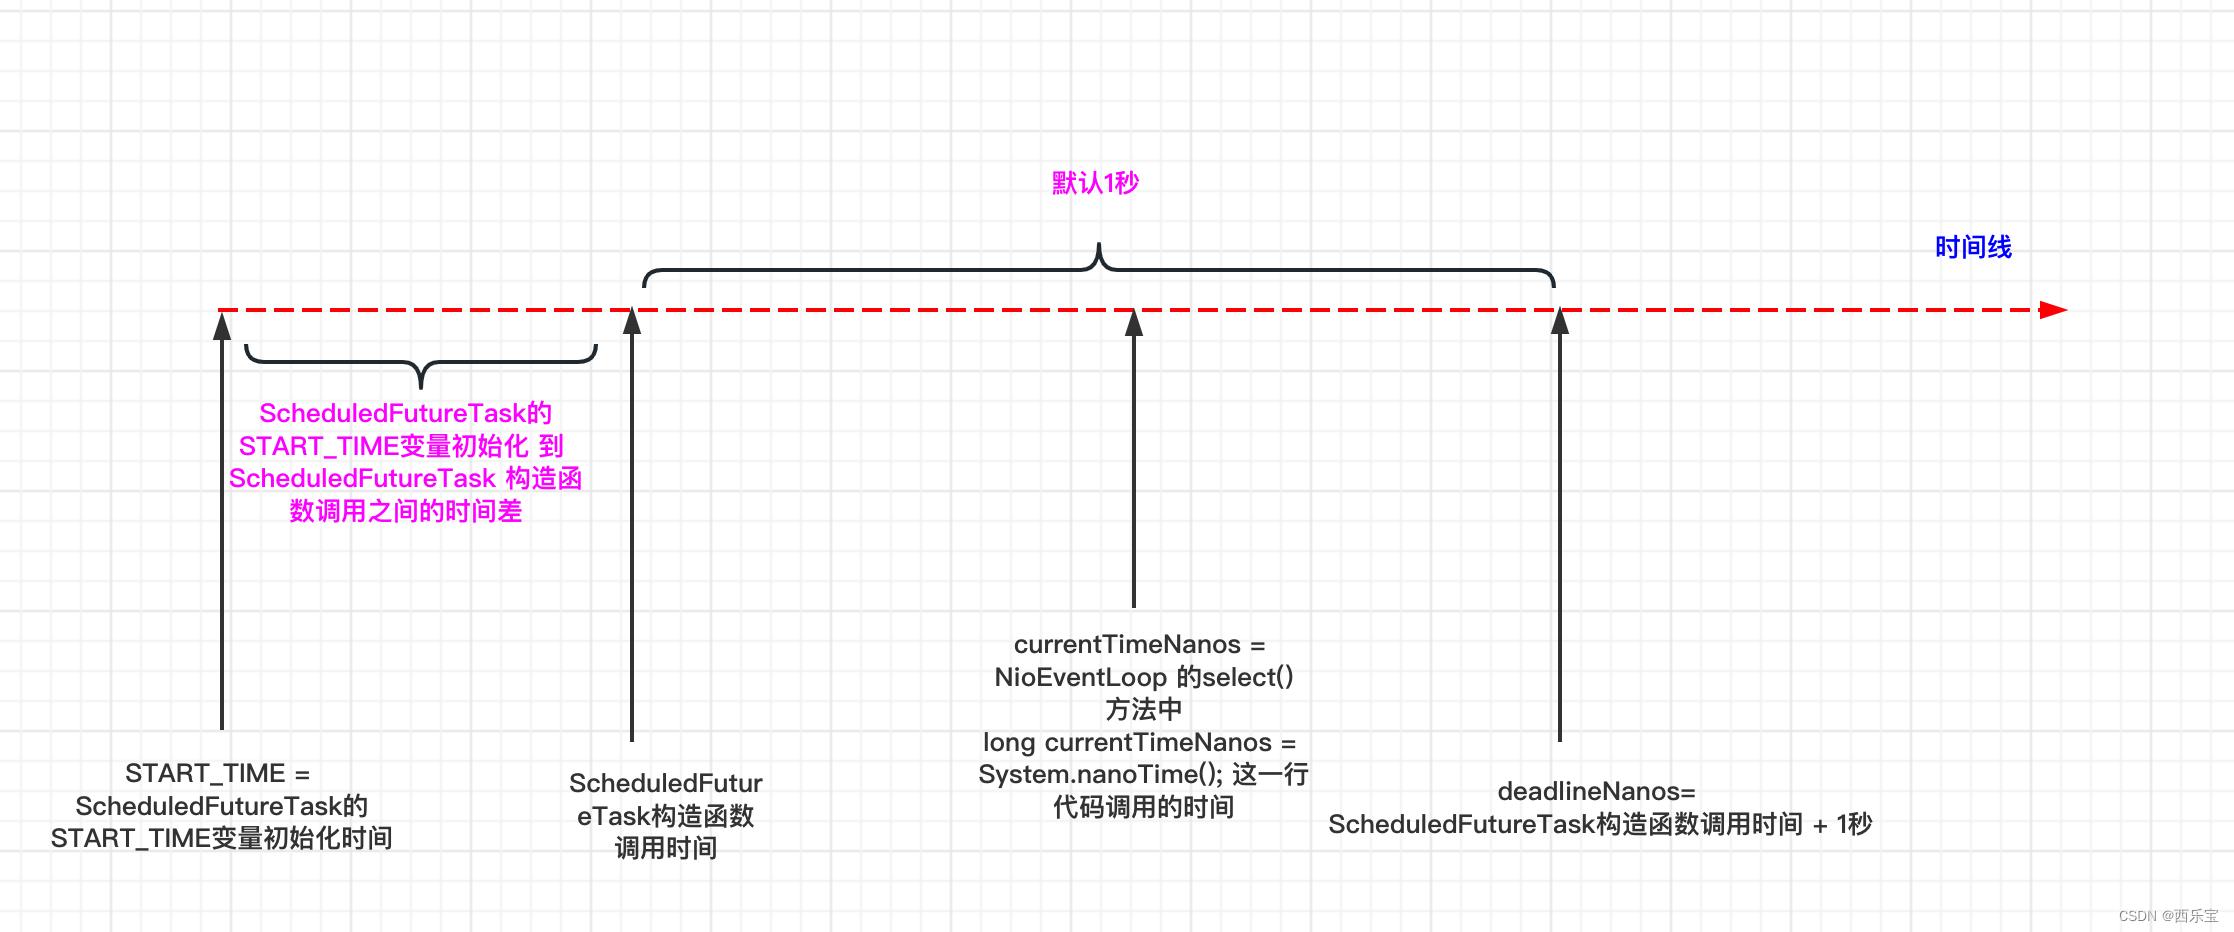
ScheduledFutureTask的START_TIME属性有一个初始化时间,ScheduledFutureTask的构造函数调用也有一个时间,而ScheduledFutureTask的构造函数调用时间大于ScheduledFutureTask的START_TIME属性初始化时间,它们之间有一个时间差。 运行到select()方法的long currentTimeNanos = System.nanoTime();这一行代码有一个时间currentTimeNanos,而delayNanos()方法调用时间为ScheduledFutureTask的构造函数调用 + 1 秒,假如ScheduledFutureTask的初始化时间为5毫秒, 那么deadlineNanos的值为1005毫秒,线程执行到select()的这一行代码long currentTimeNanos = System.nanoTime();时所花的时间为1004.6秒,则会进入下面加粗代码并执行。 但如果运行到long currentTimeNanos = System.nanoTime(); 这一行代码的时间为1004.4秒,则依然不会进入下面加粗代码,因为 timeoutMillis的值精确到毫秒。
private void select(boolean oldWakenUp) throws IOException {
    Selector selector = this.selector;
    try {
        int selectCnt = 0;
        long currentTimeNanos = System.nanoTime();
        long selectDeadLineNanos = currentTimeNanos + delayNanos(currentTimeNanos);
        for (; ; ) {
            long timeoutMillis = (selectDeadLineNanos - currentTimeNanos + 500000L) / 1000000L;
            if (timeoutMillis <= 0) {
                if (selectCnt == 0) {
                    selector.selectNow();
                    selectCnt = 1;
                }
                break;
            }
            ...
        }
    }
}
那么来看另外一种情况 ,假如 delayNanos(currentTimeNanos)返回值为1秒 ,select(timeoutMillis) 方法的执行时间大于等于999.5毫秒时。 当然啦,在下图中是假设selector.select(timeoutMillis)的执行时间为1002毫秒,再次进入循环时,timeoutMillis的值就为-2秒。
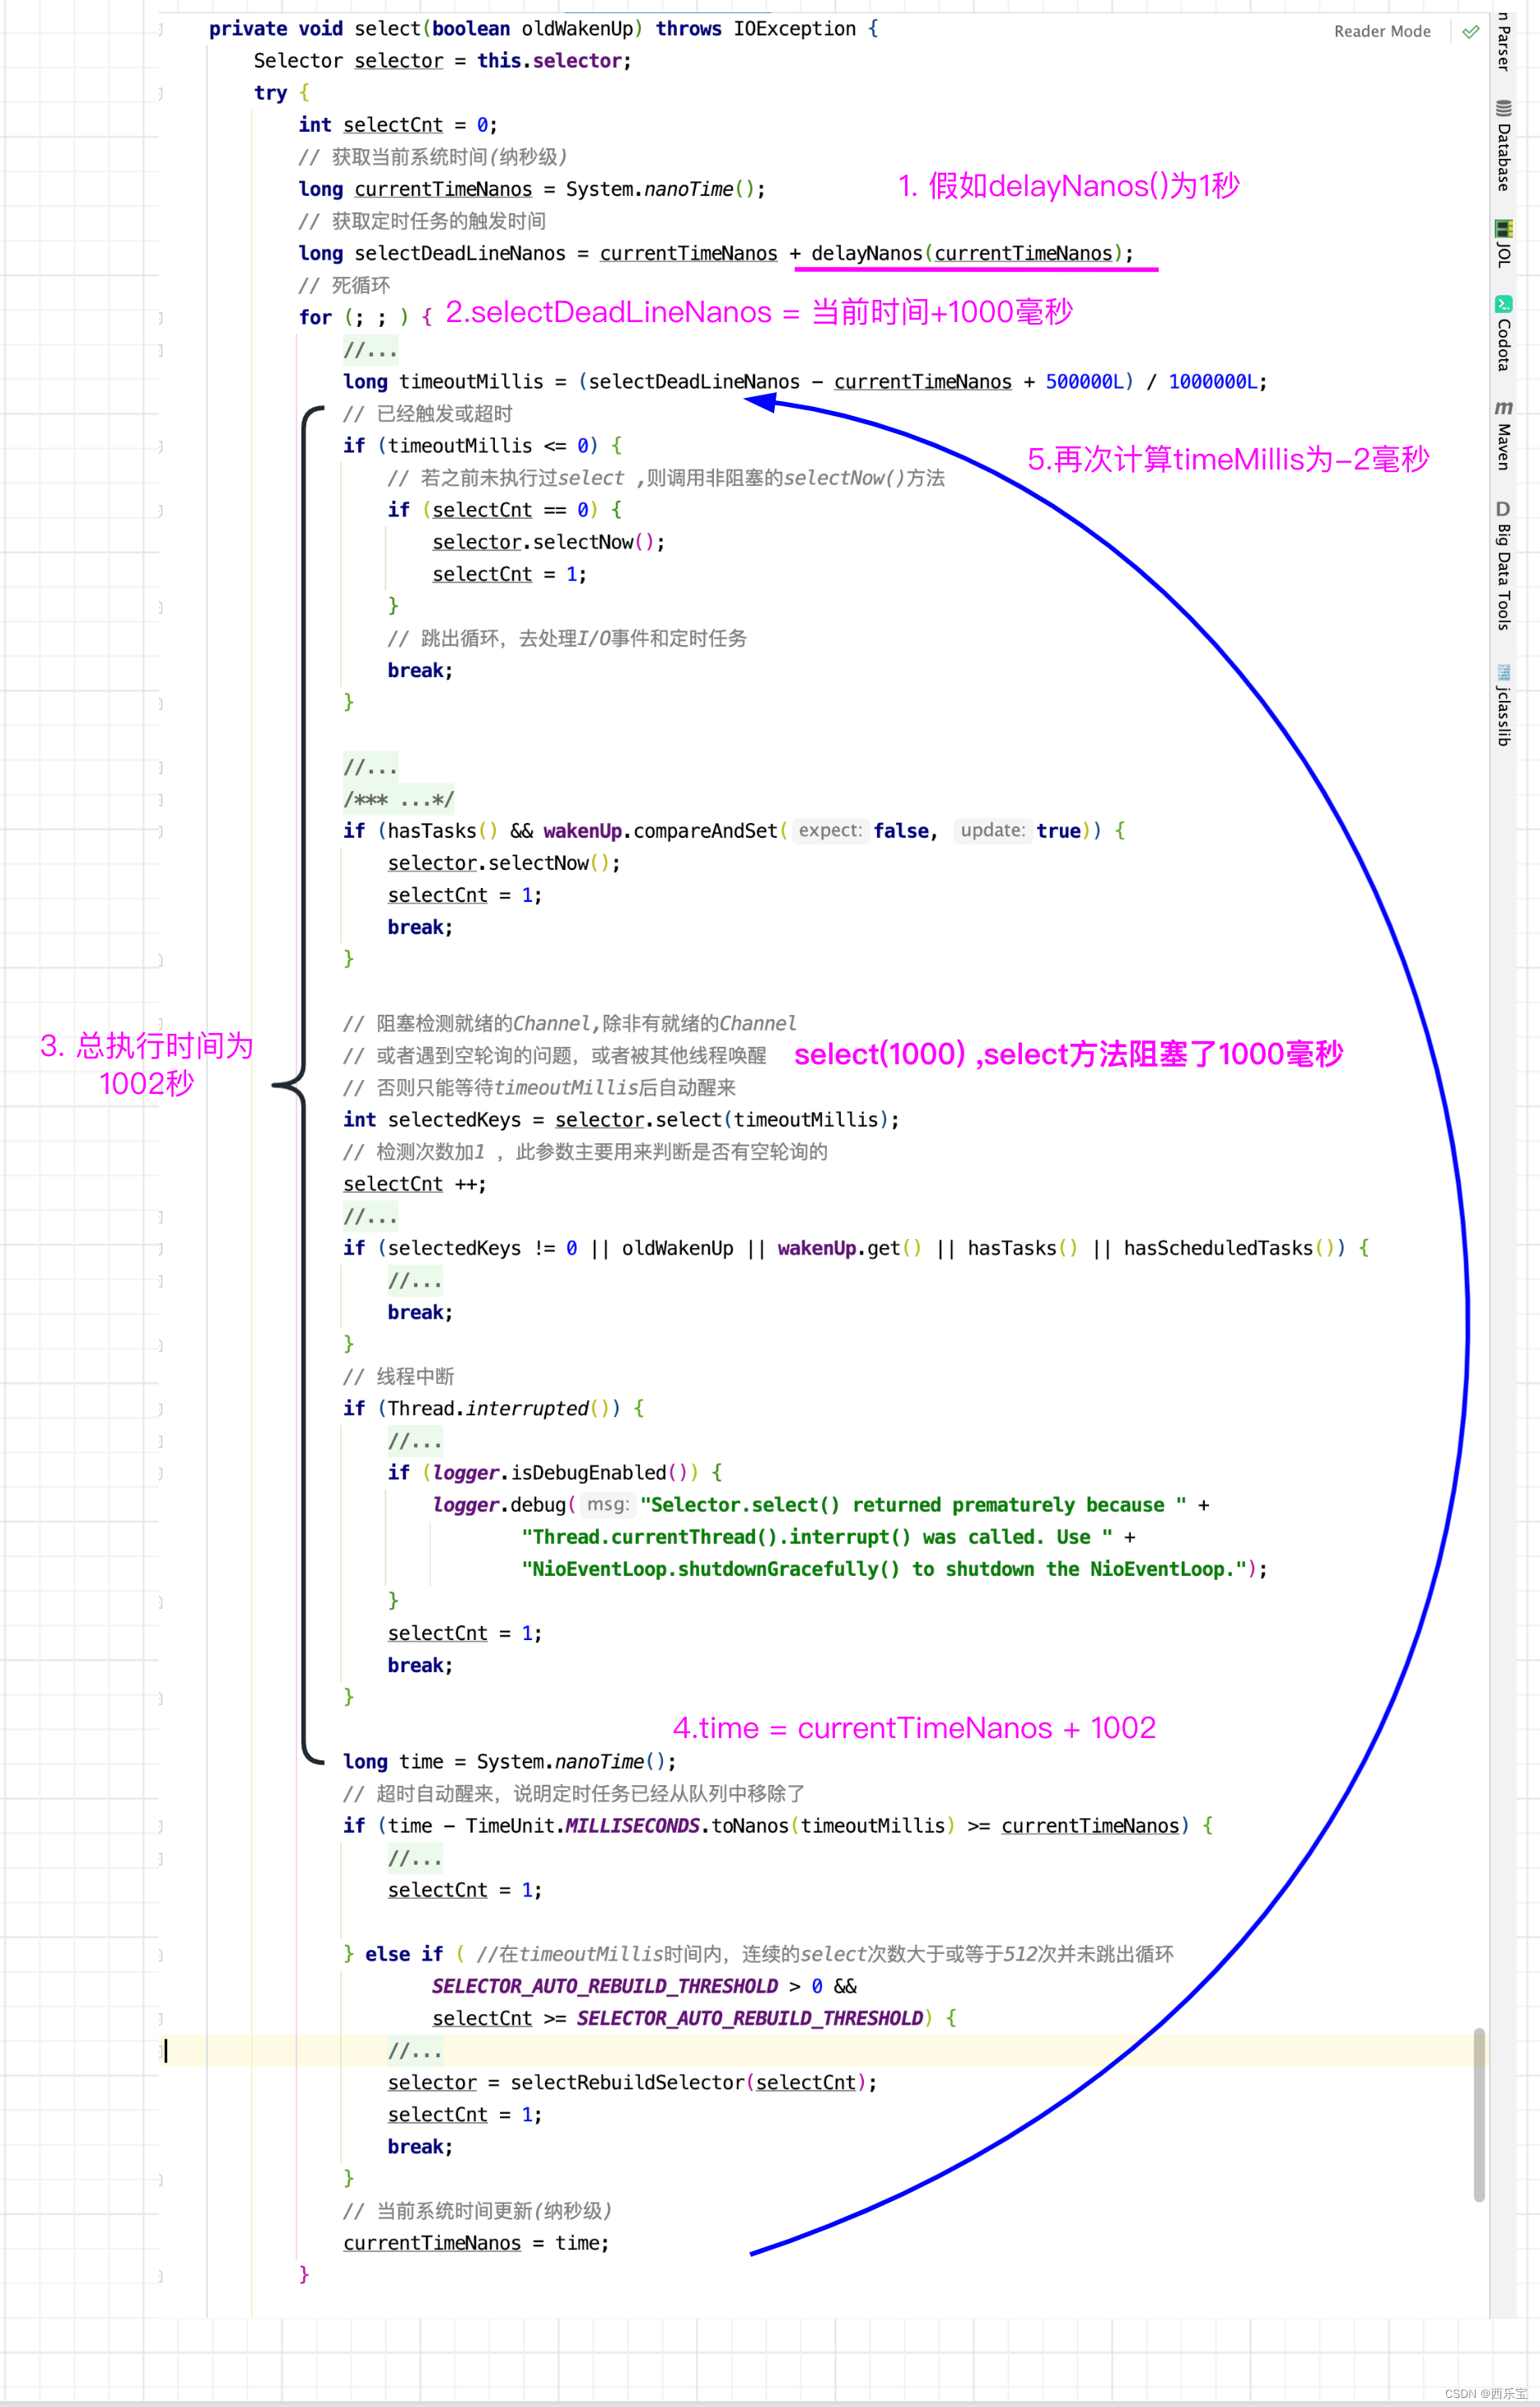
如果是上面这种情况,则会执行下面加粗代码 。
private void select(boolean oldWakenUp) throws IOException {
    Selector selector = this.selector;
    try {
        int selectCnt = 0;
        long currentTimeNanos = System.nanoTime();
        long selectDeadLineNanos = currentTimeNanos + delayNanos(currentTimeNanos);
        for (; ; ) {
            long timeoutMillis = (selectDeadLineNanos - currentTimeNanos + 500000L) / 1000000L;
            if (timeoutMillis <= 0) {
                if (selectCnt == 0) {
                    selector.selectNow();
                    selectCnt = 1;
                }
                break;
            }
            ...
        }
    }
}
假如select(timeoutMillis) 的执行时间小于999.5毫秒时, 假如为999.4毫秒,select(timeoutMillis)就从阻塞中唤醒,此时 long timeoutMillis = (selectDeadLineNanos - currentTimeNanos + 500000L) / 1000000L;的值为timeoutMillis = 1000 - 999.4 + 0.5 = 0.6 四舍五入,为1 毫秒。此时会继续执行循环内代码,继续执行 select(1毫秒),其他情况以此类推。
接下来看另外一种情况,什么时候进入下面加粗代码执行呢?
private void select(boolean oldWakenUp) throws IOException {
    Selector selector = this.selector;
    try {
        int selectCnt = 0;
        long currentTimeNanos = System.nanoTime();
        long selectDeadLineNanos = currentTimeNanos + delayNanos(currentTimeNanos);
        for (; ; ) {
            ...
            if (hasTasks() && wakenUp.compareAndSet(false, true)) {
                selector.selectNow();
                selectCnt = 1;
                break;
            }
            ...
        }
    } catch (CancelledKeyException e) {
    }
}
聪明的小伙伴肯定一眼就看出来了,当添加任务时,就会执行上述加粗代码,场景是怎样子的呢?

当线程1向NioEventLoop的执行任务线程(称线程2 )添加了任务,此时线程2刚好执行到if (hasTasks() && wakenUp.compareAndSet(false, true)) {…} 这一行代码,发现队列中有任务,就执行wakenUp.compareAndSet(false, true) CAS 操作,但线程1 也执行了wakeup(boolean inEventLoop) 方法,同时也执行了wakenUp.compareAndSet(false, true)操作,也就是上述步骤3 和步骤4 位置的代码同时执行 。但步骤4 也就是NioEventLoop执行任务的线程CAS操作成功。 此时线程2 就会执行上述加粗代码。
if (hasTasks() && wakenUp.compareAndSet(false, true)) {
    selector.selectNow();
    selectCnt = 1;
    break;
}
但聪明的小伙伴肯定会想,如果此时线程1的 步骤3 抢锁成功,会怎样呢?这里又分两种情况,如果线程1的selector.wakeup();先执行,此时线程2的int selectedKeys = selector.select(timeoutMillis); 这一行代码后执行,根据之前例子中分析得出的结论【如果当前Selector没有阻塞在select方法上,那么本次 wakeup调用会在下一次select阻塞的时候生效】,此时select()方法不会阻塞,并且在后续的 if (selectedKeys != 0 || oldWakenUp || wakenUp.get() || hasTasks() || hasScheduledTasks()) {… } 这一行代码的hasTask()方法返回true,退出死循环,如果线程2的int selectedKeys = selector.select(timeoutMillis); 这一行代码先执行,而线程1的selector.wakeup();后执行,依然会唤醒线程2 中的select()方法,同样的方式退出死循环。
接下来,对NioEventLoop的if (selectedKeys != 0 || oldWakenUp || wakenUp.get() || hasTasks() || hasScheduledTasks()) { … } 这一行代码的前4种情况进行分析 。
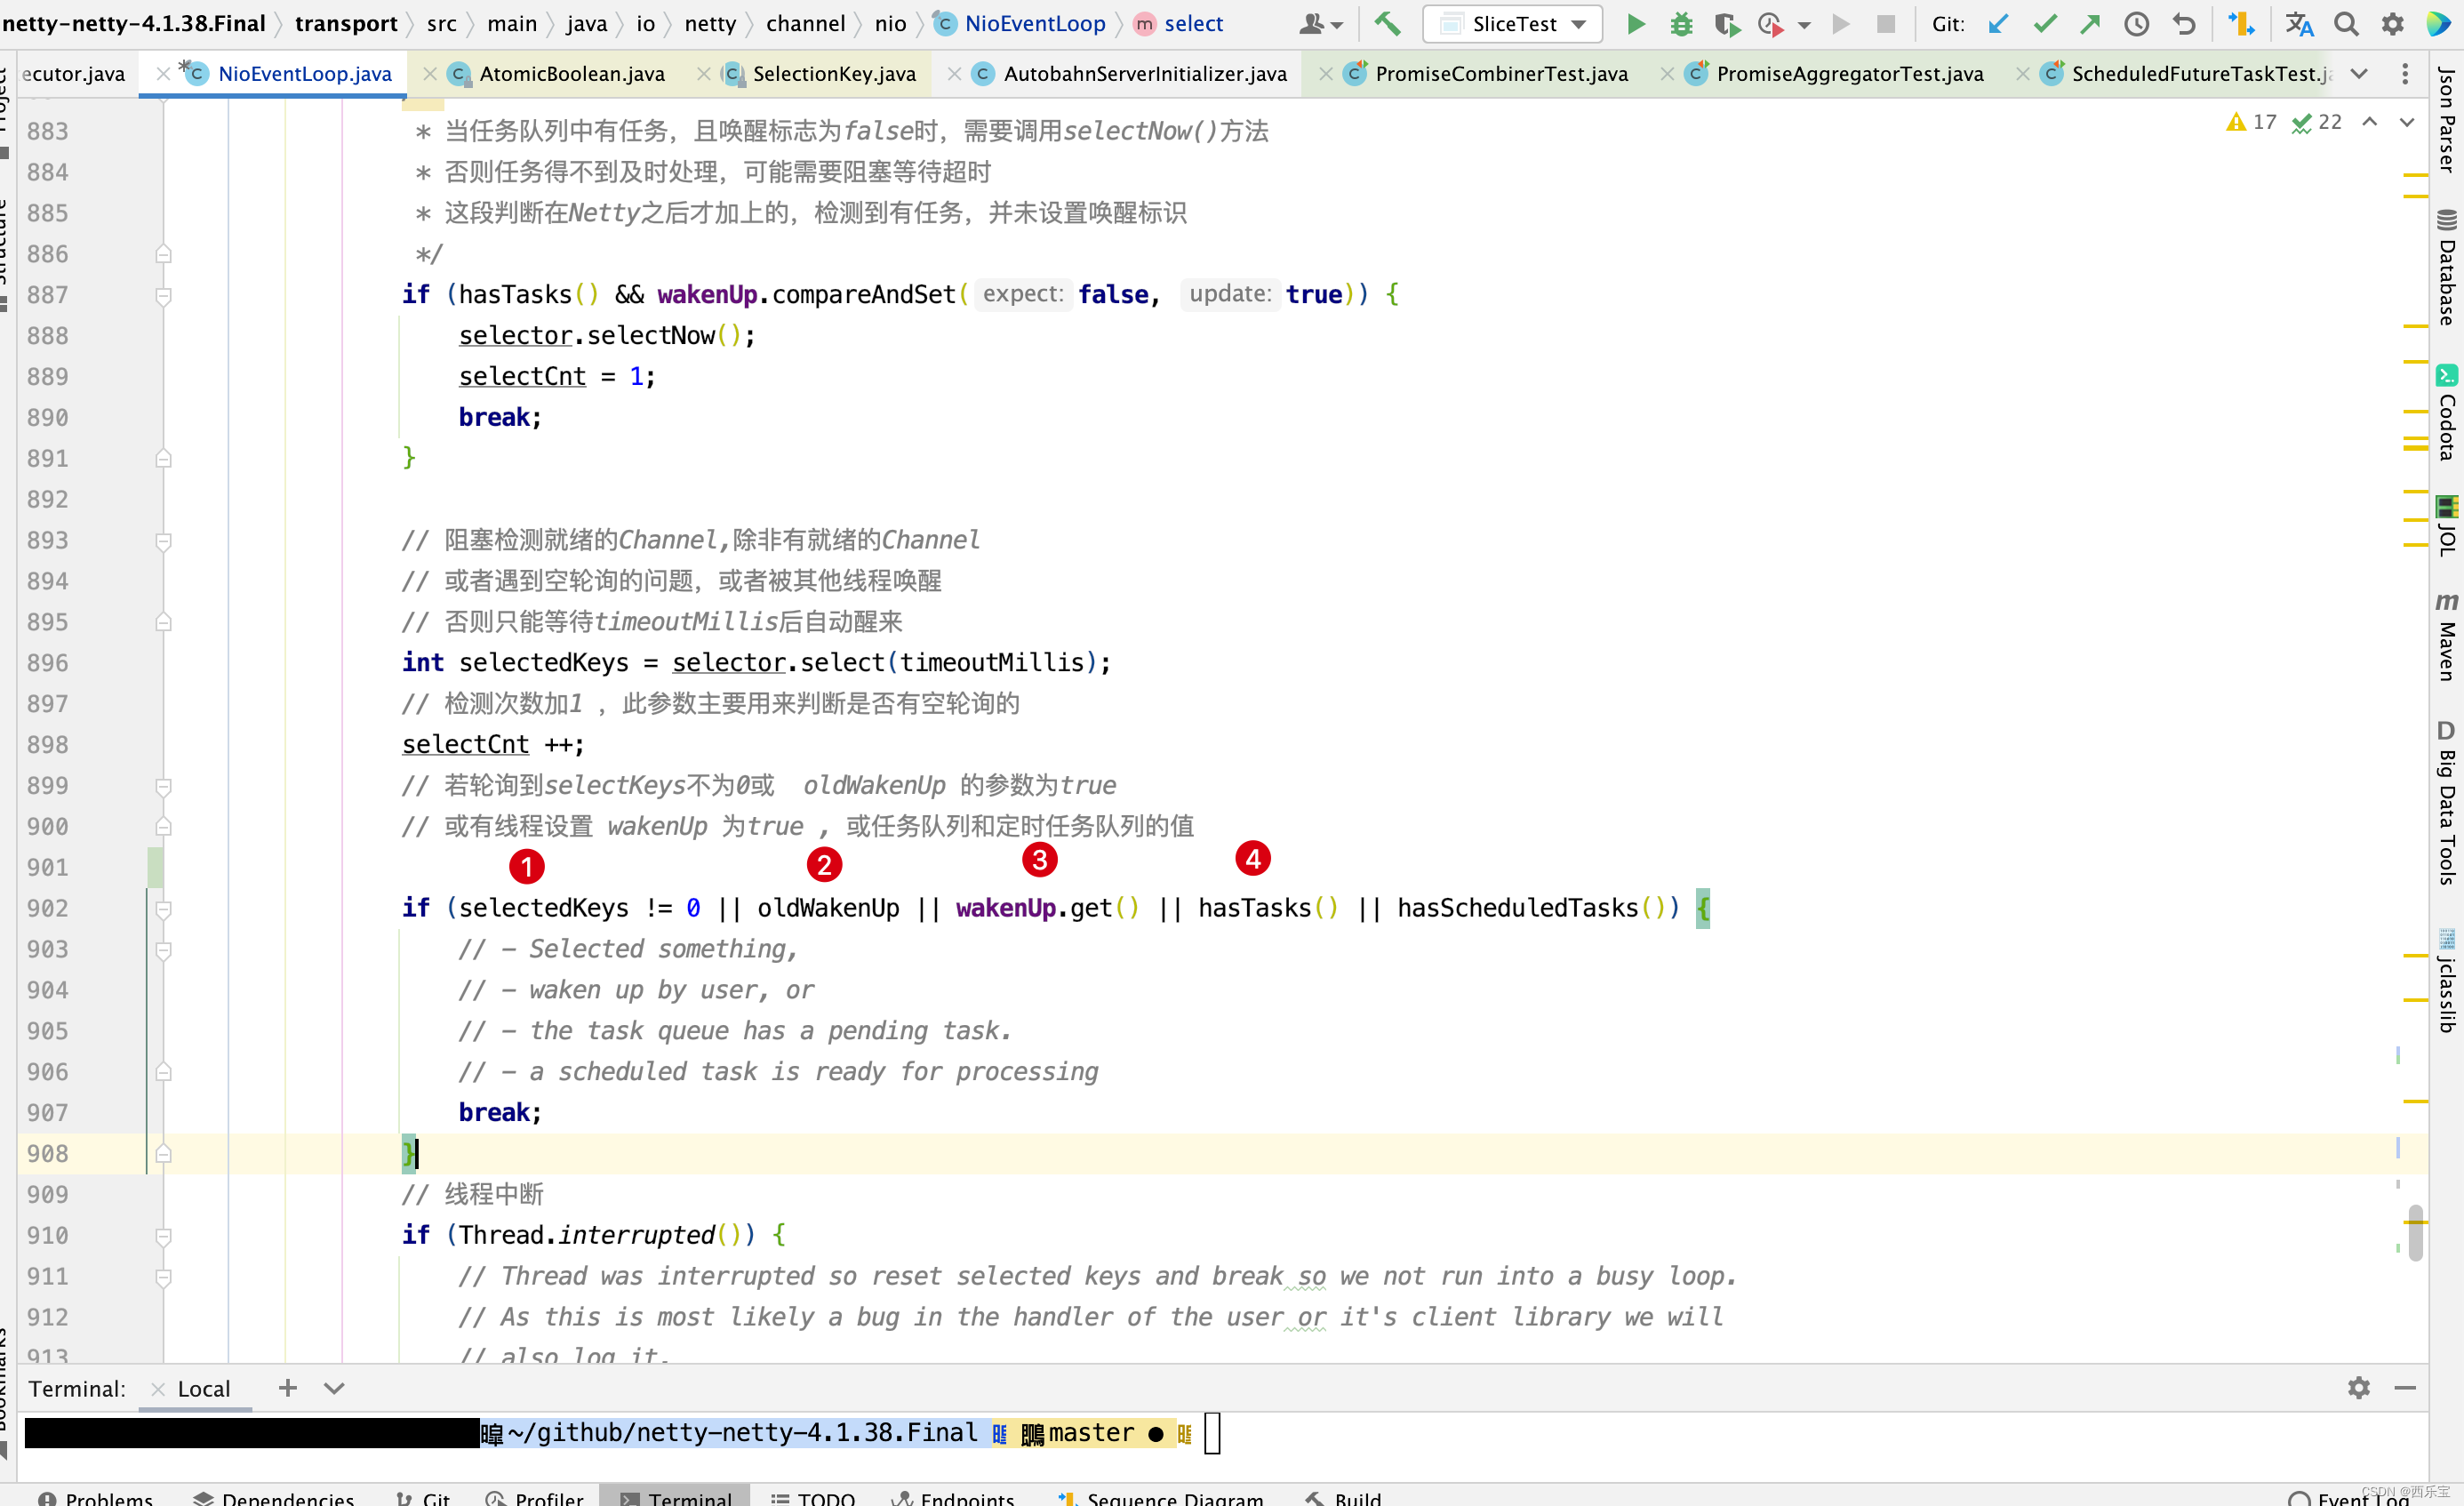
- 第一种情况 selectedKeys != 0时,这种情况很好理解,有就绪的Channel时,selector.select(timeoutMillis);就会被唤醒。
- 第二种情况,在runAllTasks()方法执行完且select(wakenUp.getAndSet(false));方法执行前,此时有任务添加到队列,又在select()方法中的 if (hasTasks() && wakenUp.compareAndSet(false, true)) { 这一行代码执行之前,又有任务添加到队列,此时会出现 selectedKeys == 0 && oldWakenUp ==true的情况 。
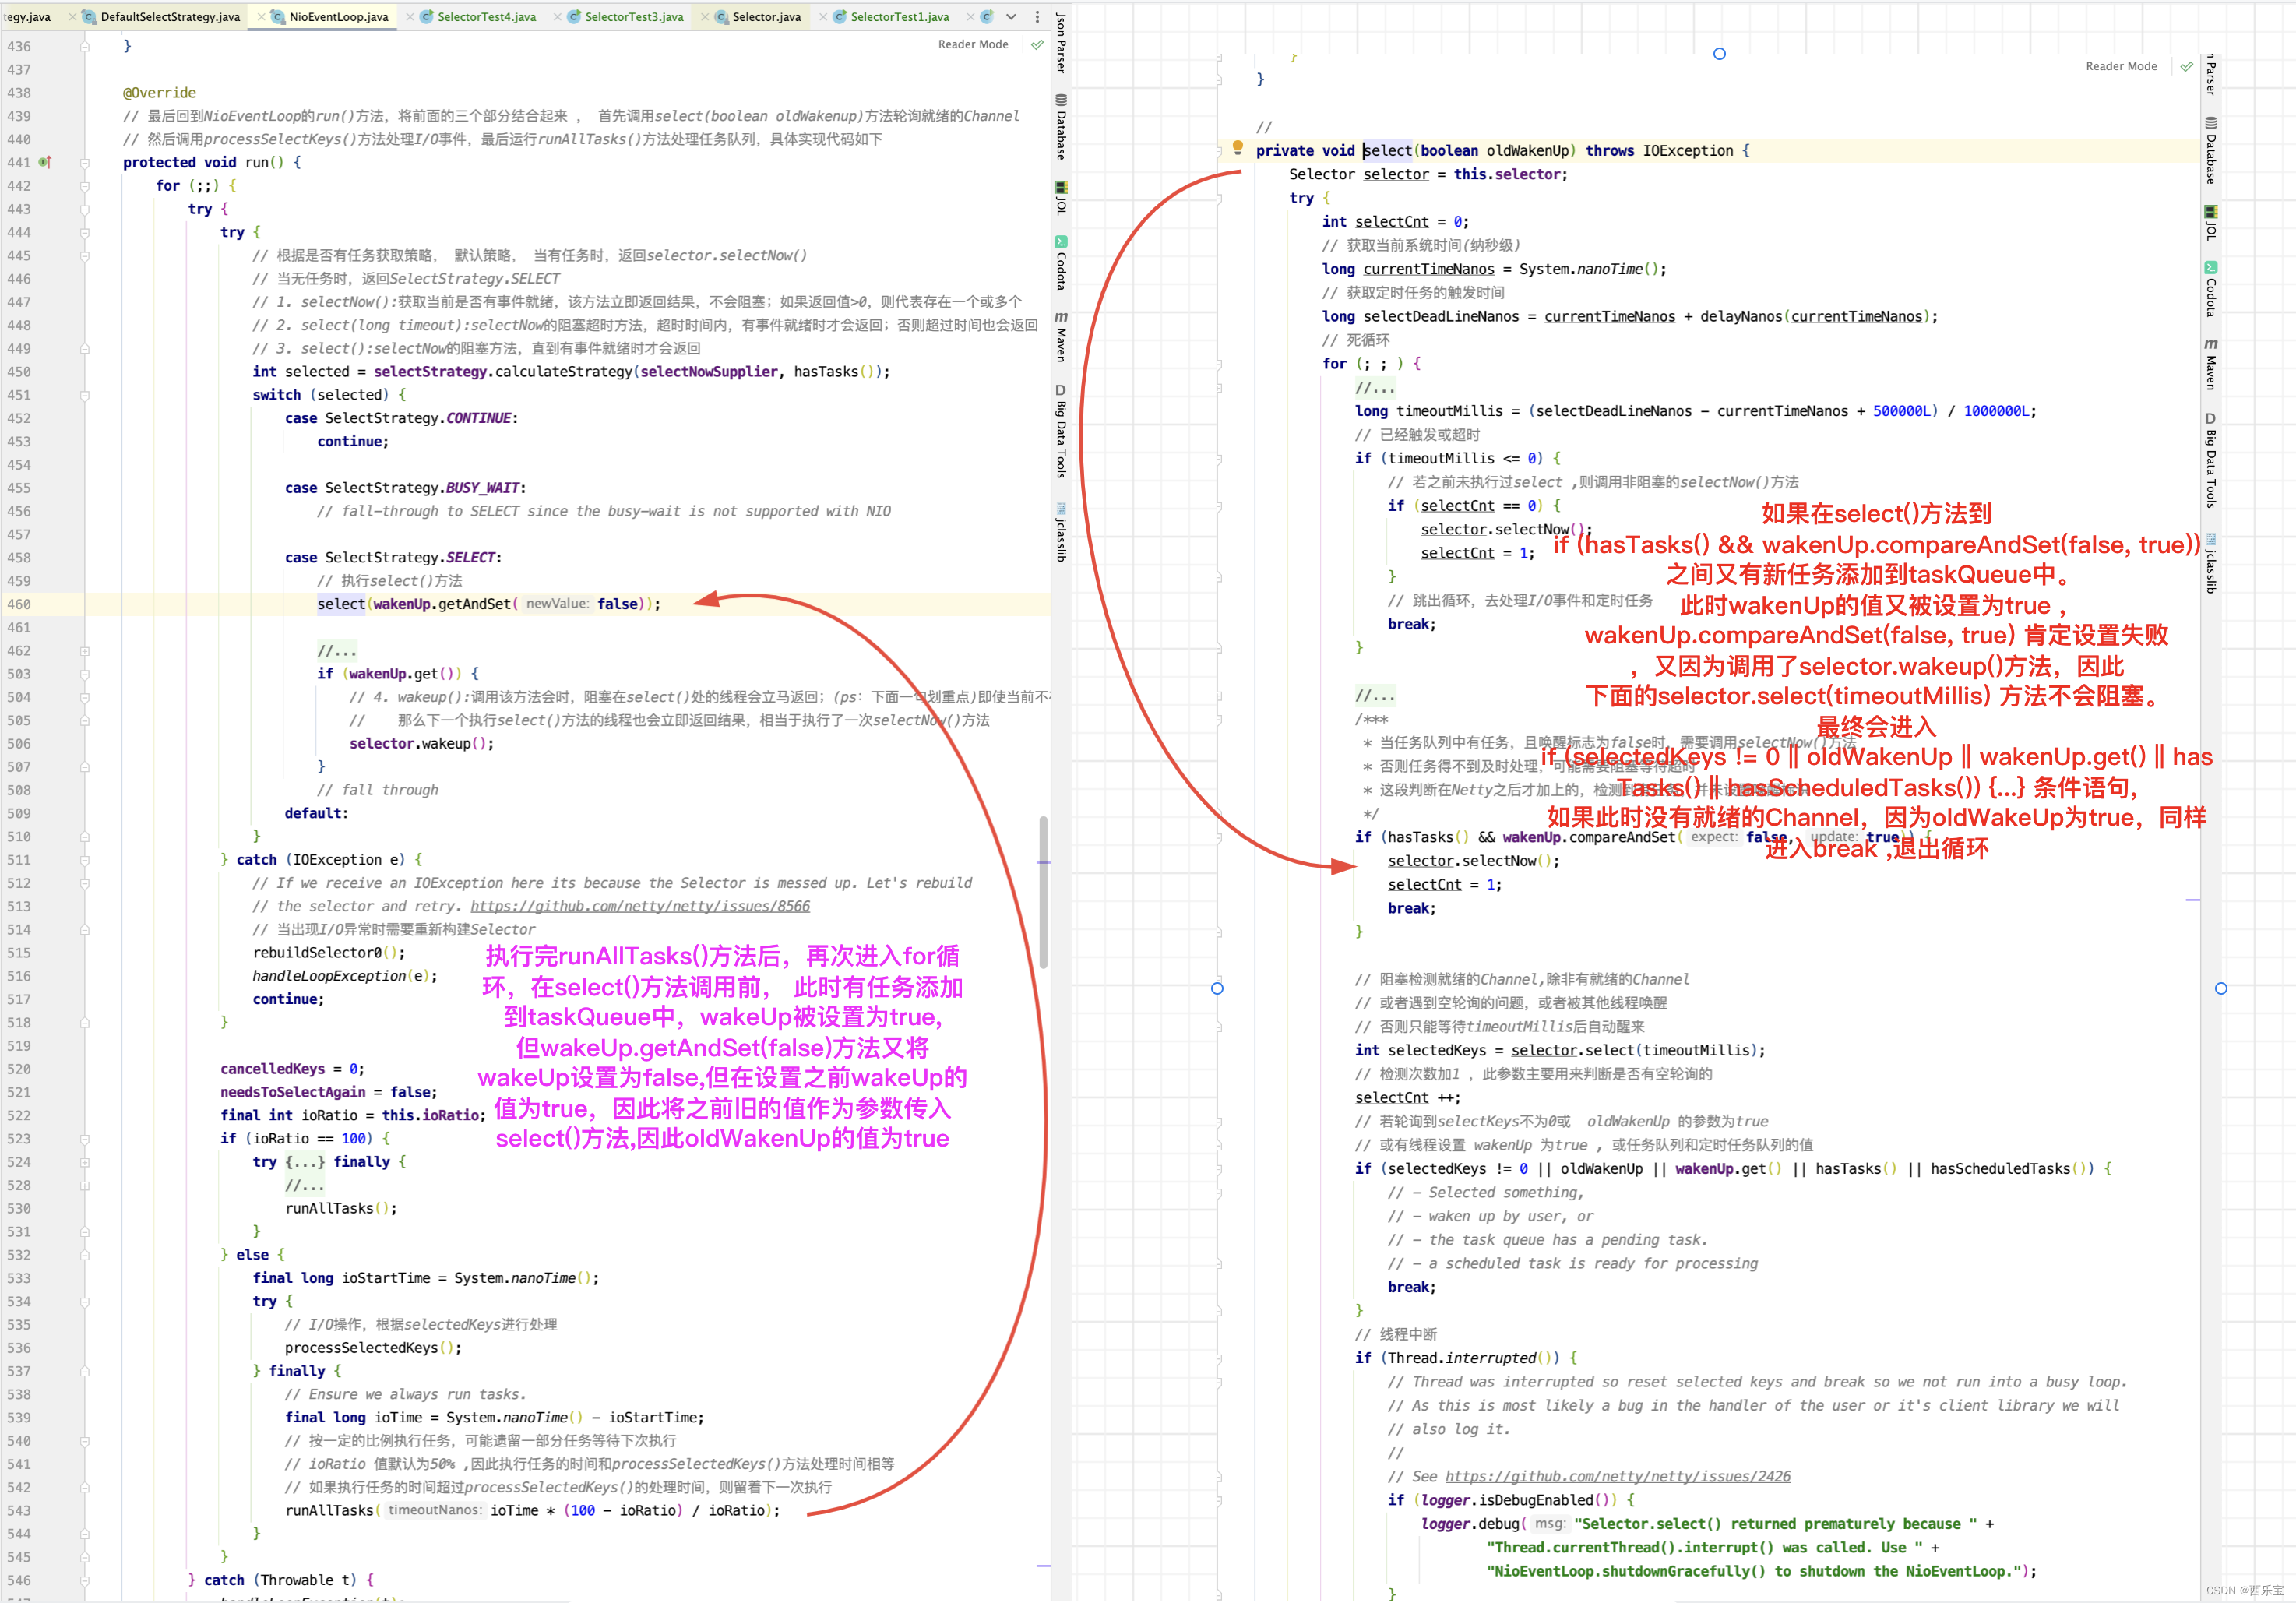
3. 什么时候会出现selectedKeys == 0 && oldWakenUp == false && wakenUp.get() == true的情况呢? 这个就更简单了。
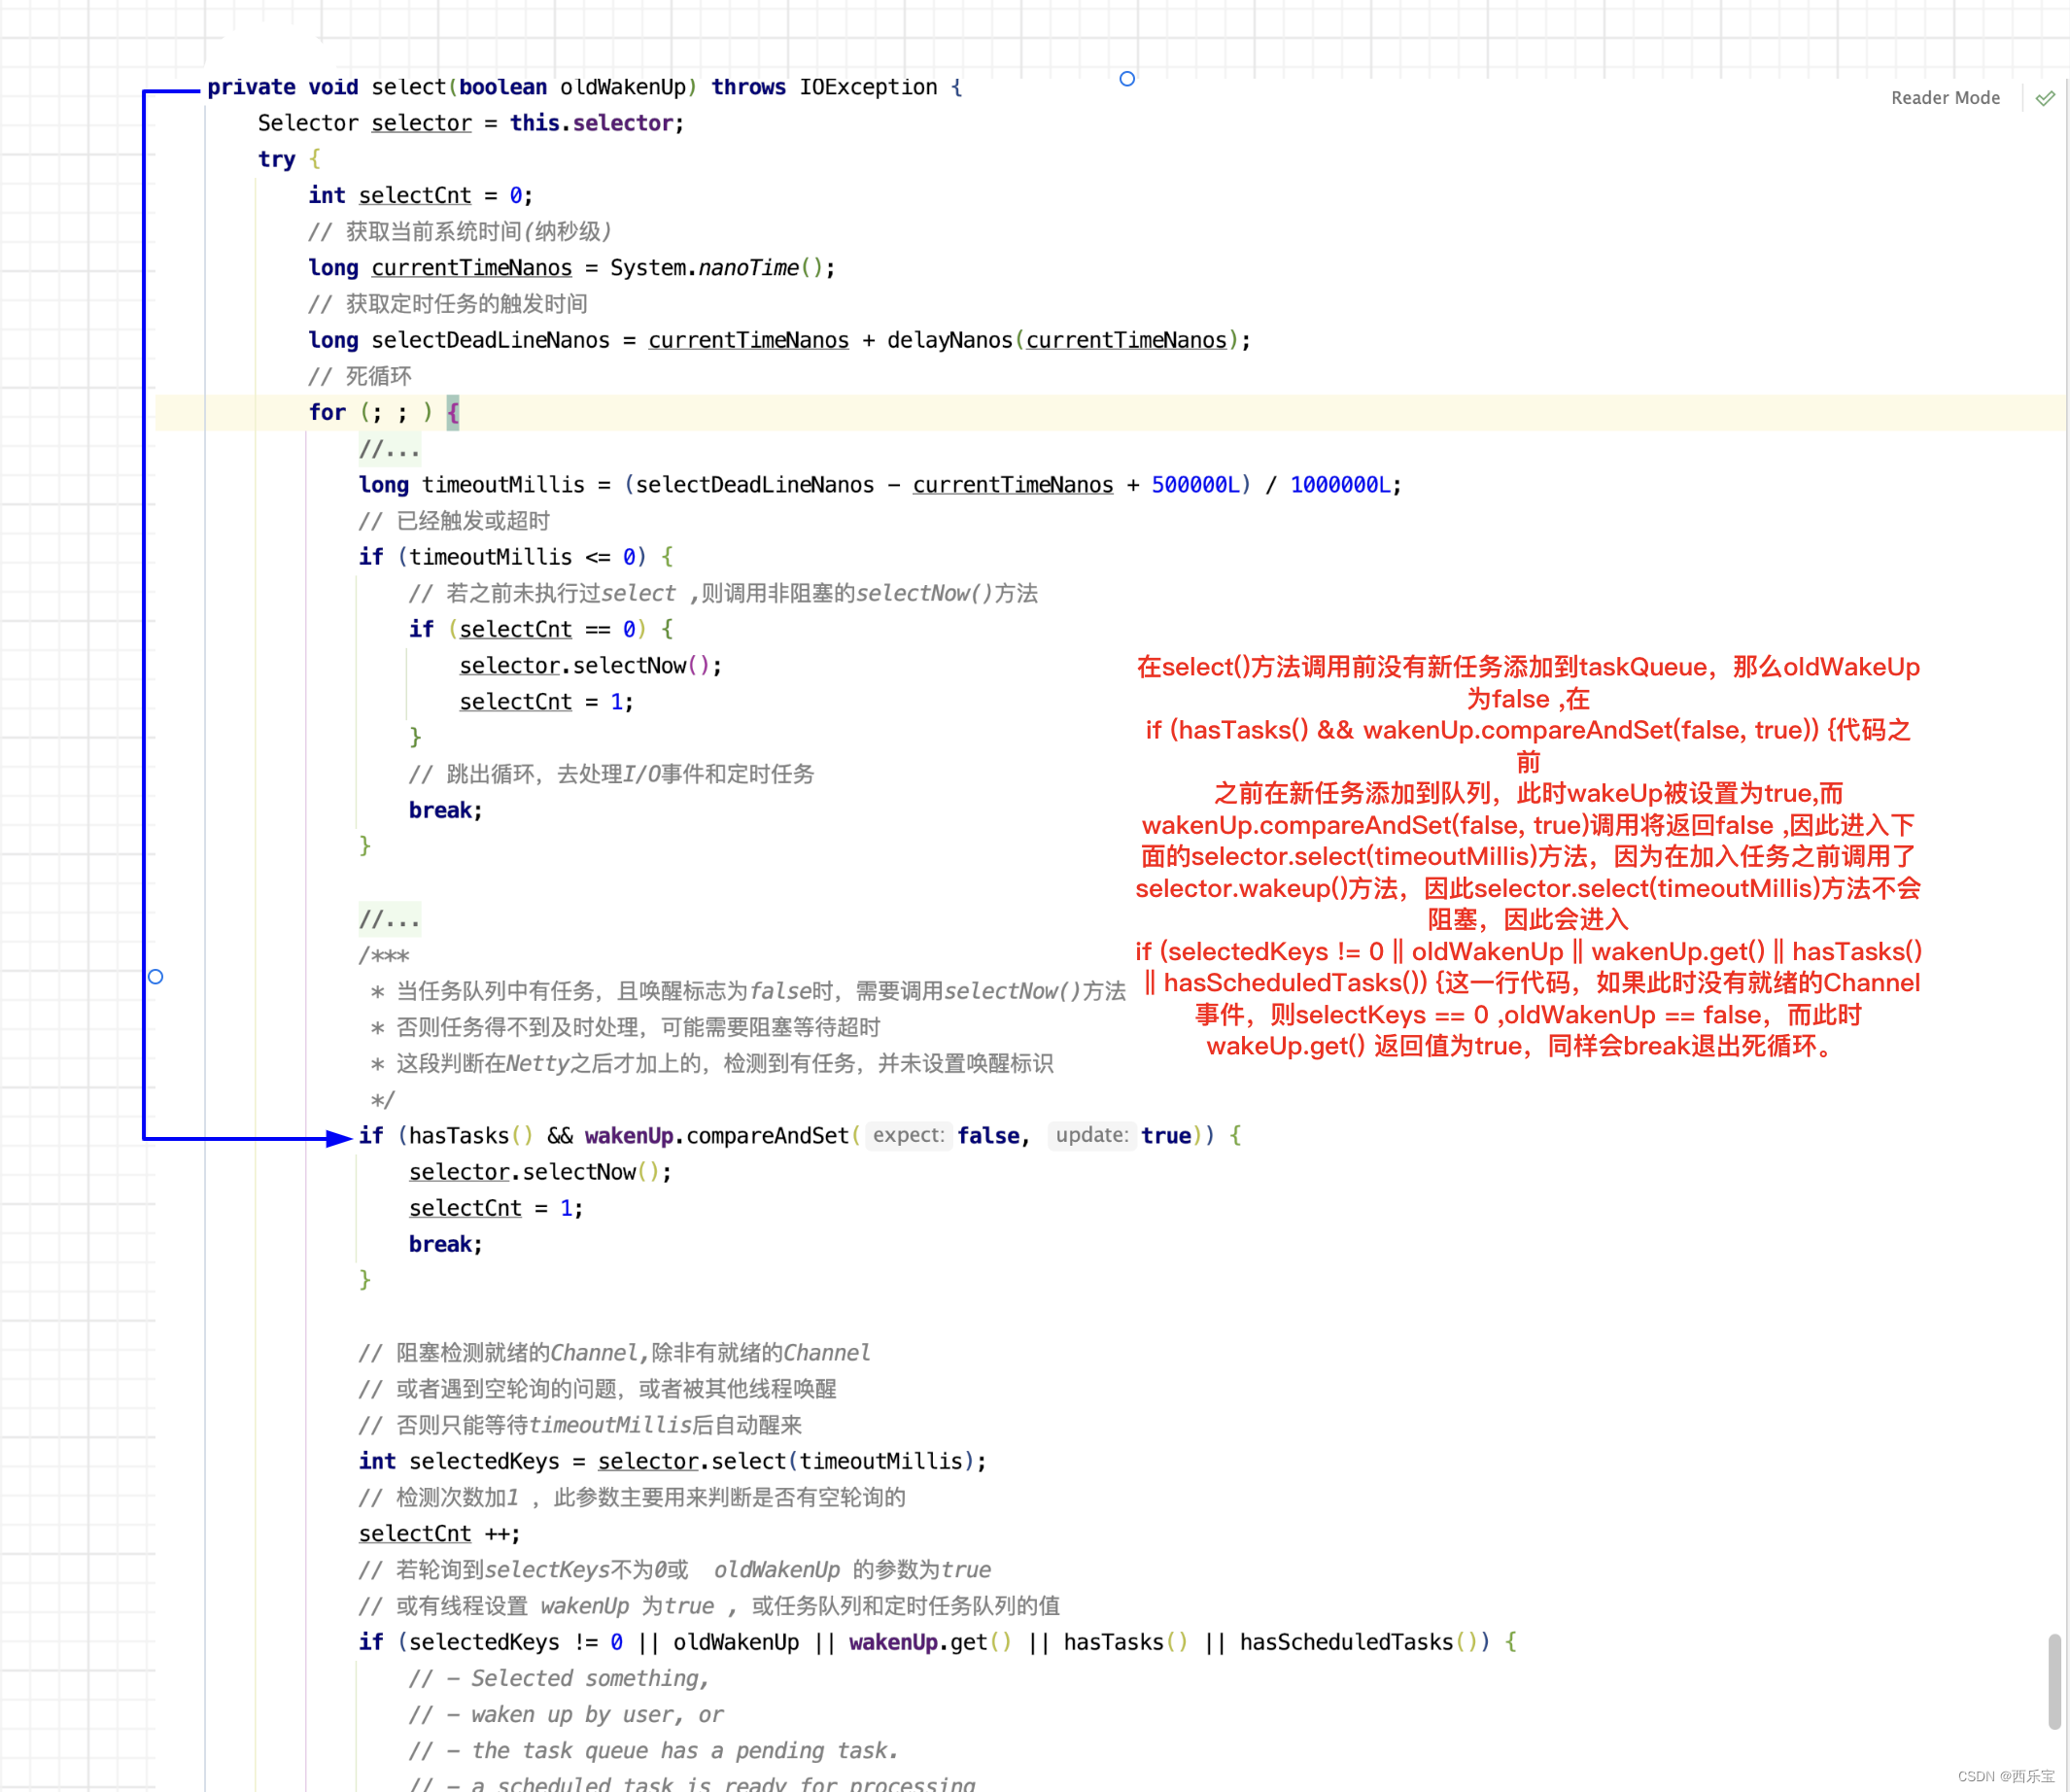
4. 什么时候会出现selectedKeys== 0 && oldWakenUp == false && wakenUp.get()== false && hasTasks() == true呢? 如果对源码比较了解,还是不难的。
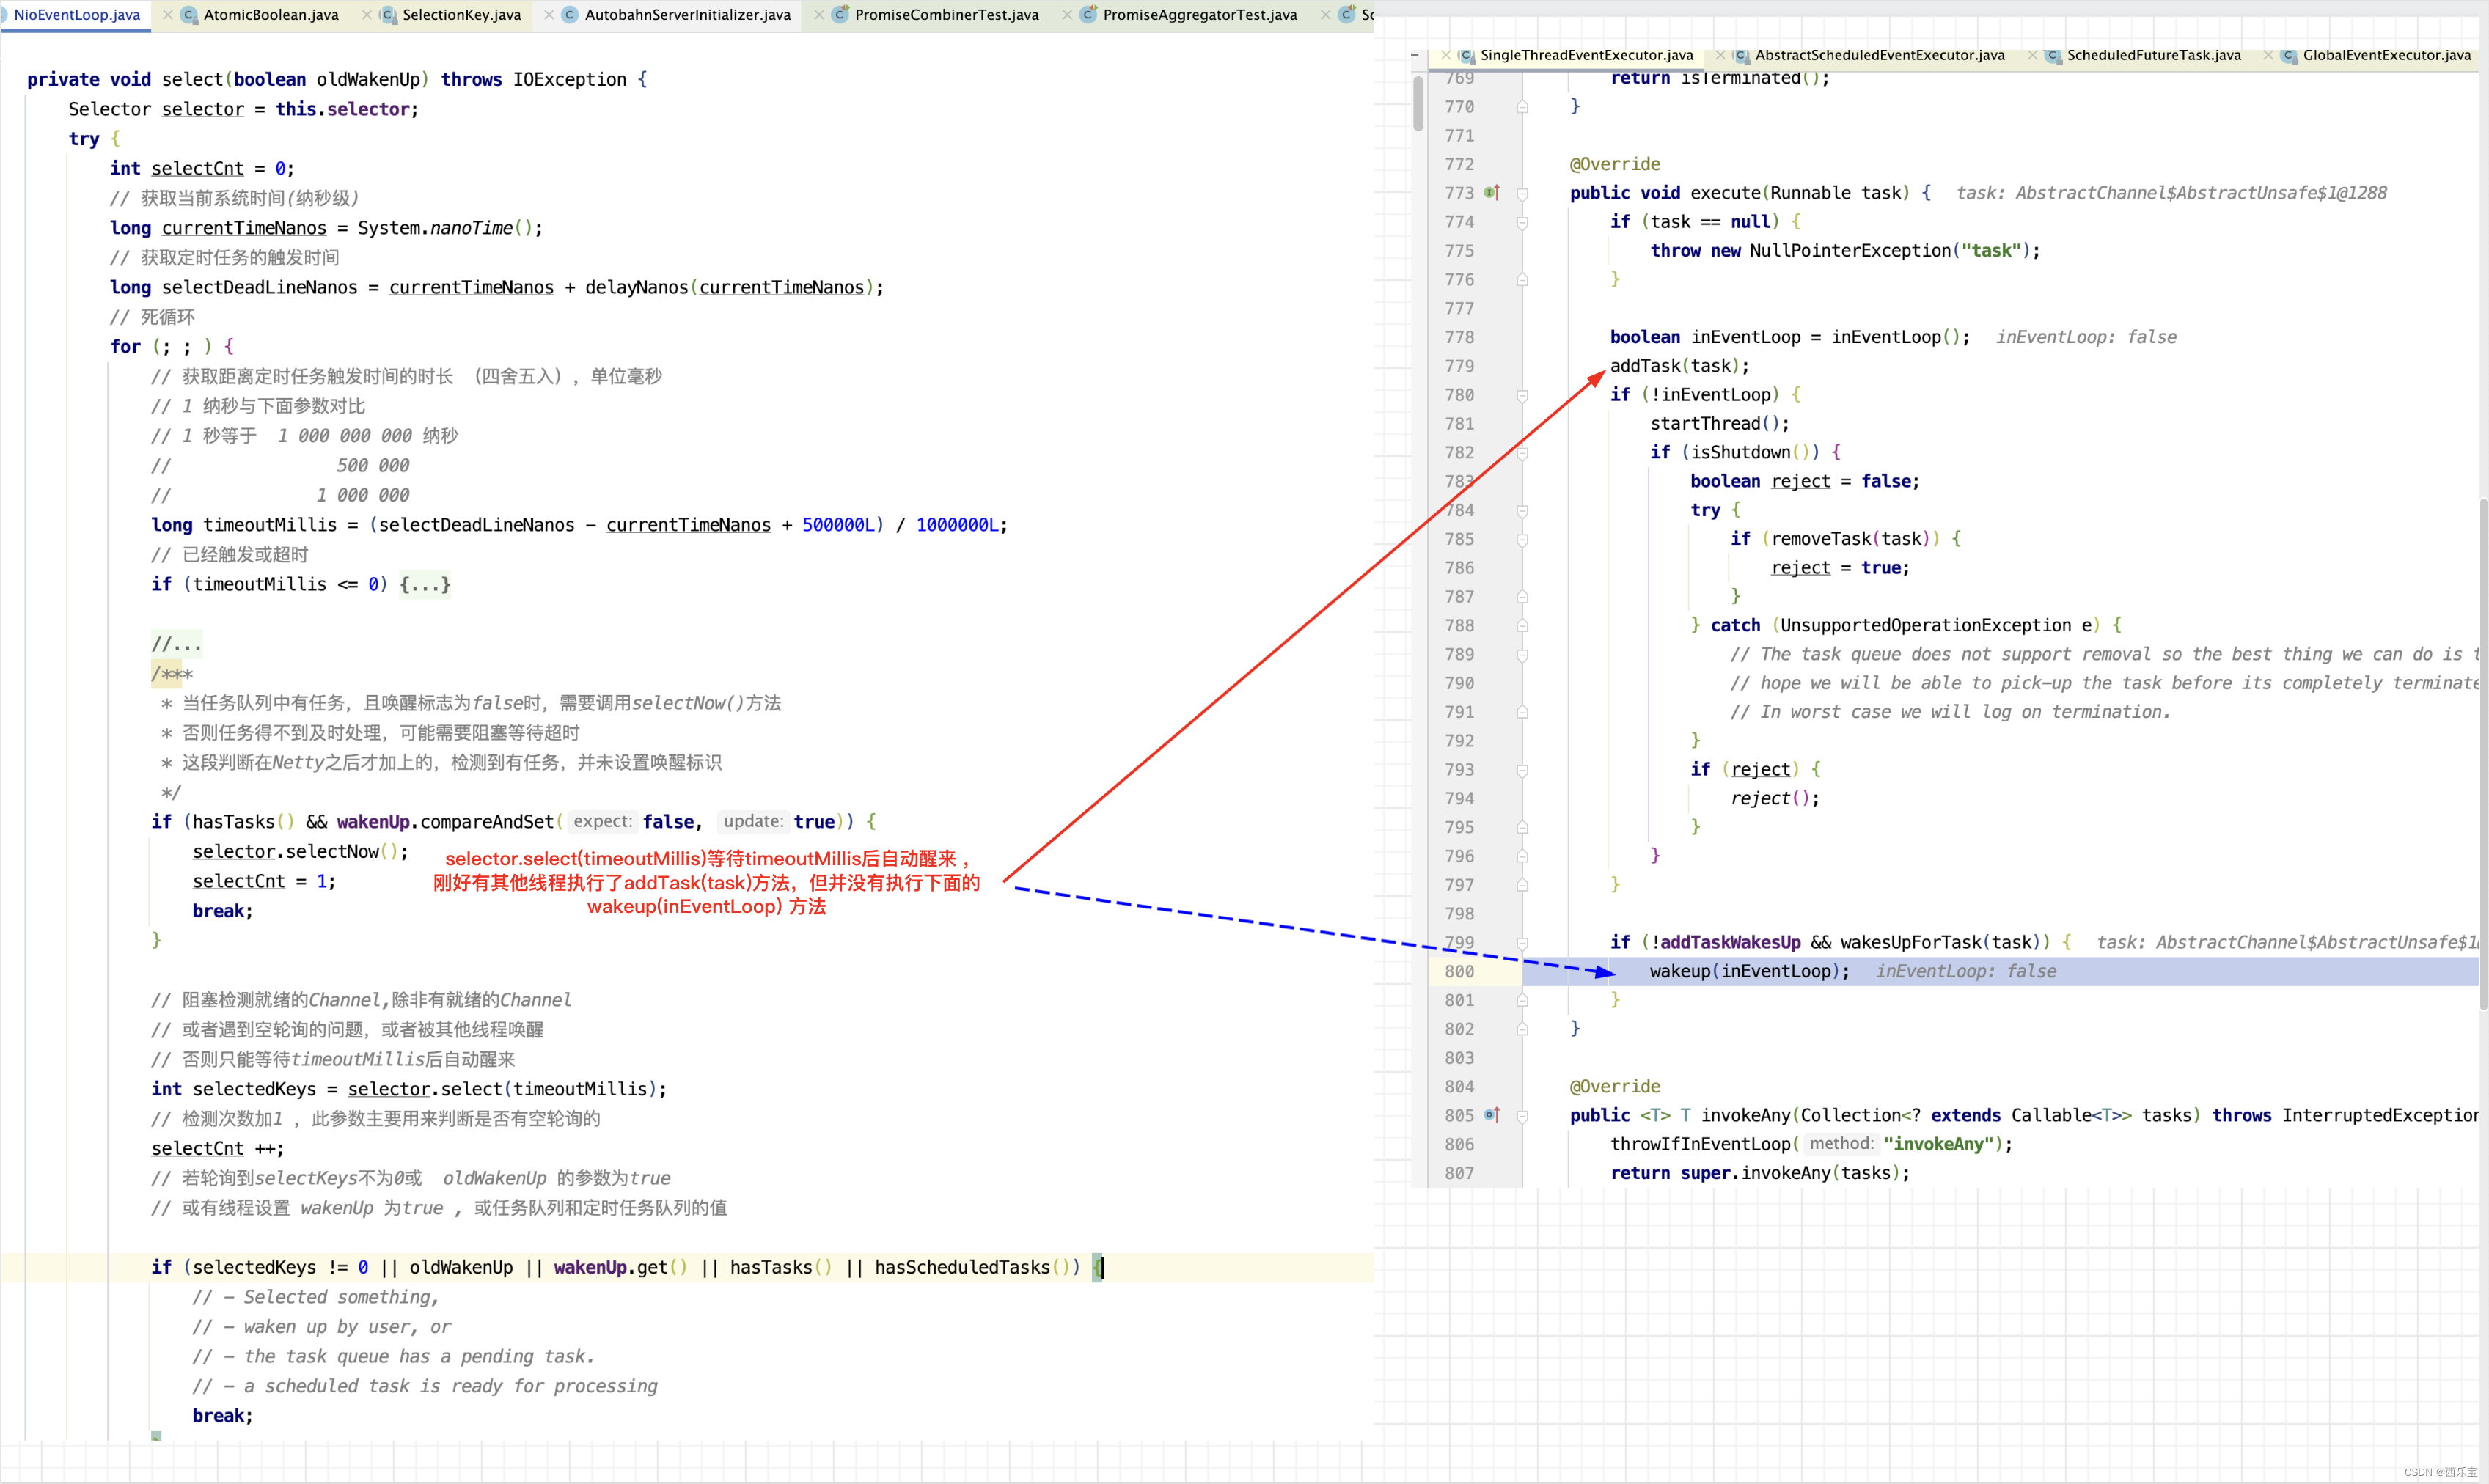
当然啦,超时醒来,在后面的循环判断中也会退出死循环,但这里相当于走了捷径,能更快的退出循环。从而提升程序的性能。 从这些细节中可以看出 ,Netty在性能这一方面,可谓苦心孤诣 。
接下来,再来分析之前提出的疑问,下面加红框代码的用意何在。

如果selector.wakeup()被执行,首先要满足条件wakenUp.get() 返回值为true,而我们知道在进入select(wakenUp.getAndSet(false))方法时,肯定wakenUp.get() 肯定为false,因此再次进入select()方法的分析 。
- 在select()方法执行开始到selector.select(timeoutMillis) 这段代码期间有新任务添加,当然,有分为两中情况,
第一种情况,if (hasTasks() && wakenUp.compareAndSet(false, true)) 这一行代码执行前没有新任务添加,且在这一行代码执行时
刚好有新任务添加,且这一行代码CAS操作成功,wakenUp.compareAndSet(false, true)返回true .
第二种情况,在if (hasTasks() && wakenUp.compareAndSet(false, true)) 这一行代码执行前就已经在新任务添加。
但无论哪种情况,此时wakeUp的值始终为true .
会触发外层run()方法中的selector.wakeup()方法调用。
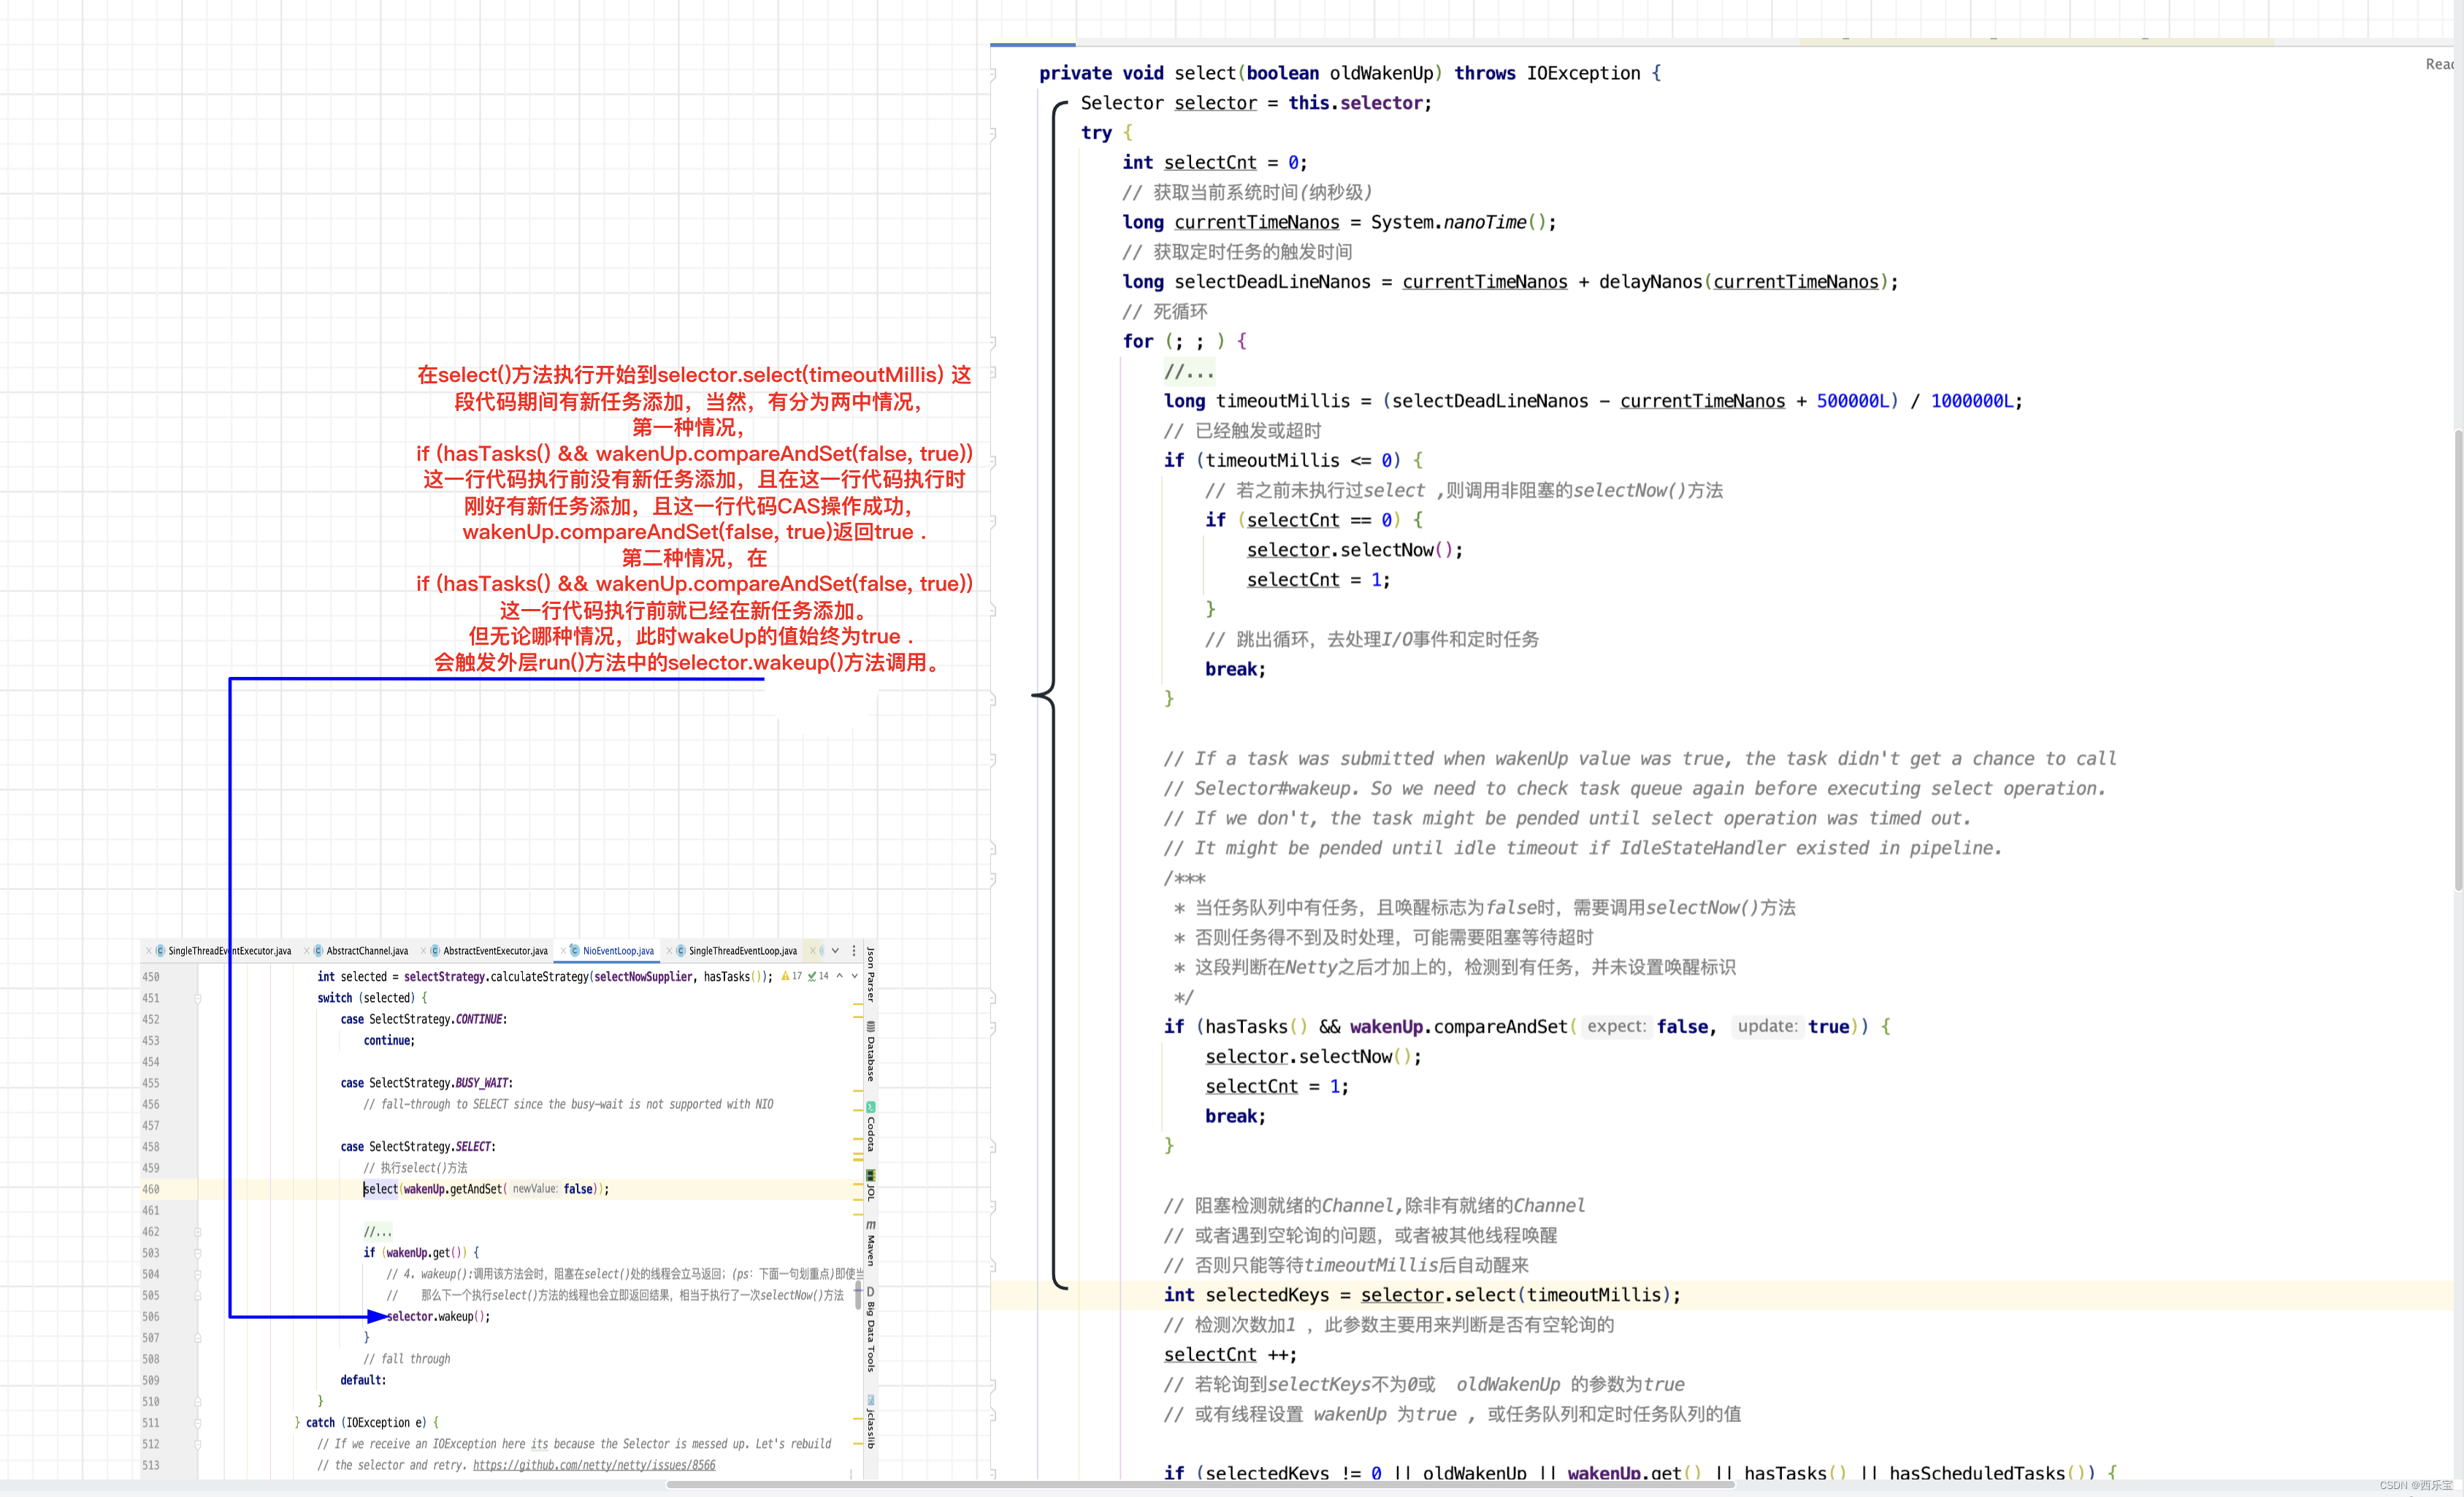
- 在runAllTasks()方法执行完,再次进入循环执行select(wakenUp.getAndSet(false)) 这一行代码之间有任务添加到队列中。 在select()方法内, 在private void select(boolean oldWakenUp) 方法执行开始到if (hasTasks() && wakenUp.compareAndSet(false, true)) 这一行代码之间如果没有任务添加到队列,则会执行selector.selectNow(); 代码,退出循环,此时对性能没有什么影响 。
但如果在select(boolean oldWakenUp) 到if (hasTasks() && wakenUp.compareAndSet(false, true))这一行代码之间有新的任务
添加到队列中, 此时(hasTasks() && wakenUp.compareAndSet(false, true))条件为false ,会进入下面的selector.select(timeoutMillis) 这一行代码执行,但select()方法是阻塞的,需要等待selector.wakeup()调用后,此方法才能被唤醒,对于高性能的Netty来说,是无法忍受的。此时提前预调用 selector.wakeup()就起到重要作用, 从之前wakeup()的原理得知【 NIO中的Selector封装了底层的系统调用,其中wakeup用于唤醒阻塞在select方法上的线程,它的实现很简单,在linux上就是创建一 个管道并加入poll的fd集合,wakeup就是往管道里写一个字节,那么阻塞的poll方法有数据可读就立即返回。】,因为在runAllTasks()方法之前就已经调用了selector.wakeup();方法,而此时管道中肯定有一个字节存在了,当调用 selector.select(timeoutMillis)方法时,发现管道中有一个字节存在,则立即返回,不会进入阻塞,从最大程度上压榨了CPU的性能 。
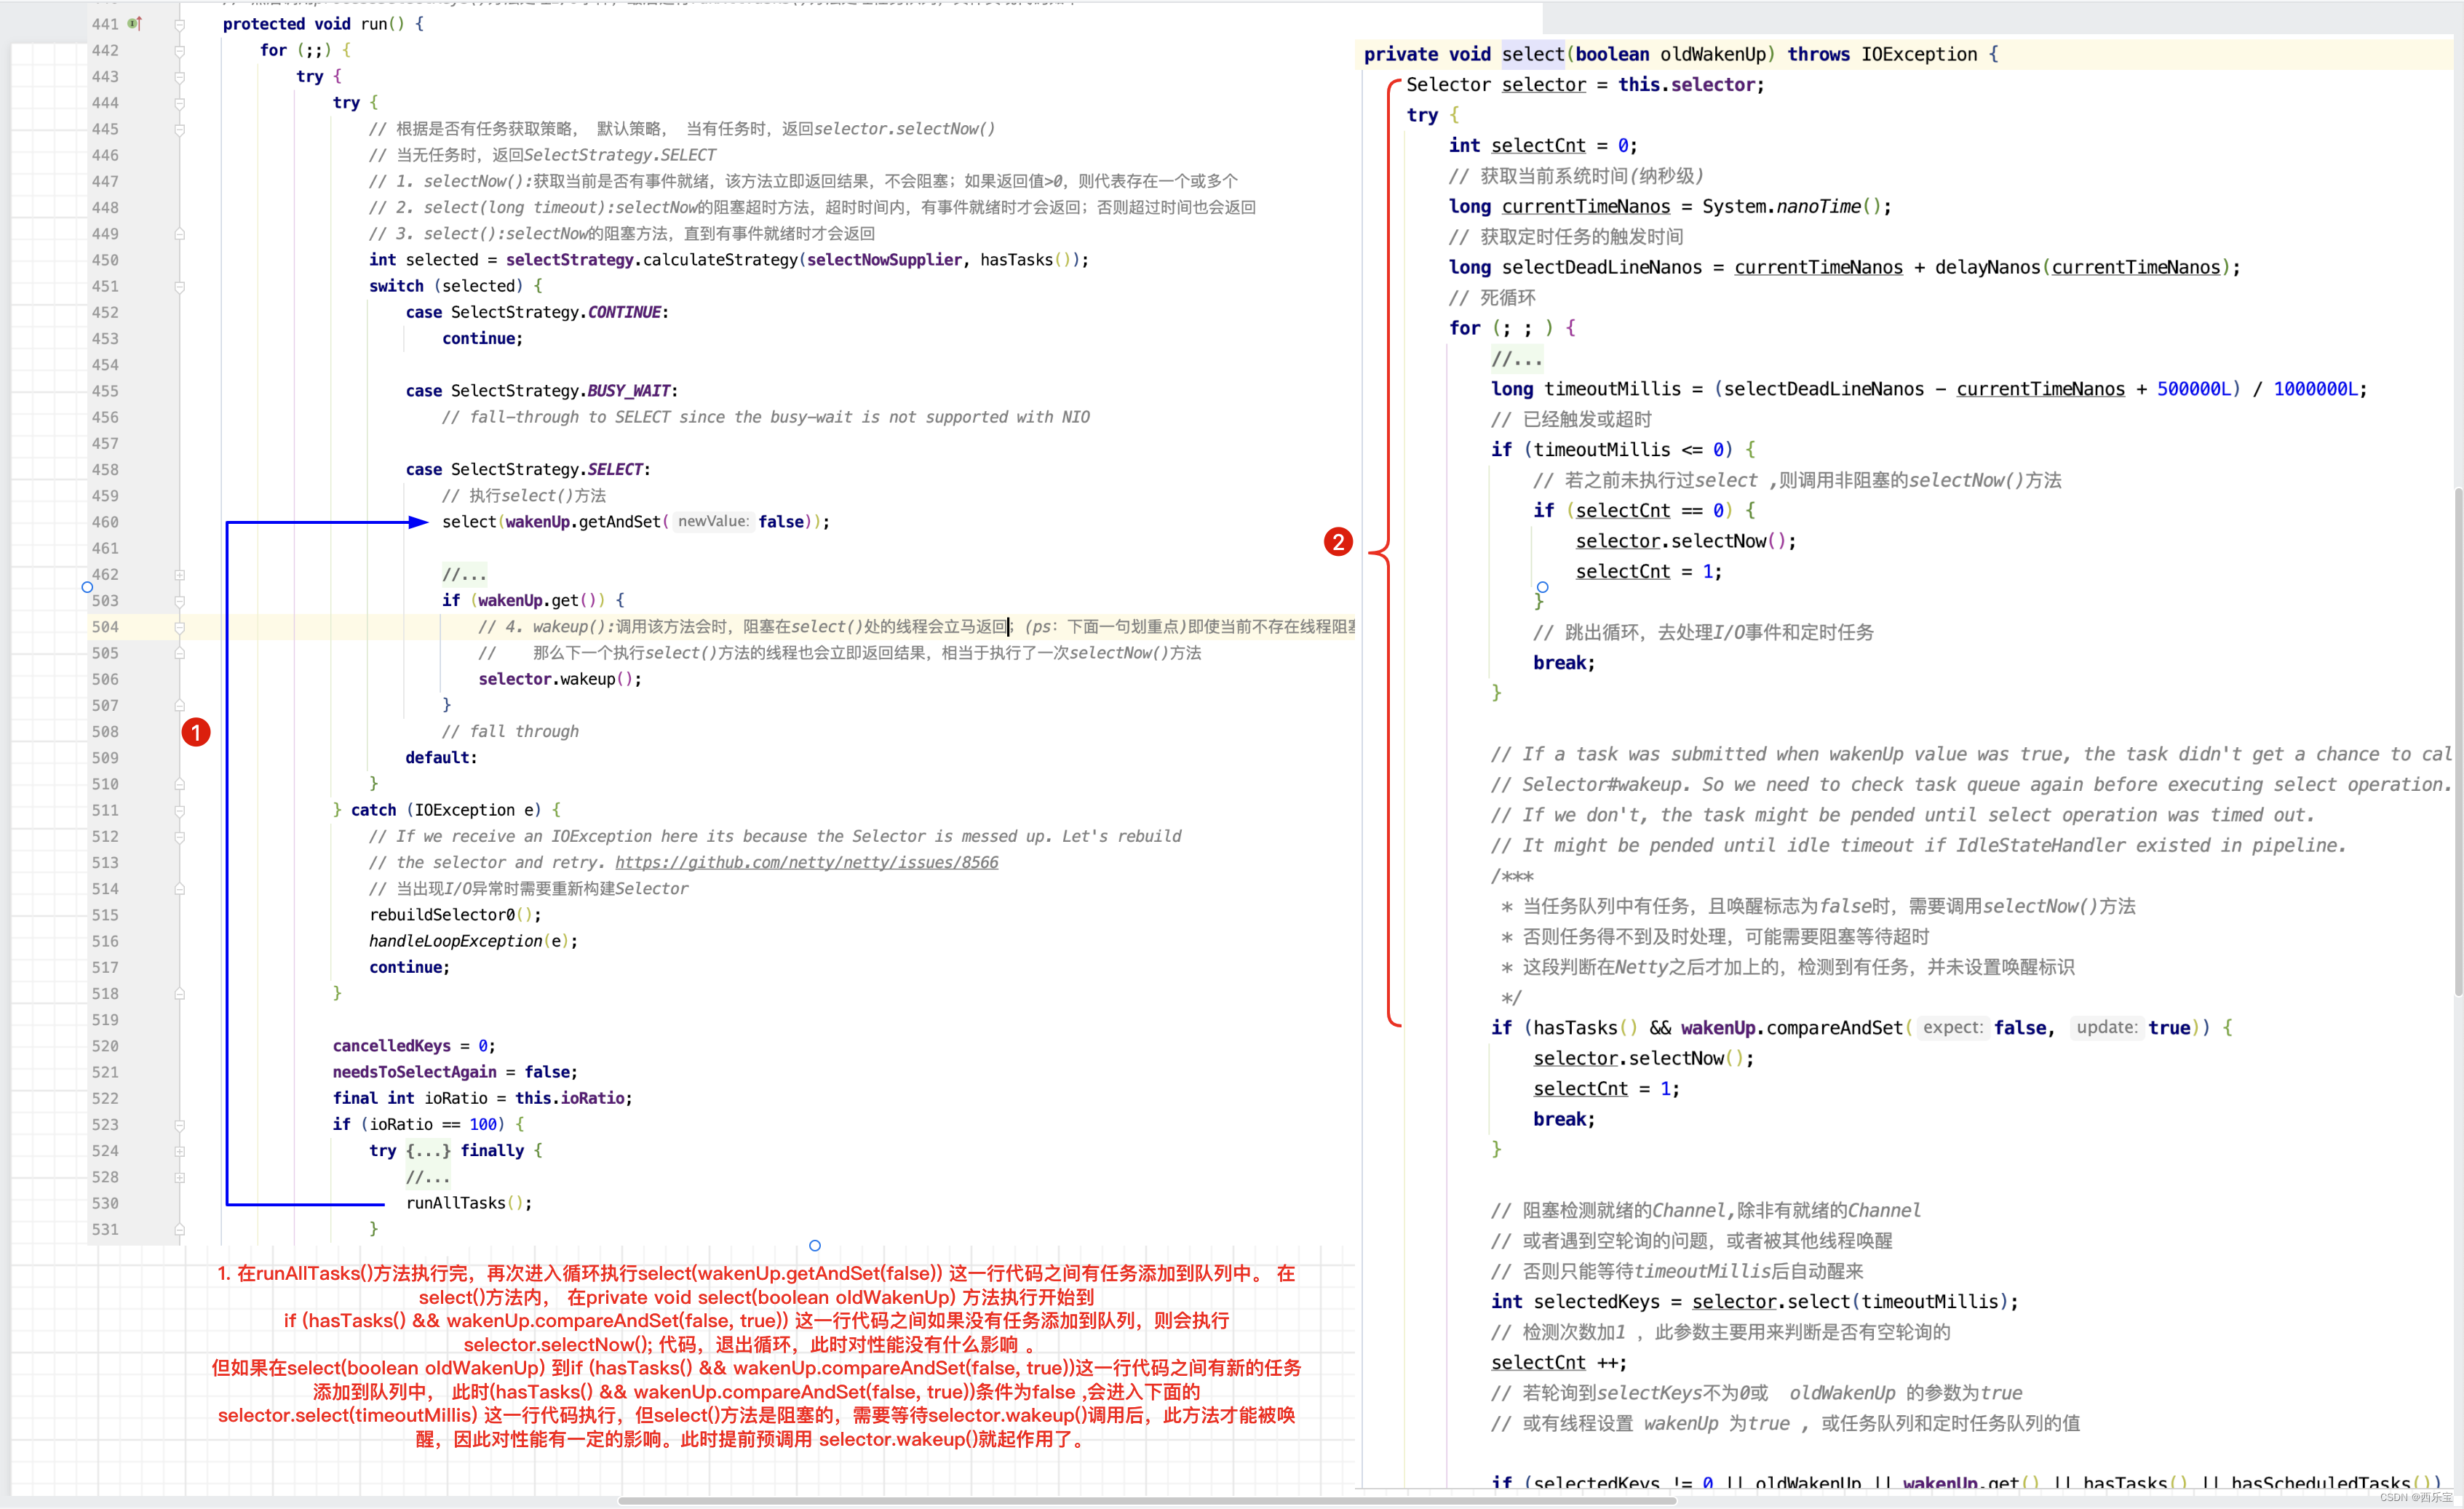
有 3 种方式可以 select 就绪事件:
1)select() 阻塞方法,有一个就绪事件,或者其它线程调用了 wakeup() 或者当前线程被中断时返回。
2)select(long timeout) 阻塞方法,有一个就绪事件,或者其它线程调用了 wakeup(),或者当前线程被中断,或者阻塞时长达到了 timeout 时返回。不抛出超时异常。
3)selectNode() 不阻塞,如果无就绪事件,则返回 0;如果有就绪事件,则将就绪事件放到一个集合,返回就绪事件的数量。
当然,我们知道selectNow()为非阻塞的,select(…)方法为阻塞的,那么性能上有什么差别呢?同样用例子来证明 。
例1 : selectNow()方法调用10万次,看执行时间
public static void main(String[] args) throws Exception {
    Selector selector = Selector.open();
    long start = System.currentTimeMillis();
    for (int i = 0; i < 100000; i++) {
        selector.selectNow();
    }
    Utils.print("结束 : " + (System.currentTimeMillis() - start));
}
例2 :同样的方式,select()方法调用10万次,但此时有另外一个线程不断的调用selector.wakeup()方法,不断的唤醒select()方法,看执行时间 。
public static boolean stop = false;

public static void main(String[] args) throws Exception {
    Selector selector = Selector.open();
    long start = System.currentTimeMillis();
    FutureTask<Boolean> futureTask = new FutureTask<Boolean>(new MyCallable(selector));
    Thread thread = new Thread(futureTask);
    thread.start();
    new Thread(new Runnable() {
        @Override
        public void run() {
            for (;;) {
                if (stop) {
                    break;
                }
                selector.wakeup();
            }
        }
    }).start();
    stop = futureTask.get();
    Utils.print("结束 : " + (System.currentTimeMillis() - start));
}
static class MyCallable implements Callable<Boolean> {
    public Selector selector;
    public MyCallable(Selector selector) {
        this.selector = selector;
    }
    @Override
    public Boolean call() throws Exception {
        for (int i = 0; i < 100000; i++) {
            try {
                selector.select(50000);
            } catch (IOException e) {
                e.printStackTrace();
            }
        }
        return true;
    }
}
执行结果,经过多次测试发现:在10万次的比较中,发现select()方法的执行时间大概是selectNow()时间的2倍
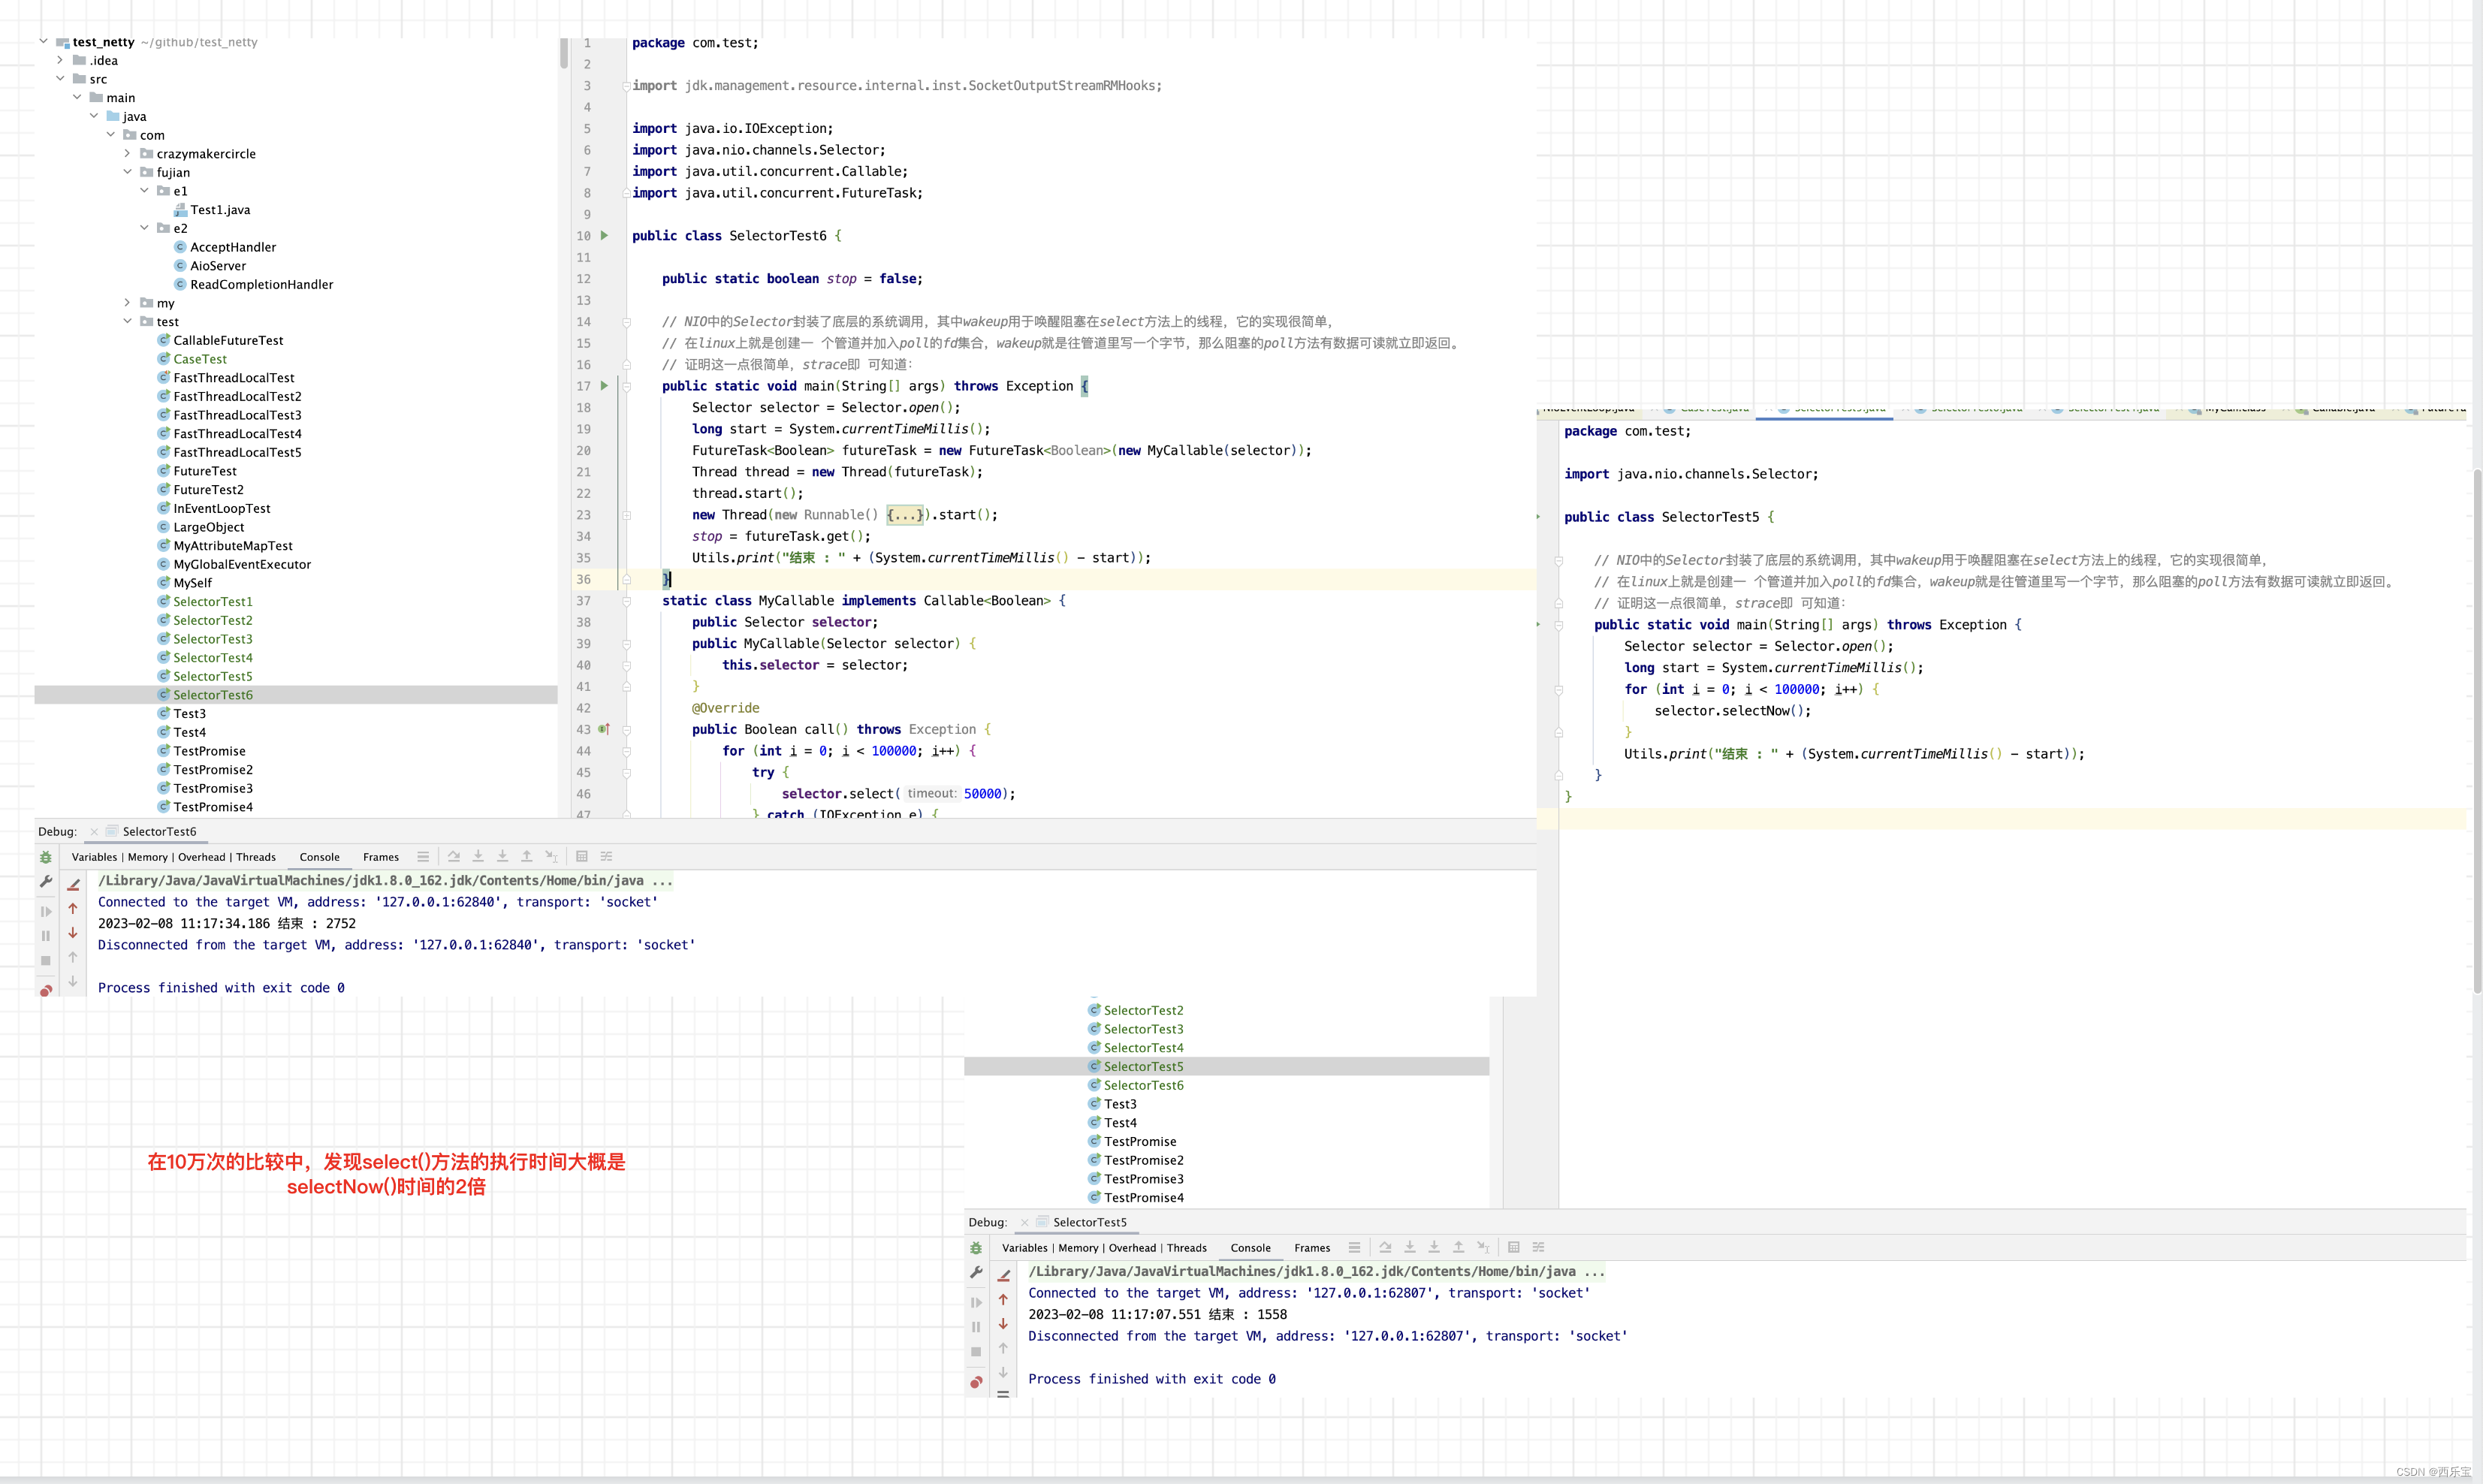
因此从测试结果上来看,wakeup()与select()方法组合比selectNow()方法更加耗时,因此预selector.wakeup() 方法调用,一定程度上能提升任务执行比较频繁情况下的性能 。
空循环bug
Netty解决JDK 空轮询Bug
大家可能早就听说过臭名昭著的Java Nio epoll 的bug , 它会导致Selector空轮询,最终导致CPU使用率达到10% , 官方称JDK1.6的update 18修复了这个问题,但是直到JDK 1.7 该问题仍旧存在,只不过该Bug发生的概率降低了一些而已,并没有根本的解决,出现此Bug 是因为当Selector轮询结果为空时 , 没有进行wakeup()或对新消息及时进行处理,导致发生空轮询,CPU 使用率达到了100%, 我们来看一下这个问题存在Issue中的原始描述 。
this is aan issue with poll (and epoll) on linux ,if a file descriptor for a connected socket is polled with a request event mask of , and if the connection is abruptly terminated(RST) then the poll wakes up with the POLLHUP (and maybe POLLERR) bit set in the returned event set ,the implication of this behaviour is that Selector wiill wakeup and as the interest set for the SocketChannel is 0 it means ther aren’t any selected events and the select method return 0 .
具体解释,在部分Linux Kernel 2.6 中, poll 和 epoll 对于突然中断的Socket 连接会对返回的EventSet 事件集体置为POLLHUP,也可能是POLLERR,EventSet 事件集合发生了变化,这就可能导致Selector 被唤醒。
这是与操作系统机制有关的, JDK 虽然仅仅是一个兼容的各个操作系统平台的软件,但遗憾的是JDK 5 和JDK 6 最初版本中,这个问题并没有得到解决,而是将帽子抛给了操作系统方。这就是这个Bug 一直到2013年才最终修复的原因 。 Netty中最终的解决办法是,创建一个新的Selector,将可用的事件重新注册到新的Selector中来终止空轮询,我们来回顾一下事件轮询的关键代码 。
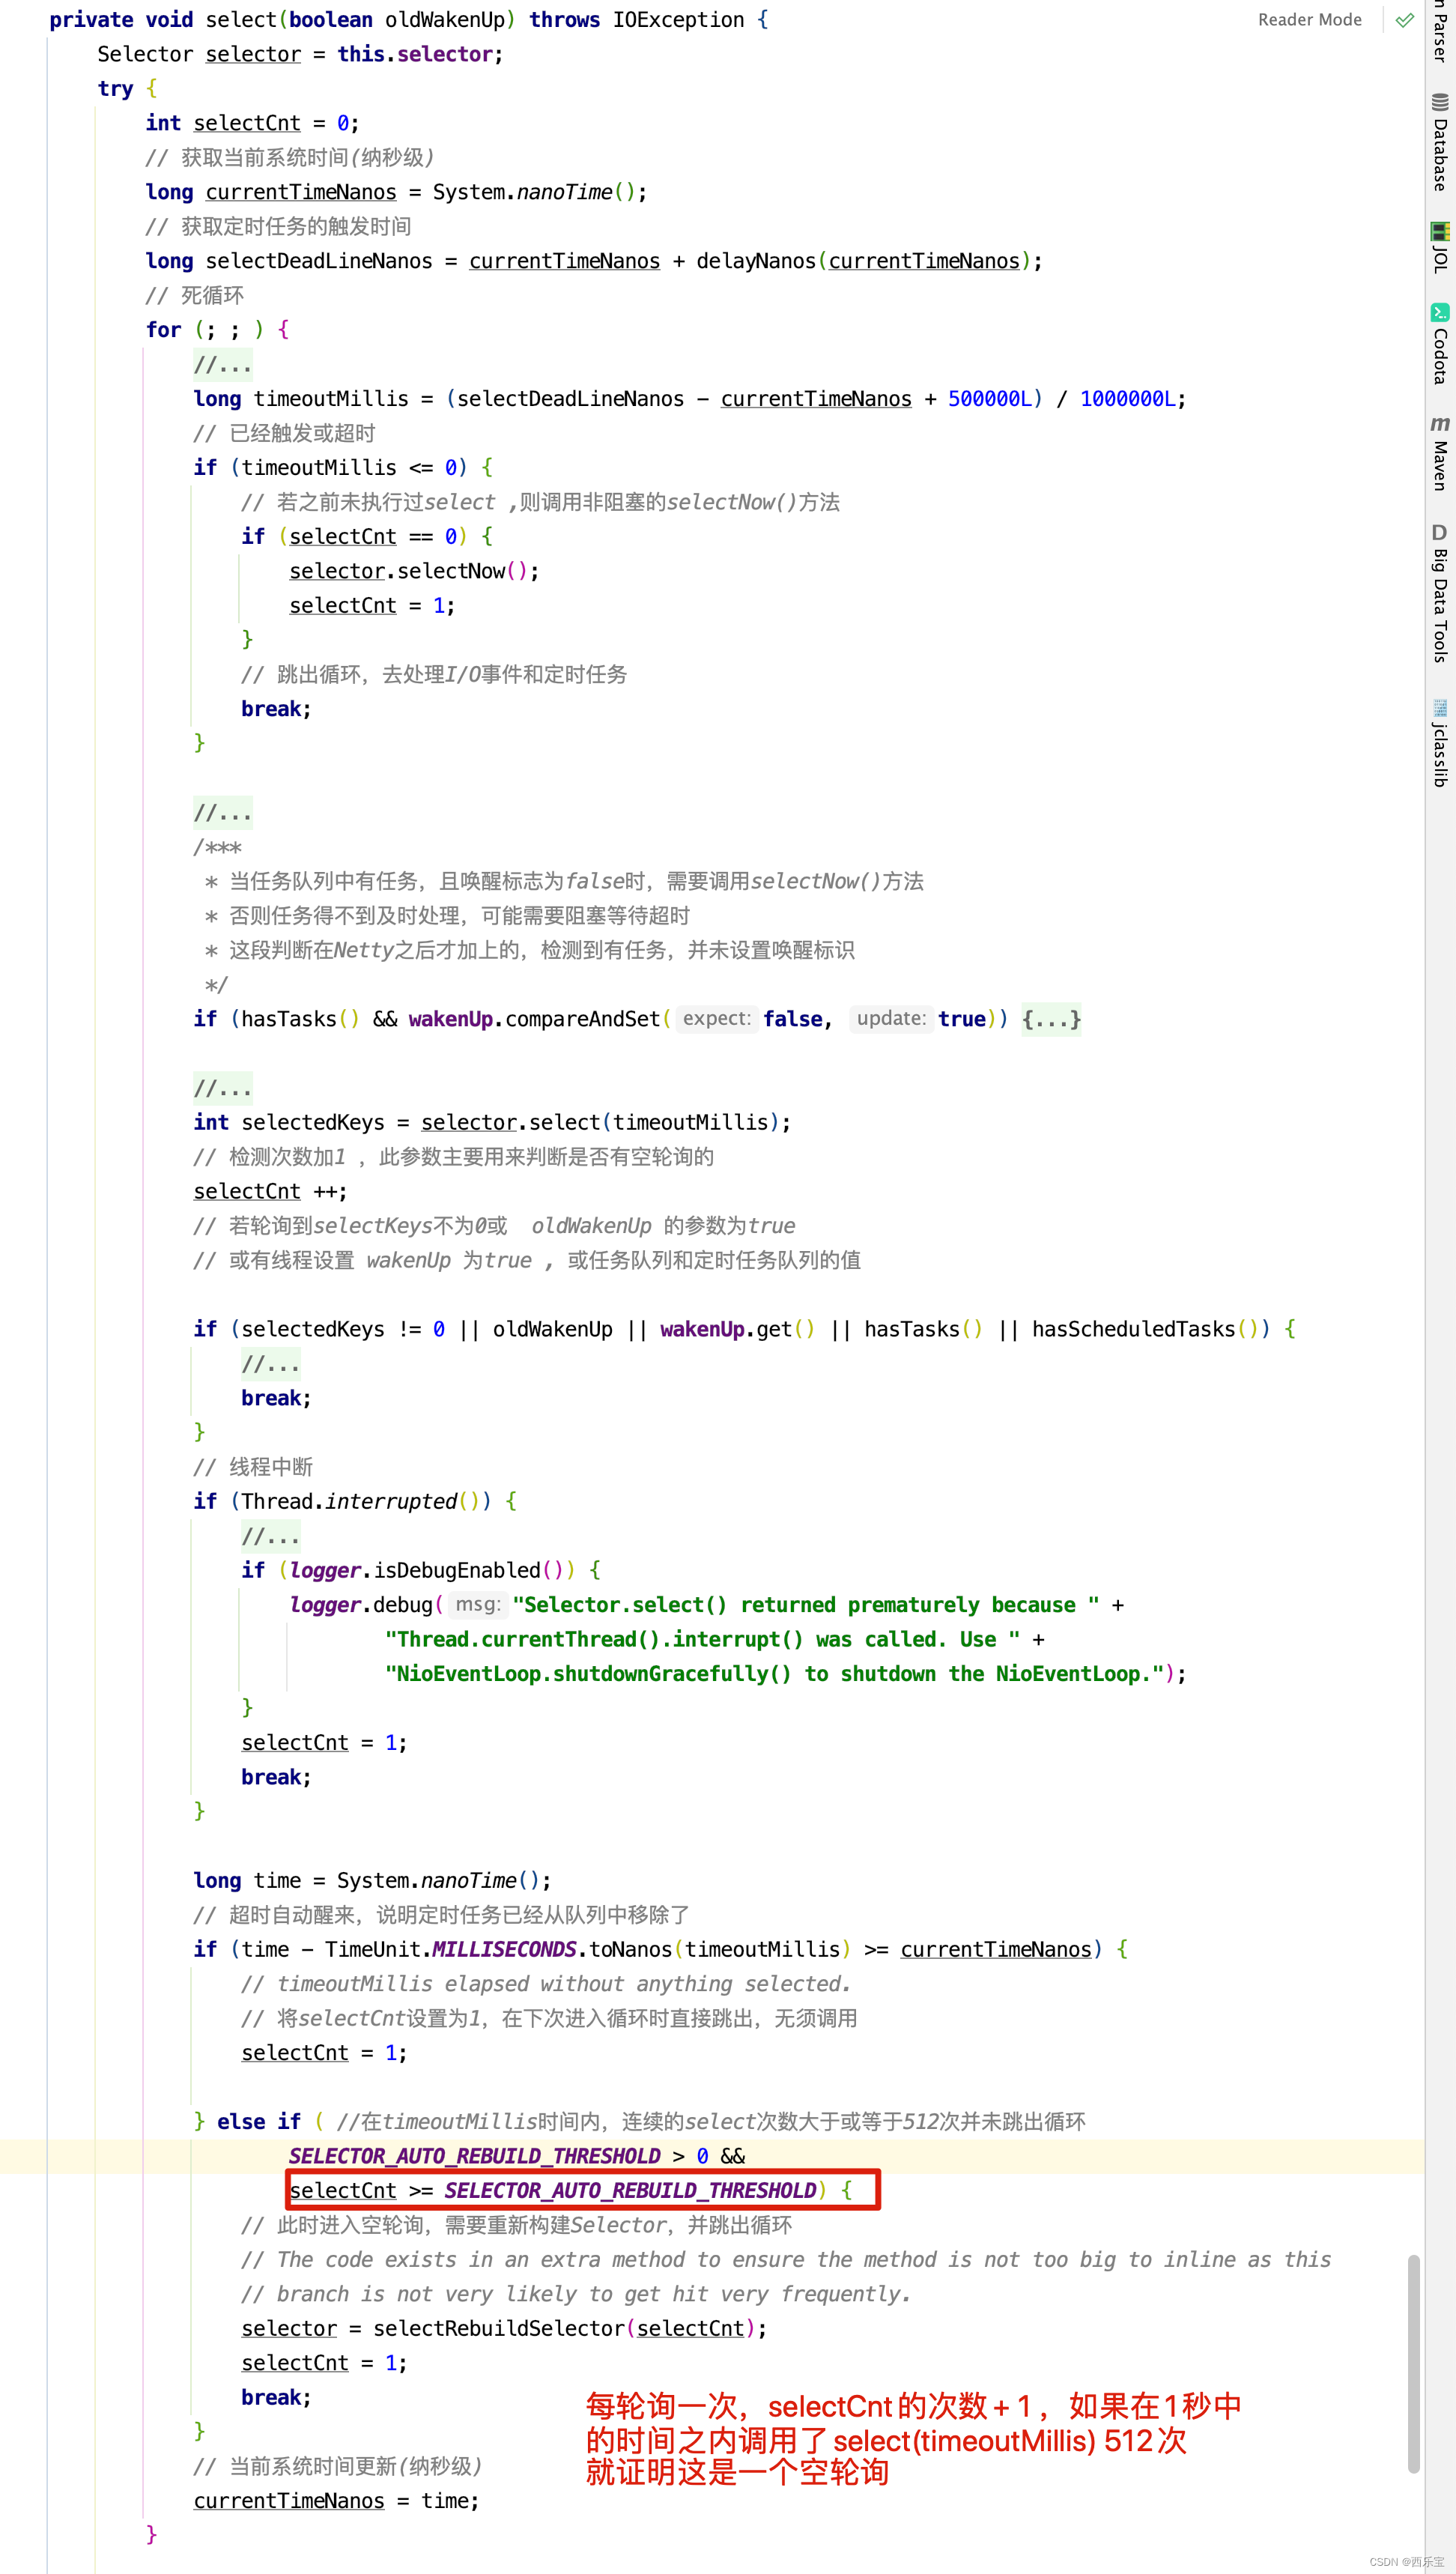
假如selector.select(timeoutMillis)方法中timeoutMillis为1000毫秒,如果在999.5毫秒后被唤醒,则此时退出循环,如果在999.5之前醒来,假如999.4 ,则 1000 - 999.4 + 0.5 取整数为1毫秒,则需要再次调用selector.select(1) 进行阻塞等待,后续循环以此类推,个人觉得一般情况只会出现2次循环,就是第一在999.5毫秒之前醒来,再一次睡眠,假如睡眠一秒钟,再次醒来,从概率上来说(一次提前醒来,一次延迟醒来),时间应该大于1秒,因此第二次循环之后应该就退出, 如果循环了3次以上
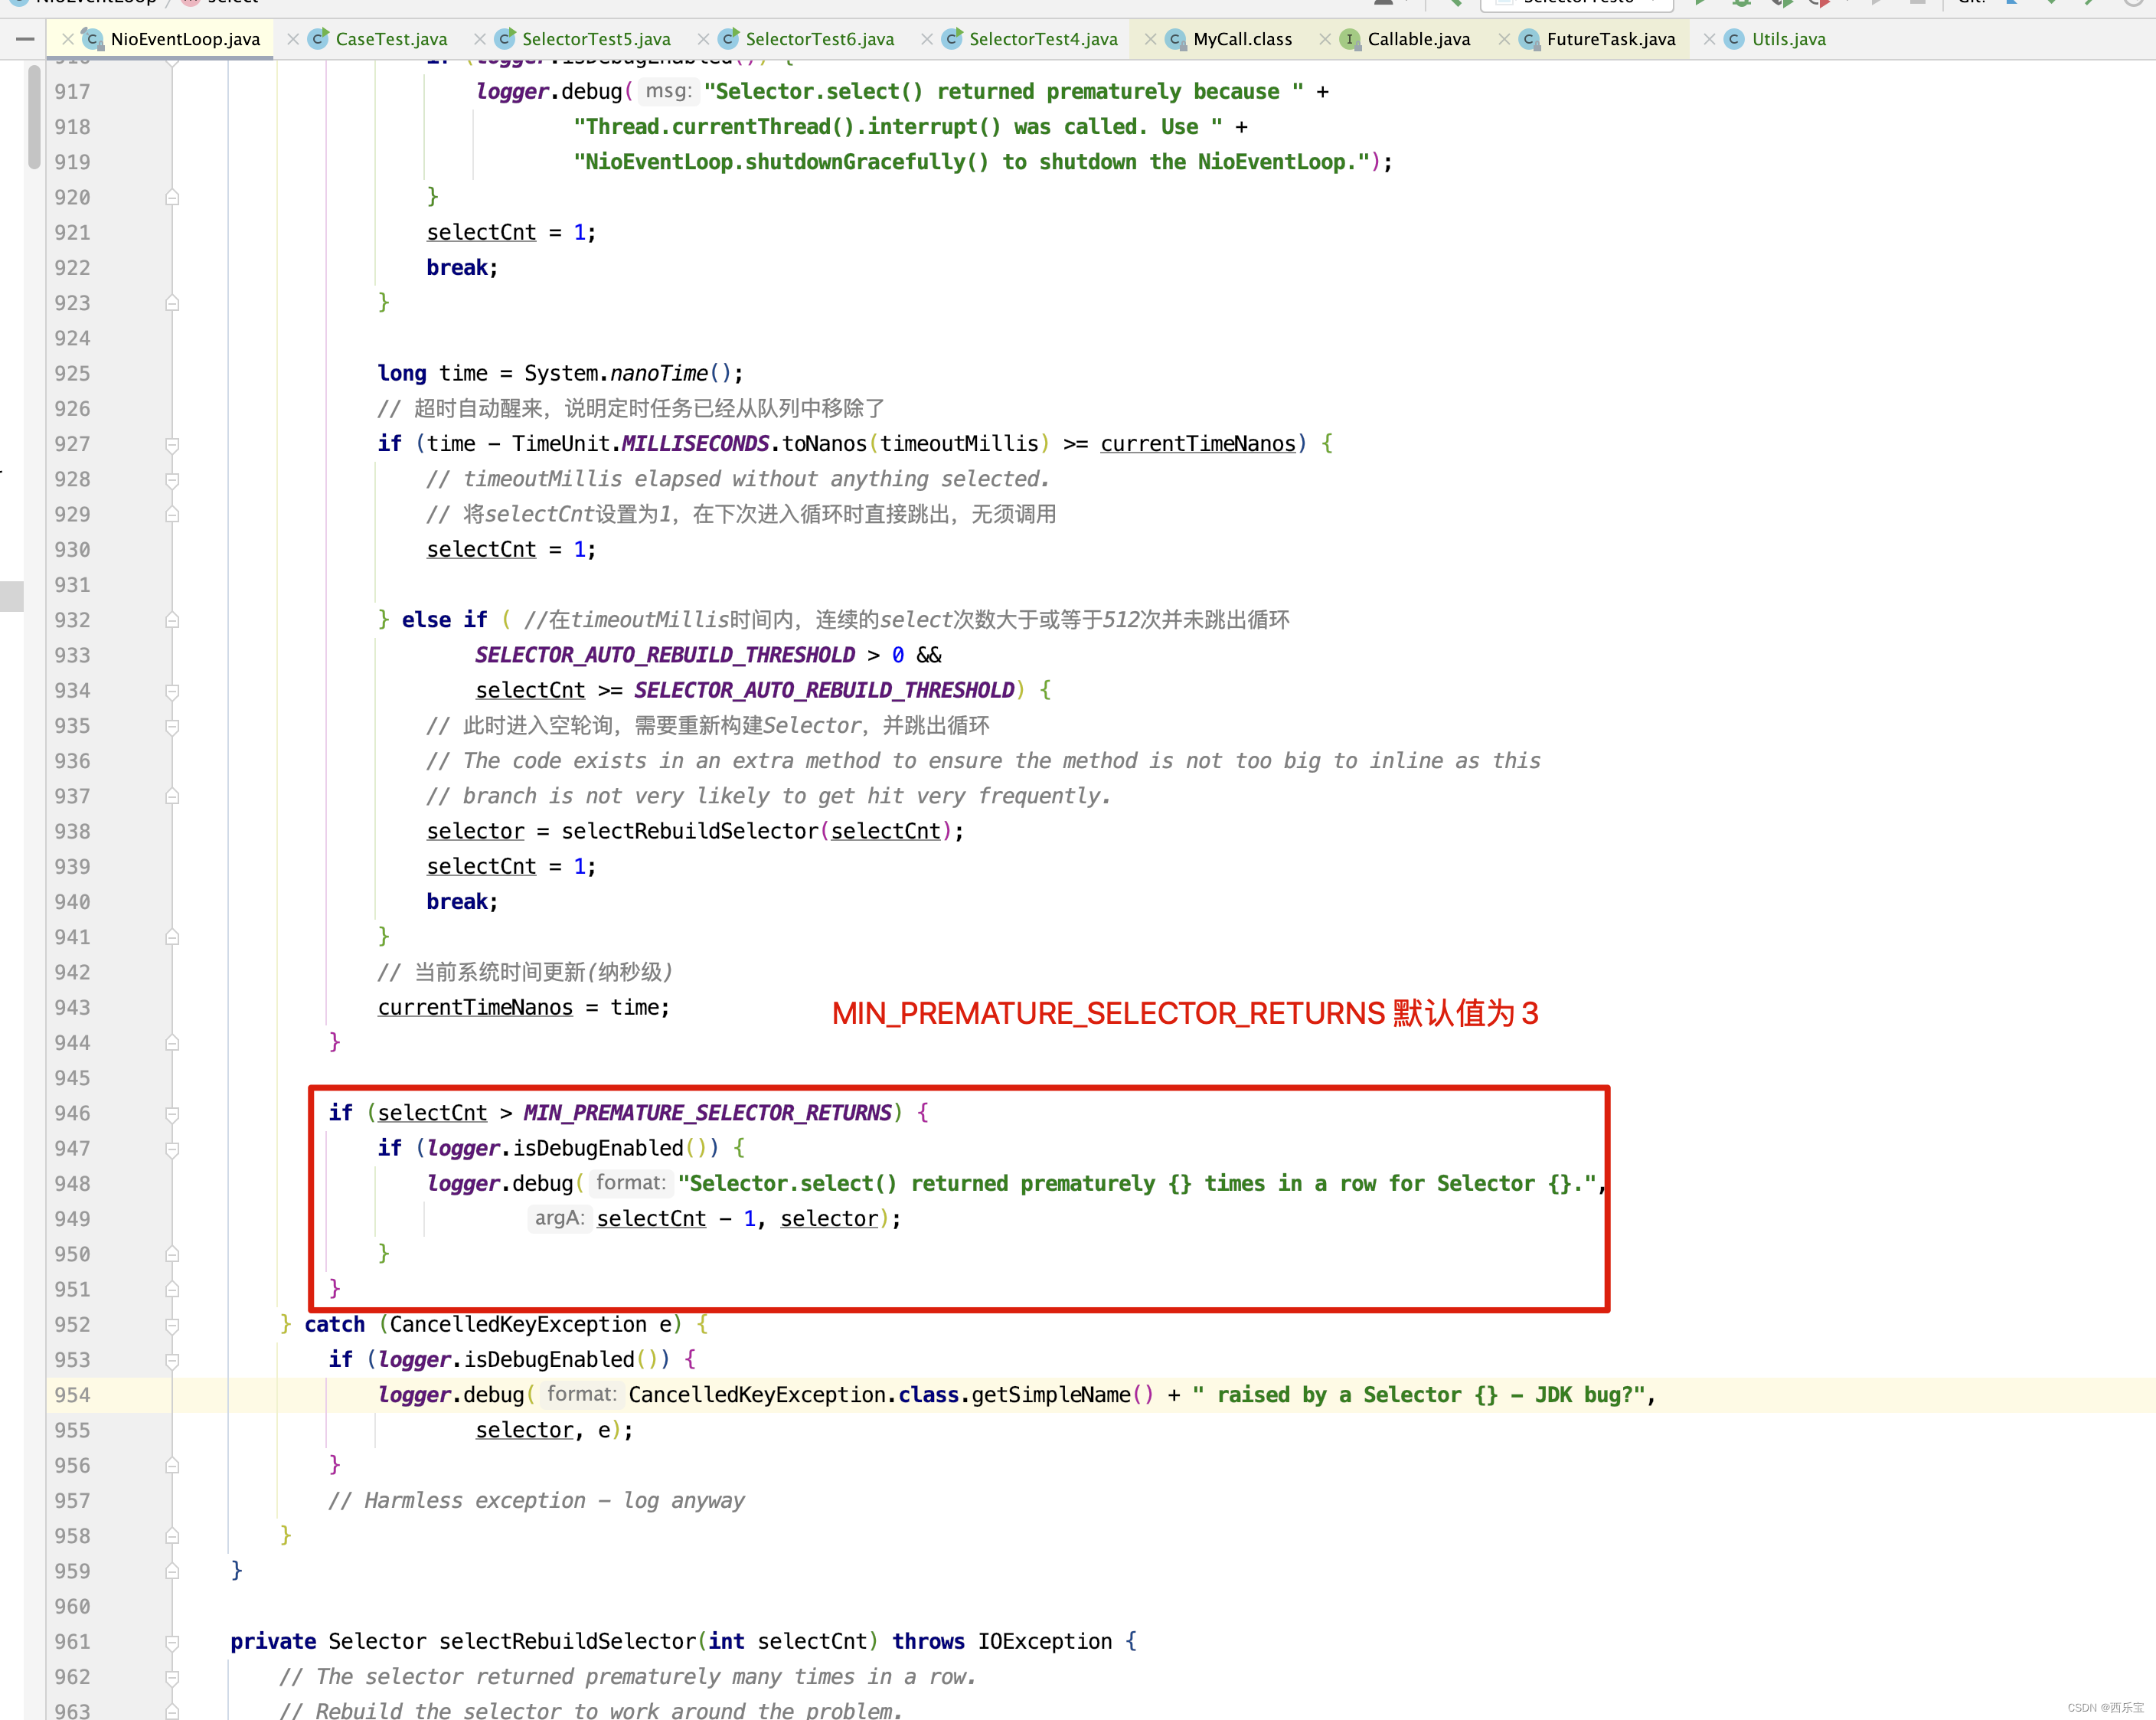
都提前0.5毫秒醒来,可能就有问题了,在这里Netty 打印了debug日志,我相信有了这些理论知识,再来理解Netty 开发者为什么会在selectCnt大于3时打印一行debug日志的原因了。 如果出现空轮询bug,Netty会怎样做呢?进入selectRebuildSelector()方法 。
private Selector selectRebuildSelector(int selectCnt) throws IOException {
    // The selector returned prematurely many times in a row.
    // Rebuild the selector to work around the problem.
    logger.warn(
            "Selector.select() returned prematurely {} times in a row; rebuilding Selector {}.",
            selectCnt, selector);

    rebuildSelector();
    Selector selector = this.selector;

    // Select again to populate selectedKeys.
    selector.selectNow();
    return selector;
}


public void rebuildSelector() {
    if (!inEventLoop()) {
        execute(new Runnable() {
            @Override
            public void run() {
                rebuildSelector0();
            }
        });
        return;
    }
    rebuildSelector0();
}

// select函数的代码解读中发现,Netty在处理空轮询次数大于或等于阈值(默认是512)时,需要重新构建Selector,重新构建Selector
// 方式比较巧妙,重新打开一个新的Selector ,将旧的Selector 上的key和attchment复制过去,同时关闭旧的Selector,具体代码如下
private void rebuildSelector0() {
    final Selector oldSelector = selector;
    final SelectorTuple newSelectorTuple;

    if (oldSelector == null) {
        return;
    }

    try {
        // 开启新的Selector
        newSelectorTuple = openSelector();
    } catch (Exception e) {
        logger.warn("Failed to create a new Selector.", e);
        return;
    }

    // Register all channels to the new Selector.
    // 遍历旧的Selector上的key
    int nChannels = 0;
    for (SelectionKey key: oldSelector.keys()) {
        Object a = key.attachment();
        try {
            // 判断key是否有效
            if (!key.isValid() || key.channel().keyFor(newSelectorTuple.unwrappedSelector) != null) {
                continue;
            }
            // 将旧的Selector 上触发的事件需要取消
            int interestOps = key.interestOps();
            key.cancel();
            // 把channel重新注册到新的Selector 上
            SelectionKey newKey = key.channel().register(newSelectorTuple.unwrappedSelector, interestOps, a);
            if (a instanceof AbstractNioChannel) {
                // Update SelectionKey
                ((AbstractNioChannel) a).selectionKey = newKey;
            }
            nChannels ++;
        } catch (Exception e) {
            logger.warn("Failed to re-register a Channel to the new Selector.", e);
            if (a instanceof AbstractNioChannel) {
                AbstractNioChannel ch = (AbstractNioChannel) a;
                ch.unsafe().close(ch.unsafe().voidPromise());
            } else {
                @SuppressWarnings("unchecked")
                NioTask<SelectableChannel> task = (NioTask<SelectableChannel>) a;
                invokeChannelUnregistered(task, key, e);
            }
        }
    }

    selector = newSelectorTuple.selector;
    unwrappedSelector = newSelectorTuple.unwrappedSelector;

    try {
        // time to close the old selector as everything else is registered to the new one
        // 关闭旧的Selector
        oldSelector.close();
    } catch (Throwable t) {
        if (logger.isWarnEnabled()) {
            logger.warn("Failed to close the old Selector.", t);
        }
    }

    if (logger.isInfoEnabled()) {
        logger.info("Migrated " + nChannels + " channel(s) to the new Selector.");
    }
}
实际上,在rebuildSelector() 方法中,主要做了以下三件事件。
- 创建了一个新的Selector
- 将原来的Selector中注册的事件全部取消。
- 将可用的事件重新注册到新的Selector,并激活,就这样,Netty 完美的解决了JDK的空轮询bug。
对于ioRatio这个参数的理解 。
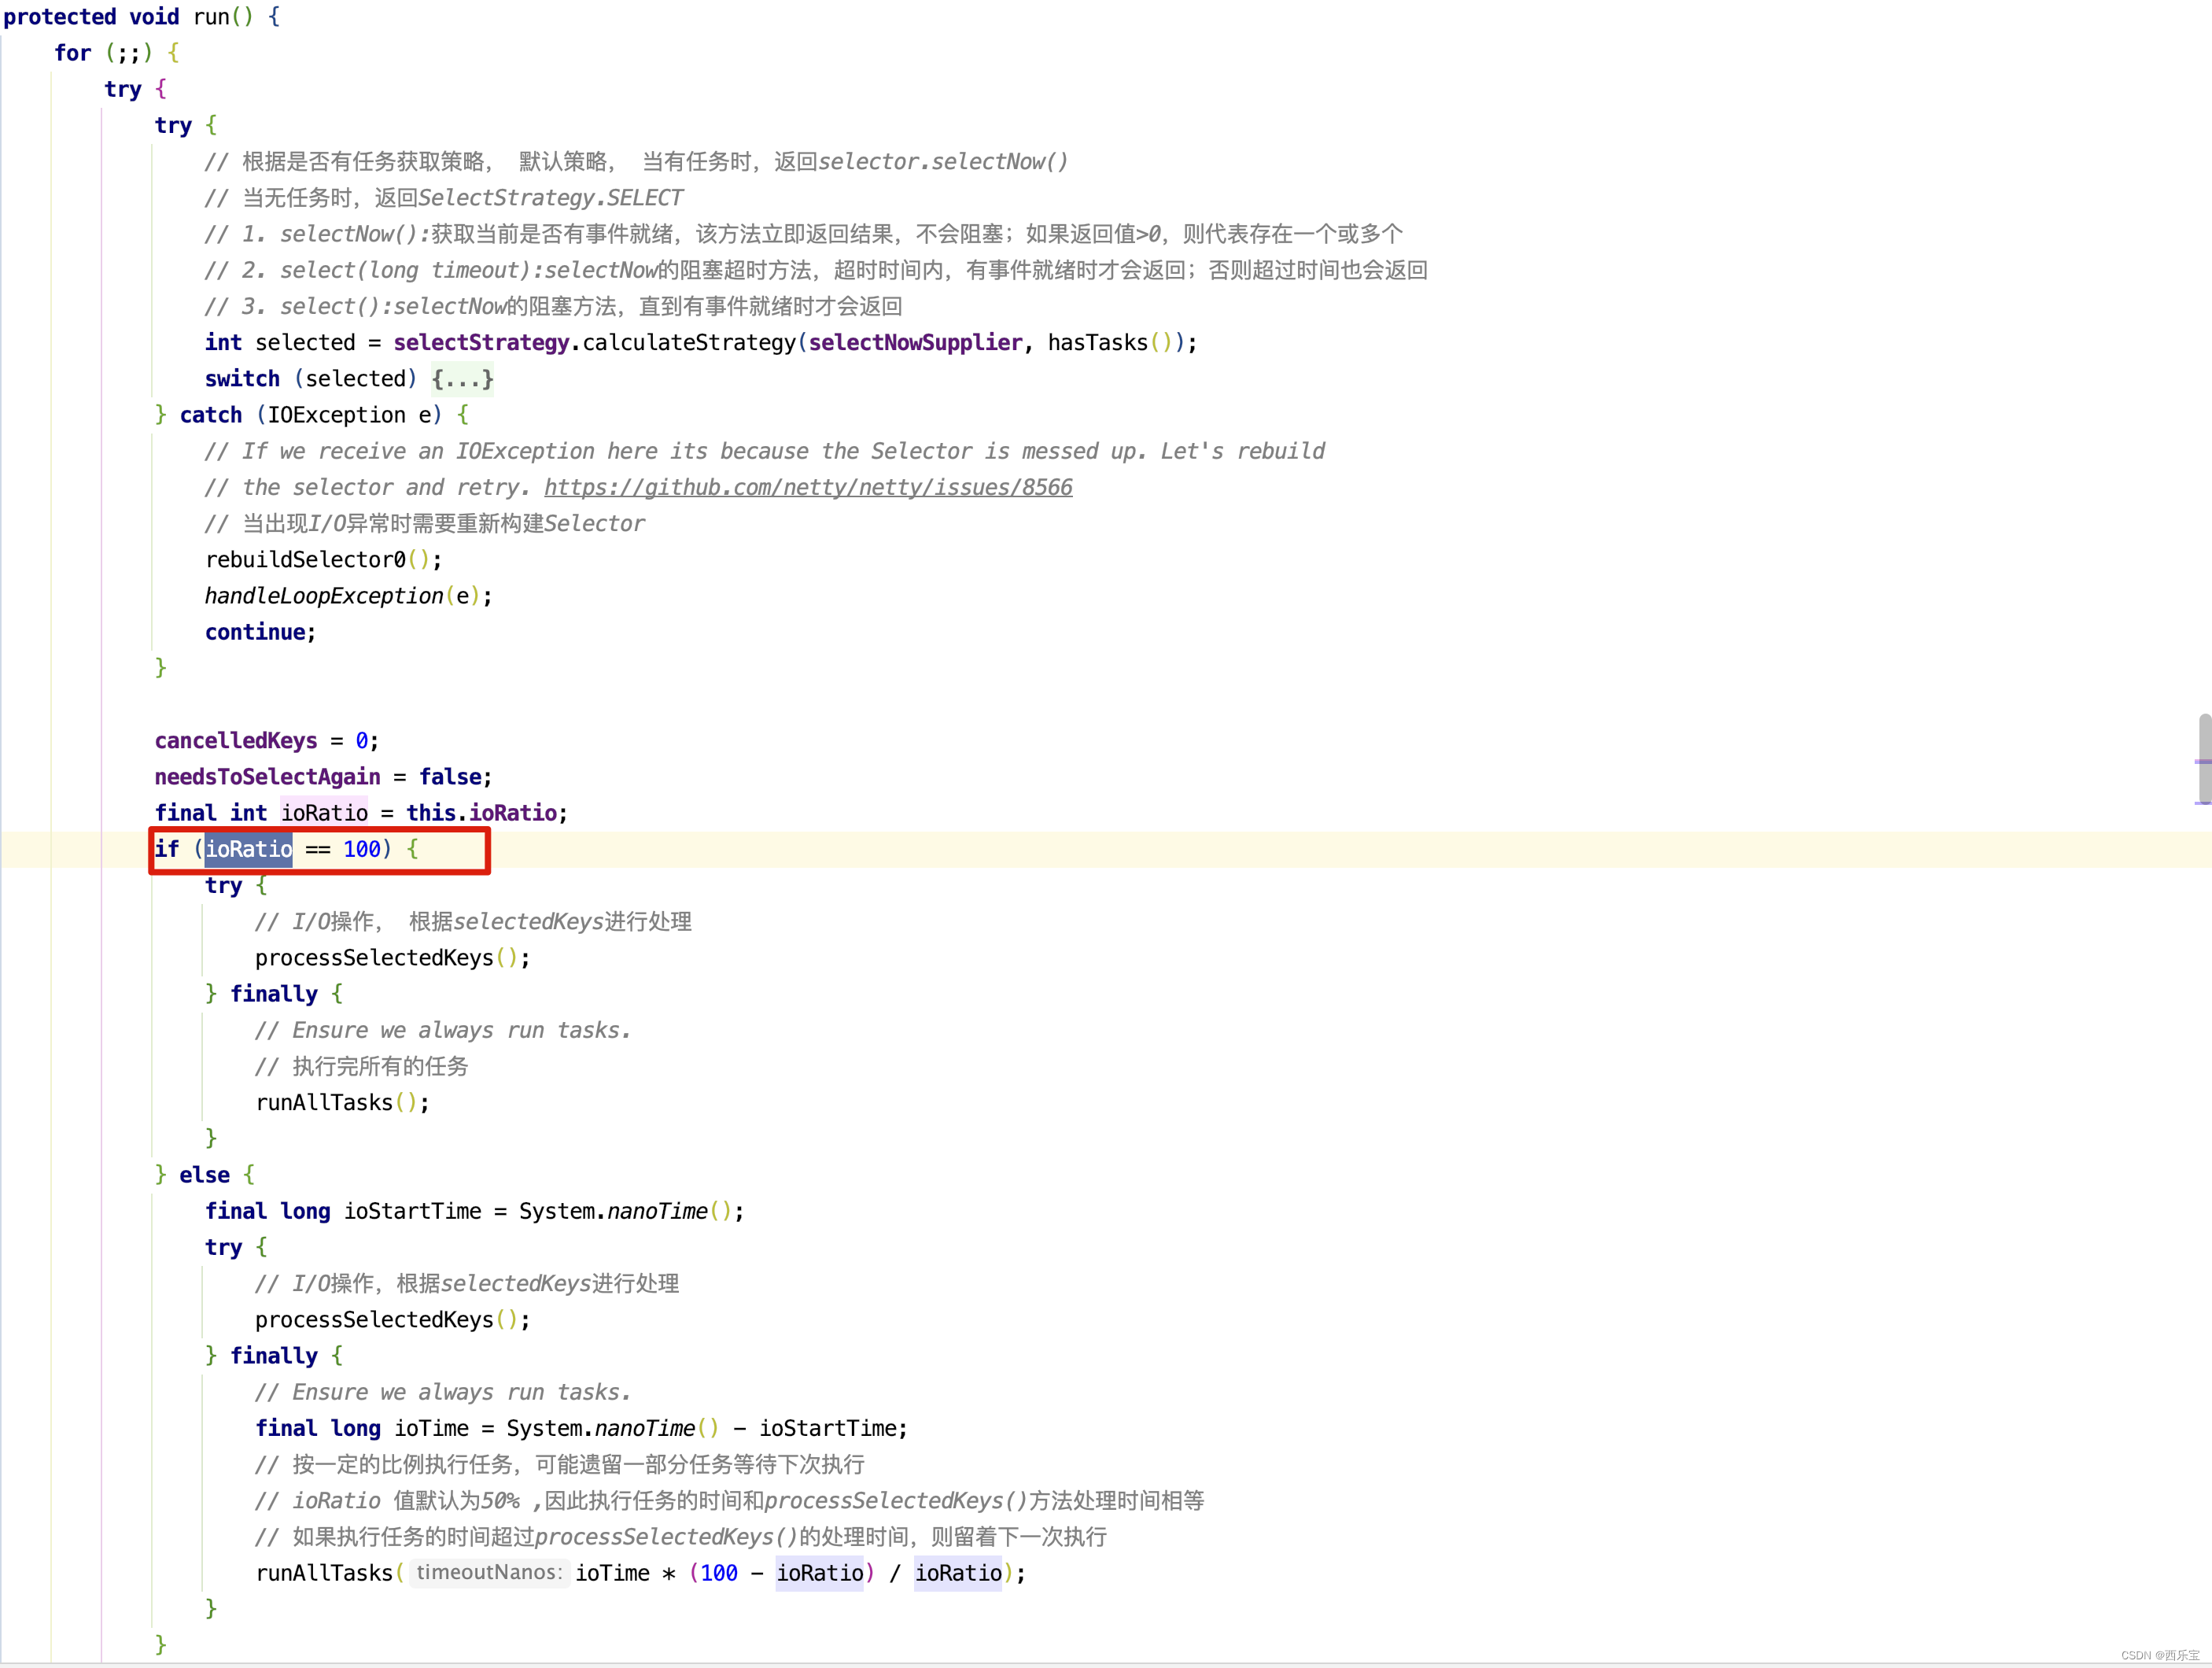
如果ioRatio的值为100,则没有时间概念,先执行完processSelectedKeys()接着执行runAllTasks(),执行完runAllTasks()后再执行processSelectedKeys(),交替执行,但配置了ioRatio比率时,假如比率为60,而processSelectedKeys()的执行时间为6秒,则下次runAllTasks()的执行时间为 6 * (100 - 60) / 60 = 4 秒,但也不一定准确的是只能执行4秒的时间,因为在runAllTasks()方法的内部,每执行完64个任务才检测一次,如前63个任务执行时间为3秒,第64个任务执行时间为2秒,当第64个任务执行完,检测时间有没有大于4秒, 3 + 2 = 5 秒,显然大于,退出任务,但此runAllTasks()总花的时间为5秒。 关于processSelectedKeys()的处理逻辑,后面再来分析,先来分析runAllTasks()方法的处理逻辑 。
protected boolean runAllTasks(long timeoutNanos) {
    // 从定时任务队列中将达到执行时间的task丢到taskQueue队列中
    fetchFromScheduledTaskQueue();
    // 从taskQueue队列获取task
    Runnable task = pollTask();
    // 若task为空
    if (task == null) {
        // 执行tailTasks中的task,做收尾工作
        afterRunningAllTasks();
        return false;
    }
    // 获取执行截止时间
    final long deadline = ScheduledFutureTask.nanoTime() + timeoutNanos;
    // 执行任务个数
    long runTasks = 0;
    // 运行task的最后时间
    long lastExecutionTime;
    for (;;) {
        // 运行task的run()方法
        safeExecute(task);

        runTasks ++;
        // Check timeout every 64 tasks because nanoTime() is relatively expensive.
        // XXX: Hard-coded value - will make it configurable if it is really a problem.
        // 运行64个任务就进行一次是否达到截止时间检查
        // 0x3F 代表63 ,转化为二进制为 0011 1111
        if ((runTasks & 0x3F) == 0) {
            lastExecutionTime = ScheduledFutureTask.nanoTime();
            if (lastExecutionTime >= deadline) {
                break;
            }
        }
        // 再从taskQueue队列中获取task
        task = pollTask();
        // 若没有task了,则更新最后执行时间,并跳出循环
        if (task == null) {
            lastExecutionTime = ScheduledFutureTask.nanoTime();
            break;
        }
    }
    // 收尾工作
    afterRunningAllTasks();
    this.lastExecutionTime = lastExecutionTime;
    return true;
}

protected static void safeExecute(Runnable task) {
    try {
        task.run();
    } catch (Throwable t) {
        logger.warn("A task raised an exception. Task: {}", task, t);
    }
}
第二部分,runAllTasks , 主要目的就是执行taskQueue队列和定时任务的中的任务 , 如心跳检测,异步写操作等,首先NioEventLoop会根据ioRatio(I/O事件与taskQueue运行时间占比)计算任务执行时长,由一个NioEventLoop线程线程需要管理很多的Channel,这些Channel的任务可能非常多, 若要执行完, 则I/O事件可能得不到及时处理,因此每执行64个任务后就会检测执行任务的时间是否已经用完 , 如果执行任务的时间用完了, 就不再执行后续的任务了。
其中的任务,当然包括之前的register0()方法。如下图所示 。

对于register0()方法,还没有分析,接下来进入register0()的具体实现逻辑。
// 在AbstractUnsafe的register0()方法中有关于如何将用户自定义 的Hanlder添加到NioSocket Channel的Handler链表中的方法,核心代 码解读如下:
private void register0(ChannelPromise promise) {
    try {
        // check if the channel is still open as it could be closed in the mean time when the register
        // call was outside of the eventLoop
        if (!promise.setUncancellable() || !ensureOpen(promise)) {
            return;
        }
        boolean firstRegistration = neverRegistered;
        // 此方法调用AbstractNioChannel的doRegister()方法,把NioServerSocketChannel和NioSocketChannel的注册抽象出来
        doRegister();
        neverRegistered = false;
        registered = true;

        // Ensure we call handlerAdded(...) before we actually notify the promise. This is needed as the
        // user may already fire events through the pipeline in the ChannelFutureListener.
        /**
         * 在ServerBootstrapAcceptor的channelRead()方法中把用户定义的Handler 追加到Channel 的管道中(child.pipeline().addLast(childHandler))
         * 此方法会追加一个回调,此时正好会触发这个回调
         * if(!registered){
         *      newCtx.setAddPending();
         *      callHandlerCallbackLater(newCtx,true);
         *      return this;
         * }
         */

        pipeline.invokeHandlerAddedIfNeeded();

        // 此方法会触发promise
       	safeSetSuccess(promise);
        pipeline.fireChannelRegistered();
        // Only fire a channelActive if the channel has never been registered. This prevents firing
        // multiple channel actives if the channel is deregistered and re-registered.
        if (isActive()) {
            if (firstRegistration) {
                // 此方法会触发HeadContext的channelActive()方法,并最终调用AbstractNioChannel的doBeginRead()方法注册监听OP_READ事件
                pipeline.fireChannelActive();
            } else if (config().isAutoRead()) {
                // This channel was registered before and autoRead() is set. This means we need to begin read
                // again so that we process inbound data.
                //
                // See https://github.com/netty/netty/issues/4805
                beginRead();
            }
        }
    } catch (Throwable t) {
        // Close the channel directly to avoid FD leak.
        closeForcibly();
        closeFuture.setClosed();
        safeSetFailure(promise, t);
    }
}
// doRegister()方法在AbstractUnsafe的register0()方法中被调用
protected void doRegister() throws Exception {
    boolean selected = false;
    for (;;) {
        try {
            /**
             * 通过javaChannel()方法获取具体的NioChannel
             * 把Channel 注册到EventLoop线程的Selector上
             * 对于注册后返回的SelectionKey,需要为其设置Channel 感兴趣的事件
             */
            selectionKey = javaChannel().register(eventLoop().unwrappedSelector(), 0, this);
            return;
        } catch (CancelledKeyException e) {
            if (!selected) {
                // Force the Selector to select now as the "canceled" SelectionKey may still be
                // cached and not removed because no Select.select(..) operation was called yet.
                // 由于尚未调用select.select(...)
                // 因此可能仍在缓存而未删除但已经取消SelectionKey
                // 强制调用selector.selectNow()方法
                // 将已经取消的selectionKey从Selector 上删除
                eventLoop().selectNow();
                selected = true;
            } else {
                // We forced a select operation on the selector before but the SelectionKey is still cached
                // for whatever reason. JDK bug ?
                // 只有第一次抛出此异常,才能调用select.selectNow()进行取消
                // 如果调用selector.selectNow()还有取消缓存,则可能是JDK的一个bug
                throw e;
            }
        }
    }
}
对于javaChannel()这个方法需要注意。
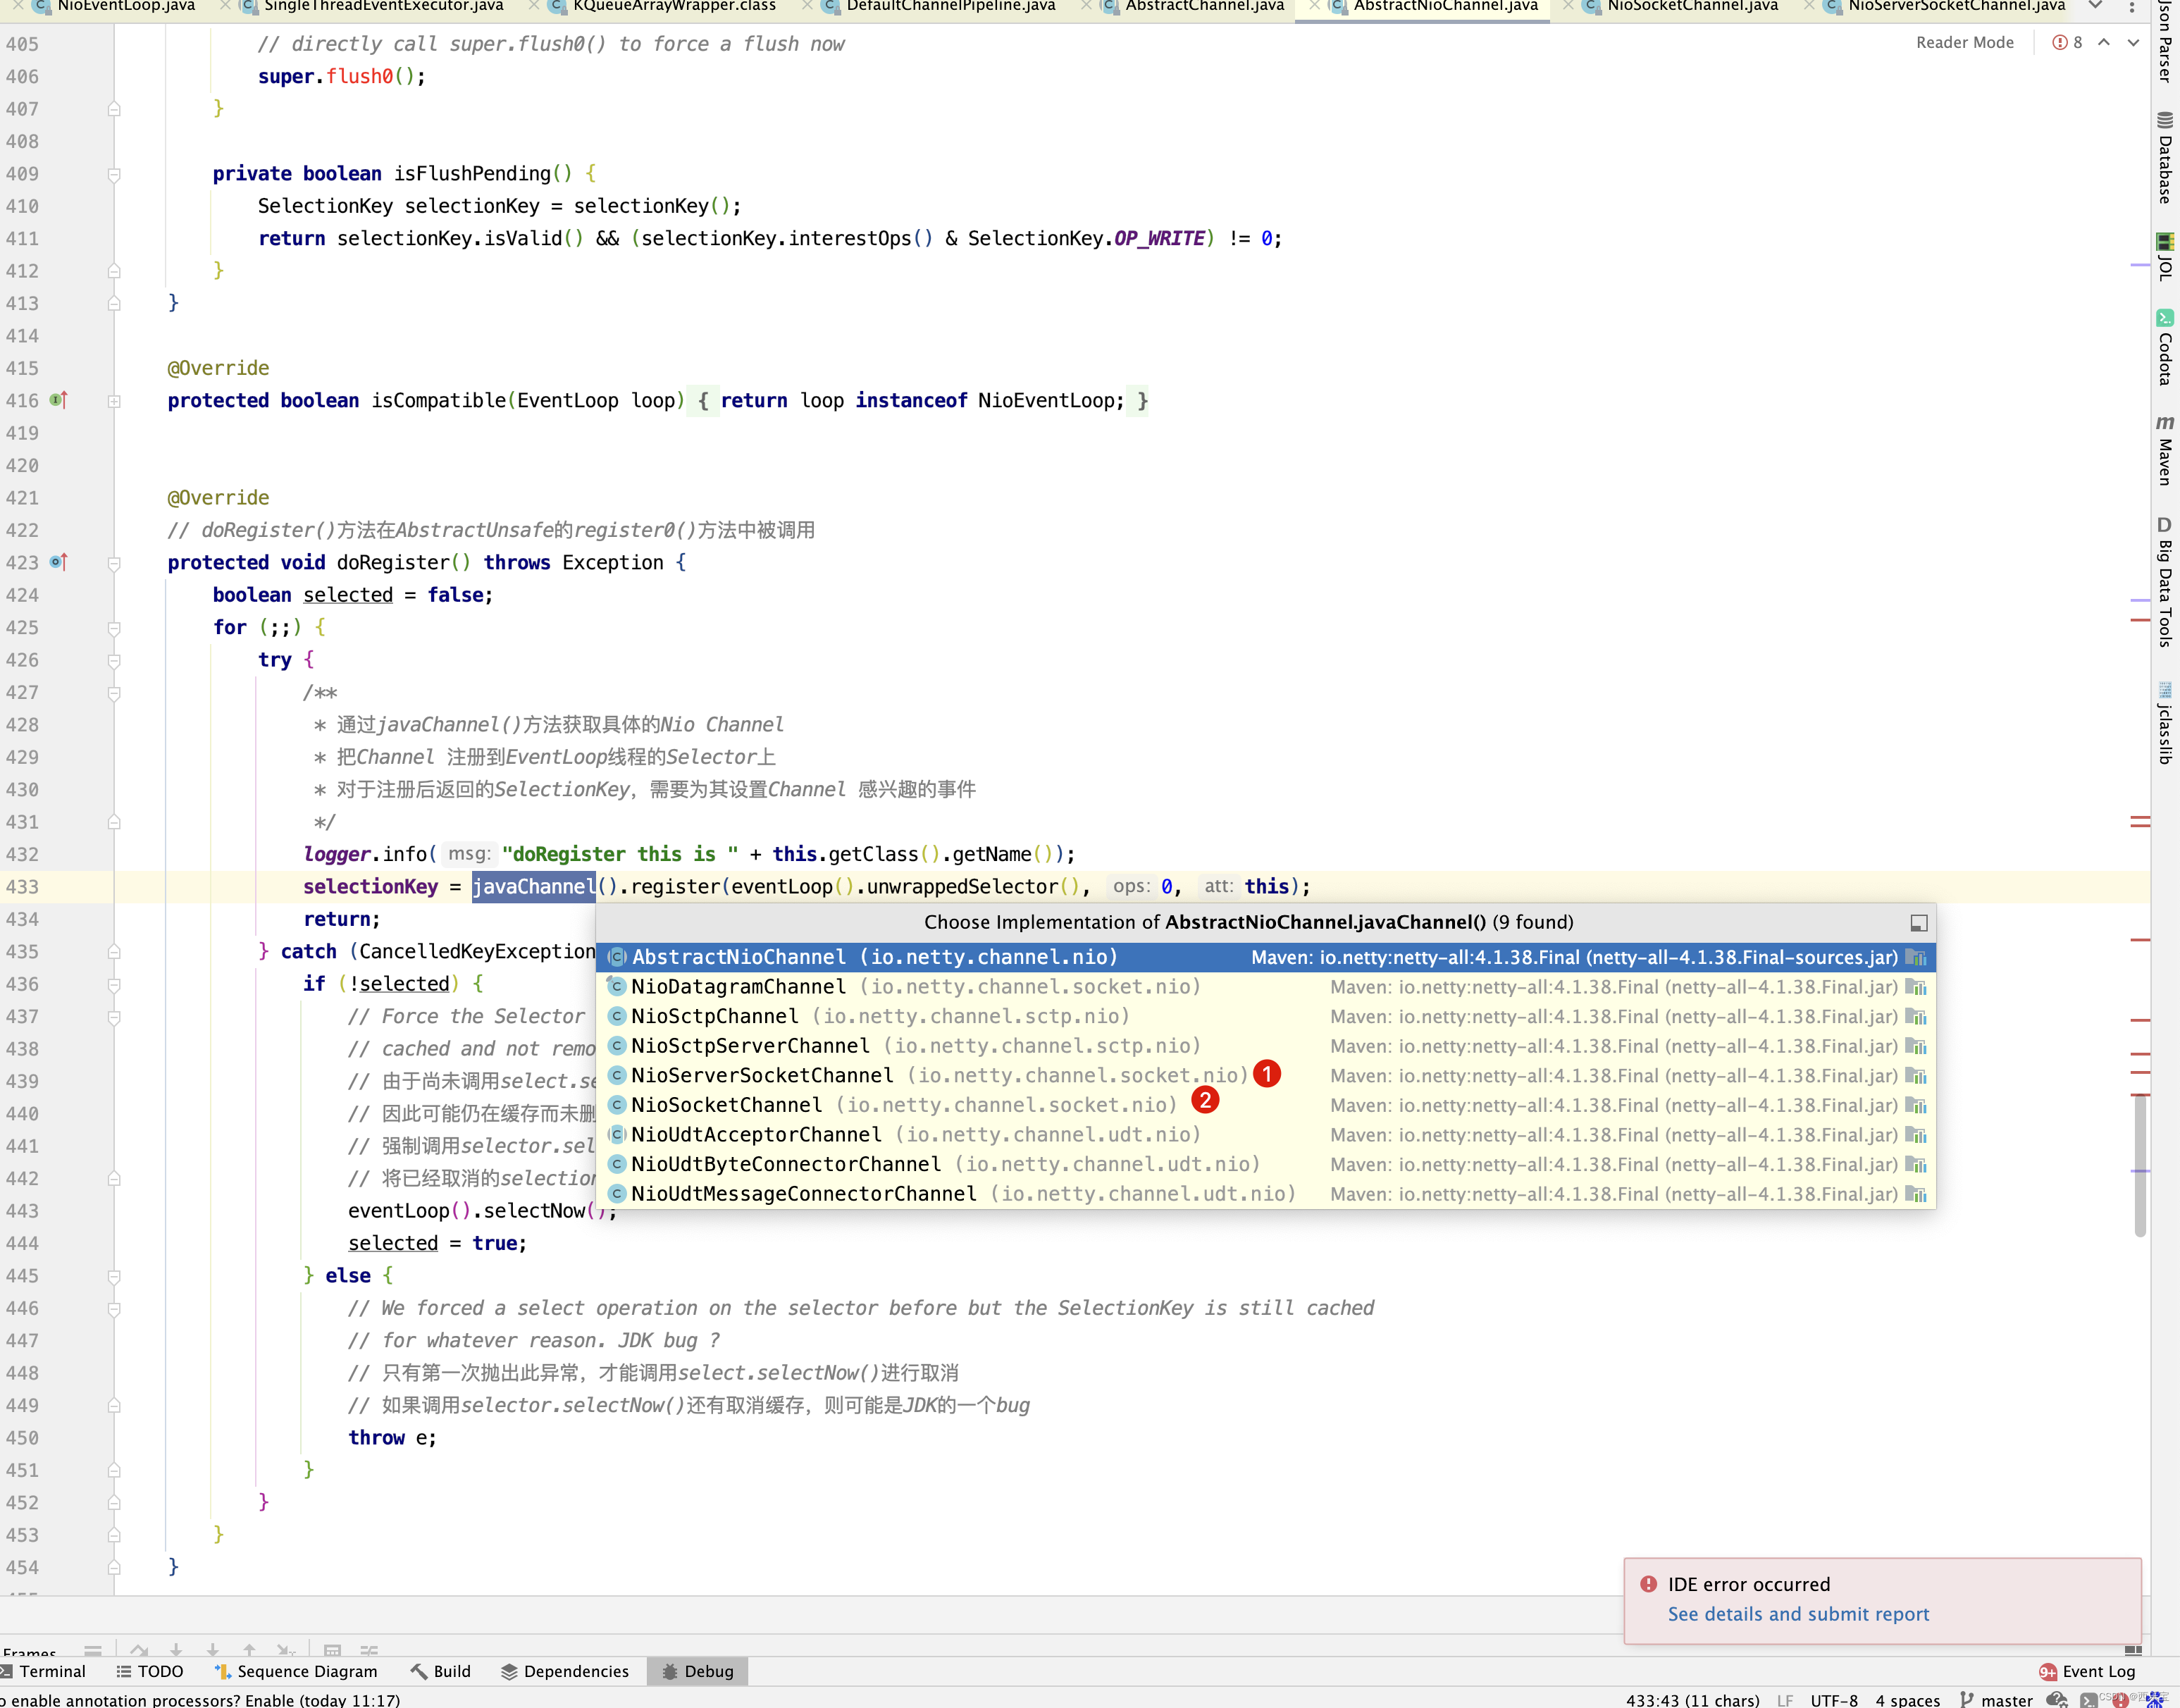
如果当前channel是NioServerSocketChannel,则返回的是ServerSocketChannel,如果当前是NioSocketChannel,则返回的是SocketChannel,但无论是无论是bossGroup还是workerGroup,都调用其相应的Channel的register方法,还有一点需要注意,这些传入感兴趣的事件为0 ,并不是OP_READ,OP_WRITE,OP_CONNECT,OP_ACCEPT事件,那什么时候注册成这些事件的呢? 留着疑问,后面来分析 。 当然register()方法的第三个参数为this,也就是SocketChannel本身,先记着,后面会有用。
接下来分析invokeHandlerAddedIfNeeded()方法,在之前提到过, pipeline为DefaultChannelPipeline,因此进入它的invokeHandlerAddedIfNeeded()方法 。
final void invokeHandlerAddedIfNeeded() {
    assert channel.eventLoop().inEventLoop();
    // firstRegistration的初始化值为true
    if (firstRegistration) {
        firstRegistration = false;
        // We are now registered to the EventLoop. It's time to call the callbacks for the ChannelHandlers,
        // that were added before the registration was done.
        callHandlerAddedForAllHandlers();
    }
}
上面就是普通的方法调用,接下来进入callHandlerAddedForAllHandlers()方法的研究。
private void callHandlerAddedForAllHandlers() {
    final PendingHandlerCallback pendingHandlerCallbackHead;
    synchronized (this) {
        assert !registered;

        // This Channel itself was registered.
        registered = true;

        pendingHandlerCallbackHead = this.pendingHandlerCallbackHead;
        // Null out so it can be GC'ed.
        this.pendingHandlerCallbackHead = null;
    }

    // This must happen outside of the synchronized(...) block as otherwise handlerAdded(...) may be called while
    // holding the lock and so produce a deadlock if handlerAdded(...) will try to add another handler from outside
    // the EventLoop.
    PendingHandlerCallback task = pendingHandlerCallbackHead;
    while (task != null) {
        task.execute();
        task = task.next;
    }
}
首先要明白pendingHandlerCallbackHead是什么,是什么时候添加的呢? 在代码中寻寻觅觅。 callHandlerCallbackLater()中打断点 。

pendingHandlerCallbackHead在callHandlerCallbackLater()初始化,而什么时候被调用的呢?
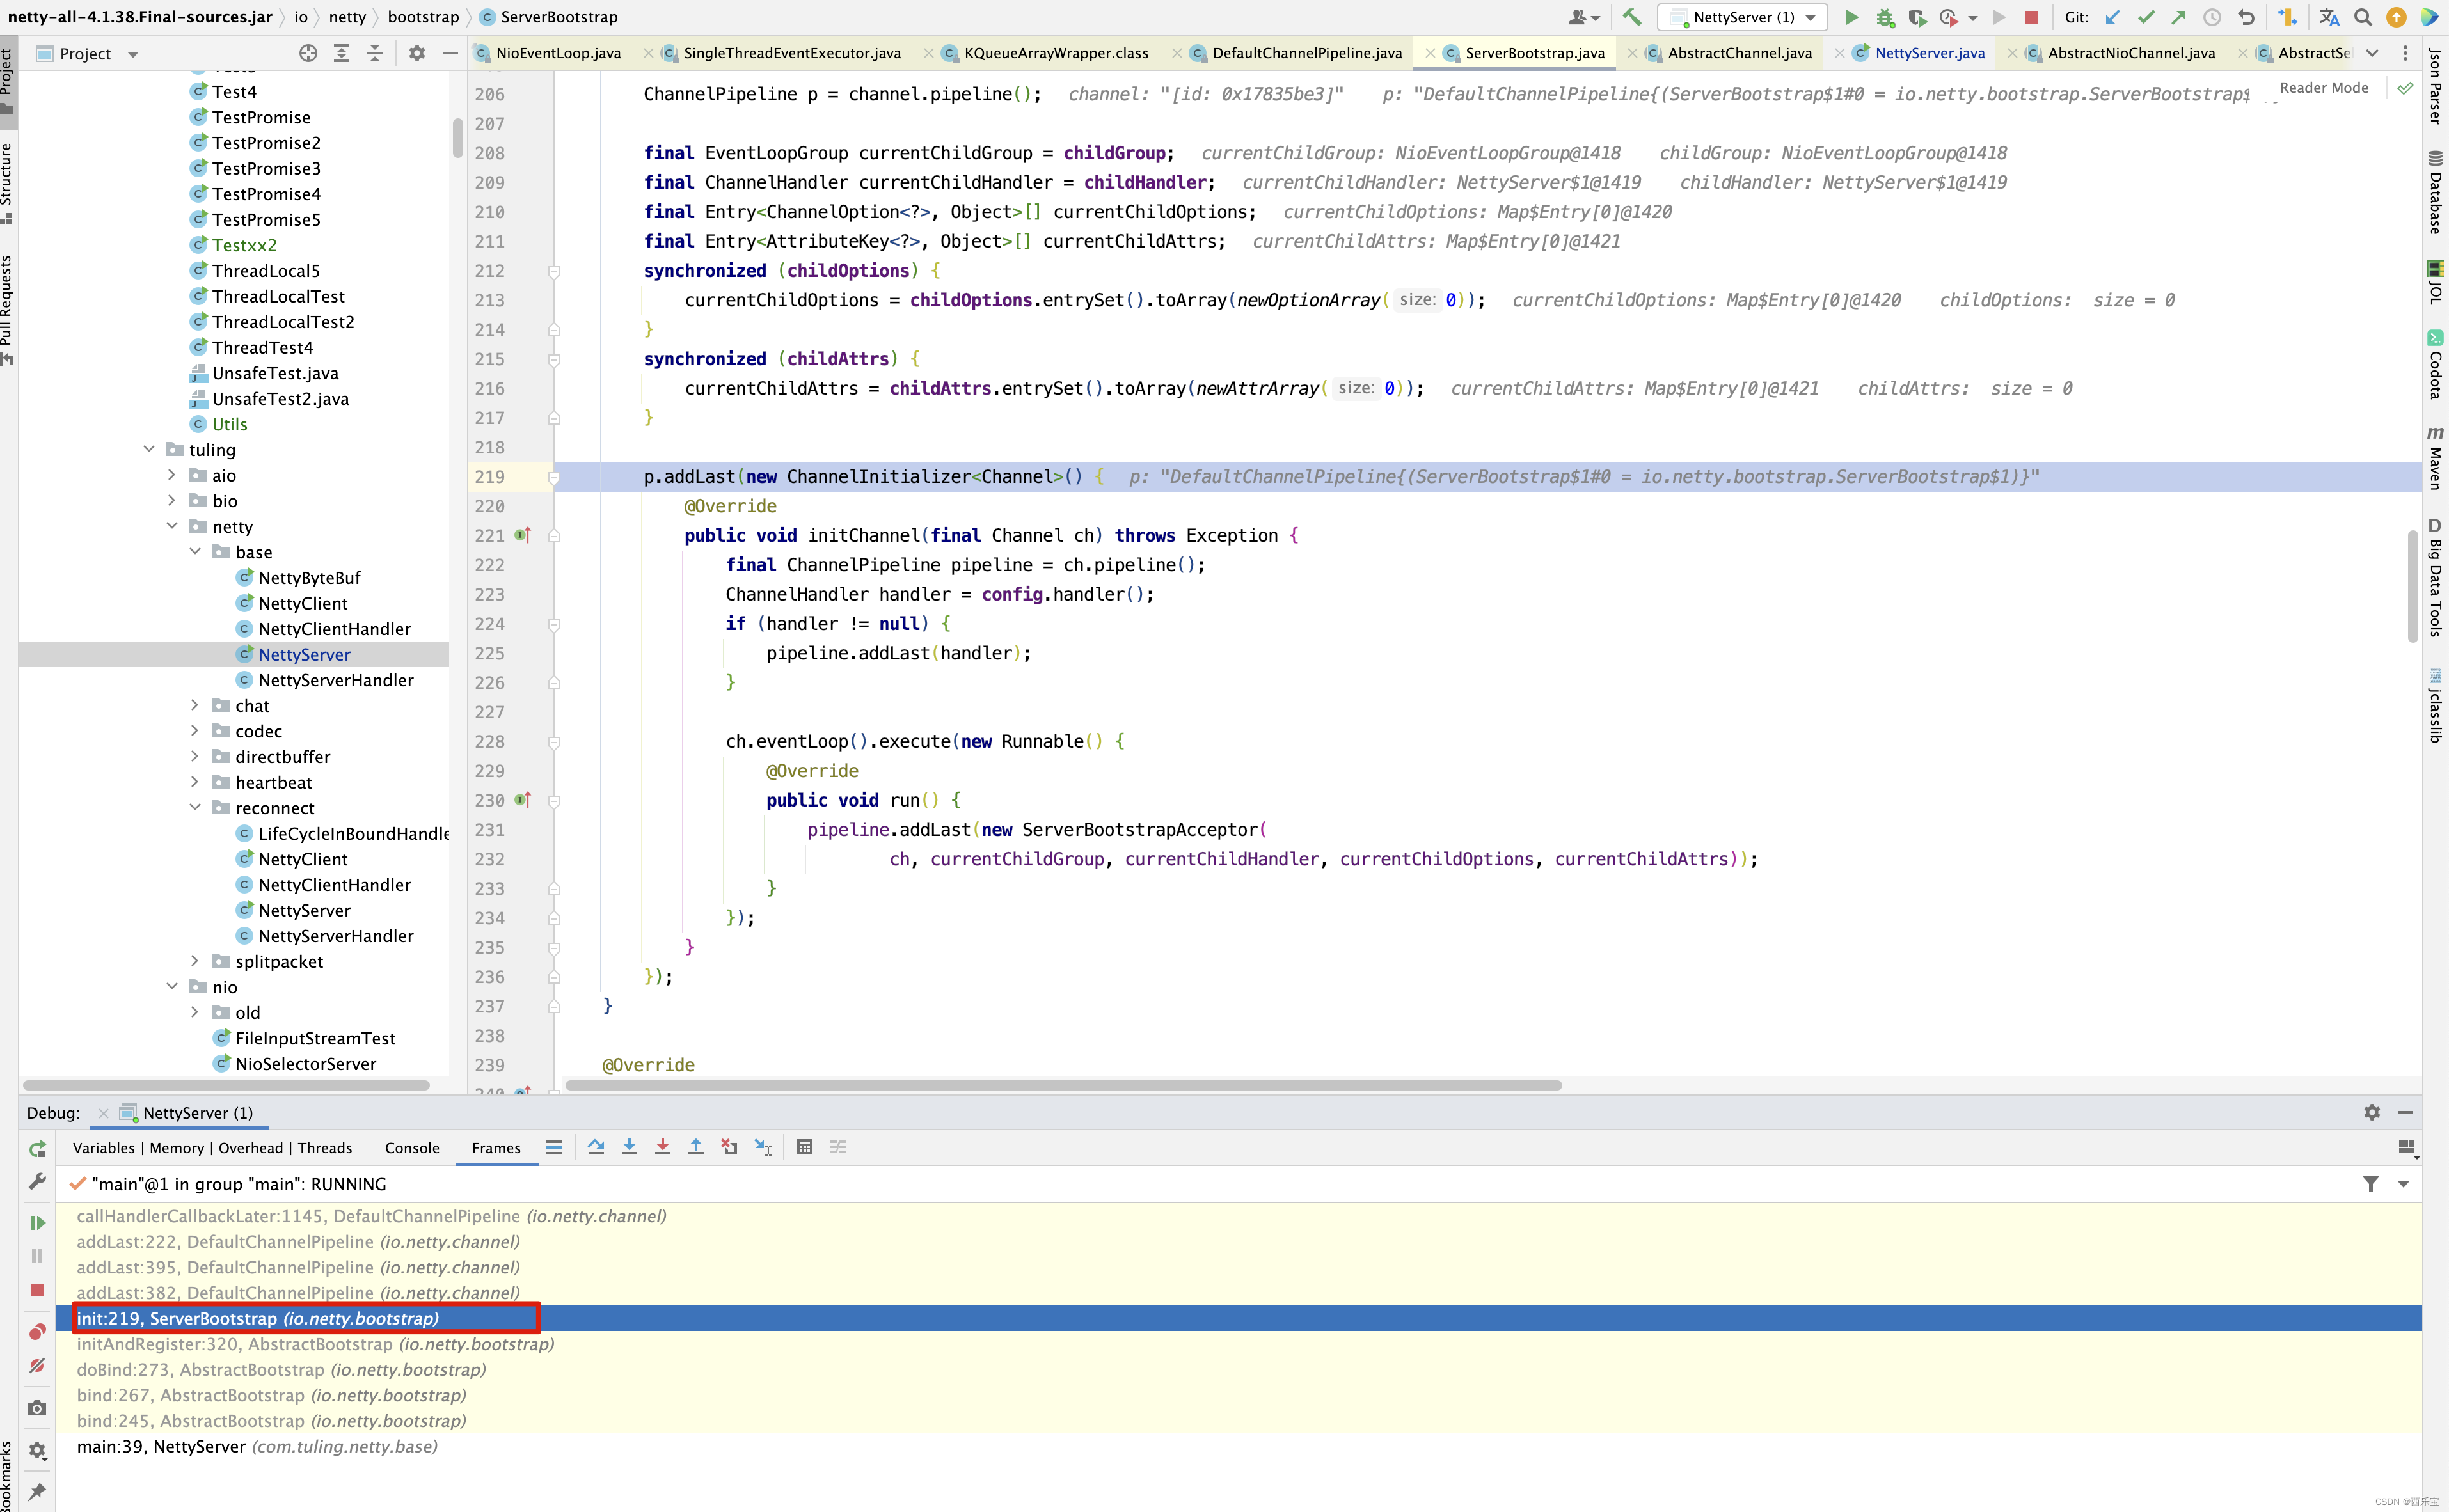
也就是在ServerBootstrap的init()方法中,p.addLast(new ChannelInitializer<Channel>() {…} 这一行代码执行时,初始化了pendingHandlerCallbackHead。
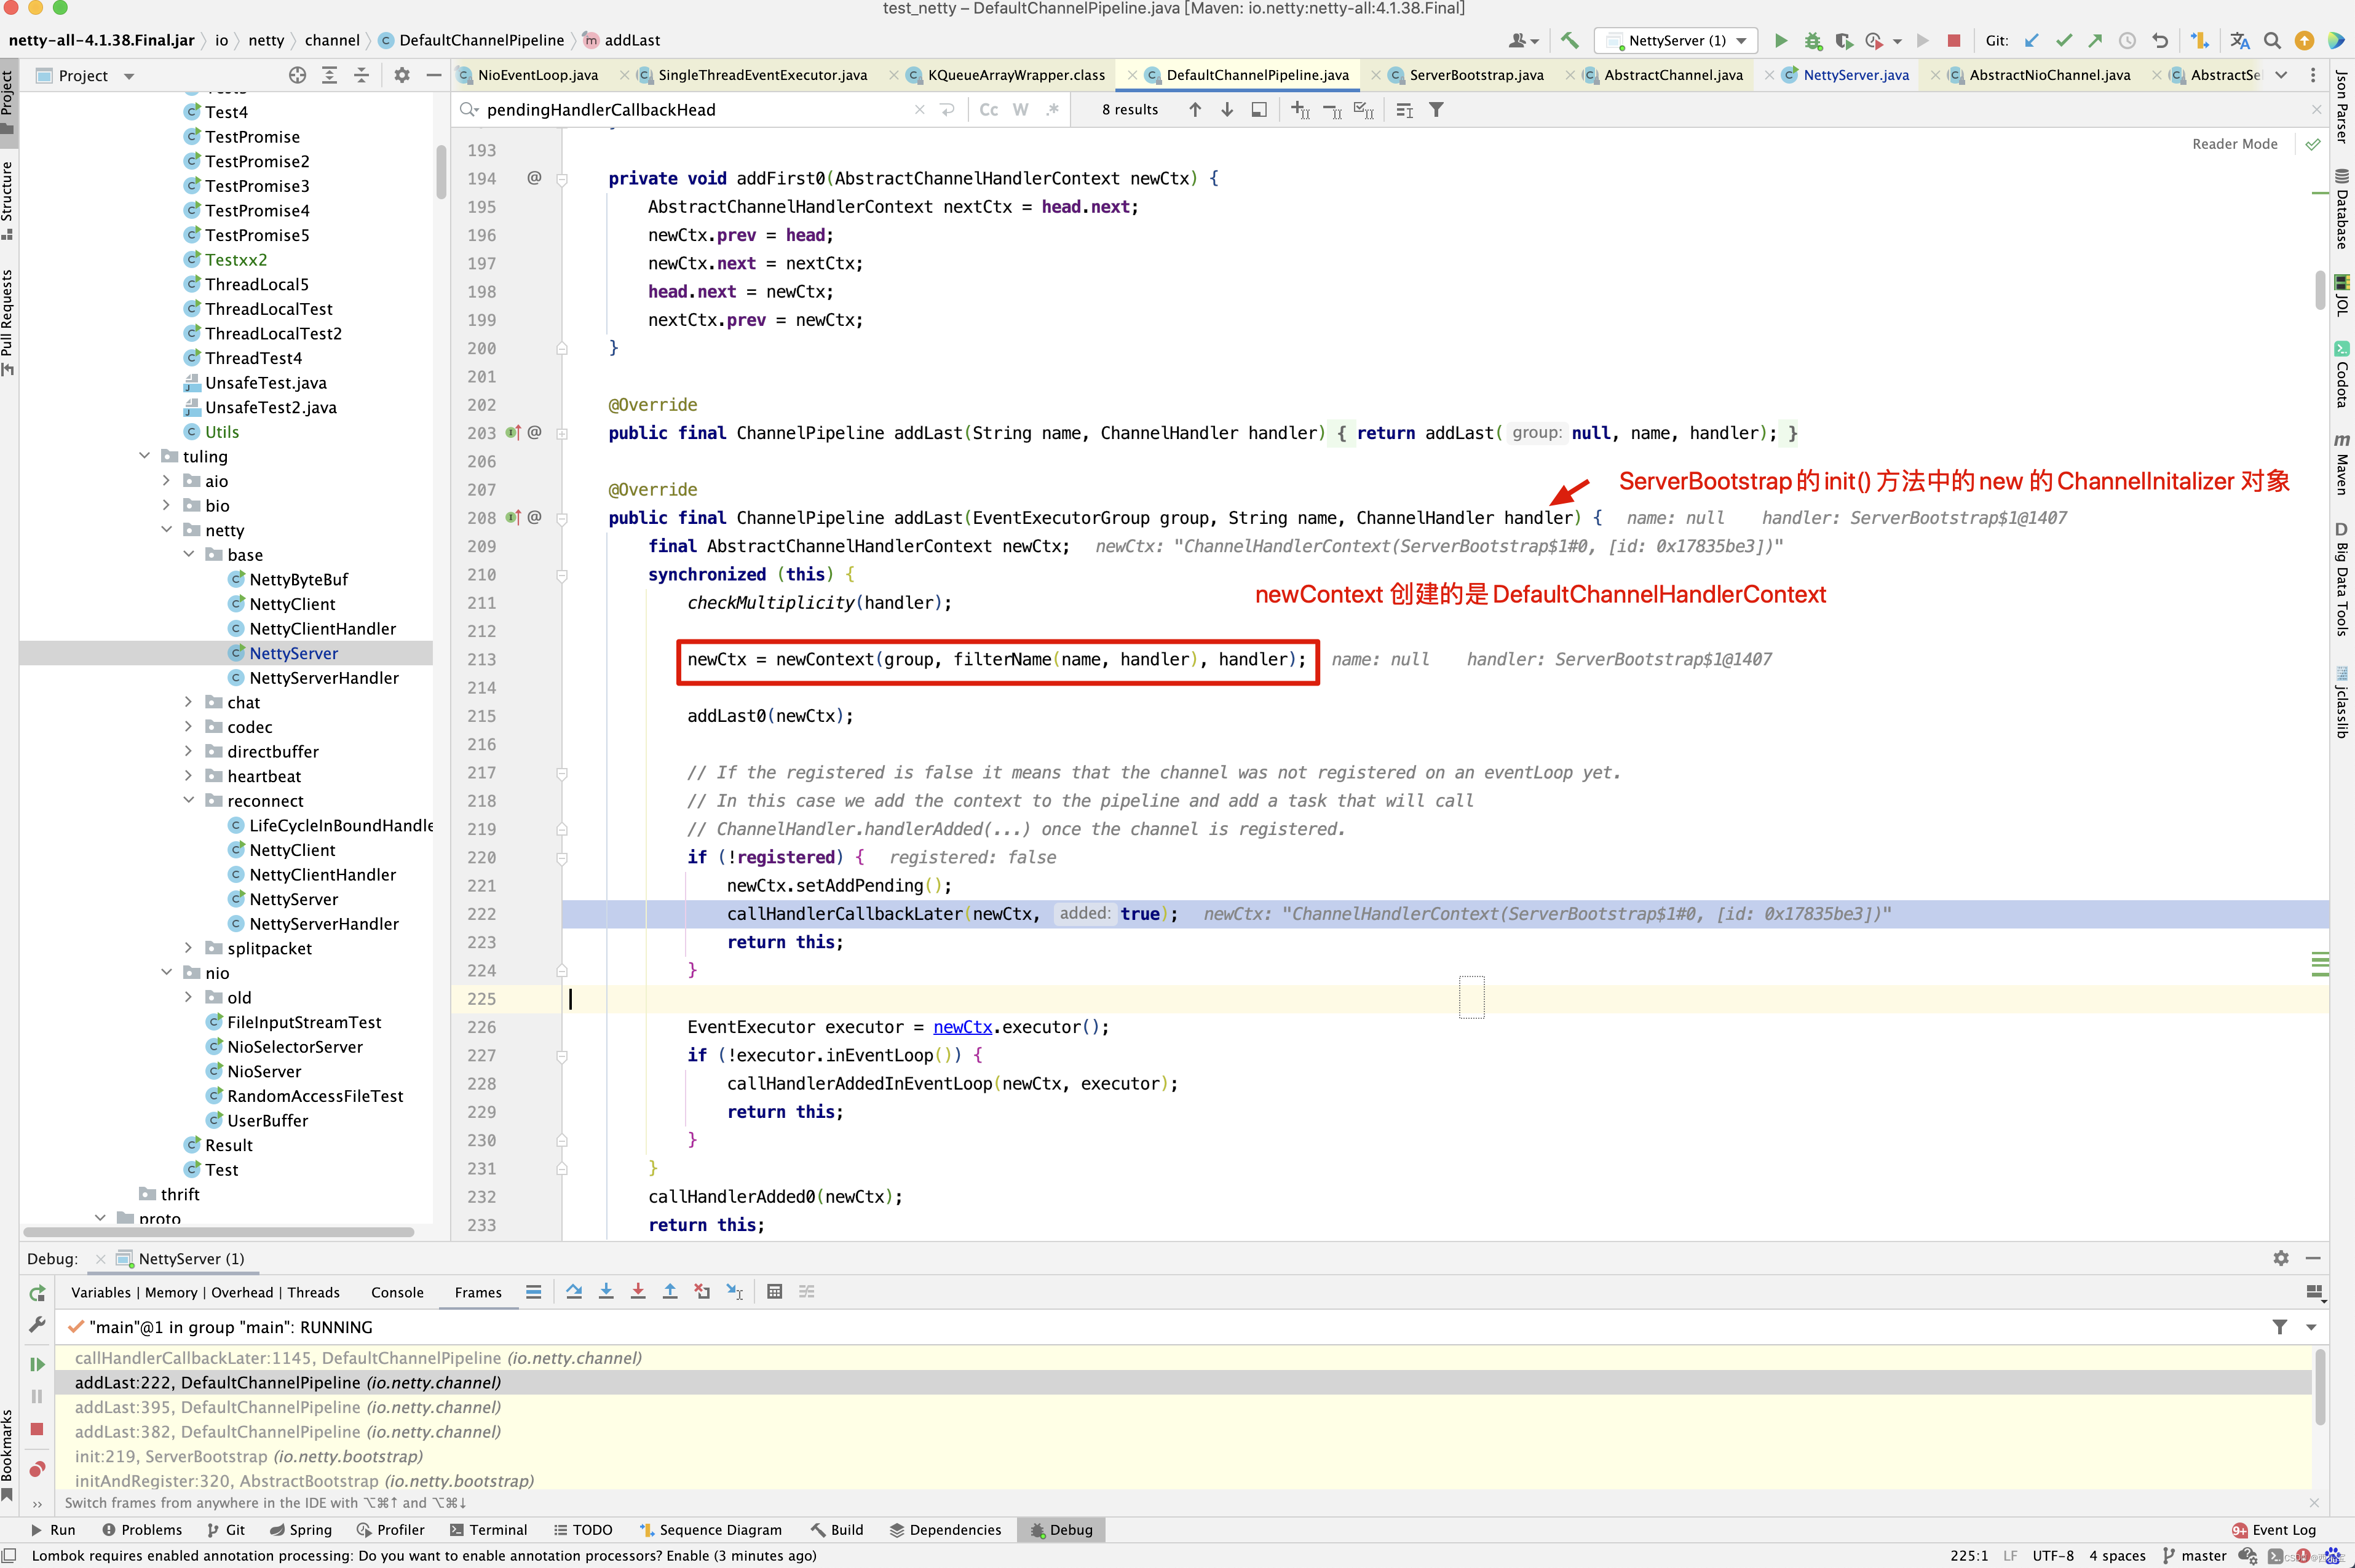
接下来进入PendingHandlerAddedTask的execute()方法 。
private final class PendingHandlerAddedTask extends PendingHandlerCallback {
    PendingHandlerAddedTask(AbstractChannelHandlerContext ctx) {
        super(ctx);
    }
    @Override
    public void run() {
        callHandlerAdded0(ctx);
    }
    @Override
    void execute() {
        EventExecutor executor = ctx.executor();
        // executor 就是NioEventloop,而此方法正好是
        // NioEventLoop runAllTasks()方法内部调用的,因此executor.inEventLoop()
        // 值为true
        if (executor.inEventLoop()) {
            callHandlerAdded0(ctx);
        } else {
            try {
                executor.execute(this);
            } catch (RejectedExecutionException e) {
                if (logger.isWarnEnabled()) {
                    logger.warn(
                            "Can't invoke handlerAdded() as the EventExecutor {} rejected it, removing handler {}.",
                            executor, ctx.name(), e);
                }
                remove0(ctx);
                ctx.setRemoved();
            }
        }
    }
}
大家可能晕了,上面加粗代码又是什么 ? 进入executor()方法 。
AbstractChannelHandlerContext#
public EventExecutor executor() {
    if (executor == null) {
        return channel().eventLoop();
    } else {
        return executor;
    }
}

AbstractNioChannel#
public NioEventLoop eventLoop() {
    return (NioEventLoop) super.eventLoop();
}

AbstractChannel#
public EventLoop eventLoop() {
    EventLoop eventLoop = this.eventLoop;
    if (eventLoop == null) {
        throw new IllegalStateException("channel not registered to an event loop");
    }
    return eventLoop;
}
executor最终来源于AbstractNioChannel的eventLoop属性,那eventLoop属性又是什么时候初始化的呢? 在代码中寻寻觅觅,发现是在ServerBootstrap的doBind()方法中内初始化。
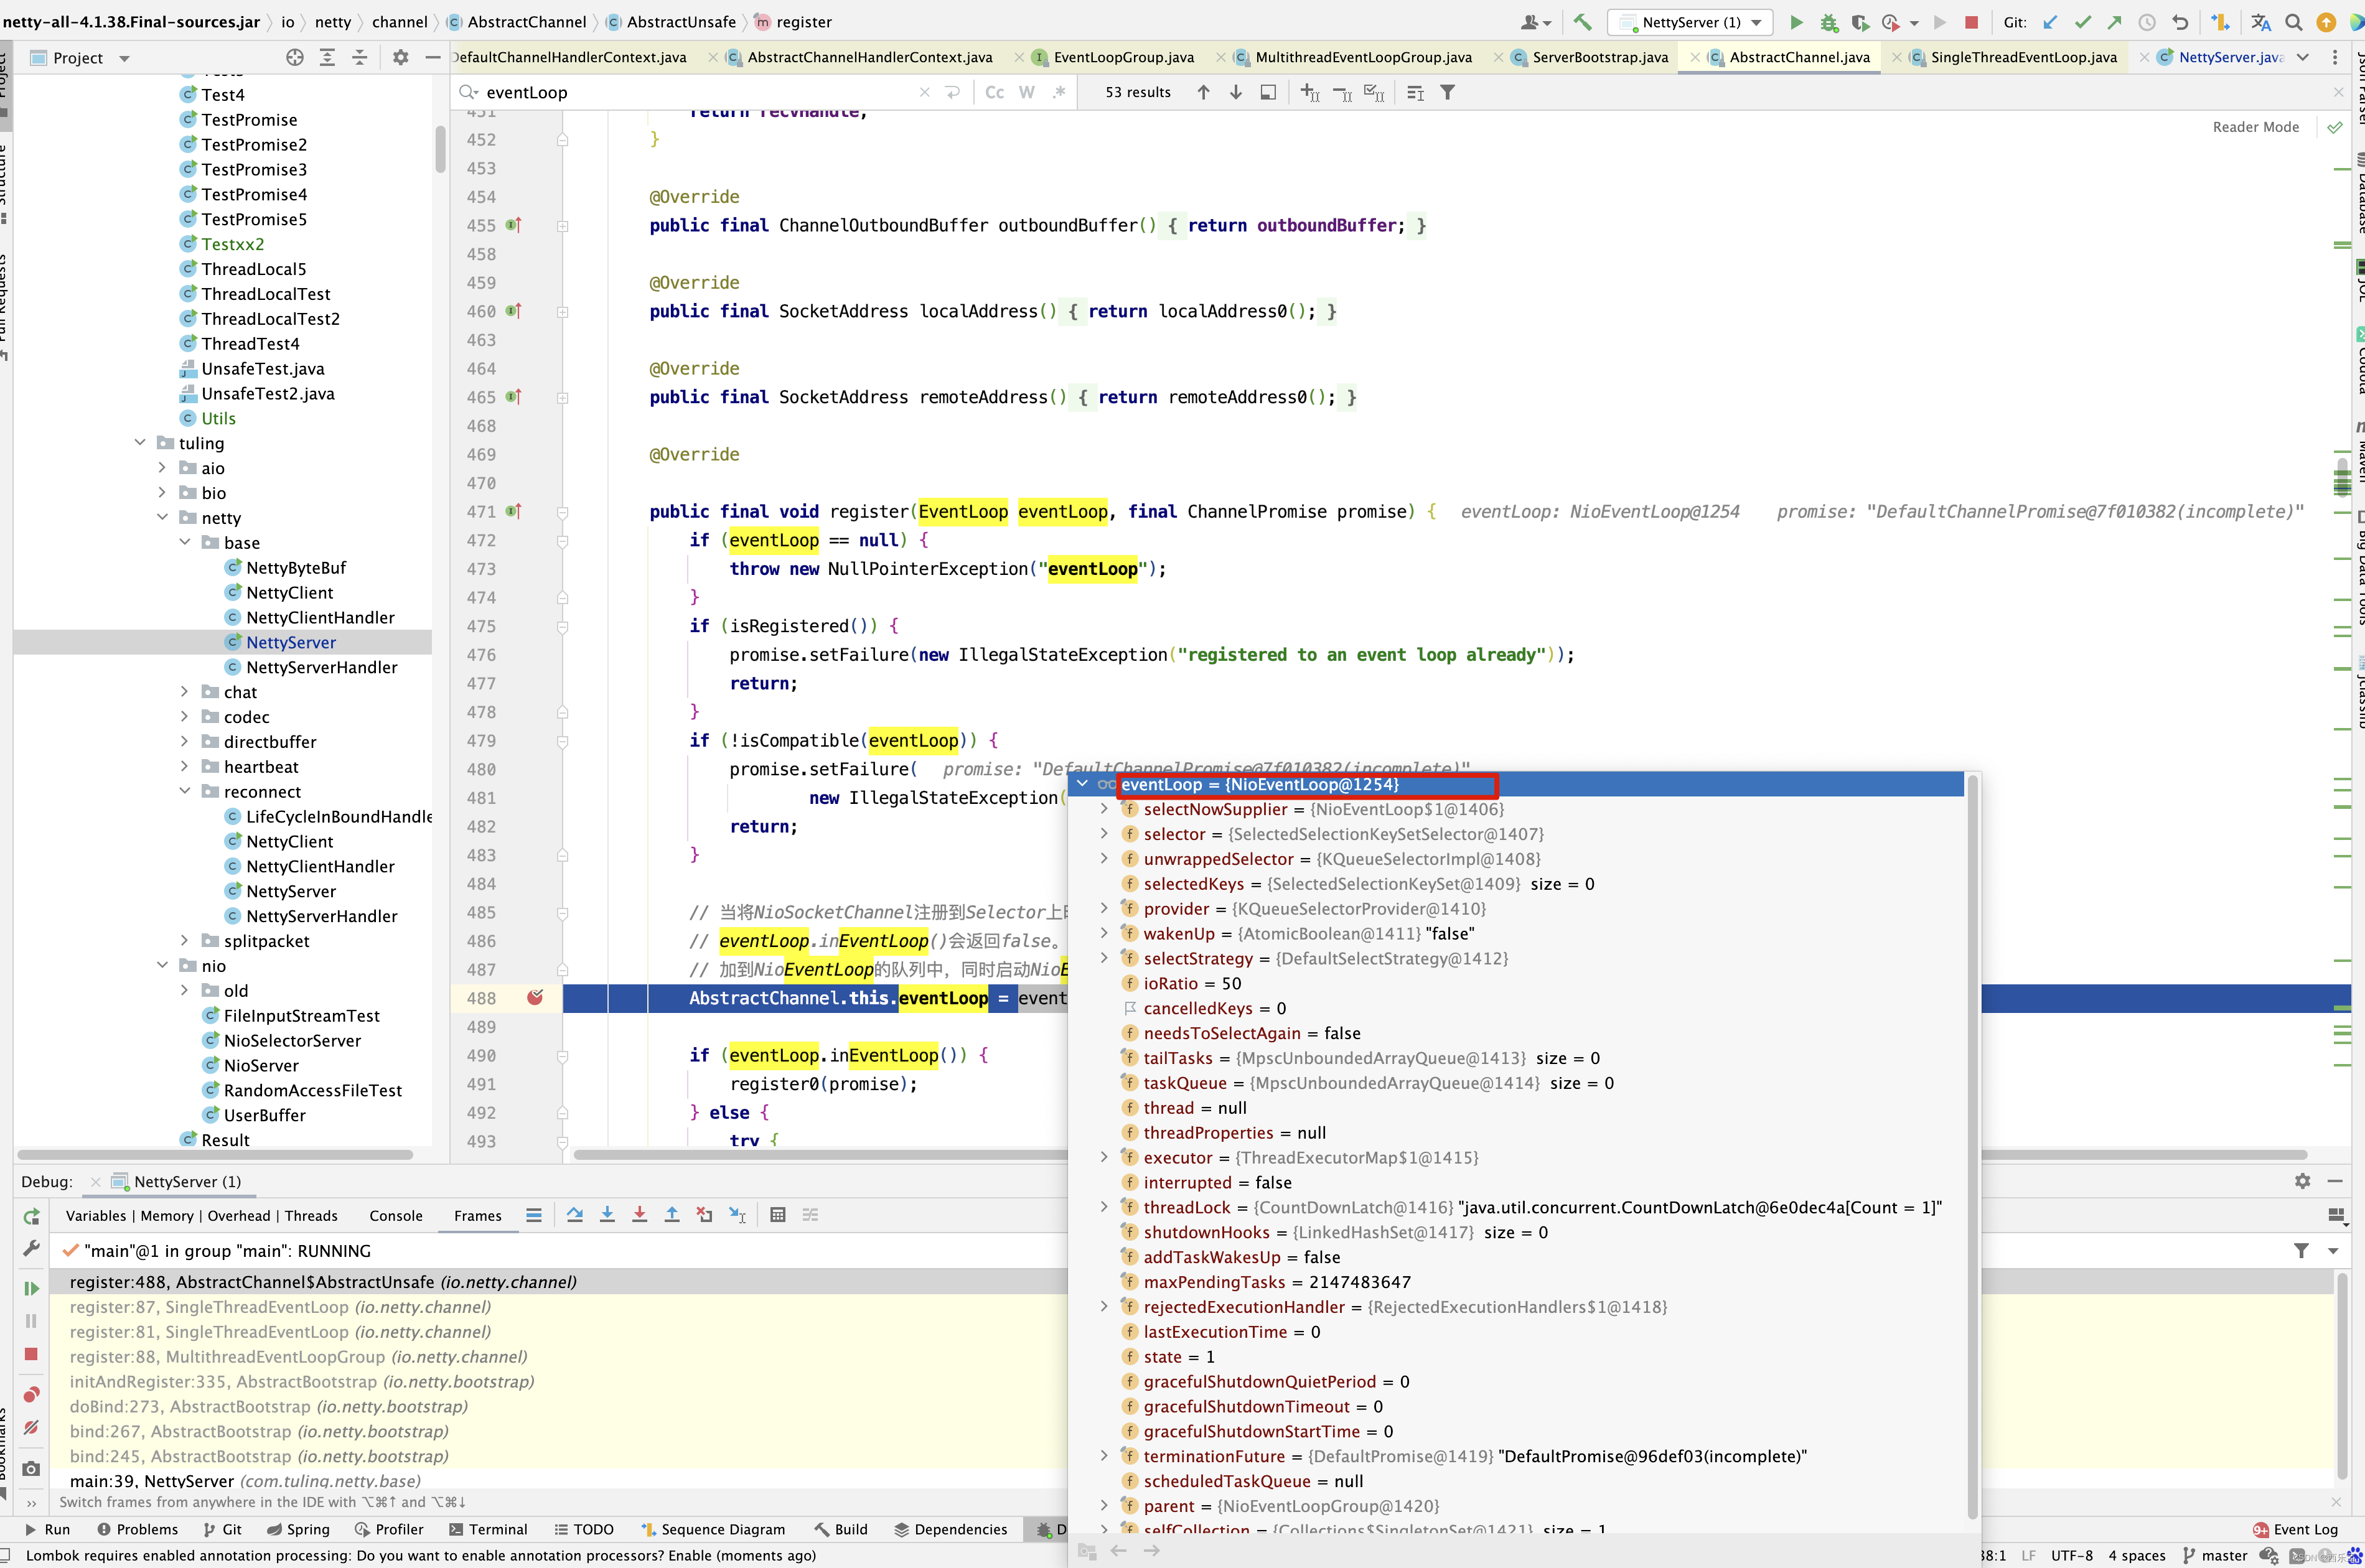
eventLoop的值又来源于chooser选择器。 关于chooser选择器,他的原理之前已经分析过。 这里就不再赘述 ,通过不断的回顾之前的代码,大家有没有发现之前看不懂的代码,逻辑开始慢慢的清晰了。

言归正传,回到之前的代码 。
private void callHandlerAdded0(final AbstractChannelHandlerContext ctx) {
    try {
        ctx.callHandlerAdded();
    } catch (Throwable t) {
        boolean removed = false;
        try {
            remove0(ctx);
            ctx.callHandlerRemoved();
            removed = true;
        } catch (Throwable t2) {
            if (logger.isWarnEnabled()) {
                logger.warn("Failed to remove a handler: " + ctx.name(), t2);
            }
        }

        if (removed) {
            fireExceptionCaught(new ChannelPipelineException(
                    ctx.handler().getClass().getName() +
                    ".handlerAdded() has thrown an exception; removed.", t));
        } else {
            fireExceptionCaught(new ChannelPipelineException(
                    ctx.handler().getClass().getName() +
                    ".handlerAdded() has thrown an exception; also failed to remove.", t));
        }
    }
}
当然,上面主要调用了callHandlerAdded()方法,接下来进入callHandlerAdded()这个方法 。
final void callHandlerAdded() throws Exception {
    // We must call setAddComplete before calling handlerAdded. Otherwise if the handlerAdded method generates
    // any pipeline events ctx.handler() will miss them because the state will not allow it.
    if (setAddComplete()) {
        handler().handlerAdded(this);
    }
}
接着进入handlerAdded()方法 。
public void handlerAdded(ChannelHandlerContext ctx) throws Exception {
	// 在AbstractUnsafe的register0()方法中,channel的registered已经被设置为true
    if (ctx.channel().isRegistered()) {
        // This should always be true with our current DefaultChannelPipeline implementation.
        // The good thing about calling initChannel(...) in handlerAdded(...) is that there will be no ordering
        // surprises if a ChannelInitializer will add another ChannelInitializer. This is as all handlers
        // will be added in the expected order.
        if (initChannel(ctx)) {

            // We are done with init the Channel, removing the initializer now.
            removeState(ctx);
        }
    }
}
private boolean initChannel(ChannelHandlerContext ctx) throws Exception {
    if (initMap.add(ctx)) { // Guard against re-entrance.
        try {
            initChannel((C) ctx.channel());
        } catch (Throwable cause) {
            // Explicitly call exceptionCaught(...) as we removed the handler before calling initChannel(...).
            // We do so to prevent multiple calls to initChannel(...).
            exceptionCaught(ctx, cause);
        } finally {
            ChannelPipeline pipeline = ctx.pipeline();
            if (pipeline.context(this) != null) {
            	// 将handler从pipeline链表中移除掉
                pipeline.remove(this);
            }
        }
        return true;
    }
    return false;
}
之前说过, handler()就是ServerBootstrap 的init方法中new 的ChannelInitializer。
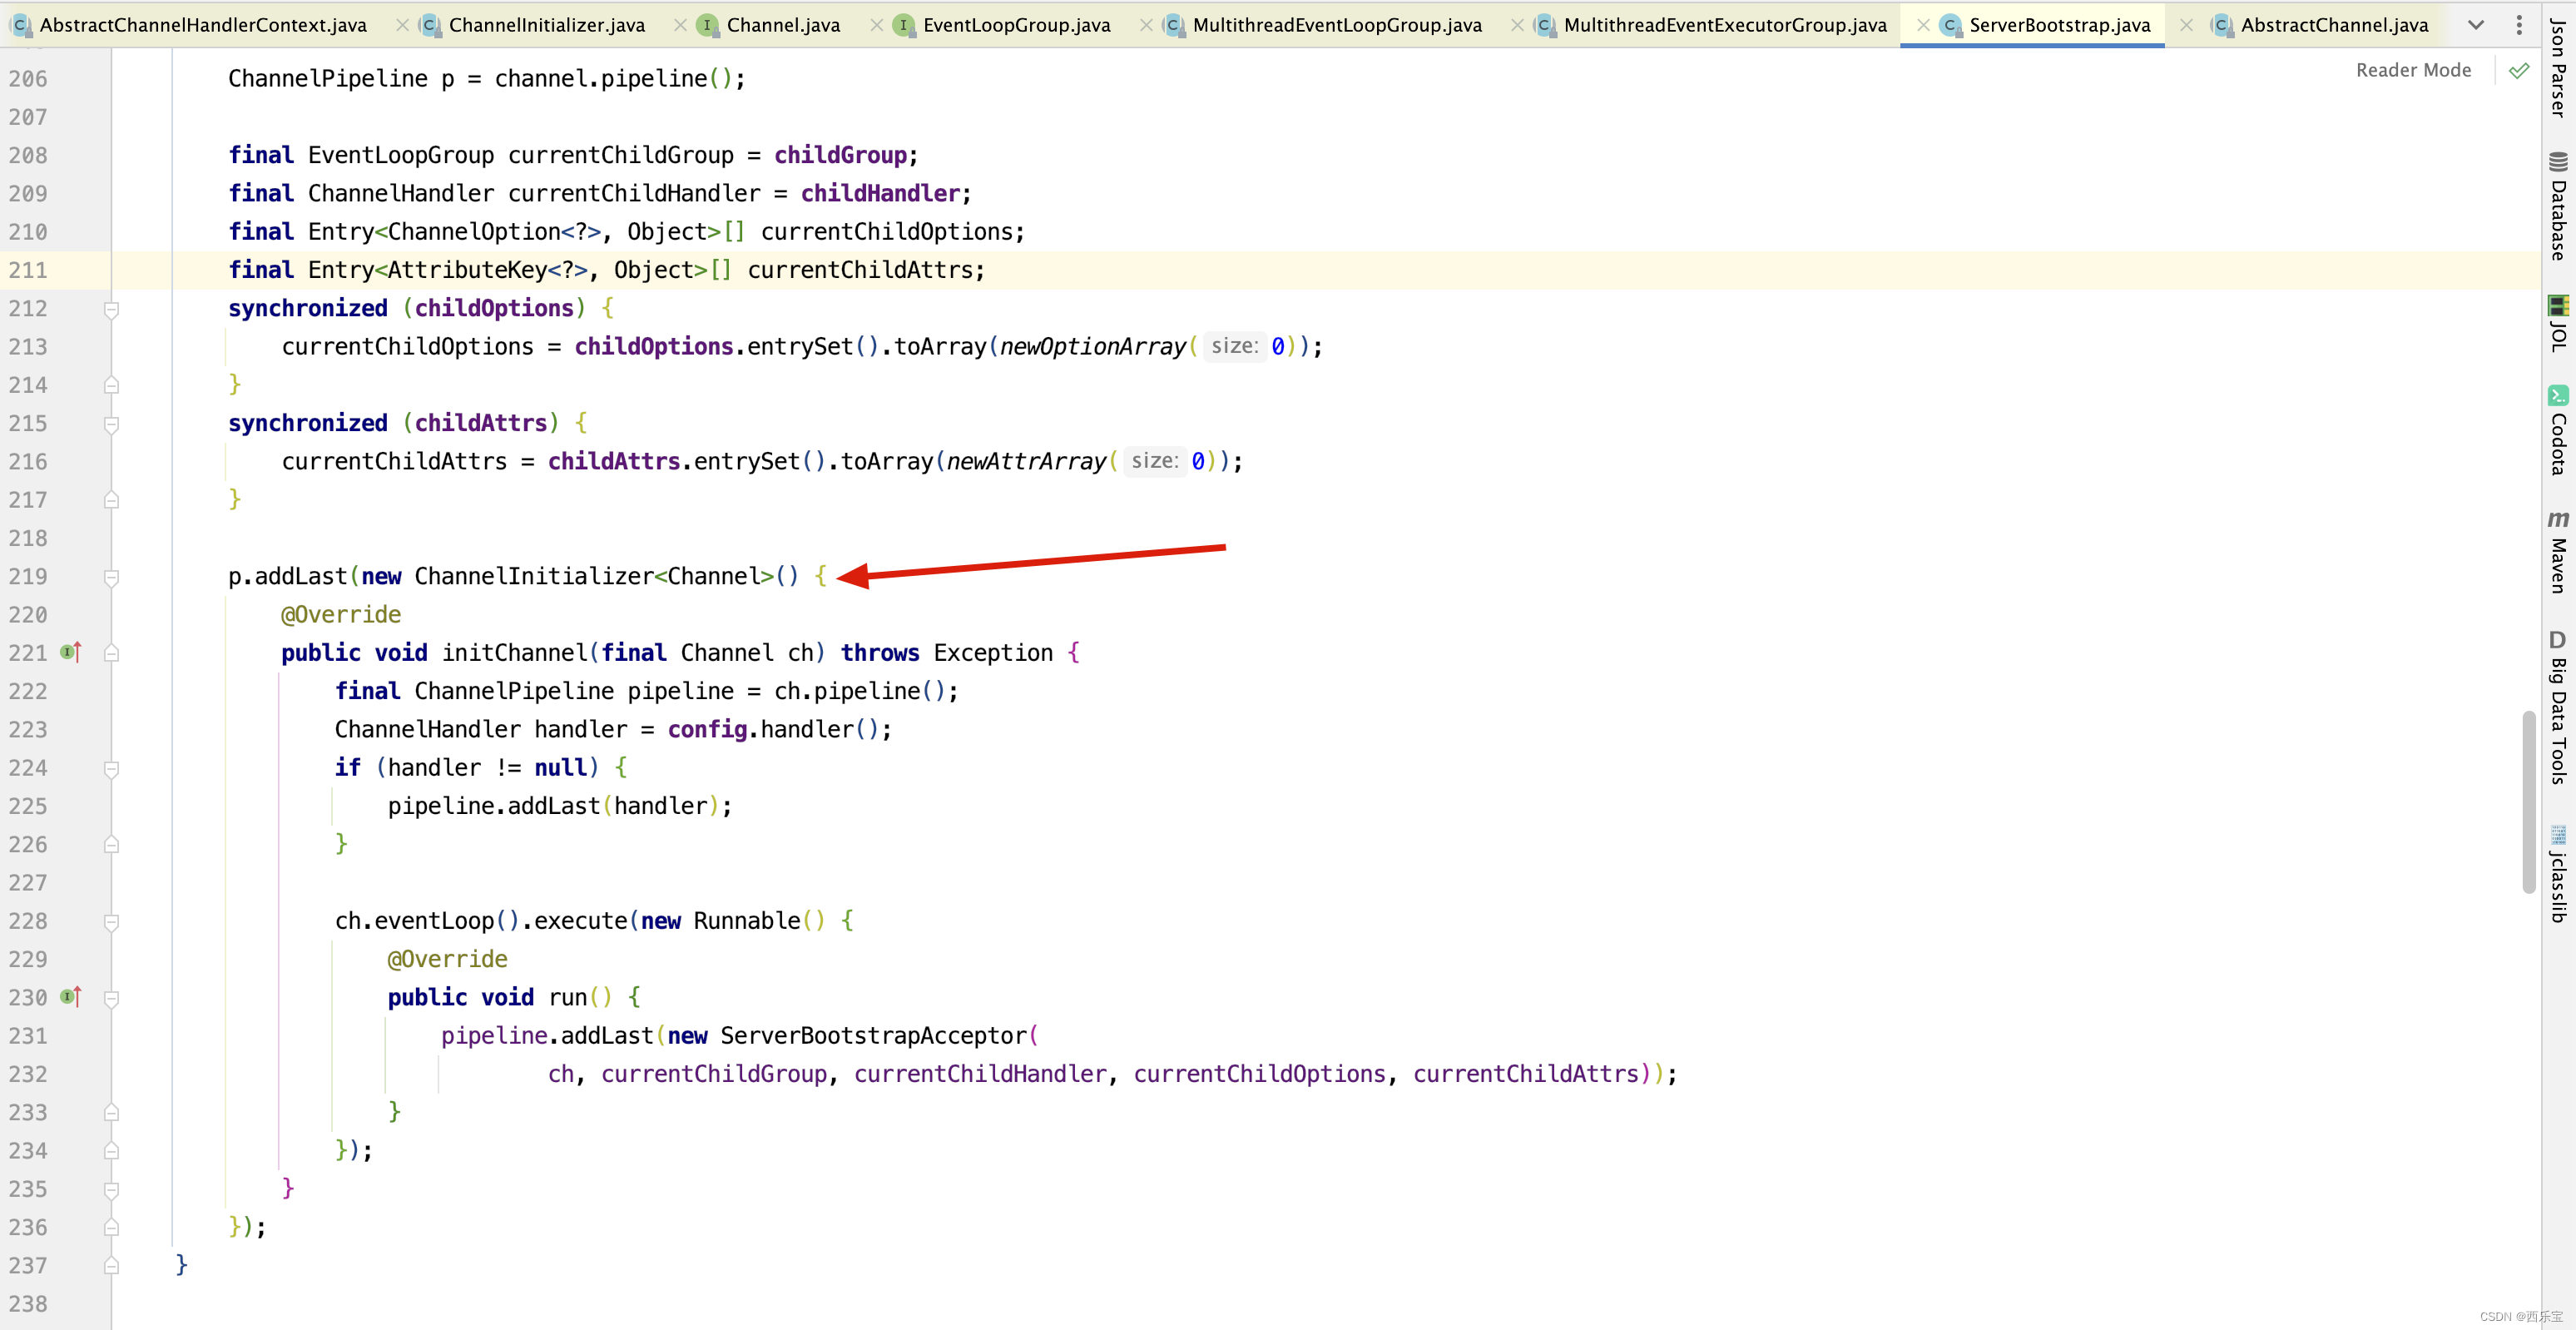
而传入的参数,如果当前channel为NioServerSocketChannel,则传入的则是NioServerSocketChannel,如果是NioSocketChannel,则传入的也就是NioSocketChannel。
public void initChannel(final Channel ch) throws Exception {
    final ChannelPipeline pipeline = ch.pipeline();
    ChannelHandler handler = config.handler();
    if (handler != null) {
        pipeline.addLast(handler);
    }

    ch.eventLoop().execute(new Runnable() {
        @Override
        public void run() {
            pipeline.addLast(new ServerBootstrapAcceptor(
                    ch, currentChildGroup, currentChildHandler, currentChildOptions, currentChildAttrs));
        }
    });
}
上述ch.eventLoop().execute() 方法,不就是又向NioEventLoop中加任务嘛,之前分析过那么多select(…)相关的方法,此时终于用到了,此时
new Runnable() {
        @Override
        public void run() {
            pipeline.addLast(new ServerBootstrapAcceptor(
                    ch, currentChildGroup, currentChildHandler, currentChildOptions, currentChildAttrs));
        }
    });
}
被当作任务添加到eventLoop的任务队列中,最终这个任务又在runAllTasks(…)方法中被执行。当然,handler执行完毕,将被移除掉。 因为在移除handler()时也会调用pipeline.context(this)方法,因此将context()方法在remove()时再做分析 ,接下来看移除handler的代码
public final ChannelPipeline remove(ChannelHandler handler) {
    remove(getContextOrDie(handler));
    return this;
}

private AbstractChannelHandlerContext getContextOrDie(ChannelHandler handler) {
    AbstractChannelHandlerContext ctx = (AbstractChannelHandlerContext) context(handler);
    if (ctx == null) {
        throw new NoSuchElementException(handler.getClass().getName());
    } else {
        return ctx;
    }
}

public final ChannelHandlerContext context(ChannelHandler handler) {
    if (handler == null) {
        throw new NullPointerException("handler");
    }

    AbstractChannelHandlerContext ctx = head.next;
    for (;;) {

        if (ctx == null) {
            return null;
        }

        if (ctx.handler() == handler) {
            return ctx;
        }

        ctx = ctx.next;
    }
}
上述过程中,context()方法是查找handler在pipeline链表中的过程,因为pipeline链表中存储的并不是handler 本身,而是AbstractChannelHandlerContext,只是handler属性是我们需要执行的任务而已,因此上述context()方法,需要从Head 开始向后遍历,直到Tail。中途所有的AbstractChannelHandlerContext的handler是否和自己传入的handler相等,如果相等,则证明找到了handler对应的AbstractChannelHandlerContext,取出AbstractChannelHandlerContext并调用remove()方法将其移除掉。
private AbstractChannelHandlerContext remove(final AbstractChannelHandlerContext ctx) {
        assert ctx != head && ctx != tail;

        synchronized (this) {
            remove0(ctx);

            // If the registered is false it means that the channel was not registered on an eventloop yet.
            // In this case we remove the context from the pipeline and add a task that will call
            // ChannelHandler.handlerRemoved(...) once the channel is registered.
            if (!registered) {
                callHandlerCallbackLater(ctx, false);
                return ctx;
            }

            EventExecutor executor = ctx.executor();
            if (!executor.inEventLoop()) {
                executor.execute(new Runnable() {
                    @Override
                    public void run() {
                        callHandlerRemoved0(ctx);
                    }
                });
                return ctx;
            }
        }
        callHandlerRemoved0(ctx);
        return ctx;
    }
}
当然,在remove()方法中,并没有立即移除,而是调用remove0()来实现真正的移除操作。
private static void remove0(AbstractChannelHandlerContext ctx) {
    AbstractChannelHandlerContext prev = ctx.prev;
    AbstractChannelHandlerContext next = ctx.next;
    prev.next = next;
    next.prev = prev;
}
remove0()的实现逻辑很简单,其实就是双向链表中移除元素的操作。
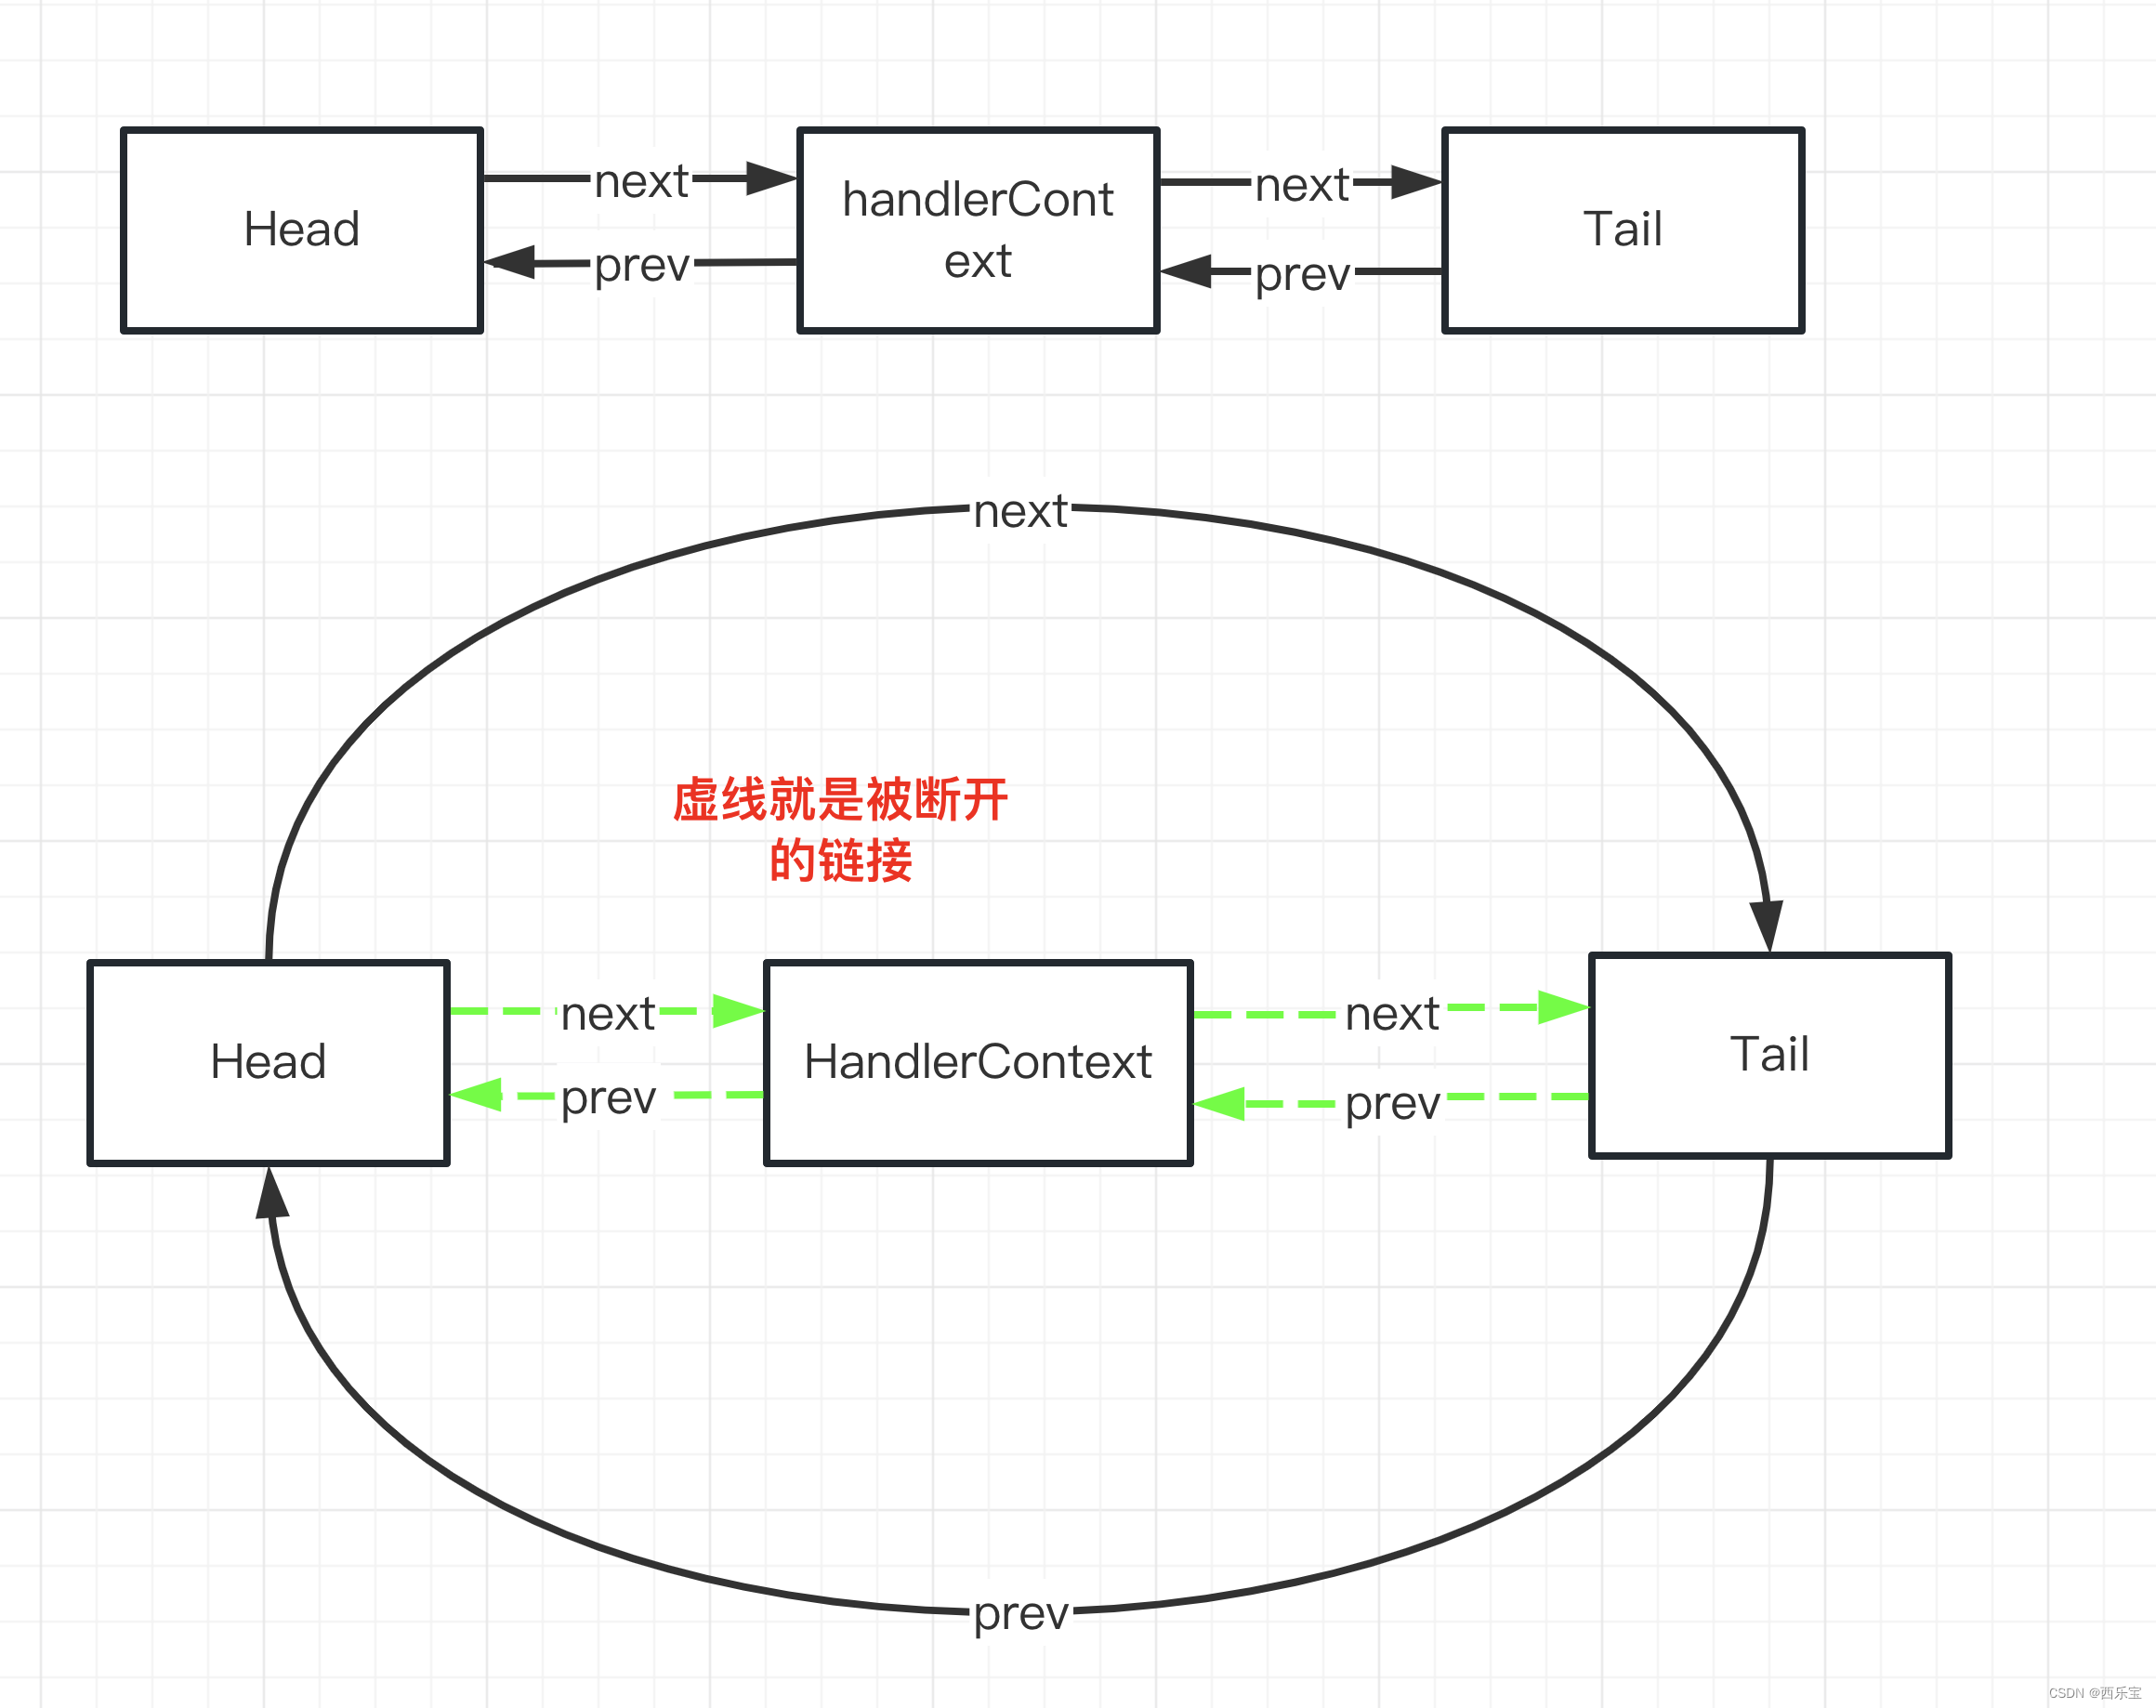
Pipeline add 方法的实现
之前对于Pipeline的addLast()方法有过简单的分析,如下代码 。
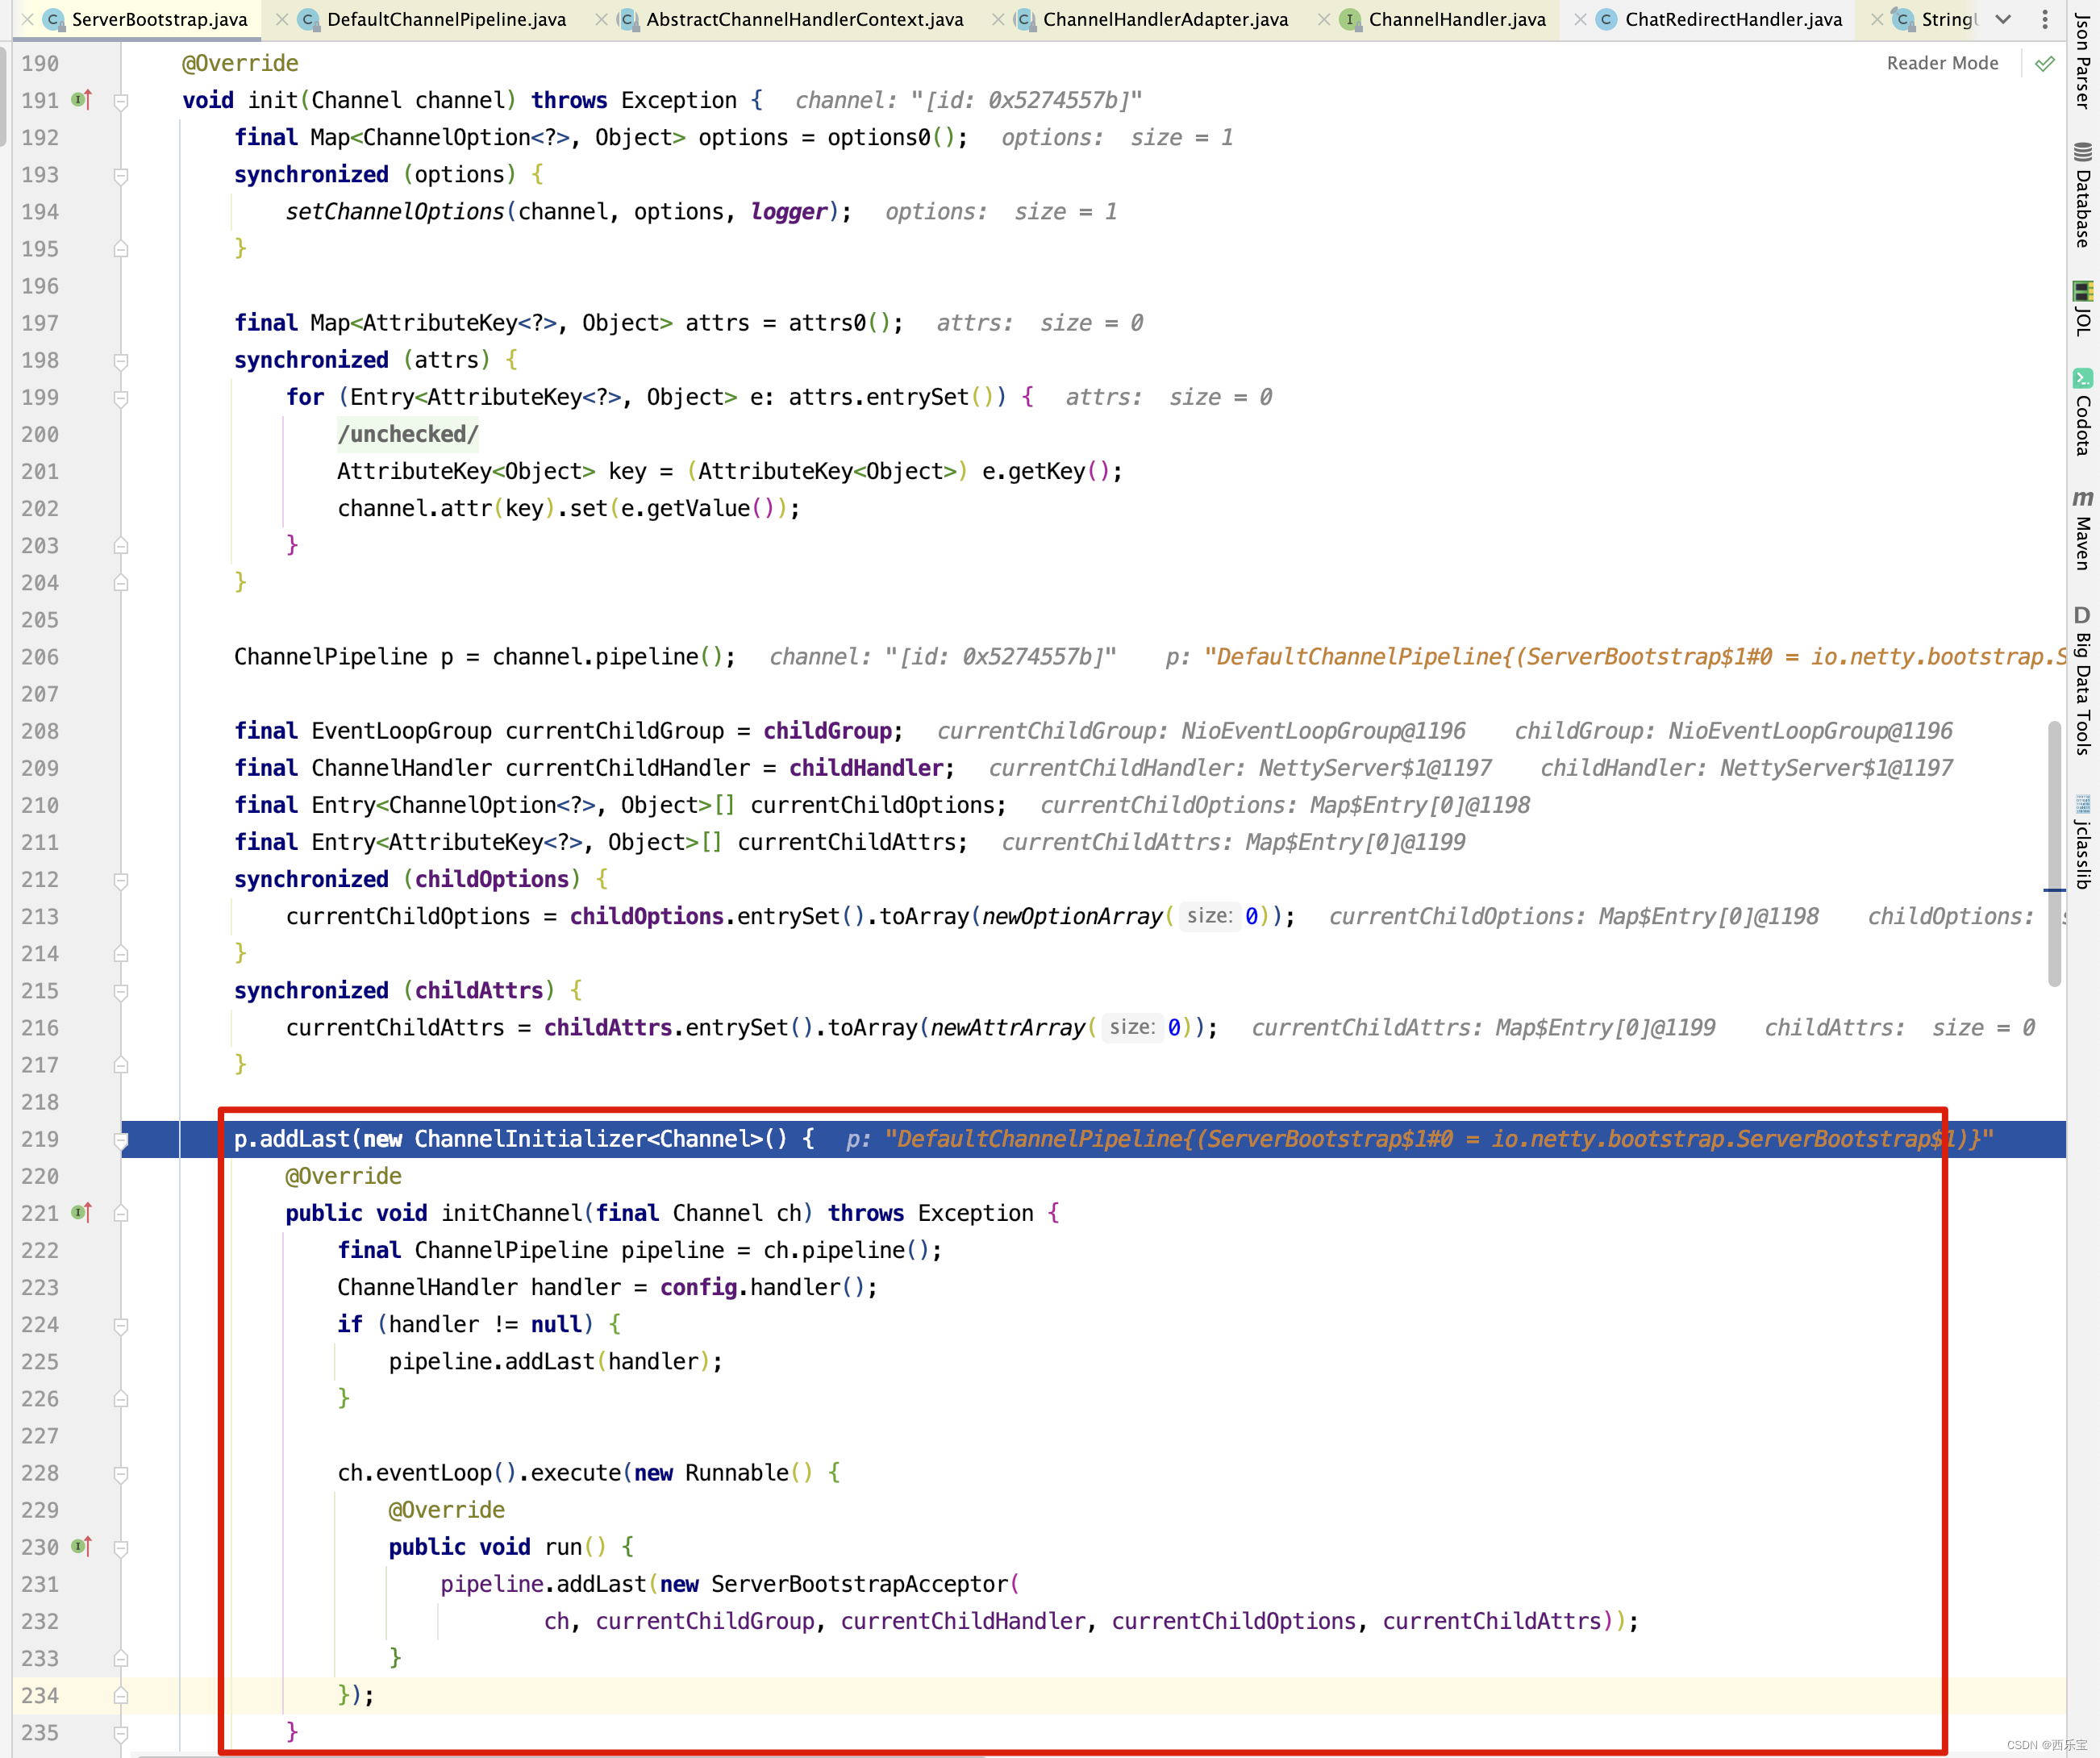
下面就以 p.addLast(new ChannelInitializer<Channel>() {…} 为例子来详细的分析addLast()到底做了哪些事情 。
public final ChannelPipeline addLast(ChannelHandler... handlers) {
    return addLast(null, handlers);
}

public final ChannelPipeline addLast(EventExecutorGroup executor, ChannelHandler... handlers) {
    if (handlers == null) {
        throw new NullPointerException("handlers");
    }

    for (ChannelHandler h: handlers) {
        if (h == null) {
            break;
        }
        addLast(executor, null, h);
    }

    return this;
}
上述方法没有什么难的,就是遍历handlers,将每个Handler通过addLast()方法加入到pipeline中,但需要注意的是EventExecutorGroup传入的值为null。接下来进入新的addLast()方法。
public final ChannelPipeline addLast(EventExecutorGroup group, String name, ChannelHandler handler) {
    final AbstractChannelHandlerContext newCtx;
    synchronized (this) {
        checkMultiplicity(handler);
        newCtx = newContext(group, filterName(name, handler), handler);
        addLast0(newCtx);
        // If the registered is false it means that the channel was not registered on an eventLoop yet.
        // In this case we add the context to the pipeline and add a task that will call
        // ChannelHandler.handlerAdded(...) once the channel is registered.
        if (!registered) {
            newCtx.setAddPending();
            callHandlerCallbackLater(newCtx, true);
            return this;
        }

        EventExecutor executor = newCtx.executor();
        if (!executor.inEventLoop()) {
            callHandlerAddedInEventLoop(newCtx, executor);
            return this;
        }
    }
    // 如果已经注册了,直接调用handler()的handlerAdded(this);方法
    callHandlerAdded0(newCtx);
    return this;
}
上面有一个有意思的方法checkMultiplicity(), 在看这个方法之前先来了解@Sharable注解的基本使用。
@Sharable 注解的基本用法
在使用没有标注 @Sharable 的 handler 时,在添加到到一个 pipeline 中时,你需要每次都创建一个新的 handler 实例,因为它的成员变量是不可分享的。所以正确的做法应该是 ch.pipeline.addLast(new ...)。
当自定义一个 handler 时,要考虑应不应该为其加 @Sharable 注解。如果该 handler 只是用来打印一些消息,那么可以加上该注解,因为它被共享时,每个pipeline的信息不会错乱。比如,Netty 自带的 LoggingHandler 就只是打印日志消息,就加上了 @Sharable 注解。相反,如果你定义的 handler 里面需要保存一些信息,供使用该 handler 的 pipeline 使用,如果它是线程安全的,也可以加上 @Sharable 注解。如果它不是线程安全的,加上 @Sharable 注解,那么如果有多个 pipeline 共用一个 handler 实例, 就可能导致不同 pipeline 之间的信息混乱。
接下来进入checkMultiplicity()方法,看它是怎样控制,如果不加@Sharable,Handler 是不能被共享的。
private static void checkMultiplicity(ChannelHandler handler) {
    if (handler instanceof ChannelHandlerAdapter) {
        ChannelHandlerAdapter h = (ChannelHandlerAdapter) handler;
        if (!h.isSharable() && h.added) {
            throw new ChannelPipelineException(
                    h.getClass().getName() +
                    " is not a @Sharable handler, so can't be added or removed multiple times.");
        }
        h.added = true;
    }
}

public boolean isSharable() {
    /**
     * Cache the result of {@link Sharable} annotation detection to workaround a condition. We use a
     * {@link ThreadLocal} and {@link WeakHashMap} to eliminate the volatile write/reads. Using different
     * {@link WeakHashMap} instances per {@link Thread} is good enough for us and the number of
     * {@link Thread}s are quite limited anyway.
     *
     * See <a href="https://github.com/netty/netty/issues/2289">#2289</a>.
     */
    Class<?> clazz = getClass();
    Map<Class<?>, Boolean> cache = InternalThreadLocalMap.get().handlerSharableCache();
    Boolean sharable = cache.get(clazz);
    if (sharable == null) {
        sharable = clazz.isAnnotationPresent(Sharable.class);
        cache.put(clazz, sharable);
    }
    return sharable;
}
判断能不能被共享有一个重要的条件就是handler有没有实现ChannelHandlerAdapter接口,如果没有实现,就不需要判断有没有加@Sharable注解,而!h.isSharable() && h.added的判断条件就是,如果handler已经被加入到pipeline,但handler没有配置Sharable注解,则抛出提示信息为 is not a @Sharable handler, so can’t be added or removed multiple times.异常。 当然,在isSharable()方法中还看到了什么呢?就是InternalThreadLocalMap对象,线程范围内的变量共享,将类中是否有Sharable注解的结果存储到线程共享变量中,下次再需要判断类中是否有Sharable注解,从缓存中取出即可。 接下来看addLast()方法中的newContext()方法 。
private AbstractChannelHandlerContext newContext(EventExecutorGroup group, String name, ChannelHandler handler) {
    return new DefaultChannelHandlerContext(this, childExecutor(group), name, handler);
}

final class DefaultChannelHandlerContext extends AbstractChannelHandlerContext {

    private final ChannelHandler handler;

     DefaultChannelHandlerContext(
            DefaultChannelPipeline pipeline, EventExecutor executor, String name, ChannelHandler handler) {
        super(pipeline, executor, name, handler.getClass());
        this.handler = handler;
    }

    @Override
    public ChannelHandler handler() {
        return handler;
    }
}
AbstractChannelHandlerContext(DefaultChannelPipeline pipeline, EventExecutor executor,
                              String name, Class<? extends ChannelHandler> handlerClass) {
    this.name = ObjectUtil.checkNotNull(name, "name");
    this.pipeline = pipeline;
    this.executor = executor;
    this.executionMask = mask(handlerClass);
    // Its ordered if its driven by the EventLoop or the given Executor is an instanceof OrderedEventExecutor.
    ordered = executor == null || executor instanceof OrderedEventExecutor;
}
DefaultChannelHandlerContext有一个最大的特点就是有一个handler属性,就是将任务保存到这个属性中。接下来看addLast0()方法,这个方法和之前的remove0()方法很像,接下来进入addLast0()方法。
// 通过addLast()方法追加进去的编码器和解码器都位于 TailContext的前面。
private void addLast0(AbstractChannelHandlerContext newCtx) {
    AbstractChannelHandlerContext prev = tail.prev;
    newCtx.prev = prev;
    newCtx.next = tail;
    prev.next = newCtx;
    tail.prev = newCtx;
}
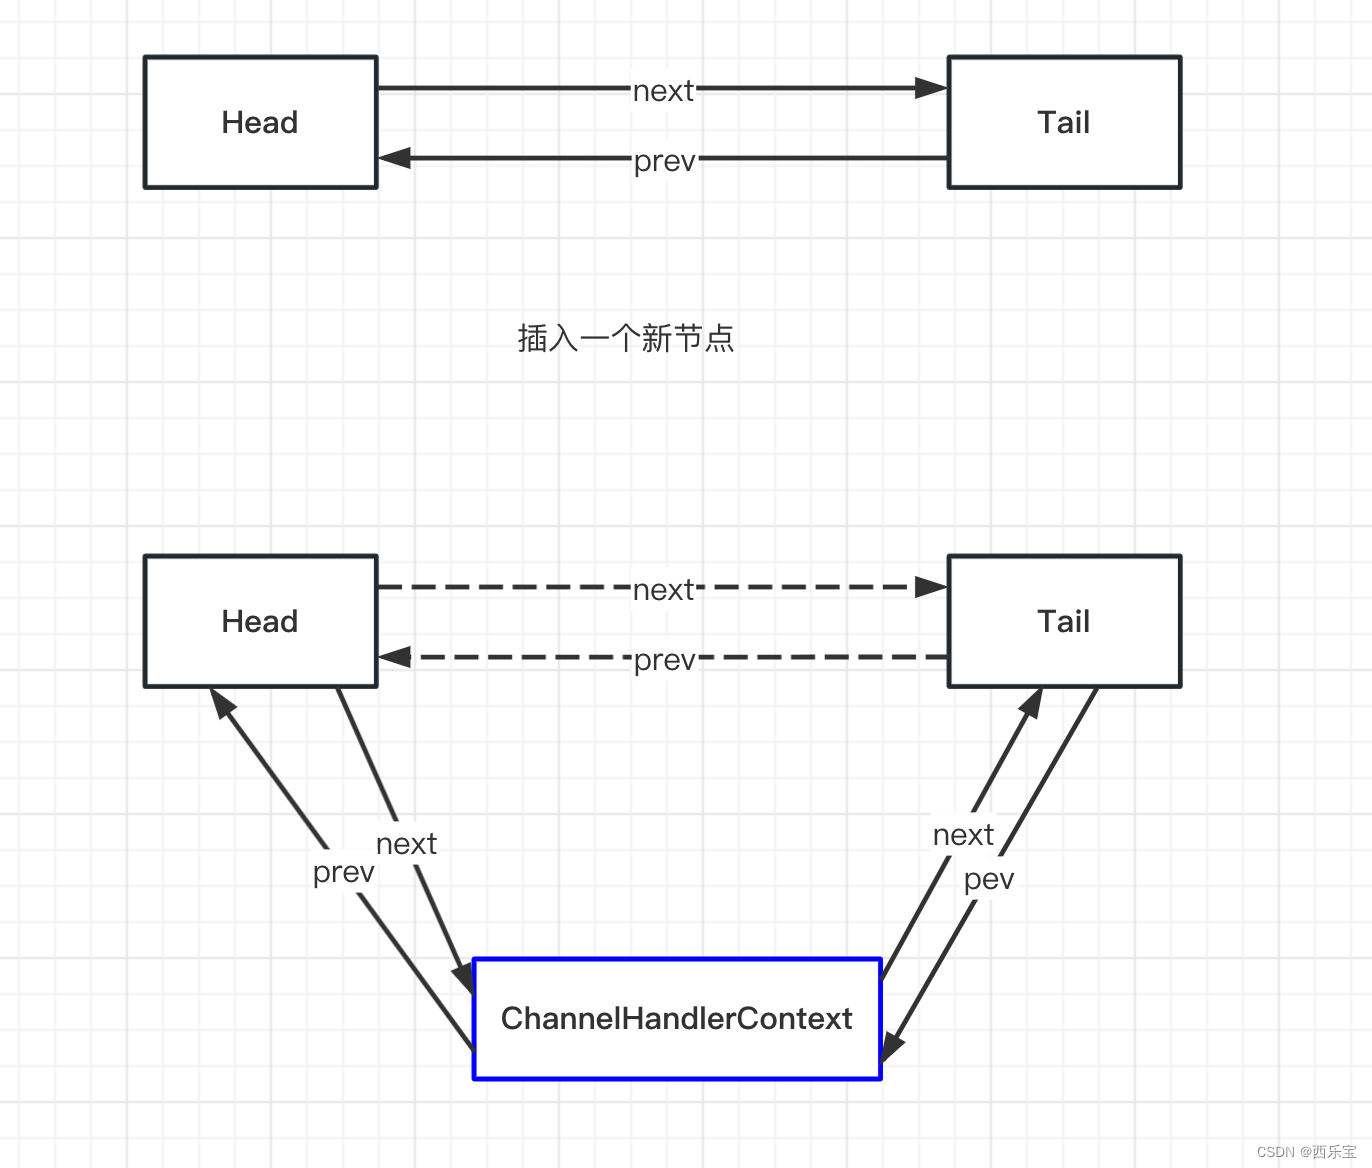
最终pipeline的结构如下。
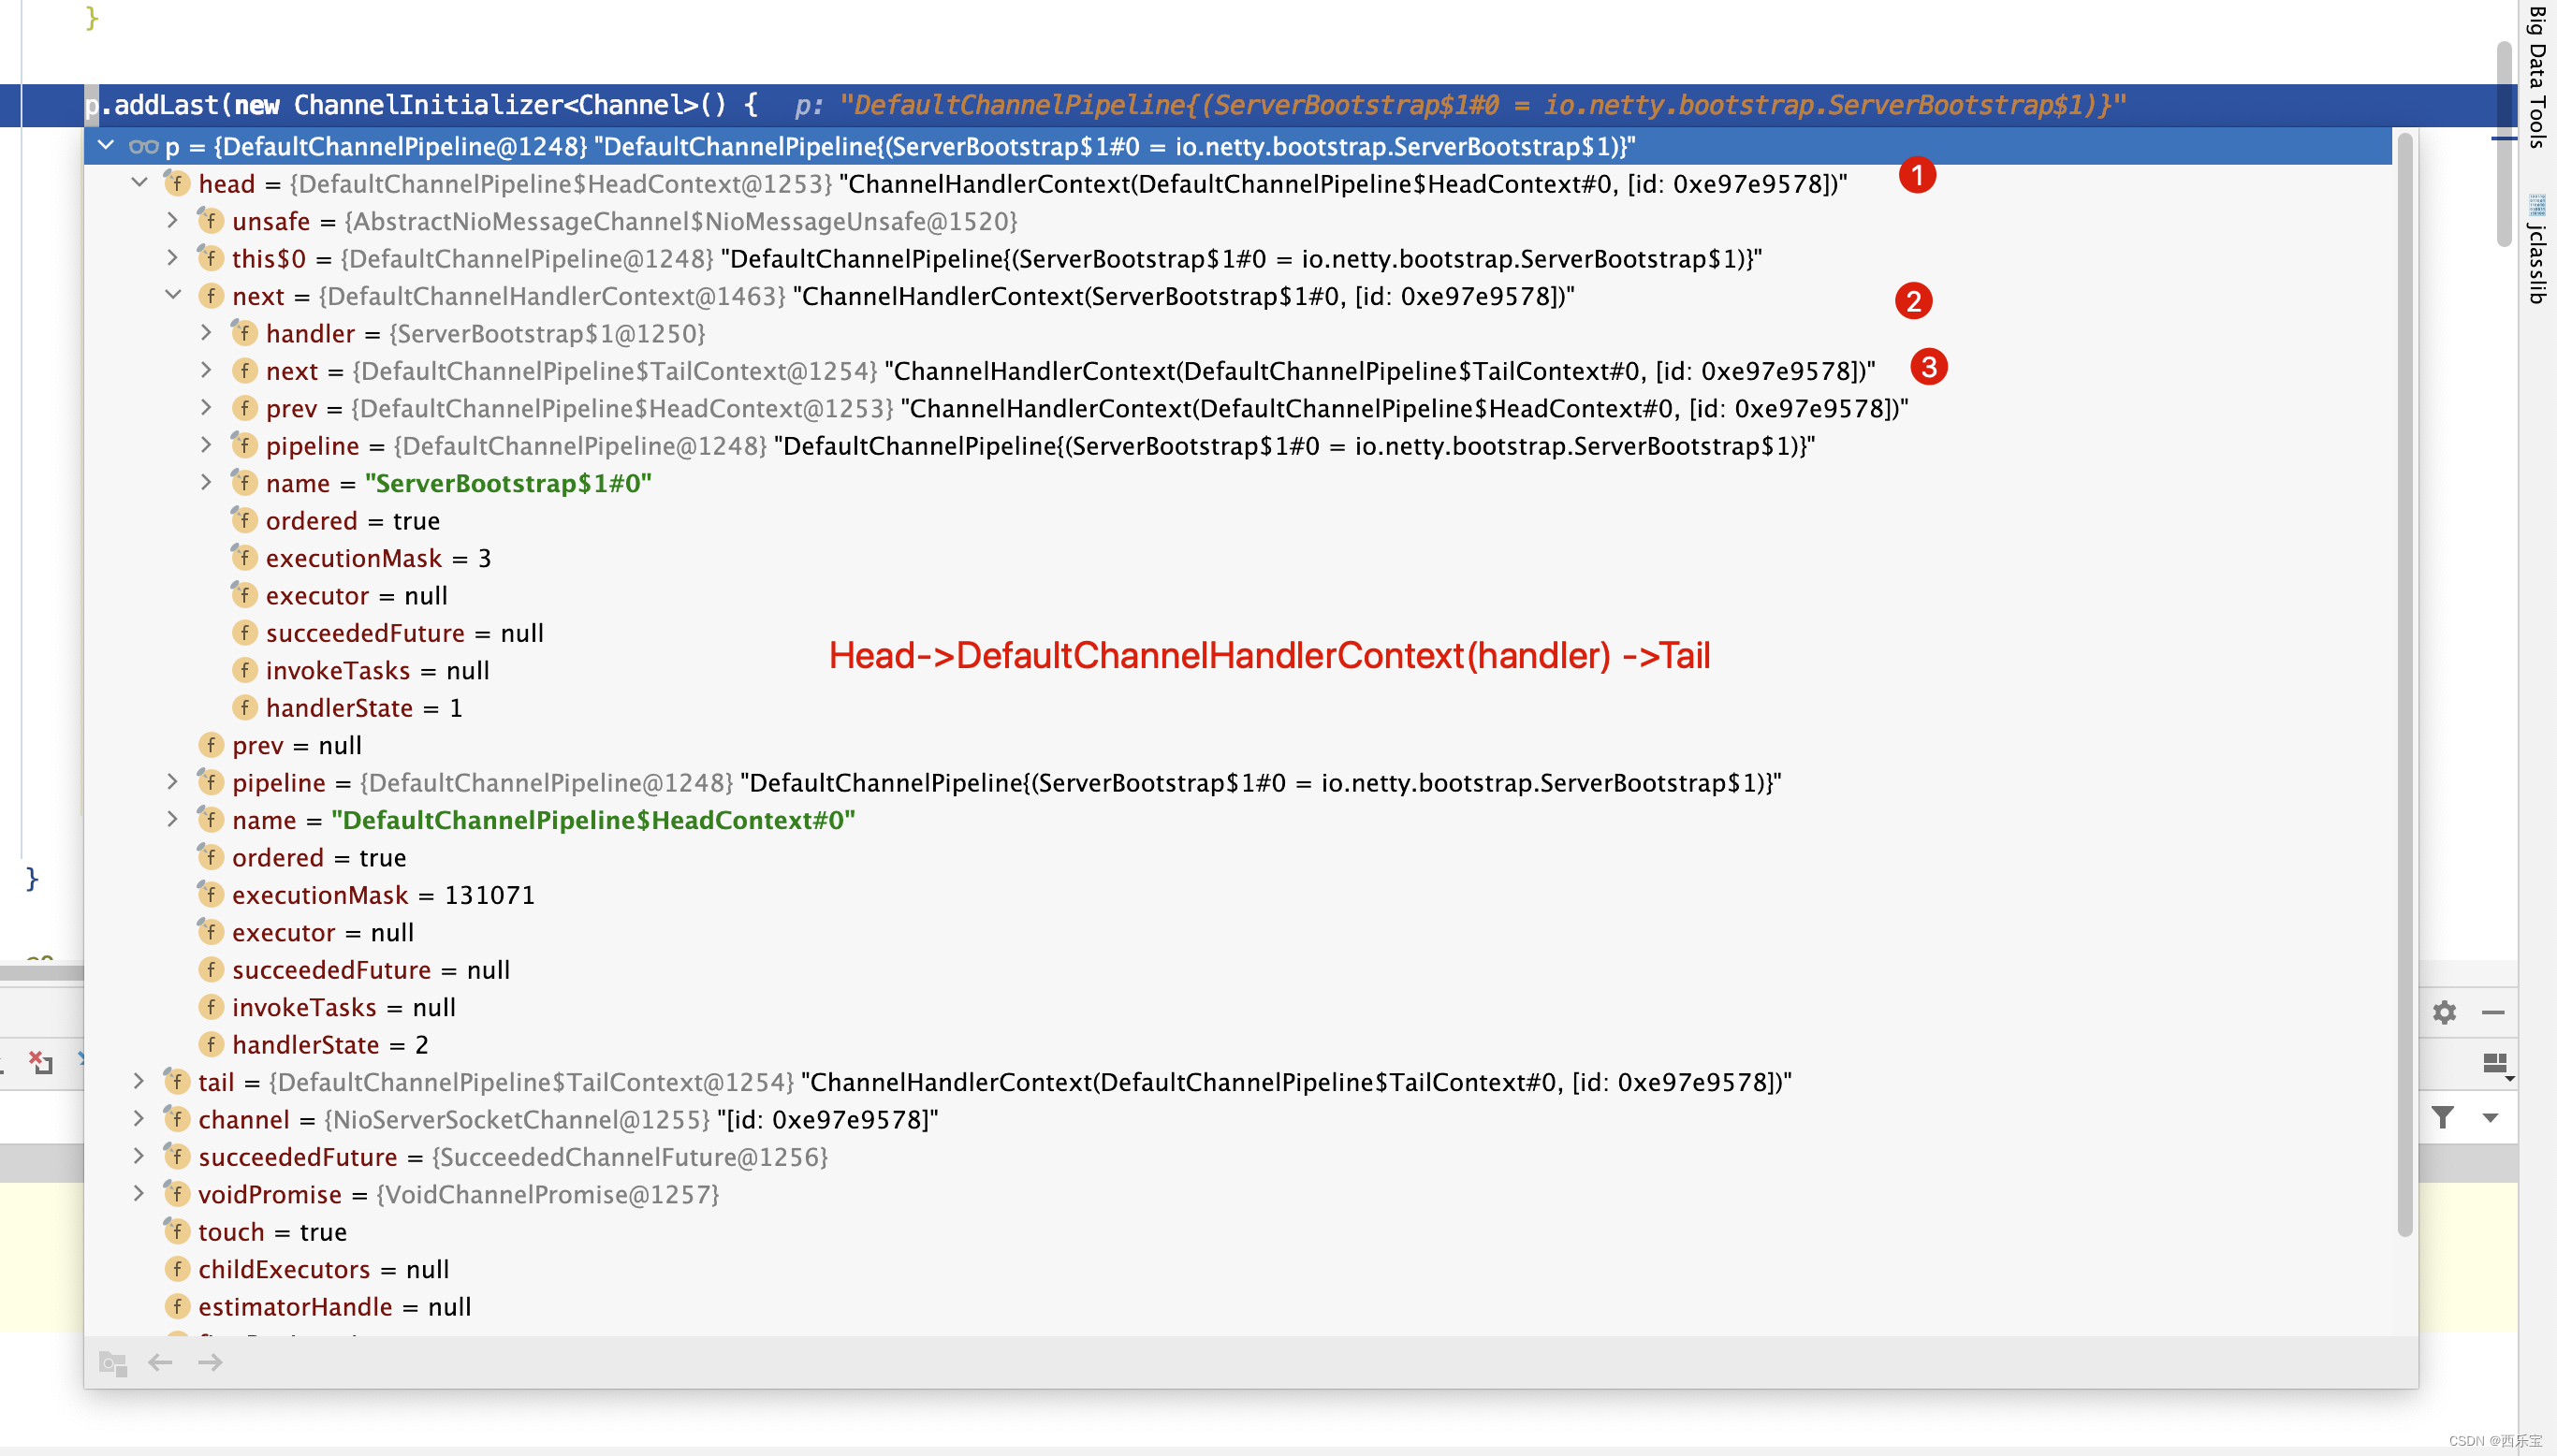
接下来看register0()的safeSetSuccess()方法。
protected final void safeSetSuccess(ChannelPromise promise) {
    if (!(promise instanceof VoidChannelPromise) && !promise.trySuccess()) {
        logger.warn("Failed to mark a promise as success because it is done already: {}", promise);
    }
}
那这个方法调用会有什么作用呢? 之前写过一篇博客 Netty 之 DefaultPromise 源码解析 就是关于ChannelPromise的使用的,看明白那篇博客再来分析safeSetSuccess()方法就容易多了。再来看register0()方法参数ChannelPromise从何而来。
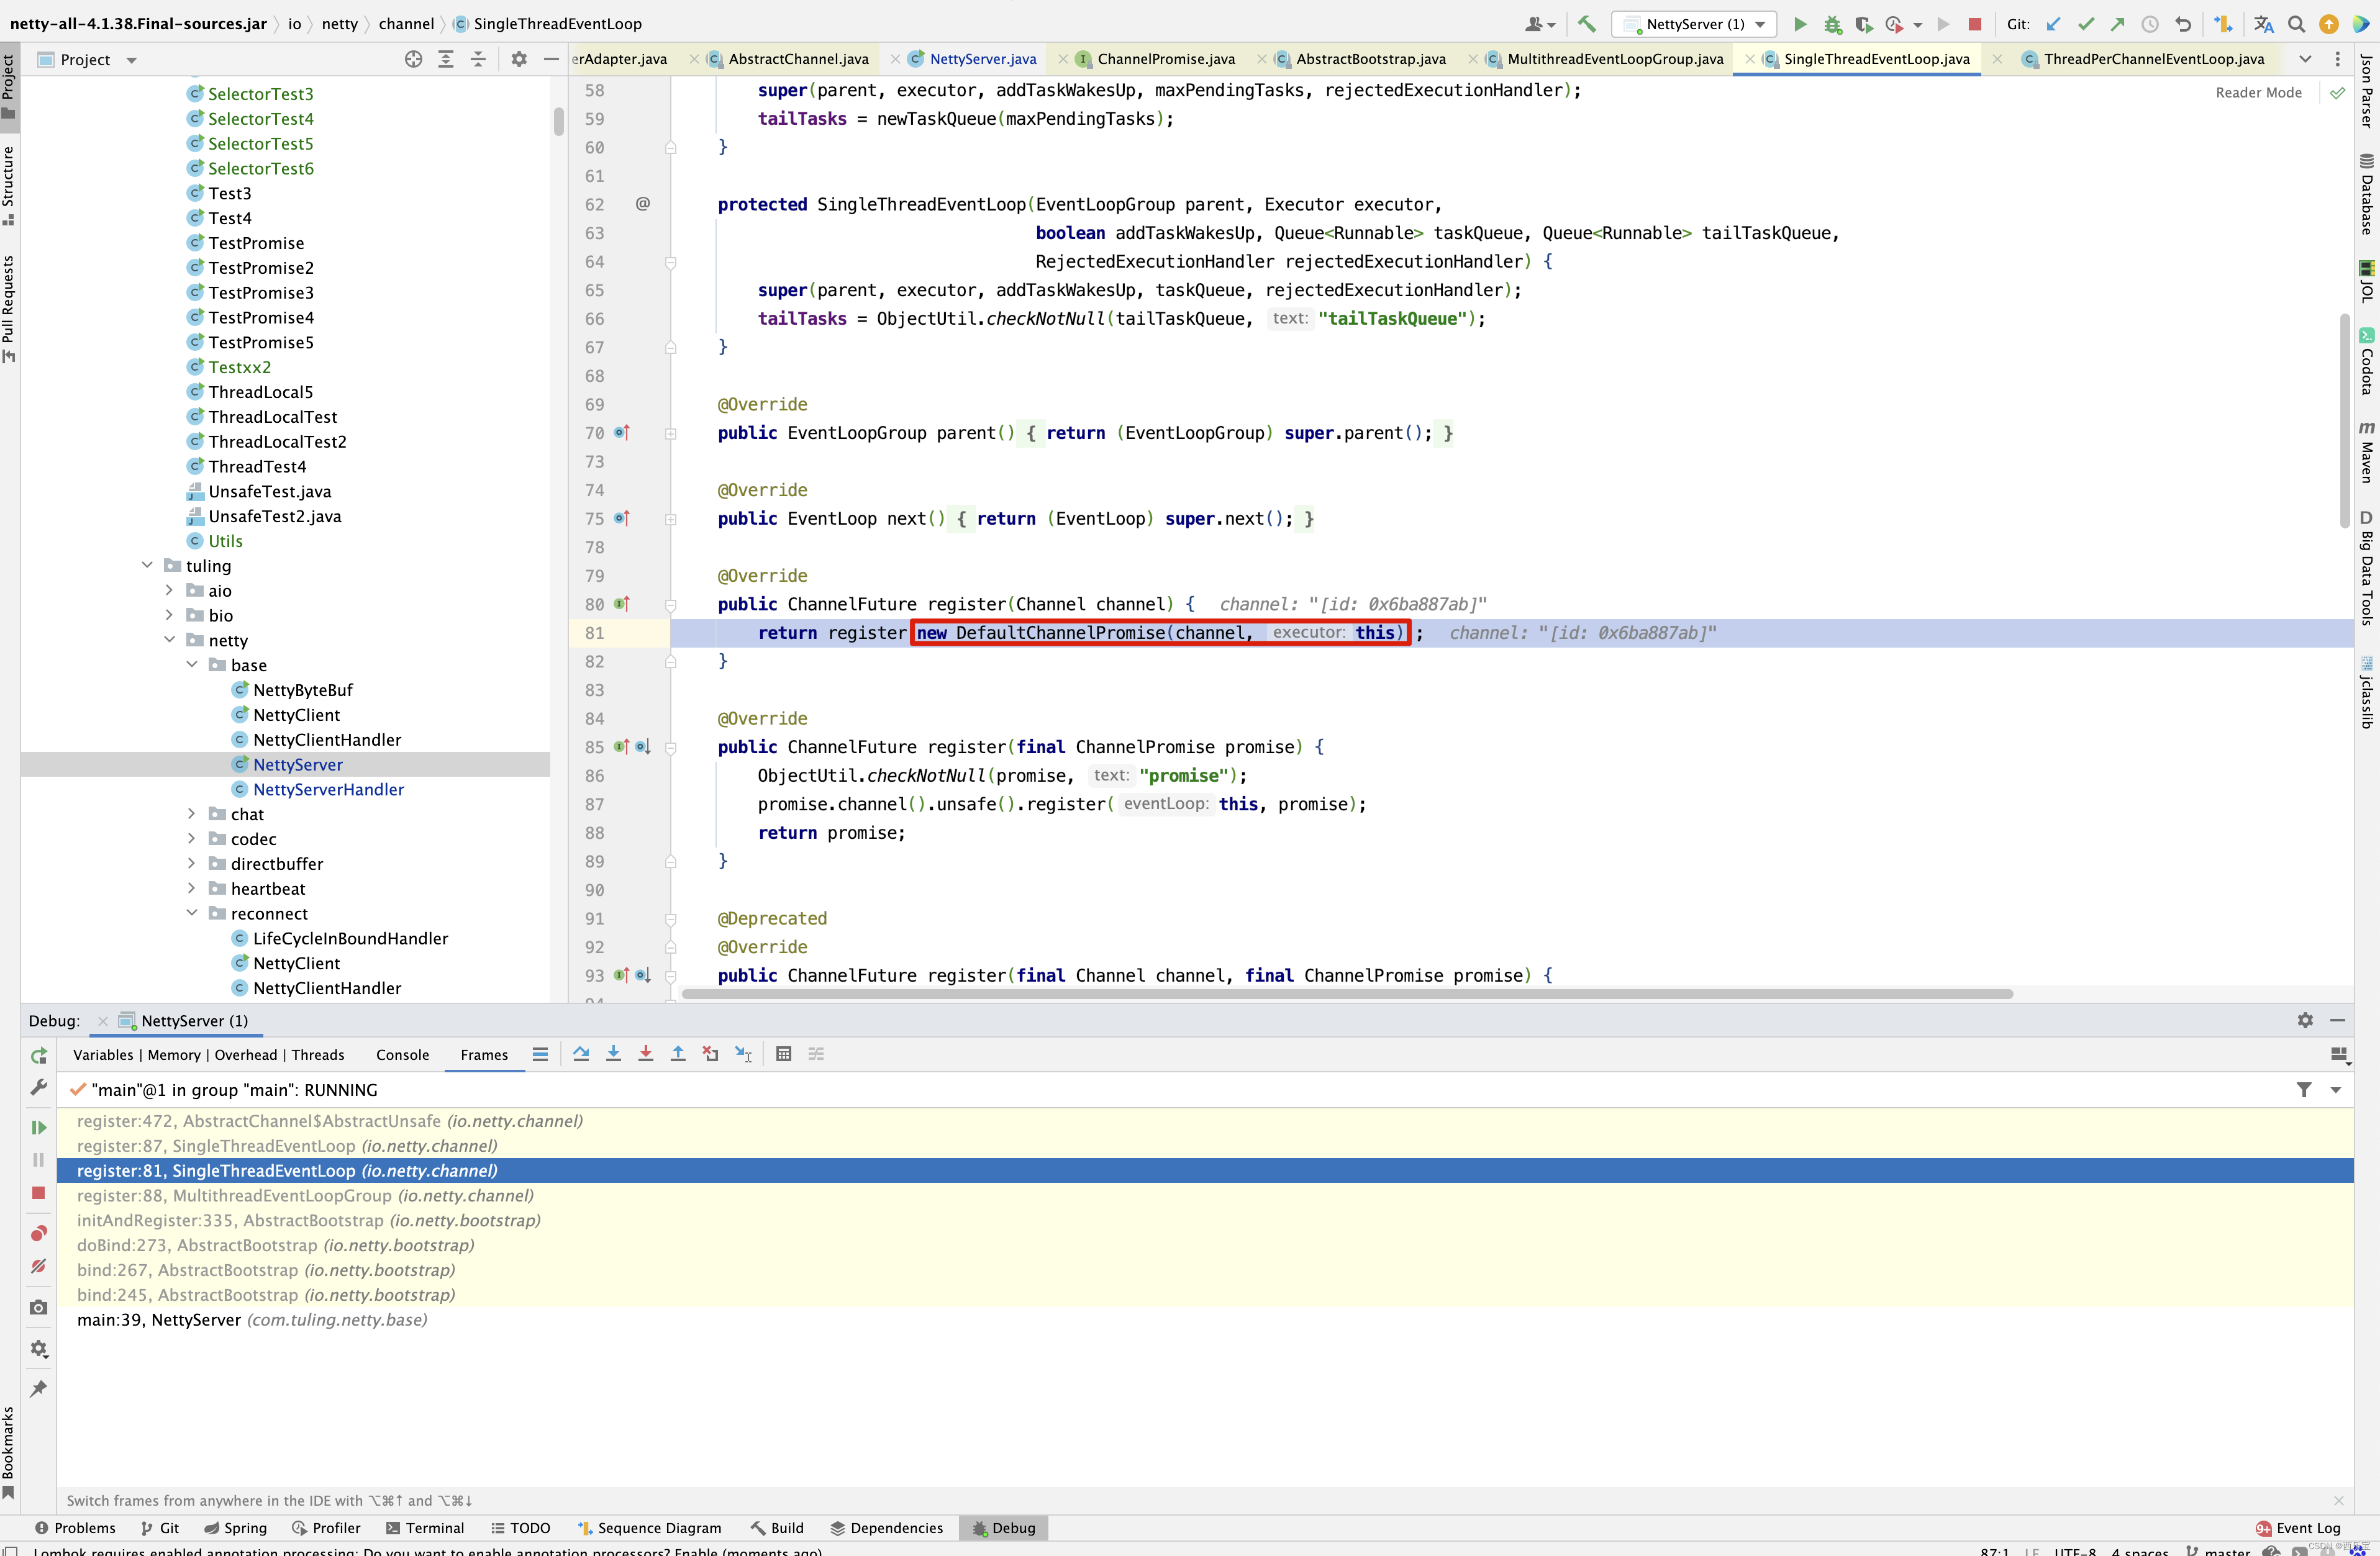
来源于SingleThreadEventLoop的register(Channel channel) 方法。
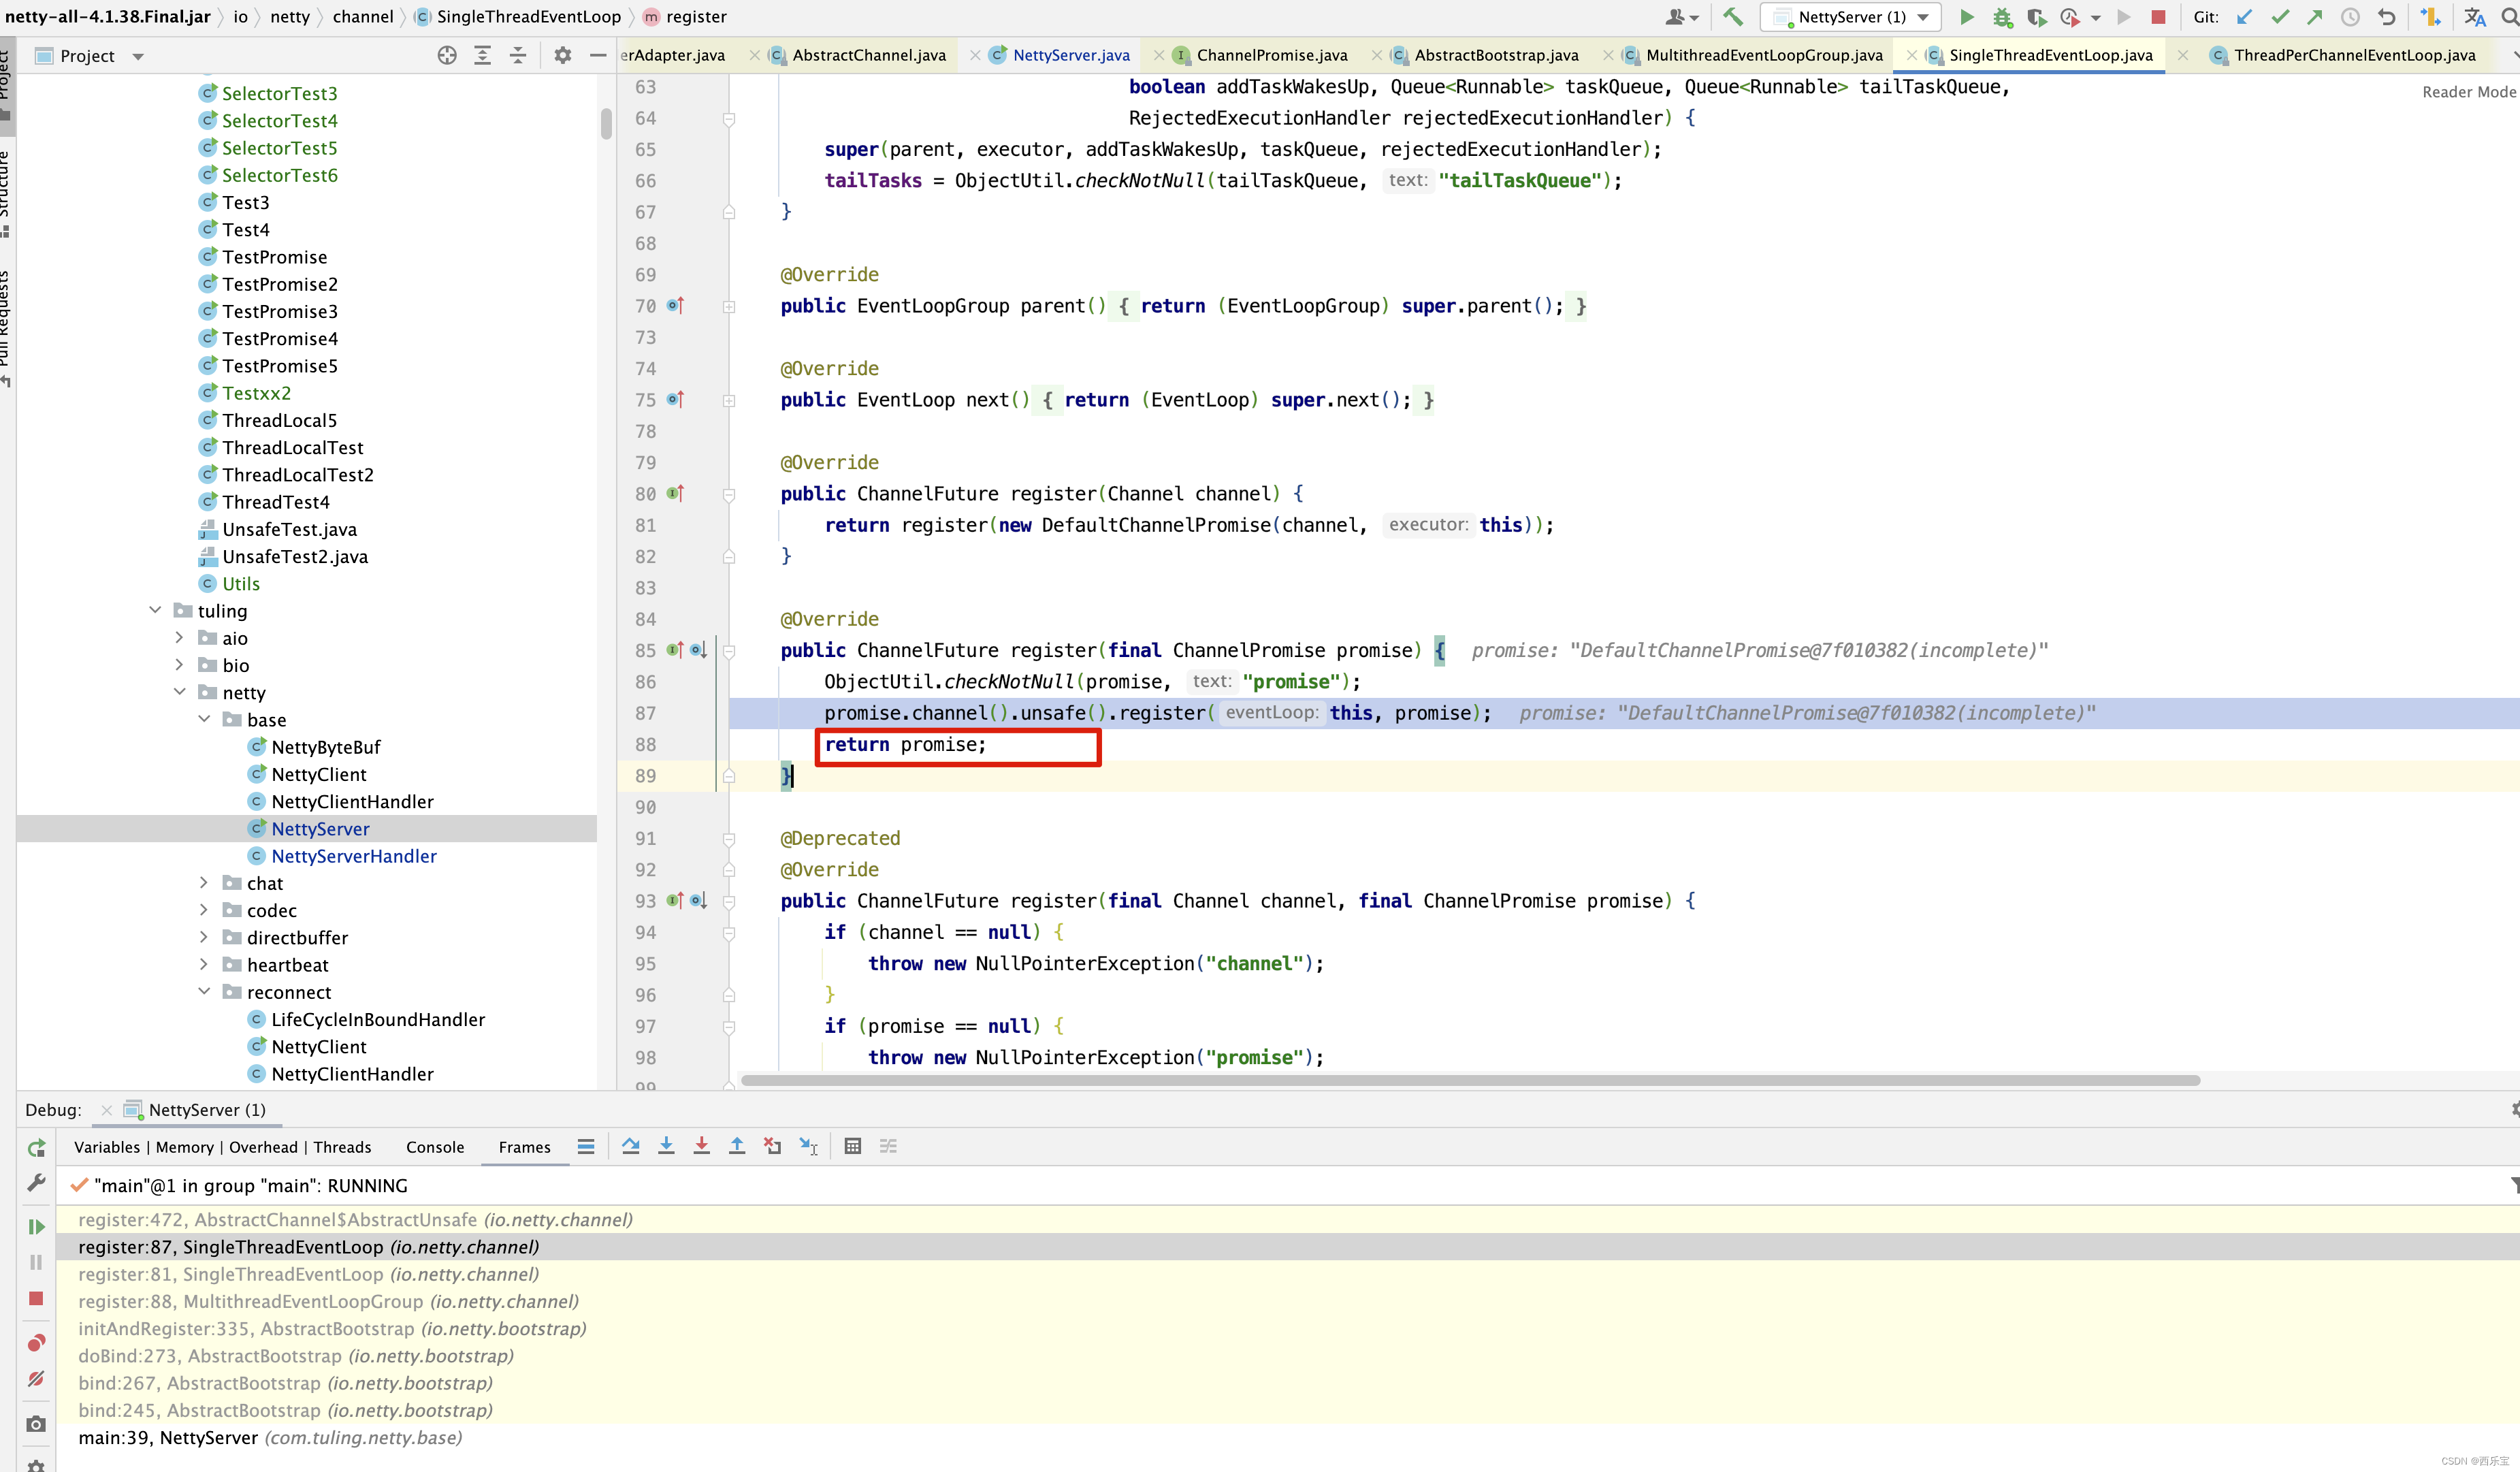
同时又作为参数返回到ServerBootstrap方法的doBind()方法中。
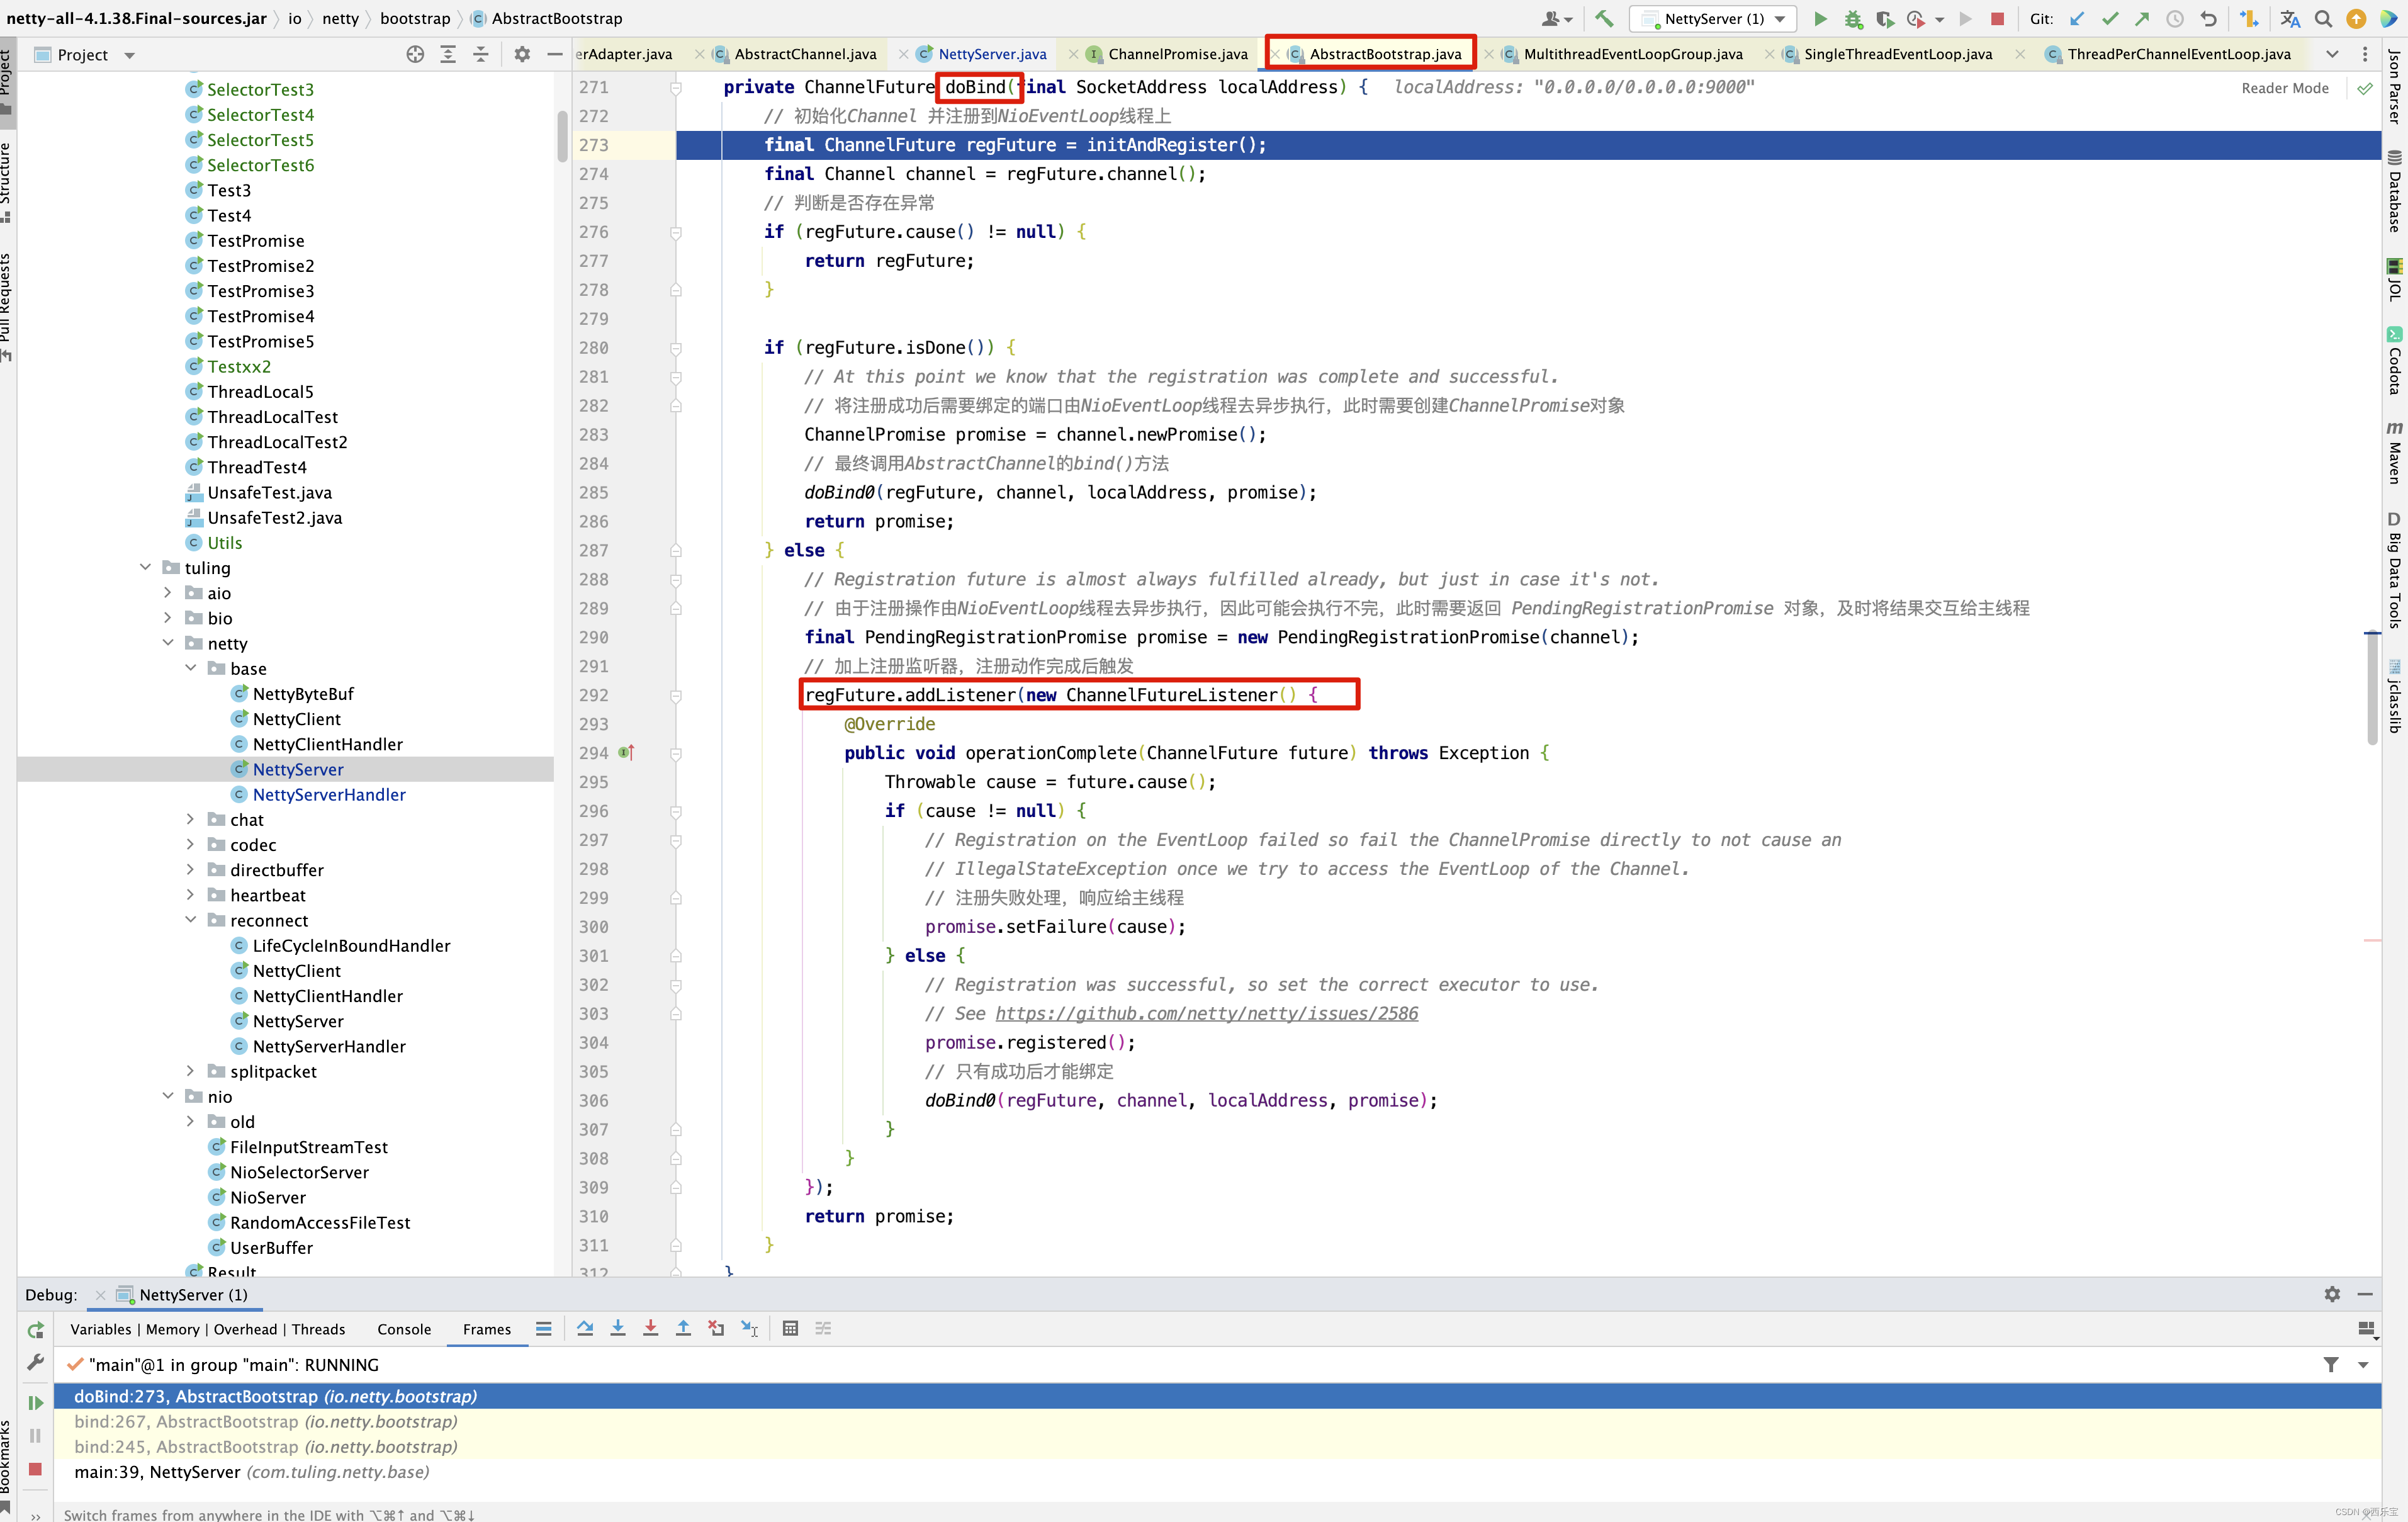
new DefaultChannelPromise(channel, this)又添加了监听器
new ChannelFutureListener() {
    @Override
    public void operationComplete(ChannelFuture future) throws Exception {
        Throwable cause = future.cause();
        if (cause != null) {
            // Registration on the EventLoop failed so fail the ChannelPromise directly to not cause an
            // IllegalStateException once we try to access the EventLoop of the Channel.
            // 注册失败处理,响应给主线程
            promise.setFailure(cause);
        } else {
            // Registration was successful, so set the correct executor to use.
            // See https://github.com/netty/netty/issues/2586
            promise.registered();
            // 只有成功后才能绑定
            doBind0(regFuture, channel, localAddress, promise);
        }
    }
}
根据之前DefaultPromise的基本特性,当调用safeSetSuccess()方法后,会触发所有监听器的operationComplete()方法调用 。 当然也会触发NettyServer中我们自己声明的ChannelFutureListener的operationComplete()调用 。
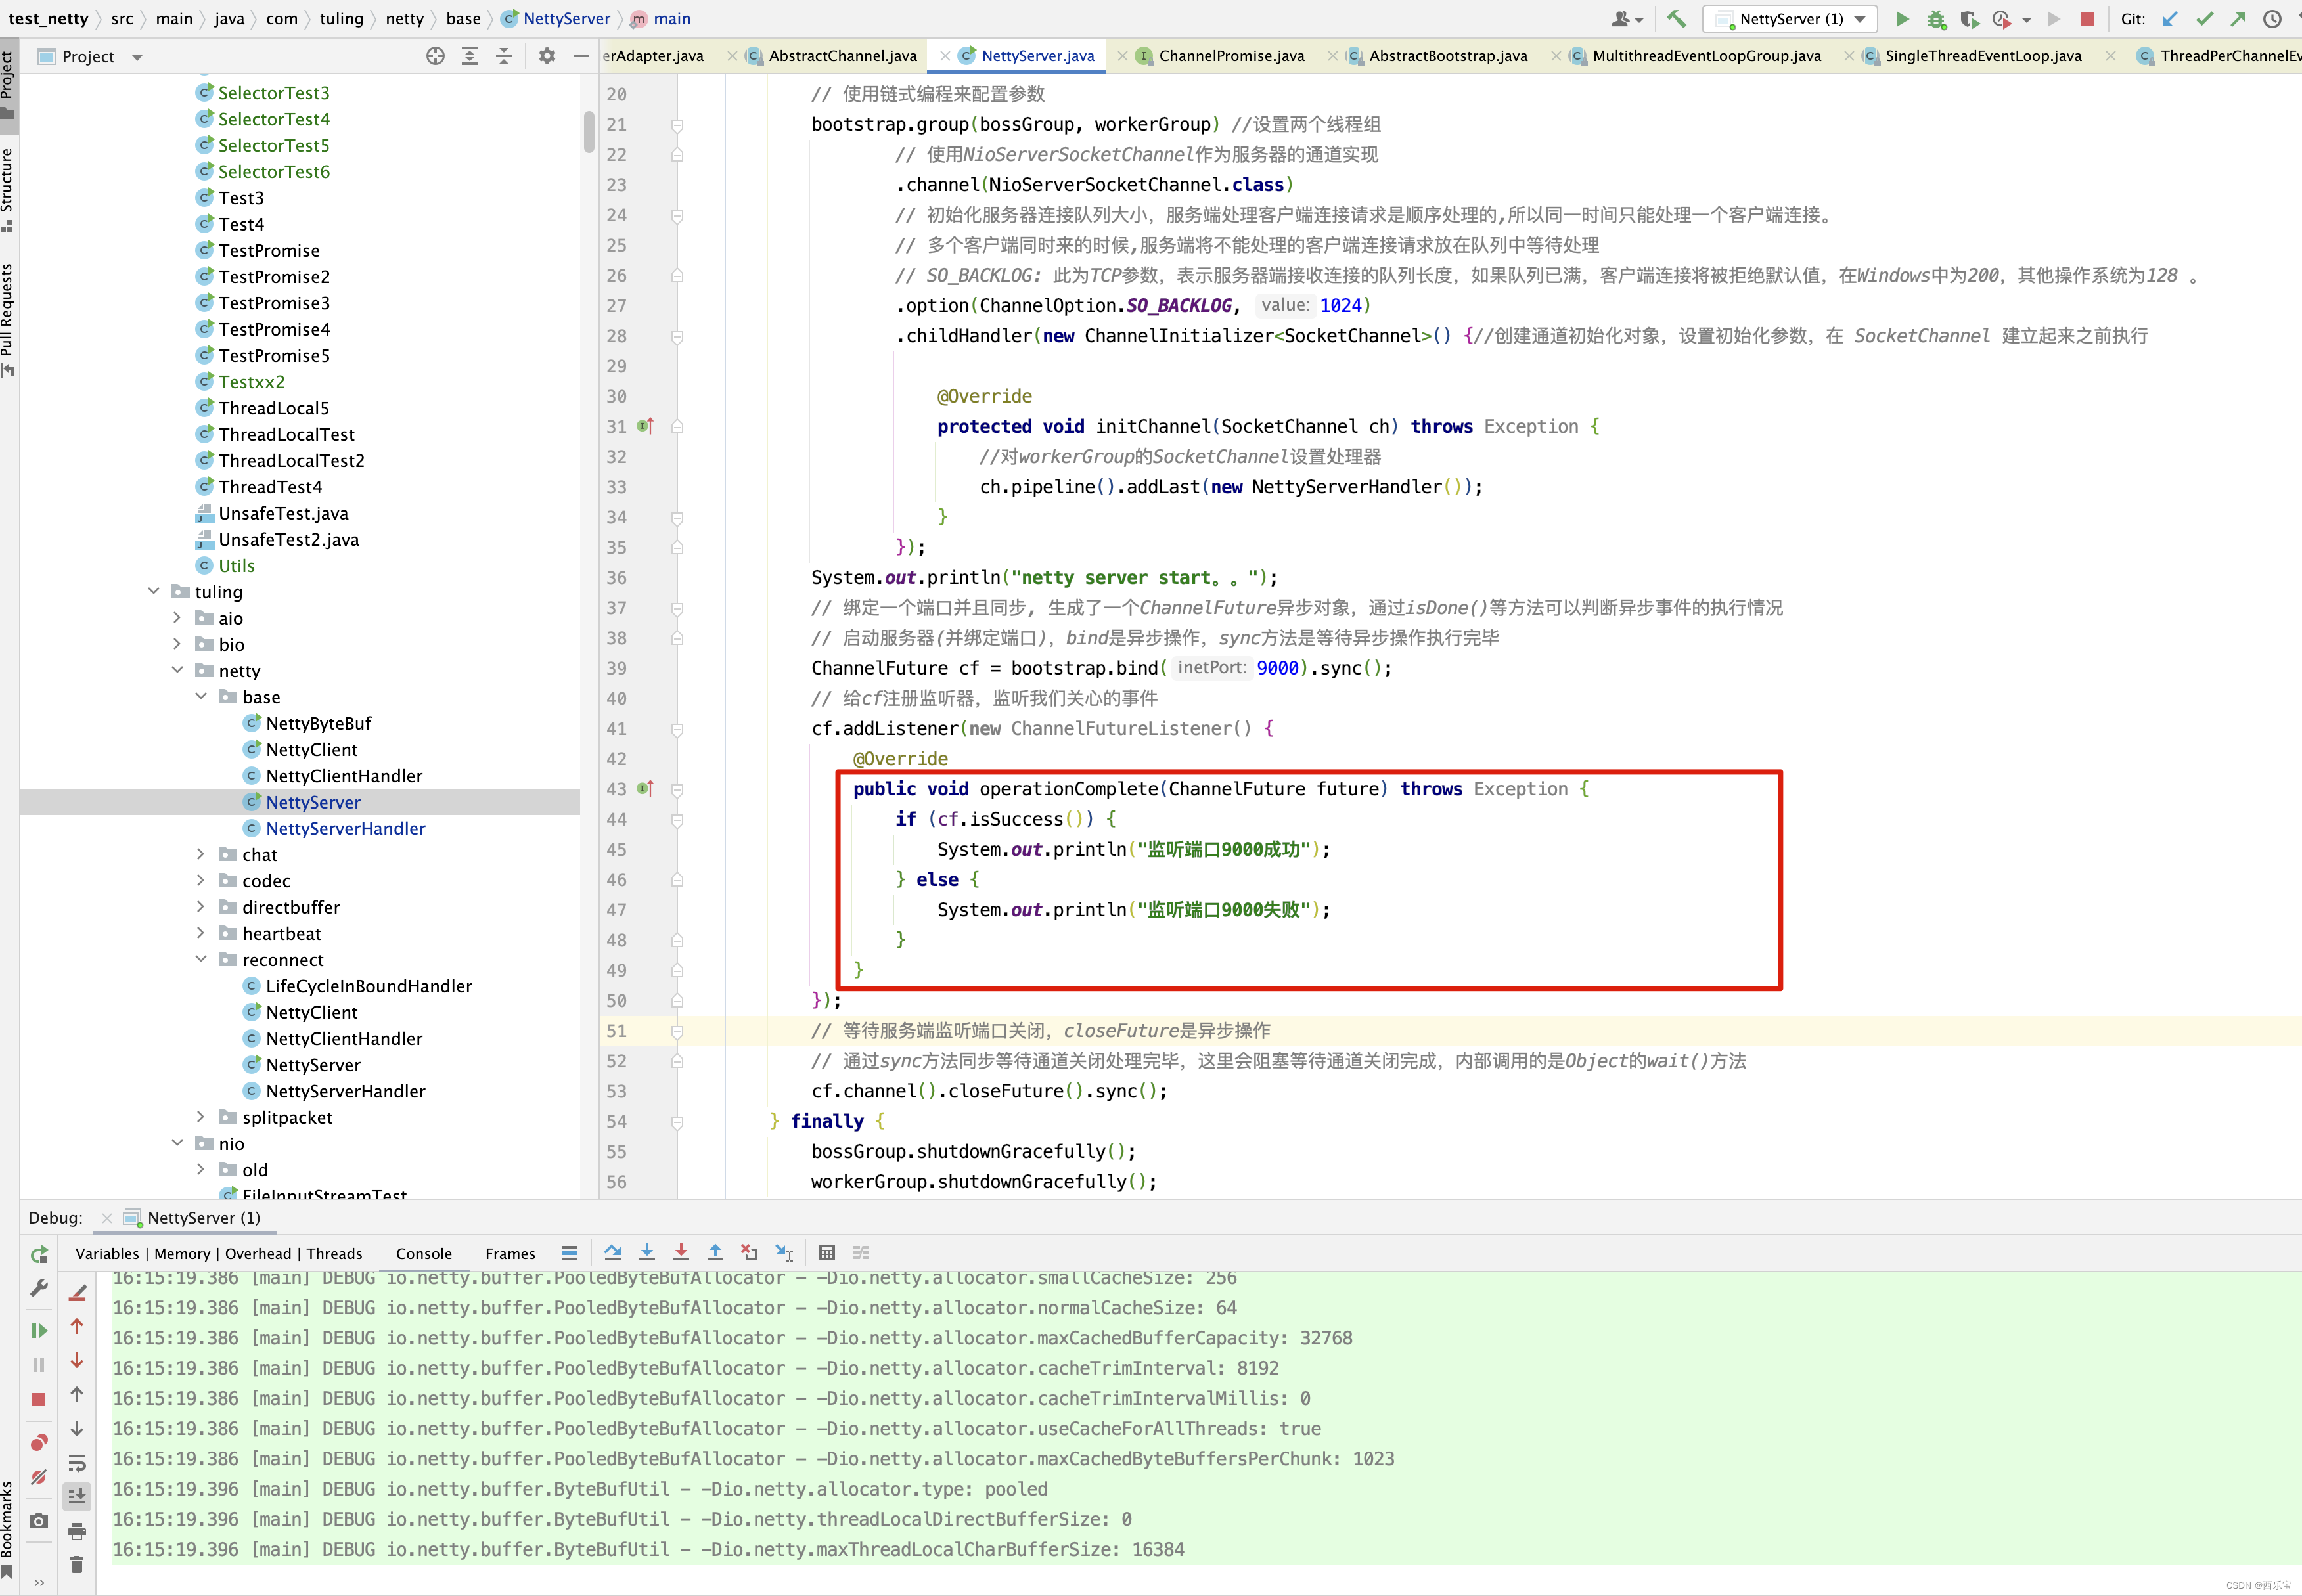
当然,operationComplete()方法的调用也是有先后顺序的,越先声明ChannelFutureListener,它的operationComplete()方法就越先被调用 。
接下来看doBind0()具体做了哪些事情 。
private static void doBind0(
        final ChannelFuture regFuture, final Channel channel,
        final SocketAddress localAddress, final ChannelPromise promise) {

    // This method is invoked before channelRegistered() is triggered.  Give user handlers a chance to set up
    // the pipeline in its channelRegistered() implementation.
    channel.eventLoop().execute(new Runnable() {
        @Override
        public void run() {
            if (regFuture.isSuccess()) {
                channel.bind(localAddress, promise).addListener(ChannelFutureListener.CLOSE_ON_FAILURE);
            } else {
                promise.setFailure(regFuture.cause());
            }
        }
    });
}
发现没有,又创建了一个任务添加到EventLoop的任务队列中.
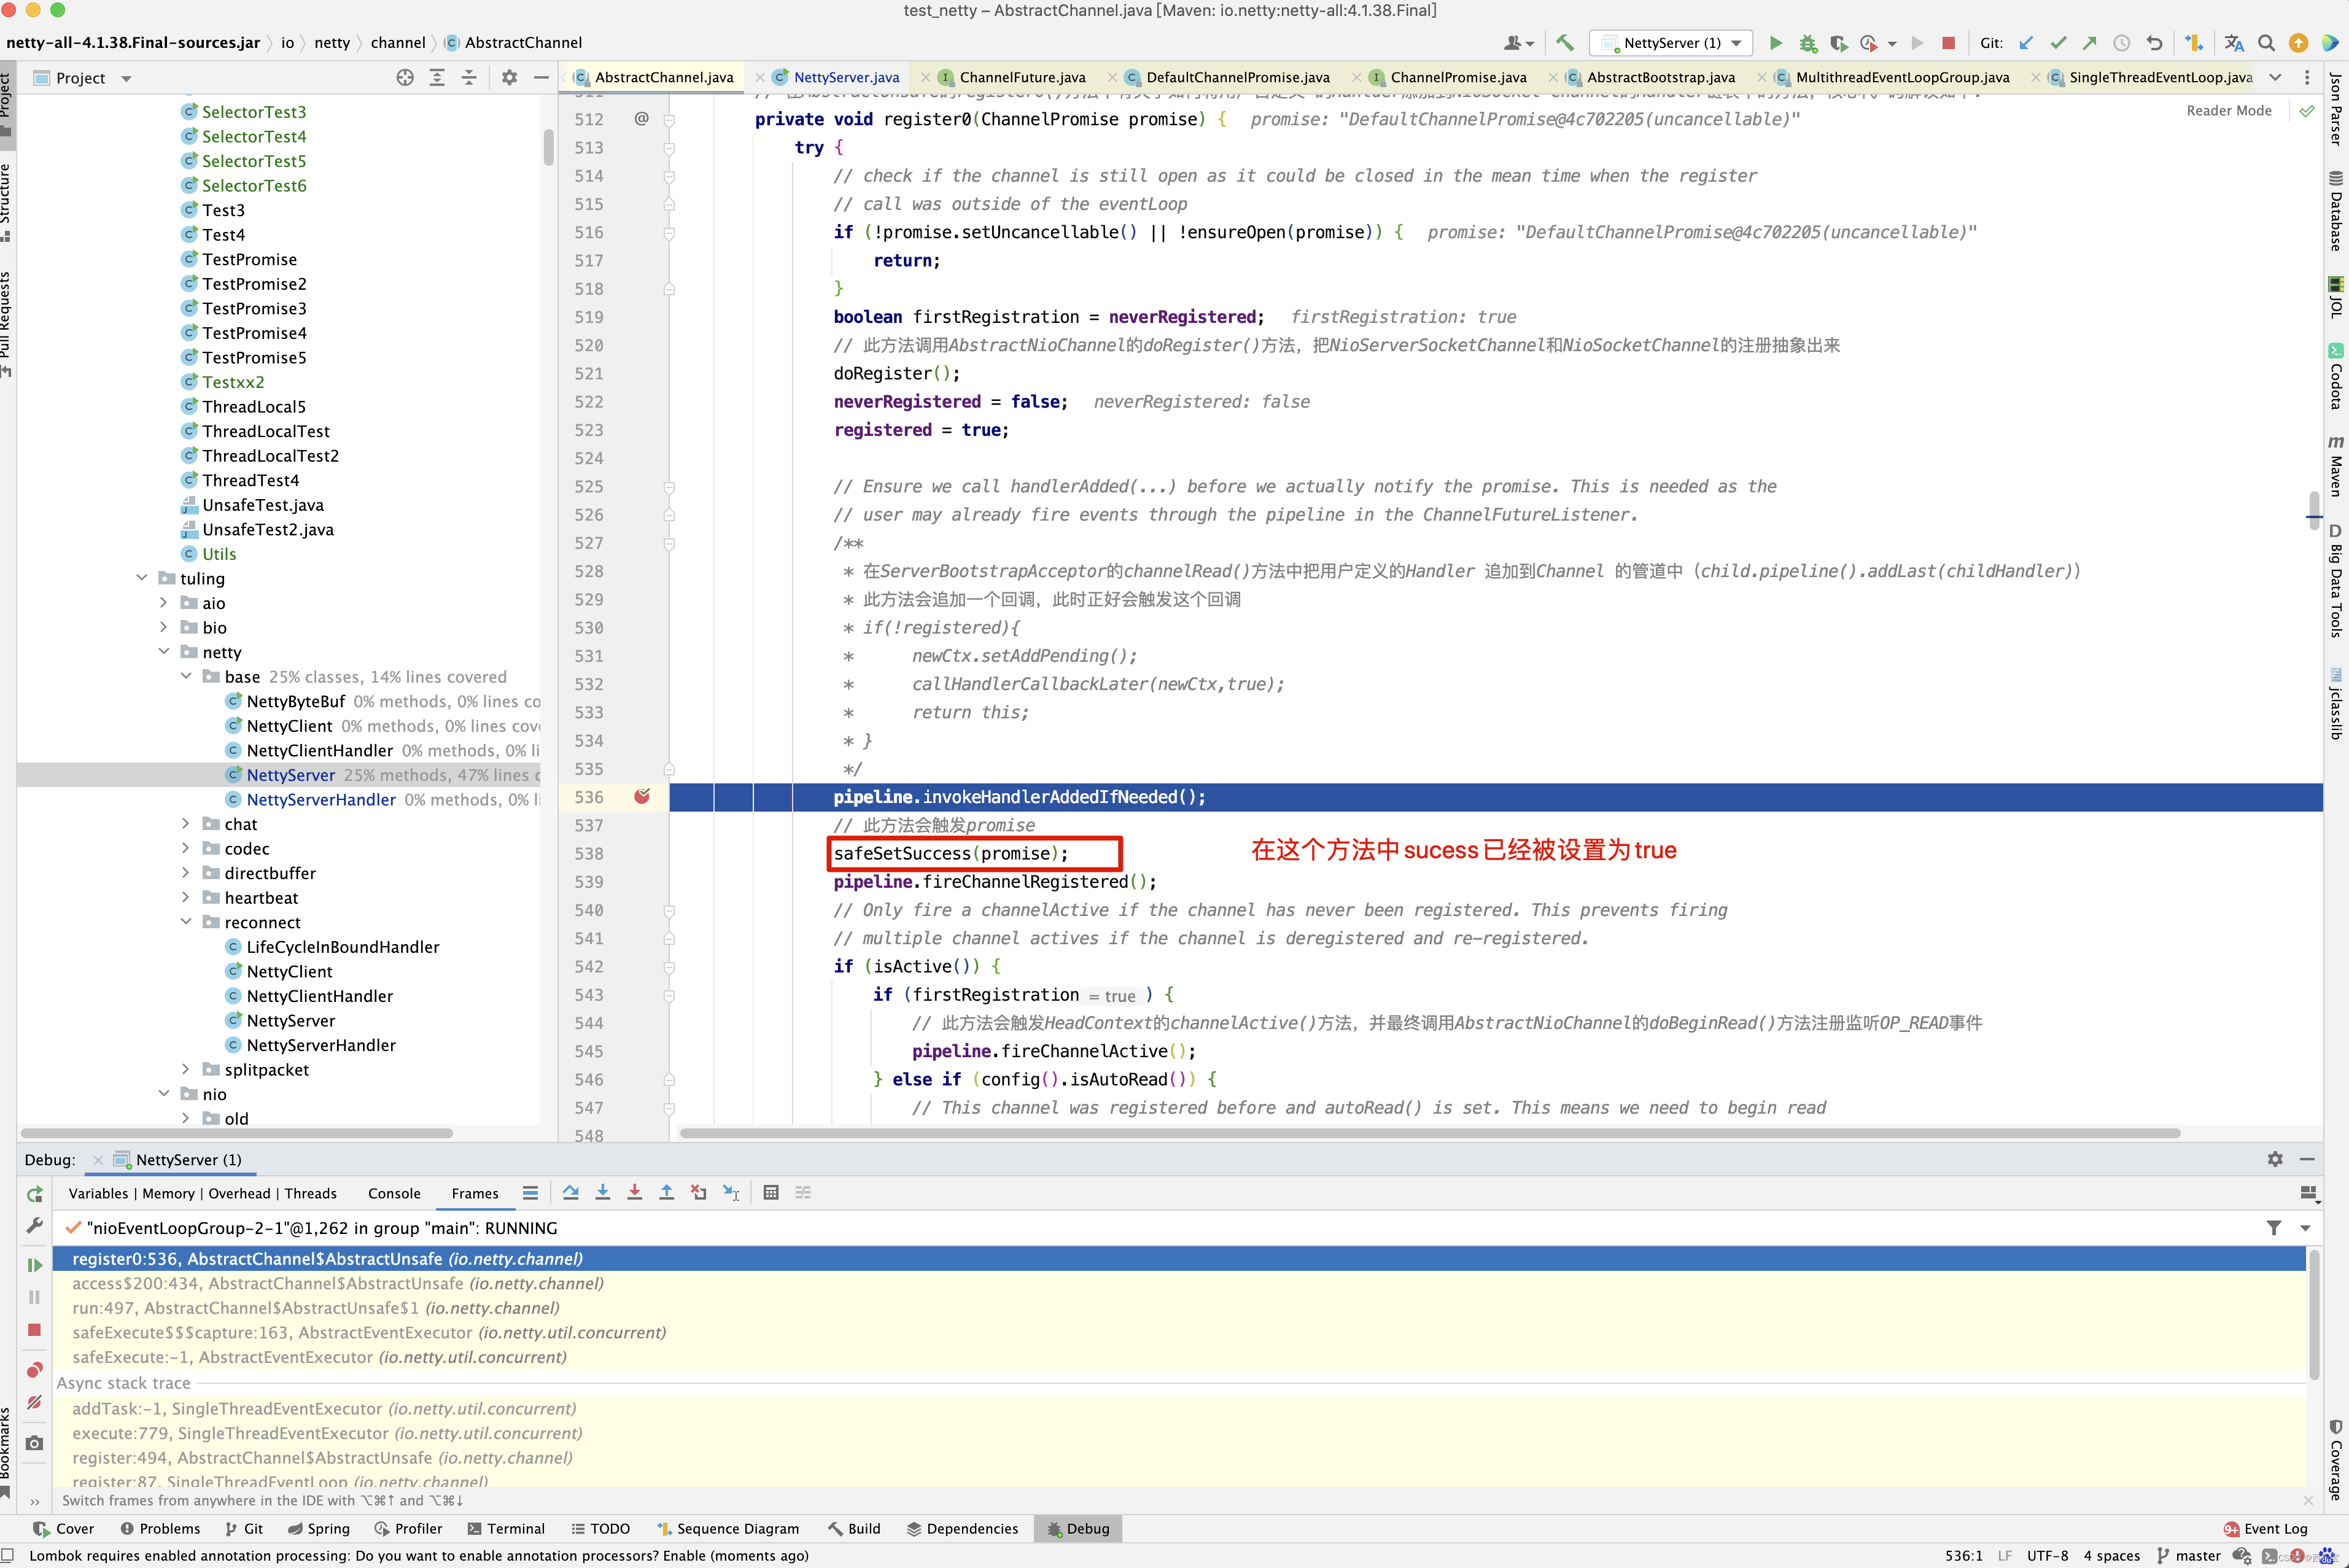
因为在AbstractChannel的register0()方法中已经被设置为true。因此if (regFuture.isSuccess()) 判断将返回true,进入channel.bind(localAddress, promise)方法 。
public ChannelFuture bind(SocketAddress localAddress, ChannelPromise promise) {
    return pipeline.bind(localAddress, promise);
}

public final ChannelFuture bind(SocketAddress localAddress, ChannelPromise promise) {
    return tail.bind(localAddress, promise);
}
调用channel的bind()方法,实际上是调用了pipeline的bind()方法,而调用pipeline的bind()方法,实际上是从tail向前调用所有流水线上的bind()方法 。 接下来进入
public ChannelFuture bind(final SocketAddress localAddress, final ChannelPromise promise) {
    if (localAddress == null) {
        throw new NullPointerException("localAddress");
    }
    if (isNotValidPromise(promise, false)) {
        // cancelled
        return promise;
    }

    final AbstractChannelHandlerContext next = findContextOutbound(MASK_BIND);
    EventExecutor executor = next.executor();
    if (executor.inEventLoop()) {
        next.invokeBind(localAddress, promise);
    } else {
        safeExecute(executor, new Runnable() {
            @Override
            public void run() {
                next.invokeBind(localAddress, promise);
            }
        }, promise, null);
    }
    return promise;
}
findContextInbound()方法,是从pipeline链表中从前向后调用,而findContextOutbound()方法,是从链表从后向前调用 。
private AbstractChannelHandlerContext findContextOutbound(int mask) {
    AbstractChannelHandlerContext ctx = this;
    do {
    	// 从后向前查找
        ctx = ctx.prev;
    //如果ctx.executionMask & mask == 0
    // 则证明handler 的 mask对应的方法上设置了Skip注解
    } while ((ctx.executionMask & mask) == 0);
    return ctx;
}
上面关于ctx.executionMask & mask 应该怎样理解呢? 先弄明白ctx的executionMask参数是如何初始化的。 这个要回溯到DefaultChannelHandlerContext的构造方法中。 请看AbstractChannelHandlerContext,其中加粗代码this.executionMask = mask(handlerClass);就是初始化executionMask的值。那进入mask()方法中,看executionMask是如何计算得来的。
static int mask(Class<? extends ChannelHandler> clazz) {
    // Try to obtain the mask from the cache first. If this fails calculate it and put it in the cache for fast
    // lookup in the future.
    Map<Class<? extends ChannelHandler>, Integer> cache = MASKS.get();
    Integer mask = cache.get(clazz);
    if (mask == null) {
        mask = mask0(clazz);
        cache.put(clazz, mask);
    }
    return mask;
}
mask()方法的逻辑还是很简单的,根据类类型从缓存中查找,如果缓存中不存在,则调用mask0()方法获取 。
final class ChannelHandlerMask {
    private static final InternalLogger logger = InternalLoggerFactory.getInstance(ChannelHandlerMask.class);
    static final int MASK_EXCEPTION_CAUGHT = 1;
    static final int MASK_CHANNEL_REGISTERED = 1 << 1;
    static final int MASK_CHANNEL_UNREGISTERED = 1 << 2;
    static final int MASK_CHANNEL_ACTIVE = 1 << 3;
    static final int MASK_CHANNEL_INACTIVE = 1 << 4;
    static final int MASK_CHANNEL_READ = 1 << 5;
    static final int MASK_CHANNEL_READ_COMPLETE = 1 << 6;
    static final int MASK_USER_EVENT_TRIGGERED = 1 << 7;
    static final int MASK_CHANNEL_WRITABILITY_CHANGED = 1 << 8;
    static final int MASK_BIND = 1 << 9;
    static final int MASK_CONNECT = 1 << 10;
    static final int MASK_DISCONNECT = 1 << 11;
    static final int MASK_CLOSE = 1 << 12;
    static final int MASK_DEREGISTER = 1 << 13;
    static final int MASK_READ = 1 << 14;
    static final int MASK_WRITE = 1 << 15;
    static final int MASK_FLUSH = 1 << 16;

    private static final int MASK_ALL_INBOUND = MASK_EXCEPTION_CAUGHT | MASK_CHANNEL_REGISTERED |
            MASK_CHANNEL_UNREGISTERED | MASK_CHANNEL_ACTIVE | MASK_CHANNEL_INACTIVE | MASK_CHANNEL_READ |
            MASK_CHANNEL_READ_COMPLETE | MASK_USER_EVENT_TRIGGERED | MASK_CHANNEL_WRITABILITY_CHANGED;
    private static final int MASK_ALL_OUTBOUND = MASK_EXCEPTION_CAUGHT | MASK_BIND | MASK_CONNECT | MASK_DISCONNECT |
            MASK_CLOSE | MASK_DEREGISTER | MASK_READ | MASK_WRITE | MASK_FLUSH;

    private static final FastThreadLocal<Map<Class<? extends ChannelHandler>, Integer>> MASKS =
            new FastThreadLocal<Map<Class<? extends ChannelHandler>, Integer>>() {
                @Override
                protected Map<Class<? extends ChannelHandler>, Integer> initialValue() {
                    return new WeakHashMap<Class<? extends ChannelHandler>, Integer>(32);
                }
            };


    private static int mask0(Class<? extends ChannelHandler> handlerType) {
        int mask = MASK_EXCEPTION_CAUGHT;
        try {
            if (ChannelInboundHandler.class.isAssignableFrom(handlerType)) {
                mask |= MASK_ALL_INBOUND;

                if (isSkippable(handlerType, "channelRegistered", ChannelHandlerContext.class)) {
                    mask &= ~MASK_CHANNEL_REGISTERED;
                }
				...
            }

            if (ChannelOutboundHandler.class.isAssignableFrom(handlerType)) {
                mask |= MASK_ALL_OUTBOUND;

                if (isSkippable(handlerType, "bind", ChannelHandlerContext.class,
                        SocketAddress.class, ChannelPromise.class)) {
                    mask &= ~MASK_BIND;
                }

                ...
            }

            if (isSkippable(handlerType, "exceptionCaught", ChannelHandlerContext.class, Throwable.class)) {
                mask &= ~MASK_EXCEPTION_CAUGHT;
            }
        } catch (Exception e) {
            PlatformDependent.throwException(e);
        }

        return mask;
    }

    @SuppressWarnings("rawtypes")
    private static boolean isSkippable(
            final Class<?> handlerType, final String methodName, final Class<?>... paramTypes) throws Exception {
        return AccessController.doPrivileged(new PrivilegedExceptionAction<Boolean>() {
            @Override
            public Boolean run() throws Exception {
                Method m;
                try {
                    m = handlerType.getMethod(methodName, paramTypes);
                } catch (NoSuchMethodException e) {
                    logger.debug(
                        "Class {} missing method {}, assume we can not skip execution", handlerType, methodName, e);
                    return false;
                }
                // 如果方法存在,并且方法上有Skip注解,则返回true
                return m != null && m.isAnnotationPresent(Skip.class);
            }
        });
    }

    private ChannelHandlerMask() { }

    @Target(ElementType.METHOD)
    @Retention(RetentionPolicy.RUNTIME)
    @interface Skip {

    }
}
如果ChannelHandler的bind()方法上配置了@Skip注解,其他方法都没有配置@Skip注解,则executionMask的计算方式 。
首先
MASK_ALL_OUTBOUND转化为二进制为 11111111000000001
~MASK_BIND = 11111111111111111111110111111111
mask &= ~MASK_BIND; 等于
1 1111 1110 0000 0001 &
1 1111 1101 1111 1111 =
1 1111 1100 0000 0001
因此得到executionMask = mask &= ~MASK_BIND 的二进制数为
1 1111 1100 0000 0001
而
MASK_BIND的值转化为二进制为
0 0000 0010 0000 0000
因此再来理解 findContextOutbound()方法中的while条件ctx.executionMask & mask 就好理解了。
假如Handler的bind()方法配置了@Skip 注解,其他方法都没有配置@Skip注解 ,则它的executionMask转化为二进制为
1 1111 1100 0000 0001
而 MASK_BIND的二进制码为
0 0000 0010 0000 0000 ,那两者二进制相与值为0
1 1111 1100 0000 0001 &
0 0000 0010 0000 0000 =
0 0000 0000 0000 0000
在本例findContextOutbound() 方法中,只要链表中的节点对应的handler的bind()方法加了@Skip注解,则跳过当前节点, 继续向前查找 。 当然啦,上面两行加粗代码的判断也需要注意, ChannelInboundHandler.class.isAssignableFrom(handlerType), 和ChannelOutboundHandler.class.isAssignableFrom(handlerType),也就是说,如果类只有是ChannelInboundHandler的子类,拥有MASK_ALL_INBOUND ,同理,类只有继承ChannelOutboundHandler才能拥有MASK_ALL_OUTBOUND 。
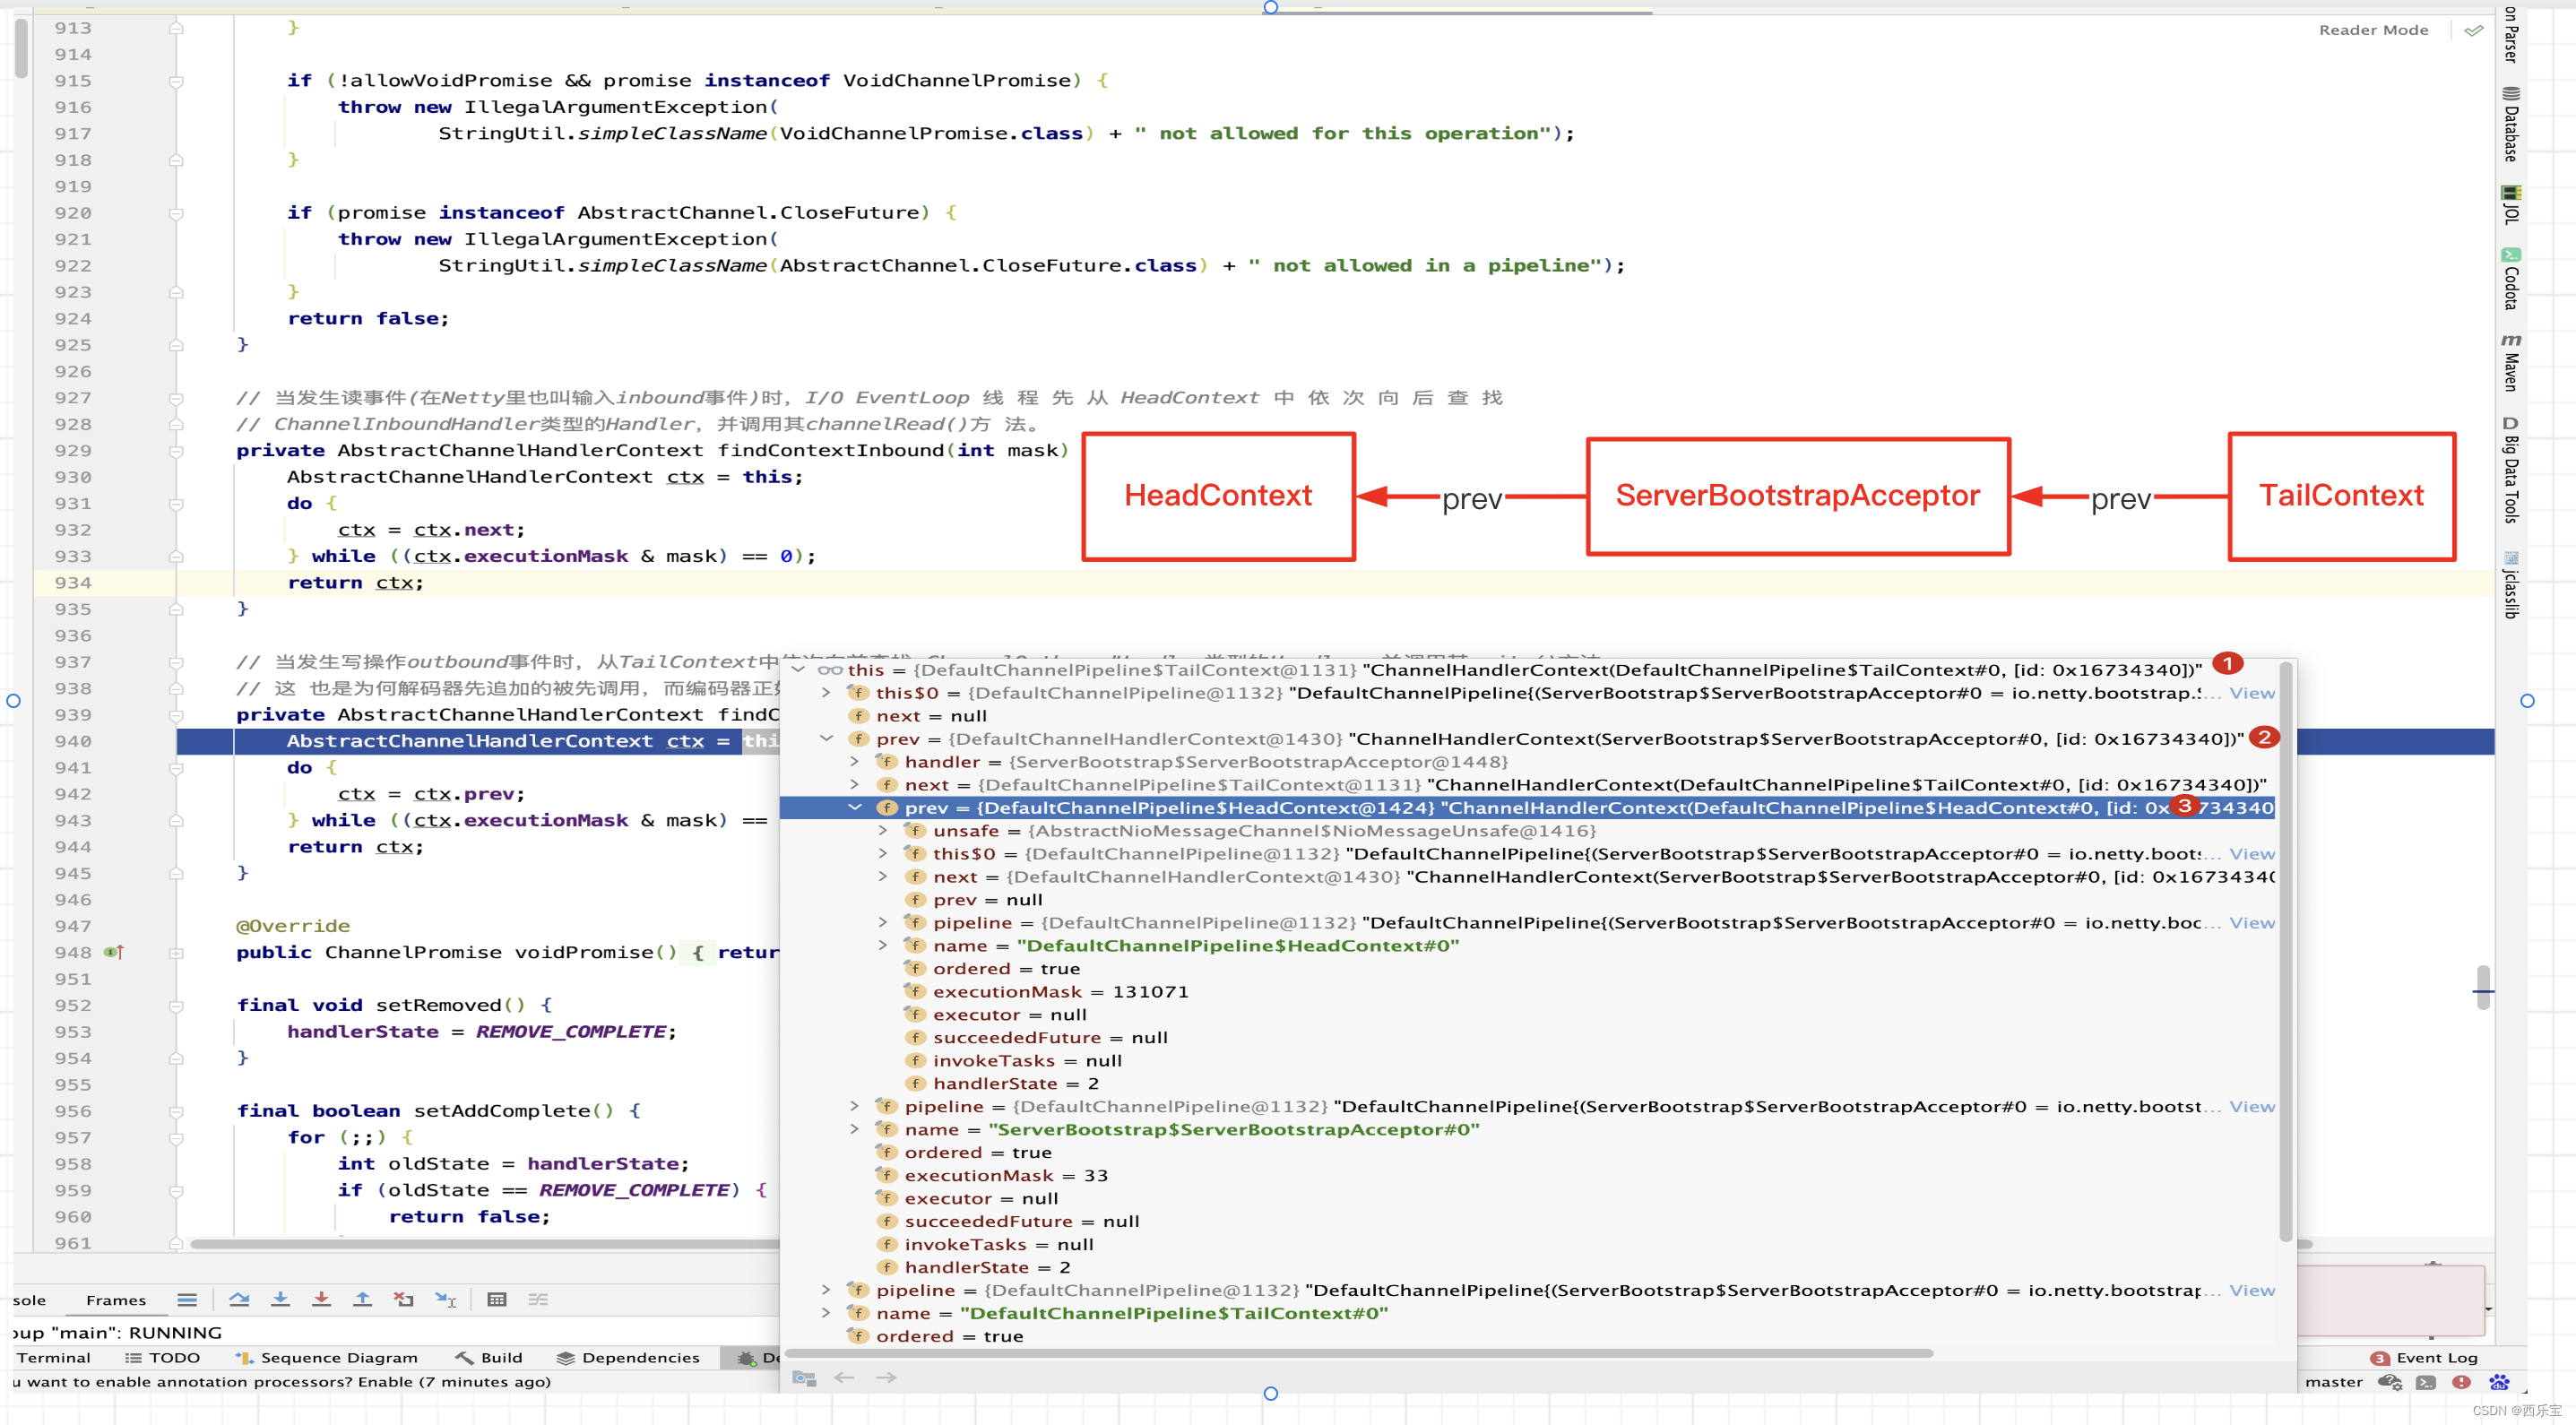
先来看TailContext的类关系 。
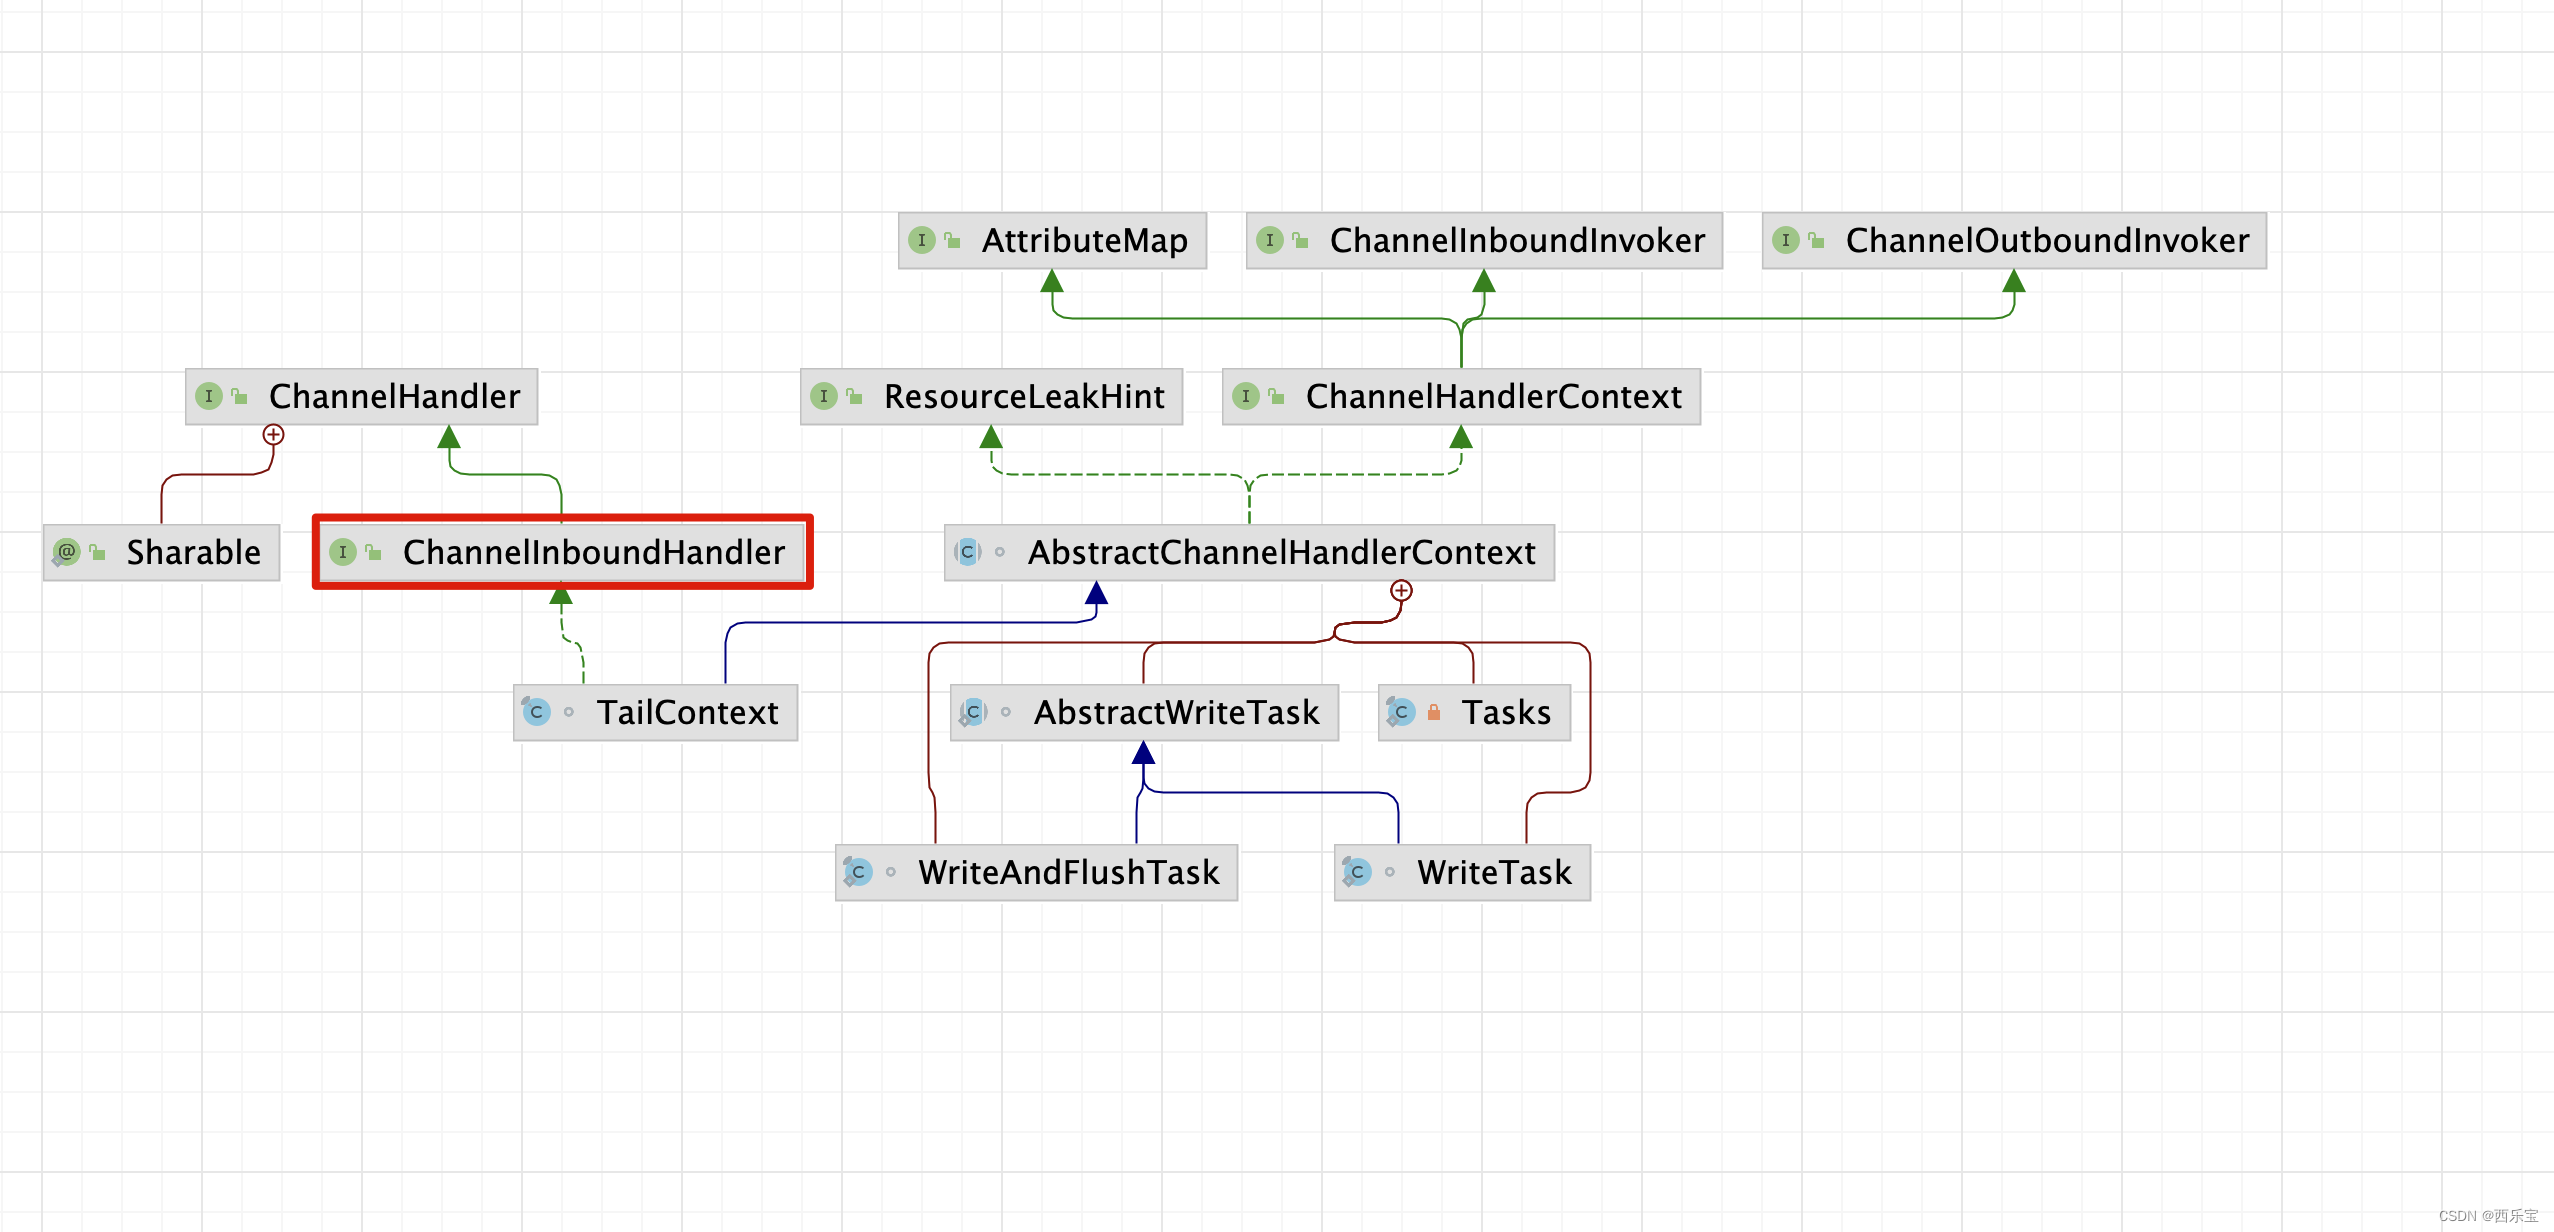
再来看ServerBootstrapAcceptor的类关系 。

TailContext和ServerBootstrapAcceptor都是ChannelInboundHandler的子类,而它们的executionMask & MASK_BIND == 0,因此真正调用的是HeadContext的bind()方法 。
private void invokeBind(SocketAddress localAddress, ChannelPromise promise) {
    if (invokeHandler()) {
        try {
            ((ChannelOutboundHandler) handler()).bind(this, localAddress, promise);
        } catch (Throwable t) {
            notifyOutboundHandlerException(t, promise);
        }
    } else {
        bind(localAddress, promise);
    }
}

public void bind(
        ChannelHandlerContext ctx, SocketAddress localAddress, ChannelPromise promise) {
    unsafe.bind(localAddress, promise);
}
对于NioServerSocketChannel的unsafe是 NioMessageUnsafe,进入NioMessageUnsafe的bind()方法 。
public final void bind(final SocketAddress localAddress, final ChannelPromise promise) {
    assertEventLoop();

    if (!promise.setUncancellable() || !ensureOpen(promise)) {
        return;
    }

    // See: https://github.com/netty/netty/issues/576
    if (Boolean.TRUE.equals(config().getOption(ChannelOption.SO_BROADCAST)) &&
        localAddress instanceof InetSocketAddress &&
        !((InetSocketAddress) localAddress).getAddress().isAnyLocalAddress() &&
        !PlatformDependent.isWindows() && !PlatformDependent.maybeSuperUser()) {
        // Warn a user about the fact that a non-root user can't receive a
        // broadcast packet on *nix if the socket is bound on non-wildcard address.
        logger.warn(
                "A non-root user can't receive a broadcast packet if the socket " +
                "is not bound to a wildcard address; binding to a non-wildcard " +
                "address (" + localAddress + ") anyway as requested.");
    }

    boolean wasActive = isActive();
    try {
        // 模板设计模式,调用子类的NioServerSocketChannel的doBind()方法
        doBind(localAddress);
    } catch (Throwable t) {
        // 绑定失败回调
        safeSetFailure(promise, t);
        closeIfClosed();
        return;
    }
    // 从非活跃状态到活跃状态触发了active事件,如果之前没有激活,调用bind()方法后就已经激活了,激活后需要调用fireChannelActive 方法 。

    if (!wasActive && isActive()) {
        invokeLater(new Runnable() {
            @Override
            public void run() {
            	// 第一次激活,需要调用流水线中handler的channelActive 方法
                pipeline.fireChannelActive();
            }
        });
    }
    // 绑定成功回调通知
    safeSetSuccess(promise);
}
模板设计模式,根据不同的Channel 调用它的bind()方法 。
protected void doBind(SocketAddress localAddress) throws Exception {
    if (PlatformDependent.javaVersion() >= 7) {
        javaChannel().bind(localAddress, config.getBacklog());
    } else {
        javaChannel().socket().bind(localAddress, config.getBacklog());
    }
}
这里以NioServerSocketChannel为例,真正调用的是ServerSocketChannelImpl的bind()方法 。
之前的例子中bind()方法是这样写的。
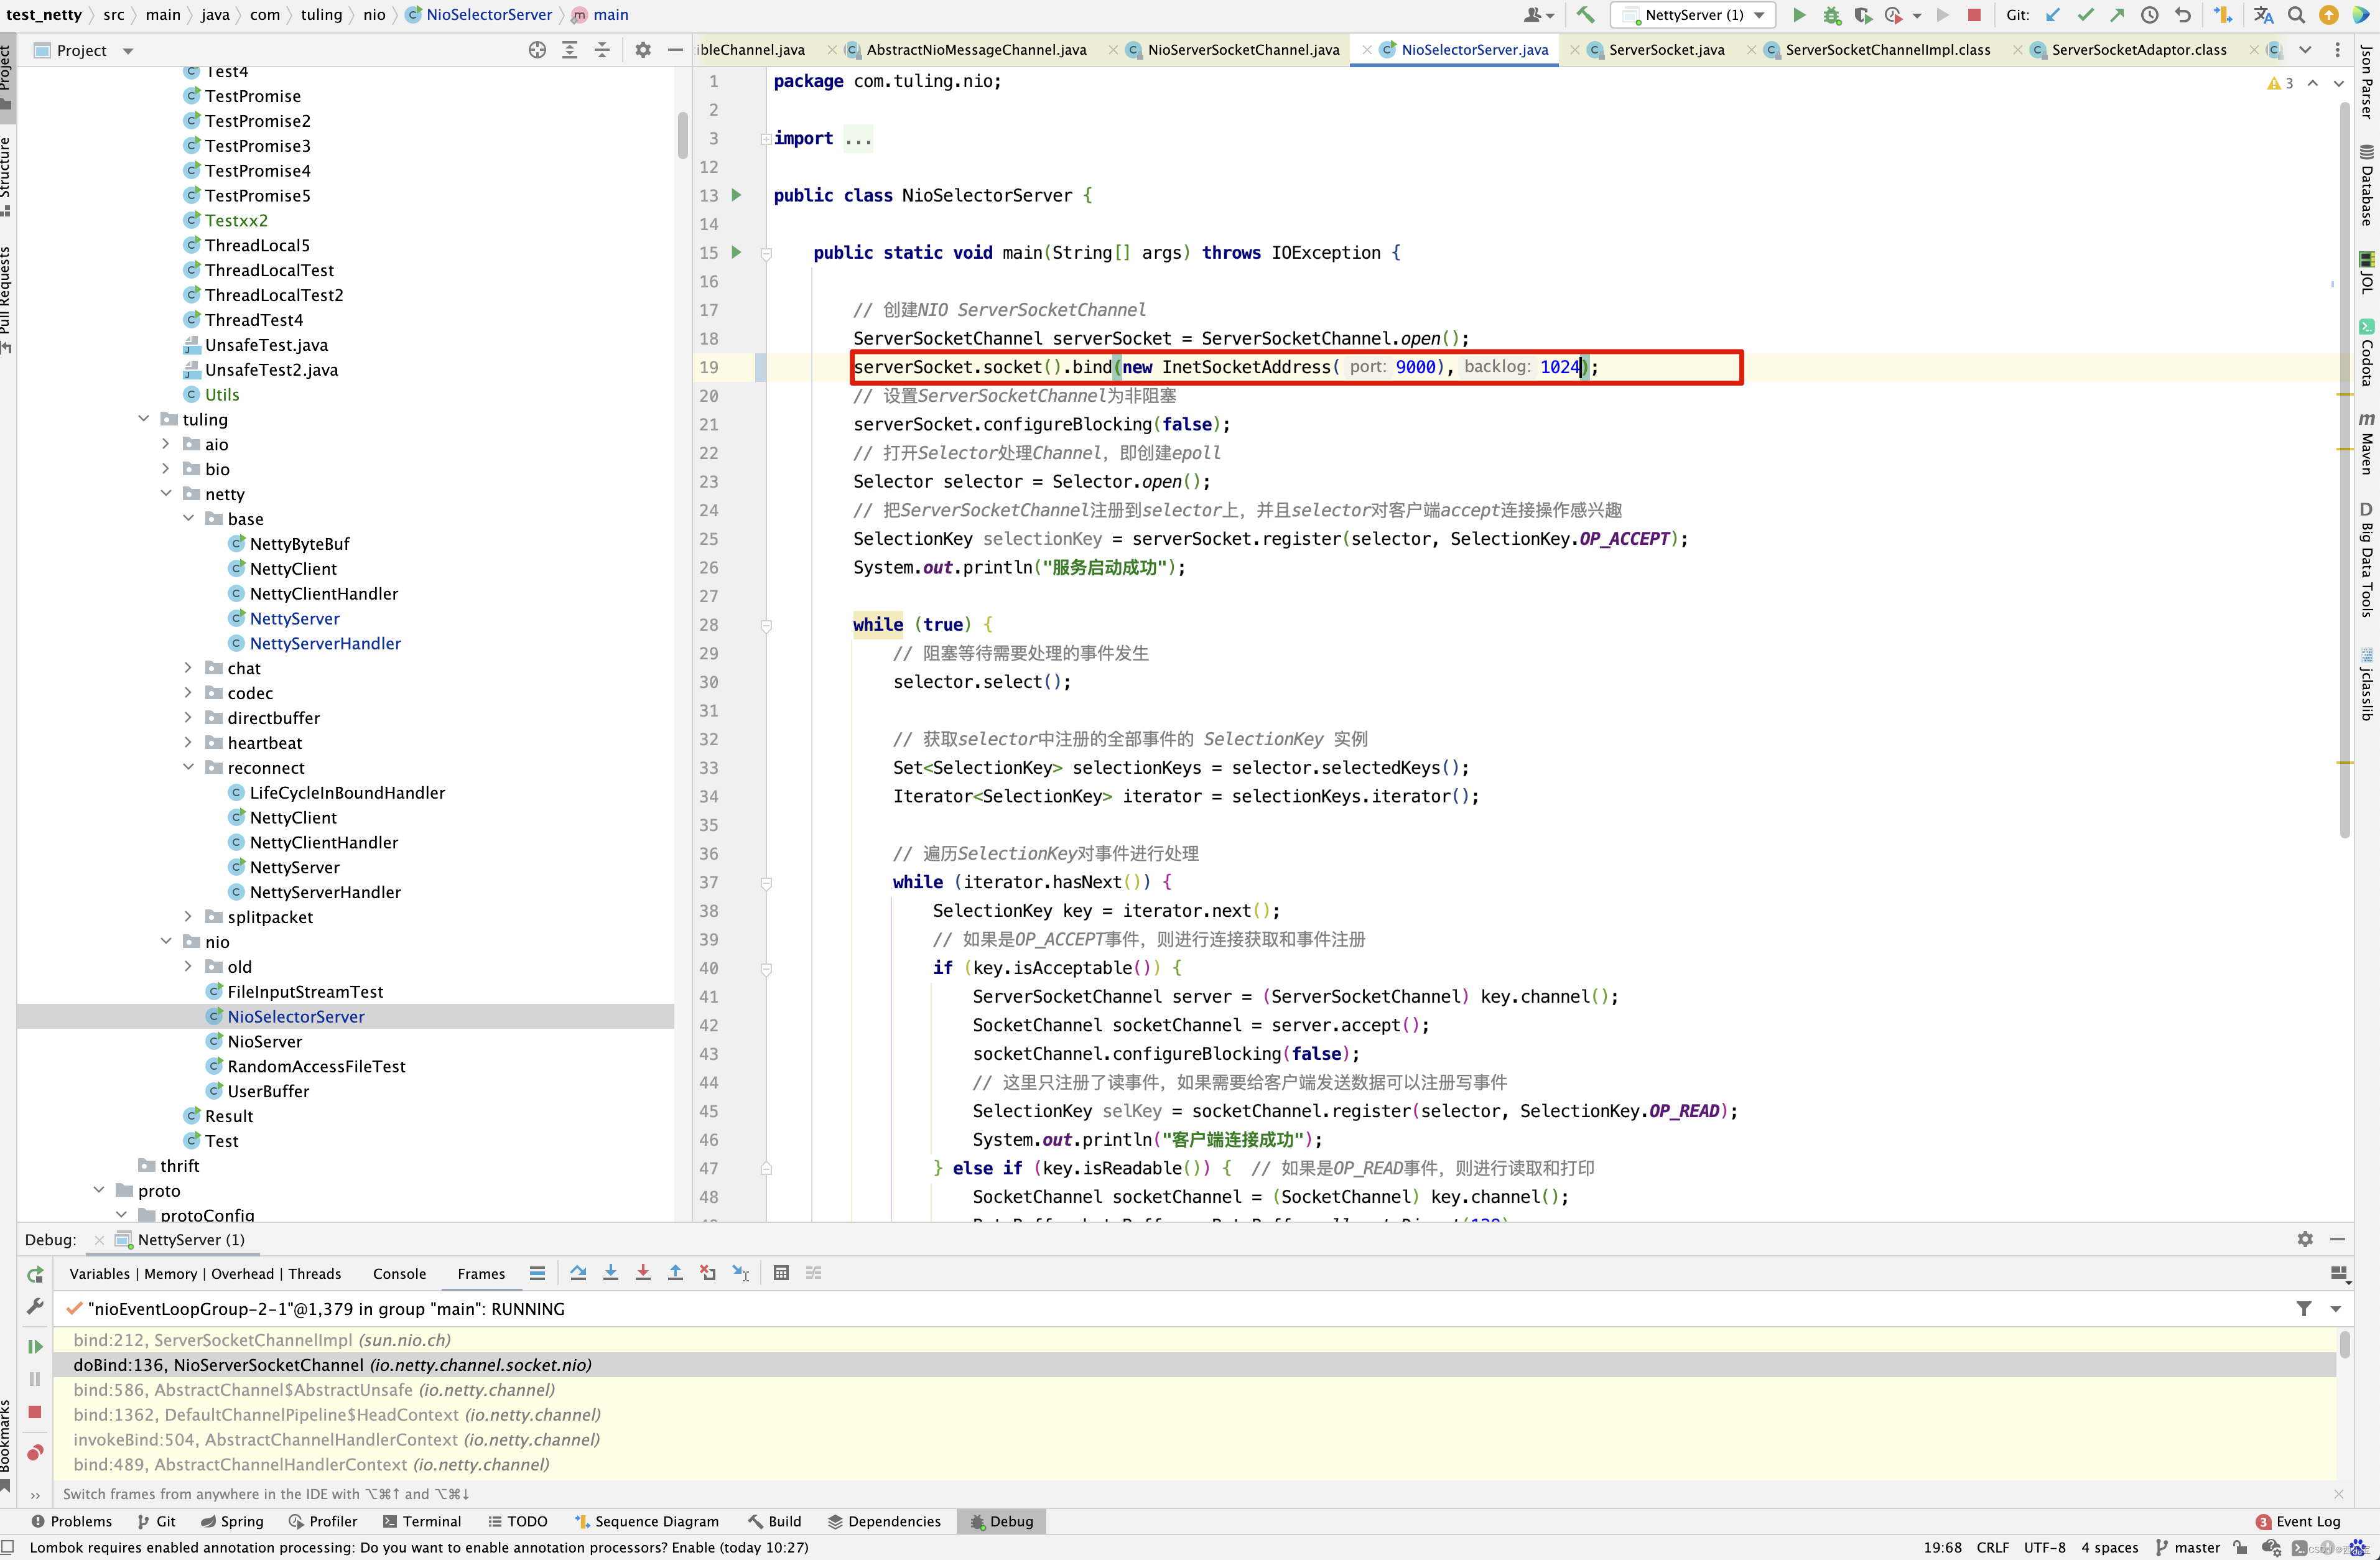
先来分析ServerSocketChannel serverSocket = ServerSocketChannel.open();这一行代码。
ServerSocketChannel serverSocket = ServerSocketChannel.open();

public static ServerSocketChannel open() throws IOException {
    return SelectorProvider.provider().openServerSocketChannel();
}

public ServerSocketChannel openServerSocketChannel() throws IOException {
    return new ServerSocketChannelImpl(this);
}
ServerSocketChannel.open()方法实际上创建的是ServerSocketChannelImpl对象 。接下来看serverSocket.socket().bind(new InetSocketAddress(9000),1024);这一行代码 。
serverSocket.socket().bind(new InetSocketAddress(9000),1024);

public ServerSocket socket() {
    synchronized(this.stateLock) {
        if (this.socket == null) {
            this.socket = ServerSocketAdaptor.create(this);
        }

        return this.socket;
    }
}

public class ServerSocketAdaptor extends ServerSocket {
    private final ServerSocketChannelImpl ssc;


    public static ServerSocket create(ServerSocketChannelImpl var0) {
        try {
            return new ServerSocketAdaptor(var0);
        } catch (IOException var2) {
            throw new Error(var2);
        }
    }

    private ServerSocketAdaptor(ServerSocketChannelImpl var1) throws IOException {
        this.ssc = var1;
    }
}
socket()最终创建的是ServerSocketAdaptor对象,而他的ssc属性就是ServerSocketChannelImpl自身,因此调用bind()方法实际上又是调用ServerSocketAdaptor的bind()方法 ,进入ServerSocketAdaptor的bind()方法 。
public void bind(SocketAddress var1, int var2) throws IOException {
    if (var1 == null) {
        var1 = new InetSocketAddress(0);
    }

    try {
        this.ssc.bind((SocketAddress)var1, var2);
    } catch (Exception var4) {
        Net.translateException(var4);
    }
}
最终又是调用ssc的bind()方法,从之前的分析逻辑中得知,ssc就是ServerSocketChannelImpl,因此绕了一大圈,
ServerSocketChannel serverSocket = ServerSocketChannel.open();
serverSocket.socket().bind(new InetSocketAddress(9000),1024);
这两行代码实际上调用的是ServerSocketChannelImpl的bind()方法 。
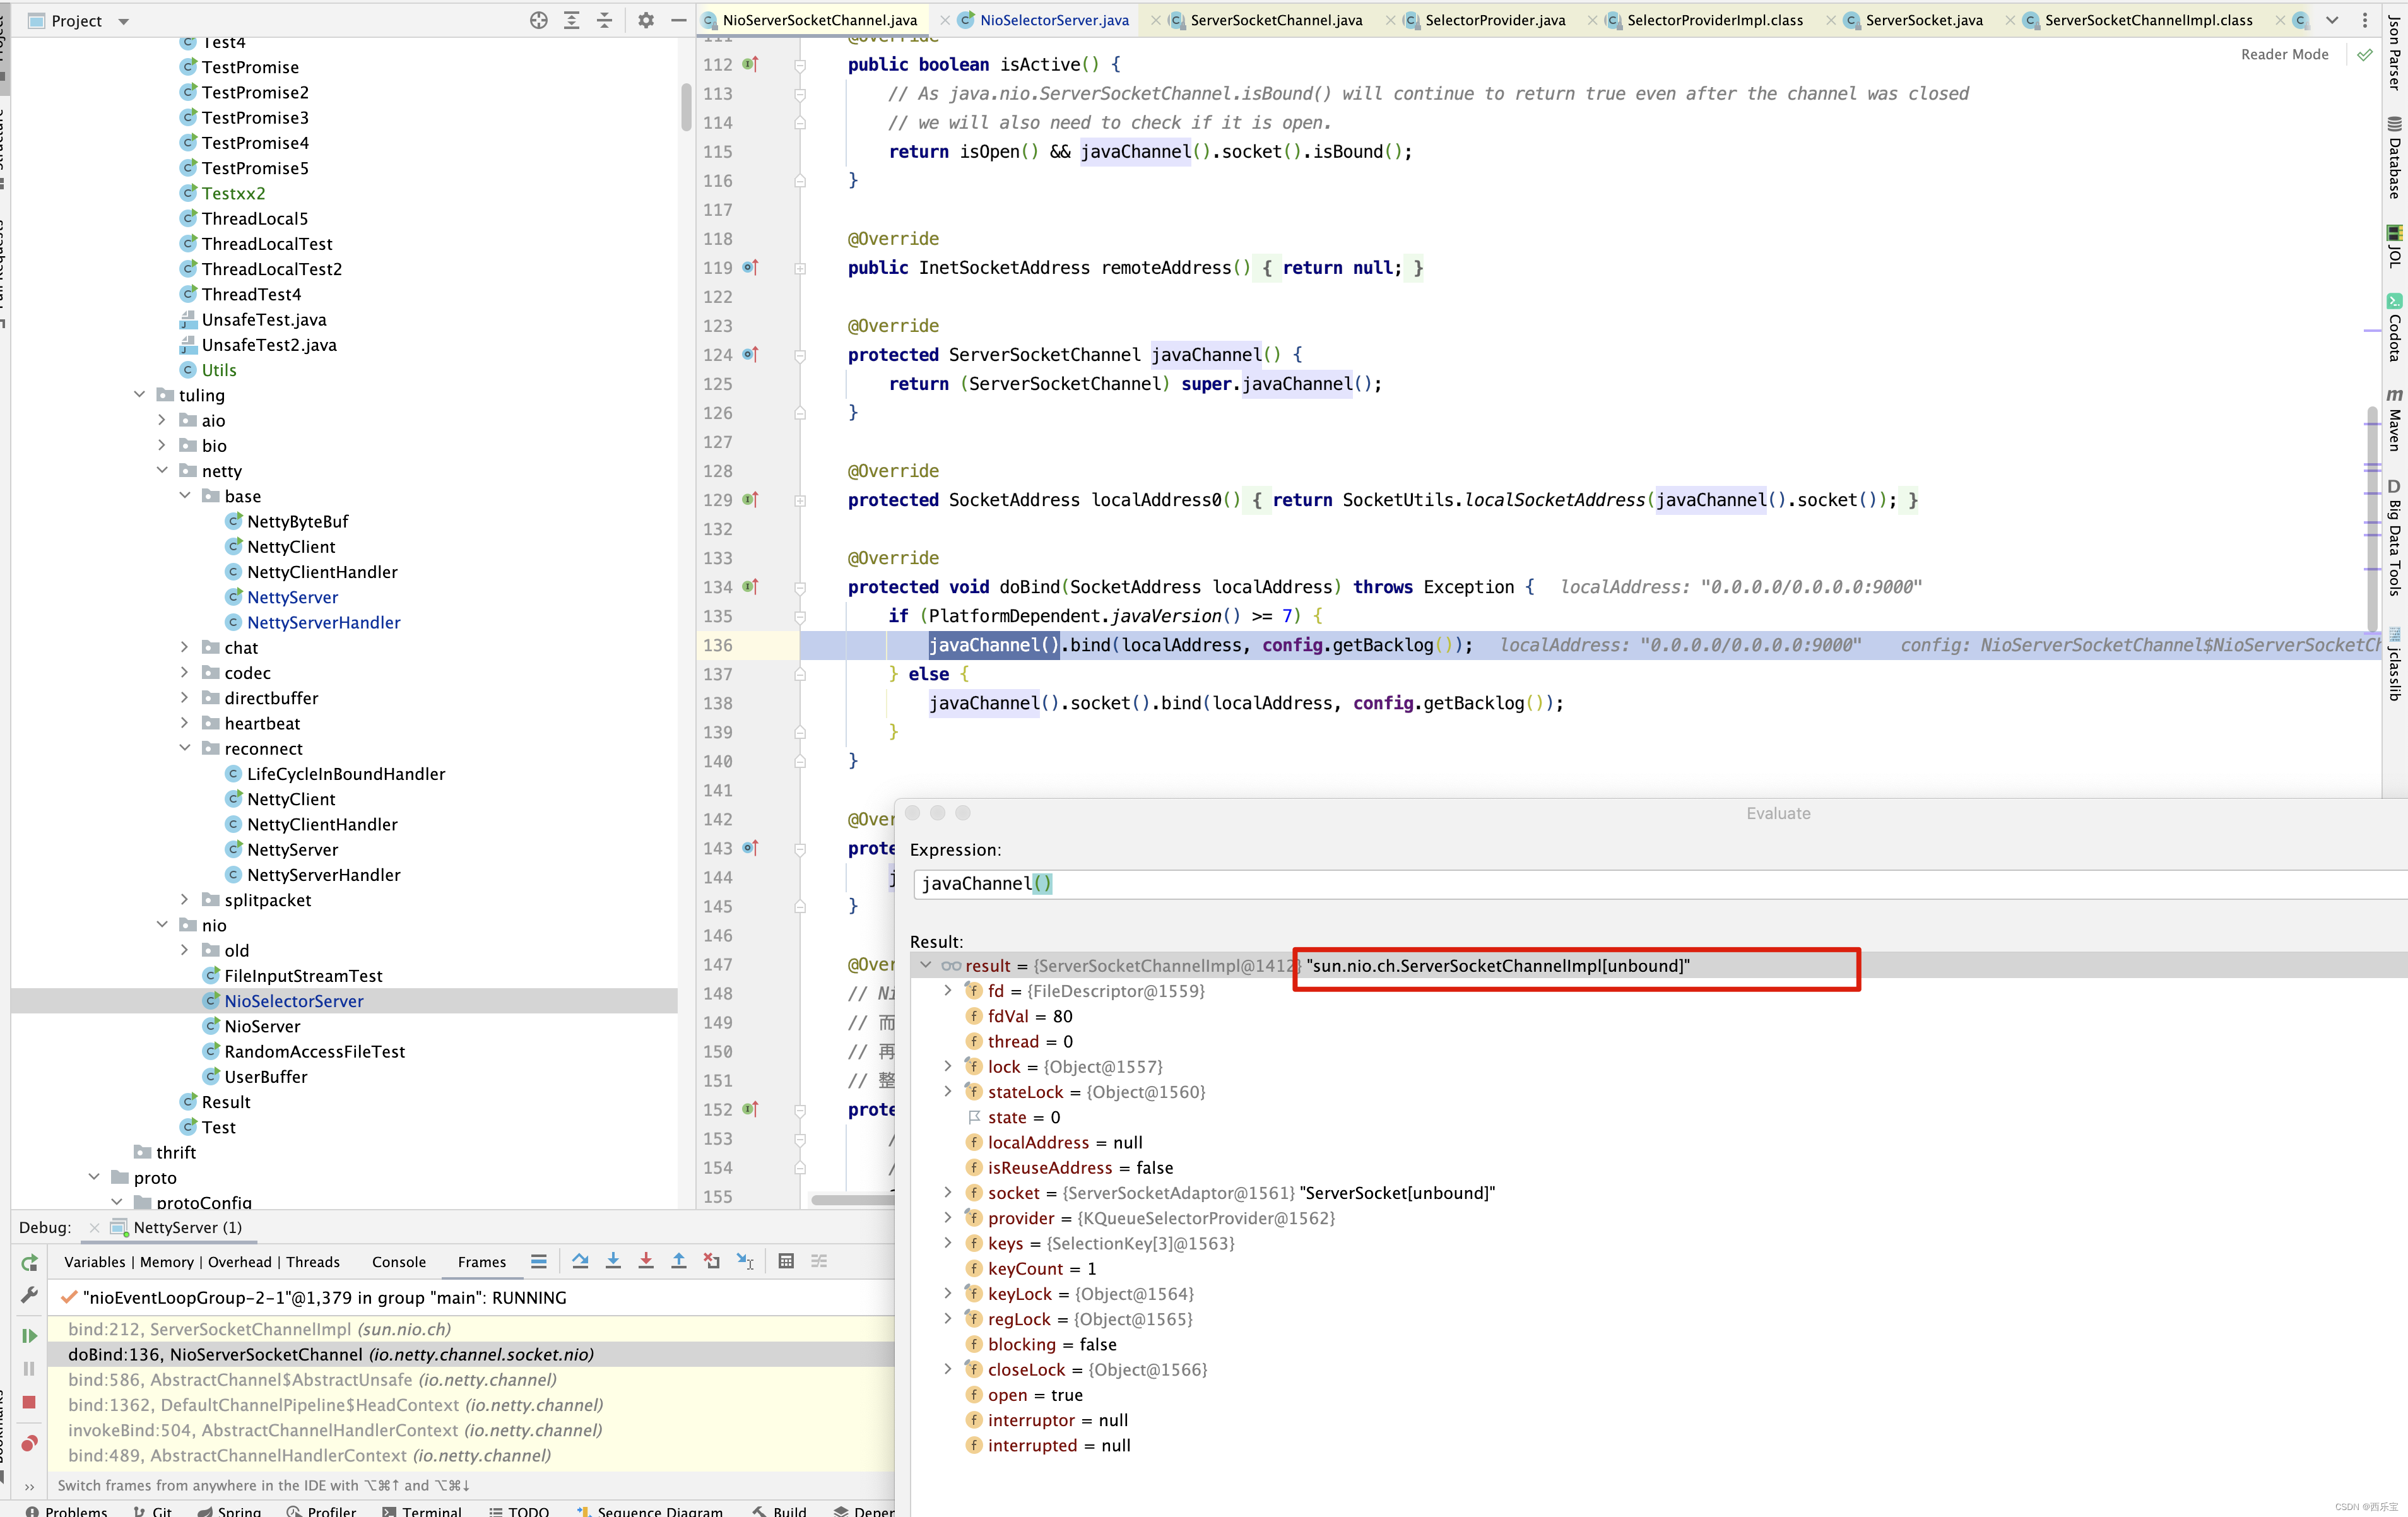
现在应该对bind()方法有所理解了吧,如果SocketChannel是第一次激活,将调用管道中的所有handler的ChannelActive()方法 ,而激活方法是从流水线从前向后调用,因此下面方法中,首先传入的值为head。
public final ChannelPipeline fireChannelActive() {
    AbstractChannelHandlerContext.invokeChannelActive(head);
    return this;
}
接下来进入fireChannelActive()方法 ,首先进入HeadContext的
static void invokeChannelActive(final AbstractChannelHandlerContext next) {
    EventExecutor executor = next.executor();
    if (executor.inEventLoop()) {
        next.invokeChannelActive();
    } else {
        executor.execute(new Runnable() {
            @Override
            public void run() {
                next.invokeChannelActive();
            }
        });
    }
}


private void invokeChannelActive() {
    if (invokeHandler()) {
        try {
            ((ChannelInboundHandler) handler()).channelActive(this);
        } catch (Throwable t) {
            notifyHandlerException(t);
        }
    } else {
        fireChannelActive();
    }
}


public void channelActive(ChannelHandlerContext ctx) {
    ctx.fireChannelActive();

    readIfIsAutoRead();
}
HeadContext的channelActive内部,先调用它的fireChannelActive方法 ,后面再来分析readIfIsAutoRead的使用。
public ChannelHandlerContext fireChannelActive() {
    invokeChannelActive(findContextInbound(MASK_CHANNEL_ACTIVE));
    return this;
}
我们之前分析过一个
findContextOutbound(),而findContextOutbound()方法是从后向前查找,findContextInbound()方法,则是从流水线中从前向后查找 。
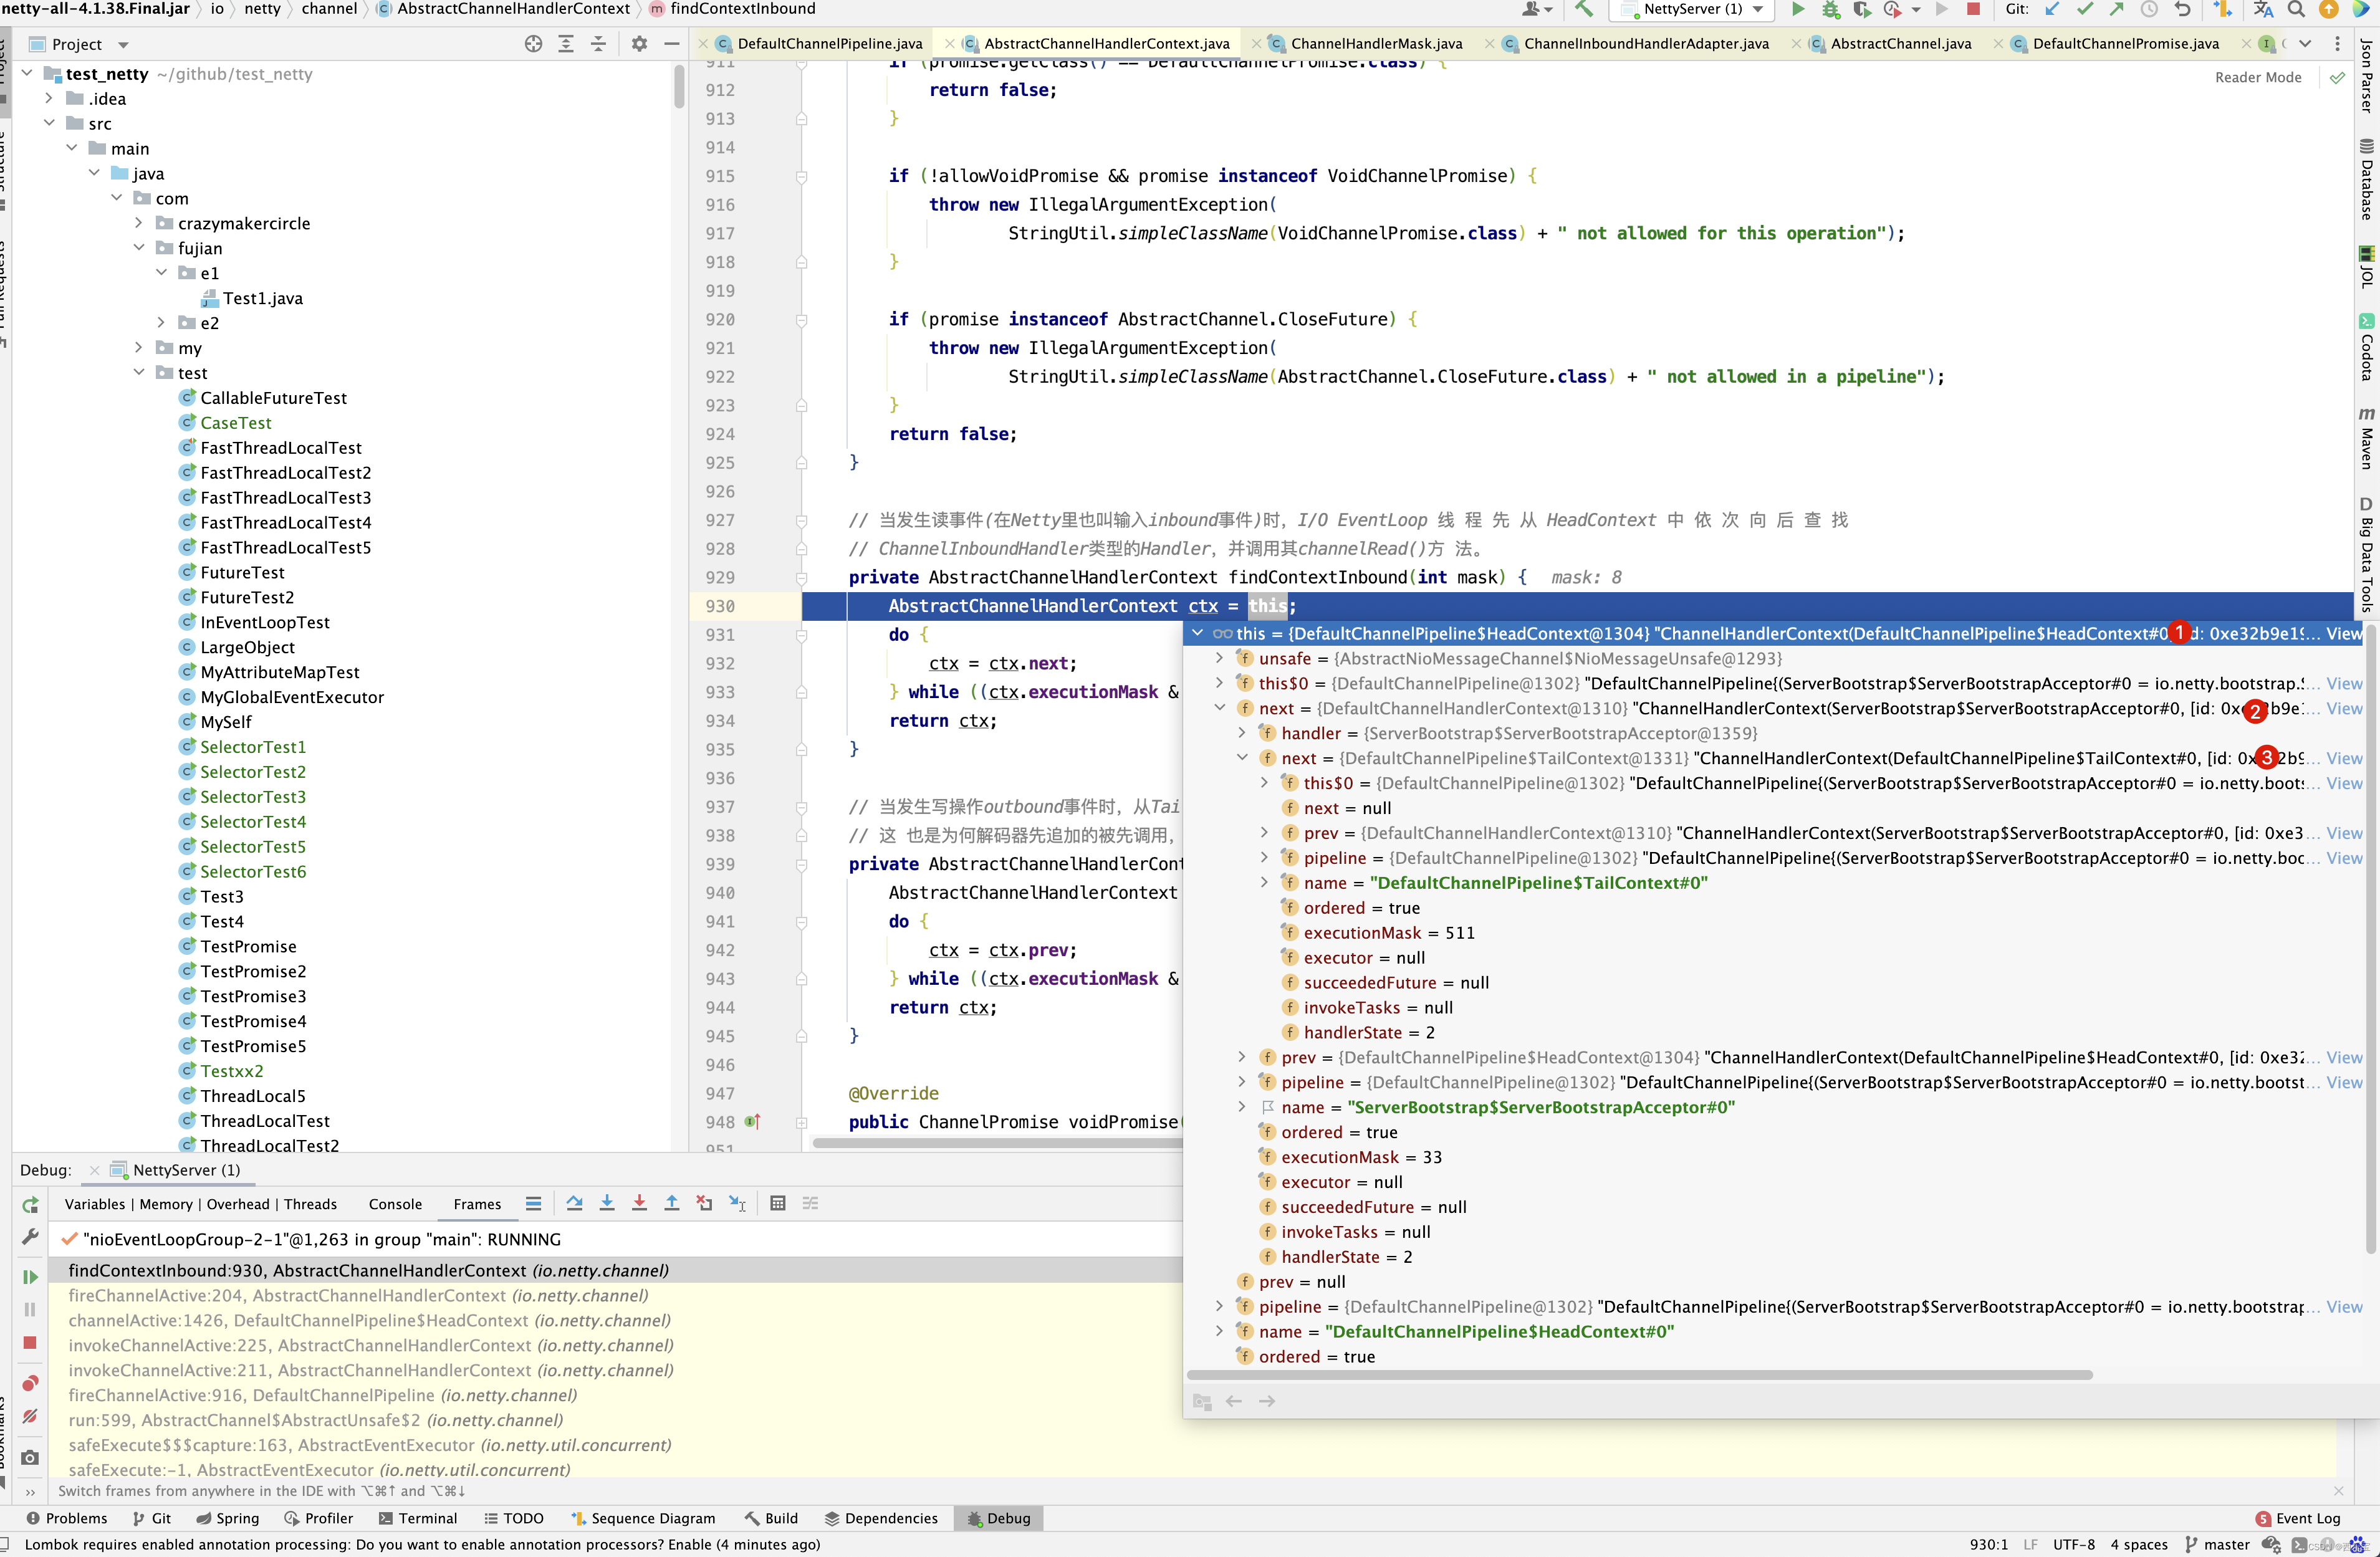
我们之前分析过, HeadContext是实现了ChannelOutboundHandler, ChannelInboundHandler,而TailContext实现了ChannelInboundHandler,但是在findContextInbound()方法中,do while循环中,首先跳过HeadContext,因为HeadContext的channelActive()方法已经调用过了,而ServerBootstrapAcceptor是实现了ChannelInboundHandler接口,但遗憾的是ServerBootstrapAcceptor所继承的类ChannelInboundHandlerAdapter的channelActive方法配置了Skip注解。
@Skip
@Override
public void channelActive(ChannelHandlerContext ctx) throws Exception {
    ctx.fireChannelActive();
}
因此最终调用的是TailContext的fireChannelActive()方法 。
public void channelActive(ChannelHandlerContext ctx) {
    onUnhandledInboundChannelActive();
}

protected void onUnhandledInboundChannelActive() {

}
在TailContext的onUnhandledInboundChannelActive()方法中,什么也没有做,只是一个空实现,到这里 channelActive()方法已经调用完毕,但是在HeadContext的channelActive()方法中,readIfIsAutoRead()方法还没有分析,这个方法做了哪些事情呢? 进入这个方法 。
private void readIfIsAutoRead() {
    if (channel.config().isAutoRead()) {
        channel.read();
    }
}
首先要明白channel.config()是什么, 在NioServerSocketChannel创建时,是不是初始化了一个config属性。
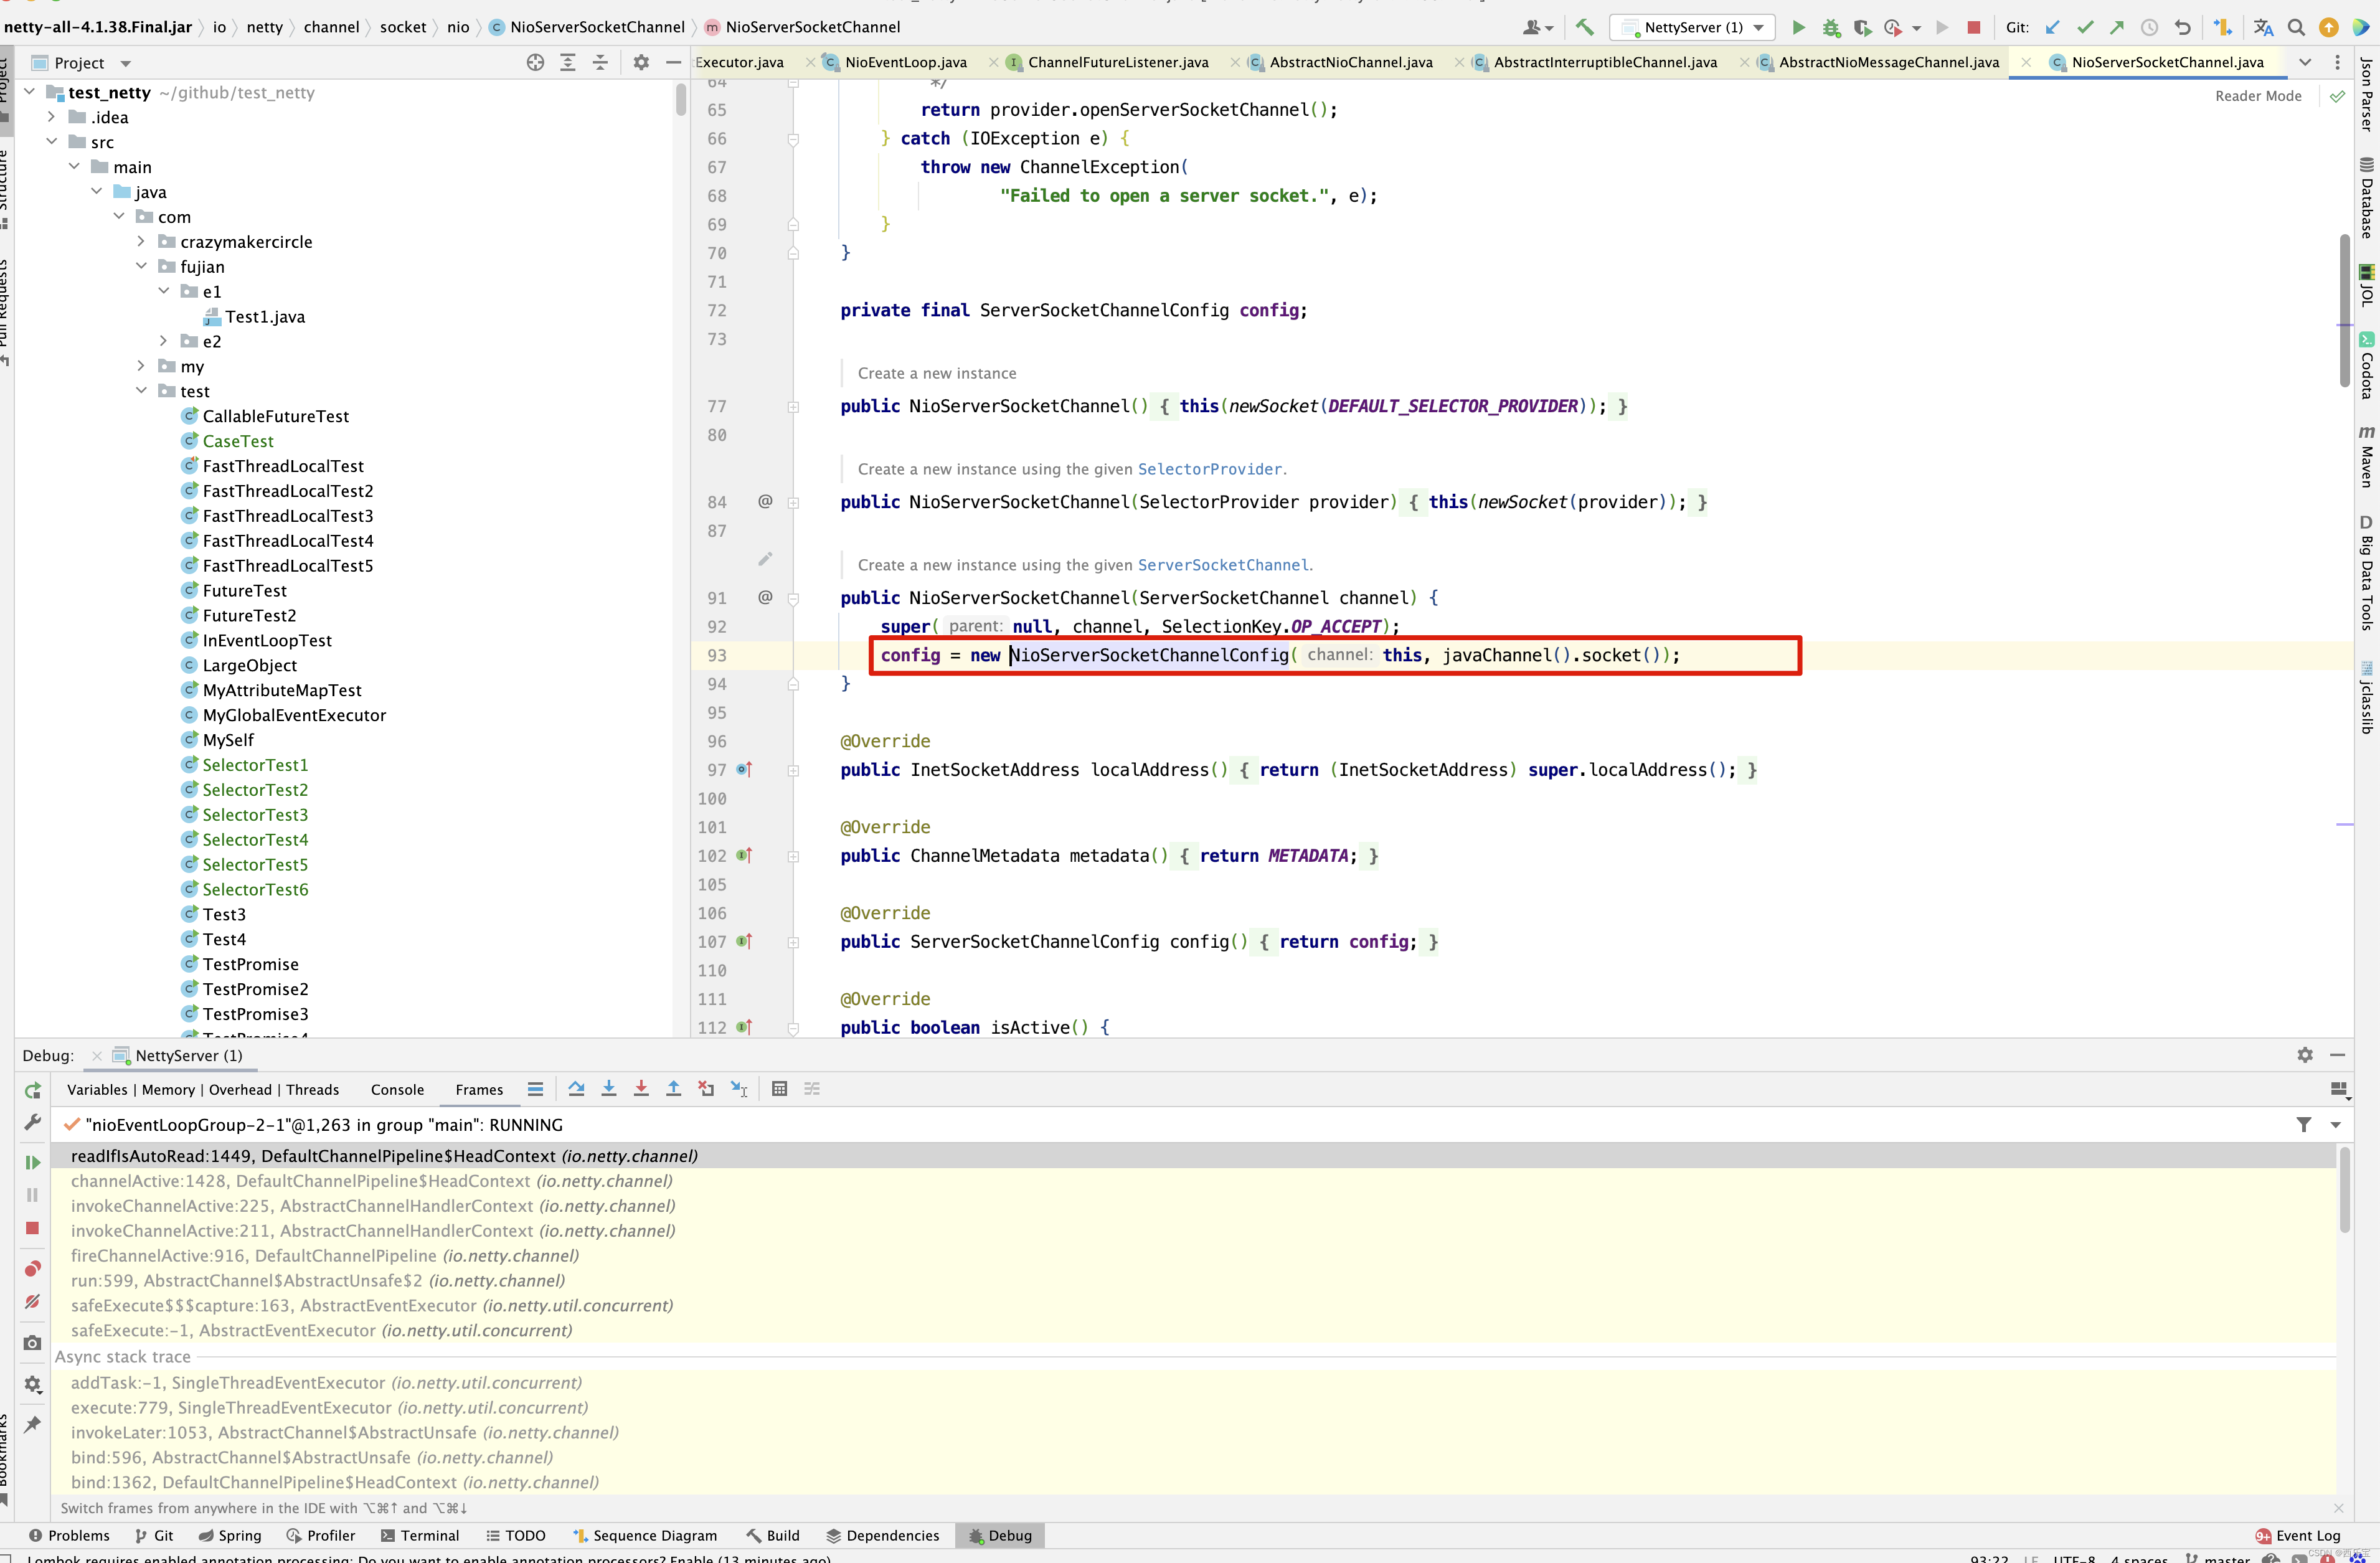
而DefaultChannelConfig的autoRead属性的默认值为1,以NioServerSocketChannel为例子,默认情况下channel.config().isAutoRead()的值为true。 因此会调用channel.read()方法。
public Channel read() {
    pipeline.read();
    return this;
}
此方法的作用为:读取通道数据,并且启动入站处理,具体来说,从内部的Java NIO Channel 通道读取数据,然后启动内部的Pipeline流水线启数据读取的入站处理,此方法的返回通道自身用于链式调用。
public final ChannelPipeline read() {
    tail.read();
    return this;
}
上面的方法还是很简单的,直接进入TailContext的read()方法 。
public ChannelHandlerContext read() {
	// 沿着流水线从后向前调用read方法
    final AbstractChannelHandlerContext next = findContextOutbound(MASK_READ);
    EventExecutor executor = next.executor();
    if (executor.inEventLoop()) {
        next.invokeRead();
    } else {
        Tasks tasks = next.invokeTasks;
        if (tasks == null) {
            next.invokeTasks = tasks = new Tasks(next);
        }
        executor.execute(tasks.invokeReadTask);
    }

    return this;
}
沿着流水线从后向前调用read()方法,最终调用HeadContext的read()方法 。
private void invokeRead() {
    if (invokeHandler()) {
        try {
            ((ChannelOutboundHandler) handler()).read(this);
        } catch (Throwable t) {
            notifyHandlerException(t);
        }
    } else {
        read();
    }
}


public void read(ChannelHandlerContext ctx) {
    unsafe.beginRead();
}
在HeadContext的read()方法中,又调用了unsafe的beginRead()方法,如果是NioServerSocket的话,unsafe是NioMessageChannel。接下来进入beginRead()方法 。
public final void beginRead() {
    assertEventLoop();

    if (!isActive()) {
        return;
    }

    try {
        doBeginRead();
    } catch (final Exception e) {
        invokeLater(new Runnable() {
            @Override
            public void run() {
                pipeline.fireExceptionCaught(e);
            }
        });
        close(voidPromise());
    }
}


protected void doBeginRead() throws Exception {
    if (inputShutdown) {
        return;
    }
    super.doBeginRead();
}


protected void doBeginRead() throws Exception {
    // Channel.read() or ChannelHandlerContext.read() was called
    final SelectionKey selectionKey = this.selectionKey;
    if (!selectionKey.isValid()) {
        return;
    }

    readPending = true;

    final int interestOps = selectionKey.interestOps();
    if ((interestOps & readInterestOp) == 0) {
        selectionKey.interestOps(interestOps | readInterestOp);
    }
}
其实上面的 doBeginRead()方法的最终目的就是上面加粗代码,修改selectionKey的监听事件 。 readInterestOp的值是什么呢?如果是NioServerSocketChannel,则是SelectionKey.OP_ACCEPT接收事件 。
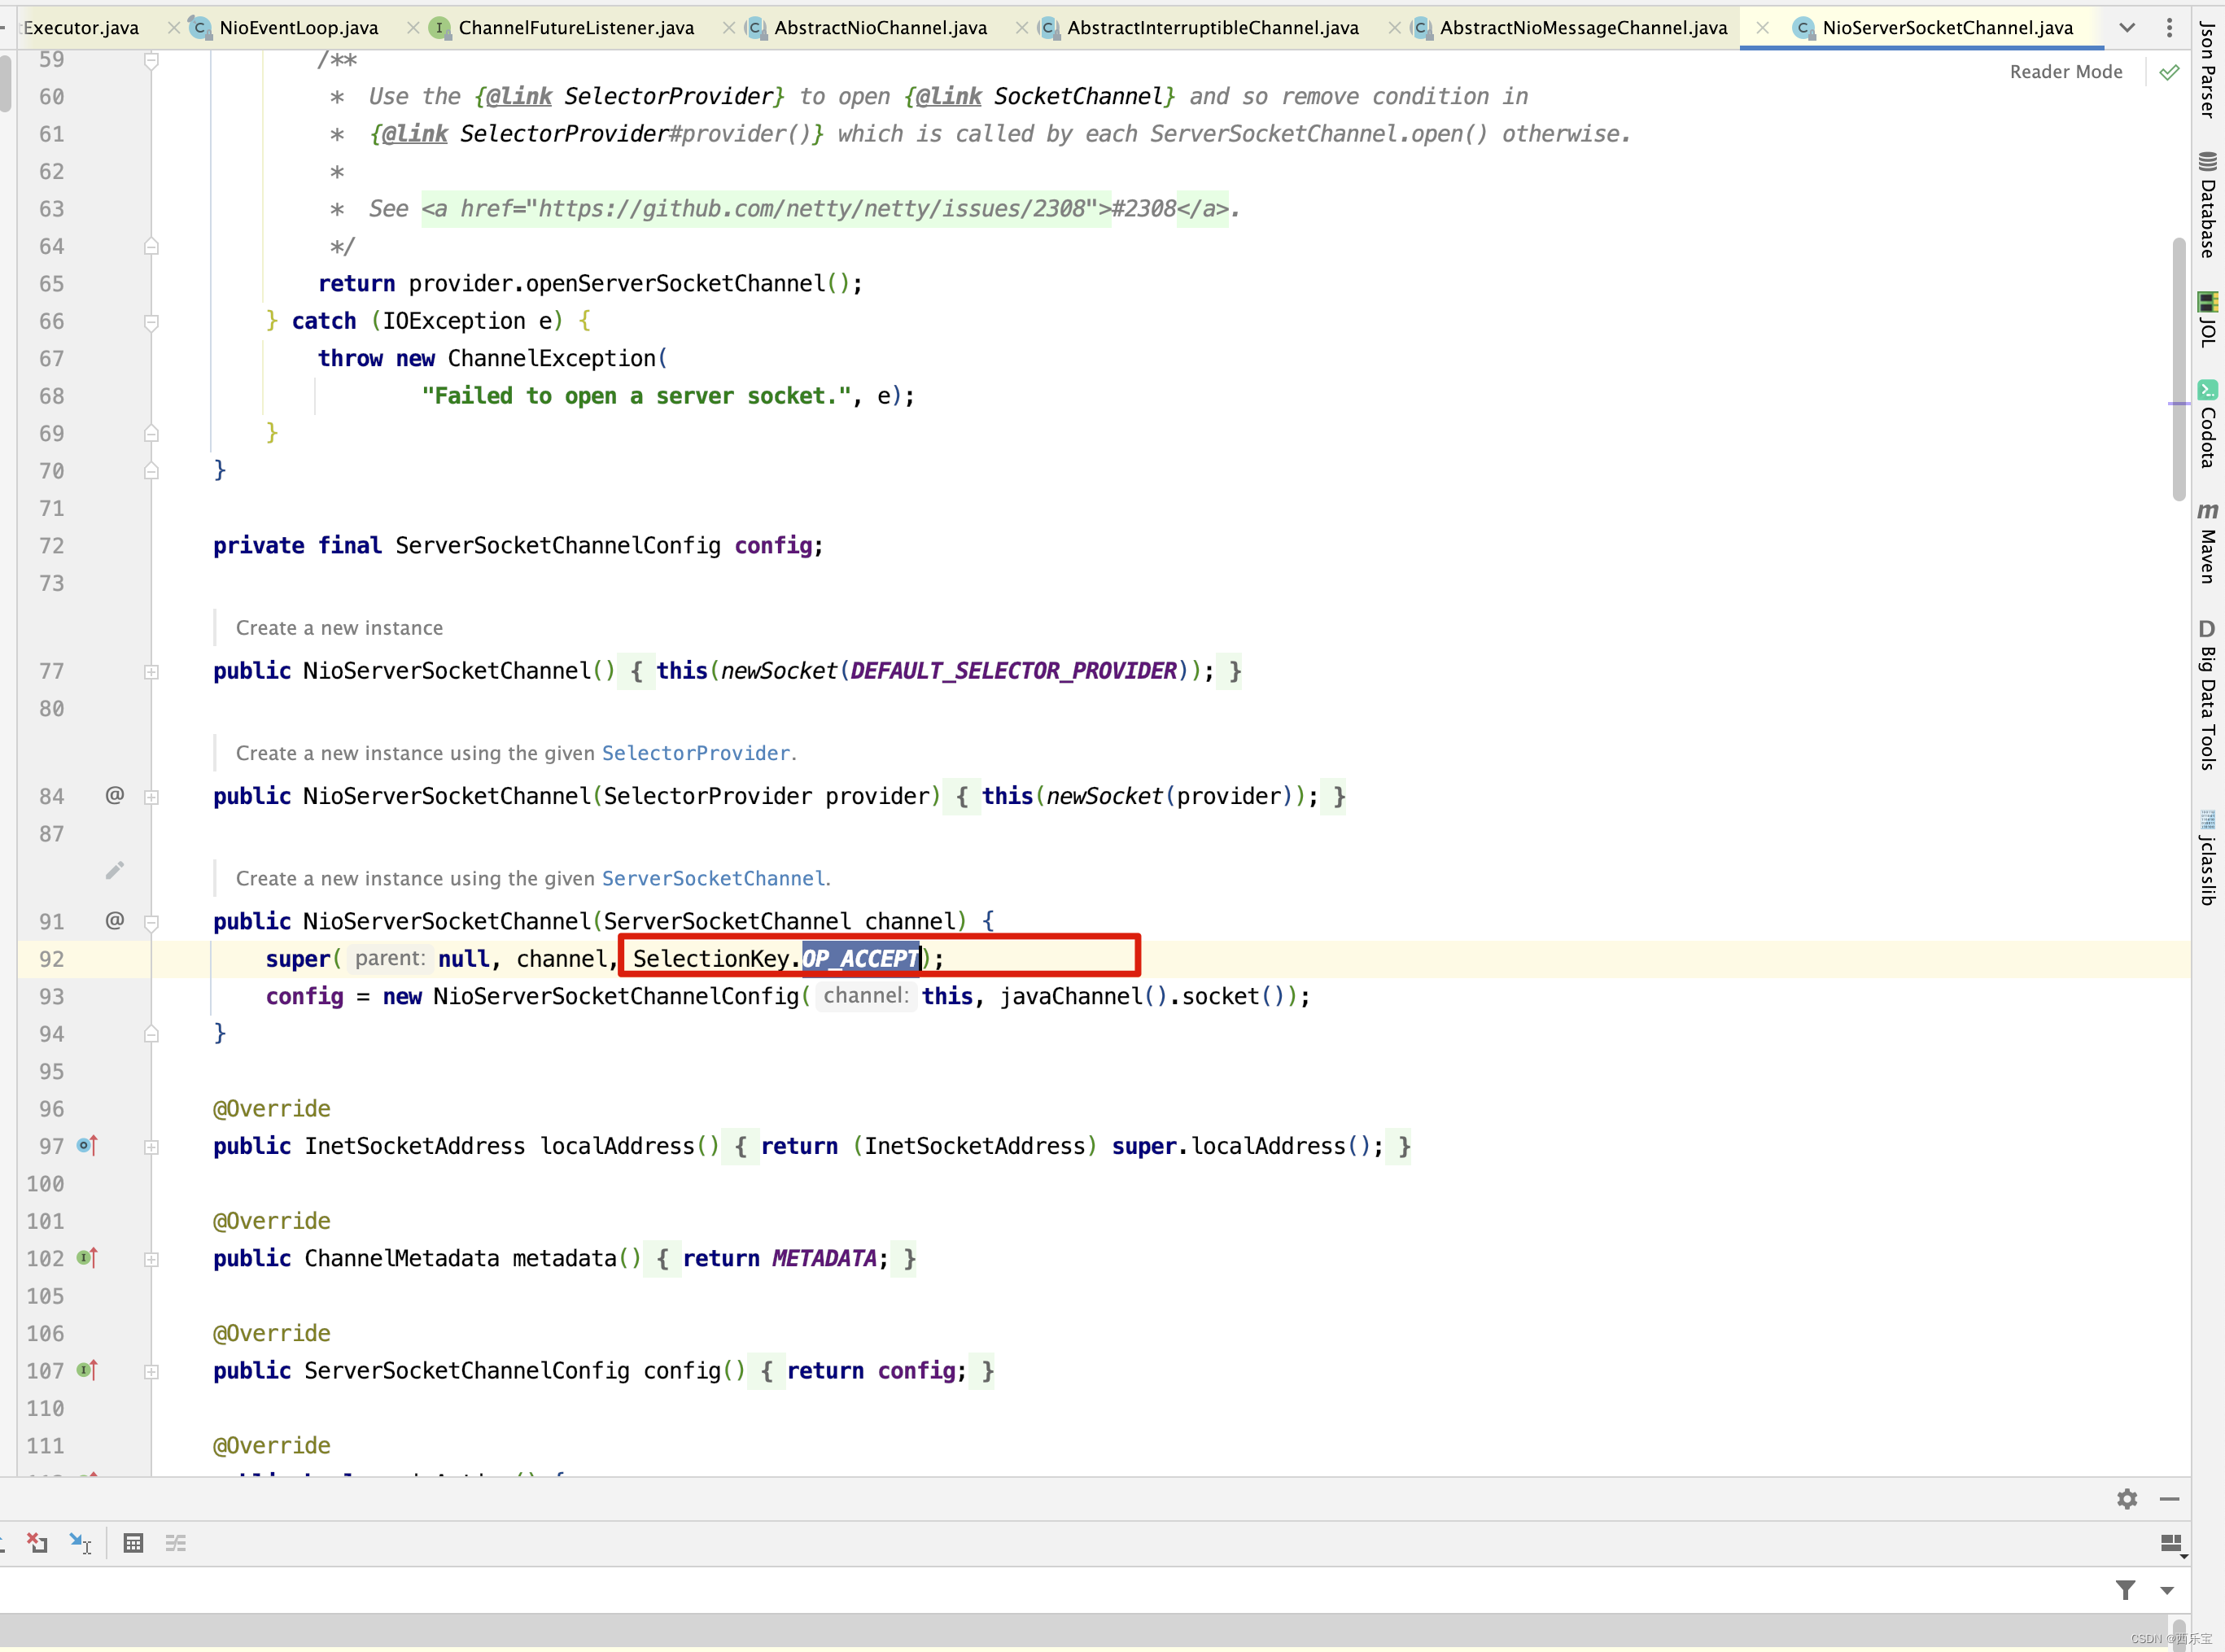
如果是NioSocketChannel,readInterestOp的值为SelectionKey.OP_READ。
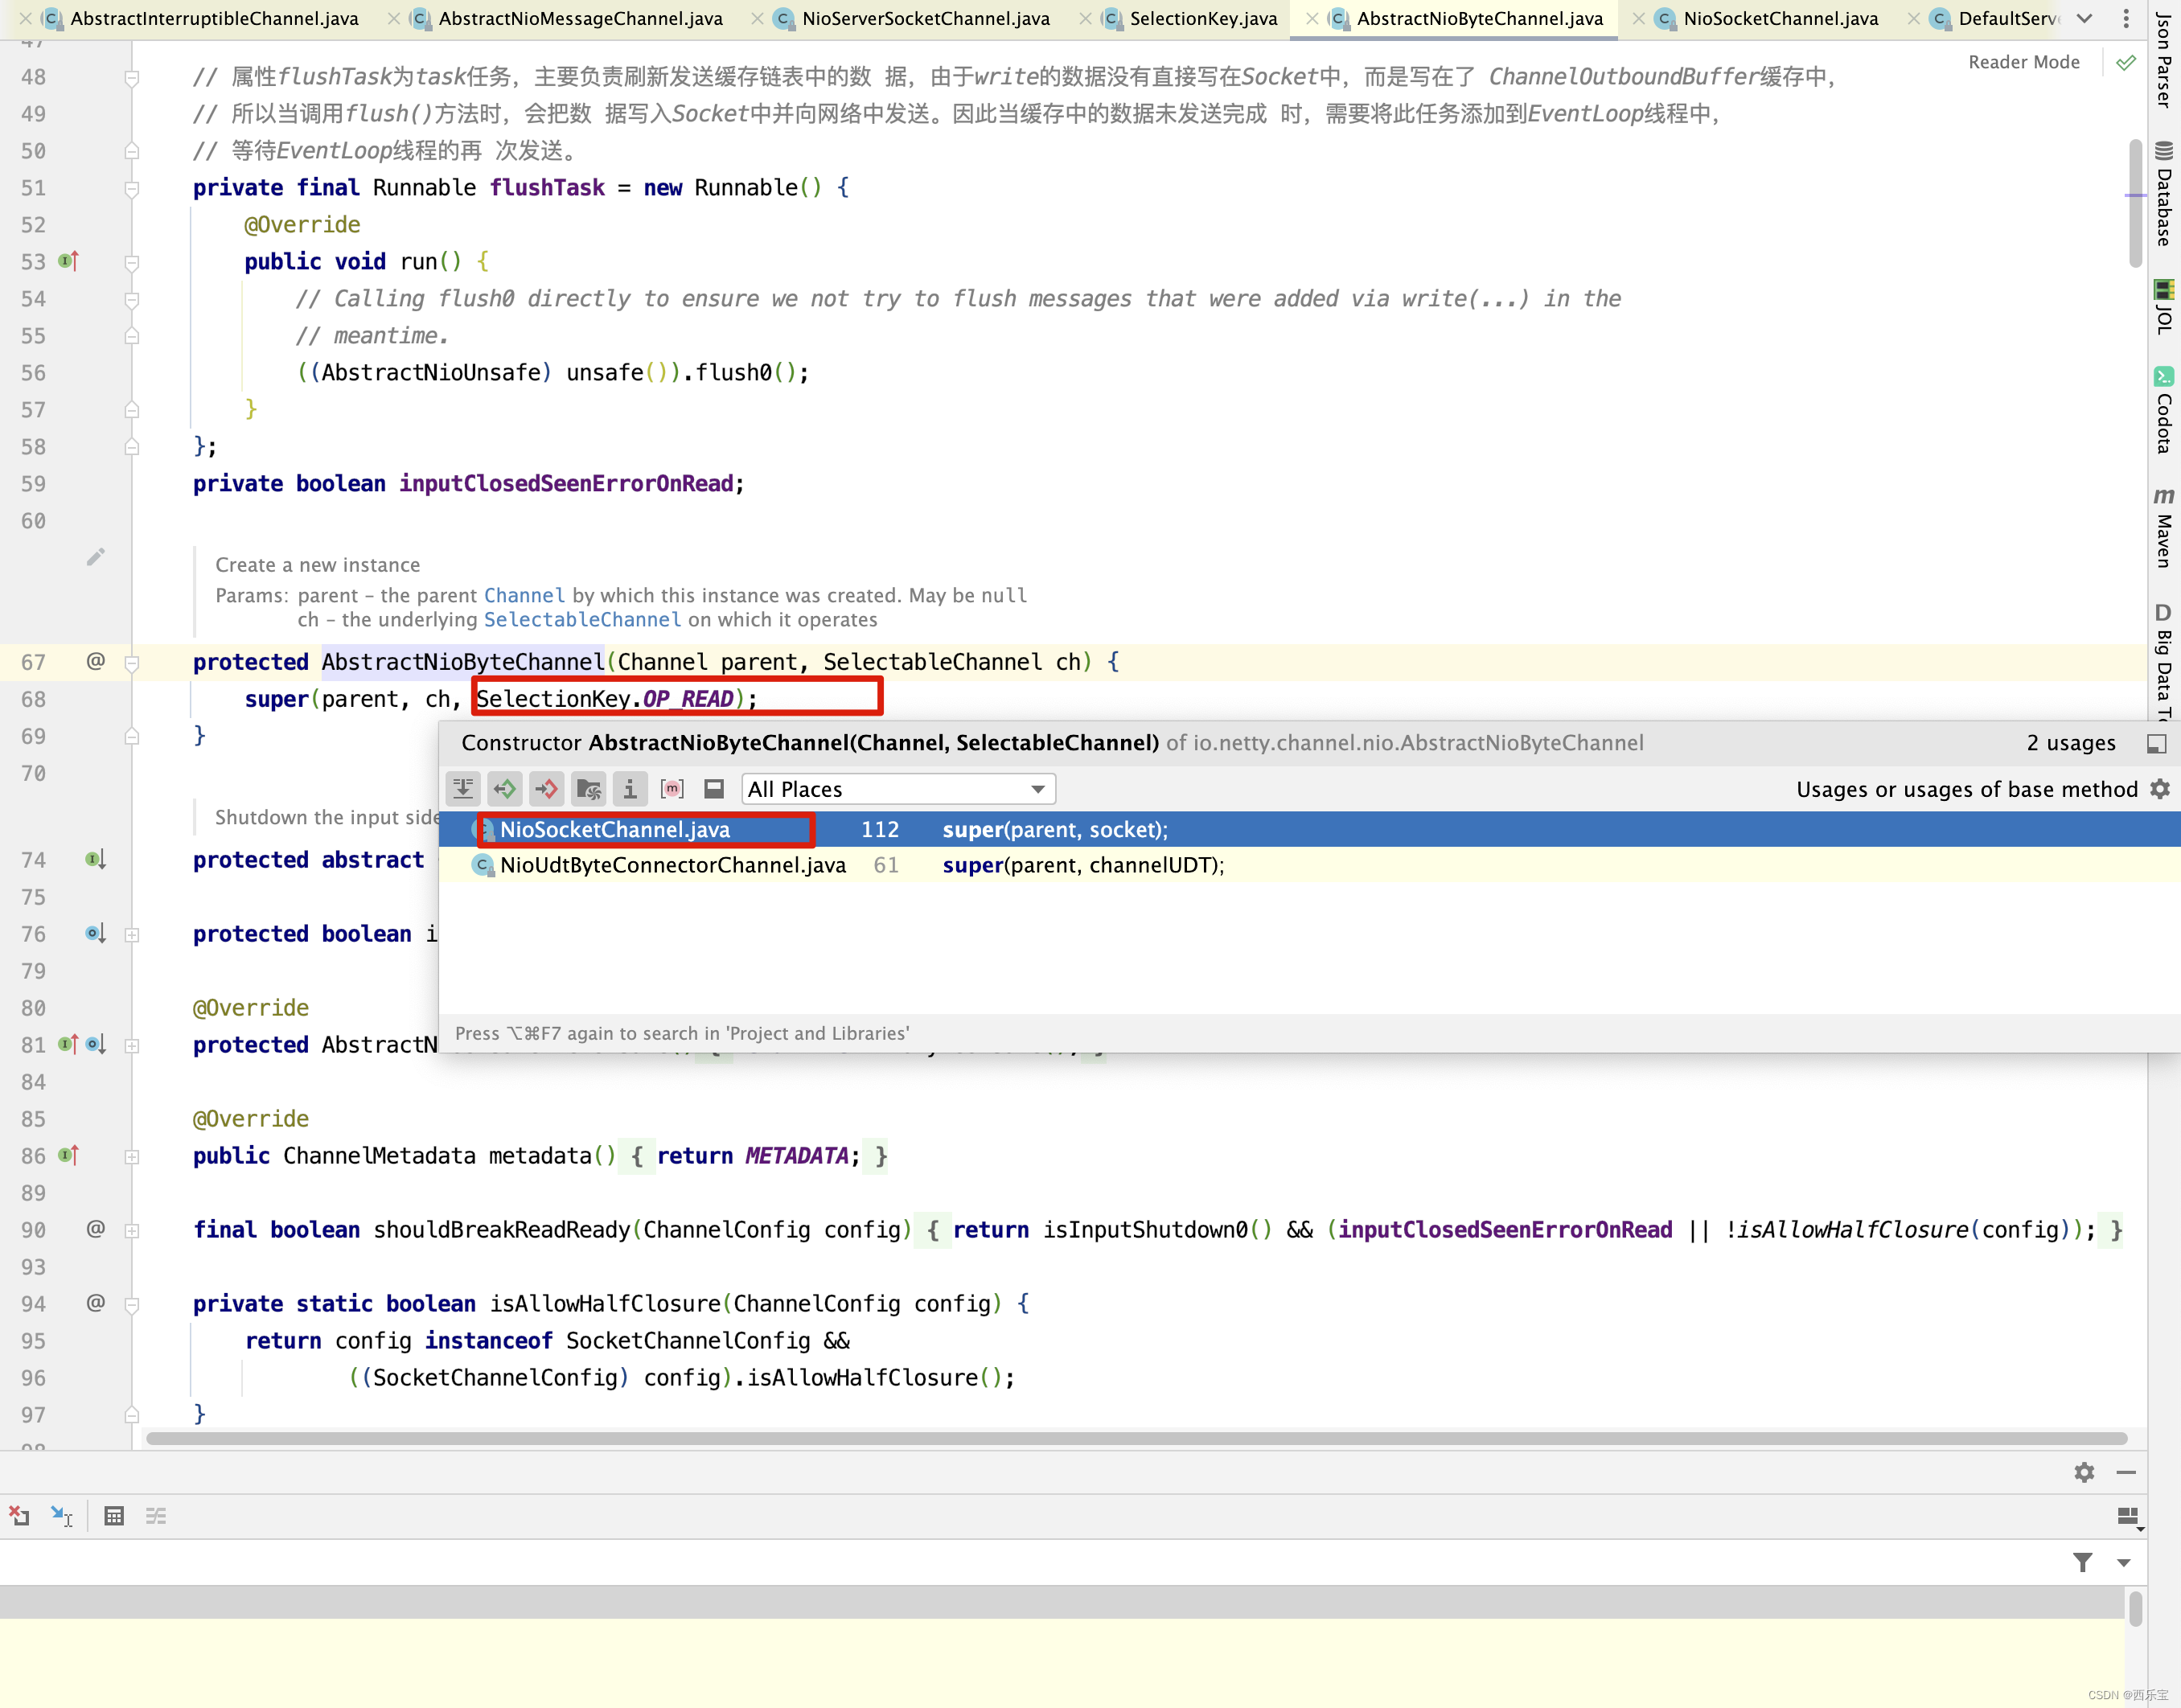
interestOps(int ops)方法可以修改事件列表,对于NioServerSocketChannel,等同于下面红框代码,注册SelectionKey.OP_ACCEPT事件 。
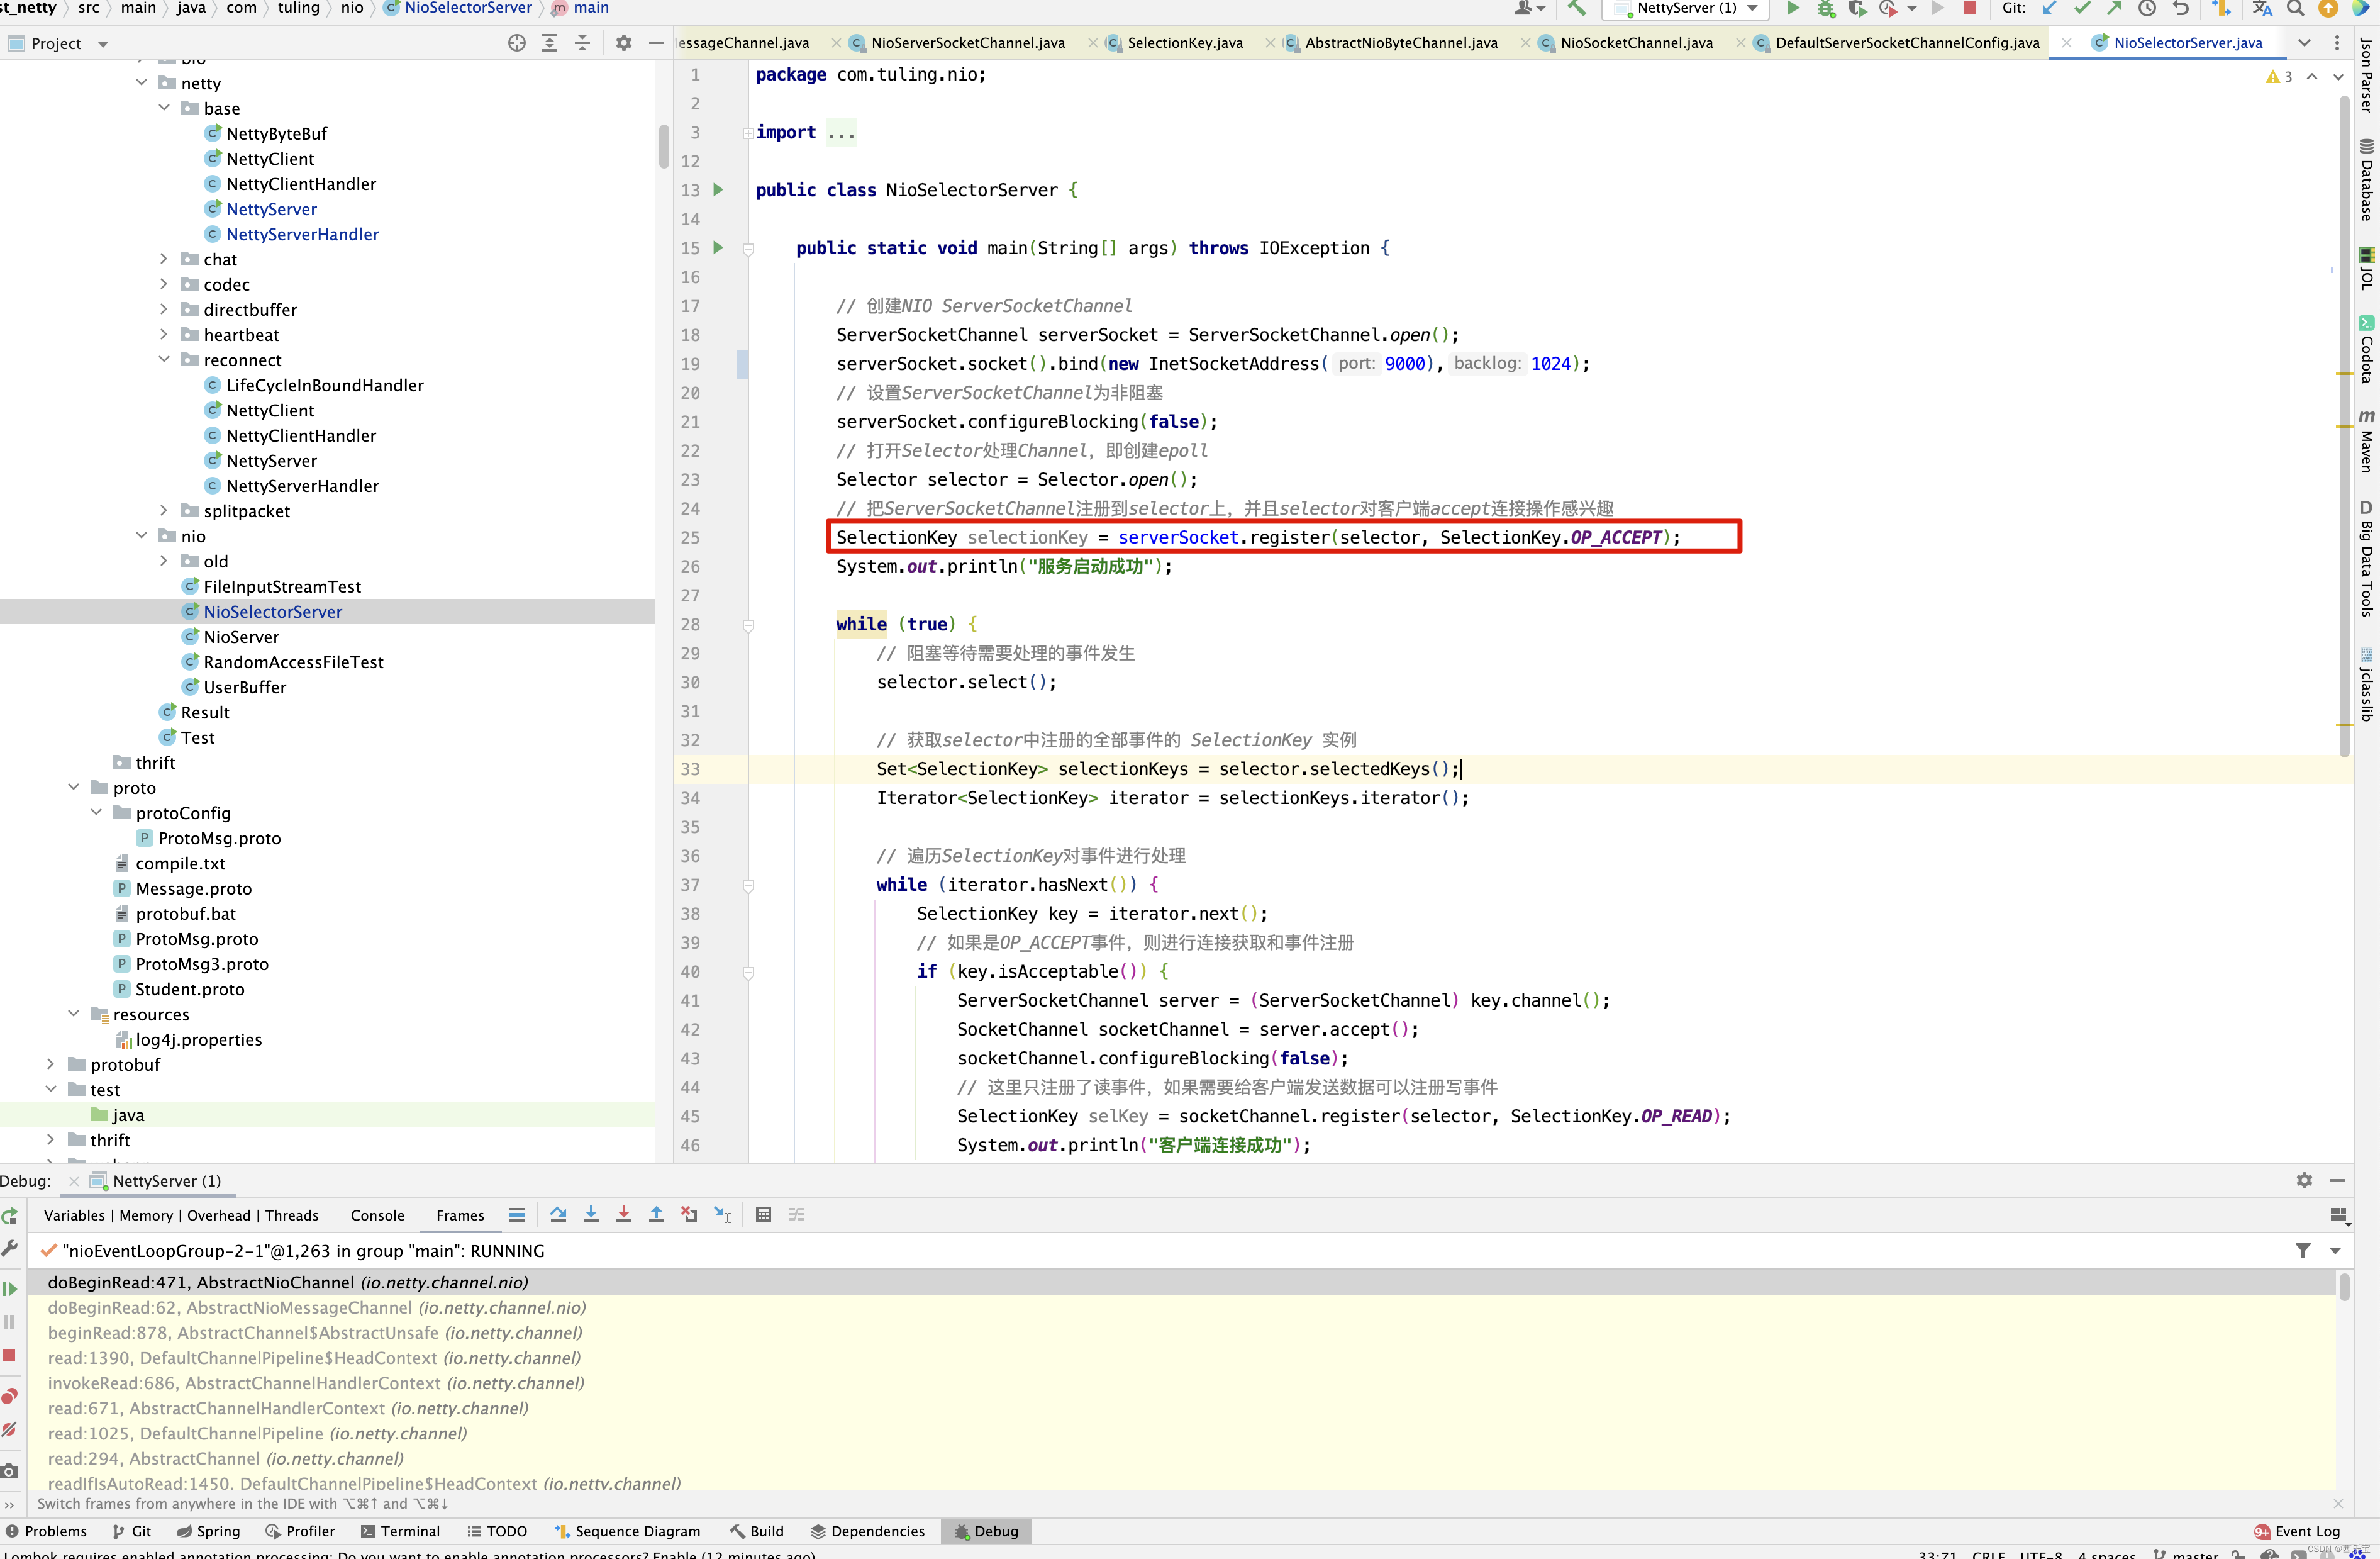
接着请看


 1140
1140


 被折叠的 条评论
为什么被折叠?
被折叠的 条评论
为什么被折叠?
 到【灌水乐园】发言


