


上篇介绍了初步使用,接下来是进阶使用中遇到的问题。首先你的项目需要一个网络请求库,比如在OC中我们使用AFNetwork,同样,他的作者在Swift下也写了一个网络请求库:Alamofire。不过,它只是支持iOS8.1以上。要求有点高,但是我们学习,不在意这个。接下来是正文。
此处注意:swift导入第三方库都需要这样做!首先是原文:
**Manually**

If you prefer not to use either of the aforementioned dependency managers, you can integrate Alamofire into your project manually.

**Embedded Framework**

Open up Terminal, cd into your top-level project directory, and run the following command "if" your project is not initialized as a git repository:
$ git init
Add Alamofire as a git submodule by running the following command:
$ git submodule add https://github.com/Alamofire/Alamofire.git
Open the new Alamofire folder, and drag the Alamofire.xcodeproj into the Project Navigator of your application's Xcode project.

It should appear nested underneath your application's blue project icon. Whether it is above or below all the other Xcode groups does not matter.
Select the Alamofire.xcodeproj in the Project Navigator and verify the deployment target matches that of your application target.

Next, select your application project in the Project Navigator (blue project icon) to navigate to the target configuration window and select the application target under the "Targets" heading in the sidebar.
In the tab bar at the top of that window, open the "General" panel.
Click on the + button under the "Embedded Binaries" section.
You will see two different Alamofire.xcodeproj folders each with two different versions of the Alamofire.framework nested inside a Products folder.

It does not matter which Products folder you choose from, but it does matter whether you choose the top or bottom Alamofire.framework.
Select the top Alamofire.framework for iOS and the bottom one for OS X.

You can verify which one you selected by inspecting the build log for your project. The build target for Alamofire will be listed as either Alamofire iOS or Alamofire OSX.
And that's it!

The Alamofire.framework is automagically added as a target dependency, linked framework and embedded framework in a copy files build phase which is all you need to build on the simulator and a device.
照着这个步骤做下来,发现报错。找不到Alamofire。然后,仔细对照步骤重新做还是不成功。到网上找,大体也是这个步骤。
下午,继续弄,在stackoverflow上看到这个问题的回答,又仔细看了一遍,发现多了一个步骤是:
Open project settings of your project, Build Phases pane, expand Target Dependencies section, and add Alamofire as new dependency然后,发现其实系统已经自动导入了,不过是MacOS的。更改好,一起正常。
简单用中文描述一下:
1、把整个工程文件拷贝到你的工程文件根目录下。
2、把Alamofire工程文件添加到你的工程里,注意这个工程文件时蓝色的,不是白色的。
3、看图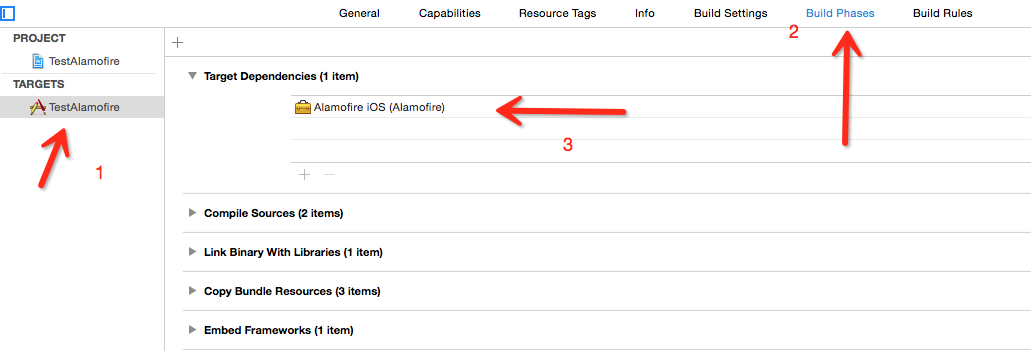
4、看图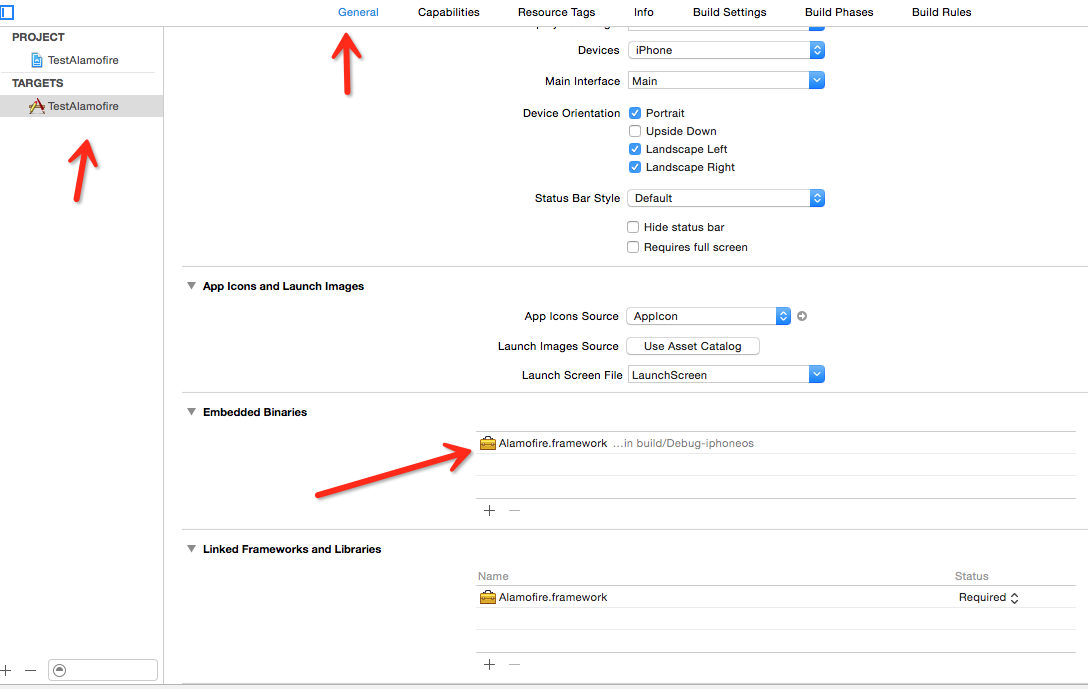
注意选择iOS平台


 2047
2047

 被折叠的 条评论
为什么被折叠?
被折叠的 条评论
为什么被折叠?
 到【灌水乐园】发言


