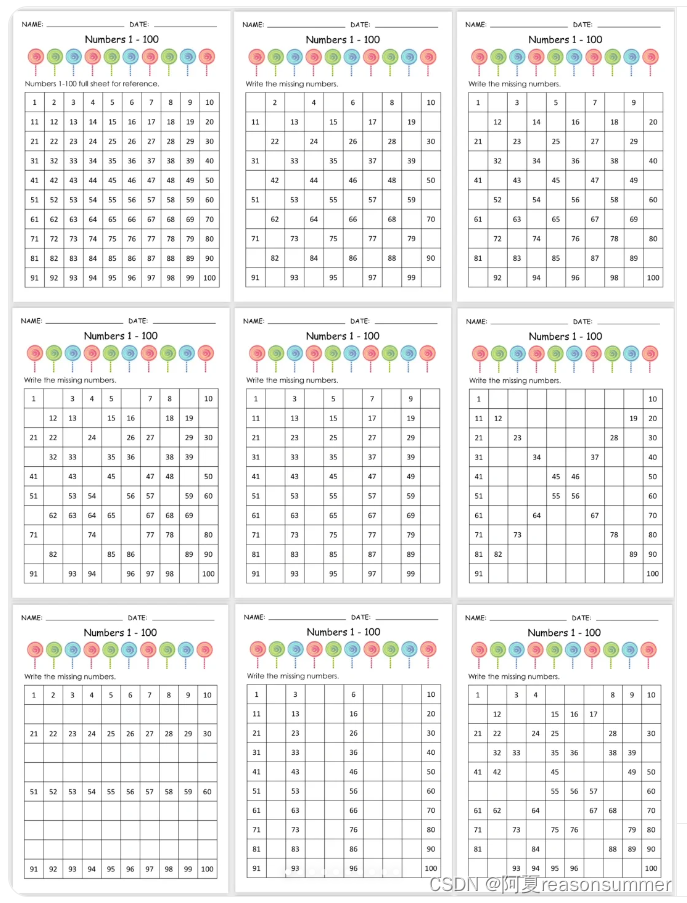
作品分析:
背景需求
小红书上看到一套“百数版”尝试用Python做了一下
word模版
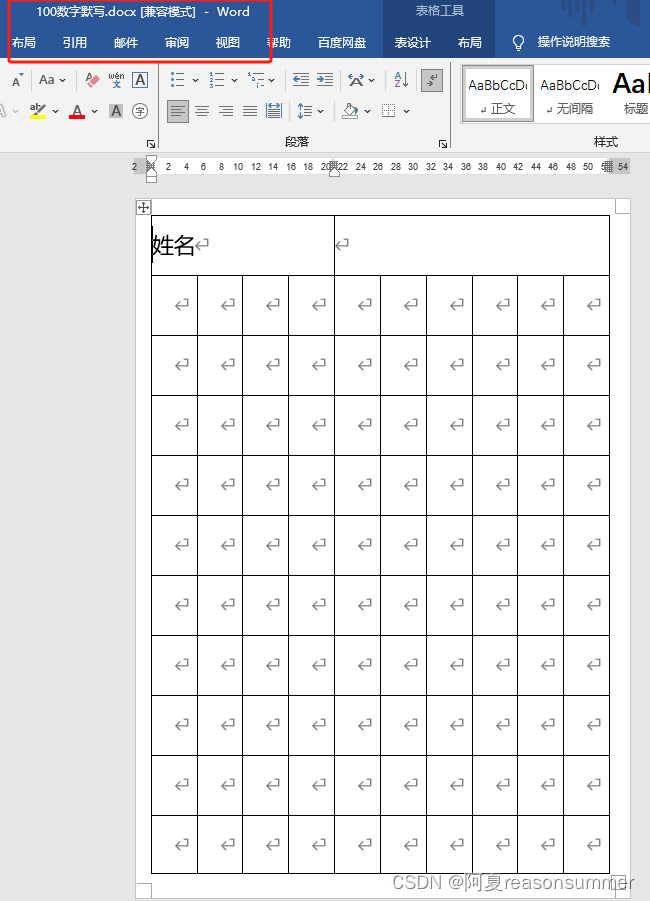
第1款:100个数全部
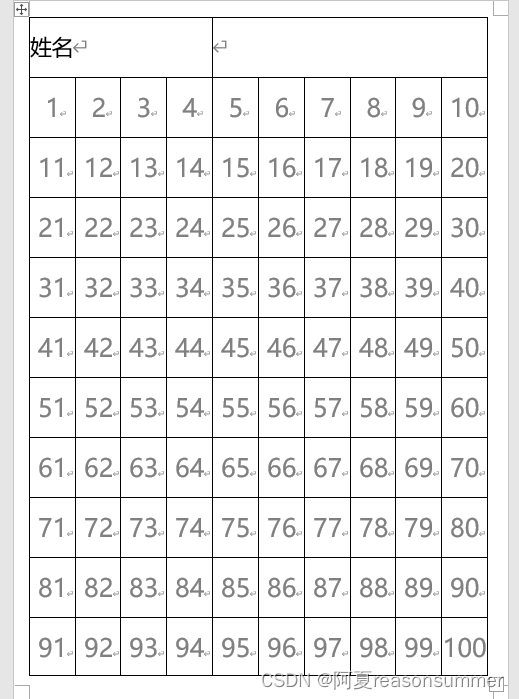
'''
百数板(原始100数字)
AI对话大师,阿夏
2024年5月23日
'''

from docx import Document
from docx.shared import Pt
from docx.oxml.ns import nsdecls
from docx.oxml import parse_xml
from docx.shared import RGBColor
from docx.enum.table import WD_ALIGN_VERTICAL

# 定义文件路径
path = r'C:\Users\jg2yXRZ\OneDrive\桌面\100数字默写'

# 打开已有的Word文档
doc = Document(path+r'\100数字默写.docx')

# 获取第一个表格
table = doc.tables[0]

# 定义填充范围的起始和结束单元格坐标
start_row, start_col = 1, 0
end_row, end_col = 10, 9

# 填充表格单元格
for i in range(1, 101):
    row = start_row + (i - 1) // (end_col - start_col + 1)
    col = start_col + (i - 1) % (end_col - start_col + 1)
    cell = table.cell(row, col)
    cell.text = str(i)

    # 设置字体样式
    run = cell.paragraphs[0].runs[0]
    run.font.name = "微软雅黑"
    # run.font.bold = True
    run.font.size = Pt(30)

    # 设置单元格居中对齐
    cell.vertical_alignment = WD_ALIGN_VERTICAL.CENTER
    cell.paragraphs[0].alignment = 1

    # 设置单元格背景颜色为灰色
    # shading_elm = parse_xml(r'<w:shd {} w:fill="D3D3D3"/>'.format(nsdecls('w')))
    # cell._tc.get_or_add_tcPr().append(shading_elm)

    # 设置字体颜色为灰色
    run.font.color.rgb = RGBColor(0x80, 0x80, 0x80)

# 保存为1.docx
doc.save(path+r'\1.docx')
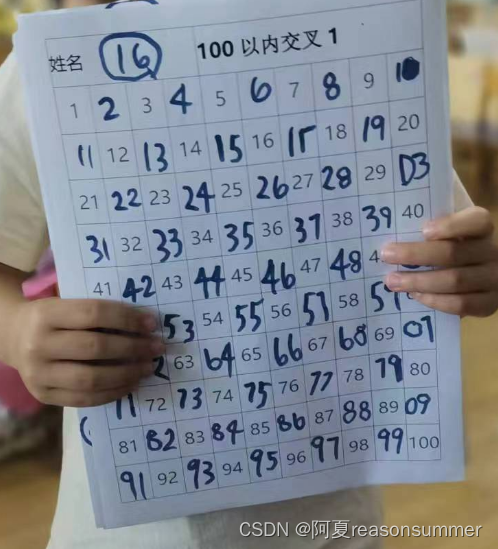
第2款 交叉系列01(01开始)
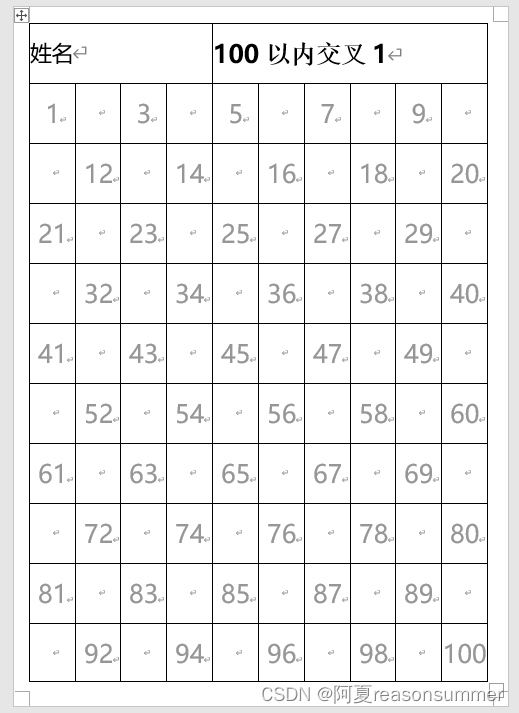
'''
100以内(填写交叉1 ,01)
AI对话大师,阿夏
2024年5月23日
'''

from docx import Document
from docx.shared import Pt
from docx.oxml.ns import nsdecls
from docx.oxml import parse_xml
from docx.shared import RGBColor
from docx.enum.table import WD_ALIGN_VERTICAL

# 定义文件路径
path = r'C:\Users\jg2yXRZ\OneDrive\桌面\100数字默写'

# 打开已有的Word文档
doc = Document(path+r'\100数字默写.docx')

# 获取第一个表格
table = doc.tables[0]

# 获取指定单元格
cell = table.cell(0, 4)

# 获取指定单元格的第二个段落
paragraph = cell.paragraphs[0]
t='100以内交叉1'
# 添加新的运行文本
run = paragraph.add_run(t)

# 设置字体样式
run.font.name = "微软雅黑"
run.font.bold = True
run.font.size = Pt(30)
run.font.color.rgb = RGBColor(0, 0, 0)  # 黑色

# 定义填充范围的起始和结束单元格坐标
start_row, start_col = 1, 0
end_row, end_col = 10, 9

# 定义填充范围的起始行
start_row = 1

# 填充表格单元格
for i in range(1, 101):
    row = start_row + (i - 1) // (end_col - start_col + 1)
    col = start_col + (i - 1) % (end_col - start_col + 1)
    cell = table.cell(row, col)

    # 行号是偶数同时列号是奇数的情况。 # 行号是奇数同时列号是偶数的情况。
    # 如果在双行且为单数,或者在单行且为双数,写入空格
    if (row % 2 == 0 and i % 2 == 1) or (row % 2 == 1 and i % 2 == 0):

        cell.text = ""

    else:
        cell.text=str(i)


    # 设置字体样式
    run = cell.paragraphs[0].runs[0]
    run.font.name = "微软雅黑"
    # run.font.bold = True
    run.font.size = Pt(30)

    # 设置单元格居中对齐
    cell.vertical_alignment = WD_ALIGN_VERTICAL.CENTER
    cell.paragraphs[0].alignment = 1

    # # 设置单元格背景颜色为灰色
    # shading_elm = parse_xml(r'<w:shd {} w:fill="D3D3D3"/>'.format(nsdecls('w')))
    # cell._tc.get_or_add_tcPr().append(shading_elm)

    # 设置字体颜色为灰色
    # run.font.color.rgb = RGBColor(0x80, 0x80, 0x80)
    run.font.color.rgb = RGBColor(150, 150, 150)  # 黑色

# 保存为1.docx
doc.save(path+fr'\{t}.docx')
第2款 交叉系列02(02开始)
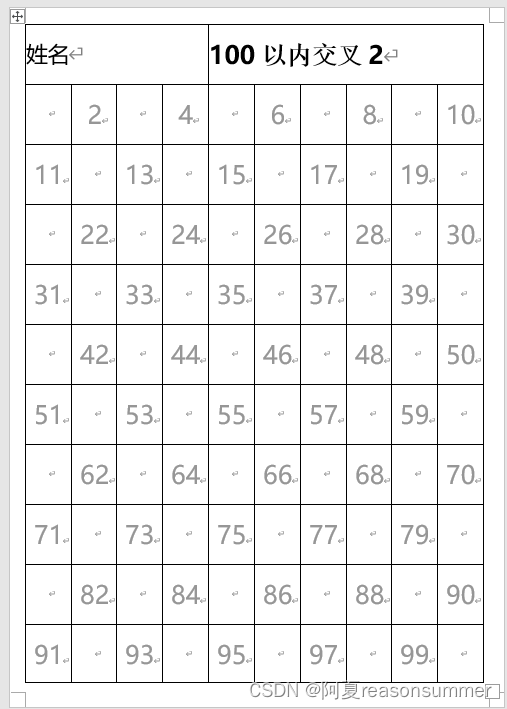
'''
100以内(填写交叉2 ,02)
AI对话大师,阿夏
2024年5月23日
'''


from docx import Document
from docx.shared import Pt
from docx.oxml.ns import nsdecls
from docx.oxml import parse_xml
from docx.shared import RGBColor
from docx.enum.table import WD_ALIGN_VERTICAL

# 定义文件路径
path = r'C:\Users\jg2yXRZ\OneDrive\桌面\100数字默写'

# 打开已有的Word文档
doc = Document(path+r'\100数字默写.docx')

# 获取第一个表格
table = doc.tables[0]

# 获取指定单元格
cell = table.cell(0, 4)

# 获取指定单元格的第二个段落
paragraph = cell.paragraphs[0]
t='100以内交叉2'
# 添加新的运行文本
run = paragraph.add_run(t)

# 设置字体样式
run.font.name = "微软雅黑"
run.font.bold = True
run.font.size = Pt(30)
run.font.color.rgb = RGBColor(0, 0, 0)  # 黑色

# 定义填充范围的起始和结束单元格坐标
start_row, start_col = 1, 0
end_row, end_col = 10, 9

# 定义填充范围的起始行
start_row = 1

# 填充表格单元格
for i in range(1, 101):
    row = start_row + (i - 1) // (end_col - start_col + 1)
    col = start_col + (i - 1) % (end_col - start_col + 1)
    cell = table.cell(row, col)

    # 如果在单行且为单数,或者在双行且为双数,写入空格
    if (row % 2 == 1 and i % 2 == 1) or (row % 2 == 0 and i % 2 == 0):
        cell.text = ""

    else:
        cell.text=str(i)


    # 设置字体样式
    run = cell.paragraphs[0].runs[0]
    run.font.name = "微软雅黑"
    # run.font.bold = True
    run.font.size = Pt(30)

    # 设置单元格居中对齐
    cell.vertical_alignment = WD_ALIGN_VERTICAL.CENTER
    cell.paragraphs[0].alignment = 1

    # 设置单元格背景颜色为灰色
    # shading_elm = parse_xml(r'<w:shd {} w:fill="D3D3D3"/>'.format(nsdecls('w')))
    # cell._tc.get_or_add_tcPr().append(shading_elm)

    # 设置字体颜色为灰色
    # run.font.color.rgb = RGBColor(0x80, 0x80, 0x80)
    run.font.color.rgb = RGBColor(150, 150, 150)  # 黑色

# 保存为1.docx
doc.save(path+fr'\{t}.docx')
第3款 每行随机3-4个空
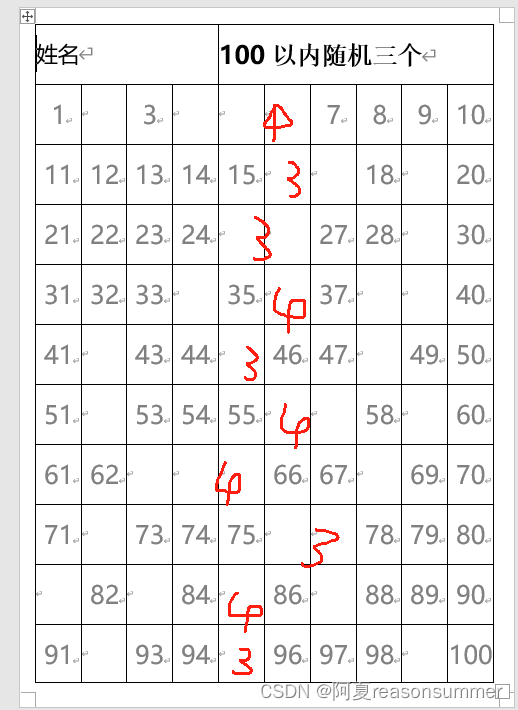
'''
100以内(每行随机3-4个空 )
AI对话大师,阿夏
2024年5月23日
'''

from docx import Document
from docx.shared import Pt
from docx.oxml.ns import nsdecls
from docx.oxml import parse_xml
from docx.shared import RGBColor
from docx.enum.table import WD_ALIGN_VERTICAL
from docx import Document
import random


# 定义文件路径
path = r'C:\Users\jg2yXRZ\OneDrive\桌面\100数字默写'

# 打开已有的Word文档
doc = Document(path+r'\100数字默写.docx')

# 获取第一个表格
table = doc.tables[0]

# 获取指定单元格
cell = table.cell(0, 4)

# 获取指定单元格的第二个段落
paragraph = cell.paragraphs[0]
t='100以内随机三个'
# 添加新的运行文本
run = paragraph.add_run(t)

# 设置字体样式
run.font.name = "微软雅黑"
run.font.bold = True
run.font.size = Pt(30)
run.font.color.rgb = RGBColor(0, 0, 0)  # 黑色

# 定义填充范围的起始和结束单元格坐标
start_row, start_col = 1, 0
end_row, end_col = 10, 9

# 填充表格单元格
for i in range(1, 101):
    row = start_row + (i - 1) // (end_col - start_col + 1)
    col = start_col + (i - 1) % (end_col - start_col + 1)
    cell = table.cell(row, col)
    cell.text = str(i)

    # 设置字体样式
    run = cell.paragraphs[0].runs[0]
    run.font.name = "微软雅黑"
    # run.font.bold = True
    run.font.size = Pt(30)

    # 设置单元格居中对齐
    cell.vertical_alignment = WD_ALIGN_VERTICAL.CENTER
    cell.paragraphs[0].alignment = 1

    # 设置单元格背景颜色为灰色
    # shading_elm = parse_xml(r'<w:shd {} w:fill="D3D3D3"/>'.format(nsdecls('w')))
    # cell._tc.get_or_add_tcPr().append(shading_elm)

    # 设置字体颜色为灰色
    run.font.color.rgb = RGBColor(0x80, 0x80, 0x80)

# 保存为1.docx
doc.save(path+fr'\{t}.docx')


# 指定文件路径
path2 =path+fr'\{t}.docx'

# 定义要处理的行范围
start_row, end_row = 1, 10

# 打开文档
doc = Document(path2)

# 获取表格
table = doc.tables[0]

# 循环处理每一行
for row in range(start_row, end_row + 1):
    # 每行随机空3个或者4个
    s=random.randint(3,4)
    # 随机选择要清空内容的单元格
    cells_to_clear = random.sample(range(0, 9), s)
    print(cells_to_clear)
    # 清空指定单元格的内容
    for col in cells_to_clear:
        cell = table.cell(row, col)
        # print(cell)
        cell.text = ""

# 保存修改后的文档
doc.save(path+fr'\{t}.docx')
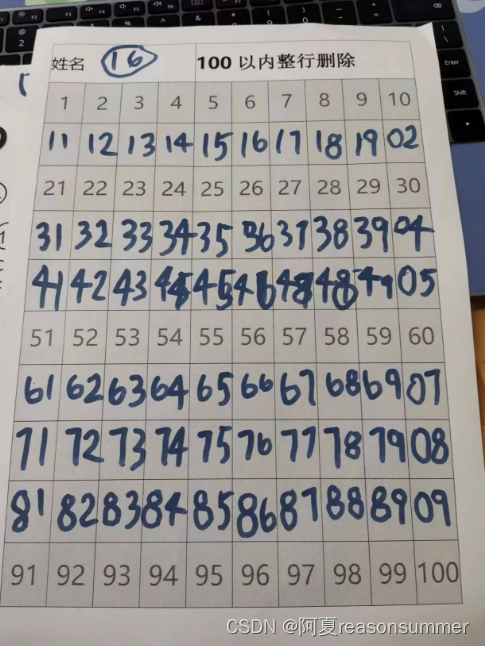
第4款 指定行,整行删除
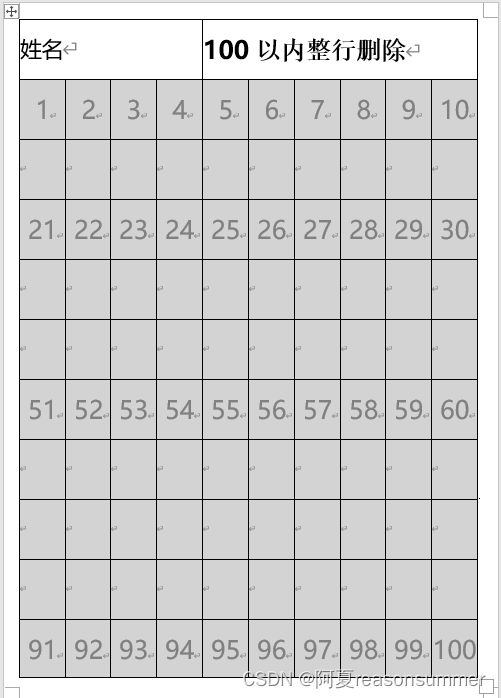
'''
100以内(删除指定行 )
AI对话大师,阿夏
2024年5月23日
'''

from docx import Document
from docx.shared import Pt
from docx.oxml.ns import nsdecls
from docx.oxml import parse_xml
from docx.shared import RGBColor
from docx.enum.table import WD_ALIGN_VERTICAL
from docx import Document
import random


# 定义文件路径
path = r'C:\Users\jg2yXRZ\OneDrive\桌面\100数字默写'

# 打开已有的Word文档
doc = Document(path+r'\100数字默写.docx')

# 获取第一个表格
table = doc.tables[0]

# 获取指定单元格
cell = table.cell(0, 4)

# 获取指定单元格的第二个段落
paragraph = cell.paragraphs[0]
t='100以内整行删除'
# 添加新的运行文本
run = paragraph.add_run(t)

# 设置字体样式
run.font.name = "微软雅黑"
run.font.bold = True
run.font.size = Pt(30)
run.font.color.rgb = RGBColor(0, 0, 0)  # 黑色

# 定义填充范围的起始和结束单元格坐标
start_row, start_col = 1, 0
end_row, end_col = 10, 9

# 填充表格单元格
for i in range(1, 101):
    row = start_row + (i - 1) // (end_col - start_col + 1)
    col = start_col + (i - 1) % (end_col - start_col + 1)
    cell = table.cell(row, col)
    cell.text = str(i)

    # 设置字体样式
    run = cell.paragraphs[0].runs[0]
    run.font.name = "微软雅黑"
    # run.font.bold = True
    run.font.size = Pt(30)

    # 设置单元格居中对齐
    cell.vertical_alignment = WD_ALIGN_VERTICAL.CENTER
    cell.paragraphs[0].alignment = 1

    # 设置单元格背景颜色为灰色
    shading_elm = parse_xml(r'<w:shd {} w:fill="D3D3D3"/>'.format(nsdecls('w')))
    cell._tc.get_or_add_tcPr().append(shading_elm)

    # 设置字体颜色为灰色
    run.font.color.rgb = RGBColor(0x80, 0x80, 0x80)

# 保存为1.docx
doc.save(path+fr'\{t}.docx')


path2 = path + fr'\{t}.docx'

# 定义要处理的行范围
# numbers = list(range(1, 12))
# rows = random.sample(numbers, 3)

rows=[2,4,5,7,8,9]

# 打开文档
doc = Document(path2)

# 获取表格
table = doc.tables[0]

# 循环处理每一行
for row in rows:
    # 清空指定行的所有单元格
    for cell in table.row_cells(row):
        cell.text = ""

# 保存修改后的文档
doc.save(path + fr'\{t}.docx')
第4款 指定列,整列删除
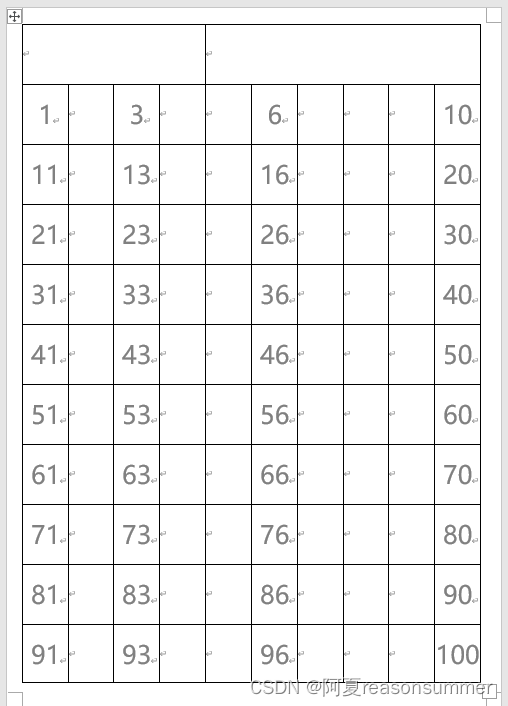
'''
100以内(删除指定列 )
AI对话大师,阿夏
2024年5月23日
'''

from docx import Document
from docx.shared import Pt
from docx.oxml.ns import nsdecls
from docx.oxml import parse_xml
from docx.shared import RGBColor
from docx.enum.table import WD_ALIGN_VERTICAL
from docx import Document
import random


# 定义文件路径
path = r'C:\Users\jg2yXRZ\OneDrive\桌面\100数字默写'

# 打开已有的Word文档
doc = Document(path+r'\100数字默写.docx')

# 获取第一个表格
table = doc.tables[0]

# 获取指定单元格
cell = table.cell(0, 4)

# 获取指定单元格的第二个段落
paragraph = cell.paragraphs[0]
t='100以内整列删除'
# 添加新的运行文本
run = paragraph.add_run(t)

# 设置字体样式
run.font.name = "微软雅黑"
run.font.bold = True
run.font.size = Pt(30)
run.font.color.rgb = RGBColor(0, 0, 0)  # 黑色

# 定义填充范围的起始和结束单元格坐标
start_row, start_col = 1, 0
end_row, end_col = 10, 9

# 填充表格单元格
for i in range(1, 101):
    row = start_row + (i - 1) // (end_col - start_col + 1)
    col = start_col + (i - 1) % (end_col - start_col + 1)
    cell = table.cell(row, col)
    cell.text = str(i)

    # 设置字体样式
    run = cell.paragraphs[0].runs[0]
    run.font.name = "微软雅黑"
    # run.font.bold = True
    run.font.size = Pt(30)

    # 设置单元格居中对齐
    cell.vertical_alignment = WD_ALIGN_VERTICAL.CENTER
    cell.paragraphs[0].alignment = 1

    # # 设置单元格背景颜色为灰色
    # shading_elm = parse_xml(r'<w:shd {} w:fill="D3D3D3"/>'.format(nsdecls('w')))
    # cell._tc.get_or_add_tcPr().append(shading_elm)

    # 设置字体颜色为灰色
    run.font.color.rgb = RGBColor(0x80, 0x80, 0x80)

# 保存为1.docx
doc.save(path+fr'\{t}.docx')


from docx import Document

# 指定文件路径
path2 = path + fr'\{t}.docx'

cols = [1,3, 4, 6, 7, 8,]

# 打开文档
doc = Document(path2)

# 获取表格
table = doc.tables[0]

# 循环处理每一列
for col in cols:
    # 清空指定列的所有单元格
    for cell in table.column_cells(col):
        cell.text = ""

# 保存修改后的文档
doc.save(path + fr'\{t}.docx')
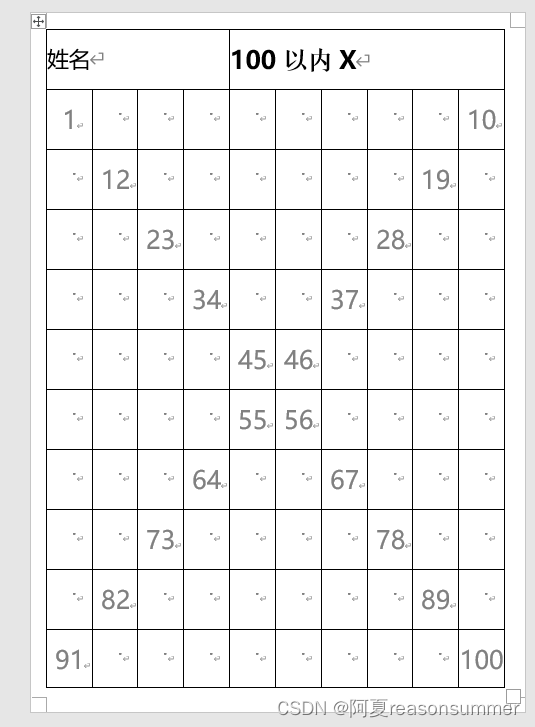
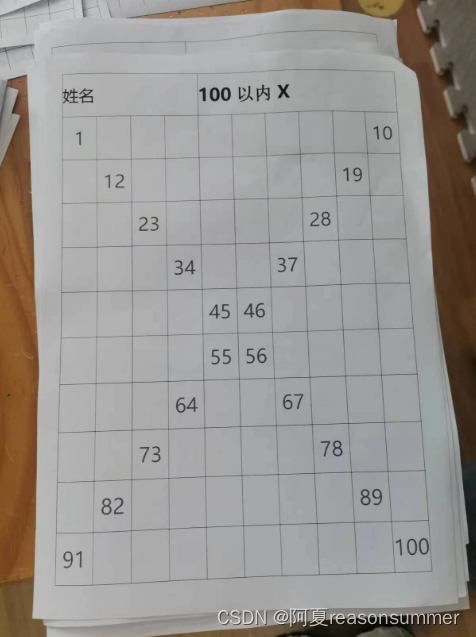
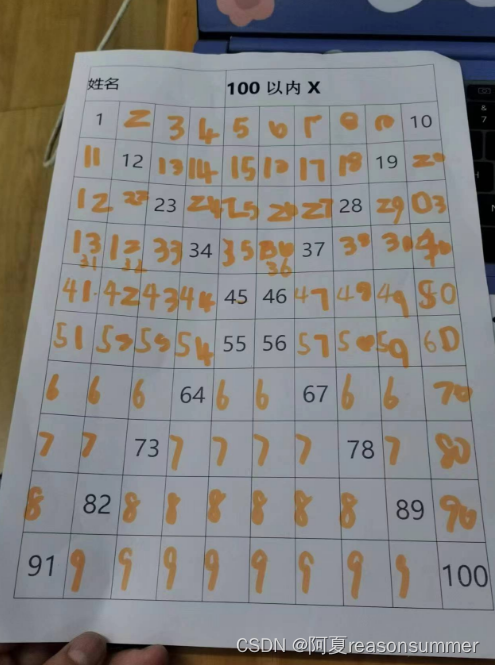
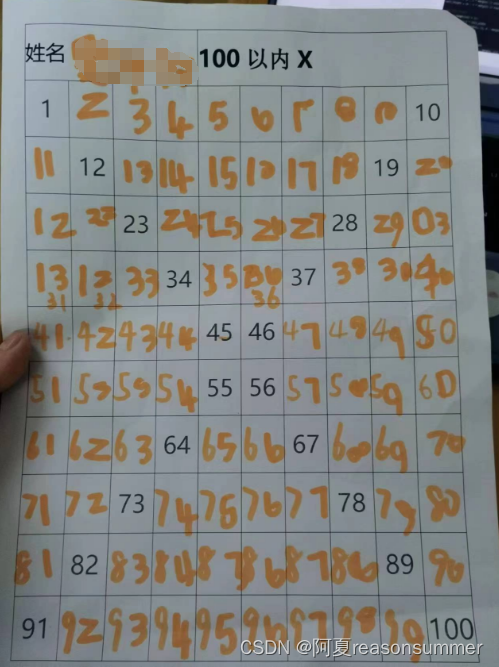
第5款 X形状
'''
100以内(X形 )
AI对话大师,阿夏
2024年5月23日
'''

from docx import Document
from docx.shared import Pt
from docx.oxml.ns import nsdecls
from docx.oxml import parse_xml
from docx.shared import RGBColor
from docx.enum.table import WD_ALIGN_VERTICAL

# 定义文件路径
path = r'C:\Users\jg2yXRZ\OneDrive\桌面\100数字默写'

# 打开已有的Word文档
doc = Document(path+r'\100数字默写.docx')


# 创建一个10x10的空白表格
table = [[' ' for _ in range(10)] for _ in range(10)]

# positions1列表
positions1 = [i for i in range(1, 101, 11)]

# positions2列表
positions2 = [i for i in range(10, 100, 9)]

positions = positions1 + positions2

# 遍历表格每个单元格
count = 1
for i in range(10):
    for j in range(10):
        if count in positions:
            table[i][j] = str(count)
        count += 1

# 将填充后的表格内容保存为列表
table_list = [row for row in table]
print(table_list)
tt=[]
for  t in table_list:
    for t1 in t:
        tt.append(t1)
print(tt)

# # 打印填充后的表格列表
# for row in table_list:
#     print(' '.join(row))


# 获取第一个表格
table = doc.tables[0]

# 获取指定单元格
cell = table.cell(0, 4)

# 获取指定单元格的第二个段落
paragraph = cell.paragraphs[0]
t='100以内X'
# 添加新的运行文本
run = paragraph.add_run(t)

# 设置字体样式
run.font.name = "微软雅黑"
run.font.bold = True
run.font.size = Pt(30)
run.font.color.rgb = RGBColor(0, 0, 0)  # 黑色

# 定义填充范围的起始和结束单元格坐标
start_row, start_col = 1, 0
end_row, end_col = 10, 9


# 填充表格单元格
for i in range(1, len(tt)+1):
    row = start_row + (i - 1) // (end_col - start_col + 1)
    col = start_col + (i - 1) % (end_col - start_col + 1)
    cell = table.cell(row, col)
    cell.text = str(tt[i-1])

    # 设置字体样式
    run = cell.paragraphs[0].runs[0]
    run.font.name = "微软雅黑"
    # run.font.bold = True
    run.font.size = Pt(30)

    # 设置单元格居中对齐
    cell.vertical_alignment = WD_ALIGN_VERTICAL.CENTER
    cell.paragraphs[0].alignment = 1

    # # 设置单元格背景颜色为灰色
    # shading_elm = parse_xml(r'<w:shd {} w:fill="D3D3D3"/>'.format(nsdecls('w')))
    # cell._tc.get_or_add_tcPr().append(shading_elm)

    # 设置字体颜色为灰色
    run.font.color.rgb = RGBColor(0x80, 0x80, 0x80)

# 保存为1.docx
doc.save(path+fr'\{t}.docx')
第7种 单数
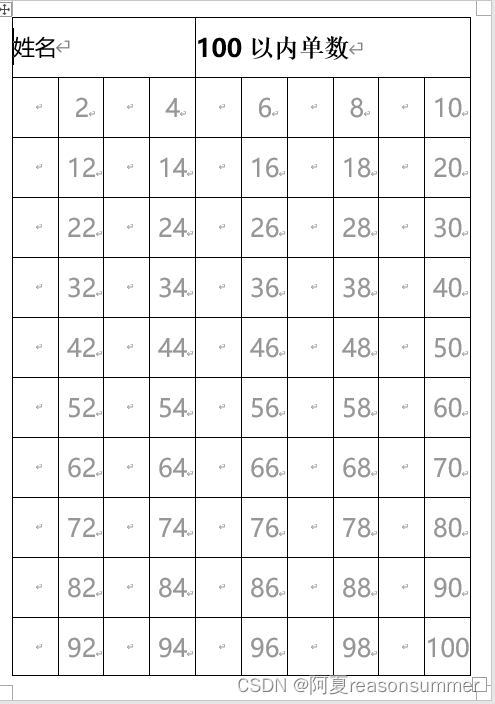
'''

100以内(单数 )
AI对话大师,阿夏
2024年5月23日
'''

from docx import Document
from docx.shared import Pt
from docx.oxml.ns import nsdecls
from docx.oxml import parse_xml
from docx.shared import RGBColor
from docx.enum.table import WD_ALIGN_VERTICAL

# 定义文件路径
path = r'C:\Users\jg2yXRZ\OneDrive\桌面\100数字默写'

# 打开已有的Word文档
doc = Document(path+r'\100数字默写.docx')

# 获取第一个表格
table = doc.tables[0]

# 获取指定单元格
cell = table.cell(0, 4)

# 获取指定单元格的第二个段落
paragraph = cell.paragraphs[0]
t='100以内单数'
# 添加新的运行文本
run = paragraph.add_run(t)

# 设置字体样式
run.font.name = "微软雅黑"
run.font.bold = True
run.font.size = Pt(30)
run.font.color.rgb = RGBColor(0, 0, 0)  # 黑色

# 定义填充范围的起始和结束单元格坐标
start_row, start_col = 1, 0
end_row, end_col = 10, 9

# 填充表格单元格
for i in range(1, 101):

    row = start_row + (i - 1) // (end_col - start_col + 1)
    col = start_col + (i - 1) % (end_col - start_col + 1)
    cell = table.cell(row, col)
    # 如果是双数,就写入空格
    if i % 2 == 1:
        cell.text = ""
    else:
        cell.text = str(i)

    # 设置字体样式
    run = cell.paragraphs[0].runs[0]
    run.font.name = "微软雅黑"
    # run.font.bold = True
    run.font.size = Pt(30)

    # 设置单元格居中对齐
    cell.vertical_alignment = WD_ALIGN_VERTICAL.CENTER
    cell.paragraphs[0].alignment = 1

    # 设置单元格背景颜色为灰色
    # shading_elm = parse_xml(r'<w:shd {} w:fill="D3D3D3"/>'.format(nsdecls('w')))
    # cell._tc.get_or_add_tcPr().append(shading_elm)

    # 设置字体颜色为灰色
    # run.font.color.rgb = RGBColor(0x80, 0x80, 0x80)
    run.font.color.rgb = RGBColor(150, 150, 150)  # 黑色

# 保存为1.docx
doc.save(path+fr'\{t}.docx')
第7种 双数
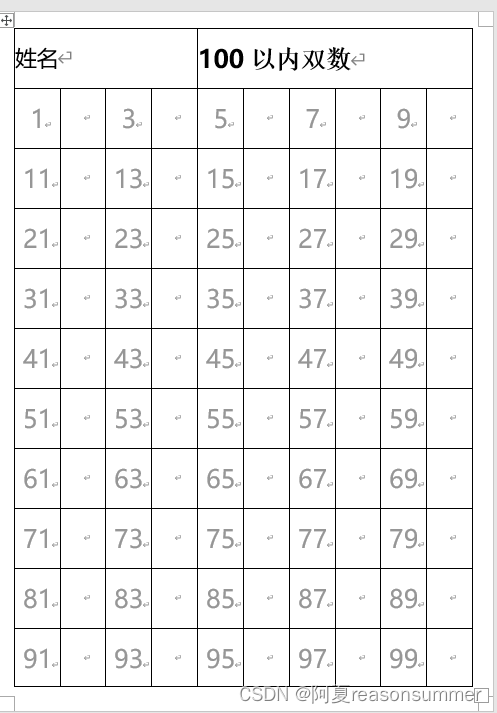
'''
100以内(双数 )
AI对话大师,阿夏
2024年5月23日
'''
from docx import Document
from docx.shared import Pt
from docx.oxml.ns import nsdecls
from docx.oxml import parse_xml
from docx.shared import RGBColor
from docx.enum.table import WD_ALIGN_VERTICAL

# 定义文件路径
path = r'C:\Users\jg2yXRZ\OneDrive\桌面\100数字默写'

# 打开已有的Word文档
doc = Document(path+r'\100数字默写.docx')

# 获取第一个表格
table = doc.tables[0]

# 获取指定单元格
cell = table.cell(0, 4)

# 获取指定单元格的第二个段落
paragraph = cell.paragraphs[0]
t='100以内双数'
# 添加新的运行文本
run = paragraph.add_run(t)

# 设置字体样式
run.font.name = "微软雅黑"
run.font.bold = True
run.font.size = Pt(30)
run.font.color.rgb = RGBColor(0, 0, 0)  # 黑色

# 定义填充范围的起始和结束单元格坐标
start_row, start_col = 1, 0
end_row, end_col = 10, 9

# 填充表格单元格
for i in range(1, 101):

    row = start_row + (i - 1) // (end_col - start_col + 1)
    col = start_col + (i - 1) % (end_col - start_col + 1)
    cell = table.cell(row, col)
    # 如果是双数,就写入空格
    if i % 2 == 0:
        cell.text = ""
    else:
        cell.text = str(i)

    # 设置字体样式
    run = cell.paragraphs[0].runs[0]
    run.font.name = "微软雅黑"
    # run.font.bold = True
    run.font.size = Pt(30)

    # 设置单元格居中对齐
    cell.vertical_alignment = WD_ALIGN_VERTICAL.CENTER
    cell.paragraphs[0].alignment = 1

    # # 设置单元格背景颜色为灰色
    # shading_elm = parse_xml(r'<w:shd {} w:fill="D3D3D3"/>'.format(nsdecls('w')))
    # cell._tc.get_or_add_tcPr().append(shading_elm)

    # 设置字体颜色为灰色
    # run.font.color.rgb = RGBColor(0x80, 0x80, 0x80)
    run.font.color.rgb = RGBColor(150, 150, 150)  # 黑色

# 保存为1.docx
doc.save(path+fr'\{t}.docx')
可以设计出各种各样的百数板空缺哦
教学实践:
时间:2024年5月24日
班级:中4
人数:5人(百日咳隔离)
数字:7类百数板,1份
2位孩子做了百数板(16号经验丰富)
孩子写到40后面就不会写了,老师吧十位数都写好,提示幼儿写个位数(1-9)


 519
519

 被折叠的 条评论
为什么被折叠?
被折叠的 条评论
为什么被折叠?
 到【灌水乐园】发言


