


this当前类
实例化对象 let p = new person("" , )
为什么在实例化的时候赋值
因为上面使用了构造函数,
export default {}

class Person {
    // 字段
    name: string
    age: number
    //  构造函数
    constructor(name: string, age: number) {
        this.name = name
        this.age = age
    }
    // 函数
    setHello(): void {
        console.log(`我叫${this.name}我今年${this.age}`);

    }
}
let q = new Person("张三", 23)
console.log(q);
重写父类方法
export default {}

class Person {
    // 字段
    name: string
    age: number
    //  构造函数
    constructor(name: string, age: number) {
        this.name = name
        this.age = age
    }
    // 函数
    setHello(): void {
        console.log(`我叫${this.name}我今年${this.age}`);
    }
}
// let q = new Person("张三", 23)
// console.log(q);
// q.setHello()

class Zilei extends Person {
    // 字段
    score: string
    // 构造函数
    constructor(name: string, age: number, score: string) {
        super(name, age)
        this.score = score
    }
    // 函数
    set(): void {
        // 父级的函数
        // super.setHello()
        // 重写父类的方法
        console.log(`我叫${this.name}我今年${this.age},我考了${this.score}`);
    }
}
let w = new Zilei("张四", 23, "甲")
w.set()
static 与 instanceof

export default {}

class Fn {
    static salary: string = "张三"
    static say(): void {
        console.log(`我叫${this.salary}`);
    }
}
Fn.say()

class Person { }
let p = new Person()
let b = p instanceof Person;
console.log("p是Person实例化出来的吗?", b);


class Student extends Person { }
let s = new Student();
let d = s instanceof Person;
console.log("s是Person实例化出来的吗?", d);
类中的修饰符

export default {}

class Person {
    // 字段
    public name: string
    protected age: number
    private sex: string
    //  构造函数
    constructor(name: string, age: number, sex: string) {
        this.name = name
        this.age = age
        this.sex = sex
    }
    // 函数
    setHello(): void {
        console.log(`我叫${this.name}我性别${this.sex}今年${this.age}`);
    }
}
let q = new Person("张三", 23, "男")
q.setHello()

class Zilei extends Person {
    // 字段
    score: string
    // 构造函数
    constructor(name: string, age: number, sex: string, score: string) {
        super(name, age, sex)
        this.score = score
    }
    // 函数
    set(): void {
        console.log(this.name);
        console.log(this.age);
        // console.log(this.sex);  //因为上面是私有属性 不能使用继承所以报错
        console.log(this.score);

    }
}
let w = new Zilei("张四", 23, "男", "甲")
w.set()
readonly用于标记一个属性是只读的,也就是不可修改的。
export default {}

class Print {
    // readonly 只读属性必须在声明时
    readonly str1: string = "我是声明 时赋的值"
    readonly str2: string
    readonly str3: string
    readonly str4: string
    readonly str5: string
    readonly str6: string
    constructor(str2: string, str3: string, str4: string, str5: string, str6: string) {
        this.str2 = str2
        this.str3 = str3
        this.str4 = str4
        this.str5 = str5
        this.str6 = str6
    }
}
let str = new Print("嗡嗡嗡", "哇哇哇", "呜呜呜", "喂喂喂", "我我我")
console.log(str);
get 读取字段 set 对字段进行修改
export default {}

class Name {
    // 私有的字段
    private myName: string = "张三"
    // 读取字段的值 取值
    get fullName() {
        console.log("get");
        return this.myName;
    }
    // 为字段赋值 (修改)
    set fullName(newName: string) {
        // console.log("set");
        this.myName = newName
    }
}
let n = new Name()
n.fullName = "赵四" //修改赋值

console.log(n);     //修改

// console.log(n.fullName);  //取值
抽象类(抽象 成员)
抽象类作为其他派生类的基类的使用,他们一般不会直接被实例化
抽象类专门用于定义那些不希望被外界 直接创建的类的
抽象类和接口一样用于约束子类
抽象类和接口类的区别:
抽象方法必须包含,abstract关键字并且可以包含访问修饰符
接口中只能定义约束不能定义具体实现,而抽象类中既可以定义约束,又可以定义具体实现
export default {}
// 父类
abstract class Fn {
    abstract name: string
    abstract age: number
    abstract show(): string
    // void 没有返回值
    strNname(): void {
        console.log("我叫张三");
    }
}

// 子类
class Str extends Fn {
    name: string = "张三"
    age: number = 34
    show() {
        return "我是赵四"
    }
}
let s = new Str()
let q = s.show()
console.log(q);
implements子句
类继承多个接口
export default {}

// 接口
interface Fu {
    name: string
    age: number
    sex: string
    show(): void
}
// 接口
interface Xiong {
    each: string
}
// 类
// 类继承一个接口 implements
class Zi implements Fu, Xiong {
    name: string = "张三";
    age: number = 32;
    sex: string = "男";
    each: string = "吃饭";
    show() {
        console.log(`我叫${this.name}今年${this.age}`);
    }
}
let n = new Zi()
n.show()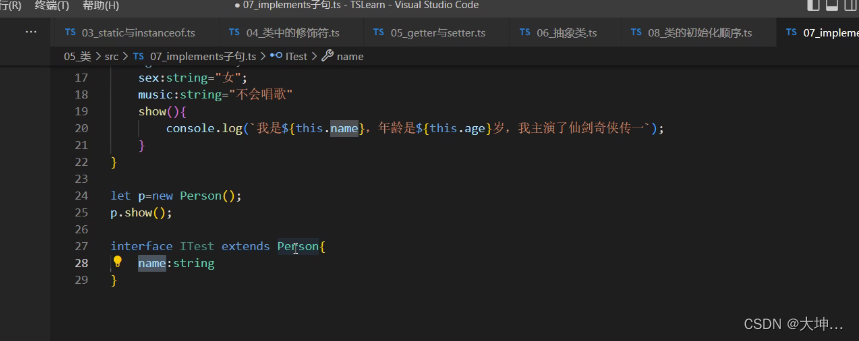
继承一个类 同时可以继承一个接口
接中不能在里面提供实现赋值的
export default {}

// 接口
interface Fu {
    name: string
    age: number
    sex: string
    show(): void
}
// 接口
interface Xiong {
    each: string
}
// 类
// 类继承一个接口 implements
class Zi implements Fu, Xiong {
    name: string = "张三";
    age: number = 32;
    sex: string = "男";
    each: string = "吃饭";
    show() {
        console.log(`我叫${this.name}今年${this.age}`);
    }
}
let n = new Zi()
n.show()
// 接口继承一个类
interface Lei extends Zi {
    // name:string = "ss"  类不可以赋值
    name: string
}

// 继承一个 类  同时可以继承一个接口
class Star extends Zi implements Lei {
    name: string = "张四"
    age: number = 12;
    sex: string = "男";
    each: string = "吃不饱";
}
let p = new Star()
console.log(p.name);

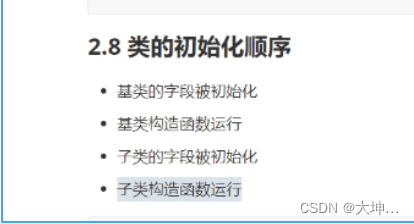
2.8类的初始化顺序
export default {}

class Fu {
    name: string = "张三"
    age: number = 34
    constructor() {
        console.log(`我叫${this.name}我今年${this.age}`);
    }
}
class Zi extends Fu {
    name: string = "张四"
    age: number = 54
    constructor() {
        super()
        console.log(`我叫${this.name}今年${this.age}`);

    }
}
let s = new Zi

泛型的基本使用 (支持多个数据类型)
export default {}

// 简单的数组
// const arr: string[] = ["嗡嗡嗡", "喂喂喂", "呜呜呜"]
// console.log(arr);
// const arr1: number[] = [1, 2, 3, 4, 5, 6]
// console.log(arr1);

// const arr2: Array<number> = [1, 2, 3, 4, 5, 6]
// console.log(arr2);

// const arr3: Array<string> = ["嗡嗡嗡", "喂喂喂", "呜呜呜"]
// console.log(arr3);

// let arrArray = (value: number, item: number): number[] => {
//     return new Array(item).fill(value)
// }
// let arr4 = arrArray(1, 3)
// console.log(arr4);


let arrArray = <T>(value: T, item: number): T[] => {
    return new Array(item).fill(value)
}
let arr4 = arrArray("sss", 3)
console.log(arr4);
泛型的约束
export default {}

// function Get<T>(e:T):T{
//     console.log(e.length);  //类型“T”上不存在属性“length”。
//     return e
// }

// function Get<T>(e: Array<T>): Array<T> {
//     console.log(e.length);
//     return e
// }
// // Get("ss") //类型“string”的参数不能赋给类型“unknown[]”的参数。
// Get(["sss","sss","ss"])
// Get([1,2,3,4])

interface Len {
    length: number
}
// 通过继承接口的方式来 加上length
function Ger<T extends Len>(e: T): T {
    return e
}
Ger("ss")
Ger(["sss", "sss", "ss"])
Ger([1, 2, 3, 4])
泛型接口
将泛型与接口结合起来使用,可以大大简化我们的代码,增强 我们 的代码的可读性
反省也可以使用默认值
export default {}

// interface Iperson<T1, T2> {
//     name: T1
//     age: T2
// }

// let Name: Iperson<string, number> = {
//     name: "张三",
//     age: 34
// }


// 简写
interface Iperson<T1 = string, T2 = number> {
    name: string
    age: number
}

let Name: Iperson = {
    name: "张三",
    age: 34
}
泛型的改造
export default {}

class Arr<T1, T2>{
    // 字段 (属性)
    name: T1
    age: T2
    sex: T1
    // 构造函数
    constructor(name: T1, age: T2, sex: T1) {
        this.name = name
        this.age = age
        this.sex = sex
    }

}
// 实例化对象
let q = new Arr<string, number>("李四", 19, "男")
console.log(q);
其他类型的补充
export default {}

// 任何类型都可以赋值给unknown类型
let Mytype1: unknown;
Mytype1 = "李四";
Mytype1 = true;
Mytype1 = 34

// 不能将unknown类型赋值给其他类型
let Mytype2: unknown = 18;
let num: number;
// 类型缩小
if (typeof Mytype2 == "number") {
    num = Mytype2
}
// 类型断言
num = Mytype2 as number

// Mytype2 = num  //报错  不能将unknown类型赋值给其他类型

// unknown 类型与其他类型组成的交叉类型都是其他类型
type Mytype3 = unknown & number
let number: Mytype3 = 34
//  let number1:Mytype3="ss" //报错 他会变成 数字类型number


// unknown 除了与any之外 与其他类型组合的联合类型都是unknown类型
type Mytype4 = unknown | any
type Mytype5 = unknown | number
type Mytype6 = unknown | number | string

// never类型是unknown类型的子类型
type Mytype7 = never extends unknown ? true : false
Map类型
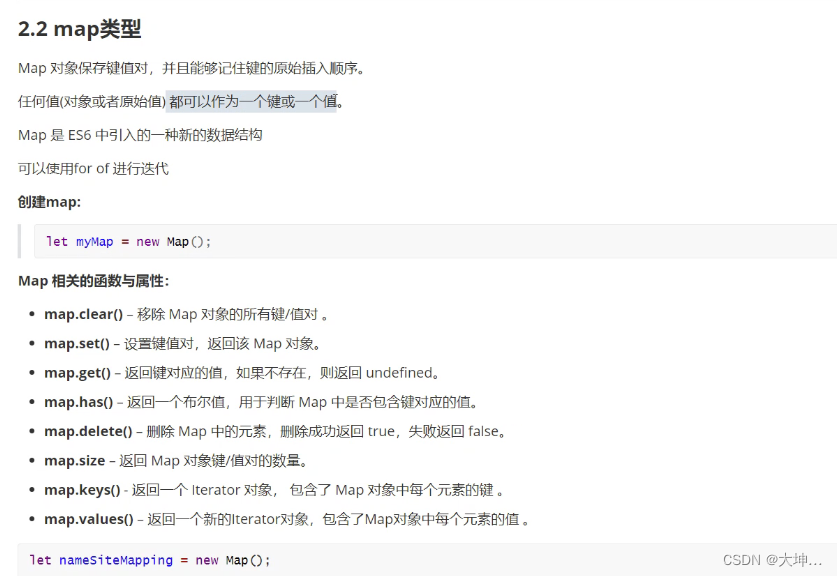
export default {}

// Map类型
let nameMap = new Map()

// 设置Map对象
nameMap.set("李四", 1)
nameMap.set("王五", 2)
nameMap.set("老六", 3)

// 获取对象的键值
// console.log(nameMap.get("李四")); //1

// 判断Map里面是否包含键对应的值
// console.log(nameMap.has("李四")); //true

// 判断Map键对应值的数量
// console.log(nameMap.size);  //3

// 判断一处Map里面所有的键值对
// nameMap.clear()
// console.log(nameMap);  //Map(0) {}

// // 迭代Map里面的key
// for (const key of nameMap.keys()) {
//     console.log(key); //李四 王五 老六
// }

// // 迭代Map里面的value
// for (const value of nameMap.values()) {
//     console.log(value); //1 2 3
// }

// 迭代Map中的key=>value
for (const entry of nameMap.entries()) {
    console.log(entry);
}

// 适用对象解析
for (const [key, value] of nameMap) {
    console.log(key, value);

}
条件类型
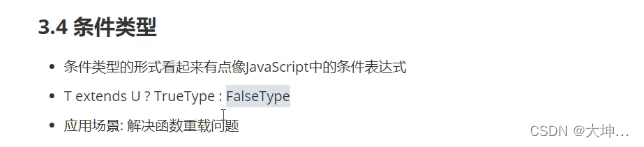
export default {}


type Mytype<T> = T extends string ? string : any
type res = Mytype<string>


interface IName {
    name: string
}
interface TAge {
    name: number
}
type Condition<T> = T extends string ? IName : TAge

function reLoad<T extends number | string>(idOrNmae: T): Condition<T> {
    throw ""
}
let res1 = reLoad("三十三")
let res2 = reLoad(34)

console.log(res1);
console.log(res2);
映射类型
    export default {}

    type Name = "person" | "animal"
    type Person = {
        name: string
        age: number
    }
    type NewType = Record<Name, Person>;
    let res: NewType =
    {
        person: {
            name: "富兰克林",
            age: 16
        },
        animal: {
            name: "小查",
            age: 3
        }
    }

    console.log(res);

    interface TPerson {
        name: string
        age: number
    }
    type Mytype = Pick<TPerson, "name">
    let res2: Mytype = {
        name: "崔弗"
    }
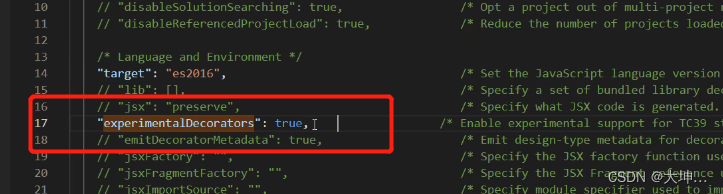
装饰器
装饰器的主要作用是给一个已有的方法或类扩展一些新的行为,而不去直接修改他的本身
1.要先修改 tsconfig.json文件
案例
export default {}

function fn(constructure: any) {
    constructure.prototype.name = "李四"
    constructure.prototype.show = () => {
        console.log(`我叫${constructure.prototype.name}`);
    }
}
@fn
class Person {

}

let n = new Person();
(n as any).show();
console.log((n as any).name);
装饰器工厂
装饰器工厂也是一个函数,它的返回值是一个函数,返回的函数作为修饰器的调用函数,如果使用装饰器工厂,那么在使用的时候就要加上函数的调用
export default {}
function fn(flag: boolean) {
    if (flag) {
        return function (constructure: any) {
            constructure.prototype.name = "李四"
            constructure.prototype.show = (): void => {
                console.log(`我叫${constructure.prototype.name}`);
            }
        }
    } else {
        return function (constructure: any) {
            constructure.prototype.show = (): void => {
                console.log("hello   world");
            }
        }
    }
}
@fn(false)
class Person {

}

let n = new Person();
(n as any).show();
// console.log((n as any).name);
混入Mixins
介绍:除了传统的面向对象继承方式,还流行一种通过可重用组件类的方式,就是联合另一种简单类的代码
作用:解决TS中继承一次只能 继承一个类的问题
注意点:类的混入不能混入属性名
export default {}

let str = { name: "李四" };
let num = { age: 34 };

// Object.assign(str, num);
// console.log(str);
// console.log(num);

Object.assign(num, str);
console.log(str);
console.log(num);
模块与命名空间
TS中的模块
import Text = require("./muduleText")
class Person implements Text.str {
    name = "李四"
    age = 34
    sex = "男"
    show() {
        console.log(`他叫${this.name}今年${this.age}岁性别${this.sex}`);
    }

}
var p = new Person()
console.log(p);

// 直接在公共ts里面赋值 在这里引用
import { nae } from "./muduleText";
console.log(nae);
公共样式
export interface str {
    name: string
    age: number
    sex: string
    show(): void
}

export let nae = { uname: "王五" }
TS中的命名空间
在TS1.5之前被 叫做内部模块主要用于组织代码,避免命名冲突
本质就是一个定义一个大对象,把变量方法类接口...都放到里面
通过export导出
通过namespace定义
namespace A {
    export const a = 100
    export namespace B {
        export const b = 200
    }
}

namespace Q {
    export const a = 100
    export namespace B {
        const b = 200
    }
}
// 1
console.log(A.a); //100
// 简化命名空间
import b = A.B.b
console.log(b); //100
// 3


import { W } from "./namespaceText";
console.log(W.w);
公共样式
export namespace W {
    export const w = 10000;
}


 1037
1037


 被折叠的 条评论
为什么被折叠?
被折叠的 条评论
为什么被折叠?
 到【灌水乐园】发言


