//过滤数字
<input type=text οnkeypress=
"return event.keyCode>=48&&event.keyCode<=57||(this.value.indexOf(’.’)<0?event.keyCode==46:false)" οnpaste="return !clipboardData.getData(’text’).match(//D/)" οndragenter="return false">
//特殊用途
<input type=button value=导入收藏夹 οnclick=
"window.external.ImportExportFavorites(true,’http://localhost’);">
<input type=button value=导出收藏夹 οnclick="window.external.ImportExportFavorites(false,’http://localhost’);">
<input type=button value=整理收藏夹 οnclick="window.external.ShowBrowserUI(’OrganizeFavorites’, null)">
<input type=button value=语言设置 οnclick="window.external.ShowBrowserUI(’LanguageDialog’, null)">
<input type=button value=加入收藏夹 οnclick="window.external.AddFavorite(’http://www.google.com/’, ’google’)">
<input type=button value=加入到频道 οnclick="window.external.addChannel(’http://www.google.com/’)">
<input type=button value=加入到频道 οnclick="window.external.showBrowserUI(’PrivacySettings’,null)">
//不缓存
//正则匹配
匹配中文字符的正则表达式: [/u4e00-/u9fa5]
匹配双字节字符(包括汉字在内):[^/x00-/xff]
匹配空行的正则表达式:/n[/s| ]*/r
匹配HTML标记的正则表达式:/<(.*)>.*<///1>|<(.*) //>/
匹配首尾空格的正则表达式:(^/s*)|(/s*$)(像vbscript那样的trim函数)
匹配Email地址的正则表达式:/w+([-+.]/w+)*@/w+([-.]/w+)*/./w+([-.]/w+)*
匹配网址URL的正则表达式:http:
//([/w-]+/.)+[/w-]+(/[/w- ./?%&=]*)?
以下是例子:
利用正则表达式限制网页表单里的文本框输入内容:
用正则表达式限制只能输入中文:οnkeyup="value=value.replace(/[^/u4E00-/u9FA5]/g,’’)" onbeforepaste="clipboardData.setData(’text’,clipboardData.getData(’text’).replace(/[^/u4E00-/u9FA5]/g,’’))"
1.用正则表达式限制只能输入全角字符: οnkeyup="value=value.replace(/[^/uFF00-/uFFFF]/g,’’)" onbeforepaste="clipboardData.setData(’text’,clipboardData.getData(’text’).replace(/[^/uFF00-/uFFFF]/g,’’))"
2.用正则表达式限制只能输入数字:οnkeyup="value=value.replace(/[^/d]/g,’’) "onbeforepaste="clipboardData.setData(’text’,clipboardData.getData(’text’).replace(/[^/d]/g,’’))"
3.用正则表达式限制只能输入数字和英文:οnkeyup="value=value.replace(/[/W]/g,’’) "onbeforepaste="clipboardData.setData(’text’,clipboardData.getData(’text’).replace(/[^/d]/g,’’))"
//消除图像工具栏
<IMG SRC="mypicture.jpg" HEIGHT="100px" WIDTH="100px" GALLERYIMG="false">
or
<head>
<meta http-equiv="imagetoolbar" content="no">
</head>
//无提示关闭
function Close()
{
var ua=navigator.userAgent
var ie=navigator.appName=="Microsoft Internet Explorer"?true:false
if(ie)
{
var IEversion=parseFloat(ua.substring(ua.indexOf("MSIE ")+5,ua.indexOf(";",ua.indexOf("MSIE "))))
if(IEversion< 5.5)
{
var str = ’<object id=noTipClose classid="clsid:ADB880A6-D8FF-11CF-9377-00AA003B7A11">’
str += ’<param name="Command" value="Close"></object>’;
document.body.insertAdjacentHTML("beforeEnd", str);
document.all.noTipClose.Click();
}
else
{
window.opener =null;
window.close();
}
}
else
{
window.close()
}
}
//取得控件得绝对位置(1)
<script language="javascript">
function getoffset(e)
{
var t=e.offsetTop;
var l=e.offsetLeft;
while(e=e.offsetParent)
{
t+=e.offsetTop;
l+=e.offsetLeft;
}
var rec = new Array(1);
rec[0] = t;
rec[1] = l;
return rec
}
</script>
//获得控件的绝对位置(2)
oRect = obj.getBoundingClientRect();
oRect.left
oRect.
//最小化,最大化,关闭
<object id=min classid=
"clsid:ADB880A6-D8FF-11CF-9377-00AA003B7A11">
<param name="Command" value="Minimize"></object>
<object id=max classid="clsid:ADB880A6-D8FF-11CF-9377-00AA003B7A11">
<param name="Command" value="Maximize"></object>
<OBJECT id=close classid="clsid:adb880a6-d8ff-11cf-9377-00aa003b7a11">
<PARAM NAME="Command" value="Close"></OBJECT>
<input type=button value=最小化 οnclick=min.Click()>
<input type=button value=最大化 οnclick=max.Click()>
<input type=button value=关闭 οnclick=close.Click()>
//光标停在文字最后
//页面进入和退出的特效
进入页面<meta http-equiv="Page-Enter" content="revealTrans(duration=x, transition=y)">
推出页面<meta http-equiv="Page-Exit" content="revealTrans(duration=x, transition=y)">
这个是页面被载入和调出时的一些特效。duration表示特效的持续时间,以秒为单位。transition表示使
用哪种特效,取值为1-23:
0 矩形缩小
1 矩形扩大
2 圆形缩小
3 圆形扩大
4 下到上刷新
5 上到下刷新
6 左到右刷新
7 右到左刷新
8 竖百叶窗
9 横百叶窗
10 错位横百叶窗
11 错位竖百叶窗
12 点扩散
13 左右到中间刷新
14 中间到左右刷新
15 中间到上下
16 上下到中间
17 右下到左上
18 右上到左下
19 左上到右下
20 左下到右上
21 横条
22 竖条
23
//网页是否被检索
//打印分页
//设置打印
<object id="factory" style="display:none" viewastext
classid="clsid:1663ed61-23eb-11d2-b92f-008048fdd814"
codebase="http://www.meadroid.com/scriptx/ScriptX.cab#Version=5,60,0,360"
></object>
<input type=button value=页面设置 οnclick="factory.printing.PageSetup()">
<input type=button value=打印预览 οnclick="factory.printing.Preview()">
<script language=javascript>
function window.onload()
{
// -- advanced features
factory.printing.SetMarginMeasure(2) // measure margins in inches
factory.printing.SetPageRange(false, 1, 3) // need pages from 1 to 3
factory.printing.printer = "HP DeskJet 870C"
factory.printing.copies = 2
factory.printing.collate = true
factory.printing.paperSize = "A4"
factory.printing.paperSource = "Manual feed"
// -- basic features
factory.printing.header = "居左显示&b居中显示&b居右显示页码,第&p页/共&P页"
factory.printing.footer = "(自定义页脚)"
factory.printing.portrait = false
factory.printing.leftMargin = 0.75
factory.printing.topMargin = 1.5
factory.printing.rightMargin = 0.75
factory.printing.bottomMargin = 1.5
}
function Print(frame) {
factory.printing.Print(true, frame) // print with prompt
}
</script>
<input type=button value="打印本页" οnclick="factory.printing.Print(false)">
<input type=button value="页面设置" οnclick="factory.printing.PageSetup()">
<input type=button value="打印预览" οnclick="factory.printing.Preview()"><br>
<a href="http://www.meadroid.com/scriptx/docs/printdoc.htm?static" target=_blank>具体使用手册,更多信息,点这里</a>
//自带的打印预览
WebBrowser.ExecWB(1,1) 打开
Web.ExecWB(2,1) 关闭现在所有的IE窗口,并打开一个新窗口
Web.ExecWB(4,1) 保存网页
Web.ExecWB(6,1) 打印
Web.ExecWB(7,1) 打印预览
Web.ExecWB(8,1) 打印页面设置
Web.ExecWB(10,1) 查看页面属性
Web.ExecWB(15,1) 好像是撤销,有待确认
Web.ExecWB(17,1) 全选
Web.ExecWB(22,1) 刷新
Web.ExecWB(45,1) 关闭窗体无提示
<style media=print>
.Noprint<!--用本样式在打印时隐藏非打印项目-->
.PageNext<!--控制分页-->
</style>
<object id=
"WebBrowser" width=0 height=0 classid="CLSID:8856F961-340A-11D0-A96B-00C04FD705A2">
</object>
<center class="Noprint" >
<input type=button value=打印 οnclick=document.all.WebBrowser.ExecWB(6,1)>
<input type=button value=直接打印 οnclick=document.all.WebBrowser.ExecWB(6,6)>
<input type=button value=页面设置 οnclick=document.all.WebBrowser.ExecWB(8,1)>
</p>
<p> <input type=button value=打印预览 οnclick=document.all.WebBrowser.ExecWB(7,1)>
</center>
//去掉打印时的页眉页脚
<script language="JavaScript">
var HKEY_Root,HKEY_Path,HKEY_Key;
HKEY_Root="HKEY_CURRENT_USER";
HKEY_Path="//Software//Microsoft//Internet Explorer//PageSetup//";
//设置网页打印的页眉页脚为空
function PageSetup_Null()
{
try
{
var Wsh=new ActiveXObject("WScript.Shell");
HKEY_Key="header";
Wsh.RegWrite(HKEY_Root+HKEY_Path+HKEY_Key,"");
HKEY_Key="footer";
Wsh.RegWrite(HKEY_Root+HKEY_Path+HKEY_Key,"");
}
catch(e){}
}
//设置网页打印的页眉页脚为默认值
function PageSetup_Default()
{
try
{
var Wsh=new ActiveXObject("WScript.Shell");
HKEY_Key="header";
Wsh.RegWrite(HKEY_Root+HKEY_Path+HKEY_Key,"&w&b页码,&p/&P");
HKEY_Key="footer";
Wsh.RegWrite(HKEY_Root+HKEY_Path+HKEY_Key,"&u&b&d");
}
catch(e){}
}
</script>
<input type="button" value="清空页码" οnclick=PageSetup_Null()>
<input type="button" value="恢复页码" οnclick=PageSetup_Default()>
//浏览器验证
function checkBrowser()
{
this.ver=navigator.appVersion
this.dom=document.getElementById?1:0
this.ie6=(this.ver.indexOf("MSIE 6")>-1 && this.dom)?1:0;
this.ie5=(this.ver.indexOf("MSIE 5")>-1 && this.dom)?1:0;
this.ie4=(document.all && !this.dom)?1:0;
this.ns5=(this.dom && parseInt(this.ver) >= 5) ?1:0;
this.ns4=(document.layers && !this.dom)?1:0;
this.mac=(this.ver.indexOf(’Mac’) > -1) ?1:0;
this.ope=(navigator.userAgent.indexOf(’Opera’)>-1);
this.ie=(this.ie6 || this.ie5 || this.ie4)
this.ns=(this.ns4 || this.ns5)
this.bw=(this.ie6 || this.ie5 || this.ie4 || this.ns5 || this.ns4 || this.mac
|| this.ope)
this.nbw=(!this.bw)
return this;
}
//计算内容宽和高
<SCRIPT language=
"javascript">
function test(obj)
{
var range = obj.createTextRange();
alert("内容区宽度: " + range.boundingWidth
+ "px/r/n内容区高度: " + range.boundingHeight + "px");
}
</SCRIPT>
<BODY>
<Textarea id="txt" height="150">sdf</textarea><INPUT type="button" value="计算内容宽度" onClick="test(txt)">
</BODY>
//无模式的提示框
function modelessAlert(Msg)
{
window.showModelessDialog("javascript:alert(/""+escape(Msg)+"/");window.close();","",
"status:no;resizable:no;help:no;
dialogHeight:height:30px;dialogHeight:40px;");
}
//屏蔽按键
//移动的图层,拖动
1.<span style=’position:absolute;width:200;height:200;background:red’
οnmοusedοwn=MouseDown(this) οnmοusemοve=MouseMove() οnmοuseup=MouseUp()>meizz</span>
<script language=javascript>
var Obj;
function MouseDown(obj)
{
Obj=obj;
Obj.setCapture();
Obj.l=event.x-Obj.style.pixelLeft;
Obj.t=event.y-Obj.style.pixelTop;
}
function MouseMove()
{
if(Obj!=null)
{
Obj.style.left = event.x-Obj.l;
Obj.style.top = event.y-Obj.t;
}
}
function MouseUp()
{
if(Obj!=null)
{
Obj.releaseCapture();
Obj=null;
}
}
</script>
2.
<div id="myDiv" src="logo.gif" οndrag="doDrag();" οnmοuseοver="this.style.cursor=’hand’"
style="position:absolute;left=100;top=100;"
οnmοusedοwn="doMouseDown();">
<a href="#" οnclick="return false"><h1>wlecome</h1></a>
</div>
<script language="JavaScript" type="text/javascript">
var orgMouseX;
var orgMouseY;
var orgObjX;
var orgObjY;
function doDrag()
{
var myObject=document.all.myDiv;
var x=event.clientX;
var y=event.clientY;
myObject.style.left=x-(orgMouseX-orgObjX);
myObject.style.top=y-(orgMouseY-orgObjY);
}
function doMouseDown()
{
orgMouseX=event.clientX;
orgMouseY=event.clientY;
orgObjX=parseInt(document.all.myDiv.style.left);
orgObjY=parseInt(document.all.myDiv.style.top);
}
</script>
//文档状态改变
<iframe src=
"a.html" id="f" name="f" scrolling="no" frameborder=0
marginwidth=0 marginheight=0></iframe>
<script>
var doc=window.frames["f"].document;
function s(){
if (doc.readyState=="complete"){
document.all.f.style.height=doc.body.scrollHeight
document.all.f.style.width=doc.body.scrollWidth
}
}
doc.onreadystatechange=s
</script>
//刷新后不变的文本框
//访问剪贴板
//操作COOKIE
function SetCookie(sName, sValue)
{
document.cookie = sName + "=" + escape(sValue) + "; ";
}
function GetCookie(sName)
{
var aCookie = document.cookie.split("; ");
for (var i=0; i < aCookie.length; i++)
{
var aCrumb = aCookie[i].split("=");
if (sName == aCrumb[0])
return unescape(aCrumb[1]);
}
}
function DelCookie(sName)
{
document.cookie = sName + "=" + escape(sValue) + "; expires=Fri, 31 Dec 1999 23:59:59 GMT;";
}
//setTimeout增加参数
<script>
var _st = window.setTimeout;
window.setTimeout = function(fRef, mDelay) {
if(typeof fRef == ’function’){
var argu = Array.prototype.slice.call(arguments,2);
var f = (function(){ fRef.apply(null, argu); });
return _st(f, mDelay);
}
return _st(fRef,mDelay);
}
function test(x){
alert(x);
}
window.setTimeout(test,1000,’fason’);
</script>
//自定义的apply,call
Function.prototype.apply =
function (obj, argu) {
if (obj) obj.constructor.prototype._caller = this;
var argus = new Array();
for (var i=0;i<argu.length;i++)
argus[i] = "argu[" + i + "]";
var r;
eval("r = " + (obj ? ("obj._caller(" + argus.join(",") + ");") : ("this(" + argus.join(",") + ");")));
return r;
};
Function.prototype.call = function (obj) {
var argu = new Array();
for (var i=1;i<arguments.length;i++)
argu[i-1] = arguments[i];
return this.apply(obj, argu);
};
//下载文件
function DownURL(strRemoteURL,strLocalURL)
{
try
{
var xmlHTTP=new ActiveXObject("Microsoft.XMLHTTP");
xmlHTTP.open("Get",strRemoteURL,false);
xmlHTTP.send();
var adodbStream=new ActiveXObject("ADODB.Stream");
adodbStream.Type=1;//1=adTypeBinary
adodbStream.Open();
adodbStream.write(xmlHTTP.responseBody);
adodbStream.SaveToFile(strLocalURL,2);
adodbStream.Close();
adodbStream=null;
xmlHTTP=null;
}
catch(e)
{
window.confirm("下载URL出错!");
}
//window.confirm("下载完成.");
}
//检验连接是否有效
function getXML(URL)
{
var xmlhttp = new ActiveXObject("microsoft.xmlhttp");
xmlhttp.Open("GET",URL, false);
try
{
xmlhttp.Send();
}
catch(e){}
finally
{
var result = xmlhttp.responseText;
if(result)
{
if(xmlhttp.Status==200)
{
return(true);
}
else
{
return(false);
}
}
else
{
return(false);
}
}
}
//POST代替FORM
<SCRIPT language=
"VBScript">
Function URLEncoding(vstrIn)
strReturn = ""
For i = 1 To Len(vstrIn)
ThisChr = Mid(vStrIn,i,1)
If Abs(Asc(ThisChr)) < &HFF Then
strReturn = strReturn & ThisChr
Else
innerCode = Asc(ThisChr)
If innerCode < 0 Then
innerCode = innerCode + &H10000
End If
Hight8 = (innerCode And &HFF00)/ &HFF
Low8 = innerCode And &HFF
strReturn = strReturn & "%" & Hex(Hight8) & "%" & Hex(Low8)
End If
Next
URLEncoding = strReturn
End Function
Function bytes2BSTR(vIn)
strReturn = ""
For i = 1 To LenB(vIn)
ThisCharCode = AscB(MidB(vIn,i,1))
If ThisCharCode < &H80 Then
strReturn = strReturn & Chr(ThisCharCode)
Else
NextCharCode = AscB(MidB(vIn,i+1,1))
strReturn = strReturn & Chr(CLng(ThisCharCode) * &H100 + CInt(NextCharCode))
i = i + 1
End If
Next
bytes2BSTR = strReturn
End Function
dim strA,oReq
strA = URLEncoding("submit1=Submit&text1=中文")
set oReq = CreateObject("MSXML2.XMLHTTP")
oReq.open "POST","http://ServerName/VDir/TstResult.asp",false
oReq.setRequestHeader "Content-Length",Len(strA)
oReq.setRequestHeader "CONTENT-TYPE","application/x-www-form-urlencoded"
oReq.send strA
msgbox bytes2BSTR(oReq.responseBody)
</SCRIPT>
//readystate是xmlhttp返回数据的进度,0=载入中,1=未初始化,2=已载入,3=运行中,4=完成
//组件是否安装
isComponentInstalled("", "componentID"))
//检查网页是否存在
function CheckURL(URL)
{
var xmlhttp = new ActiveXObject("Microsoft.XMLHTTP");
xmlhttp.Open("GET",URL, false);
try
{
xmlhttp.Send();
var result = xmlhttp.status;
}
catch(e) {return(false); }
if(result==200)
{
return true;
}
xmlhttp = null;
return false;
}
//连接数据库
<script language="javascript">
//用 JavaScript 写服务器端连接数据库的代码示例
var conn = new ActiveXObject("ADODB.Connection");
conn.Open("Provider=SQLOLEDB.1; Data Source=localhost; User ID=sa; "
+"Password=; Initial Catalog=pubs");
var rs = new ActiveXObject("ADODB.Recordset");
var sql="select * from authors";
rs.open(sql, conn);
shtml = "<table width=’100%’ border=1>";
shtml +="<tr bgcolor=’#f4f4f4’><td>au_id</td><td>
au_lname</td><td>au_fname
</td><td>phone</td><td>address</td><td> city</td>
<td>state</td><td>zip</td></tr>";
while(!rs.EOF)
{
shtml += "<tr><td>" + rs("au_id") + "</td><td>" + rs("au_lname") + "</td><td>" + rs("au_fname") + "</td><td>" + rs("phone") + "</td><td>" + rs("address") + "</td><td>" + rs("city") + "</td><td>" + rs("state") + "</td><td>" + rs("zip") + "</td></tr>";
rs.moveNext;
}
shtml += "</table>";
document.write(shtml);
rs.close();
rs = null;
conn.close();
conn = null;
</script>
//使用数据岛
<html>
<body>
srno:<input type=text datasrc=#xmldate DataFLD=srno size=
"76"><BR>
times:<input type=text datasrc=#xmldate DataFLD=times size="76"><BR>
<input id="first" TYPE=button value="<< 第一条记录" οnclick="xmldate.recordset.moveFirst()">
<input id="prev" TYPE=button value="<上一条记录" οnclick="xmldate.recordset.movePrevious()">
<input id="next" TYPE=button value="下一条记录>" οnclick="xmldate.recordset.moveNext()">
<input id="last" TYPE=button value="最后一条记录>>" οnclick="xmldate.recordset.moveLast()">
<input id="Add" TYPE=button value="添加新记录" οnclick="xmldate.recordset.addNew()">
<XML ID="xmldate">
<infolist>
<info ><srno>20041025-01</srno><times>null</times></info>
<info ><srno>20041101-09</srno><times>2004年10月1*2点22分0秒</times></info>
</infolist>
</XML>
</body>
</html>
//获得参数
<body>
<a href=
"javascript:location.href=location.href + ’?a=1&b=2’">search</a>
<script language="JavaScript">
<!--
var a = location.search.substr(1);
if(a.length>0)
{
var re = /([^&]*?)/=([^&]*)/g
var s = a.match(re);
for(var i= 0;i<s.length;i++)
{
alert(s[i]);
alert(s[i].split("=")[1]);
}
}
//-->
</script>
</body>
//可编辑SELECT
<input type=text name=re_name style=
"width:100px;height:21px;font-size:10pt;"><span style="width:18px;border:0px solid red;"><select
name="r00" style="margin-left:-100px;width:118px; background-color:#FFEEEE;" onChange="document.all.re_name.value=this.value;">
<option value="1">11111111<option>
<option value="2">222222</option>
<option value="3">333333</option>
</select>
</span>
作者:追风 来自:网络
统计在线用户的作用不言而喻,就是为了网站管理者可以知道当前用户的多少,然后根据用户数量来观察服务器或者程序的性能,从而可以直观的了解到网站的吸引力或者网站程序的效率。现在,我们就介绍一个简单明了的方法来统计在线用户的多少,该方法的特点就是充分的利用了ASP.NET的特点,结合global.asax文件,用Application和Session巧妙的实现在线用户的统计,由于程序中只用到一个Application,所以,程序占用系统资源几乎可以忽略不及,当然,这也是网站管理者最关心的问题之一。
一、用户显示页面的使用
首先,我们来看看怎样现实当前网站的访问用户数量,程序代码如下:
<%@ Page Language="c#" debug="true" %>
<html>
<head>
<SCRIPT LANGUAGE="c#" RUNAT="server">
private void Page_Load(object sender, System.EventArgs e)
{
Visitors.Text = "本站当前有: <b>" + Application["user_sessions"].ToString() + "" + "</b> 位访问者 !";
}
<title>在线用户</title>
</head>
<body>
<asp:label id="visitors" runat="server" /><br>
</body>
</html>
可以看出,以上的程序特别简单,就是调用Application。当然,我们不必要专门设计一个页面来显示在线用户数量,在网站的任何页面,我们都可以直接调用Application("user_sessions").ToString()来显示当前用户数量。
二、global.asax文件实现
global.asax文件的作用我们自不必说,现在,我们直接来看统计当前在线用户数量如何实现:
<script language="c#" runat="Server">
protected void Application_Start(Object sender, EventArgs e)
{
Application["user_sessions"] = 0;
}
protected void Session_Start(Object sender, EventArgs e)
{
Application.Lock();
Application["user_sessions"] = (int)Application["user_sessions"] + 1;
Application.Unlock();
}
protected void Session_End(Object sender, EventArgs e)
{
Application.Lock();
Application["user_sessions"] = (int)Application["user_sessions"] - 1;
Application.Unlock();
}
</script>
以上代码很容易理解,当网站开始服务的时候(Application开始的时候),程序设置Application["user_sessions"]为零,然后,当用户进入网站(Session开始的时候)的时候,锁定Application,然后,将application("user_sessions")加一,用户退出网站的时候,application("user_sessions")减一。这样,就很巧妙的实现了在线用户的统计。
三、一点讨论
以上的统计,简明扼要,程序很容易实现。但是,如果我们仔细考虑,发现该方法有一定的局限,统计出来的在线用户数量可能稍微有点误差。因为我们在以上程序中,是根据用户建立和退出会话(Session)来实现在线人数的加减的,而我们知道,如果用户没有关闭浏览器,而进入另外一个网站,那么,这个会话在一定的时间内是不会结束的,这个时间我们可以通过TimeOut来设置,一般的,我们设置为20分钟。所以,在用户数量统计上面,还是存在一点误差的。
另外,我们知道,在ASP中,如果用户将浏览器上面的Cookies设置为“禁用”,那么,Session就不能再被传递,显然,这样设置让以上的统计程序无能为力。不过,在ASP.NET中我们有解决方法,在config.web文件中,我们将<sessionstate cookieless="false" />设置为true就可以了,也就说,不使用Cookies也可以传递Session。这样,我们的程序就可以在不同的访问者环境中顺利运行。
四、总结
以上的统计程序特别简单,但是,细节的东西我们不一定想到,这也是我们在编程中需要多一点考虑的。 |
|
Author: From:Internet
ASP.NET是微软推出的下一代WEB开发工具,其强大的功能立即吸引了一大批WEB开发者投入它的靡下。现在,我们来看看ASP.NET的验证控件,感受ASP.NET的强大功能同时方便我们现在的WEB开发。
WEB开发者特别是ASP开发者,一直对数据验证比较恼火,当你好不容易写出数据提交程序的主体以后,还不得不花大把时间去验证用户的每一个输入是否合法。如果开发者熟悉JavaScript或者VBScript,可以用这些脚本语言轻松实现验证,但是又要考虑用户浏览器是否支持这些脚本语言;如果对这些不是很熟悉或者想支持所有用户浏览器,就必须在ASP程序里面验证,但是这样验证就会增加服务器负担。现在,有了ASP.NET,你不但可以轻松的实现对用户输入的验证,而且,还可以选择验证在服务器端进行还是在客户端进行,再也不必考虑那么多了,程序员们可以将重要精力放在主程序的设计上了。
asp.net公有六种验证控件,分别如下:
控件名 功能描叙
RequiredFieldValidator(必须字段验证) 用于检查是否有输入值
CompareValidator(比较验证) 按设定比较两个输入
RangeValidator(范围验证) 输入是否在指定范围
RegularExpressionValidator(正则表达式验证) 正则表达式验证控件
CustomValidator(自定义验证) 自定义验证控件
ValidationSummary(验证总结) 总结验证结果
下面,我们来看这些控件的使用
一:RequiredFieldValidator(必须字段验证)的使用
RequiredFieldValidator控件使用的标准代码如下:
<ASP:RequiredFieldValidator id="Validator_Name" Runat="Server"
ControlToValidate="要检查的控件名"
ErrorMessage="出错信息"
Display="Static|Dymatic|None"
>
占位符
</ASP: RequiredFieldValidator >
在以上标准代码中:
ControlToValidate:表示要进行检查控件ID;
ErrorMessage:表示当检查不合法时,出现的错误信息;
Display:错误信息的显示方式;Static表示控件的错误信息在页面中占有肯定位置;Dymatic表示控件错误信息出现时才占用页面控件;None表示错误出现时不显示,但是可以在ValidatorSummary中显示;
占位符:表示Display为Static时,错误信息占有"占位符"那么大的页面空间;
现在,让我们看一个实例:
<ASP:TextBox id="txtName" RunAt="Server"/>
<ASP:RequiredFieldValidator id="Validator1" Runat="Server"
ControlToValidate="txtName"
ErrorMessage="姓名必须输入"
Display="Static">
*姓名必须输入
</ASP:RequiredFieldValidator>
在以上例子中,检查txtname控件是否有输入,如果没有,显示错误信息"姓名必须输入"。是不是很简单?
注意:以上代码和下面其他控件的代码最好放入Form中,和ASP中不一样的是,Form最好写为这样:
<Form RunAt="Server">
其他代码
</Form>
这样,Form在服务器端执行,提交才会有效;
二:comparevalidator(比较验证)控件
比较控件比较两个控件的输入是否符合程序设定,大家不要把比较仅仅理解为"相等",尽管相等是用的最多的,其实,这里的比较包括范围很广,大家看标准代码就会明白。
比较控件的标准代码如下:
<ASP:CompareValidator id="Validator_ID" RunAt="Server"
ControlToValidate="要验证的控件ID"
errorMessage="错误信息"
ControlToCompare="要比较的控件ID"
type="String|Integer|Double|DateTime|Currency"
operator="Equal|NotEqual|GreaterThan|GreaterTanEqual|LessThan|LessThanEqual|DataTypeCheck"
Display="Static|Dymatic|None"
>
占位符
</ASP:CompareValidator>
在以上标准代码中:
Type表示要比较的控件的数据类型;
Operator表示比较操作(也就是刚才说的为什么比较不仅仅是"相等"的原因),这里,比较有7种方式;
其他属性和RequiredFieldValidator相同;
在这里,要注意ControlToValidate和ControlToCompare的区别,如果operate为GreateThan,那么,必须ControlToCompare大于ControlToValidate才是合法的,这下,应该明白它们两者的意义了吧?例子程序请参考RequiredFieldValidator控件,对照标准代码自己设计。
三:RangeValidator(范围验证)控件
验证输入是否在一定范围,范围用MaximumValue(最大)和MinimunVlaue来确定,标准代码如下:
<ASP:RangeValidator id="Vaidator_ID" Runat="Server"
controlToValidate="要验证的控件ID"
type="Integer"
MinimumValue="最小值"
MaximumValue="最大值"
errorMessage="错误信息"
Display="Static|Dymatic|None"
>
占位符
</ASP:RangeValidator>
在以上代码中:
用MinimumValue和MaximumValue来界定控件输入值得范围,用type来定义控件输入值的类型。
四:RegularExpresionValidator(正则表达式)控件
正则表达式验证控件的功能非常强大,你可以自己容易构造验证方式,我们先来看看标准代码:
<ASP:RegularExpressionValidator id="Validator_ID" RunAt="Server"
ControlToValidate="要验证控件名"
ValidationExpression="正则表达式"
errorMessage="错误信息"
display="Static"
>
占位符
</ASP:RegularExpressionValidator>
在以上标准代码中,ValidationExpression是重点,现在来看看它的构造:
在ValidationExpression中,不同的字符表示不同的含义:
"."表示任意字符;
"*"表示和其他表达式一起,表示容易组合;
"[A-Z]"表示任意大写字母;
"/d"表示容易一个数字;
注意,在以上表达式中,引号不包括在内;
举例:
正则表达式:".*[A-Z]"表示数字开头的任意字符组合其后接一个大写字母。
五:ValidationSummary(验证总结)控件
该控件收集本页的所有验证错误信息,并可以将它们组织以后再显示出来。其标准代码如下:
<ASP:ValidationSummary id="Validator_ID" RunAT="Server"
HeaderText="头信息"
ShowSummary="True|False"
DiaplayMode="List|BulletList|SingleParagraph"
>
</ASP: ValidationSummary >
在以上标准代码中,HeadText相当于表的HeadText,DisplayMode表示错误信息显示方式:List相当于HTML中的<BR>;BulletList相当于HTML中的<LI>;SingleParegraph表示错误信息之间不作如何分割;
六:CustomValidator(自定义验证)控件]
该控件用自定义的函数界定验证方式,其标准代码如下:
<ASP:CustomValidator id="Validator_ID" RunAt="Server"
controlToValidate="要验证的控件"
onServerValidateFunction="验证函数"
errorMessage="错误信息"
Display="Static|Dymatic|None"
>
占位符
</ASP: CustomValidator >
以上代码中,用户必须定义一个函数来验证输入。
七:总结
ASP.NET验证控件已经介绍完了,大家可以发现它们的功能很强大,再也不要为验证而烦恼了。当然,以上介绍并不是特别详细,细微的地方,还请大家自己阅读微软的SDK。 |
|
<sessionstate
inproc="false"
server="localhost"
port="42424"
/>
是不是发现这里的Session是不是很强大啊:),把localhost改成您要的主机,Session还能在另外一台主机上保持。 |
|
1. 打开新的窗口并传送参数:
传送参数:
response.write("<script>window.open(’*.aspx?id="+this.DropDownList1.SelectIndex+"&id1="+...+"’)</script>")
接收参数:
string a = Request.QueryString("id");
 string b = Request.QueryString("id1");
2.为按钮添加对话框
Button1.Attributes.Add("onclick","return confirm(’确认?’)");
 button.attributes.add("onclick","if(confirm(’are you sure...?’)){return true;}else{return false;}")
3.删除表格选定记录
int intEmpID = (int)MyDataGrid.DataKeys[e.Item.ItemIndex];
 string deleteCmd = "DELETE from Employee where emp_id = " + intEmpID.ToString()
4.删除表格记录警告
private void DataGrid_ItemCreated(Object sender,DataGridItemEventArgs e)
 {
  switch(e.Item.ItemType)
  {
   case ListItemType.Item :
   case ListItemType.AlternatingItem :
   case ListItemType.EditItem:
    TableCell myTableCell;
    myTableCell = e.Item.Cells[14];
    LinkButton myDeleteButton ;
    myDeleteButton = (LinkButton)myTableCell.Controls[0];
    myDeleteButton.Attributes.Add("onclick","return confirm(’您是否确定要删除这条信息’);");
    break;
   default:
    break;
  }

 }
5.点击表格行链接另一页
private void grdCustomer_ItemDataBound(object sender, System.Web.UI.WebControls.DataGridItemEventArgs e)
 {
  //点击表格打开
  if (e.Item.ItemType == ListItemType.Item || e.Item.ItemType == ListItemType.AlternatingItem)
   e.Item.Attributes.Add("onclick","window.open(’Default.aspx?id=" + e.Item.Cells[0].Text + "’);");
 }
双击表格连接到另一页
在itemDataBind事件中
if(e.Item.ItemType == ListItemType.Item || e.Item.ItemType == ListItemType.AlternatingItem)
 {
  string OrderItemID =e.item.cells[1].Text;
  ...
  e.item.Attributes.Add("ondblclick", "location.href=’../ShippedGrid.aspx?id=" + OrderItemID + "’");
 }
双击表格打开新一页
if(e.Item.ItemType == ListItemType.Item || e.Item.ItemType == ListItemType.AlternatingItem)
 {
  string OrderItemID =e.item.cells[1].Text;
  ...
  e.item.Attributes.Add("ondblclick", "open(’../ShippedGrid.aspx?id=" + OrderItemID + "’)");
 }
★特别注意:【?id=】 处不能为 【?id =】
6.表格超连接列传递参数
<asp:HyperLinkColumn Target="_blank" headertext="ID号" DataTextField="id" NavigateUrl="aaa.aspx?id=’
  <%# DataBinder.Eval(Container.DataItem, "数据字段1")%>’ & name=’<%# DataBinder.Eval(Container.DataItem, "数据字段2")%>’ />
7.表格点击改变颜色
if (e.Item.ItemType == ListItemType.Item ||e.Item.ItemType == ListItemType.AlternatingItem)
 {
  e.Item.Attributes.Add("onclick","this.style.backgroundColor=’#99cc00’;
     this.style.color=’buttontext’;this.style.cursor=’default’;");
 }
写在DataGrid的_ItemDataBound里
if (e.Item.ItemType == ListItemType.Item ||e.Item.ItemType == ListItemType.AlternatingItem)
8.关于日期格式
日期格式设定
DataFormatString=""
我觉得应该在itembound事件中
e.items.cell["你的列"].text=DateTime.Parse(e.items.cell["你的列"].text.ToString("yyyy-MM-dd"))
9.获取错误信息并到指定页面
不要使用Response.Redirect,而应该使用Server.Transfer
e.g
// in global.asax
 protected void Application_Error(Object sender, EventArgs e) {
 if (Server.GetLastError() is HttpUnhandledException)
 Server.Transfer("MyErrorPage.aspx");

 //其余的非HttpUnhandledException异常交给ASP.NET自己处理就okay了 :)
 }
Redirect会导致post-back的产生从而丢失了错误信息,所以页面导向应该直接在服务器端执行,这样就可以在错误处理页面得到出错信息并进行相应的处理
10.清空Cookie
Cookie.Expires=[DateTime];
 Response.Cookies("UserName").Expires = 0
11.自定义异常处理
//自定义异常处理类
 using System;
 using System.Diagnostics;

 namespace MyAppException
 {
  /// <summary>
  /// 从系统异常类ApplicationException继承的应用程序异常处理类。
  /// 自动将异常内容记录到Windows NT/2000的应用程序日志
  /// </summary>
  public class AppException:System.ApplicationException
  {
   public AppException()
   {
    if (ApplicationConfiguration.EventLogEnabled)LogEvent("出现一个未知错误。");
   }

  public AppException(string message)


  public AppException(string message,Exception innerException)
  {
   LogEvent(message);
   if (innerException != null)

  }

  //日志记录类
  using System;
  using System.Configuration;
  using System.Diagnostics;
  using System.IO;
  using System.Text;
  using System.Threading;

  namespace MyEventLog
  {
   /// <summary>
   /// 事件日志记录类,提供事件日志记录支持
   /// <remarks>
   /// 定义了4个日志记录方法 (error, warning, info, trace)
   /// </remarks>
   /// </summary>
   public class ApplicationLog
   {
    /// <summary>
    /// 将错误信息记录到Win2000/NT事件日志中
    /// <param name="message">需要记录的文本信息</param>
    /// </summary>
    public static void WriteError(String message)
    {
     WriteLog(TraceLevel.Error, message);
    }

    /// <summary>
    /// 将警告信息记录到Win2000/NT事件日志中
    /// <param name="message">需要记录的文本信息</param>
    /// </summary>
    public static void WriteWarning(String message)
    {
     WriteLog(TraceLevel.Warning, message);
    }

    /// <summary>
    /// 将提示信息记录到Win2000/NT事件日志中
    /// <param name="message">需要记录的文本信息</param>
    /// </summary>
    public static void WriteInfo(String message)
    {
     WriteLog(TraceLevel.Info, message);
    }
    /// <summary>
    /// 将跟踪信息记录到Win2000/NT事件日志中
    /// <param name="message">需要记录的文本信息</param>
    /// </summary>
    public static void WriteTrace(String message)
    {
     WriteLog(TraceLevel.Verbose, message);
    }

    /// <summary>
    /// 格式化记录到事件日志的文本信息格式
    /// <param name="ex">需要格式化的异常对象</param>
    /// <param name="catchInfo">异常信息标题字符串.</param>
    /// <retvalue>
    /// <para>格式后的异常信息字符串,包括异常内容和跟踪堆栈.</para>
    /// </retvalue>
    /// </summary>
    public static String FormatException(Exception ex, String catchInfo)
    {
     StringBuilder strBuilder = new StringBuilder();
     if (catchInfo != String.Empty)

     strBuilder.Append(ex.Message).Append("/r/n").Append(ex.StackTrace);
     return strBuilder.ToString();
    }

    /// <summary>
    /// 实际事件日志写入方法
    /// <param name="level">要记录信息的级别(error,warning,info,trace).</param>
    /// <param name="messageText">要记录的文本.</param>
    /// </summary>
    private static void WriteLog(TraceLevel level, String messageText)
    {
     try
     {
      EventLogEntryType LogEntryType;
      switch (level)
      {
       case TraceLevel.Error:
        LogEntryType = EventLogEntryType.Error;
        break;
       case TraceLevel.Warning:
        LogEntryType = EventLogEntryType.Warning;
        break;
       case TraceLevel.Info:
        LogEntryType = EventLogEntryType.Information;
        break;
       case TraceLevel.Verbose:
        LogEntryType = EventLogEntryType.SuccessAudit;
        break;
       default:
        LogEntryType = EventLogEntryType.SuccessAudit;
        break;
      }

      EventLog eventLog = new EventLog("Application", ApplicationConfiguration.EventLogMachineName, ApplicationConfiguration.EventLogSourceName );
      //写入事件日志
      eventLog.WriteEntry(messageText, LogEntryType);

     }
    catch {} //忽略任何异常
   }
  } //class ApplicationLog
 }
12.Panel 横向滚动,纵向自动扩展
<asp:panel style="overflow-x:scroll;overflow-y:auto;"></asp:panel>
13.回车转换成Tab
<script language="javascript" for="document" event="onkeydown">
  if(event.keyCode==13 && event.srcElement.type!=’button’ && event.srcElement.type!=’submit’ &&     event.srcElement.type!=’reset’ && event.srcElement.type!=’’&& event.srcElement.type!=’textarea’);
    event.keyCode=9;
 </script>

 onkeydown="if(event.keyCode==13) event.keyCode=9"
14.DataGrid超级连接列
DataNavigateUrlField="字段名" DataNavigateUrlFormatString="http://xx/inc/delete.aspx?ID="
15.DataGrid行随鼠标变色
private void DGzf_ItemDataBound(object sender, System.Web.UI.WebControls.DataGridItemEventArgs e)
 {
  if (e.Item.ItemType!=ListItemType.Header)
  {
   e.Item.Attributes.Add( "onmouseout","this.style.backgroundColor=/""+e.Item.Style["BACKGROUND-COLOR"]+"/"");
   e.Item.Attributes.Add( "onmouseover","this.style.backgroundColor=/""+ "#EFF3F7"+"/"");
  }
 }
16.模板列
<ASP:TEMPLATECOLUMN visible="False" sortexpression="demo" headertext="ID">
 <ITEMTEMPLATE>
 <ASP:LABEL text=’<%# DataBinder.Eval(Container.DataItem, "ArticleID")%>’ runat="server" width="80%" id="lblColumn" />
 </ITEMTEMPLATE>
 </ASP:TEMPLATECOLUMN>

 <ASP:TEMPLATECOLUMN headertext="选中">
 <HEADERSTYLE wrap="False" horizontalalign="Center"></HEADERSTYLE>
 <ITEMTEMPLATE>
 <ASP:CHECKBOX id="chkExport" runat="server" />
 </ITEMTEMPLATE>
 <EDITITEMTEMPLATE>
 <ASP:CHECKBOX id="chkExportON" runat="server" enabled="true" />
 </EDITITEMTEMPLATE>
 </ASP:TEMPLATECOLUMN>
后台代码
protected void CheckAll_CheckedChanged(object sender, System.EventArgs e)
 {
  //改变列的选定,实现全选或全不选。
  CheckBox chkExport ;
  if( CheckAll.Checked)
  {
   foreach(DataGridItem oDataGridItem in MyDataGrid.Items)
   {
    chkExport = (CheckBox)oDataGridItem.FindControl("chkExport");
    chkExport.Checked = true;
   }
  }
  else
  {
   foreach(DataGridItem oDataGridItem in MyDataGrid.Items)
   {
    chkExport = (CheckBox)oDataGridItem.FindControl("chkExport");
    chkExport.Checked = false;
   }
  }
 }
17.数字格式化
【<%#Container.DataItem("price")%>的结果是500.0000,怎样格式化为500.00?】
<%#Container.DataItem("price","")%>

 int i=123456;
 string s=i.ToString("###,###.00");
18.日期格式化

   【aspx页面内:<%# DataBinder.Eval(Container.DataItem,"Company_Ureg_Date")%>

   显示为: 2004-8-11 19:44:28

   我只想要:2004-8-11 】

 <%# DataBinder.Eval(Container.DataItem,"Company_Ureg_Date","")%>
   应该如何改?

   【格式化日期】

   取出来,一般是object((DateTime)objectFromDB).ToString("yyyy-MM-dd");

   【日期的验证表达式】

   A.以下正确的输入格式: [2004-2-29], [2004-02-29 10:29:39 pm], [2004/12/31]

 ^((/d(([02468][048])|([13579][26]))[/-///s]?((((0?[13578])|(1[02]))[/-///s]?((0?[1-9])|([1-2][0-9])|(3[01])))|(((0?[469])|(11))[/-///s]?((0?[1-9])|([1-2][0-9])|(30)))|(0?2[/-///s]?((0?[1-9])|([1-2][0-9])))))|(/d(([02468][1235679])|([13579][01345789]))[/-///s]?((((0?[13578])|(1[02]))[/-///s]?((0?[1-9])|([1-2][0-9])|(3[01])))|(((0?[469])|(11))[/-///s]?((0?[1-9])|([1-2][0-9])|(30)))|(0?2[/-///s]?((0?[1-9])|(1[0-9])|(2[0-8]))))))(/s(((0?[1-9])|(1[0-2]))/:([0-5][0-9])((/s)|(/:([0-5][0-9])/s))([AM|PM|am|pm])))?$
   B.以下正确的输入格式:[0001-12-31], [9999 09 30], [2002/03/03]

 ^/d[/-///s]?((((0[13578])|(1[02]))[/-///s]?(([0-2][0-9])|(3[01])))|(((0[469])|(11))[/-///s]?(([0-2][0-9])|(30)))|(02[/-///s]?[0-2][0-9]))$
   【大小写转换】

 HttpUtility.HtmlEncode(string);
 HttpUtility.HtmlDecode(string)
   19.如何设定全局变量

   Global.asax中

   Application_Start()事件中

   添加Application[属性名] = xxx;

   就是你的全局变量

   20.怎样作到HyperLinkColumn生成的连接后,点击连接,打开新窗口?

   HyperLinkColumn有个属性Target,将器值设置成"_blank"即可.(Target="_blank")

   【ASPNETMENU】点击菜单项弹出新窗口

   在你的menuData.xml文件的菜单项中加入URLTarget="_blank",如:

 <?xml version="1.0" encoding="GB2312"?>
 <MenuData ImagesBaseURL="images/">
 <MenuGroup>
 <MenuItem Label="内参信息" URL="Infomation.aspx" >
 <MenuGroup ID="BBC">
 <MenuItem Label="公告信息" URL="Infomation.aspx" URLTarget="_blank" LeftIcon="file.gif"/>
 <MenuItem Label="编制信息简报" URL="NewInfo.aspx" LeftIcon="file.gif" />
 ......
   最好将你的aspnetmenu升级到1.2版

   21.读取DataGrid控件TextBox值

 foreach(DataGrid dgi in yourDataGrid.Items)
 {
  TextBox tb = (TextBox)dgi.FindControl("yourTextBoxId");
  tb.Text....
 }
   23.在DataGrid中有3个模板列包含Textbox分别为 DG_ShuLiang (数量) DG_DanJian(单价) DG_JinE(金额)分别在5.6.7列,要求在录入数量及单价的时候自动算出金额即:数量*单价=金额还要求录入时限制为 数值型.我如何用客户端脚本实现这个功能?

   〖思归〗

 <asp:TemplateColumn HeaderText="数量">
 <ItemTemplate>
 <asp:TextBox id="ShuLiang" runat=’server’ Text=’<%# DataBinder.Eval(Container.DataItem,"DG_ShuLiang")%>’
 onkeyup="javascript:DoCal()"
 />

 <asp:RegularExpressionValidator id="revS" runat="server" ControlToValidate="ShuLiang" ErrorMessage="must be integer" ValidationExpression="^/d+$" />
 </ItemTemplate>
 </asp:TemplateColumn>

 <asp:TemplateColumn HeaderText="单价">
 <ItemTemplate>
 <asp:TextBox id="DanJian" runat=’server’ Text=’<%# DataBinder.Eval(Container.DataItem,"DG_DanJian")%>’
 onkeyup="javascript:DoCal()"
 />

 <asp:RegularExpressionValidator id="revS2" runat="server" ControlToValidate="DanJian" ErrorMessage="must be numeric" ValidationExpression="^/d+(/./d*)?$" />

 </ItemTemplate>
 </asp:TemplateColumn>

 <asp:TemplateColumn HeaderText="金额">
 <ItemTemplate>
 <asp:TextBox id="JinE" runat=’server’ Text=’<%# DataBinder.Eval(Container.DataItem,"DG_JinE")%>’ />
 </ItemTemplate>
 </asp:TemplateColumn><script language="javascript">
 function DoCal()
 {
  var e = event.srcElement;
  var row = e.parentNode.parentNode;
  var txts = row.all.tags("INPUT");
  if (!txts.length || txts.length < 3)
   return;

  var q = txts[txts.length-3].value;
  var p = txts[txts.length-2].value;

  if (isNaN(q) || isNaN(p))
   return;

  q = parseInt(q);
  p = parseFloat(p);

  txts[txts.length-1].value = (q * p).toFixed(2);
 }
 </script>
24.datagrid选定比较底下的行时,为什么总是刷新一下,然后就滚动到了最上面,刚才选定的行因屏幕的关系就看不到了。
page_load
 page.smartNavigation=true
25.在Datagrid中修改数据,当点击编辑键时,数据出现在文本框中,怎么控制文本框的大小 ?
private void DataGrid1_ItemDataBound(obj sender,DataGridItemEventArgs e)
 {
  for(int i=0;i<e.Item.Cells.Count-1;i++)
   if(e.Item.ItemType==ListItemType.EditType)
   {
    e.Item.Cells[i].Attributes.Add("Width", "80px")
   }
 }
26.对话框
private static string ScriptBegin = "<script language=/"JavaScript/">";
 private static string ScriptEnd = "</script>";

 public static void ConfirmMessageBox(string PageTarget,string Content)
 {
  string ConfirmContent="var retValue=window.confirm(’"+Content+"’);"+"if(retValue)";

  ConfirmContent=ScriptBegin + ConfirmContent + ScriptEnd;

  Page ParameterPage = (Page)System.Web.HttpContext.Current.Handler;
  ParameterPage.RegisterStartupScript("confirm",ConfirmContent);
  //Response.Write(strScript);
 }
27. 将时间格式化:string aa=DateTime.Now.ToString("yyyy年MM月dd日");
1.1 取当前年月日时分秒
currentTime=System.DateTime.Now;
1.2 取当前年
int 年= DateTime.Now.Year;
1.3 取当前月
int 月= DateTime.Now.Month;
1.4 取当前日
int 日= DateTime.Now.Day;
1.5 取当前时
int 时= DateTime.Now.Hour;
1.6 取当前分
int 分= DateTime.Now.Minute;
1.7 取当前秒
int 秒= DateTime.Now.Second;
1.8 取当前毫秒
int 毫秒= DateTime.Now.Millisecond;
28.自定义分页代码:
先定义变量 :
public static int pageCount; //总页面数
 public static int curPageIndex=1; //当前页面
下一页:
if(DataGrid1.CurrentPageIndex < (DataGrid1.PageCount - 1))
 {
  DataGrid1.CurrentPageIndex += 1;
  curPageIndex+=1;
 }

 bind(); // DataGrid1数据绑定函数
上一页:
if(DataGrid1.CurrentPageIndex >0)
 {
  DataGrid1.CurrentPageIndex += 1;
  curPageIndex-=1;
 }

 bind(); // DataGrid1数据绑定函数
直接页面跳转:
int a=int.Parse(JumpPage.Value.Trim());//JumpPage.Value.Trim()为跳转值

 if(a<DataGrid1.PageCount)
 {
  this.DataGrid1.CurrentPageIndex=a;
 }

 bind();
29.DataGrid使用:
添加删除确认:
private void DataGrid1_ItemCreated(object sender, System.Web.UI.WebControls.DataGridItemEventArgs e)
 {
  foreach(DataGridItem di in this.DataGrid1.Items)
  {
   if(di.ItemType==ListItemType.Item||di.ItemType==ListItemType.AlternatingItem)
   {
    ((LinkButton)di.Cells[8].Controls[0]).Attributes.Add("onclick","return confirm(’确认删除此项吗?’);");
   }
  }
 }
样式交替:
ListItemType itemType = e.Item.ItemType;

 if (itemType == ListItemType.Item )
 {
  e.Item.Attributes["onmouseout"] = "javascript:this.style.backgroundColor=’#FFFFFF’;";
  e.Item.Attributes["onmouseover"] = "javascript:this.style.backgroundColor=’#d9ece1’;cursor=’hand’;" ;
 }
 else if( itemType == ListItemType.AlternatingItem)
 {
  e.Item.Attributes["onmouseout"] = "javascript:this.style.backgroundColor=’#a0d7c4’;";
  e.Item.Attributes["onmouseover"] = "javascript:this.style.backgroundColor=’#d9ece1’;cursor=’hand’;" ;
 }
添加一个编号列:
DataTable dt= c.ExecuteRtnTableForAccess(sqltxt); //执行sql返回的DataTable
 DataColumn dc=dt.Columns.Add("number",System.Type.GetType("System.String"));

 for(int i=0;i<dt.Rows.Count;i++)
 {
  dt.Rows[i]["number"]=(i+1).ToString();
 }

 DataGrid1.DataSource=dt;
 DataGrid1.DataBind();
DataGrid1中添加一个CheckBox,页面中添加一个全选框
private void CheckBox2_CheckedChanged(object sender, System.EventArgs e)
 {
  foreach(DataGridItem thisitem in DataGrid1.Items)
  {
   ((CheckBox)thisitem.Cells[0].Controls[1]).Checked=CheckBox2.Checked;
  }
 }
将当前页面中DataGrid1显示的数据全部删除
foreach(DataGridItem thisitem in DataGrid1.Items)
 {
  if(((CheckBox)thisitem.Cells[0].Controls[1]).Checked)
  {
   string strloginid= DataGrid1.DataKeys[thisitem.ItemIndex].ToString();
   Del (strloginid); //删除函数
  }
 }
30.当文件在不同目录下,需要获取数据库连接字符串(如果连接字符串放在Web.config,然后在Global.asax中初始化)
在Application_Start中添加以下代码:
Application["ConnStr"]=this.Context.Request.PhysicalApplicationPath+ConfigurationSettings.
    AppSettings["ConnStr"].ToString();
31. 变量.ToString()
字符型转换 转为字符串
12345.ToString("n"); //生成 12,345.00
 12345.ToString("C"); //生成 ¥12,345.00
 12345.ToString("e"); //生成 1.234500e+004
 12345.ToString("f4"); //生成 12345.0000
 12345.ToString("x"); //生成 3039 (16进制)
 12345.ToString("p"); //生成 1,234,500.00%
32、变量.Substring(参数1,参数2);
截取字串的一部分,参数1为左起始位数,参数2为截取几位。 如:string s1 = str.Substring(0,2);
33.在自己的网站上登陆其他网站:(如果你的页面是通过嵌套方式的话,因为一个页面只能有一个FORM,这时可以导向另外一个页面再提交登陆信息)
<SCRIPT language="javascript">
 <!--
  function gook(pws)
  {
   frm.submit();
  }
 //-->

 </SCRIPT> <body leftMargin="0" topMargin="0" onload="javascript:gook()" marginwidth="0" marginheight="0">
 <form name="frm" action=" http://220.194.55.68:6080/login.php?retid=7259 " method="post">
 <tr>
 <td>
 <input id="f_user" type="hidden" size="1" name="f_user" runat="server">
 <input id="f_domain" type="hidden" size="1" name="f_domain" runat="server">
 <input class="box" id="f_pass" type="hidden" size="1" name="pwshow" runat="server">

 <INPUT id="lng" type="hidden" maxLength="20" size="1" value="5" name="lng">
 <INPUT id="tem" type="hidden" size="1" value="2" name="tem">

 </td>

 </tr>

 </form>
文本框的名称必须是你要登陆的网页上的名称,如果源码不行可以用vsniffer 看看。
下面是获取用户输入的登陆信息的代码:
string name;
 name=Request.QueryString["EmailName"];

 try
 {
  int a=name.IndexOf("@",0,name.Length);
  f_user.Value=name.Substring(0,a);
  f_domain.Value=name.Substring(a+1,name.Length-(a+1));
  f_pass.Value=Request.QueryString["Psw"];
 }

 catch
 {
  Script.Alert("错误的邮箱!");
  Server.Transfer("index.aspx");
 }
|
|
Bill Evjen
Reuters 适用于: Microsoft ASP.NET 2.0
Microsoft Visual Web Developer 2005 Express Edition 摘要:了解如何使用 Microsoft ASP.NET 2.0 中新增的 FileUpload 服务器控件。 本页内容
简介
FileUpload 服务器控件示例
小结 简介
自引入 Microsoft ASP.NET 版本 1.0 之*起,就存在生成 Web 应用程序的内置方法,这些方法能够将文件上载到宿主服务器。这是通过使用 File Field HTML 服务器控件实现的。我以前写过一篇关于如何在 ASP.NET 应用程序中有效使用该控件的 MSDN 文章。本文将再次介绍文件上载过程,但不是使用 File Field 控件,我将向您介绍如何有效使用 ASP.NET 2.0 提供的新 FileUpload 服务器控件。 虽然本文向您介绍新增的 FileUpload 服务器控件,但现在仍然可以在应用程序中使用 File Field 控件,注意到这一点是非常重要的。 返回页首
FileUpload 服务器控件示例
在 ASP.NET 1.x 中使用 File Field 控件时,必须采取一些额外的步骤才能使一切有条不紊地正常运行。例如,您需要亲自将 enctype="multipart/form-data" 添加到页面的 <form> 元素中。ASP.NET 2.0 中提供的新 FileUpload 服务器控件使将文件上载到宿主服务器的过程尽可能的简单。 最后,您试图允许对 HTML <input type="file">标记进行编程。该标记用于与 HTML 窗体中的文件数据一起使用。过去使用传统的 ASP(ASP 3.0 或更早的版本)时,许多程序员使用第三方组件将文件从客户端上载到服务器。现在,通过 .NET 和该新控件可以进行上载。清单 1 显示如何使用 FileUpload 控件将文件上载到服务器。 注 提供 Microsoft Visual Basic 和 C# 形式的示例代码。 清单 1. 使用 FileUpload 控件将文件上载到服务器 Visual Basic <%@ Page Language="VB" %>
<script runat="server">
Protected Sub Button1_Click(ByVal sender As Object, _
ByVal e As System.EventArgs)
If FileUpload1.HasFile Then
Try
FileUpload1.SaveAs("C:/Uploads/" & _
FileUpload1.FileName)
Label1.Text = "File name: " & _
FileUpload1.PostedFile.FileName & "<br>" & _
"File Size: " & _
FileUpload1.PostedFile.ContentLength & " kb<br>" & _
"Content type: " & _
FileUpload1.PostedFile.ContentType
Catch ex As Exception
Label1.Text = "ERROR: " & ex.Message.ToString()
End Try
Else
Label1.Text = "You have not specified a file."
End If
End Sub
</script> <HTML xmlns="http://www.w3.org/1999/xHTML" >
<head runat="server">
<title>Upload Files</title>
</head>
<body>
<form id="form1" runat="server">
<div>
<ASP:FileUpload ID="FileUpload1" runat="server" /><br />
<br />
<ASP:Button ID="Button1" runat="server" OnClick="Button1_Click"
Text="Upload File" /> <br />
<br />
<ASP:Label ID="Label1" runat="server"></ASP:Label></div>
</form>
</body>
</HTML> C# <%@ Page Language="C#" %>
<script runat="server">
protected void Button1_Click(object sender, EventArgs e)
{
if (FileUpload1.HasFile)
try
{
FileUpload1.SaveAs("C://Uploads//" +
FileUpload1.FileName);
Label1.Text = "File name: " +
FileUpload1.PostedFile.FileName + "<br>" +
FileUpload1.PostedFile.ContentLength + " kb<br>" +
"Content type: " +
FileUpload1.PostedFile.ContentType;
}
catch (Exception ex)
{
Label1.Text = "ERROR: " + ex.Message.ToString();
}
else
{
Label1.Text = "You have not specified a file.";
}
}
</script> <HTML xmlns="http://www.w3.org/1999/xHTML" >
<head runat="server">
<title>Upload Files</title>
</head>
<body>
<form id="form1" runat="server">
<div>
<ASP:FileUpload ID="FileUpload1" runat="server" /><br />
<br />
<ASP:Button ID="Button1" runat="server" OnClick="Button1_Click"
Text="Upload File" /> <br />
<br />
<ASP:Label ID="Label1" runat="server"></ASP:Label></div>
</form>
</body>
</HTML> 运行该页,如果看看为该页生成的源代码,就会注意到一些问题。清单 2 列出这段源代码。 清单 2. FileUpload 控件生成的源代码 <HTML xmlns="http://www.w3.org/1999/xHTML" >
<head><title>
Upload Files
</title></head>
<body>
<form name="form1" method="post" action="MyFileUpload.ASPx"
id="form1" enctype="multipart/form-data">
<div>
<input type="hidden" name="__VIEWSTATE" id="__VIEWSTATE" value="/wEPDwUJNDcxNTg5NDg3D2QWAgIEDxYCHgdlbmN0eXBlBRNtdWx0aXBhcnQvZm9yb
S1kYXRhZGQUQEUFMY1+/fp1mnrkbqmVNQIzFA==" />
</div> <div>
<input type="file" name="FileUpload1" id="FileUpload1" /><br />
<br />
<input type="submit" name="Button1" value="Upload File"
id="Button1" /> <br />
<br />
<span id="Label1"></span>
</div>
<div> <input type="hidden" name="__EVENTVALIDATION" id="__EVENTVALIDATION"
value="/wEWAgLB+7jIAwKM54rGBv2Iz6LxVY7jWec0gZMxnuaK2ufq" />
</div></form>
</body>
</HTML> 首先要注意的是,由于 FileUpload 控件位于该页上,因此 ASP.NET 2.0 通过添加相应的 enctype 属性来代替您修改该页的 <form> 元素。您还会注意到,FileUpload 控件被转换为一个 HTML <input type="file">元素。 清单 1 中的页面运行后,您可以选择一个文件,然后通过单击该页上的 Upload File 按钮将它上载到服务器。针对该示例,我们需要重温一些重要的事项,以便理解实现该操作所需的所有步骤。要使清单 1 中的示例生效,必须使服务器上的目标文件夹对于 ASP.NET 使用的帐户是可写的,这样才能将文件保存到指定的文件夹中。 如果您认为自己的 ASP.NET 帐户不能写入希望的文件夹,则只需打开 Microsoft Windows Explorer,然后定位到要添加该权限的文件夹即可。右击该文件夹(本例中为 Uploads 文件夹),然后选择 Properties。在 Properties 对话框中,单击 Security 选项卡,确保列表中包括 ASP.NET 机器帐户,该帐户具有写入磁盘的适当权限(请参见图 1)。
|
|
Author: dudu
From: http://www.cnblogs.com/dudu/
概述:
本文基于ASP.NET 2.0的源代码,对ASP.NET 2.0运行时进行了简要的分析,希望能帮助你理解ASP.NET 2.0中请求处理过程及页面编译模型。 关键字:
ASP.NET 2.0运行时,原理,请求处理,页面编译,ASP.NET 2.0 HTTP Runtime 主要类:
System.Web.HttpRuntime
System.Web.HttpApplicationFactory
System.Web.HttpApplication
System.Web.Compilation.BuildManager
System.Web.Compilation.ApplicationBuildProvider
System.Web.Compilation.BuildProvidersCompiler
System.Web.UI.PageHandlerFactory
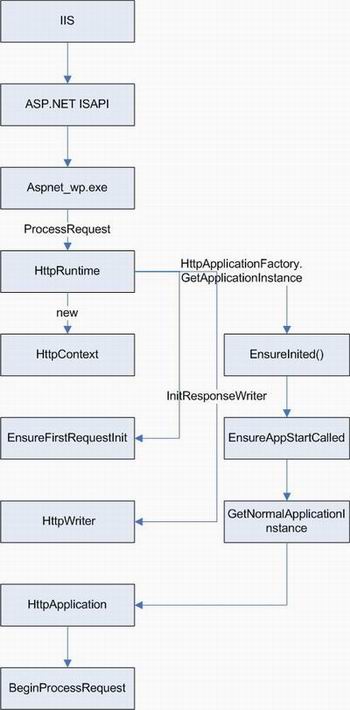
请求处理简要流程图:
阅读建议:
用Reflector工具边查看ASP.NET 2.0的源代码边阅读。
分析:
当我们通过浏览器向ASP.NET 2.0网站的一个asp.net页面发起请求时,在服务器端首先是IIS收到请求,IIS一看是asp.net页面,心里很开心,因为这个请求不用它处理,交给ASP.NET ISAPI就行了。ASP.NET ISAPI的工作也比较轻松,他的主要任务就是安排aspnet_wp.exe处理请求,并监视aspnet_wp.exe进程的执行情况,如果aspnet_wp.exe进程太累了,不能出色地完成任务,ASP.NET ISAPI就要让他下岗,换一个新的aspnet_wp.exe来处理工作。
aspnet_wp.exe的主要任务是将请求交给一系列称为的 HTTP 管道的托管对象。如果把ASP.NET ISAPI比做销售经理,那aspnet_wp.exe就是生产经理,而HTTP 管道就是生产的流水线。负责流水线的小组就是HttpRuntime,生产经理aspnet_wp.exe会将订单(HTTP请求)交给HttpRuntime小组的工作人员ProcessRequest(HttpWorkerRequest wr),HttpRuntime根据内部的分工,最终由ProcessRequestInternal(HttpWorkerRequest wr)在流水线上进行生产,所以ProcessRequestInternal(HttpWorkerRequest wr)是我们分析的重点。
ProcessRequestInternal的主要工作是:
1. 创建HttpContext实例。
2. 对第一次请求进行初始化(EnsureFirstRequestInit)。
a) 在EnsureFirstRequestInit中通过调用System.Web.HttpRuntime.FirstRequestInit进行一些初始化工作,比如:将Web.Config配置读到到RuntimeConfig中,从bin目录中装载所有dll文件。
3. 创建HttpWriter实例。
4. 通过调用HttpApplicationFactory.GetApplicationInstance创建HttpApplication实例。
在HttpApplicationFactory.GetApplicationInstance中有三个关键方法:
HttpApplicationFactory._theApplicationFactory.EnsureInited();
HttpApplicationFactory._theApplicationFactory.EnsureAppStartCalled(context);
HttpApplicationFactory._theApplicationFactory.GetNormalApplicationInstance(context); 下面我们对这三个方法逐个进行分析:
1) HttpApplicationFactory._theApplicationFactory.EnsureInited();
该方法检查HttpApplicationFactory是否被初始化,如果没有,就通过HttpApplicationFactory.Init()进行初始化。
在Init()中,先获取global.asax文件的完整路径,然后调用CompileApplication()对global.asax进行编译。
那编译是如何进行的呢?
编译的工作由BuildManager完成的。BuildManager先得到GlobalAsaxType(也就是HttpApplication),然后调用BuildManager.GetGlobalAsaxBuildResult()=》GetGlobalAsaxBuildResultInternal()=》EnsureTopLevelFilesCompiled()进行编译。
在EnsureTopLevelFilesCompiled中,先进行CompilationStage.TopLevelFiles编译,对下面三个目录中的文件进行编译:
a. CompileResourcesDirectory();
编译App_GlobalResources目录。
b. CompileWebRefDirectory();
编译App_WebReferences目录。
c. CompileCodeDirectories();
编译App_Code目录。 接着进行CompilationStage.GlobalAsax 编译,对global.asax进行编译,方法调用情况:CompileGlobalAsax()=》ApplicationBuildProvider.GetGlobalAsaxBuildResult(BuildManager.IsPrecompiledApp)。
在GetGlobalAsaxBuildResult中具体的编译是由ApplicationBuildProvider与BuildProvidersCompiler共同完成的。
BuildProvidersCompiler.PerformBuild();进行编译工作。
ApplicationBuildProvider.GetBuildResult得到编译的结果。
编译成功后,会在C:/WINDOWS/Microsoft.NET/Framework/v2.0.50727/Temporary ASP.NET Files/相应的目录中生成类似App_global.asax.mlgx7n2v.dll的dll文件。
编译生成的类名为ASP.global_asax,继承自HttpApplication。
注:如果Web目录中没有Global.asax文件,就不会编译生成App_global.asax.mlgx7n2v.dll这样的文件。 2) httpapplicationfactory._theapplicationfactory.ensureappstartcalled(context);
创建特定的HttpApplication实例,触发ApplicationOnStart事件,执行ASP.global_asax中的Application_Start(object sender, EventArgs e)方法。这里创建的HttpApplication实例在处理完事件后,就被回收。 3) httpapplicationfactory._theapplicationfactory.getnormalapplicationinstance(context);
该 方法创建HttpApplication实例并进行初始化(调用System.Web.HttpApplication. InitInternal()方法)。
创建HttpApplication实例是根据实际的_theApplicationType进行创建。如果Web目录中没有global.asa文件,也就是说没有动态编译生成ASP.global_asax类型,那就直接实例化HttpApplication。如果创建了ASP.global_asax类型,那就对ASP.global_asa进行实例化。
创建HttpApplication实例之后就是调用实例的InitInternal方法。
InitInternal方法也是我们重点分析的方法,该方法的主要功能如下:
1. InitModules():根据Web.Config的设置,创建相应的HttpModules。
2. HookupEventHandlersForAppplicationAndModules:根据发生的事件,调用HttpApplication实例中相应的事件处理函数。
3. 创建很多实现IExecutionStep接口的类的实例并添加到当前HttpApplication实例的_execSteps中,等待回调时执行。从这里我们可以看到HttpApplication是以异步的方式处理请求,对请求的很多处理工作都放入了_execStep等待回调时执行。
_execStep中主要的处理工作如下:
1) 对请求的路径进行安全检查,禁止非法路径访问(ValidatePathExecutionStep)。
2) 如果设置了UrlMappings, 进行RewritePath(UrlMappingsExecutionStep)。
3) 执行事件处理函数,比如:BeginRequest、AuthenticateRequest等等。
4) 获取处理当前请求的HttpHandler,ASP.NET页面的动态编译也是在这里进行的。(MapHandlerExecutionStep)
该处理是通过调用System.Web.HttpApplication. MapHttpHandler方法。
在MapHttpHandler中,首先根据访问的地址从web.config获取相应的实现IHttpHandlerFactory的类型。对于asp.net页面,默认是PageHanlderFactory。然后创建PageHanlderFactory实例,调用GetHandlerHelper,在GetHandlerHelper中调用BuildManager.CreateInstanceFromVirtualPath编译并创建当前请求的ASP.NET页面的实例(如果已经编译过,直接从缓存中加载)。
CreateInstanceFromVirtualPath经过几次方法调用,将编译任务给了BuildManager. CompileWebFile()。CompileWebFile从web.config得到相应的BuildProvider,对于.aspx文件,相应的BuildProvider是PageBuildProvider。PageBuildProvider是如何进行页面编译的,这里就不再就进一步分析了,如果你感兴趣,可以进一步研究ASP.NET 2.0的源代码。
5) 调用相应HttpHandler的.ProcessRequest方法处理请求(如果是异步方式,调用BeginProcessReques)。(CallHandlerExecutionStep)
6) 将响应内容写入Filter。(CallFilterExecutionStep) 5. 调用HttpApplication实例的BeginProcessRequest异步处理请求。
上面所讲的_execSteps中所发生的许多事情,都是在HttpRuntime调用HttpApplication BeginProcessRequest之后,在BeginProcessRequest中调用ResumeSteps后执行的。 ASP.NET 2.0运行时是ASP.NET 2.0中非常复杂、难以理解也是很重要的部分,对ASP.NET 2.0运行时源代码的研究有处于我们加深对ASP.NET 2.0原理的理解,会给我们开发ASP.NET 2.0应用程序带来不少帮助。这篇文章是我初次学习ASP.NET 2.0运行时,为了帮助自己更好地理解ASP.NET 2.0运行时而写的,欢迎你对文章内容提出批评与建议。
我觉得写文章,不仅能提高自己的写作水平、方便交流,而且通过写文章,可以理清自己的思路、促进自己深入地思考从而加深自己对技术的理解,开发人员在编码之余抽点时间写些技术文章对提高自己还是很有帮助的。 |
|
Author : 未知
From: 网络
上次做了个项目,涉及到数据库的还原和恢复,到网上找了一下,是利用SQLDMO实现的,只要添加SQLDMO引用就好了,然后利用下边的类的方法就可以实现了。 我把原作者的类扩充了一下,可以自动识别web.config里 的数据库连接字符串,可以通过变量设置还原恢复的信息。 需要注意的时还原,还原的时候问题最大了,有别的用户使用数据库的时候无法还原,解决办法就是在MASTER数据库中添加一个存储过程: create proc killspid (@dbname varchar(20))
as begin declare @sql nvarchar(500)
declare @spid int set @sql=’declare getspid cursor for select spid from sysprocesses where dbid=db_id(’’’+@dbname+’’’)’ exec (@sql)
open getspid fetch next from getspid into @spid while @@fetch_status<>-1 begin exec(’kill ’+@spid)
fetch next from getspid into @spid end close getspid deallocate getspid end GO 在还原之前先执行这个存储过程,需要传递dbname,就是你的数据库的名字。下边是类的原代码:(web.config里的数据库连接字符串是constr) using System;
using System.Configuration;
using System.Data.SqlClient;
using System.Data;
namespace web.base_class
...{
/**
/// DbOper类,主要应用SQLDMO实现对Microsoft SQL Server数据库的备份和恢复
///
public class DbOper
...{
private string server;
private string uid;
private string pwd;
private string database;
private string conn;
/**
/// DbOper类的构造函数
///
public DbOper()
...{
conn=System.Configuration.ConfigurationSettings.AppSettings["constr"].ToString(); server=cut(conn,"server=",";");
uid=cut(conn,"uid=",";");
pwd=cut(conn,"pwd=",";");
database=cut(conn,"database=",";");
}
public string cut(string str,string bg,string ed)
...{
string sub;
sub=str.Substring(str.IndexOf(bg)+bg.Length);
sub=sub.Substring(0,sub.IndexOf(";"));
return sub;
}
/**
/// 数据库备份
///
public bool DbBackup(string url)
...{ SQLDMO.Backup oBackup = new SQLDMO.BackupClass();
SQLDMO.SQLServer oSQLServer = new SQLDMO.SQLServerClass();
try
...{
oSQLServer.LoginSecure = false;
oSQLServer.Connect(server,uid, pwd);
oBackup.Action = SQLDMO.SQLDMO_BACKUP_TYPE.SQLDMOBackup_Database;
oBackup.Database = database;
oBackup.Files = url;//"d:/Northwind.bak";
oBackup.BackupSetName = database;
oBackup.BackupSetDescription = "数据库备份"; oBackup.Initialize = true; oBackup.SQLBackup(oSQLServer);
return true;
}
catch
...{
return false;
throw;
}
finally
...{
oSQLServer.DisConnect();
}
}
///数据库恢复 ///
public string DbRestore(string url)
{ if(exepro()!=true)
//执行存储过程 { return "操作失败"; }
else { SQLDMO.Restore oRestore = new SQLDMO.RestoreClass();
SQLDMO.SQLServer oSQLServer = new SQLDMO.SQLServerClass();
try { oSQLServer.LoginSecure = false; oSQLServer.Connect(server, uid, pwd);
oRestore.Action = SQLDMO.SQLDMO_RESTORE_TYPE.SQLDMORestore_Database;
oRestore.Database = database;
oRestore.Files = url;
//@"d:/Northwind.bak";
oRestore.FileNumber = 1;
oRestore.ReplaceDatabase = true;
oRestore.SQLRestore(oSQLServer);
return "ok"; } catch(Exception e)
{ return "恢复数据库失败";
throw;
} finally { oSQLServer.DisConnect();
} } }
private bool exepro()
{ SqlConnection conn1 = new SqlConnection("server="+server+";uid="+uid+";pwd="+pwd+";database=master");
SqlCommand cmd = new SqlCommand("killspid",conn1);
cmd.CommandType = CommandType.StoredProcedure;
cmd.Parameters.Add("@dbname","port");
try { conn1.Open();
cmd.ExecuteNonQuery();
return true;
}
catch(Exception ex)
{ return false;
} finally
{
conn1.Close();
}
}
}
} |
|
适用于:ASP.NET 2.0 版 Windows Server 2003 Internet 信息服务 (IIS) 6.0 摘要:本教程阐释在 ASP.NET 2.0 版中,IIS 集成 Windows 身份验证以及 ASP.NET Windows 身份验证的工作机制。同时,阐释 NTLM 和 Kerberos 身份验证的工作机制。此外,本教程还阐释 WindowsAuthenticationModule 类如何构造 WindowsPrincipal 和 WindowsIdentity 对象,然后将这些对象附加到当前的 ASP.NET Web 请求以表示经过身份验证的用户。 解释:ASP.NET 2.0 中的 Windows 身份验证
本页内容
目标
概述
IIS 身份验证
NTLM 身份验证
Kerberos 身份验证
ASP.NET 身份验证
安全上下文
模拟
委托
其他资源
反馈
技术支持
社区和新闻组
投稿人与审阅者
概述 身份验证是一个验证客户端身份的过程,通常采用指定的第三方授权方式。客户端可能是最终用户、计算机、应用程序或服务。客户端的标识称为安全原则。为了使用服务器应用程序进行验证,客户端提供某种形式的凭据来允许服务器验证客户端的标识。确认了客户端的标识后,应用程序可以授予执行操作和访问资源的原则。 如果应用程序使用 Active Directory 用户存储,则应该使用集成 Windows 身份验证。对 ASP.NET 应用程序使用集成 Windows 身份验证时,最好的方法是使用 ASP.NET 的 Windows 身份验证提供程序附带的 Internet 信息服务 (IIS) 身份验证方法。使用该方法,将自动创建一个 windowsprincipal 对象(封装一个 windowsidentity 对象)来表示经过身份验证的用户。您无需编写任何身份验证特定的代码。 asp.net 还支持使用 Windows 身份验证的自定义解决方案(避开了 IIS 身份验证)。例如,可以编写一个根据 Active Directory 检查用户凭据的自定义 ISAPI 筛选器。使用该方法,必须手动创建一个 windowsprincipal 对象。 本文阐释在具有 IIS 6.0 的 ASP.NET 2.0 中 Windows 身份验证的工作机制。
IIS 身份验证 如果 ASP.NET 针对 Windows 身份验证进行配置,则 ASP.NET 依靠 IIS,利用配置好的身份验证模式对其客户端进行身份验证。IIS 通过检查特定应用程序的元数据库设置来确定其身份验证模式。成功验证某个用户的身份后,IIS 将代表经过身份验证的用户的 Windows 令牌传递给宿主 ASP.NET 的 ASP.NET 辅助进程 (w3wp.exe)。如果应用程序使用在 IIS 中配置的虚拟目录来支持匿名访问,该令牌代表匿名 Internet 用户帐户;否则,该令牌代表经过身份验证的用户。 iis 支持以下身份验证模式:
| • | 匿名。如果不需要对客户端进行身份验证(或者使用自定义身份验证机制,如窗体身份验证),则可将 IIS 配置为允许匿名访问。在该事件中,IIS 创建一个 Windows 令牌来表示具有相同匿名(或客人)帐户的所有匿名用户。默认的匿名帐户是 IUSR_MACHINENAME,其中 MACHINENAME 是安装期间指定的计算机的 NetBIOS 名称。 | | • | 基本。基本身份验证要求用户以用户名和密码的形式提供凭据来证明他们的身份。基本身份验证基于 Internet 标准 RFC 2617,所有常用浏览器都支持它。用户的凭据以未加密的 Base64 编码格式从浏览器传送到 Web 服务器。为了更好保护这些凭据,只要在使用基本身份验证同时再使用安全套接字层 (SSL) 即可。由于 Web 服务器包含未加密的用户凭据,因此 ASP.NET 应用程序可以模拟调用方并使用他们的凭据来访问网络资源。 | | • | 集成的 Windows。集成的 Windows 身份验证(以前称为 NTLM,也称为 Windows NT 质询/应答身份验证,Windows NT Challenge/Response)是使用 Kerberos v5 身份验证还是 NTLM 身份验证,取决于客户端和服务器的配置。服务器与客户端协商确定要使用的协议。如果满足以下条件,则使用 Kerberos 身份验证:
| • | asp.net Web 应用程序正在 NetworkService 帐户或自定义域帐户下运行。如果应用程序在本地帐户(如 Windows 2000 Server 上的 ASPNET 帐户)上运行,则使用 NTLM 身份验证。 | | • | 域帐户的 Active Directory 中有一个服务主要名称 (SPN),该域帐户用于运行客户端进行身份验证所使用的服务。 | | • | 客户端计算机和服务器计算机至少需要运行 Windows 2000 Server,且处在相同的(即信任的)Windows 域中。 |
|
注 默认情况下,对于 Windows Server 2003 操作系统启用集成 Windows 身份验证。然而,如果 Windows Server 2003 Service Pack 1 (SP1) 作为 Windows Server 2003 操作系统整合安装的一部分进行安装,则默认情况下禁用集成 Windows 身份验证。如果使用 SP1 升级 Windows Server 2003,则集成 Windows 身份验证的设置与其 Windows Server 2003 设置相同。 应该使用集成 Windows 身份验证而不是基本身份验证,因为前者避免了通过网络传输用户凭据。由于 Kerberos v5 身份验证支持相互身份验证,因此用户还可以对正在连接的服务器进行身份验证。 集成 Windows 身份验证最适合于 Intranet 环境,其中的客户端计算机和 Web 服务器计算机都是相同(即信任的)域的一部分。
NTLM 身份验证 ntlm 是用于 Windows NT 和 Windows 2000 Server 工作组环境的身份验证协议。它还用在必须对 Windows NT 系统进行身份验证的混合 Windows 2000 Active Directory 域环境中。当 Windows 2000 Server 转换为不存在下层 Windows NT 域控制器的本机模式时,禁用 NTLM。然后 Kerberos v5 变成企业级的默认身份验证协议。 ntlm 身份验证机制 图 1 显示 NTLM 协议。

图 1. NTLM 质询/应答机制
下面概述质询/应答机制:
| • | 用户请求访问。用户尝试通过提供用户凭据登录到客户端。登录前,客户端计算机缓存密码的哈希值并放弃密码。客户端向服务器发送一个请求,该请求包括用户名以及纯文本格式的请求。 | | • | 服务器发送质询消息。服务器生成一个称为质询的 16 字节随机数(即 NONCE),并将它发送到客户端。 | | • | 客户端发送应答消息。客户端使用由用户的密码生成的一个密码哈希值来加密服务器发送的质询。它以应答的形式将这个加密的质询发回到服务器。 | | • | 服务器将质询和应答发送到域控制器。服务器将用户名、原始质询以及应答从客户端计算机发送到域控制器。 | | • | 域控制器比较质询和应答以对用户进行身份验证。域控制器获取该用户的密码哈希值,然后使用该哈希值对原始质询进行加密。接下来,域控制器将加密的质询与客户端计算机的应答进行比较。如果匹配,域控制器则发送该用户已经过身份验证的服务器确认。 | | • | 服务器向客户端发送应答。假定凭据有效,服务器授予对所请求的服务或资源的客户端访问权。 |
Kerberos 身份验证 与 NTLM 身份验证相比,Kerberos 身份验证具有以下优势:
| • | 相互身份验证。当客户端使用 Kerberos v5 协议对特定服务器上的特定服务进行身份验证,Kerberos 为客户端提供网络上恶意代码不会模拟该服务的保证。 | | • | 委托支持。使用 Kerberos 身份验证对客户端进行身份验证的服务器可以模拟这些客户端,并使用该客户端的安全上下文访问网络资源。 | | • | 性能。Kerberos 身份验证提供优于 NTLM 身份验证的改进的性能。 | | • | 简化的信任管理。具有多个域的网络不再需要一组复杂的显式、点对点信任关系。 | | • | 互操作性。Microsoft 实现的 Kerberos 协议基于向 Internet 工程任务组 (IETF) 推荐的标准跟踪规范。因此,Windows 2000 中协议的实现为与其他网络的互操作奠定了基础(其中 Kerberos 版本 5 用于身份验证)。 |
kerberos 身份验证机制 图 2 显示 Kerberos 身份验证协议的简化视图。

图 2. Kerberos 身份验证
当客户端对网络服务进行身份验证之后,kerberos v5 协议遵循以下步骤:
| • | 客户端从 KDC 请求 TGT。用户试图通过提供用户凭据登录到客户端。客户端计算机上的 Kerberos 服务向密钥发行中心 (KDC) 发送一个 Kerberos 身份验证服务请求。该请求包含用户名、请求票证授予票证(ticket-granting ticket,TGT)所获取的服务信息,以及使用用户的长期密钥(即密码)加密的时间戳。 注 在 Windows 2000 Server 或 Windows Server 2003 操作系统上,域控制器充当 KDC,而 Active Directory 宿主安全帐户数据库。 | | • | 身份验证服务发送加密的 TGT 和会话密钥。KDC 为来自 Active Directory 的用户获取长期密钥(即密码),然后解密随请求一起传送的时间戳。如果该时间戳有效,则用户是真正的用户。KDC 身份验证服务创建一个登录会话密钥,并使用用户的长期密钥对该副本进行加密。然后,该身份验证服务创建一个 TGT,它包括用户信息和登录会话密钥。最后,该身份验证服务使用自己的密钥加密 TGT,并将加密的会话密钥和加密的 TGT 传递给客户端。 | | • | 客户端从 TGT 请求服务器访问。客户端使用其长期密钥(即密码)解密登录会话密钥,并在本地缓存它。此外,客户端还将加密的 TGT 存储在它的缓存中。访问网络服务时,客户端向 KDC 票证授予服务(ticket-granting service,TGS)发送一个包含信息的请求,这些信息包括用户名、使用用户登录会话密钥加密的验证者消息、TGT,以及用户想访问的服务(和服务器)名称。 | | • | TGS 发送加密的会话密钥和票证。KDC 上的 TGS 使用自己的密钥解密 KDC 并提取登录会话密钥。它使用该登录会话密钥解密验证者消息(通常是时间戳)。如果验证者消息成功解密,TGS 从 TGT 提取用户信息,并使用用户信息创建一个用于访问该服务的服务会话密钥。它使用该用户的登录会话密钥对该服务会话密钥的一个副本进行加密,创建一个具有服务会话密钥和用户信息的服务票证,然后使用该服务的长期密钥(密码)对该服务票证进行加密。然后,TGS 将加密的服务会话密钥和服务票证添加到客户端。 | | • | 客户端发送服务票证。客户端访问服务时,向服务器发送一个请求。该请求包含验证者消息(时间戳),该消息使用服务会话密钥和服务票证进行加密。 | | • | 服务器发送加密的时间戳以进行客户端验证。服务器解密服务票证并提取服务会话密钥。通过使用服务会话密钥,服务器解密验证者消息(时间戳)并计算它。如果验证者通过测试,则服务器使用服务会话密钥对验证者(时间戳)进行加密,然后将验证者传回到客户端。客户端解密时间戳,如果该时间戳与原始时间戳相同,则该服务是真正的,客户端继续连接。 |
服务的主要名称 kerberos v5 身份验证协议之所以使用服务的主要名称 (SPN),原因如下:
| • | 支持相互身份验证。 | | • | 允许一个客户端请求票证,进而允许该客户端与特定服务通讯。 |
例如,如果某个客户端需要获得一个票证,并对在侦听端口 4766 运行的计算机 (myserver) 上的特定服务 (myservice) 进行身份验证,则该客户端使用根据该信息构造的名称从 KDC 请求一个票证,如下所示:
在 Active Directory 中注册的 SPN 在该名称和运行所请求的服务的域帐户之间维护一个映射。通过使用该机制,恶意用户难以在网络上模拟服务。恶意用户必须禁用实际服务并从该网络移除实际服务器。然后,恶意用户必须向网络中添加一台同名的新计算机并公开重复的服务。由于客户端使用具有相互身份验证的 Kerberos v5 协议,因此该客户端将无法使用重复的服务,除非它可以提供配置实际服务进行运行的域帐户的密码。
ASP.NET 身份验证 iis 向 ASP.NET 传递代表经过身份验证的用户或匿名用户帐户的令牌。该令牌在一个包含在 iprincipal 对象中的 iidentity对象中维护,iprincipal 对象进而附加到当前 Web 请求线程。可以通过 httpcontext.user 属性访问 iprincipal 和 iidentity对象。这些对象和该属性由身份验证模块设置,这些模块作为 HTTP 模块实现并作为 ASP.NET 管道的一个标准部分进行调用,如图 3 所示。

图 3. ASP.NET 管道
asp.net 管道模型包含一个 httpapplication 对象、多个 HTTP 模块对象,以及一个 HTTP 处理程序对象及其相关的工厂对象。httpruntime 对象用于处理序列的开头。在整个请求生命周期中,httpcontext 对象用于传递有关请求和响应的详细信息。 有关 ASP.NET 请求生命周期的详细信息,请参阅"ASP.NET Life Cycle",网址是 http://msdn2.microsoft.com/library/ms227435(en-US,VS.80).aspx。 身份验证模块 asp.net 2.0 在计算机级别的 Web.config 文件中定义一组 HTTP 模块。其中包括大量身份验证模块,如下所示:
<httpModules>

  <add name="WindowsAuthentication"
    type="System.Web.Security.WindowsAuthenticationModule" />
  <add name="FormsAuthentication"
    type="System.Web.Security.FormsAuthenticationModule" />
  <add name="PassportAuthentication"
    type="System.Web.Security.PassportAuthenticationModule" />

</httpModules>
只加载一个身份验证模块,这取决于该配置文件的 authentication 元素中指定了哪种身份验证模式。该身份验证模块创建一个 iprincipal 对象并将它存储在 httpcontext.user 属性中。这是很关键的,因为其他授权模块使用该 iprincipal 对象作出授权决定。 当 IIS 中启用匿名访问且 authentication 元素的 mode 属性设置为 none 时,有一个特殊模块将默认的匿名原则添加到 httpcontext.user 属性中。因此,在进行身份验证之后,httpcontext.user 绝不是一个空引用(在 Visual Basic 中为 nothing)。 windowsauthenticationmodule 如果 Web.config 文件包含以下元素,则激活 windowsauthenticationmodule 类。
<authentication mode="Windows" />
WindowsAuthenticationModule 类负责创建 windowsprincipal 和 windowsidentity 对象来表示经过身份验证的用户,并且负责将这些对象附加到当前 Web 请求。 对于 Windows 身份验证,遵循以下步骤:
| • | WindowsAuthenticationModule 使用从 IIS 传递到 ASP.NET 的 Windows 访问令牌创建一个 windowsprincipal 对象。该令牌包装在 httpcontext 类的 workerrequest 属性中。引发 authenticaterequest 事件时,windowsauthenticationmodule 从 httpcontext 类检索该令牌并创建 windowsprincipal 对象。httpcontext.user 用该 windowsprincipal 对象进行设置,它表示所有经过身份验证的模块和 ASP.NET 页的经过身份验证的用户的安全上下文。 | | • | WindowsAuthenticationModule 类使用 P/Invoke 调用 Win32 函数并获得该用户所属的 Windows 组的列表。这些组用于填充 windowsprincipal 角色列表。 | | • | WindowsAuthenticationModule 类将 windowsprincipal 对象存储在 httpcontext.user 属性中。随后,授权模块用它对经过身份验证的用户授权。 注:defaultauthenticationmodule 类(也是 ASP.NET 管道的一部分)将 thread.currentprincipal 属性设置为与 httpcontext.user 属性相同的值。它在处理 authenticaterequest 事件之后进行此操作。 |
授权模块 WindowsAuthenticationModule 类完成其处理之后,如果未拒绝请求,则调用授权模块。授权模块也在计算机级别的 Web.config 文件中的 httpmodules 元素中定义,如下所示:
<httpModules>
  <add name="UrlAuthorization"
    type="System.Web.Security.UrlAuthorizationModule" />
  <add name="FileAuthorization"
    type="System.Web.Security.FileAuthorizationModule" />
  <add name="AnonymousIdentification"
    type="System.Web.Security.AnonymousIdentificationModule" />
</httpModules>
urlauthorizationmodule 调用 urlauthorizationmodule 类时,它在计算机级别或应用程序特定的 Web.config 文件中查找 authorization 元素。如果存在该元素,则 urlauthorizationmodule 类从 httpcontext.user 属性检索 iprincipal 对象,然后使用指定的动词(GET、POST 等)来确定是否授权该用户访问请求的资源。 fileauthorizationmodule 接下来,调用 fileauthorizationmodule 类。它检查 httpcontext.user.identity 属性中的 iidentity 对象是否是 windowsidentity 类的一个实例。如果 iidentity 对象不是 windowsidentity 类的一个实例,则 fileauthorizationmodule类停止处理。 如果存在 windowsidentity 类的一个实例,则 fileauthorizationmodule 类调用 accesscheck Win32 函数(通过 P/Invoke)来确定是否授权经过身份验证的客户端访问请求的文件。如果该文件的安全描述符的随机访问控制列表 (DACL) 中至少包含一个 read 访问控制项 (ACE),则允许该请求继续。否则,fileauthorizationmodule 类调用 httpapplication.completerequest 方法并将状态码 401 返回到客户端。
安全上下文 .net Framework 使用以下两个接口封装 Windows 令牌和登录会话:
| • | System.Security.Principal.IPrincipal | | • | System.Security.Principal.IIdentity(它公开为 iprincipal 接口中的一个属性。) |
httpcontext.user 在 ASP.NET 中,用 windowsprincipal 和 windowsidentity 类表示使用 Windows 身份验证进行身份验证的用户的安全上下文。使用 Windows 身份验证的 ASP.NET 应用程序可以通过 httpcontext.user 属性访问 windowsprincipal 类。 要检索启动当前请求的 Windows 经过身份验证的用户的安全上下文,使用以下代码:
using System.Security.Principal;
...
// Obtain the authenticated user’s Identity
WindowsPrincipal winPrincipal = (WindowsPrincipal)HttpContext.Current.User;
windowsidentity.getcurrent WindowsIdentity.GetCurrent 方法可用于获得当前运行的 Win32 线程的安全上下文的标识。如果不使用模拟,线程继承 IIS 6.0(默认情况下的 NetworkService 帐户)上进程的安全上下文。 该安全上下文在访问本地资源时使用。通过使用经过身份验证的初始用户的安全上下文或使用固定标识,您可以使用模拟重写该安全上下文。 要检索运行应用程序的安全上下文,使用以下代码:
using System.Security.Principal;
...
// Obtain the authenticated user’s identity.
WindowsIdentity winId = WindowsIdentity.GetCurrent();
WindowsPrincipal winPrincipal = new WindowsPrincipal(winId);
thread.currentprincipal asp.net 应用程序中的每个线程公开一个 currentprincipal 对象,该对象保存经过身份验证的初始用户的安全上下文。该安全上下文可用于基于角色的授权。 要检索线程的当前原则,使用以下代码:
using System.Security.Principal;
...
// Obtain the authenticated user’s identity
WindowsPrincipal winPrincipal = (WindowsPrincipal) Thread.CurrentPrincipal();
表 1 显示从各种标识属性获得的结果标识,当您的应用程序使用 Windows 身份验证且 IIS 配置为使用集成 Windows 身份验证时,可以从 ASP.NET 应用程序使用这些标识属性。
|
| <identity impersonate="true"/>
<authentication mode="Windows" /> | HttpContext
WindowsIdentity
线程 | Domain/UserName
Domain/UserName
Domain/UserName | | <identity impersonate="false"/>
<authentication mode="Windows" /> | HttpContext
WindowsIdentity
线程 | Domain/UserName
NT AUTHORITY/NETWORK SERVICE
Domain/UserName | | <identity impersonate="true"/>
<authentication mode="Forms" /> | HttpContext
WindowsIdentity
线程 | 用户提供的名称
Domain/UserName
用户提供的名称 | | <identity impersonate="false"/>
<authentication mode="Forms" /> | HttpContext
WindowsIdentity
线程 | 用户提供的名称
NT AUTHORITY/NETWORK SERVICE
用户提供的名称 |
模拟 asp.net 应用程序可以使用模拟来执行操作,使用经过身份验证的客户端或特定 Windows 帐户的安全上下文来访问资源。 初始用户模拟 要模拟初始(经过身份验证的)用户,请在 Web.config 文件中使用以下配置:
<authentication mode="Windows" />
<identity impersonate="true" />
使用该配置,asp.net 始终模拟经过身份验证的用户,且所有资源访问均使用经过身份验证的用户的安全上下文执行。如果您的应用程序的虚拟目录上启用了匿名访问,则模拟 IUSR_MACHINENAME 帐户。 要暂时模拟经过身份验证的调用方,将 identity 元素的 impersonate 属性设置为 false,然后使用以下代码:
using System.Security.Principal;
...
// Obtain the authenticated user’s identity.
WindowsIdentity winId = (WindowsIdentity)HttpContext.Current.User.Identity;
WindowsImpersonationContext ctx = null;
try
{
    // Start impersonating.
    ctx = winId.Impersonate();
    // Now impersonating.
    // Access resources using the identity of the authenticated user.
}
// Prevent exceptions from propagating.
catch
{
}
finally
{
    // Revert impersonation.
    if (ctx != null)
        ctx.Undo();
}
// Back to running under the default ASP.NET process identity.
这段代码模拟经过身份验证的初始用户。在 httpcontext.current.user.identity 对象中维护初始用户的标识和 Windows 令牌。 固定标识模拟 如果需要在应用程序的整个生命周期中模拟相同的标识,可以在 Web.config 文件中的 identity 元素上指定凭据。以下示例显示如何模拟名为"TestUser"的 Windows 帐户。 如果使用该方法,应该对这些凭据进行加密。使用 ASP.NET 2.0,您可以使用 ASP.NET IIS 注册工具 (Aspnet_regiis.exe)。使用 ASP.NET 1.1 版,您可以使用 Aspnet_setreg.exe 实用工具。有关该实用工具的详细信息,请参阅 http://msdn.microsoft.com/library/default.asp?url=/library/en-us/cptools/html/cpgrfaspnetiisregistrationtoolaspnet_regiisexe.asp。 要在 ASP.NET 应用程序中使用固定标识进行资源访问,可使用 Windows 2000 Server 或 Windows Server 2003 上的 identity 元素来配置凭据。如果正在运行 Windows Server 2003,其中的 IIS 6.0 配置为运行在辅助进程隔离模式下(默认情况),则可通过将 ASP.NET 应用程序配置为在自定义应用程序池(在特定的域标识下运行)中运行来避免模拟。然后,可以使用指定的域标识访问资源而无需使用模拟。
委托 模拟只提供对本地资源的访问。委托是一个扩展的模拟功能,它允许您使用模拟令牌访问网络资源。 如果应用程序使用 Kerberos v5 身份验证对其用户进行身份验证,则可使用 Kerberos 委托在应用程序的各层传递用户标识并访问网络资源。如果应用程序不使用 Kerberos v5 身份验证,则可使用协议转换切换到 Kerberos,然后使用委托传递该标识。 windows Server 2003 中的约束委托需要 Kerberos 身份验证。如果您的应用程序无法使用 Kerberos 身份验证对其调用方进行身份验证,您可以使用协议转换从可选的非 Windows 身份验证模式(如,窗体或证书身份验证)切换到 Kerberos 身份验证。然后,可使用具有约束委托的 Kerberos 访问下游网络资源。 约束的和未约束的委托 windows 2000 Server 上的 Kerberos 委托是未约束的。Active Directory 中配置了委托的服务器可在使用模拟的用户安全上下文的同时访问任何网络资源或网络上的任何计算机。这会带来潜在的安全威胁,尤其是 Web 服务器遭受恶意用户攻击时。 为了解决该安全问题,windows Server 2003 引入了约束的委托。这使管理员能够在使用模拟的用户安全上下文时准确指定另一个服务器或域帐户可以访问的服务。 配置委托 要使用 Kerberos 委托,需要适当的 Active Directory 配置。 要授予 Web 服务器委托客户端凭据的权限,请按以下方式配置 Active Directory:
| • | 如果在 NetworkService 帐户下运行应用程序,Web 服务器计算机帐户必须在 Active Directory 中标记为受信任委托。 | | • | 如果在自定义域帐户下运行应用程序,该用户帐户必须在 Active Directory 中标记为受信任委托。 | | • | 如果应用程序模拟一个用户帐户,请确保应用程序模拟的用户帐户在 Active Directory 中未标记为"敏感帐户,不能被委托"。 |
有关协议转换和约束委托的详细信息,请参阅 How To: Use Protocol Transition and Constrained Delegation in ASP.NET 2.0。
其他资源
|
|
(1)拖拽访问
event.dataTransfer.setData(
"URL", oImage.src);
sImageURL = event.dataTransfer.getData("URL")
(2)普通访问
window.clipboardData.setData("Text",oSource.innerText);
window.clipboardData.getData("Text");
<HTML>
<HEAD>
<META NAME=
"save" CONTENT="history">
<STYLE>
.sHistory
</STYLE>
</HEAD>
<BODY>
<INPUT class=sHistory type=text id=oPersistInput>
</BODY>
</HTML>
<html>
<head>
<meta http-equiv=
"Content-Type" content="text/html; charset=gb2312">
<noscript><meta http-equiv="refresh" content="0;url=about:noscript"></noscript>
<title>屏蔽鼠标右键、Ctrl+N、Shift+F10、Alt+F4、F11、F5刷新、退格键</title>
</head>
<body>
<script language="Javascript"><!--
//屏蔽鼠标右键、Ctrl+N、Shift+F10、F11、F5刷新、退格键
//Author: meizz(梅花雨) 2002-6-18
function document.oncontextmenu(){event.returnValue=false;}//屏蔽鼠标右键
function window.onhelp(){return false} //屏蔽F1帮助
function document.onkeydown()
{
if ((window.event.altKey)&&
((window.event.keyCode==37)|| //屏蔽 Alt+ 方向键 ←
(window.event.keyCode==39))) //屏蔽 Alt+ 方向键 →
{
alert("不准你使用ALT+方向键前进或后退网页!");
event.returnValue=false;
}
/* 注:这还不是真正地屏蔽 Alt+ 方向键,
因为 Alt+ 方向键弹出警告框时,按住 Alt 键不放,
用鼠标点掉警告框,这种屏蔽方法就失效了。以后若
有哪位高手有真正屏蔽 Alt 键的方法,请告知。*/
if ((event.keyCode==8) || //屏蔽退格删除键
(event.keyCode==116)|| //屏蔽 F5 刷新键
(event.ctrlKey && event.keyCode==82)){ //Ctrl + R
event.keyCode=0;
event.returnValue=false;
}
if (event.keyCode==122){event.keyCode=0;event.returnValue=false;} //屏蔽F11
if (event.ctrlKey && event.keyCode==78) event.returnValue=false; //屏蔽 Ctrl+n
if (event.shiftKey && event.keyCode==121)event.returnValue=false; //屏蔽 shift+F10
if (window.event.srcElement.tagName == "A" && window.event.shiftKey)
window.event.returnValue = false; //屏蔽 shift 加鼠标左键新开一网页
if ((window.event.altKey)&&(window.event.keyCode==115)) //屏蔽Alt+F4
{
window.showModelessDialog("about:blank","","dialogWidth:1px;dialogheight:1px");
return false;
, ;}
}
</script>
屏蔽鼠标右键、Ctrl+N、Shift+F10、Alt+F4、F11、F5刷新、退格键
</body>
</html>
//屏蔽打印
<style>
@media print{
*
}
</style>
<p style=
"page-break-after:always">page1</p>
<p style="page-break-after:always">page2</p>
<meta name=
"ROBOTS" content="属性值">
其中属性值有以下一些:
属性值为"all": 文件将被检索,且页上链接可被查询;
属性值为"none": 文件不被检索,而且不查询页上的链接;
属性值为"index": 文件将被检索;
属性值为"follow": 查询页上的链接;
属性值为"noindex": 文件不检索,但可被查询链接;
属性值为"nofollow":
<script language=
"javascript">
function cc()
{
var e = event.srcElement;
var r =e.createTextRange();
r.moveStart(’character’,e.value.length);
r.collapse(true);
r.select();
}
</script>
<input type=text name=text1 value="123" οnfοcus="cc()">
<META HTTP-EQUIV=
"pragma" CONTENT="no-cache">
<META HTTP-EQUIV="Cache-Control" CONTENT="no-cache, must-revalidate">
<META HTTP-EQUIV="expires" CONTENT="0">


 823
823

 被折叠的 条评论
为什么被折叠?
被折叠的 条评论
为什么被折叠?
 到【灌水乐园】发言


