


GMSSL简介
项目主页:http://gmssl.org/
github:https://github.com/guanzhi/GmSSL
GMSSL windows + vs2010 编译
编译和安装:http://gmssl.org/docs/install.html
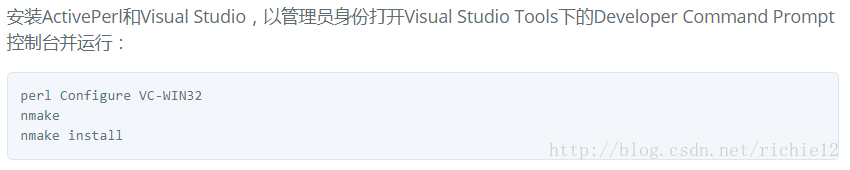
Windows下编译如下:
编译错误
1. base58.c error C2057: 应输入常量表达式
报错如下:
crypto\base58\base58.c(81) : error C2057: 应输入常量表达式
crypto\base58\base58.c(81) : error C2466: 不能分配常量大小为 0 的数组
crypto\base58\base58.c(81) : error C2133: “outi”: 未知的大小
报错代码为:
int base58_decode(const char *b58, size_t b58sz, void *bin, size_t *binszp)
{
    size_t binsz = *binszp;
    const unsigned char *b58u = (void*)b58;
    unsigned char *binu = bin;
    size_t outisz = (binsz + 3) / 4;
    uint32_t outi[outisz];
    uint64_t t;
    uint32_t c;
    size_t i, j;
解决方法:
vs不支持使用变量定义数组大小,所以将outi改为使用malloc分配即可。
int base58_decode(const char *b58, size_t b58sz, void *bin, size_t *binszp)
{
    size_t binsz = *binszp;
    const unsigned char *b58u = (void*)b58;
    unsigned char *binu = bin;
    size_t outisz = (binsz + 3) / 4;
    uint32_t *outi = (uint32_t *)malloc(outisz);//改为malloc
    uint64_t t;
    uint32_t c;
    size_t i, j;
2. base58.c : error C2065: “ssize_t”: 未声明的标识符
报错如下:
crypto\base58\base58.c(173) : error C2065: “ssize_t”: 未声明的标识符
crypto\base58\base58.c(173) : error C2146: 语法错误: 缺少“;”(在标识符“i”的前面)
报错代码为:
int base58_encode(const void *data, size_t binsz, char *b58, size_t *b58sz)
{
    const uint8_t *bin = data;
    int carry;
    ssize_t i, j, high, zcount = 0;
解决方法:
ssize_t定义在BaseTsd.h中,该文件在Windows SDK目录中,在base58.c中引入该头文件即可。
#if defined(_MSC_VER)
#include <BaseTsd.h>
#endif
3.base58.c error C2275: “uint8_t”: 将此类型用作表达式非法
报错如下:
crypto\base58\base58.c(185) : error C2275: “uint8_t”: 将此类型用作表达式非法
报错代码为:
int base58_encode(const void *data, size_t binsz, char *b58, size_t *b58sz)
{
    const uint8_t *bin = data;
    int carry;
    ssize_t i, j, high, zcount = 0;
    size_t size;

    while (zcount < binsz && !bin[zcount])
        ++zcount;

    size = (binsz - zcount) * 138 / 100 + 1;
    uint8_t buf[size];
    memset(buf, 0, size);
解决方法:
vs不支持使用变量定义数组大小,所以buf改为malloc分配
由于c语言中,变量的声明要放在函数起始位置,所以将buf声明放到函数开始
int base58_encode(const void *data, size_t binsz, char *b58, size_t *b58sz)
{
    const uint8_t *bin = data;
    unsigned char *buf = NULL;
    int carry;
    ssize_t i, j, high, zcount = 0;
    size_t size;

    while (zcount < binsz && !bin[zcount])
        ++zcount;

    size = (binsz - zcount) * 138 / 100 + 1;
    buf = (unsigned char *)malloc(size);//改为malloc
4.ffx.c fatal error C1083: 无法打开包括文件:“inttypes.h”: No such file or directory
解决方法:
参考这篇文章
将下载的inttypes.h放到ffx.c同目录并将引用改为引号
#include <stdio.h>
#include <ctype.h>
#include <string.h>
//#include <inttypes.h>
#include "inttypes.h"
5.saf_ec.c(94) : error C2275: “EVP_PKEY_CTX”: 将此类型用作表达式非法
凡是遇到将此类型用作表达式非法的错误都是因为变量的生命没有放到函数开始处
解决方法:
将声明放到函数开始出即可
6.error LNK2001: 无法解析的外部符号 speck_expand16
报错如下:
libcrypto-1_1.def : error LNK2001: 无法解析的外部符号 speck_expand16
libcrypto-1_1.def : error LNK2001: 无法解析的外部符号 speck_expand32
libcrypto-1_1.def : error LNK2001: 无法解析的外部符号 speck_expand64
libcrypto.lib : fatal error LNK1120: 3 个无法解析的外部命令
解决方法:
将include\openssl\speck.h中speck_expand16,speck_expand32,speck_expand64的声明删除
执行 perl util/mkdef.pl crypto update重新生成libcrypto.num


 3545
3545

 被折叠的 条评论
为什么被折叠?
被折叠的 条评论
为什么被折叠?
 到【灌水乐园】发言


