OpenRisc-56-Advanced Debug System

引言

在前面我们阐述了OpenRISC 的调试系统的几种不同的实现方案,本小节我们着重介绍一下其中的Advanced Debug System。

为了在不同的阶段进行不同层次的调试,模拟和仿真,opencores也开发了相应的debug系统(advancedebug systemhttp://opencores.org/project,adv_debug_sys),其中既包含目标硬件模块也包含软件模块,甚至还包含软件和硬件之间的调试器(ORSoC USB debugger)。


1,调试级别

Advanced Debug System实现了三个级别的调试和仿真。

一般根据研发过程中不同的阶段分为三种调试仿真级别:体系结构设计初期的调试,设计中期的调试,和设计末期的调试。

下面我们就从三个方面来分别介绍advanced debug system的实现。


2,体系结构设计初期的调试

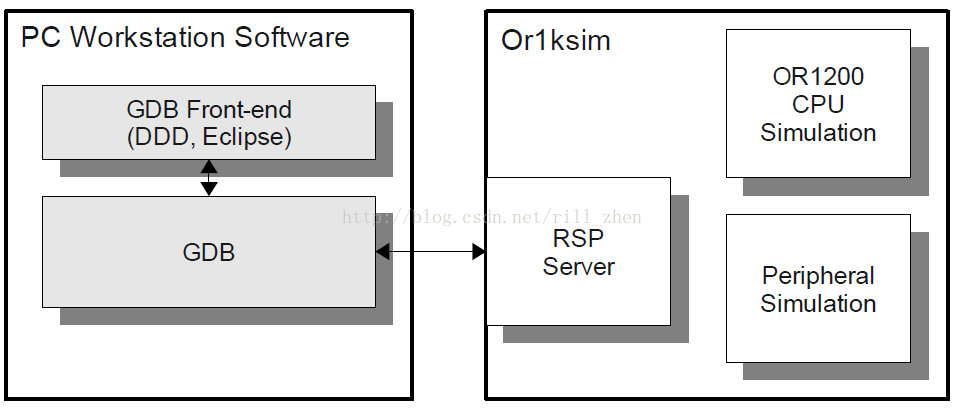
首先,就是在体系结构设计初期的调试,这时候体系结构的RTL还没有开始编写,也没有FPGA的验证系统,更没有流片生成最终的ASIC,但是为了达到调试的目的,就需要别写体系结构对应的simulator(模拟器),对于OpenRISC1000来说就是or1ksim。利用or1ksim,我们就可以模拟指令的执行和CPU的行为,此外,随着不断向模拟器中增加额外的模拟模型,还可以模拟串口,模拟内存控制器等。一旦有了比较完善的体系结构模拟器,就可以实现软件和硬件并行开发。Or1ksim内部包含了一个RSPserver,这就意味着GDB可以直接和or1ksim通信,不需要adv_jtag_bridge程序的参与,如下图所示。


3,体系结构设计中期的调试

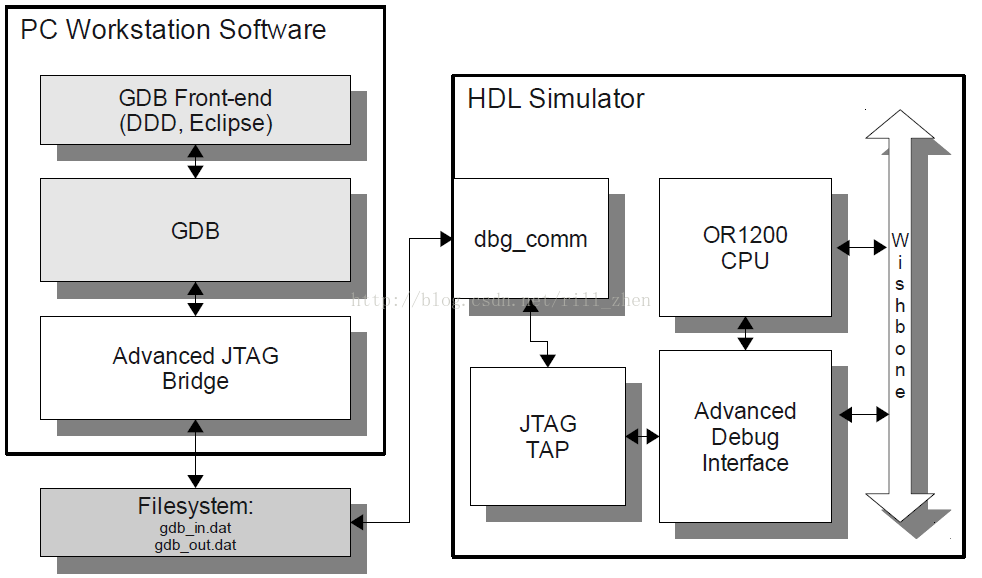
其次,是在体系结构设计中期,在这个时候,体系结构的特性和模块已经基本确定下来了,并且已经编写了对应的RTL,但是还是没有FPGA验证平台,这种情况下,就可以进行RTL级别的emulation(仿真)了。RTL级别的仿真的实现主要有两种方式,一种是在bridgeRTL仿真器之间使用FILE IO,另外一种是使用VPI IO

如果采用FILEIO的方式,需要在利用主机的文件系统来完成数据的传递,这就需要在RTL仿真这一端增加一个模块(dbg_comm.v),来读写文件,根据文件内容设置JTAG的状态。在仿真过程中,bridge向文件中写入数据,等待dbg_com的应答。dbg_com收到数据后,根据数据信息,完成对应操作之后,向文件中写入应答数据。Bridge收到应答之后完成一次调试动作。如下图所示:
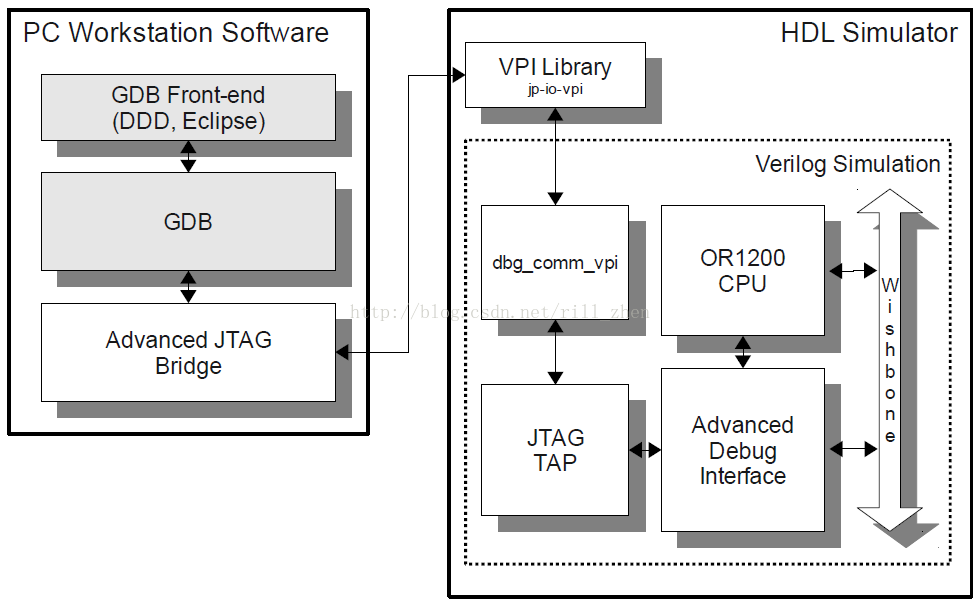


       如果采用的是VPI IO的方式,与FILEIO的方式类似,但是在bridgeRTL仿真器之间需要VPIverilogprogram interface)的支持。VPI既支持支持C语言又支持verilog模块,所以dbg_com模块可以使用VPI的库,而不必通过读写文件的形式就可以与bridge通信了。采用VPI IO方式的仿真系统,如下图所示:


4,系结构设计末期的调试

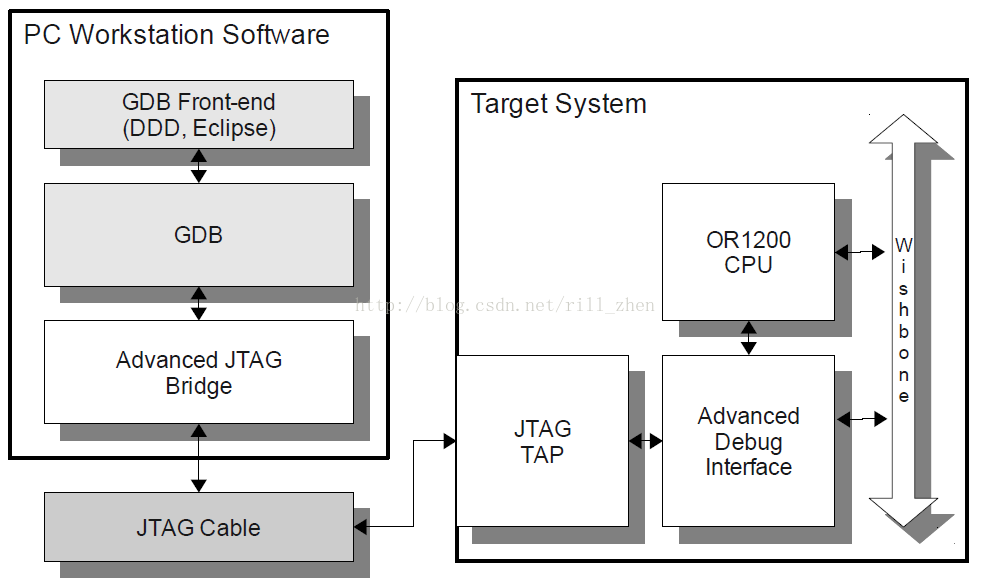
最后,在体系结构设计的末期,为了进一步提高仿真的精确度,需要在FPGA上做进一步的调试和验证。这种调试级别,就需要购买FPGA开发板和对应的JTAG cable,也就是我们前面最常用的调试方式。其结构如下所示:


5,小结

本小节简单介绍了advanced debug system的系统组成和工作原理,读者可根据自己的具体情况选择不同的调试方式。

advanced debug system的搭建,可分成两部分,在自己的SoC中例化tap和adv_dbg_if等IP core,在PC机上安装adv_jtag_bridge。

verilog HDL/VHDL的模块例化和linux下软件的安装和使用的具体细节可下载参考 adv_debug_sys_latest.tar.gz中的adv_jtag_bridge的手册获得(http://opencores.org/project,adv_debug_sys)。

需要注意的是要实现最终的调试,TAP,cable,bridge,gdb 四者要协同工作才能完成。即bridge要能检测到JTAG cable并开启RSP server,JTAG cable要能连接到TAP,TAP要能扫描链中识别adv_dbg_if。

enjoy!


  • 1
    点赞
  • 2
    收藏
    觉得还不错? 一键收藏
  • 0
    评论
Purpose of this tutorial is to help you compose and implement a custom, OpenRISC based, embedded system in the eastiest way possible. Unexperienced users should be warned that the OpenRISC processor is quite difficult processor : the lack of a self-configuring embedded system- package and the more ‘open’ nature of the OpenRISC compared to other opensource processors like the Leon SPARC is one of the reasons for this. Before proceeding, check if you have the following software and hardware: Hardware: - Linux-PC or Windows-PC - Development board with Altera FPGA (minimum 8000LEs), UART and 6 available pins. Software: - Correctly built OpenRISC-GNU Toolchain - Altera Quartus II 3.0 (or Quartus II Web edition) with service pack 2 - For Windows : WinCVS 1.2 (http://prdownloads.sourceforge.net/cvsgui/WinCvs120.zip) If you experience problems building the OpenRISC-GNU Toolchain, there is also an OpenRISC Software tutorial available from our website (http://emsys.denayer.wenk.be). The flow of implementing a custom, OpenRISC based, embedded system is: A. retreive OpenRISC Platform HDL source-code B. remove unnecessary components from source-code C. adjust RAM module D. synthesize and place & route OpenRISC based system E. download F. test the OpenRISC system The OpenRISC Platform source code is available through a CVS server. To make sure that this tutorial doesn’t get obsolete, the source code that will be downloaded is the same version that was used writing this tutorial. IN WINDOWS: Windows doesn’t come with a cvs-client, so if you haven’t installed wincvs yet, you need to download the CVS client WinCVS 1.2 (http://prdownloads.sourceforge.net/cvsgui/WinCvs120.zip). After downloading, install and open it. First, configure WinCVS: ??goto menu item ‘Admin’ and click on ‘Preferences’ ??‘CVSROOT’ should be cvs@cvs.opencores.org:/home/oc/cvs ??‘Authentication” needs to be “passwd file on the cvs server” ??disable “Checkout read-only” at the ‘Globals’ tab. I

“相关推荐”对你有帮助么?

  • 非常没帮助
  • 没帮助
  • 一般
  • 有帮助
  • 非常有帮助
提交
评论
添加红包

请填写红包祝福语或标题

红包个数最小为10个

红包金额最低5元

当前余额3.43前往充值 >
需支付:10.00
成就一亿技术人!
领取后你会自动成为博主和红包主的粉丝 规则
hope_wisdom
发出的红包
实付
使用余额支付
点击重新获取
扫码支付
钱包余额 0

抵扣说明:

1.余额是钱包充值的虚拟货币,按照1:1的比例进行支付金额的抵扣。
2.余额无法直接购买下载,可以购买VIP、付费专栏及课程。

余额充值