


实验1
要求掌握:
touch, echo, tail, find, grep, date, tar, ls, awk, mv,
# 新建一个exam1.txt的文件
touch exam1.txt

# 利⽤重定向把字符串 1234567890 追加到 exam1.txt 的末尾;
echo 1234567890 >>exam1.txt

#把/etc/passwd的最后5⾏追加到 exam1.txt 中;
tail -n 5 /etc/passwd >>exam1.txt

# 搜索 /usr 下所有以 xml 结尾的⽂件(不包含⽬录),并把路径中含有"codes"的⽂件路径追加到exam1.txt 中;
find /usr -name "*.xml" | grep codes >>exam1.txt

# 把当前时间按照 年-⽉-⽇ 时:分:秒 的格式追加到 exam1.txt 中。如:2020-11-23 09:32:43;
date +'%Y-%m-%d %H:%M:%S'>>exam1.txt

# 对⽬录 /var/log 进⾏压缩⽣成名为 log.tar.gz ⽂件;
tar -czvf log.tar.gz /var/log

# 通过 ls 命令以⻓格式的形式查看 log.tar.gz 的信息,并把信息追加到 exam1.txt 中;
ls -l log.tar.gz

# 利⽤ awk 命令提取上⼀步中打印的 log.tar.gz 的 ⽂件类型和权限信息 追加到 exam1.txt
中;
ls -l log.tar.gz | awk '{print $1 $2}' >>exam1.txt

# 把 exam1.txt 重命名为 学号.txt 然后提交
mv exam1.txt 2018238907.txt
实验2
要求掌握:
mkdir, touch, cat, head, useradd, userdel, chown, chmod, chgrp, su, ls[-lRSh], ln, rm,
# 登录 root 账号,查看 /tmp ⽬录下是否存在⼦⽬录 myshare,如果没有则建⽴该⽬录;
mkdir myshare

# 在 myshare ⽬录下创建⼀个名为“学号”的⽂件夹和⼀个名为 exam2.txt 的⽂件;
mkdir 201825666
touch exam2.txt

# 创建⼀个名字为 test 的新⽤户,并指定uid为1024;
useradd -u 1024 test

# 把 /etc/passwd 和 /etc/shadow 含有⽤户 test 信息的⾏追加到 exam2.txt ⽂件中;
cat /etc/passwd | grep test >>exam2.txt
cat /etc/shadow | grep test >>exam2.txt

# 把 /etc/passwd 前13⾏的内容 追加到 myshare ⽬录下名为 tmp.txt的⽂件中;
head -n 13 /etc/passwd >>myshare/tmp.txt

# 把 myshare ⽬录下的所有⽂件和⼦⽬录的内容以⻓格式(含权限信息)的⽅式追加到 exam2.txt 中;
ls -lR myshare >>exam2.txt

# 把 myshare ⽬录及其⽬录下的所有⽂件和⼦⽬录的拥有者设置为⽤户 test ,组改为 mail;
chown -R test myshare
chgrp -R mail myshare

# 利⽤su命令切换到⽤户 test 账号;
su test

# 保存 hello.sh 后,给予 hello.sh 拥有者可读、可写和可执⾏的权限,同组可读可执⾏,其他⼈可执⾏权限;
chmod 751 hello.sh

# 以⻓格式的形式查看 hello.sh 的⽂件权限信息,并把输出内容追加到 exam2.txt;
ls -l hello.sh>>exam2.txt

# 输⼊ ./hello.sh 执⾏脚本,查看输出结果。并把输出结果追加 exam2.txt;
./hello.sh >>exam2.txt

# 进⼊⽤户 test 的⽤户主⽬录,在这个⽬录下创建 hello.sh 的软链接,同时拷⻉ hello.sh 到该⽬录下并改名为 hello.sh.bak;
cd /home/test
ln -s /tmp/myshare/hello.sh /home/test/hello.sh
cp /tmp/myshare/hello.sh hello.sh.bak

# 以⻓格式形式查看⽤户 test 主⽬录下的所有⽂件(含隐藏⽂件)并把结果追加到 exam2.txt中;
ls -lRa /home/test >>exam2.txt

# 执⾏⽤户 test 主⽬录下的hello.sh⽂件,查看链接是否正常;
/home/test/hello.sh

# 退出⽤户 test 帐号,回到root帐号
su root

# 以⻓格式形式查看⽤户 test 主⽬录下的所有⽂件(含隐藏⽂件)并把结果追加到 exam2.txt中;
ls -lRa /home/test >>exam2.txt

# 从 /usr 开始查找后缀名为.conf的所有⽂件(不包含⽬录),把输出结果追加到 exam2.txt中;
find /usr -name "*.conf" -type f >>exam2.txt

# 利⽤命令从上⼀步找到的conf⽂件中找出⽂件容量最⼤的⽂件,并把这个⽂件以⻓格式形式追加到exam2.txt 中 ;(倒引号)
ls -lSh `find /usr -name "*.conf" -type f` | head -n 1 >>exam2.txt

# 统计出系统中有多少个⽤户帐号,把数量追加到 exam2.txt 中;
cat /etc/passwd | wc -l >>exam2.txt

# 删除⽤户test 的所有内容(包括主⽬录)
userdel -r test

# 删除/tmp/myshare⽬录
rm -rf /tmp/myshare
实验3
我使用的是 Windows10 下的 WSL-Ubuntu18.04
要求掌握:
# 关闭防火墙
systemctl stop firewall

# 安装并启动telnet服务(xinetd模式);
sudo apt install -y xinetd telnetd
service xinetd start
service xinetd stop
service xinetd restart
vim /etc/xinetd.d/telnet

# 测试 telnet
telnet localhost

# 安装并启动ftp服务(stand alone模式);
sudo apt install -y vsftpd
service xinetd restart
service vsftpd start
ps -ef | grep vsftp

# 创建名为 a+学号 的账号,并在sudoers⽂件中添加该⽤户信息,使得该⽤户可以使⽤sudo命令;
useradd a2018988888
passwd a2018988888
chmod u+w /etc/sudoers
# 增加“a2018988888 ALL=(ALL) ALL”一行

# 利⽤chkconfig命令查看 telnet状态,并把结果追加到 root主⽬录下的 exam3.txt ⽂件中;
chkconfig --list | grep telnet >>exam3.txt

# 把vsftpd的进程信息追加到 exam3.txt ⽂件中(注意去掉grep本身那⼀条记录);
ps -ef | grep vsftpd | grep -v "grep">>exam3.txt

# 把telnet的配置⽂件的内容追加到 exam3.txt 中;
cat /etc/xinetd.d/telnet >>exam3.txt

# 在window命令⾏下,使⽤ a+学号 帐号 telnet 登录linux,把root主⽬录下的 exam3.txt ⽂件复制到当前⽤户的主⽬录下 tmp.txt ,并把 tmp.txt 的所属⽤户和所属组改为当前⽤户和当前⽤户所属的组;
telnet 192.168.1.107
sudo cp exam3.txt /home/jt/tmp.txt
sudo chown jt /home/jt/tmp.txt
sudo chgrp jt /home/jt/tmp.txt

# 在上⼀步的telnet登录中,把当前路径和当前时间追加到 tmp.txt 中;
sudo pwd>>tmp.txt
date +"%H:%M:%S">>tmp.txt

# 在上⼀步的telnet登录中,把/etc/passwd⽂件中的第1、3、4字段内容(⽤户名、uid和gid信息)追加到 tmp.txt 中;


# 在新打开的cmd窗⼝中使⽤ftp命令进⾏匿名登录(⽤户名:ftp,密码为:空);
ftp 192.168.1.107

# 退出ftp⽤户登录
ftp>close
ftp>quit

# 登录成功后,切换到/usr⽬录,并查看⽬录内容。发现⽤户可以访问其他⽬录;
cd /usr

# 修改vsftp的配置⽂件,禁⽌匿名⽤户登录,同时锁定登录⽤户的⽬录,不能进⾏⽬录切换;
mkdir /var/ftp/test
chmod -R 777 /var/ftp/test
touch /var/ftp/test/1.txt
chown -R jt:jt /var/ftp/test
service vsftpd restart

# 然后把hosts⽂件上传到 a+学号 的⽤户主⽬录中;
put hosts /var/ftp/hosts

# 删除 a+学号 ⽤户信息;
userdel -r a2018666666
实验5
例子1:
#!/bin/bash
options_show(){
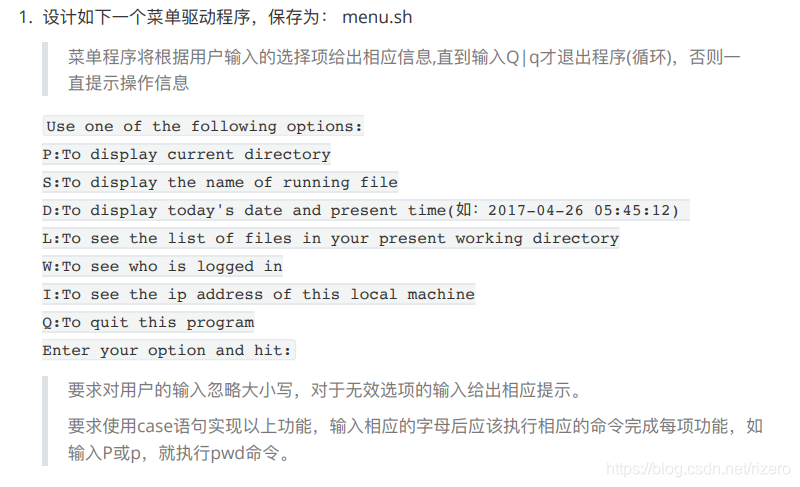
echo "Use one of the following options:"
echo "P:To display current directory"
echo "S:To display the name of running file"
echo "D:To display today's date and present time(如:2017-04-26 05:45:12) "
echo "L:To see the list of files in your present working directory"
echo "W:To see who is logged in"
echo "I:To see the ip address of this local machine"
echo "echo \"Q:To quit this program"
echo "Enter your option and hit:"
}
typeset -l opt
options_show
while read opt
do
case $opt in
"p")
echo `pwd`
;;
"s")
echo $0
;;
"d")
echo `date +"%Y-%m-%d %H:%M:%S"`
;;
"l")
echo `ls .`
;;
"w")
echo `whoami`
;;
"i")
echo `ifconfig`
;;
"q")
break
;;
esac
options_show
done
例子2
#!/bin/bash
show(){
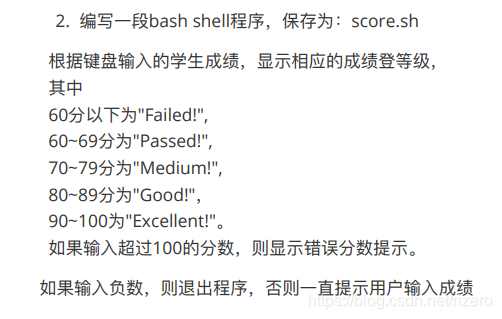
echo "Please input your score:"
}
show
while read score
do
if [ $score -lt 0 ]
then
break
elif [ $score -lt 60 ]
then
echo "Failed"
elif [ $score -ge 60 -a $score -le 69 ]
then
echo "Passed"
elif [ $score -ge 70 -a $score -le 79 ]
then
echo "Medium"
elif [ $score -ge 80 -a $score -le 89 ]
then
echo "Good"
elif [ $score -ge 90 -a $score -le 100 ]
then
echo "Excellent"
fi
show
done
例子3

#!/bin/bash
show(){
    echo "Please input your dir-path:"
}

while read dir
do
    if [ $dir = "q" ]
    then
        break
    fi
    if [ -e $dir ]
    then
        idx=0
        fns=(`ls $dir`) # 这个括号非常重要,可以转成数组
        ls -l $dir | while read x
        do
            if [ $idx == 0 ]
            then
                let idx++
                continue
            else
                echo "/"${fns[$idx-1]}"_"${x:0:1}
                let idx++
            fi
        done
    else
        echo "This path is not exists!"
    fi
    show
done
这里,如果是带有空格的行就需要用read的方式来分割,如果是空格的分割,只需要用数组转换法即可
实验6
例子4
#!/bin/bash
while read opt
do
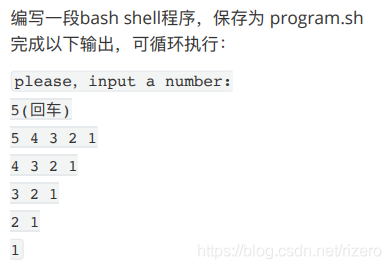
for((i=$opt;i>=1;i--));do
for((j=$i;j>=1;j--));do
echo -n "$j " #不换行
done
echo
done
done
例子5
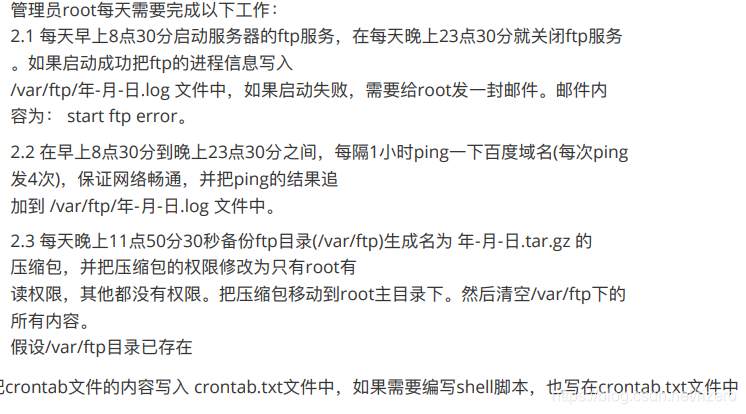
计划任务:
需求1:crontab 30 8 * * * run1.sh 和 crontab 30 23 * * * run2.sh
需求2:crontab 30 8-23/1 * * * run3.sh
需求3:crontab 50 23 * * * run4.sh
需求1:启动和关闭ftp服务:
#!/bin/bash
# run1.sh
systemctl start vsftpd
if [ $?!=0 ];then
	echo "start ftp error" | mail -s "start ftp error" root
else
	pinfo=`ps -ef | grep vsftpd | head -n 1`
	date=`date +"%Y-%m-%d"`
	echo $pinfo>>/var/ftp/${date}.log
fi
#!/bin/bash
# run2.sh
systemctl stop vsftpd
if [ $?!=0 ];then
	echo "Stop ftp error" | mail -s "Stop ftp error" root
fi
需求2:ping Baidu:
#!/bin/bash
# run3.sh
date=`date +"%Y-%m-%d"`
ping -c 4 >>/var/ftp/${date}.log
需求3:打包日志:
#!/bin/bash
# run4.sh
date=`date +"%Y-%m-%d"`
tar -czvf "/root/${date}.tar.gz" /var/ftp
chmod 400 "/root/${date}.tar.gz"
rm -rf /var/ftp/*
实验7
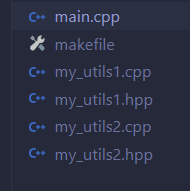
main.cpp
#include "my_utils1.hpp"
#include "my_utils2.hpp"
#include <cstdio>

int main()
{
    my_utils1_print();
    my_utils2_print();
    return 0;
}
my_utils1.cpp
#include <cstdio>

void my_utils1_print(){
    printf("This U1\n");
}
my_utils1.hpp
#ifndef _U1_H
#define _U1_H
void my_utils1_print();
#endif
makefile
main : main.cpp my_utils1.cpp my_utils2.cpp my_utils1.hpp my_utils2.hpp
	gcc -o main $^
执行:
make
makefile的其他写法1:
CC=gcc
CFLAGS=-Wall-c   #-Wall:编译后显示所有警告
OBJS=main.cpp my_utils1.cpp my_utils2.cpp my_utils1.hpp my_utils2.hpp

main : ${OBJS}
	${CC} ${OBJS} -o main #需要注意的是前面必须要tab
makefile的其他写法2:
CC=gcc
CFLAGS=-Wall   #-Wall:编译后显示所有警告
OBJS=main.o my_utils1.o my_utils2.o

main : ${OBJS}
	${CC} ${OBJS} -o main

main.o : main.cpp my_utils1.hpp my_utils2.hpp
	${CC} -c main.cpp

my_utils1.o : my_utils1.cpp my_utils1.hpp
	${CC} -c my_utils1.cpp

my_utils2.o : my_utils2.cpp my_utils2.hpp
	${CC} -c my_utils2.cpp
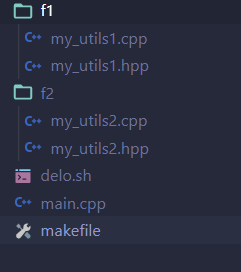
假如目录结构如下:
CC=gcc
OBJS=main.o my_utils1.o my_utils2.o

main : ${OBJS}
	${CC} ${OBJS} -o main

main.o : main.cpp
	${CC} -c main.cpp -If1 -If2

my_utils1.o : f1/my_utils1.cpp f1/my_utils1.hpp
	${CC} -c f1/my_utils1.cpp -If1

my_utils2.o : f2/my_utils2.cpp f2/my_utils2.hpp
	${CC} -c f2/my_utils2.cpp -If2
如果省的记那么多,可以用这个最暴力:
main : main.cpp f1/my_utils1.cpp f2/my_utils2.cpp f1/my_utils1.hpp f2/my_utils2.hpp
	gcc -o main -If1 -If2 $^


 2627
2627


 被折叠的 条评论
为什么被折叠?
被折叠的 条评论
为什么被折叠?
 到【灌水乐园】发言


