


 本文介绍了Linux内核中的input设备驱动,包括字符设备、块设备、网络设备的分类,重点讲述了input设备的特性,如何注册input设备,以及input设备的操作集合。通过实例解释了如何使用input子系统来处理输入设备的事件,如按键、鼠标等,指出input设备的驱动编写相对简单,因为内核已经提供了接口函数。文章以akm8973芯片为例,展示了如何为input设备添加驱动,包括申请设备、设置参数、注册设备及报告事件的过程。
原文链接:https://blog.csdn.net/weixin_55796564/article/details/120435257
Input 设备驱动,操作硬件获取硬件寄存器中设备输入的数据,并把数据交给核心层,本质还是字符设备,
只是比较复杂,不止fileopration,还包括核心层,事件上报,
比如鼠标,就包括usb架构,套上input架构。触摸屏,通过i2c读取数据,就需要注册到i2c架构,套上input架构
开篇前,讲一下,input很复杂,但是对于驱动开发不难,只需调用内核提供的,注册接口,注册input设备,上报事件就行了,
关字符设备那一套fileopration,不需要我们去实现,内核帮我们实现了,刚开始学习时,没有明白,后面明白了,当我们app应用层
read,cat读取数据时,按字符设备那套,是需要我们去实现这个read函数的,但是input架构,不需要我们,内核内部实现了,之所以这样,是统一了接口,不管是鼠标,按键,触摸屏,只需通过report函数,上报数据给内核,内核那套,转给应用read了。
触摸屏是通过i2c read数据的,读出来的数据,转给bufer,report上报上去了,其实也可以是有fileopration的,只是上面套了一层input架构。
需要更明白,可以看下一篇文章,触摸屏驱动架构。
static const struct file_operations evdev_fops = {

       .owner           = THIS_MODULE,
       .read              = evdev_read,
       .write             = evdev_write,
       .poll        	= evdev_poll,
       .open             = evdev_open,
       .release    		= evdev_release,
       .unlocked_ioctl      = evdev_ioctl,
       .compat_ioctl  	= evdev_ioctl_compat,
       .fasync           = evdev_fasync,
       .flush             = evdev_flush
};
一、input子系统
用过linux的都知道,linux所有的设备都是以文件的形式实现的,要访问一个设备,我们只需要以open、read、write的形式对设备的进行操作就可以了。在linux系统的/dev目录下,罗列了当前系统支持的所有设备。运行 ls /dev一下
# ls /dev
fd0         input    ptmx      sg0         tty26  tty53  vcs6
按键、鼠标、键盘、触摸屏等都属于输入(input)设备,Linux内核为此专门做了一个叫做input子系统的框架来处理输入事件。输入设备本质上还是字符设备,只是在此基础上套上了input框架,用户只需要负责上报输入事件,比如按键值、坐标等信息,input核心层负责处理这些事件。本章我们就来学习一下Linux内核中的input子系统。
1 input子系统简
input就是输入的意思,因此input子系统就是管理输入的子系统,和pinctrl、gpio子系统一样,都是Linux内核针对某一类设备而创建的框架。比如按键输入、键盘、鼠标、触摸屏等等这些都属于输入设备,不同的输入设备所代表的含义不同,按键和键盘就是代表按键信息,鼠标和触摸屏代表坐标信息,因此在应用层的处理就不同,对于驱动编写者而言不需要去关心应用层的事情,我们只需要按照要求上报这些输入事件即可。为此input子系统分为input驱动层、input核心层、input事件处理层,最终给用户空间提供可访问的设备节点,input子系统框架如图58.1.1.1所示:
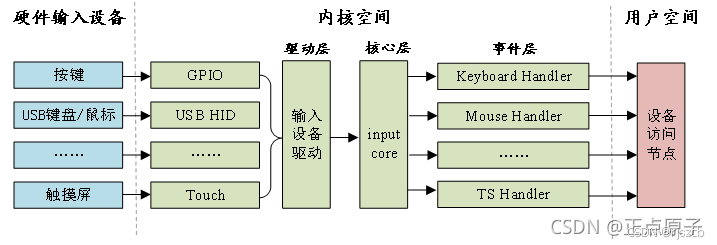
图58.1.1.1中左边就是最底层的具体设备,比如按键、USB键盘/鼠标等,中间部分属于Linux内核空间,分为驱动层、核心层和事件层,最右边的就是用户空间,所有的输入设备以文件的形式供用户应用程序使用。可以看出input子系统用到了我们前面讲解的驱动分层模型,我们编写驱动程序的时候只需要关注中间的驱动层、核心层和事件层,这三个层的分工如下:
驱动层:输入设备的具体驱动程序,比如按键驱动程序,向内核层报告输入内容。
核心层:承上启下,为驱动层提供输入设备注册和操作接口。通知事件层对输入事件进行处理。
事件层:主要和用户空间进行交互。
58.1.2 input驱动编写流程
input核心层会向Linux内核注册一个字符设备,大家找到drivers/input/input.c这个文件,input.c就是input输入子系统的核心层,此文件里面有如下所示代码:
示例代码58.1.2.1 input核心层创建字符设备过程
1767 struct class input_class = {
1768    .name       = "input",
1769    .devnode    = input_devnode,
1770 };
......
2414 static int __init input_init(void)
2415 {
2416    int err;
2417
2418    err = class_register(&input_class);
2419    if (err) {
2420        pr_err("unable to register input_dev class\n");
2421        return err;
2422    }
2423
2424    err = input_proc_init();
2425    if (err)
2426        goto fail1;
2427
2428    err = register_chrdev_region(MKDEV(INPUT_MAJOR, 0),
2429                     INPUT_MAX_CHAR_DEVICES, "input");
2430    if (err) {
2431        pr_err("unable to register char major %d", INPUT_MAJOR);
2432        goto fail2;
2433    }
2434
2435    return 0;
2436
2437  fail2:    input_proc_exit();
2438  fail1:    class_unregister(&input_class);
2439    return err;
2440 }
第2418行,注册一个input类,这样系统启动以后就会在/sys/class目录下有一个input子目录,如图58.1.2.1所示:
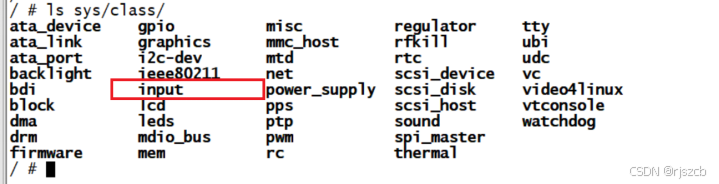
图58.1.2.1 input类
第2428~2429行,注册一个字符设备,主设备号为INPUT_MAJOR,INPUT_MAJOR定义在include/uapi/linux/major.h文件中,定义如下:
#define INPUT_MAJOR 13
因此,input子系统的所有设备主设备号都为13,我们在使用input子系统处理输入设备的时候就不需要去注册字符设备了,我们只需要向系统注册一个input_device即可。
1、注册input_dev
在使用input子系统的时候我们只需要注册一个input设备即可,input_dev结构体表示input设备,此结构体定义在include/linux/input.h文件中,定义如下(有省略):
示例代码58.1.2.2 input_dev结构体
121 struct input_dev {
122     const char *name;
123     const char *phys;
124     const char *uniq;
125     struct input_id id;
126
127     unsigned long propbit[BITS_TO_LONGS(INPUT_PROP_CNT)];
128
129     unsigned long evbit[BITS_TO_LONGS(EV_CNT)];	/* 事件类型的位图 */
130     unsigned long keybit[BITS_TO_LONGS(KEY_CNT)];	/* 按键值的位图	  */
131     unsigned long relbit[BITS_TO_LONGS(REL_CNT)];	/* 相对坐标的位图  */
132     unsigned long absbit[BITS_TO_LONGS(ABS_CNT)];	/* 绝对坐标的位图  */
133     unsigned long mscbit[BITS_TO_LONGS(MSC_CNT)];	/* 杂项事件的位图  */
134     unsigned long ledbit[BITS_TO_LONGS(LED_CNT)];	/*LED相关的位图    */
135     unsigned long sndbit[BITS_TO_LONGS(SND_CNT)];/* sound有关的位图 */
136     unsigned long ffbit[BITS_TO_LONGS(FF_CNT)];	/* 压力反馈的位图  */
137     unsigned long swbit[BITS_TO_LONGS(SW_CNT)]; 	/*开关状态的位图   */
......
189     bool devres_managed;
190 };
第129行,evbit表示输入事件类型,可选的事件类型定义在include/uapi/linux/input.h文件中,事件类型如下:
示例代码58.1.2.3 事件类型
#define EV_SYN          	0x00    /* 同步事件 		*/
#define EV_KEY          	0x01    /* 按键事件 		*/
#define EV_REL          	0x02    /* 相对坐标事件 	*/
#define EV_ABS          	0x03    /* 绝对坐标事件 	*/
#define EV_MSC          	0x04    /* 杂项(其他)事件 	*/
#define EV_SW           	0x05    /* 开关事件 		*/
#define EV_LED          	0x11    /* LED 			*/
#define EV_SND          	0x12    /* sound(声音) 	*/
#define EV_REP          	0x14    /* 重复事件 		*/
#define EV_FF           	0x15    /* 压力事件 		*/
#define EV_PWR          	0x16    /* 电源事件 		*/
#define EV_FF_STATUS    	0x17    /* 压力状态事件 	*/
比如本章我们要使用到按键,那么就需要注册EV_KEY事件,如果要使用连按功能的话还需要注册EV_REP事件。
继续回到示例代码58.1.2.2中,第129行~137行的evbit、keybit、relbit等等都是存放不同事件对应的值。比如我们本章要使用按键事件,因此要用到keybit,keybit就是按键事件使用的位图,Linux内核定义了很多按键值,这些按键值定义在include/uapi/linux/input.h文件中,按键值如下:
示例代码58.1.2.4 按键值
215 #define KEY_RESERVED			0
216 #define KEY_ESC         		1
217 #define KEY_1           		2
218 #define KEY_2           		3
219 #define KEY_3           		4
220 #define KEY_4           		5
221 #define KEY_5           		6
222 #define KEY_6           		7
223 #define KEY_7           		8
224 #define KEY_8           		9
225 #define KEY_9           		10
226 #define KEY_0           		11
......
794 #define BTN_TRIGGER_HAPPY39	0x2e6
795 #define BTN_TRIGGER_HAPPY40	0x2e7
我们可以将开发板上的按键值设置为示例代码58.1.2.4中的任意一个,比如我们本章实验会将I.MX6U-ALPHA开发板上的KEY按键值设置为KEY_0。
在编写input设备驱动的时候我们需要先申请一个input_dev结构体变量,使用input_allocate_device函数来申请一个input_dev,此函数原型如下所示:
struct input_dev *input_allocate_device(void)

函数参数和返回值含义如下:
参数:无。
返回值:申请到的input_dev。
如果要注销的input设备的话需要使用input_free_device函数来释放掉前面申请到的input_dev,input_free_device函数原型如下:
void input_free_device(struct input_dev *dev)

函数参数和返回值含义如下:
dev:需要释放的input_dev。
返回值:无。
申请好一个input_dev以后就需要初始化这个input_dev,需要初始化的内容主要为事件类型(evbit)和事件值(keybit)这两种。input_dev初始化完成以后就需要向Linux内核注册input_dev了,需要用到input_register_device函数,此函数原型如下:
int input_register_device(struct input_dev *dev)

函数参数和返回值含义如下:
dev:要注册的input_dev 。
返回值:0,input_dev注册成功;负值,input_dev注册失败
同样的,注销input驱动的时候也需要使用input_unregister_device函数来注销掉前面注册的input_dev,input_unregister_device函数原型如下:
void input_unregister_device(struct input_dev *dev)

函数参数和返回值含义如下:
dev:要注销的input_dev 。
返回值:无。
综上所述,input_dev注册过程如下:
①、使用input_allocate_device函数申请一个input_dev。
②、初始化input_dev的事件类型以及事件值。
③、使用input_register_device函数向Linux系统注册前面初始化好的input_dev。
④、卸载input驱动的时候需要先使用input_unregister_device函数注销掉注册的input_dev,然后使用input_free_device函数释放掉前面申请的input_dev。
input_dev注册过程示例代码如下所示:
示例代码58.1.2.5 input_dev注册流程
1  struct input_dev *inputdev;      /* input结构体变量 */
2
3  /* 驱动入口函数 */
4  static int __init xxx_init(void)
5  {
6   	......
7   	inputdev = input_allocate_device(); 	/* 申请input_dev 		*/
8   	inputdev->name = "test_inputdev";  		/* 设置input_dev名字 	*/
9
10  	/*********第一种设置事件和事件值的方法***********/
11  	__set_bit(EV_KEY, inputdev->evbit); 	/* 设置产生按键事件 		*/
12  	__set_bit(EV_REP, inputdev->evbit); 	/* 重复事件  			*/
13  	__set_bit(KEY_0, inputdev->keybit); 	/*设置产生哪些按键值 	*/
14  	/************************************************/
15
16  	/*********第二种设置事件和事件值的方法***********/
17  	keyinputdev.inputdev->evbit[0] = BIT_MASK(EV_KEY) | BIT_MASK(EV_REP);
18  	keyinputdev.inputdev->keybit[BIT_WORD(KEY_0)] |= BIT_MASK(KEY_0);
19  	/************************************************/
20
21  	/*********第三种设置事件和事件值的方法***********/
22  	keyinputdev.inputdev->evbit[0] = BIT_MASK(EV_KEY) | BIT_MASK(EV_REP);
23  	input_set_capability(keyinputdev.inputdev, EV_KEY, KEY_0);
24  	/************************************************/
25
26  	/* 注册input_dev */
27  	input_register_device(inputdev);
28  	......
29  	return 0;
30 }
31
32 /* 驱动出口函数 */
33 static void __exit xxx_exit(void)
34 {
35  	input_unregister_device(inputdev);  	/* 注销input_dev 	*/
36  	input_free_device(inputdev);        		/* 删除input_dev 	*/
37 }
第1行,定义一个input_dev结构体指针变量。
第430行,驱动入口函数,在此函数中完成input_dev的申请、设置、注册等工作。第7行调用input_allocate_device函数申请一个input_dev。第1023行都是设置input设备事件和按键值,这里用了三种方法来设置事件和按键值。第27行调用input_register_device函数向Linux内核注册inputdev。
第33~37行,驱动出口函数,第35行调用input_unregister_device函数注销前面注册的input_dev,第36行调用input_free_device函数删除前面申请的input_dev。
2、上报输入事件
当我们向Linux内核注册好input_dev以后还不能高枕无忧的使用input设备,input设备都是具有输入功能的,但是具体是什么样的输入值Linux内核是不知道的,我们需要获取到具体的输入值,或者说是输入事件,然后将输入事件上报给Linux内核。比如按键,我们需要在按键中断处理函数,或者消抖定时器中断函数中将按键值上报给Linux内核,这样Linux内核才能获取到正确的输入值。不同的事件,其上报事件的API函数不同,我们依次来看一下一些常用的事件上报API函数。
首先是input_event函数,此函数用于上报指定的事件以及对应的值,函数原型如下:
void input_event(struct input_dev *dev,unsigned int type,unsigned int code,int value)

函数参数和返回值含义如下:
dev:需要上报的input_dev。
type: 上报的事件类型,比如EV_KEY。
code:事件码,也就是我们注册的按键值,比如KEY_0、KEY_1等等。
value:事件值,比如1表示按键按下,0表示按键松开。
返回值:无。
input_event函数可以上报所有的事件类型和事件值**,Linux内核也提供了其他的针对具体事件的上报函数**,这些函数其实都用到了input_event函数。比如上报按键所使用的input_report_key函数,此函数内容如下:
例代码58.1.2.6 input_report_key函数
static inline void input_report_key(struct input_dev *dev, unsigned int code, int value)
{
    input_event(dev, EV_KEY, code, !!value);
}
从示例代码58.1.2.6可以看出,input_report_key函数的本质就是input_event函数,如果要上报按键事件的话还是建议大家使用input_report_key函数。
同样的还有一些其他的事件上报函数,这些函数如下所示:
void input_report_rel(struct input_dev *dev, unsigned int code, int value)
void input_report_abs(struct input_dev *dev, unsigned int code, int value)
void input_report_ff_status(struct input_dev *dev, unsigned int code, int value)
void input_report_switch(struct input_dev *dev, unsigned int code, int value)
void input_mt_sync(struct input_dev *dev)
当我们上报事件以后还需要使用input_sync函数来告诉Linux内核input子系统上报结束,input_sync函数本质是上报一个同步事件,和我写的一篇文章,按键异步通知,一个道理,类似软中断,数据来了。
此函数原型如下所示:
void input_sync(struct input_dev *dev)
函数参数和返回值含义如下:dev:需要上报同步事件的input_dev。
综上所述,按键的上报事件的参考代码如下所示
示例代码58.1.2.7 事件上报参考代码
1  /* 用于按键消抖的定时器服务函数 */
2  void timer_function(unsigned long arg)
3  {
4   	unsigned char value;
5
6   	value = gpio_get_value(keydesc->gpio);  	/* 读取IO值 	*/
7   	if(value == 0){                         		/* 按下按键 		*/
8       		/* 上报按键值 */
9       		input_report_key(inputdev, KEY_0, 1);	/* 最后一个参数1,按下 */
10      	input_sync(inputdev);               		/*  同步事件 	*/
11  	} else {                                			/* 按键松开 		*/
12      	input_report_key(inputdev, KEY_0, 0);	/* 最后一个参数0,松开 */
13      	input_sync(inputdev);               		/*  同步事件 	*/
14  	}
15 }
第9~10行,如果按键值为0那么表示按键被按下了,如果按键按下的话就要使用input_report_key函数向Linux系统上报按键值,比如向Linux系统通知KEY_0这个按键按下了。
第12~13行,如果按键值为1的话就表示按键没有按下,是松开的。向Linux系统通知KEY_0这个按键没有按下或松开了。
58.1.3 input_event结构体
Linux内核使用input_event这个结构体来表示所有的输入事件,input_envent结构体定义在include/uapi/linux/input.h文件中,结构体内容如下:
示例代码58.1.3.1 input_event结构体
24 struct input_event {
25  	struct timeval time;
26  	__u16 type;
27  	__u16 code;
28  	__s32 value;
29 };
我们依次来看一下input_event结构体中的各个成员变量:
time:时间,也就是此事件发生的时间,为timeval结构体类型,timeval结构体定义如下:
示例代码58.1.3.2 timeval结构体
1 typedef long         	 	__kernel_long_t;
2 typedef __kernel_long_t   	__kernel_time_t;
3 typedef __kernel_long_t  	__kernel_suseconds_t;
4
5 struct timeval {
6   	__kernel_time_t     		tv_sec;   	/* 秒	*/
7   	__kernel_suseconds_t    	tv_usec;  	/* 微秒 	*/
8 };
从示例代码58.1.3.2可以看出,tv_sec和tv_usec这两个成员变量都为long类型,也就是32位,这个一定要记住,后面我们分析event事件上报数据的时候要用到。
type:事件类型,比如EV_KEY,表示此次事件为按键事件,此成员变量为16位。
code:事件码,比如在EV_KEY事件中code就表示具体的按键码,如:KEY_0、KEY_1等等这些按键。此成员变量为16位。
value:值,比如EV_KEY事件中value就是按键值,表示按键有没有被按下,如果为1的话说明按键按下,如果为0的话说明按键没有被按下或者按键松开了。
input_envent这个结构体非常重要,因为所有的输入设备最终都是按照input_event结构体呈现给用户的,用户应用程序可以通过input_event来获取到具体的输入事件或相关的值,比如按键值等。关于input子系统就讲解到这里,接下来我们就以开发板上的KEY0按键为例,讲解一下如何编写input驱动。
3 、实验程序编写
1、 修改设备树文件

2、 按键input驱动程序编写
新建keyinput.c文件,在keyinput.c里面输入如下内容:
示例代码58.3.2.1 keyinput.c文件代码段
1   #include <linux/types.h>
2   #include <linux/kernel.h>
3   #include <linux/delay.h>
4   #include <linux/ide.h>
5   #include <linux/init.h>
6   #include <linux/module.h>
7   #include <linux/errno.h>
8   #include <linux/gpio.h>
9   #include <linux/cdev.h>
10  #include <linux/device.h>
11  #include <linux/of.h>
12  #include <linux/of_address.h>
13  #include <linux/of_gpio.h>
14  #include <linux/input.h>
15  #include <linux/semaphore.h>
16  #include <linux/timer.h>
17  #include <linux/of_irq.h>
18  #include <linux/irq.h>
19  #include <asm/mach/map.h>
20  #include <asm/uaccess.h>
21  #include <asm/io.h>

32  #define KEYINPUT_CNT   	1           	/* 设备号个数  	*/
33  #define KEYINPUT_NAME   	"keyinput"	/* 名字       	*/
34  #define KEY0VALUE       	0X01        /* KEY0按键值	*/
35  #define INVAKEY          	0XFF        /* 无效的按键值 	*/
36  #define KEY_NUM         	1          	/* 按键数量    	*/
37
38  /* 中断IO描述结构体 */
39  struct irq_keydesc {
40      int gpio;                         	/* gpio 			*/
41      int irqnum;                        	/* 中断号     		*/
42      unsigned char value;            	/* 按键对应的键值 	*/
43      char name[10];                   	/* 名字 			*/
44      irqreturn_t (*handler)(int, void *);    /* 中断服务函数 */
45  };
46
47  /* keyinput设备结构体 */
48  struct keyinput_dev{
49      dev_t devid;            	/* 设备号     		*/
50      struct cdev cdev;       	/* cdev     		*/
51      struct class *class;    	/* 类      			*/
52      struct device *device;  	/* 设备    			*/
53      struct device_node  *nd; /* 设备节点 		*/
54      struct timer_list timer;	/* 定义一个定时器	*/
55      struct irq_keydesc irqkeydesc[KEY_NUM]; 	/* 按键描述数组 */
56      unsigned char curkeynum;                		/* 当前的按键号 	*/
57      struct input_dev *inputdev;     				/* input结构体	*/
58  };
59
60  struct keyinput_dev keyinputdev;    /* key input设备 */
61
62  /* @description  		: 中断服务函数,开启定时器,延时10ms,
63   *                   	  定时器用于按键消抖。
64   * @param - irq     	: 中断号
65   * @param - dev_id  	: 设备结构。
66   * @return          	: 中断执行结果
67   */
68  static irqreturn_t key0_handler(int irq, void *dev_id)
69  {
70      struct keyinput_dev *dev = (struct keyinput_dev *)dev_id;
71
72      dev->curkeynum = 0;
73      dev->timer.data = (volatile long)dev_id;
74      mod_timer(&dev->timer, jiffies + msecs_to_jiffies(10));
75      return IRQ_RETVAL(IRQ_HANDLED);
76  }
77
78  /* @description 	: 定时器服务函数,用于按键消抖,定时器到了以后
79   *                	  再次读取按键值,如果按键还是处于按下状态就表示按键有效。
80   * @param - arg 	: 设备结构变量
81   * @return      	: 无
82   */
83  void timer_function(unsigned long arg)
84  {
85      unsigned char value;
86      unsigned char num;
87      struct irq_keydesc *keydesc;
88      struct keyinput_dev *dev = (struct keyinput_dev *)arg;
89
90      num = dev->curkeynum;
91      keydesc = &dev->irqkeydesc[num];
92      value = gpio_get_value(keydesc->gpio);  	/* 读取IO值 	*/
93      if(value == 0){                         		/* 按下按键 		*/
94          /* 上报按键值 */
95          //input_event(dev->inputdev, EV_KEY, keydesc->value, 1);
96          input_report_key(dev->inputdev, keydesc->value, 1);/*1,按下*/
97          input_sync(dev->inputdev);
98      } else {                                    	/* 按键松开 */
99          //input_event(dev->inputdev, EV_KEY, keydesc->value, 0);
100         input_report_key(dev->inputdev, keydesc->value, 0);
101         input_sync(dev->inputdev);
102     }
103 }
104
105 /*
106  * @description 	: 按键IO初始化
107  * @param       	: 无
108  * @return      	: 无
109  */
110 static int keyio_init(void)
111 {
112     unsigned char i = 0;
113     char name[10];
114     int ret = 0;
115
116     keyinputdev.nd = of_find_node_by_path("/key");
117     if (keyinputdev.nd== NULL){
118         printk("key node not find!\r\n");
119         return -EINVAL;
120     }
121
122     /* 提取GPIO */
123     for (i = 0; i < KEY_NUM; i++) {
124         keyinputdev.irqkeydesc[i].gpio =  of_get_named_gpio(keyinputdev.nd,"key-gpio", i);
125         if (keyinputdev.irqkeydesc[i].gpio < 0) {
126             printk("can't get key%d\r\n", i);
127         }
128     }
129
130     /* 初始化key所使用的IO,并且设置成中断模式 */
131     for (i = 0; i < KEY_NUM; i++) {
132         memset(keyinputdev.irqkeydesc[i].name, 0, sizeof(name));
133         sprintf(keyinputdev.irqkeydesc[i].name, "KEY%d", i);
134         gpio_request(keyinputdev.irqkeydesc[i].gpio, name);
135         gpio_direction_input(keyinputdev.irqkeydesc[i].gpio);
136         keyinputdev.irqkeydesc[i].irqnum = irq_of_parse_and_map(keyinputdev.nd, i);
137     }
138     /* 申请中断 */
139     keyinputdev.irqkeydesc[0].handler = key0_handler;
140     keyinputdev.irqkeydesc[0].value = KEY_0;
141
142     for (i = 0; i < KEY_NUM; i++) {
143         ret = request_irq(keyinputdev.irqkeydesc[i].irqnum, keyinputdev.irqkeydesc[i].handler,
144                            IRQF_TRIGGER_FALLING|IRQF_TRIGGER_RISING, keyinputdev.irqkeydesc[i].name, &keyinputdev);
145         if(ret < 0){
146             printk("irq %d request failed!\r\n", keyinputdev.irqkeydesc[i].irqnum);
147             return -EFAULT;
148         }
149     }
150
151     /* 创建定时器 */
152     init_timer(&keyinputdev.timer);
153     keyinputdev.timer.function = timer_function;
154
155     /* 申请input_dev */
156     keyinputdev.inputdev = input_allocate_device();
157     keyinputdev.inputdev->name = KEYINPUT_NAME;
158 #if 0
159     /* 初始化input_dev,设置产生哪些事件 */
160     __set_bit(EV_KEY, keyinputdev.inputdev->evbit); /*按键事件 	*/
161     __set_bit(EV_REP, keyinputdev.inputdev->evbit); /* 重复事件  */
162
163     /* 初始化input_dev,设置产生哪些按键 */
164     __set_bit(KEY_0, keyinputdev.inputdev->keybit);
165 #endif
166
167 #if 0
168     keyinputdev.inputdev->evbit[0] = BIT_MASK(EV_KEY) | BIT_MASK(EV_REP);
169     keyinputdev.inputdev->keybit[BIT_WORD(KEY_0)] |= BIT_MASK(KEY_0);
170 #endif
171
172     keyinputdev.inputdev->evbit[0] = BIT_MASK(EV_KEY) | BIT_MASK(EV_REP);
173     input_set_capability(keyinputdev.inputdev, EV_KEY, KEY_0);
174
175     /* 注册输入设备 */
176     ret = input_register_device(keyinputdev.inputdev);
177     if (ret) {
178         printk("register input device failed!\r\n");
179         return ret;
180     }
181     return 0;
182 }
183
184 /*
185  * @description 	: 驱动入口函数
186  * @param       	: 无
187  * @return      	: 无
188  */
189 static int __init keyinput_init(void)
190 {
191     keyio_init();
192     return 0;
193 }
194
195 /*
196  * @description 	: 驱动出口函数
197  * @param       	: 无
198  * @return      	: 无
199  */
200 static void __exit keyinput_exit(void)
201 {
202     unsigned int i = 0;
203     /* 删除定时器 */
204     del_timer_sync(&keyinputdev.timer);
205
206     /* 释放中断 */
207     for (i = 0; i < KEY_NUM; i++) {
208         free_irq(keyinputdev.irqkeydesc[i].irqnum, &keyinputdev);
209     }
210     /* 释放input_dev */
211     input_unregister_device(keyinputdev.inputdev);
212     input_free_device(keyinputdev.inputdev);
213 }
214
215 module_init(keyinput_init);
216 module_exit(keyinput_exit);
217 MODULE_LICENSE("GPL");
218 MODULE_AUTHOR("zuozhongkai");
keyinput.c文件内容其实就是实验“13_irq”中的imx6uirq.c文件中修改而来的,只是将其中与字符设备有关的内容进行了删除,加入了input_dev相关的内容,我们简单来分析一下示例代码58.3.2.1中的程序。
第57行,在设备结构体中定义一个input_dev指针变量。
第93~102行,在按键消抖定时器处理函数中上报输入事件,也就是使用input_report_key函数上报按键事件以及按键值,最后使用input_sync函数上报一个同步事件,这一步一定得做!
第156~180行,使用input_allocate_device函数申请input_dev,然后设置相应的事件以及事件码(也就是KEY模拟成那个按键,这里我们设置为KEY_0)。最后使用input_register_device函数向Linux内核注册input_dev。
第211~212行,当注销input设备驱动的时候使用input_unregister_device函数注销掉前面注册的input_dev,最后使用input_free_device函数释放掉前面申请的input_dev。
8.3.3 编写测试APP
新建keyinputApp.c文件,然后在里面输入如下所示内容:
示例代码58.3.3.1 keyinputApp.c文件代码段
1  #include "stdio.h"
2  #include "unistd.h"
3  #include "sys/types.h"
4  #include "sys/stat.h"
5  #include "sys/ioctl.h"
6  #include "fcntl.h"
7  #include "stdlib.h"
8  #include "string.h"
9  #include <poll.h>
10 #include <sys/select.h>
11 #include <sys/time.h>
12 #include <signal.h>
13 #include <fcntl.h>
14 #include <linux/input.h>
15 /***************************************************************

27 /* 定义一个input_event变量,存放输入事件信息 */
28 static struct input_event inputevent;
29
30 /*
31  * @description  	: main主程序
32  * @param - argc  	: argv数组元素个数
33  * @param - argv 	: 具体参数
34  * @return        	: 0 成功;其他 失败
35  */
36 int main(int argc, char *argv[])
37 {
38  	int fd;
39  	int err = 0;
40  	char *filename;
41
42  	filename = argv[1];
43
44  	if(argc != 2) {
45      	printf("Error Usage!\r\n");
46      	return -1;
47  	}
48
49  	fd = open(filename, O_RDWR);
50  	if (fd < 0) {
51      	printf("Can't open file %s\r\n", filename);
52      	return -1;
53  	}
54
55 	 	while (1) {
56      	err = read(fd, &inputevent, sizeof(inputevent));
57      	if (err > 0) { /* 读取数据成功 */
58          		switch (inputevent.type) {
59              		case EV_KEY:
60                 	 	if (inputevent.code < BTN_MISC) { /* 键盘键值 */
61                      		printf("key %d %s\r\n", inputevent.code, inputevent.value ? "press" : "release");
62                  		} else {
63                      		printf("button %d %s\r\n", inputevent.code, inputevent.value ? "press" : "release");
64                  		}
65                  		break;
66
67              		/* 其他类型的事件,自行处理 */
68              		case EV_REL:
69                  		break;
70              		case EV_ABS:
71                  		break;
72              		case EV_MSC:
73                  		break;
74              		case EV_SW:
75                  		break;
76          		}
77      	} else {
78          		printf("读取数据失败\r\n");
79      	}
80  	}
81  	return 0;
82 }
第58.1.3小节已经说过了,Linux内核会使用input_event结构体来表示输入事件,所以我们要获取按键输入信息,那么必须借助于input_event结构体。第28行定义了一个inputevent变量,此变量为input_event结构体类型。
第56行,当我们向Linux内核成功注册input_dev设备以后,会在/dev/input目录下生成一个名为“eventX(X=0….n)”的文件,这个/dev/input/eventX就是对应的input设备文件。我们读取这个文件就可以获取到输入事件信息,比如按键值什么的。使用read函数读取输入设备文件,也就是/dev/input/eventX,读取到的数据按照input_event结构体组织起来。获取到输入事件以后(input_event结构体类型)使用switch case语句来判断事件类型,本章实验我们设置的事件类型为EV_KEY,因此只需要处理EV_KEY事件即可。比如获取按键编号(KEY_0的编号为11)、获取按键状态,按下还是松开的?

当前/dev/input目录文件
从图58.4.2.1可以看出,当前/dev/input目录只有event0和mice这两个文件。接下来输入如下命令加载keyinput.ko这个驱动模块。
depmod //第一次加载驱动的时候需要运行此命令
modprobe keyinput.ko //加载驱动模块
当驱动模块加载成功以后再来看一下/dev/input目录下有哪些文件,结果如图58.4.2.2所示:

从图58.4.2.2可以看出,多了一个event1文件,因此/dev/input/event1就是我们注册的驱动所对应的设备文件。keyinputApp就是通过读取/dev/input/event1这个文件来获取输入事件信息的,输入如下测试命令:
./keyinputApp /dev/input/event1
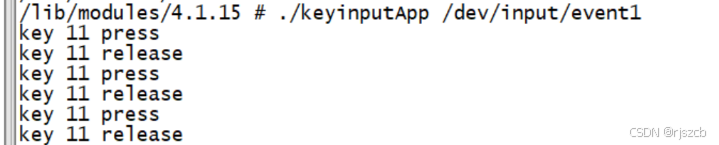
从图58.4.2.3可以看出,当我们按下或者释放开发板上的按键以后都会在终端上输出相应的内容,提示我们哪个按键按下或释放了,在Linux内核中KEY_0为11。
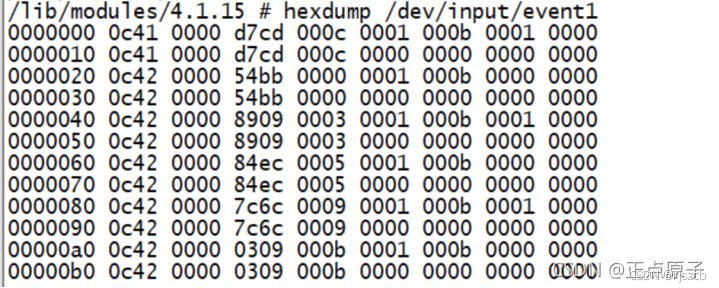
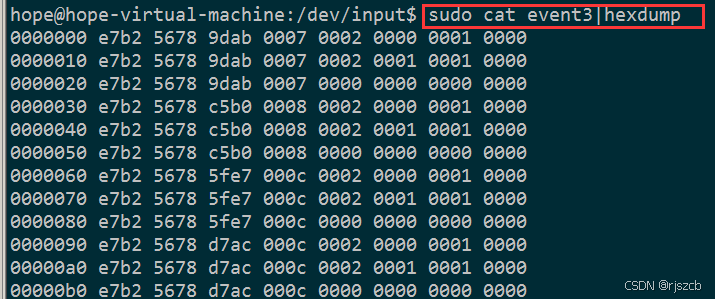
另外,我们也可以不用keyinputApp来测试驱动,可以直接使用hexdump命令来查看/dev/input/event1文件内容,输入如下命令:
hexdump /dev/input/event1
然后按下按键,终端输出如图58.4.2.4所示信息:
58.5 Linux自带按键驱动程序的使用
58.5.1 自带按键驱动程序源码简析
Linux内核也自带了KEY驱动,如果要使用内核自带的KEY驱动的话需要配置Linux内核,不过Linux内核一般默认已经使能了KEY驱动,但是我们还是要检查一下。按照如下路径找到相应的配置选项:
-> Device Drivers
-> Input device support
-> Generic input layer (needed for keyboard, mouse, …) (INPUT [=y])
-> Keyboards (INPUT_KEYBOARD [=y])
->GPIO Buttons
选中“GPIO Buttons”选项,将其编译进Linux内核中,如图58.5.1.1所示:
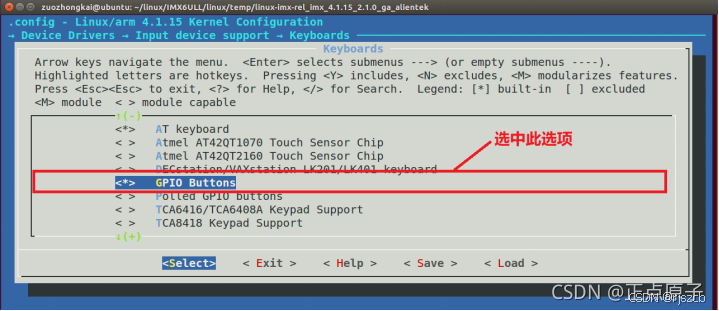
图58.5.1.1 内核自带KEY驱动使能选项
选中以后就会在.config文件中出现“CONFIG_KEYBOARD_GPIO=y”这一行,Linux内核就会根据这一行来将KEY驱动文件编译进Linux内核。Linux内核自带的KEY驱动文件为drivers/input/keyboard/gpio_keys.c,gpio_keys.c采用了platform驱动框架,在KEY驱动上使用了input子系统实现。在gpio_keys.c文件中找到如下所示内容:
示例代码58.5.1.1 gpio_keys文件代码段
673 static const struct of_device_id gpio_keys_of_match[] = {
674     { .compatible = "gpio-keys", },
675     { },
676 };
......
842 static struct platform_driver gpio_keys_device_driver = {
843     .probe      = gpio_keys_probe,
844     .remove     = gpio_keys_remove,
845     .driver     = {
846         .name   = "gpio-keys",
847         .pm = &gpio_keys_pm_ops,
848         .of_match_table = of_match_ptr(gpio_keys_of_match),
849     }
850 };
851
852 static int __init gpio_keys_init(void)
853 {
854     return platform_driver_register(&gpio_keys_device_driver);
855 }
856
857 static void __exit gpio_keys_exit(void)
858 {
859     platform_driver_unregister(&gpio_keys_device_driver);
860 }
从示例代码58.5.1.1可以看出,这就是一个标准的platform驱动框架,如果要使用设备树来描述KEY设备信息的话,设备节点的compatible属性值要设置为“gpio-keys”。当设备和驱动匹配以后gpio_keys_probe函数就会执行,gpio_keys_probe函数内容如下(为了篇幅有缩减):
示例代码58.5.1.2 gpio_keys_probe函数代码段
689 static int gpio_keys_probe(struct platform_device *pdev)
690 {
691     struct device *dev = &pdev->dev;
692     const struct gpio_keys_platform_data *pdata =
dev_get_platdata(dev);
693     struct gpio_keys_drvdata *ddata;
694     struct input_dev *input;
695     size_t size;
696     int i, error;
697     int wakeup = 0;
698
699     if (!pdata) {
700         pdata = gpio_keys_get_devtree_pdata(dev);
701         if (IS_ERR(pdata))
702             return PTR_ERR(pdata);
703     }
......
713     input = devm_input_allocate_device(dev);
714     if (!input) {
715         dev_err(dev, "failed to allocate input device\n");
716         return -ENOMEM;
717     }
718
719     ddata->pdata = pdata;
720     ddata->input = input;
721     mutex_init(&ddata->disable_lock);
722
723     platform_set_drvdata(pdev, ddata);
724     input_set_drvdata(input, ddata);
725
726     input->name = pdata->name ? : pdev->name;
727     input->phys = "gpio-keys/input0";
728     input->dev.parent = &pdev->dev;
729     input->open = gpio_keys_open;
730     input->close = gpio_keys_close;
731
732     input->id.bustype = BUS_HOST;
733     input->id.vendor = 0x0001;
734     input->id.product = 0x0001;
735     input->id.version = 0x0100;
736
737     /* Enable auto repeat feature of Linux input subsystem */
738     if (pdata->rep)
739         __set_bit(EV_REP, input->evbit);
740
741     for (i = 0; i < pdata->nbuttons; i++) {
742         const struct gpio_keys_button *button = &pdata->buttons[i];
743         struct gpio_button_data *bdata = &ddata->data[i];
744
745         error = gpio_keys_setup_key(pdev, input, bdata, button);
746         if (error)
747             return error;
748
749         if (button->wakeup)
750             wakeup = 1;
751     }
......
760     error = input_register_device(input);
761     if (error) {
762         dev_err(dev, "Unable to register input device, error: %d\n",
763             error);
764         goto err_remove_group;
765     }
......
774 }
第700行,调用gpio_keys_get_devtree_pdata函数从设备树中获取到KEY相关的设备节点信息。
第713行,使用devm_input_allocate_device函数申请input_dev。
第726~735,初始化input_dev。
第739行,设置input_dev事件,这里设置了EV_REP事件。
第745行,调用gpio_keys_setup_key函数继续设置KEY,此函数会设置input_dev的EV_KEY事件已经事件码(也就是KEY模拟为哪个按键)。
第760行,调用input_register_device函数向Linux系统注册input_dev。
我们接下来再来看一下gpio_keys_setup_key函数,此函数内容如下:
示例代码58.5.1.3 gpio_keys_setup_key函数代码段
437 static int gpio_keys_setup_key(struct platform_device *pdev,
438                 struct input_dev *input,
439                 struct gpio_button_data *bdata,
440                 const struct gpio_keys_button *button)
441 {
442     const char *desc = button->desc ? button->desc : "gpio_keys";
443     struct device *dev = &pdev->dev;
444     irq_handler_t isr;
445     unsigned long irqflags;
446     int irq;
447     int error;
448
449     bdata->input = input;
450     bdata->button = button;
451     spin_lock_init(&bdata->lock);
452
453     if (gpio_is_valid(button->gpio)) {
454
455         error = devm_gpio_request_one(&pdev->dev, button->gpio,
456                           GPIOF_IN, desc);
457         if (error < 0) {
458             dev_err(dev, "Failed to request GPIO %d, error %d\n",
459                 button->gpio, error);
460             return error;
......
488         isr = gpio_keys_gpio_isr;
489         irqflags = IRQF_TRIGGER_RISING | IRQF_TRIGGER_FALLING;
490
491     } else {
492         if (!button->irq) {
493             dev_err(dev, "No IRQ specified\n");
494             return -EINVAL;
495         }
496         bdata->irq = button->irq;
......
506
507         isr = gpio_keys_irq_isr;
508         irqflags = 0;
509     }
510
511     input_set_capability(input, button->type ?: EV_KEY, button->code);
......
540     return 0;
541 }
第511行,调用input_set_capability函数设置EV_KEY事件以及KEY的按键类型,也就是KEY作为哪个按键?我们会在设备树里面设置指定的KEY作为哪个按键。
一切都准备就绪以后剩下的就是等待按键按下,然后向Linux内核上报事件,事件上报是在gpio_keys_irq_isr函数中完成的,此函数内容如下:
示例代码58.5.1.4 gpio_keys_irq_isr函数代码段
392 static irqreturn_t gpio_keys_irq_isr(int irq, void *dev_id)
393 {
394     struct gpio_button_data *bdata = dev_id;
395     const struct gpio_keys_button *button = bdata->button;
396     struct input_dev *input = bdata->input;
397     unsigned long flags;
398
399     BUG_ON(irq != bdata->irq);
400
401     spin_lock_irqsave(&bdata->lock, flags);
402
403     if (!bdata->key_pressed) {
404         if (bdata->button->wakeup)
405             pm_wakeup_event(bdata->input->dev.parent, 0);
406
407         input_event(input, EV_KEY, button->code, 1);
408         input_sync(input);
409
410         if (!bdata->release_delay) {
411             input_event(input, EV_KEY, button->code, 0);
412             input_sync(input);
413             goto out;
414         }
415
416         bdata->key_pressed = true;
417     }
418
419     if (bdata->release_delay)
420         mod_timer(&bdata->release_timer,
421             jiffies + msecs_to_jiffies(bdata->release_delay));
422 out:
423     spin_unlock_irqrestore(&bdata->lock, flags);
424     return IRQ_HANDLED;
425 }
gpio_keys_irq_isr是按键中断处理函数,第407行向Linux系统上报EV_KEY事件,表示按键按下。第408行使用input_sync函数向系统上报EV_REP同步事件。
综上所述,Linux内核自带的gpio_keys.c驱动文件思路和我们前面编写的keyinput.c驱动文件基本一致。都是申请和初始化input_dev,设置事件,向Linux内核注册input_dev。最终在按键中断服务函数或者消抖定时器中断服务函数中上报事件和按键值。
58.5.2 自带按键驱动程序的使用
要使用Linux内核自带的按键驱动程序很简单,只需要根据Documentation/devicetree/bindings/input/gpio-keys.txt这个文件在设备树中添加指定的设备节点即可,节点要求如下:
①、节点名字为“gpio-keys”。
②、gpio-keys节点的compatible属性值一定要设置为“gpio-keys”。
③、所有的KEY都是gpio-keys的子节点,每个子节点可以用如下属性描述自己:
gpios:KEY所连接的GPIO信息。
interrupts:KEY所使用GPIO中断信息,不是必须的,可以不写。
label:KEY名字
linux,code:KEY要模拟的按键,也就是示例代码58.1.2.4中的这些按键。
④、如果按键要支持连按的话要加入autorepeat。
打开imx6ull-alientek-emmc.dts,根据上面的要求创建对应的设备节点,设备节点内容如下所示:
示例代码58.5.2.1 gpio-keys节点内容
1  gpio-keys {
2      compatible = "gpio-keys";
3      #address-cells = <1>;
4      #size-cells = <0>;
5      autorepeat;
6      key0 {
7          label = "GPIO Key Enter";
8          linux,code = <KEY_ENTER>;
9          gpios = <&gpio1 18 GPIO_ACTIVE_LOW>;
10     };
11 };
第5行,autorepeat表示按键支持连按。
第6~10行,ALPHA开发板KEY按键信息,名字设置为“GPIO Key Enter”,这里我们将开发板上的KEY按键设置为“EKY_ENTER”这个按键,也就是回车键,效果和键盘上的回车键一样。后面学习LCD驱动的时候需要用到此按键,因为Linux内核设计的10分钟以后LCD关闭,也就是黑屏,就跟我们用电脑或者手机一样,一定时间以后关闭屏幕。这里将开发板上的KEY按键注册为回车键,当LCD黑屏以后直接按一下KEY按键即可唤醒屏幕,就跟当电脑熄屏以后按下回车键即可重新打开屏幕一样。
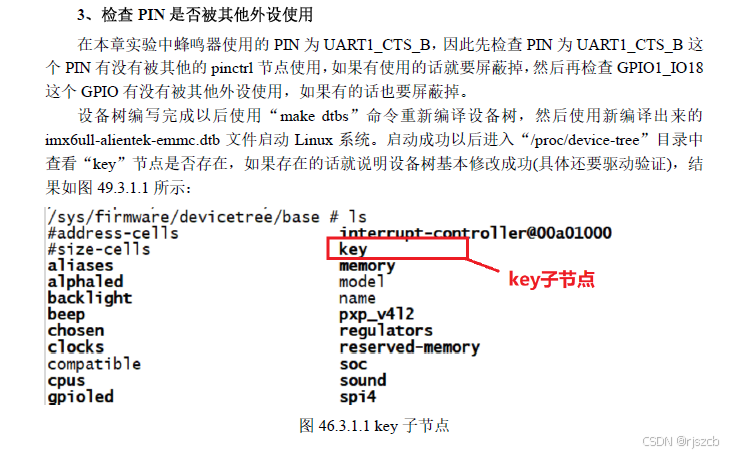
最后设置KEY所使用的IO为GPIO1_IO18,一定要检查一下设备树看看此GPIO有没有被用到其他外设上,如果有的话要删除掉相关代码!
重新编译设备树,然后用新编译出来的imx6ull-alientek-emmc.dtb启动Linux系统,系统启动以后查看/dev/input目录,看看都有哪些文件,和上面一样了。
三、其他文章总结学习
Input 设备驱动,操作硬件获取硬件寄存器中设备输入的数据,并把数据交给核心层,本质还是字符设备,只是比较复杂,不止fileopration
比如鼠标,就包括usb架构,套上input架构。触摸屏,通过i2c读取数据,就需要注册到i2c架构,套上input架构
1 、设备驱动的注册步骤:
1、分配一个struct input_dev :
2、 初始化 input_dev 这个结构体 :
3、 注册这个input_dev 设备:
Input_register_device(dev);
4、 在input设备发生输入操作时,提交所发生的事件及键值、坐标等信息:
Input_report_abs()///报告X,y的坐标值
Input_report_key()///报告触摸屏的状态,是否被按下
Input_sync () ///表示提交一个完整的报告,这样linux内核就知道哪几个数据组合起来代表一个事件
2、Linux 中输入事件的类型:
EV_SYN 0X00 同步事件
EV_KEY 0X01 按键事件
EV_REL 0X02 相对坐标
EV_ABS 0X03 绝对坐标
3、关键程序片段(以USB鼠标为例:drivers\hid\usbhid\usbmouse.c)
1、 module_usb_driver(usb_mouse_driver);///系统启动时注册usb_mouse_driver (在usb架构中实现)
2、 usb_mouse_probe (设备初始化,usbmouse 属于usb设备,匹配成功后注册input设备)
3、 input_register_device(mouse->dev); 注册设备驱动
4、 input_attach_handler(dev, handler);///遍历所有的input_handler,并与 dev 进行匹配
usbmouse除了可以和evdev_handler 匹配成功,还和mousedev_handler 匹配成功,所以会分别调用evdev_handler的connect 函数创建event 节点和 mousedev_handler 的connect创建mouse节点
5、 input_match_device(handler, dev);///---->handler 和 device 进行真正的匹配(通过id_table 进行匹配)
6、 handler->connect(handler, dev, id);///匹配成功调用handler的connect 函数
7、 evdev_connect()///将创建 event(0、1、2…)节点
8、 mousedev_connect()///将创建 mouse(0、1、2…)节点
9、 mousedev_create()
10、cdev_init(&mousedev->cdev, &mousedev_fops);
11、usb_mouse_irq()///最终的数据在中断里面获取到,并保存到mouse –>data 里面
12、input_report_key\ input_report_rel\ input_sync ///报告按键信息
13、input_event
14、input_handle_event(dev, type, code, value)
15、input_pass_values(dev, dev->vals, dev->num_vals);
16 、input_to_handler(handle, vals, count);
17、handler->event(handle, v->type, v->code, v->value);
static struct usb_driver usb_mouse_driver = {
     .name        = "usbmouse",
     .probe        = usb_mouse_probe,///当有新的usbmouse加入时,系统会进行匹配,匹配成功后则调用probe函数,完成设备的初始化
     .disconnect    = usb_mouse_disconnect,
     .id_table    = usb_mouse_id_table,
 };

module_usb_driver(usb_mouse_driver);///系统启动时module_usb_driver注册usb_mouse_driver
static int usb_mouse_probe(struct usb_interface *intf, const struct usb_device_id *id)
{
    struct usb_device *dev = interface_to_usbdev(intf);
    struct usb_host_interface *interface;
    struct usb_endpoint_descriptor *endpoint;
    struct usb_mouse *mouse;
    struct input_dev *input_dev;
    int pipe, maxp;
    int error = -ENOMEM;

    interface = intf->cur_altsetting;

    if (interface->desc.bNumEndpoints != 1)
        return -ENODEV;

    endpoint = &interface->endpoint[0].desc;
    if (!usb_endpoint_is_int_in(endpoint))
        return -ENODEV;

    pipe = usb_rcvintpipe(dev, endpoint->bEndpointAddress);
    maxp = usb_maxpacket(dev, pipe, usb_pipeout(pipe));

    mouse = kzalloc(sizeof(struct usb_mouse), GFP_KERNEL);
    input_dev = input_allocate_device();
    if (!mouse || !input_dev)
        goto fail1;

    mouse->data = usb_alloc_coherent(dev, 8, GFP_ATOMIC, &mouse->data_dma);
    if (!mouse->data)
        goto fail1;

    mouse->irq = usb_alloc_urb(0, GFP_KERNEL);
    if (!mouse->irq)
        goto fail2;

    mouse->usbdev = dev;
    mouse->dev = input_dev;

    if (dev->manufacturer)
        strlcpy(mouse->name, dev->manufacturer, sizeof(mouse->name));

    if (dev->product) {
        if (dev->manufacturer)
            strlcat(mouse->name, " ", sizeof(mouse->name));
        strlcat(mouse->name, dev->product, sizeof(mouse->name));
    }

    if (!strlen(mouse->name))
        snprintf(mouse->name, sizeof(mouse->name),
             "USB HIDBP Mouse %04x:%04x",
             le16_to_cpu(dev->descriptor.idVendor),
             le16_to_cpu(dev->descriptor.idProduct));

    usb_make_path(dev, mouse->phys, sizeof(mouse->phys));
    strlcat(mouse->phys, "/input0", sizeof(mouse->phys));

    input_dev->name = mouse->name;
    input_dev->phys = mouse->phys;
    usb_to_input_id(dev, &input_dev->id);
    input_dev->dev.parent = &intf->dev;

    evbit 关于设备支持事件类型的 bitmap
    input_dev->evbit[0] = BIT_MASK(EV_KEY) | BIT_MASK(EV_REL); ///BIT_MASK 找到参数值所在的 bit位
    input_dev->keybit[BIT_WORD(BTN_MOUSE)] = BIT_MASK(BTN_LEFT) | ///鼠标支持左键、右键、中键三个按键
        BIT_MASK(BTN_RIGHT) | BIT_MASK(BTN_MIDDLE);
    input_dev->relbit[0] = BIT_MASK(REL_X) | BIT_MASK(REL_Y); ///REL_X REL_Y 表示鼠标的位置信息
    input_dev->keybit[BIT_WORD(BTN_MOUSE)] |= BIT_MASK(BTN_SIDE) | ///在已有按键的基础上加上一个边键和一个而外的键
        BIT_MASK(BTN_EXTRA);
    input_dev->relbit[0] |= BIT_MASK(REL_WHEEL);///给相对事件加上滚轮的事件

    input_set_drvdata(input_dev, mouse);

    input_dev->open = usb_mouse_open;
    input_dev->close = usb_mouse_close;

    usb_fill_int_urb(mouse->irq, dev, pipe, mouse->data,
             (maxp > 8 ? 8 : maxp),
             usb_mouse_irq, mouse, endpoint->bInterval);
    mouse->irq->transfer_dma = mouse->data_dma;
    mouse->irq->transfer_flags |= URB_NO_TRANSFER_DMA_MAP;

    error = input_register_device(mouse->dev);
    if (error)
        goto fail3;

    usb_set_intfdata(intf, mouse);
    return 0;

fail3:
    usb_free_urb(mouse->irq);
fail2:
    usb_free_coherent(dev, 8, mouse->data, mouse->data_dma);
fail1:
    input_free_device(input_dev);
    kfree(mouse);
    return error;
}
int input_register_device(struct input_dev *dev)
{
    struct input_devres *devres = NULL;
    struct input_handler *handler;
    unsigned int packet_size;
    const char *path;
    int error;

    if (dev->devres_managed) {
        devres = devres_alloc(devm_input_device_unregister,
                      sizeof(struct input_devres), GFP_KERNEL);
        if (!devres)
            return -ENOMEM;

        devres->input = dev;
    }

    /* Every input device generates EV_SYN/SYN_REPORT events. */
    __set_bit(EV_SYN, dev->evbit);

    /* KEY_RESERVED is not supposed to be transmitted to userspace. */
    __clear_bit(KEY_RESERVED, dev->keybit);

    /* Make sure that bitmasks not mentioned in dev->evbit are clean. */
    input_cleanse_bitmasks(dev);

    packet_size = input_estimate_events_per_packet(dev);
    if (dev->hint_events_per_packet < packet_size)
        dev->hint_events_per_packet = packet_size;

    dev->max_vals = dev->hint_events_per_packet + 2;
    dev->vals = kcalloc(dev->max_vals, sizeof(*dev->vals), GFP_KERNEL);
    if (!dev->vals) {
        error = -ENOMEM;
        goto err_devres_free;
    }

    /*
     * If delay and period are pre-set by the driver, then autorepeating
     * is handled by the driver itself and we don't do it in input.c.
     */
    if (!dev->rep[REP_DELAY] && !dev->rep[REP_PERIOD]) {
        dev->timer.data = (long) dev;
        dev->timer.function = input_repeat_key;
        dev->rep[REP_DELAY] = 250;
        dev->rep[REP_PERIOD] = 33;
    }

    if (!dev->getkeycode)
        dev->getkeycode = input_default_getkeycode;

    if (!dev->setkeycode)
        dev->setkeycode = input_default_setkeycode;

    error = device_add(&dev->dev);
    if (error)
        goto err_free_vals;

    path = kobject_get_path(&dev->dev.kobj, GFP_KERNEL);
    pr_info("%s as %s\n",
        dev->name ? dev->name : "Unspecified device",
        path ? path : "N/A");
    kfree(path);

    error = mutex_lock_interruptible(&input_mutex);
    if (error)
        goto err_device_del;

    list_add_tail(&dev->node, &input_dev_list);

    list_for_each_entry(handler, &input_handler_list, node)
        input_attach_handler(dev, handler);遍历所有的input_handler,并与 dev 进行匹配

    input_wakeup_procfs_readers();

    mutex_unlock(&input_mutex);

    if (dev->devres_managed) {
        dev_dbg(dev->dev.parent, "%s: registering %s with devres.\n",
            __func__, dev_name(&dev->dev));
        devres_add(dev->dev.parent, devres);
    }
    return 0;

err_device_del:
    device_del(&dev->dev);
err_free_vals:
    kfree(dev->vals);
    dev->vals = NULL;
err_devres_free:
    devres_free(devres);
    return error;
}
1、字符设备结构体
struct file_operations {
      struct module *owner;
       loff_t (*llseek) (struct file *, loff_t, int);
       ssize_t (*read) (struct file *, char __user *, size_t, loff_t *);
       ssize_t (*write) (struct file *, const char __user *, size_t, loff_t *);
       ssize_t (*aio_read) (struct kiocb *, const struct iovec *, unsigned long, loff_t);
       ssize_t (*aio_write) (struct kiocb *, const struct iovec *, unsigned long, loff_t);
       int (*readdir) (struct file *, void *, filldir_t);
       unsigned int (*poll) (struct file *, struct poll_table_struct *);
       int (*ioctl) (struct inode *, struct file *, unsigned int, unsigned long);
       long (*unlocked_ioctl) (struct file *, unsigned int, unsigned long);
       long (*compat_ioctl) (struct file *, unsigned int, unsigned long);
       int (*mmap) (struct file *, struct vm_area_struct *);
       int (*open) (struct inode *, struct file *);
       int (*flush) (struct file *, fl_owner_t id);
       int (*release) (struct inode *, struct file *);
       int (*fsync) (struct file *, struct dentry *, int datasync);
       int (*aio_fsync) (struct kiocb *, int datasync);
       int (*fasync) (int, struct file *, int);
       int (*lock) (struct file *, int, struct file_lock *);
       ssize_t (*sendpage) (struct file *, struct page *, int, size_t, loff_t *, int);
       unsigned long (*get_unmapped_area)(struct file *, unsigned long, unsigned long, unsigned long, unsigned long);
       int (*check_flags)(int);
       int (*flock) (struct file *, int, struct file_lock *);
       ssize_t (*splice_write)(struct pipe_inode_info *, struct file *, loff_t *, size_t, unsigned int);
       ssize_t (*splice_read)(struct file *, loff_t *, struct pipe_inode_info *, size_t, unsigned int);
       int (*setlease)(struct file *, long, struct file_lock **);
};
鼠标对应的事件驱动为mouse1 和event3,因为它和两个事件驱动匹配成功;
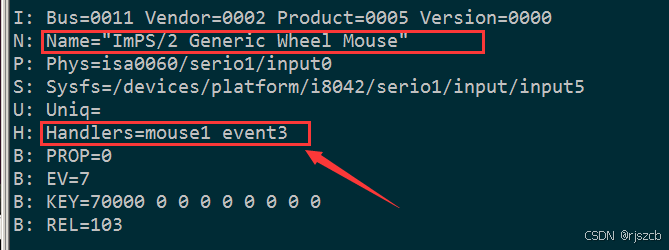
Event 节点里面存放的数据都是没有经过处理的原始数据流,通过命令
c
a
t
e
v
e
n
t
3
可以看到鼠标输入的数据,但是
m
o
u
s
e
节点里面的数据是经过处理的有结构的数据,直接对应鼠标点击或滑动的具体坐标,应用程序可以直接读取使用,可以通过命令
cat event3可以看到鼠标输入的数据,但是mouse 节点里面的数据是经过处理的有结构的数据,直接对应鼠标点击或滑动的具体坐标,应用程序可以直接读取使用,可以通过命令
catevent3可以看到鼠标输入的数据,但是mouse节点里面的数据是经过处理的有结构的数据,直接对应鼠标点击或滑动的具体坐标,应用程序可以直接读取使用,可以通过命令cat mouse1可以看到鼠标输入的数据
为例,来简单看一下写一个input设备我们需要做的工作。
首先,在驱动模块加载函数中申请一个input设备,并告知input子系统它支持哪些事件,如下所示:
akm->input_dev = input_allocate_device();
set_bit(EV_ABS, akm->input_dev->evbit);
input_set_abs_params(akm->input_dev, ABS_RX, 0, 23040, 0, 0);
input_set_abs_params(akm->input_dev, ABS_RY, -11520, 11520, 0, 0);
input_set_abs_params(akm->input_dev, ABS_RZ, -5760, 5760, 0, 0);
input_set_abs_params(akm->input_dev, ABS_THROTTLE, -30, 85, 0, 0);
input_set_abs_params(akm->input_dev, ABS_RUDDER, 0, 3, 0, 0);
input_set_abs_params(akm->input_dev, ABS_HAT0X, -2048, 2032, 0, 0);
input_set_abs_params(akm->input_dev, ABS_HAT0Y, -2048, 2032, 0, 0);
input_set_abs_params(akm->input_dev, ABS_BRAKE, -2048, 2032, 0, 0);
以上这些都是为让input子系统支持的某些参数而设置的,EV_ABS表示支持绝对值坐标,后面都是针对这些坐标的一些参数访问范围设置。至于为什么这样设置,我们继续往下走,到后面我们就明白了。
接着,在驱动模块函数中注册输入设备:
err = input_register_device(akm->input_dev);
然后,报告发生的一些事件以及对应的坐标。
input_report_abs(data->input_dev, ABS_RX, rbuf[0]);
input_report_abs(data->input_dev, ABS_RY, rbuf[1]);
input_report_abs(data->input_dev, ABS_RZ, rbuf[2]);
对应的三个方向的坐标值就被驱动记录下来了。
深入里面跟踪一下:
static inline void input_set_abs_params(struct input_dev *dev, int axis, int min, int max, int fuzz, int flat)
{
       dev->absmin[axis] = min;
       dev->absmax[axis] = max;
       dev->absfuzz[axis] = fuzz;
       dev->absflat[axis] = flat;
       dev->absbit[BIT_WORD(axis)] |= BIT_MASK(axis);
}
这个函数用来干嘛的呢?这个留到以后讲,不过你得多个心眼,后面用得到的。
添加一个input设备,我们要做的工作就这些了。
接下来我们就可以通过input内核子系统提供的接口函数来处理这些坐标值,把把他们传到用户空间。
从前一节来看,在linux内核中添加一个input设备变得很简单了。我们再也不必须去动手写那些接口函数。linux内核中的input core都已经做好。核源码目录linux-2.6.29/drivers/input/input.c文件
1、input_dev
定义于linux-2.6.29/include/linux/input.h中
struct input_dev {
	const char *name;
	const char *phys;
	const char *uniq;
	struct input_id id;
	unsigned long evbit[BITS_TO_LONGS(EV_CNT)];
	unsigned long keybit[BITS_TO_LONGS(KEY_CNT)];
	unsigned long relbit[BITS_TO_LONGS(REL_CNT)];
	unsigned long absbit[BITS_TO_LONGS(ABS_CNT)];
	unsigned long mscbit[BITS_TO_LONGS(MSC_CNT)];
	unsigned long ledbit[BITS_TO_LONGS(LED_CNT)];
	unsigned long sndbit[BITS_TO_LONGS(SND_CNT)];
	unsigned long ffbit[BITS_TO_LONGS(FF_CNT)];
	unsigned long swbit[BITS_TO_LONGS(SW_CNT)];
	unsigned int keycodemax;
	unsigned int keycodesize;
	void *keycode;
	int (*setkeycode)(struct input_dev *dev, int scancode, int keycode);
	int (*getkeycode)(struct input_dev *dev, int scancode, int *keycode);
	stuct ff_device *ff;
	unsigned int repeat_key;
	struct timer_list timer;
	int sync;
	int abs[ABS_MAX + 1];
	int rep[REP_MAX + 1];
	unsigned long key[BITS_TO_LONGS(KEY_CNT)];
	unsigned long led[BITS_TO_LONGS(LED_CNT)];
	unsigned long snd[BITS_TO_LONGS(SND_CNT)];
	unsigned long sw[BITS_TO_LONGS(SW_CNT)];
	int absmax[ABS_MAX + 1];
	int absmin[ABS_MAX + 1];
	int absfuzz[ABS_MAX + 1];
	int absflat[ABS_MAX + 1];
	int (*open)(struct input_dev *dev);
	void (*close)(struct input_dev *dev);
	int (*flush)(struct input_dev *dev, struct file *file);
	int (*event)(struct input_dev *dev, unsigned int type, unsigned int code, int value);
	struct input_handle *grab;
	spinlock_t event_lock;
	struct mutex mutex;
	unsigned int users;
	int going_away;
	struct device dev;
	struct list_head  h_list;
	struct list_head  node;
};
很强大的一个结构体,因为她把所有的input设备的信息都考虑到了,真的是很无私。不过对于我们的akm驱动来说只需要关注几个小细节,
表示此input设备支持的事件
unsigned longevbit[BITS_TO_LONGS(EV_CNT)]
设置input_dev->evbit中的相应位让它支持绝对值坐标。
set_bit(EV_ABS, akm->input_dev->evbit)
类似的还有以下这些事件:
EV_KEY -按键,
EV_REL -相对坐标
EV_ABS -绝对坐标,
EV_LED - LED,EV_FF- 力反馈。
设置相应的位以支持某一类绝对值坐标。
unsigned long absbit[BITS_TO_LONGS(ABS_CNT)];
input_set_abs_params(akm->input_dev, ABS_RX, 0, 23040, 0, 0);它的函数体如下:
static inline void input_set_abs_params(struct input_dev *dev, int axis, int min, int max, int fuzz, int flat)
{
       dev->absmin[axis] = min;
       dev->absmax[axis] = max;
       dev->absfuzz[axis] = fuzz;
       dev->absflat[axis] = flat;
       dev->absbit[BIT_WORD(axis)] |= BIT_MASK(axis);
}
表示支持绝对值x坐标,并设置它在坐标系中的最大值和最小值,以及干扰值和平焊位置等。
struct list_head h_list
表示的是和该设备相关的所有input handle的结构体链表(input handle为何物下文马上会讲到)。
struct list_head node
所有input设备组成的链表结构(后面将会知道它对应于input_dev_list)。
2、结构体struct input_handler
linux-2.6.29/include/linux/input.h
struct input_handler
{
       void *private;
       void (*event)(struct input_handle *handle, unsigned int type, unsigned int code, int value);
       int (*connect)(struct input_handler *handler, struct input_dev *dev, const struct input_device_id *id);
       void (*disconnect)(struct input_handle *handle);
       void (*start)(struct input_handle *handle);
       const struct file_operations *fops;
       int minor;
       const char *name;
       const struct input_device_id *id_table;
       const struct input_device_id *blacklist;
       struct list_head  h_list;
       struct list_head  node;
};
顾名思义:用来处理input设备的一个结构体,struct list_head h_list表示的是和该设备相关的所有input handle的结构体链表和前面那个一样;struct list_head node所有input_handle组成的结构体连链表(后面将会知道它对应于input_handler_list)。
每一个input设备在注册时,他都会遍历input_handler_list链表上的每一个input_handler,去找寻他心中的那个她,同理每一个input_handler在注册时,他也会去input_dev_list上找寻那个属于他的她。
当input_handler还没有时,input_dev就一直在那等。注意这里的input_handler和input_dev并不是一一对应的关系,有时一个input_handler对应好几个input_dev,一对多的关系。其实就是热插拔原理。检测到插入,就匹配。
3、input_handle
前面多次提到那个input_handle(注意区别input_handler)。来自linux-2.6.29/include/linux/input.h
struct input_handle {
       void *private;
       int open;
       const char *name;
       struct input_dev *dev;
       struct input_handler *handler;
       struct list_head  d_node;
       struct list_head  h_node;
};
Input_Handle其实也好理解,它就是input_dev和 input_handler粘合剂,通过Input_Handle这么一搅和,input_dev就和 input_handler发生了点关系,struct input_dev *dev对应的input设备。struct input_handler *handler对应该设备的handler。struct list_head d_node和struct list_head h_node则分别关联上前面两个结构体中的struct list_head h_list。
4、对应input core,
akm->input_dev = input_allocate_device();
err = input_register_device(akm->input_dev);
第一行,申请一个input设备:在内核中分配相应的内存空间,并初始化它。
第二行,把这个input设备注册到linux内核中,从此这个设备在内核中生根发芽,和handler匹配
linux内核源码目录linux-2.6.29/drivers/input/input.c文件中
struct input_dev *input_allocate_device(void)
{
      struct input_dev *dev;
      dev = kzalloc(sizeof(struct input_dev), GFP_KERNEL);
      if (dev)
      {
				dev->dev.type = &input_dev_type;
				dev->dev.class = &input_class;
				device_initialize(&dev->dev);
				mutex_init(&dev->mutex);
				spin_lock_init(&dev->event_lock);
				INIT_LIST_HEAD(&dev->h_list);
				INIT_LIST_HEAD(&dev->node);
				__module_get(THIS_MODULE);
       }

       return dev;
}
第1行,申明一个input_dev结构体变量;
第4到6行,对input设备的内嵌dev设备进行初始化。
第7到8行,初始化该dev的互斥量和锁,为防止对dev的并发访问。
第9、10两行,对input设备中的两个链表结构头进行初始化。
真正的执行者乃input_register_device()函数。
int input_register_device(struct input_dev *dev)
{
       1 static atomic_t input_no = ATOMIC_INIT(0);
       2 struct input_handler *handler;
       3 const char *path;
       4 int error;
       5 __set_bit(EV_SYN, dev->evbit);

       6 init_timer(&dev->timer);
       7 if (!dev->rep[REP_DELAY] && !dev->rep[REP_PERIOD]) {
       8     dev->timer.data = (long) dev;
       9     dev->timer.function = input_repeat_key;
       10    dev->rep[REP_DELAY] = 250;
       11    dev->rep[REP_PERIOD] = 33;
       12 }
       13 if (!dev->getkeycode)
       14    dev->getkeycode = input_default_getkeycode;
       15 if (!dev->setkeycode)
       16    dev->setkeycode = input_default_setkeycode;
       17 snprintf(dev->dev.bus_id, sizeof(dev->dev.bus_id),
       18    "input%ld", (unsigned long) atomic_inc_return(&input_no) - 1);
       19 error = device_add(&dev->dev);
       20 if (error)
       21    return error;
       22 path = kobject_get_path(&dev->dev.kobj, GFP_KERNEL);
       23 printk(KERN_INFO "input: %s as %s/n",
       24    dev->name ? dev->name : "Unspecified device", path ? path : "N/A");
       25 kfree(path);
       26 error = mutex_lock_interruptible(&input_mutex);
       27 if (error) {
       28   device_del(&dev->dev);
       29    return error;
       }
       30 list_add_tail(&dev->node, &input_dev_list);
       31 list_for_each_entry(handler, &input_handler_list, node)
       32 input_attach_handler(dev, handler);
       33 input_wakeup_procfs_readers();
       34 mutex_unlock(&input_mutex);
       35 return 0;
}
1-4行,初始化一些基本变量,以备后文使用。这里我们重点了解一下static atomic_t input_no = ATOMIC_INIT(0); 这里atomic_t表明一个原子变量。记住对于原子变量,不能被并发的访问,比如有两个线程,都是想让nput_no加1操作,如果input_no初值为0,当两线程串行访问,当然可以得到我们想要的值2,可以如果是并发呢,两个线程同时访问它,得到的初值都为0并同时为她加1,我们最后看到的值就只增加了一次,即为1。原子变量很好的解决了此类问题。每次只能让一个线程获得它,进行操作,释放,然后第二个线程访问,然后释放,是不是让你想到了自旋锁机制,聪明,他就是一个简化版的自旋锁,不过操作的对象是一个变量,而非一段临界区代码。
5行,设置EV_SYN,让所有的设备都支持它。
6-18行是跟按键有关的,与我们这里无关。暂且不论。
19行 error = device_add(&dev->dev);和4小结中的device_initialize(&dev->dev);夫唱妇和,共同让我们的input设备中的内嵌dev结构在系统中注册,并在sysfs文件系统中形成相应的文件层次结构。
20-25行,打印此设备在文件系统中的路径。
26、34两行代码就是为了防止其中间的临界区代码被并发访问。还记得他在哪儿初始化的吗?正是在我们第4节的input_allocate_device函数中,原句如下:mutex_init(&dev->mutex);为什么要使用互斥体呢,这个问题留到后面分析中间的临界区代码再来讨论。这里mutex_lock_interruptible()用mutex_lock取代,前者表示该可被信号打断,后者则显然不行。
27-29行代码,如果该进程没有获取到互斥量,说明此时已有另外一个程序占有了她。哥们你天生没那命,你前面的所有工作,什么买花,什么请客看电影,都白忙活了,死心吧,放弃一切(device_del(&dev->dev);),回老家,然后慢慢的躺在家里边睡边等,等待前面那位哥们,等待他放手的那一天……
30-33行,很幸运,她还是独身,也等着你的出现,所以情同意和,两小无猜,继续牵手往下走…30行,把该设备添加到input_dev_list中,31行 遍历系统中所有已注册的handler链表即input_handler_list,从中找到和自己的Mr.Right…ok,一切顺利函数返回,成功把该input设备嫁出
input_attach_handler(dev, handler)函数。就是在这个函数中,发生了所有该发生的事情。
static int input_attach_handler(struct input_dev *dev, struct input_handler *handler)
{
       1 const struct input_device_id *id;
       2 int error;
       3 if (handler->blacklist && input_match_device(handler->blacklist, dev))
       4     return -ENODEV;

       5 id = input_match_device(handler->id_table, dev);
       6 if (!id)
       7     return -ENODEV;
       8 error = handler->connect(handler, dev, id);
       9 if (error && error != -ENODEV)
       10    printk(KERN_ERR
       11           "input: failed to attach handler %s to device %s, "
       12           "error: %d/n",
       13           handler->name, kobject_name(&dev->dev.kobj), error);
       14 return error
}
1行,定义一个结构体struct input_device_id的变量id。该结构体是属于handler的,它为我们的handler提供了一套择偶标准。不在标准以内了,一律拒之门外,不管你是何方妖女。
2行,定义一个整形变量 error,后面要用得到。
3行,我们的handler应该来头不小,不是富一代,也至少是个富二代。不仅有前面那一堆择偶标准,还来一个黑名单列表,对于那些在黑名单以内的设备,比如说好不容易打听到一女的,电话一通,那头突然冒出凤姐的声音。别说handler兄,对于平凡的我估计也接受不了,所以直接枪毙。如果不是凤姐,证明你不是在黑名单以内,哪怕你身高只有1米48,哪怕你有一张大嘴,哪怕你还外加一口龅牙,咱好歹给个面子先见个面聊聊,然后找理由说你不符合我的择偶标准。
4行,好了,我们的input设备美少女开始和handler兄首次见面,然后互相匹配双方信息,深入input_match_device中你会发现,最终的主动权还是在我们的handler兄这里。
static const struct input_device_id *input_match_device(const struct input_device_id *id,struct input_dev *dev)
{
       int i;
       for (; id->flags || id->driver_info; id++) {
              if (id->flags & INPUT_DEVICE_ID_MATCH_BUS)
                     if (id->bustype != dev->id.bustype)
                            continue;
              if (id->flags & INPUT_DEVICE_ID_MATCH_VENDOR)
                     if (id->vendor != dev->id.vendor)
                            continue;
              if (id->flags & INPUT_DEVICE_ID_MATCH_PRODUCT)
                     if (id->product != dev->id.product)
                            continue;
              if (id->flags & INPUT_DEVICE_ID_MATCH_VERSION)
                     if (id->version != dev->id.version)
                            continue;
              MATCH_BIT(evbit,  EV_MAX);
              MATCH_BIT(keybit, KEY_MAX);
              MATCH_BIT(relbit, REL_MAX);
              MATCH_BIT(absbit, ABS_MAX);
              MATCH_BIT(mscbit, MSC_MAX);
              MATCH_BIT(ledbit, LED_MAX);
              MATCH_BIT(sndbit, SND_MAX);
              MATCH_BIT(ffbit,  FF_MAX);
              MATCH_BIT(swbit,  SW_MAX);
              return id;
       }
       return NULL;
}
看到没,只要我们的handler兄有某一个flag设置了,你的input设备对应的条件必须具备,否则,咱俩玩完了。深入MATCH_BIT宏:
#define MATCH_BIT(bit, max) /
              for (i = 0; i < BITS_TO_LONGS(max); i++) /
                     if ((id->bit[i] & dev->bit[i]) != id->bit[i]) /
                            break; /
              if (i != BITS_TO_LONGS(max)) /
                     continue;
还是这样,只要我们的handler兄的的id中evbit、keybit等等中的某一位设置了,input设备美眉也得具备这个条件(还记不记得我们在第二节
中用
set_bit(EV_ABS, akm->input_dev->evbit);
static const struct input_device_id evdev_ids[] = {
       { .driverinfo = 1 },      /* Matches all devices */
       { },                /* Terminating zero entry */
};
他就一个条件,而且还是一个可以说不是条件的条件,为什么会这么说呢,请继续回到我们的input_match_device函数中,看到了吗?某些兄弟可能会惊奇的大呼一声,我的妈呀!他确实是没有要求,一没设置flag,而没设置evbit、keybit等等。所以…所以…这哥们其实最有福了,就是那些所有找不到男朋友的input设备美眉,都会和他好上,(当然凤姐是看不上他的,因为他不是北大清华的经济学硕士,他长得没有金城武帅,他身高也没有1米8……)所以就出现了传说中的一夫多妻制。
这里我们这个input设备美眉因为某些条件不够,(这里申明一下,不是我们的这个input设备条件不好,是那些其他的handler针对性实在太强了,比如说,他只要嘴角下方有颗美人痣,笑起来像张曼玉,并且还得有着像张馨予一样身材的,或者是年纪20岁左右、巨蟹座的、没谈过恋爱、还长着一张张柏芝的脸的)所以也和我们这个evdev_handler结合了。evdev_handler兄偷偷地笑了,骂其他的哥们真傻,又轻松搞定一妞。
6、7行,没找到,则返回。
8行,既然找到了,就发生上关系了,马上调用我们evdev handler中的connect函数进行联姻。在此函数中,又发生什么了呢,这个我们留到下节中讲。
9-13行,如果匹配不成功,显示打印出来。
14行,打道回府。
Handler兄果然是handler兄,很给力,这不,刚和人家好上,就有了爱情的种子。有位仁兄要问了:“他是怎么做到的呢?说出来让我学习学习一下,哥这么多年了,还是一直和自己的左手生活着”,好吧,我们就来看看事情是怎样发生的:
没有错,就在第六节的error = handler->connect(handler, dev, id);这行代码中,发生了那么点事儿,也就是那么点事儿,让他们最终走到了一起了,有时候你不得不佩服那句话的力量“生米煮成熟饭”,不过在当今社会,貌似这话也不再那么给力了……可以看到,此行代码调用了我们这位evdev handler兄的connect函数。好了,见证奇迹的时刻到了:
static int evdev_connect(struct input_handler *handler, struct input_dev *dev, const struct input_device_id *id)
{
        struct evdev *evdev;
       2 int minor;
       3 int error;
       4 for (minor = 0; minor < EVDEV_MINORS; minor++)
       5     if (!evdev_table[minor])
       6            break;

       7 if (minor == EVDEV_MINORS) {
       8     printk(KERN_ERR "evdev: no more free evdev devices/n");
       9     return -ENFILE;
       10 }
       11 evdev = kzalloc(sizeof(struct evdev), GFP_KERNEL);
       12 if (!evdev)
       13    return -ENOMEM;
       14 INIT_LIST_HEAD(&evdev->client_list);
       15 spin_lock_init(&evdev->client_lock);
       16 mutex_init(&evdev->mutex);
       17 init_waitqueue_head(&evdev->wait);
       18 snprintf(evdev->name, sizeof(evdev->name), "event%d", minor);
       19 evdev->exist = 1;
       20 evdev->minor = minor;
       21 evdev->handle.dev = input_get_device(dev);
       22 evdev->handle.name = evdev->name;
       23 evdev->handle.handler = handler;
       24 evdev->handle.private = evdev;
       25 dev_set_name(&evdev->dev, evdev->name);
       26 evdev->dev.devt = MKDEV(INPUT_MAJOR, EVDEV_MINOR_BASE + minor);
       27 evdev->dev.class = &input_class;
       28 evdev->dev.parent = &dev->dev;
       29 evdev->dev.release = evdev_free;
       30 device_initialize(&evdev->dev);
       31 error = input_register_handle(&evdev->handle);
       32 if (error)
       33    goto err_free_evdev;
       34 error = evdev_install_chrdev(evdev);
       35 if (error)
       36    goto err_unregister_handle;
       37 error = device_add(&evdev->dev);
       38 if (error)
       39 goto err_cleanup_evdev;
       40 return 0;
 41 err_cleanup_evdev:
       42 evdev_cleanup(evdev);
    43 err_unregister_handle:
       44 input_unregister_handle(&evdev->handle);
    45 err_free_evdev:
       46 put_device(&evdev->dev);
       47 return error;
 }
估计兄弟你看到这么长的一个函数(其实不算很长,48行代码的函数在内核中算很短的了,当然中间省略了好多的空行),马上会拖动鼠标的滑轮一直往下走,如果你真的这么干了,说明兄弟你很有远见,因为我接下来会一行行的和你来谈论这个事件的经过。如果你没有这样,说明你是一个自由探索精神很强的哥们,好好保持,linux内核开发就需要你这样的人才。闲话不多说,我们来慢慢欣赏这小两口的那点事儿。
1-3行,定义一些基本变量,以后我们会用到的,注意这里来了一新的面孔,struct evdev *evdev,他是谁呢?这儿等会我们再讨论,先来看看这个家伙长什么样:
struct evdev {
       int exist;
       int open;
       int minor;
       char name[16];
       struct input_handle handle;
       wait_queue_head_t wait;
       struct evdev_client *grab;
       struct list_head client_list;
       spinlock_t client_lock; /* protects client_list */
       struct mutex mutex;
       struct device dev;
};
现在我们不需要搞清楚里面每一个成员的含义,到了后面你自然就明白了。就是这样,有些东西你在某一个时侯怎么想也想不明白,只要一旦到了某个阶段,再一想想,其实就那么回事。怪自己当时想的多了,考虑的太复杂了,完全没必要。所以人啊,还是要活在当下,好好做好的当前的每一件事情,未来不可遇见,也不知会有什么即将发生在你身上,比如说2012。
4-6行 注意第5行中的evdev_table[minor]数组,她是一个专门用来装evdev的数组,可以把它想象成一个摇篮,只不过这个摇篮很大,一次可以装很多个孩子。注意到34行加粗部分evdev_install_chrdev(evdev)跟踪进去:
static int evdev_install_chrdev(struct evdev *evdev)
{
evdev_table[evdev->minor] = evdev;
return 0;
}
这个函数很简单,把一个孩子evdev放到我们的摇篮中去。现在可以来讨论evdev这个结构是个啥东东了,没有错,他正是evdev handler 和我们那个input 设备美眉两个人在那些激情燃烧的岁月里创造出来的爱情结晶。而evdev_table[minor]这个摇篮是给他们装孩子用的。注意了,前面提过,evdev handler兄比较有福气,女人多,所以linux内核给他准备了一个很大的摇篮,不过摇篮的不同位置有标号的。记住,这位仁兄和一个女人只有一个孩子(计划生意在内核里也有体现的),不过男人毕竟在社会上还是主力军,还得为社会贡献自己的价值,所以老婆不能太多,最多也只可以有EVDEV_MINORS个女人,所以给他分配的那个摇篮最多只能装EVDEV_MINORS个孩子。好了现在回过头来看第4-6行代码。遍历整个摇篮的所有位置。找到一个没有孩子的空位,等下好放孩子。
7-10行,对不起,姐姐,你来晚了,摇篮都满了,说明什么,对,说明handler兄已经有EVDEV_MINORS个老婆了,那么对不起,虽然你们两情同意和,但咱还得遵守婚姻法,走吧,姐姐,当二奶一般转正的可能性不大,何况这位handler兄女人如云。
11-13行,很幸运,姐姐你来的够早,这儿还有位子,所以你们两个可以结婚,还可以生孩子。所以这一行代码比较关键,孩子的生命体在这里诞生了。至于怎么诞生的?这还问我?相信每一个智商正常的哥们都明白如何让他诞生,不明白的话,到两性网上去好好学习一下相关知识。12-13行,很不幸,孩子这个生命体是诞生了,不够还没出娘肚,就夭折了。这是很不幸的。
14-20行,初始化evdev的一些内部成员。比如锁,互斥量,等待队列等等。这里要注意第20行:evdev->minor = minor;把前面内核给孩子分配的摇篮位置号给孩子挂上,等下好对号入座。
21-24行,前面的三大数据结构,好像一直还有一个没出现,对!就是input_handle。这里终于出现了。这三行就是来填充这个数据结构的。input_handle怎么理解呢?对,他就是把孩子和他们的爸爸妈妈绑在一起的一个户口信息本。孩子的爸爸是谁,孩子的妈妈是谁,孩子叫什么名字,从此整个孩子的信息就到我们的handle里面去了。
25-29行,每一个dev设备,最终都要在linux系统中的/dev或者它的递归子目录生成一个文件,以后我们就可以对它进行open,read….操作了,这里几行再加上37行就是专干这事的。
31-33行 提交户口信息本给相关政府单位,让我们可爱的政府知道你们两有孩子了。
后面都是一些错误处理函数,这里就不一一分析,有兴趣的哥们可以去研究一下。
好了,该讲的都讲了,不该讲的好像也讲了。整个故事貌似结束了。如意郎君找到了,婚姻也结了,孩子也生了,户口也注册了。可是当你当回到这个故事的开头,你发现好像什么都还没开始。我们现在确实创造了一个设备文件evdevX(X代表摇篮位置编号)。可是用它来干什么呢?曾哥要说话了:七月份的尾巴,我是狮子座……这还不简单!这里的evdev就是拿来给我们应用开发者操作的,她是她妈akm这个input 设备对应的设备文件实体。怎么用她?那么我们得先搞定她老爸,evdev handler叔(毕竟有女儿的人了,不能再称兄了)。
说到evdev handler这个名字,相信大家一定再熟悉不过了,就是那个妻妾成群孩子成堆的家伙,一个让世界上很多男人都望尘莫及的家伙。嫉妒吧,羡慕吧,这些或许都已不重要,为了解解恨,我们还得想办法搞定她跟akm input设备大妈生下的那个女儿了。不过想搞定他女儿,咱得先搞定她爸。只要她爸开口了,后面的事情可能就好说了一些。不管怎样,还是来熟悉一下这位evdev handle大叔。
static struct input_handler evdev_handler = {
       .event             = evdev_event,
       .connect  = evdev_connect,
       .disconnect     = evdev_disconnect,
       .fops              = &evdev_fops,
       .minor            = EVDEV_MINOR_BASE,
       .name             = "evdev",
       .id_table  = evdev_ids,
};
其实我们对他里面的几个函数已经有所了解。比如evdev_connect()(上一节刚分析过,不要告诉我你不知道?那样我会很伤心地,)那么evdev_disconnect()顾名思义就是完成相反的动作(抛妻弃女)。.id_table = evdev_ids(择偶标准),.name = "evdev"孩子的姓,再加一个摇篮编号就是姓名了,显示在/dev相关目录下。.minor= EVDEV_MINOR_BASE,,还记得第7节中的那一行代码吗?evdev->dev.devt = MKDEV(INPUT_MAJOR, EVDEV_MINOR_BASE + minor);可以看到通过这条代码生成了设备的设备号。好了还剩下两个咚咚我们还不了解的。
即evdev_event,和evdev_fops。evdev_event是么子东西,这里不讲,留个悬念先后面我会详细道来……我们来看evdev_fops。跟踪进去:你会惊奇的发现:
记忆力好的哥们马上会想到我第一节所说的话了。没错,这就是input子系统为我们提供的那些文件操作集函数函数,还记得鲁迅先生说过什么了吗?不记得的话,建议回头再看看第一节的内容,让他老人家去的安心。没错,我们的应用层开发者最终都会用到它。想泡美眉的哥们绝对要记住这个结构体了,因为只有用到它,才能让这位handler叔的女儿拜倒在你的石榴裙下。
好好把握它,你就可以想打开她的心就打开她的心(open),向往她的内心写东西就可以随便写(write),想从她内心读出很多故事,她就让你读(read),最关键的是,你可以随意操作她(evdev_ioctl)。是不是很high啊。还记得我们第二节中描述的如何关于在linux中把akm这个设备注册成一个input设备吗?不记得的话,可以回头看看。关于那短短的几行代码我们基本上分析完了,不过还有一个没有分析:
input_report_abs(data->input_dev, ABS_RX, rbuf[0]);

input_report_abs(data->input_dev, ABS_RY, rbuf[1]);

input_report_abs(data->input_dev, ABS_RZ, rbuf[2]);
等几行代码。前面提过,他就是向我们的input子系统报告发生的一些事情,然后我们的input 子系统就会把它进行处理,最终提交到我们的应用层,然后就可以用上面的evdev_fops进行读写操作了。整个过程是不是有一些些明白了。
好了,关于这几个函数是如何提交我们的设备信息的,那就要跟前面evdev_handler中那个evdev_event扯上关系了。该来的它终究还是回来的,逃也逃不掉。这就是我们下一节要讨论的东东。
这里我们只以其中的一行为例来分析一下如何给我们的input子系统上报事件。
input_report_abs(data->input_dev, ABS_RX, rbuf[0]);继续跟踪:
static inline void input_report_abs(struct input_dev *dev, unsigned int code, int value)
{
       input_event(dev, EV_ABS, code, value);
}
可以看到,该函数也是只调用了一个input_event函数。网名为“拉登他爹”要骂人了:“为什么一行代码也来实现一个函数,这不是忽悠老子吗?”兄弟,你要体会我们那些写linux内核代码的哥们的用心良苦(你说你想要逃,偏偏注定要落脚 ,情灭了爱熄了 ,剩下空心要不要 ,春已走花又落 ,用心良苦却成空 ,我的痛怎么形容 ,一生爱错放你的手 。张宇大哥很经典的一首歌)他们这么做完全是希望同一个函数能同时被多个其他函数调用,达到代码复用的作用,比如这里input_event(dev, EV_ABS, code, value);根据第二个参数的不同来进行不同的处理来。下次兄弟你又要处理一个按键事件,我们就直接可以这样:
static inline void input_report_key(struct input_dev *dev, unsigned int code, int value)
{
input_event(dev, EV_KEY, code, value);
}
好了,废话不多说,继续跟踪进来:
void input_event(struct input_dev *dev,  unsigned int type, unsigned int code, int value)
{
       1 unsigned long flags;
       2 if (is_event_supported(type, dev->evbit, EV_MAX)) {
       3     spin_lock_irqsave(&dev->event_lock, flags);
       4     add_input_randomness(type, code, value);
       5     input_handle_event(dev, type, code, value);
       6     spin_unlock_irqrestore(&dev->event_lock, flags);
       }
}
终于看到一个还像个函数的函数了,至少有那么6行代码。兄弟,其实你我都应该感到很幸福。Linux内核中达到几百行代码代码的函数比比皆是。
1行,定义一个标识符,等下会用到。
2行,判断我们的input 设备中的evbit中是否设置了EV_ABS这个标识,以表示支持绝对值坐标。回想第二节中的set_bit(EV_ABS, akm->input_dev->evbit);没有错,我们是有设置的,所以可以往下走。
3、6两行,为我们的临界区代码加个自旋锁,防止并发访问。细心的哥们可能会发现,这和我们平时的自旋锁有些不同,一般的自旋锁都是spin_lock()和spin_unlock()成对出现的。这里好像多长了个尾巴。没错,男人和女人的某些区别好像也在这里,不好意思,思想又游离了…继续回来,我们这个自旋锁条件更苛刻。一般的自旋锁保护临界区代码不受其他cpu和本cpu的抢占进程打扰。这两个长尾巴的哥们更狠,他连我们的中断也一并拒之门外。总之,通告天下,被我占有的东西,你天王老子都别想再碰,除非我释放她了。够狠吧!是的,男人就应该对自己狠一点。补充一句:前面定义的那个flag就是用来保存被我们拒之门外的那个中断的状态信息的。
4行,为内核产生随机因子。
5行,真正有悟性的哥们应该扫一眼这几行代码就会发现,这一行才是真正的国家宝藏所在,难道这就是所谓的天赋,你不得不佩服尼古拉斯凯奇的犀利,凭着那么一点点信息就可以发现那么大的宝藏。不过现实生活中这样事情发生的概率就好比张曼玉突然为了你和她的外籍男友分手,然后来到长安,为的就是能默默守侯在你身边。继续跟进input_handle_event(dev, type, code, value):
又是一来自 input core的函数。
static void input_handle_event(struct input_dev *dev, unsigned int type, unsigned int code, int value)
{
       int disposition = INPUT_IGNORE_EVENT;
       switch (type) {
      case EV_SYN:
              switch (code) {
              case SYN_CONFIG:
                     disposition = INPUT_PASS_TO_ALL;
                     break;
              case SYN_REPORT:
                     if (!dev->sync) {
                            dev->sync = 1;
                            disposition = INPUT_PASS_TO_HANDLERS;
                     }
                     break;
              }
              break;
       case EV_KEY:
              if (is_event_supported(code, dev->keybit, KEY_MAX) &&
                  !!test_bit(code, dev->key) != value) {
                     if (value != 2) {
                            __change_bit(code, dev->key);
                            if (value)
                                   input_start_autorepeat(dev, code);
                     }
                     disposition = INPUT_PASS_TO_HANDLERS;
              }
              break;
       case EV_SW:
              if (is_event_supported(code, dev->swbit, SW_MAX) &&
                  !!test_bit(code, dev->sw) != value) {
                     __change_bit(code, dev->sw);
                     disposition = INPUT_PASS_TO_HANDLERS;
              }
              break;
       case EV_ABS:
       1     if (is_event_supported(code, dev->absbit, ABS_MAX))
      2     {
      3            value = input_defuzz_abs_event(value,
      4                          dev->abs[code], dev->absfuzz[code]);
      5                   if (dev->abs[code] != value)
      6                   {
                                  dev->abs[code] = value;
      7                          disposition = INPUT_PASS_TO_HANDLERS;
      8                   }
      9            }
      10   break;
       case EV_REL:
              if (is_event_supported(code, dev->relbit, REL_MAX) && value)
                    disposition = INPUT_PASS_TO_HANDLERS;
              break;
       case EV_MSC
              if (is_event_supported(code, dev->mscbit, MSC_MAX))
                     disposition = INPUT_PASS_TO_ALL;
              break;
       case EV_LED:
              if (is_event_supported(code, dev->ledbit, LED_MAX) &&
                  !!test_bit(code, dev->led) != value) {
                     __change_bit(code, dev->led);
                     disposition = INPUT_PASS_TO_ALL;
              }
              break;
       case EV_SND:
              if (is_event_supported(code, dev->sndbit, SND_MAX)) {
                     if (!!test_bit(code, dev->snd) != !!value)
                            __change_bit(code, dev->snd);
                     disposition = INPUT_PASS_TO_ALL;
              }
              break;
       case EV_REP:
              if (code <= REP_MAX && value >= 0 && dev->rep[code] != value) {
                    dev->rep[code] = value;
                     disposition = INPUT_PASS_TO_ALL;
              }
              break;
       case EV_FF:
              if (value >= 0)
               disposition = INPUT_PASS_TO_ALL;
              break;
       case EV_PWR:
             disposition = INPUT_PASS_TO_ALL;
              break;
       }

       if (disposition != INPUT_IGNORE_EVENT && type != EV_SYN)
              dev->sync = 0;

       if ((disposition & INPUT_PASS_TO_DEVICE) && dev->event)
              dev->event(dev, type, code, value);

      if (disposition & INPUT_PASS_TO_HANDLERS)
      input_pass_event(dev, type, code, value);
}
有兄弟要发话了:“好长的一堆代码“,是的,我承认,这是我这篇文档到目前为止最长的一个函数。不够在大学里面稍微学了一点点C语言的哥们应该都不觉得它复杂,否则你就将无言见江东父老,更对不起谭浩强大哥。整个函数先一个switch。然后根据不同的case进行不同的处理,得到不同的disposition变量值。然后,然后就到整个代码的最后六行代码了,是不是简单的一B。这里我们传进来的参数正好是EV_ABS。所以我们只需把注意力放到代码中的加粗部分。
1行,判断我们的input 设备中的absbit中是否设置了ABS_RX,显然前面我们已经设置了不信你回过头来看看第二节中那个曾经没有讲过的函数。相信哥们你的c语言代码阅读能力绝对在我之上,区区几行代码怎么能唬得了你。
3-4行,进行误差校准。这里我初始化时设置为0。故其实啥也没干,星星还是那颗星星哟,月亮还是那个月亮, value也还是那个value。
5-7行,把value的值付给dev->abs[code],dev->abs[code]记录的是上一次该坐标值。如果是第一次,显然为0.所以最终我们得到了disposition = INPUT_PASS_TO_HANDLERS。默默地做了那么多前期工作为的就是得到她。现在终于如愿以偿,带着她从此开始浪迹天涯……
浪到哪儿去了呢?聪明的你马上发现了浪到了最后两行代码。太阳依然发光,地球依然转动,你依然爱着心中的那个她,故事依然还在继续,input_pass_event(dev, type, code, value)也依然还在传值,他到底要把那个我们收集到的type、code、value传到哪儿去呢?
废话不多讲,开门见山,我们继续上节那个没有完的故事,我们收集到的那些值到底会传到哪里去呢?深入input_pass_event(dev, type, code, value)内部,看她花落谁家?
1行,定义一个input_handle结构体变量,不会这么快就忘了input_handle这位兄弟吧?
2、11两行是一种 RCU形式的锁机制。它允许多个执行单元对它同时对它进行读,但是多个执行单元对它进行写操作时,并不会让你随随便便就碰她,它会要求你先复制一个副本,要改要删随你便,反正你改的不是她本身。当所有的写单元都一一改完后,再统一写回,是不是比一般的自旋锁高级多了。不过不要轻易用它,系统开销较大。
3-5行,看看dev->grab有没有设置,回顾前面dev的初始化。显然没动它。所以这几行代码就这样废了。
7-10行,遍历dev->h_list链表上的handle,看看有没有handle->open不为0的,这里在我们在用户空间通过open函数打开某个evdev的时候,相应的handle->open会++,这里显然我们要打开evdev设备来对input设备进行操作,才会发生前面那些那儿,要不然我说了这么多不是等于一个0.?
第9行代码,我们通过这个handle户口信息表找到孩子的爸爸然后调用孩子爸爸里面的函数evdev_event。
我没有食言!记性好的哥们还记不记得,我们在第8节中了解evdev_handler的时候,有一个函数没讲,正是此函数。我们再来看一下evdev_handler叔的全貌:
static struct input_handler evdev_handler = {
       .event             = evdev_event,
       .connect  = evdev_connect,
       .disconnect     = evdev_disconnect,
       .fops              = &evdev_fops,
       .minor            = EVDEV_MINOR_BASE,
       .name             = "evdev",
       .id_table  = evdev_ids,
};
现在是时候来分析这个evdev_event,的时候了,为了成功泡上他的美丽女儿,我们还是有必要来攻下这最后一座城池:
static void evdev_event(struct input_handle *handle,  unsigned int type, unsigned int code, int value)
{
      1 struct evdev *evdev = handle->private;
       2 struct evdev_client *client;
       3 struct input_event event;
       4 struct timespec ts;
       5 ktime_get_ts(&ts);
       6 event.time.tv_sec = ts.tv_sec;
       7 event.time.tv_usec = ts.tv_nsec / NSEC_PER_USEC;
       8 event.type = type;
       9 event.code = code;
       10 event.value = value;
       11 rcu_read_lock();
       12 client = rcu_dereference(evdev->grab);
       13 if (client)
       14    evdev_pass_event(client, &event);
       15 else

       16    list_for_each_entry_rcu(client, &evdev->client_list, node)
       evdev_pass_event(client, &event);
    rcu_read_unlock();
       19 wake_up_interruptible(&evdev->wait)
}
1行,大家还记不记得,那个时候,evdev handler兄和我们的akm input设备美眉喜得贵女后,带着孩子去政府部门注册户口信息时,就是把他们的女儿交给了handle->private。这里把她再提取出来,赋给我们的struct evdev *evdev,没有疑问吧!
2行,又来一个新的数据结构struct evdev_client *client;,先看看她的内部结构:
struct evdev_client {
       struct input_event buffer[EVDEV_BUFFER_SIZE];
       int head;
       int tail;
       spinlock_t buffer_lock; /* protects access to buffer, head and tail */
       struct fasync_struct *fasync;
       struct evdev *evdev;
       struct list_head node;
       struct wake_lock wake_lock;
};
struct evdev *evdev;没有错,她内嵌了一个evdev结构,怎么理解呢?这就好比我们把mtk、高通、或者Marvel厂商那儿提供给我们的整个手机设计方案搬过来,改改代码,添加点应用程序,加上一个漂亮的外壳,再来一个时尚的品牌商标,一款时尚的手机就出炉了,还卖的很好哦。对,这里的struct evdev_client就是我们那个evdev的pvt版本,她是和我们的evdev紧紧地绑定在一起的,在哪儿绑定的呢?作为一个负责任的男人,我得告诉你,还是发生在应用层调用open时发生的。关于这个open整个过程我们下一节会详细讲解。不过她确实多了几个很重要的东东:struct input_event buffer[EVDEV_BUFFER_SIZE];定义一个内核区buffer。它用来干嘛?input_event结构是什么样?请看接下来的第三行代码。
3行,世界上谁跑的最快?“当然是input_event了”凤姐很得意的回答道。凤姐智商果然超群。说input_event,input_event到。我们来看看这个家伙长什么样:
struct input_event {
       struct timeval time;
       __u16 type;
       __u16 code;
       __s32 value;
};
她的作用很明显,就是用来存储我们要传递的那些值type、code、value。不信,不信请往下看。
4-7行,跟时间片有关的一些东东,和我们的这个akm 设备无关。不过handler兄老婆多,总有一个用得上的。
8-10行,把通过参数传进来的ype、code、value放到我们的event中。是不是验证了前面的说法。
11、18两行,又是加锁操作。前面有聊过,飘过。
12-14行,看看这个client有没有被强制绑定,这里我们没绑定,故略过。
16-17行,遍历client链表,找到与我们对应的那个client,然后把刚刚那个event放到里面去。放到哪里面去呢?放到struct input_event buffer[EVDEV_BUFFER_SIZE]里面去,注意最多可放EVDEV_BUFFER_SIZE个event。
进入evdev_pass_event(client, &event);跟踪:
static void evdev_pass_event(struct evdev_client *client, struct input_event *event)
{
       spin_lock(&client->buffer_lock);
       wake_lock_timeout(&client->wake_lock, 5 * HZ);
       client->buffer[client->head++] = *event;
       client->head &= EVDEV_BUFFER_SIZE - 1;
       spin_unlock(&client->buffer_lock);
       kill_fasync(&client->fasync, SIGIO, POLL_IN);
}
等下我们的用户程序就可以通过一定的方式(read()系统调用)来从这个buffer中拷贝数据了。这样一次从最下层驱动通过input子系统传到内核区buffer,然后再到用户空间的数据传输就这样完成了。整个handler就是这样。
赶紧操着家伙evdev_fops,
上面的evdev_event()函数的最后一行代码wake_up_interruptible(&evdev->wait);是用来唤醒一个等待队列,他的另一半是wait_event_interruptible(&evdev->wait),她一般位于另外一个地方。
比如:
int fun1()
{
……
……
wake_up_interruptible(&evdev->wait);
}

int fun2()
{
……
……
wait_event_interruptible(&evdev->wait);
……
……
}
函数fun2执行到wait_event_interruptible(&evdev->wait)这一句时,睡个觉先,等待她的另一半的到来,然后把她唤醒。这就需要我们的fun1函数执行到wake_up_interruptible(&evdev->wait);明白了吧!有哥们要发话了,这个机制有什么作用啊?
好吧,举个例子:两个函数对一buffer进行操作,一个读她,一个写她。要读的那个哥们是不是要先等那个要写的哥们把数据写到里面去了再读呢?否则,你去读空气啊?
好了,这里在我们这个evdev_event()函数来这么一个wake_up_interruptible(&evdev->wait);干嘛,表示你的数据已经好了,那位想读的哥们赶紧过来读吧,再不读就被别人读走了哦!
2我们通过input_report_abs(data->input_dev, ABS_RZ, rbuf[2]);最开始传输数据的,可是rbuf[2])哪来的呢?具体过程是这样的:akm8973传感器是通过I2C总线挂到系统中的,它不断地从外界收集数据(比如各坐标信息)然后把他们送到自己的寄存器中,然后我们就通过I2C总线从它的寄存器中获取数据,最终放到我们上面的rbuf[2]中。
接下来就发生了上面的那一切,致使这些数据最终被传到我们的用户空间被我的应用程序处理和显示
static const struct file_operations evdev_fops = {
       .owner           = THIS_MODULE,
       .read              = evdev_read,
       .write             = evdev_write,
       .poll        = evdev_poll,
       .open             = evdev_open,
       .release    = evdev_release,
       .unlocked_ioctl      = evdev_ioctl,
       .fasync           = evdev_fasync,
       .flush             = evdev_flush

};
要了解evdev,在应用层,我们可以通过调用open函数然后转到我们这个操作集函数中的.open = evdev_open
static int evdev_open(struct inode *inode, struct file *file)
{
     struct evdev *evdev;
     struct evdev_client *client;
     nt i = iminor(inode) - EVDEV_MINOR_BASE;
       4 int error;
       5 if (i >= EVDEV_MINORS)
       6     return -ENODEV;
       7 error = mutex_lock_interruptible(&evdev_table_mutex);
       8 if (error)
       9 return error;
       10 evdev = evdev_table[i];
       11 if (evdev)
       12    get_device(&evdev->dev);
       13 mutex_unlock(&evdev_table_mutex);
       14 if (!evdev)
       15    return -ENODEV;
       16 client = kzalloc(sizeof(struct evdev_client), GFP_KERNEL);
       17 if (!client) {
       18    error = -ENOMEM;
       19    goto err_put_evdev;
       20 }
       21 spin_lock_init(&client->buffer_lock);
       22 wake_lock_init(&client->wake_lock, WAKE_LOCK_SUSPEND, "evdev");
       23 client->evdev = evdev;
       24 evdev_attach_client(evdev, client);
       25 error = evdev_open_device(evdev);
       26 if (error)
       27   goto err_free_client;
       28 file->private_data = client;
       29 return 0;
	30 err_free_client:
       31   evdev_detach_client(evdev, client);
       32  kfree(client);
    33  err_put_evdev:
       34   put_device(&evdev->dev);
       35 return error;
}
16行,创建struct evdev_client
好了继续跟踪进来,看看input_open_device(&evdev->handle)这个中心干了什么事情:
int input_open_device(struct input_handle *handle)
{
       struct input_dev *dev = handle->dev;
       int retval;
       retval = mutex_lock_interruptible(&dev->mutex);
       if (retval)
              return retval;
       if (dev->going_away) {
              retval = -ENODEV;
              goto out;
       }
       handle->open++;
       if (!dev->users++ && dev->open)
              retval = dev->open(dev);
       if (retval) {
              dev->users--;
              if (!--handle->open) {
                     synchronize_rcu();
              }
       }

 out:
       mutex_unlock(&dev->mutex);
       return retval;
}
file->private_data = client;把这个client付给文件的私有数据.
evdev_read()深入跟踪下去:
static ssize_t evdev_read(struct file *file, char __user *buffer,size_t count, loff_t *ppos)
{
       1 struct evdev_client *client = file->private_data;
       2 struct evdev *evdev = client->evdev;
       3 struct input_event event;
       4 int retval;
       5 if (count < input_event_size())
       6     return -EINVAL;
       7 if (client->head == client->tail && evdev->exist &&
       8   (file->f_flags & O_NONBLOCK))
       9     return -EAGAIN;
       10 retval = wait_event_interruptible(evdev->wait,
       11    client->head != client->tail || !evdev->exist);
       12 if (retval)
       13    return retval;
       14 if (!evdev->exist)
       15   return -ENODEV;
       16 while (retval + input_event_size() <= count &&
       17       evdev_fetch_next_event(client, &event)) {
       18    if (input_event_to_user(buffer + retval, &event))
                     return -EFAULT;
       19    retval += input_event_size();
       }
       20 return retval;
}
相信在座的各位,现在分析这个函数也不会有什么困难。
1行,把在evdev_open里那个私有数据放到struct evdev_client *client中。
5-6行,如果要copy的字节数少于一个event的大小,对不起,结束吧。不完整的event对我们来说没什么用,别浪费表情。
10-11两行,wait_event_interruptible(evdev->wait,client->head != client->tail || !evdev->exist);
还记得她吗?是的,她已经在这里睡了好久,等待她的的如意郎君把她唤醒。后面的client->head != client->tail || !evdev->exist为条件,条件必须满足,她才会醒来。
16-19行,每次从client的buffer中取出一个input event数据放到我们这里的event中,然后把它传到应用层的buffer中,retval记录总共返回的字节数。深入input_event_to_user(buffer + retval, &event):
int input_event_to_user(char __user *buffer,const struct input_event *event)
{
       if (copy_to_user(buffer, event, sizeof(struct input_event)))
              return -EFAULT;
       return 0;
}


 4702
4702

 被折叠的 条评论
为什么被折叠?
被折叠的 条评论
为什么被折叠?
 到【灌水乐园】发言


