


spring security虽然已经简化了,但配置还是要小心翼翼的。这里运行起第一个spring security程序。
环境:
- spring 4.2.4
- spring security 4.0.4 (GA)
搭建步骤:
- pom.xml 加入web和config模块,config模块是用来支持security命名空间的。
    <!-- spring security -->
    <!-- spring 安全-->
    <dependency>
        <groupId>org.springframework.security</groupId>
        <artifactId>spring-security-web</artifactId>
        <version>4.0.4.RELEASE</version>
    </dependency>
    <dependency>
        <groupId>org.springframework.security</groupId>
        <artifactId>spring-security-config</artifactId>
        <version>4.0.4.RELEASE</version>
</dependency>- web.xml
这里添加了一个filter,以及spring security配置文件的位置。web.xml的全文在文末给出,以防filter的位置放置不当引起错误。
 <!-- spring security 配置 -->
   <filter>
     <filter-name>springSecurityFilterChain</filter-name>
     <filter-class>org.springframework.web.filter.DelegatingFilterProxy</filter-class>
   </filter>

   <filter-mapping>
    <filter-name>springSecurityFilterChain</filter-name>
    <url-pattern>/*</url-pattern>
   </filter-mapping>


   <context-param>
     <param-name>contextConfigLocation</param-name>
     <param-value>/WEB-INF/spring-security.xml, /WEB-INF/applicationContext.xml</param-value>
</context-param>- spring-security.xml
直接复制,这里先不解释,运行起来最重要
<?xml version="1.0" encoding="UTF-8"?>
<beans:beans xmlns="http://www.springframework.org/schema/security"
xmlns:beans="http://www.springframework.org/schema/beans"
xmlns:xsi="http://www.w3.org/2001/XMLSchema-instance"
xsi:schemaLocation="http://www.springframework.org/schema/beans
http://www.springframework.org/schema/beans/spring-beans-3.0.xsd
http://www.springframework.org/schema/security
http://www.springframework.org/schema/security/spring-security.xsd">
<http>
<intercept-url pattern="/**" access="hasRole('USER')" />
<form-login />
<logout />
</http>
<authentication-manager>
<authentication-provider>
<user-service>
<user name="jimi" password="jimispassword" authorities="ROLE_USER, ROLE_ADMIN" />
<user name="bob" password="bobspassword" authorities="ROLE_USER" />
</user-service>
</authentication-provider>
</authentication-manager>
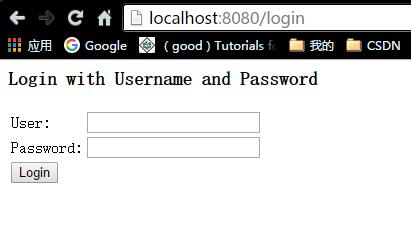
</beans:beans>就这样,一个spring security的最小配置就出来了,打开浏览器,输入:http://localhost:8080/login就可以看到spring security默认提供的登录界面,spring security成功运行起来了。
下一篇,将解释上面的配置。
web.xml 全部内容(如果怀疑各个filter的顺序可以参考):
<?xml version="1.0" encoding="UTF-8"?>
<web-app xmlns:xsi="http://www.w3.org/2001/XMLSchema-instance" xmlns="http://java.sun.com/xml/ns/javaee" xsi:schemaLocation="http://java.sun.com/xml/ns/javaee http://java.sun.com/xml/ns/javaee/web-app_3_0.xsd" version="3.0">

    <!-- spring security 配置 -->
   <filter>
     <filter-name>springSecurityFilterChain</filter-name>
     <filter-class>org.springframework.web.filter.DelegatingFilterProxy</filter-class>
   </filter>

   <filter-mapping>
    <filter-name>springSecurityFilterChain</filter-name>
    <url-pattern>/*</url-pattern>
   </filter-mapping>


   <context-param>
     <param-name>contextConfigLocation</param-name>
     <param-value>/WEB-INF/spring-security.xml, /WEB-INF/applicationContext.xml</param-value>
   </context-param>


  <!-- 配置spring  -->
    <servlet>
        <servlet-name>spring</servlet-name>
        <servlet-class>org.springframework.web.servlet.DispatcherServlet</servlet-class>
        <load-on-startup>1</load-on-startup>
    </servlet>
    <servlet-mapping>
        <servlet-name>spring</servlet-name>
        <url-pattern>/</url-pattern>
    </servlet-mapping>


    <listener>
        <listener-class>org.springframework.web.context.ContextLoaderListener</listener-class>
   </listener>


  <welcome-file-list>
    <welcome-file>/</welcome-file>
  </welcome-file-list>

</web-app>


 8106
8106

 被折叠的 条评论
为什么被折叠?
被折叠的 条评论
为什么被折叠?
 到【灌水乐园】发言


