


一、线性布局(LinearLayout)
1. 使用<LinearLayout>标签表示
2. 有两种方法指定控件位置,一种是水平方向,一种是竖直方向。
3. 属性:
- android:layout_gravity用于指定控件在布局的对齐方式
- android:gravity用于指定文字在控件中的对齐方式
- android:orientation用于指定控件的方向
(注意:当android:orientation=”vertical”时,只有水平方向的设置才起作用,垂直方向的设置不起作用。即:left, right, center_horizontal是生效的。当android :orientation=”horizontal”时,只有竖直方向上的设置起作用。即:top, bottom, center_vertical是生效的。)
例:
<?xml version="1.0" encoding="utf-8"?>
<LinearLayout xmlns:android="http://schemas.android.com/apk/res/android"
    android:layout_width="match_parent"
    android:layout_height="match_parent"
    android:orientation="horizontal">

    <Button
        android:layout_width="wrap_content"
        android:layout_height="wrap_content"
        android:hint="Button1"/>
  <Button
      android:layout_width="wrap_content"
      android:layout_height="wrap_content"
    android:layout_gravity="center_vertical"
      android:hint="Button2"/>
  <Button
      android:layout_width="wrap_content"
      android:layout_height="wrap_content"
      android:layout_gravity="bottom"

      android:hint="Button3"/>
</LinearLayout>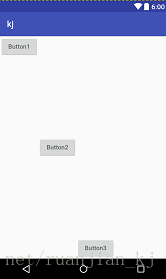
4.重要属性:
- android:layout_weight(权重)这个属性允许我们使用比例的方式来指定控件的大小
例1:
<?xml version="1.0" encoding="utf-8"?>
<LinearLayout xmlns:android="http://schemas.android.com/apk/res/android"
    android:layout_width="match_parent"
    android:layout_height="match_parent"
    android:orientation="vertical">
<TextView
    android:layout_width="match_parent"
    android:layout_height="wrap_content"
    android:layout_weight="1"
    android:layout_marginTop="10dp"
    android:background="#6666"/>
    <TextView
        android:layout_width="match_parent"
       android:layout_height="wrap_content"
        android:layout_weight="1"
        android:layout_marginTop="10dp"
        android:background="#000"/>
    <TextView
        android:layout_width="match_parent"
       android:layout_height="wrap_content"
        android:layout_weight="1"
        android:layout_marginTop="10dp"
        android:background="#000"/>
    <TextView
        android:layout_width="match_parent"
       android:layout_height="wrap_content"
        android:layout_weight="1"
        android:layout_marginTop="10dp"
        android:background="#666"/>
    <TextView
        android:layout_width="match_parent"
       android:layout_height="wrap_content"
        android:layout_weight="1"
        android:layout_marginTop="10dp"
        android:background="#6666"/>
</LinearLayout>
<?xml version="1.0" encoding="utf-8"?>
<LinearLayout xmlns:android="http://schemas.android.com/apk/res/android"
使用权重使五个TextView平分容器

(注:android:layout_marginTop=”10dp”使控件与容器顶部或上一个控件相隔10dp)
二、相对布局(RelativeLayout)
1. 相对于父布局进行定位的属性
- android:layout_alignParentLeft
- android:layout_alignParentRight
- android:layout_alignParentTop
- android:layout_alignParentBottom
- android:layout_centInParent
例:
<?xml version="1.0" encoding="utf-8"?>
<RelativeLayout xmlns:android="http://schemas.android.com/apk/res/android"
    android:layout_width="match_parent"
    android:layout_height="match_parent"
    >
 <Button android:layout_width="wrap_content"                   android:layout_height="wrap_content"        android:layout_alignParentLeft="true"
android:text="Button1"/>

<Button
android:layout_width="wrap_content"
android:layout_height="wrap_content"            android:layout_alignParentRight="true"        android:layout_alignParentTop="true"
android:text="Button2"/>

<Button
 android:layout_width="wrap_content"
 android:layout_height="wrap_content"
 android:layout_centerInParent="true"
 android:text="Button3"/>

<Button
android:layout_width="wrap_content"        android:layout_height="wrap_content"      android:layout_alignParentBottom="true"       android:layout_alignParentLeft="true"

<Button
android:layout_width="wrap_content     android:layout_height="wrap_content"       android:layout_alignParentBottom="true"       android:layout_alignParentRight="true" android:text="Button5"/>
</RelativeLayout>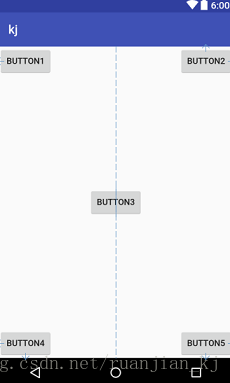
2.相对于控件进行定位的属性
- android:layout_above
- android:layout_below
- android:layout_toLeftOf
- android:layout_toRightOf
与控件对齐方式: - android:layout_alignLeft
- android:layout_alignRight
- android:layout_alignTop
- android:layout_alignBottom
例:
<?xml version="1.0" encoding="utf-8"?>
<LinearLayout xmlns:android="http://schemas.android.com/apk/res/android"
    android:layout_width="fill_parent"
    android:layout_height="fill_parent"
    android:orientation="horizontal"
    >
<RelativeLayout
    android:layout_width="match_parent"
    android:layout_weight="1"
    android:layout_height="match_parent"
    >
    <Button
        android:id="@+id/zhongxin"
        android:layout_width="wrap_content"
        android:layout_height="wrap_content"
        android:layout_centerInParent="true"
        android:text="o"/>
    <Button
        android:layout_width="wrap_content"
        android:layout_height="wrap_content"
        android:layout_above="@id/zhongxin"
        android:layout_alignLeft="@id/zhongxin"
        android:text="↑"/>
    <Button
        android:layout_width="wrap_content"
        android:layout_height="wrap_content"
        android:layout_toLeftOf="@id/zhongxin"
        android:layout_alignBottom="@id/zhongxin"
        android:text="←"/>
    <Button
        android:layout_width="wrap_content"
        android:layout_height="wrap_content"
        android:layout_toRightOf="@id/zhongxin"
        android:layout_alignBottom="@id/zhongxin"
        android:text="→"/>
    <Button
        android:layout_width="wrap_content"
        android:layout_height="wrap_content"
        android:layout_below="@id/zhongxin"
        android:layout_alignLeft="@id/zhongxin"
        android:text="↓"/>
</RelativeLayout>
    <RelativeLayout
        android:layout_width="match_parent"
        android:layout_height="match_parent"
        android:layout_weight="1">
        <Button
            android:id="@+id/a"
            android:layout_width="wrap_content"
            android:layout_height="wrap_content"
            android:layout_centerVertical="true"
            android:layout_alignParentRight="true"
            android:text="A" />
        <Button
            android:layout_width="wrap_content"
            android:layout_height="wrap_content"
            android:layout_toLeftOf="@id/a"
            android:layout_centerVertical="true"
            android:text="B"
            />

    </RelativeLayout>
</LinearLayout>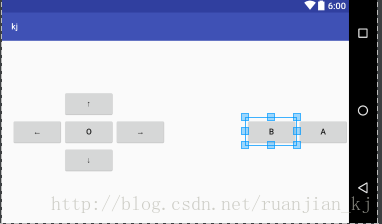
三、表格布局(TableLayout)
1.在TableLayout中,行数由TableLayout对象指控的,即布局中多少TableRow对象,就有多少行。
2.属性
- android:stretchColumns 拉伸指定列填充满TableRow
- android:layout_column 指定控件所在的列数
例:
<?xml version="1.0" encoding="utf-8"?>
<TableLayout xmlns:android="http://schemas.android.com/apk/res/android"
android:layout_width="match_parent"
android:layout_height="wrap_content"
android:stretchColumns="1">
<TableRow
    android:layout_width="wrap_content"
    android:layout_height="wrap_content"
    >
    <TextView
        android:layout_width="wrap_content"
        android:layout_height="wrap_content"
        android:hint="Account:"

        />
    <EditText
        android:layout_width="match_parent"
        android:layout_height="wrap_content"
        android:hint="Input your accpunt"
        android:layout_column="1"
        />
</TableRow>
<TableRow
    android:layout_width="match_parent"
    android:layout_height="wrap_content">
    <TextView
        android:layout_width="match_parent"
        android:layout_height="wrap_content"
        android:hint="Password:"

        />

    <EditText
        android:layout_width="wrap_content"
        android:layout_height="wrap_content"
        android:hint=""
        android:id="@+id/editText" />
</TableRow>
<TableRow
    android:layout_width="match_parent"
    android:layout_height="wrap_content">
    <Button
        android:layout_width="match_parent"
        android:layout_height="wrap_content"
        android:text="Login"
        android:layout_weight="1"
       />
</TableRow>
</TableLayout>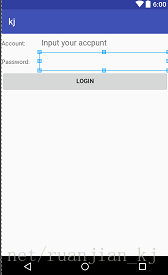
四、网格布局(GridLayout)
1.实现了控件的交错显示
2.是用一组无限细的的直线将绘图区域分成若干行、列和单元,并将指定控件的显示区域和控件在该区域的显示方法
2.属性
- android:columnCount 指定布局容器中的列数
- android:layout_columnSpan 指定控件所跨的列数
- android:layout_rowSpan 指定控件所跨的行数
例:
<?xml version="1.0" encoding="utf-8"?>
<GridLayout xmlns:android="http://schemas.android.com/apk/res/android"
    android:layout_width="wrap_content"
    android:layout_height="wrap_content"
    android:layout_gravity="center"
    android:columnCount="4">
    <Button

        android:text="/" android:layout_column="3"/>
    <Button android:text="1"/>
    <Button android:text="2"/>
    <Button android:text="3"/>
    <Button android:text="*"/>
    <Button android:text="4"/>
    <Button android:text="5"/>
    <Button android:text="6"/>
    <Button android:text="-"/>
    <Button android:text="7"/>
    <Button android:text="8"/>
    <Button android:text="9"/>
    <Button android:text="+" android:layout_rowSpan="3" android:layout_gravity="fill"/>
    <Button android:text="0" android:layout_columnSpan="2" android:layout_gravity="fill"/>
    <Button android:text="00"/>
    <Button android:text="=" android:layout_columnSpan="3" android:layout_gravity="fill"/>
</GridLayout>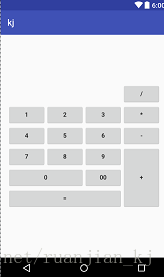
5.帧布局(FrameLayout)


 2794
2794

 被折叠的 条评论
为什么被折叠?
被折叠的 条评论
为什么被折叠?
 到【灌水乐园】发言


