


文章目录
一、Redis-Cluster集群概述
(1)Cluster集群概述
-
在Redis5.0版本发布时,推出了各种新特性,其中一点就是放弃Ruby的集群方式,改为使用C语言编写的redis-cli的方式,使集群的构建方式的复杂度降低,在Redis3.0以前的版本要实现集群一般都是借助哨兵sentinel工具来监控Master节点的状态,如果Master出现故障则会进行故障转移,主从切换,选择一台数据较完整的Slave来做Master,哨兵的配置略微复杂,并且性能和高可用方面表现一般,特别是在主从进行切换时,会有访问瞬断的情况,而且哨兵模式只有一个Master对外提供写服务,没办法支持很高的并发,并且单个主节点的内存也不能设置的太大,否则会导致持久化文件过大,影响数据恢复或主从同步的效率
-
哨兵模式的缺陷:
-
哨兵的配置略微复杂,并且性能和高可用方面表现一般,特别是在主从进行切换时,会有访问瞬断的情况
-
哨兵模式只有一个Master对外提供写服务,没办法支持很高的并发
-
单个主节点的内存也不能设置的太大,否则会导致持久化文件过大,影响数据恢复或主从同步的效率
-
-
之前没有Cluster之前使用的是Codis(豌豆荚)+redis
(2)Redis数据分区
-
Redis-Cluster采用虚拟槽进行分区,所有的键根据hash哈希函数映射到0—16383个整数槽内,总共有16384个整数槽
-
计算公式为:Slot=CRC16(key)&16384
-
每个节点负责维护一部分虚拟槽以及虚拟槽所映射的键值数据
-
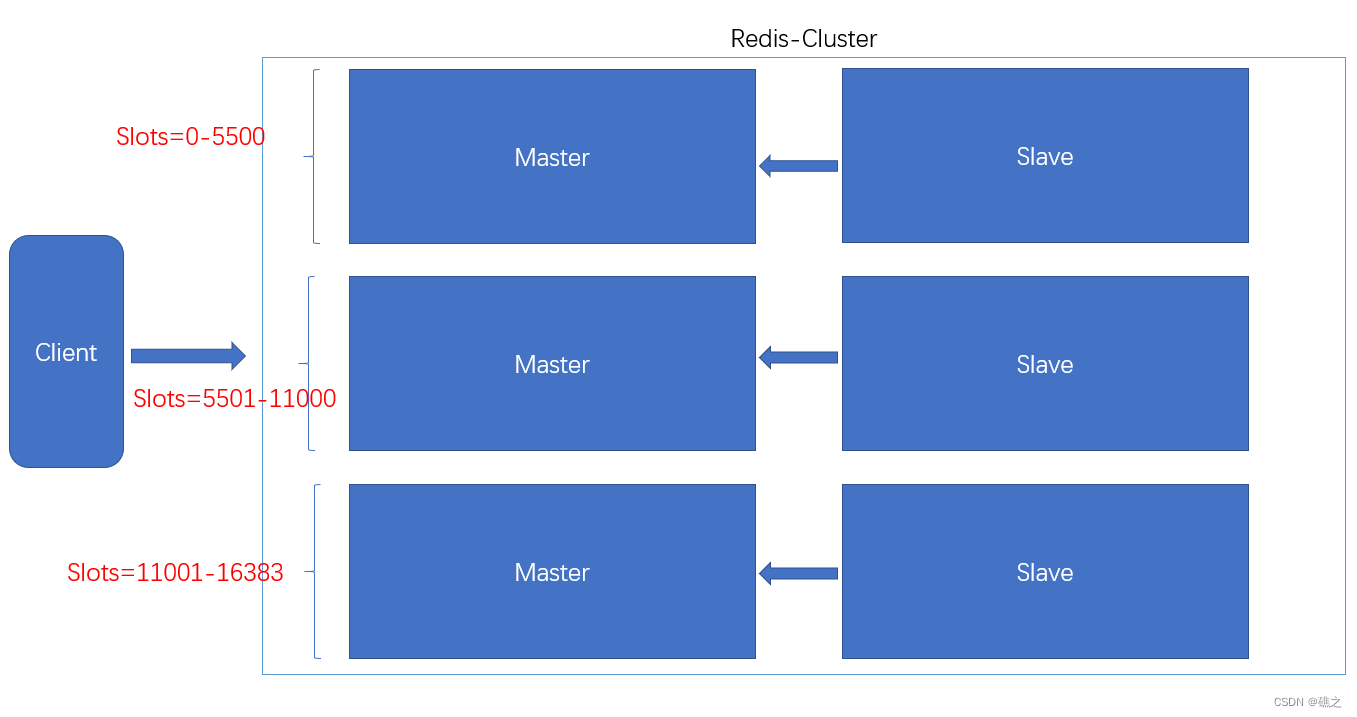
Redis集群中的每个节点都负责虚拟槽的子集,例如:
一个集群有三个节点,那么
节点A包含从0到5500的散列槽。
节点B包含从5501到11000的散列槽。
节点C包含从11001到16383的散列槽。
当用户创建键时,比如set aaa bbb,Redis会根据上面的算法计算出这个键的值,这个值不超过16383,假如说算出的值为5700,那么这个键就会保存在节点B中。当用户访问某个键时,这个键肯定也会有一个值,例如3500,那么就会从节点A上面去读取。但是用户连接的数据库时节点A,但是访问的数据在节点B怎么办,那么节点A会直接转发请求到节点B上去读取数据
(3)Redis-Cluster集群搭建
-
Redis集群至少需要3个节点,因为Cluster集群的投票容错机制要求至少半数节点认为某个节点挂了,该节点才算是挂了,当只有两个节点时是无法进行投票的,所以说至少需要3个节点
-
要保证集群的高可用,需要每个Master主节点都有一个Slave从节点,也就是用来备份的节点,在这个基础上,Redis-Cluster至少需要6台服务器,最终组成的集群架构是三主三从
(4)集群选举原理分析(ping-pong机制)
选举流程:(PING-PONG机制)
当Slave发现自己的Master变成Fail(失败)状态时,会尝试发起选举,以成为新的Master,由于挂掉的Master可能会有多个Slave,从而会存在多个Slave去竞争Master节点的过程:
- Slave发现自己的Master变成Fail(失败)状态
- Slave会将自己记录的集群currentEpoch(选举轮次标记)加1,并广播信息到集群中的其他节点
- 集群中的其他节点接收到Slave广播的消息,只有Master主节点会进行响应,判断请求者的合法性(就是确认选举Slave的Master确实是挂了),并且发送结果
- 尝试选举Master的Slave会收集其他节点的Master返回的结果,收到超过半数节点的Master的同意后,这个Slave就会变成新的Master
- 广播Pong消息通知其他集群的节点
这是成功选举的过程,前四步就是Ping的机制,而第五步就是Pong的机制,但是如果选举不成功怎么办:
如果这次Slave的选举没有成功,例如,三个节点组成的集群,三个节点分别是节点A、B、C,每个节点都有两个从服务器,当A节点的Master挂了之后,A节点的两个从服务器都会进行选举,最后的结果是B投给了第一个从服务器,C投给了第二个从服务器,这个时候会发生第二次选举,选举轮次加1继续上面的选举流程,直到选举成功
当集群中其中一台主机挂掉后,是不会影响客户端的查询和写入的,但是不能挂掉多于集群半数的主机数量
(5)跳转重定位
当客户端想获取指定的A键,但是它访问的节点中没有A键,被访问的节点会发现客户端想要获取的键自己这里没有,这个时候被访问的节点会向客户端发送一个特殊的跳转指令,这个指令会携带带有A键的节点的地址,告诉客户端去连接这个节点获取A键,客户端收到跳转指令后除了会跳转到正确的节点上去操作外,还会同步更新自己的槽位映射表缓存,后续的所有键都会使用新的槽位映射表,下次访问A键的时候会直接访问正确的节点
二、部署Redis-Cluster集群
(1)实验环境
此次实验使用的Redis版本均为Redis-5.0.4版本,三个服务器上部署双实例
| 系统 | 主机名 | ip | 端口 |
|---|---|---|---|
| Centos7.4 | Centos1 | 192.168.100.202 | 6379 |
| Centos7.4 | Centos1 | 192.168.100.202 | 6380 |
| Centos7.4 | Centos2 | 192.168.100.203 | 6379 |
| Centos7.4 | Centos2 | 192.168.100.203 | 6380 |
| Centos7.4 | Centos3 | 192.168.100.204 | 6379 |
| Centos7.4 | Centos3 | 192.168.100.204 | 6380 |
(2)实验步骤
-配置hosts文件
******(1)修改centos1,并编写hosts文件
[root@Centos7 ~]# hostnamectl set-hostname centos1
[root@Centos7 ~]# su
[root@centos1 ~]# echo ""'
192.168.100.202 centos1
192.168.100.203 centos2
192.168.100.204 centos3
''' >> /etc/hosts
[root@centos1 ~]# cat /etc/hosts
127.0.0.1   localhost localhost.localdomain localhost4 localhost4.localdomain4
::1         localhost localhost.localdomain localhost6 localhost6.localdomain6

192.168.100.202 centos1
192.168.100.203 centos2
192.168.100.204 centos3
[root@centos1 ~]# scp /etc/hosts root@192.168.100.203:/etc/hosts
[root@centos1 ~]# scp /etc/hosts root@192.168.100.204:/etc/hosts

******(2)修改centos2
[root@Centos7 ~]# hostnamectl set-hostname centos2
[root@Centos7 ~]# su
[root@centos2 ~]#

******(3)修改centos3
[root@Centos7 ~]# hostnamectl set-hostname centos3
[root@Centos7 ~]# su
[root@centos3 ~]#
-在centos1上,上传redis软件包,并且编译
[root@centos1 ~]# ll
总用量 1928
-rw-------. 1 root root    1264 1月  12 18:27 anaconda-ks.cfg
-rw-r--r--  1 root root 1966337 6月   9 23:49 redis-5.0.4.tar.gz
[root@centos1 ~]# tar xf redis-5.0.4.tar.gz
[root@centos1 ~]# cd redis-5.0.4
[root@centos1 redis-5.0.4]# make
[root@centos1 redis-5.0.4]# cd
-centos1的配置
******(1)创建工作目录
[root@centos1 ~]# mkdir -p /etc/redis/cluster/{6379,6380}
[root@centos1 ~]# ll /etc/redis/cluster/
总用量 0
drwxr-xr-x 2 root root 6 6月   9 23:47 6379
drwxr-xr-x 2 root root 6 6月   9 23:47 6380

******(2)创建数据存储目录
[root@centos1 ~]# mkdir -p /data/redis/data/{6379,6380}
[root@centos1 ~]# ll /data/redis/data/
总用量 0
drwxr-xr-x 2 root root 6 6月   9 23:48 6379
drwxr-xr-x 2 root root 6 6月   9 23:48 6380

******(3)为centos1部署双实例
[root@centos1 ~]# cp redis-5.0.4/redis.conf /etc/redis/cluster/6379/
[root@centos1 ~]# cp redis-5.0.4/redis.conf /etc/redis/cluster/6380/

******(4)修改配置文件
[root@centos1 ~]# vim /etc/redis/cluster/6379/redis.conf
。。。。。。
  68 # ~~~~~~~~~~~~~~~~~~~~~~~~~~~~~~~~~~~~~~~~~~~~~~~~~~~~~~~~~~~~~~~~~~~~~~~~
  69 bind 192.168.100.202  #指定此实例的ip
  70
。。。。。。
  88 protected-mode no #关闭安全模式
  89
  90 # Accept connections on the specified port, default is 6379 (IANA #815344).
  91 # If port 0 is specified Redis will not listen on a TCP socket.
  92 port 6379  #指定此实例的端口
  93
。。。。。。
 135 # Note that Redis will write a pid file in /var/run/redis.pid when daemonized.
 136 daemonize yes
 137
。。。。。。
 170 # output for logging but daemonize, logs will be sent to /dev/null
 171 logfile "/var/log/redis/redis_6379.log"  #指定日志存放路径
 172
。。。。。。
 262 # Note that you must specify a directory here, not a file name.
 263 dir /data/redis/data/6379  #指定RDB文件存放路径
 264
。。。。。。
 837 #
 838  cluster-enabled yes #去掉注释,开启集群
 839
。。。。。。
 845 #
 846 cluster-config-file nodes-6379.conf
 847
。。。。。。
 851 #
 852  cluster-node-timeout 15000  #请求超时,单位为毫秒,15000为15秒
 853
。。。。。。
#保存退出

————————————————————————————————————————
#可以直接这样,因为配置都相同,只需要修改一下端口号就行
[root@centos1 ~]# cp /etc/redis/cluster/6379/redis.conf  /etc/redis/cluster/6380/redis.conf
cp:是否覆盖"/etc/redis/cluster/6380/redis.conf"? yes
[root@centos1 ~]# sed -i 's/6379/6380/g' /etc/redis/cluster/6380/redis.conf
————————————————————————————————————————


[root@centos1 ~]# vim /etc/redis/cluster/6380/redis.conf
。。。。。。
  68 # ~~~~~~~~~~~~~~~~~~~~~~~~~~~~~~~~~~~~~~~~~~~~~~~~~~~~~~~~~~~~~~~~~~~~~~~~
  69 bind 192.168.100.202
  70
。。。。。。
  88 protected-mode no
  89
  90 # Accept connections on the specified port, default is 6379 (IANA #815344).
  91 # If port 0 is specified Redis will not listen on a TCP socket.
  92 port 6380  #修改端口
  93
。。。。。。
 135 # Note that Redis will write a pid file in /var/run/redis.pid when daemonized.
 136 daemonize yes  #放到后台运行
 137
。。。。。。
 157 # nothing bad happens, the server will start and run normally.
 158 pidfile /var/run/redis_6380.pid  #修改一下pid文件
 159
。。。。。。
 170 # output for logging but daemonize, logs will be sent to /dev/null
 171 logfile "/var/log/redis/redis_6380.log"  #指定日志存放路径
 172
。。。。。。
 262 # Note that you must specify a directory here, not a file name.
 263 dir /data/redis/data/6380  #指定RDB文件存放路径
 264
。。。。。。
 838  cluster-enabled yes
 839
 840 # Every cluster node has a cluster configuration file. This file is not
 841 # intended to be edited by hand. It is created and updated by Redis nodes.
 842 # Every Redis Cluster node requires a different cluster configuration file.
 843 # Make sure that instances running in the same system do not have
 844 # overlapping cluster configuration file names.
 845 #
 846 cluster-config-file nodes-6380.conf
 847
 848 # Cluster node timeout is the amount of milliseconds a node must be unreachable
 849 # for it to be considered in failure state.
 850 # Most other internal time limits are multiple of the node timeout.
 851 #
 852 cluster-node-timeout 15000
。。。。。。
#保存退出
[root@centos1 ~]# mkdir -p /usr/local/redis
[root@centos1 ~]# mkdir -p /var/log/redis
[root@centos1 ~]# cp redis-5.0.4/src/redis-server /usr/local/redis/
[root@centos1 ~]# cp redis-5.0.4/src/redis-cli /usr/local/redis/
[root@centos1 ~]# ln -s /usr/local/redis/* /usr/local/bin/

******(5)启动两台redis
[root@centos1 ~]# redis-server /etc/redis/cluster/6379/redis.conf   #指定配置文件启动redis
[root@centos1 ~]# redis-server /etc/redis/cluster/6380/redis.conf
[root@centos1 ~]# netstat -anpt | grep redis
tcp        0      0 192.168.100.202:6379    0.0.0.0:*               LISTEN      5231/redis-server 1
tcp        0      0 192.168.100.202:6380    0.0.0.0:*               LISTEN      5236/redis-server 1
tcp        0      0 192.168.100.202:16379   0.0.0.0:*               LISTEN      5231/redis-server 1
tcp        0      0 192.168.100.202:16380   0.0.0.0:*               LISTEN      5236/redis-server 1
[root@centos1 ~]# ps -ef | grep redis #查看进程,发现后面是cluster
root       5231      1  0 00:13 ?        00:00:04 redis-server 192.168.100.202:6379 [cluster]
root       5236      1  0 00:13 ?        00:00:04 redis-server 192.168.100.202:6380 [cluster]
root      19035   1062  0 02:19 pts/0    00:00:00 grep --color=auto redis

******(6)添加开机启动项
[root@centos1 ~]# echo "redis-server /etc/redis/cluster/6379/redis.conf" >> /etc/rc.local
[root@centos1 ~]# echo "redis-server /etc/redis/cluster/6380/redis.conf" >> /etc/rc.local

******(7)传输文件到另外两台服务器
[root@centos1 ~]# scp -r /etc/redis/ 192.168.100.203:/etc
root@192.168.100.203's password:
redis.conf                                                                                             100%   61KB   2.5MB/s   00:00
redis.conf                                                                                             100%   61KB  34.3MB/s   00:00
[root@centos1 ~]# scp -r /etc/redis/ 192.168.100.204:/etc
root@192.168.100.204's password:
redis.conf                                                                                             100%   61KB  33.3MB/s   00:00
redis.conf                                                                                             100%   61KB  28.8MB/s   00:00
[root@centos1 ~]# scp -r /usr/local/redis/ 192.168.100.203:/usr/local/
root@192.168.100.203's password:
redis-server                                                                                           100% 7912KB  35.5MB/s   00:00
redis-cli                                                                                                0%    0     0.0KB/s   --:-- ETA^redis-cli                                                                                              100% 4694KB  34.5MB/s   00:00
[root@centos1 ~]# scp -r /usr/local/redis/ 192.168.100.204:/usr/local/
root@192.168.100.204's password:
redis-server                                                                                           100% 7912KB  44.6MB/s   00:00
redis-cli
-centos2的配置
[root@centos2 ~]# ln -s /usr/local/redis/* /usr/local/bin/
[root@centos2 ~]# mkdir -p /data/redis/data/{6379,6380}
[root@centos2 ~]# mkdir /var/log/redis
[root@centos2 ~]# vim /etc/redis/cluster/6379/redis.conf
。。。。。。
  68 # ~~~~~~~~~~~~~~~~~~~~~~~~~~~~~~~~~~~~~~~~~~~~~~~~~~~~~~~~~~~~~~~~~~~~~~~~
  69 bind 192.168.100.203  #因为是在centos1直接传输的,所以只需修改一个ip即可
  70
。。。。。。
#保存退出
[root@centos2 ~]# vim /etc/redis/cluster/6380/redis.conf #和上面的一样,也是只要改一下ip地址就行
。。。。。。
  68 # ~~~~~~~~~~~~~~~~~~~~~~~~~~~~~~~~~~~~~~~~~~~~~~~~~~~~~~~~~~~~~~~~~~~~~~~~
  69 bind 192.168.100.203
  70
。。。。。。
#保存退出
[root@centos2 ~]# redis-server /etc/redis/cluster/6379/redis.conf #开启两台实例
[root@centos2 ~]# redis-server /etc/redis/cluster/6380/redis.conf
[root@centos2 ~]# netstat -anpt | grep redis
tcp        0      0 192.168.100.203:6379    0.0.0.0:*               LISTEN      19028/redis-server
tcp        0      0 192.168.100.203:6380    0.0.0.0:*               LISTEN      19033/redis-server
tcp        0      0 192.168.100.203:16379   0.0.0.0:*               LISTEN      19028/redis-server
tcp        0      0 192.168.100.203:16380   0.0.0.0:*               LISTEN      19033/redis-server
[root@centos2 ~]# echo "redis-server /etc/redis/cluster/6379/redis.conf" >> /etc/rc.local
[root@centos2 ~]# echo "redis-server /etc/redis/cluster/6380/redis.conf" >> /etc/rc.local
[root@centos2 ~]# ps -ef | grep redis
root      19028      1  0 02:15 ?        00:00:00 redis-server 192.168.100.203:6379 [cluster]
root      19033      1  0 02:15 ?        00:00:00 redis-server 192.168.100.203:6380 [cluster]
root      19047   1074  0 02:19 pts/0    00:00:00 grep --color=auto redis
-centos3配置
[root@centos3 ~]# ln -s /usr/local/redis/* /usr/local/bin/
[root@centos3 ~]# mkdir -p /data/redis/data/{6379,6380}
[root@centos3 ~]# mkdir /var/log/redis
[root@centos3 ~]# sed -i '69s/192.168.100.202/192.168.100.204/g' /etc/redis/cluster/6379/redis.conf
[root@centos3 ~]# sed -i '69s/192.168.100.202/192.168.100.204/g' /etc/redis/cluster/6380/redis.conf
[root@centos3 ~]# redis-server /etc/redis/cluster/6379/redis.conf
[root@centos3 ~]# redis-server /etc/redis/cluster/6380/redis.conf
[root@centos3 ~]# netstat -anpt | grep redis
tcp        0      0 192.168.100.204:6379    0.0.0.0:*               LISTEN      19002/redis-server
tcp        0      0 192.168.100.204:6380    0.0.0.0:*               LISTEN      19007/redis-server
tcp        0      0 192.168.100.204:16379   0.0.0.0:*               LISTEN      19002/redis-server
tcp        0      0 192.168.100.204:16380   0.0.0.0:*               LISTEN      19007/redis-server
[root@centos3 ~]# echo "redis-server /etc/redis/cluster/6379/redis.conf" >> /etc/rc.local
[root@centos3 ~]# echo "redis-server /etc/redis/cluster/6380/redis.conf" >> /etc/rc.local
[root@centos3 ~]# ps -ef | grep redis
root      19002      1  0 02:17 ?        00:00:00 redis-server 192.168.100.204:6379 [cluster]
root      19007      1  0 02:17 ?        00:00:00 redis-server 192.168.100.204:6380 [cluster]
root      19021   1073  0 02:20 pts/0    00:00:00 grep --color=auto redis
-创建cluster集群
注意:在redis5.0版本后不在使用ruby搭建集群,而是使用命令redis-cli
#下面的操作只需要在一台上面执行即可
[root@centos1 ~]# redis-cli --cluster create --cluster-replicas 1  192.168.100.202:6379 192.168.100.203:6379 192.168.100.204:6379 192.168.100.202:6380 192.168.100.203:6380 192.168.100.204:6380
#--cluster-replicas 1 参数1代表的是一个比例,就是主节点数/从节点数的比例,先写3个主节点,然后写3个从节点,它是按照书写顺序来确定那个是主节点。
。。。。。。
#中间输入yes
[OK] All nodes agree about slots configuration.
>>> Check for open slots...
>>> Check slots coverage...
[OK] All 16384 slots covered.  #看到ok就是创建成功了
[root@centos1 ~]# echo $?  #确认创建成功
0
[root@centos1 ~]# redis-cli -h 192.168.100.202 -p 6379 -c #启动集群,-c表示激活集群模式
192.168.100.202:6379> exit
[root@centos1 ~]# redis-cli --cluster check 192.168.100.202:6379  #查看集群的状态
192.168.100.202:6379 (ba6d20ea...) -> 0 keys | 5461 slots | 1 slaves.  #可以看到每个集群都对应的一个从服务器
192.168.100.203:6379 (8ae68dec...) -> 0 keys | 5462 slots | 1 slaves.
192.168.100.204:6379 (264cc569...) -> 0 keys | 5461 slots | 1 slaves.
[OK] 0 keys in 3 masters.
0.00 keys per slot on average.
>>> Performing Cluster Check (using node 192.168.100.202:6379)
M: ba6d20ea830f40a904b5e2a0f434fb88a73a5bfa 192.168.100.202:6379   #M表示Master,S表示Slave
   slots:[0-5460] (5461 slots) master  #这里可以看到每个Master主节点对应的hash值的范围,只有Master才会有
   1 additional replica(s)
S: 20cc55347dd1d59073d7fbf52ec568b04abad945 192.168.100.202:6380
   slots: (0 slots) slave
   replicates 264cc569d6ddfbf70cc1678b99f87e83ac6fe29b  #从服务器的这个项,就是指定的主服务器,后面是id号
S: 2f5140d502a58183ac3e297028c36dc27940e48f 192.168.100.204:6380
   slots: (0 slots) slave
   replicates 8ae68dec60391f0cd5621f9d6992f2ae02dcd0dc
M: 8ae68dec60391f0cd5621f9d6992f2ae02dcd0dc 192.168.100.203:6379
   slots:[5461-10922] (5462 slots) master
   1 additional replica(s)
M: 264cc569d6ddfbf70cc1678b99f87e83ac6fe29b 192.168.100.204:6379
   slots:[10923-16383] (5461 slots) master
   1 additional replica(s)
S: b4a21e9c4c64c2010da64bdec76d5e51ea8e7155 192.168.100.203:6380
   slots: (0 slots) slave
   replicates ba6d20ea830f40a904b5e2a0f434fb88a73a5bfa
[OK] All nodes agree about slots configuration.
>>> Check for open slots...
>>> Check slots coverage...
[OK] All 16384 slots covered.
-测试集群
******(1)创建key,查看效果
[root@centos1 ~]# redis-cli -h 192.168.100.202 -p 6379 -c
192.168.100.202:6379> set aaa bbb
-> Redirected to slot [10439] located at 192.168.100.203:6379  #可以看到提示,此键创建在了203服务器上
OK
192.168.100.203:6379> keys *  #发现这时的redis已经自动转到了203服务器上
1) "aaa"
192.168.100.203:6379> set bbb aaa  #再次创建一个
-> Redirected to slot [5287] located at 192.168.100.202:6379  #提示创建在了202上
OK
192.168.100.202:6379> exit  #发现自动转到了202上
-扩展Redis-Cluster集群
******(1)在centos1上创建两个新的实例
[root@centos1 ~]# cd /etc/redis/cluster/
[root@centos1 cluster]# ll
总用量 0
drwxr-xr-x 2 root root 24 6月  10 00:02 6379
drwxr-xr-x 2 root root 24 6月  10 00:12 6380
[root@centos1 cluster]# mkdir 6381
[root@centos1 cluster]# mkdir 6382
[root@centos1 cluster]# cp 6379/redis.conf 6381/redis.conf
[root@centos1 cluster]# cp 6379/redis.conf 6382/redis.conf
[root@centos1 cluster]# mkdir /data/redis/data/6381
[root@centos1 cluster]# mkdir /data/redis/data/6382
[root@centos1 cluster]# sed -i 's/6379/6381/g' 6381/redis.conf
[root@centos1 cluster]# sed -i 's/6379/6382/g' 6382/redis.conf
[root@centos1 cluster]# redis-server 6381/redis.conf
[root@centos1 cluster]# redis-server 6382/redis.conf
[root@centos1 cluster]# netstat -napt | grep 6381
tcp        0      0 192.168.100.202:6381    0.0.0.0:*               LISTEN      5233/redis-server 1
tcp        0      0 192.168.100.202:16381   0.0.0.0:*               LISTEN      5233/redis-server 1
[root@centos1 cluster]# netstat -napt | grep 6382
tcp        0      0 192.168.100.202:6382    0.0.0.0:*               LISTEN      5238/redis-server 1
tcp        0      0 192.168.100.202:16382   0.0.0.0:*               LISTEN      5238/redis-server 1

******(2)新增实例到集群中
[root@centos1 cluster]# redis-cli --cluster add-node 192.168.100.202:6381 192.168.100.202:6379
。。。。。。
[OK] All 16384 slots covered.
>>> Send CLUSTER MEET to node 192.168.100.202:6381 to make it join the cluster.
[OK] New node added correctly.  #ok表示成功

[root@centos1 cluster]# redis-cli --cluster check 192.168.100.202:6379  #查看集群信息
192.168.100.202:6379 (d45b3ec0...) -> 0 keys | 5461 slots | 1 slaves.
192.168.100.202:6381 (cafed3db...) -> 0 keys | 0 slots | 0 slaves.   #发现新添加了一个主节点,但是没有槽位
192.168.100.204:6379 (db170b2a...) -> 0 keys | 5461 slots | 1 slaves.
192.168.100.203:6379 (090bfee6...) -> 0 keys | 5462 slots | 1 slaves.
。。。。。。

[root@centos1 cluster]# redis-cli --cluster reshard 192.168.100.202:6379 #重新分配slots槽
。。。。。。
M: cafed3dbf858b73e77ac9760b80c03095b57b24b 192.168.100.202:6381  #M后面那个就是ID号
。。。。。。
How many slots do you want to move (from 1 to 16384)? 1000 #准备分配多少槽
What is the receiving node ID? cafed3dbf858b73e77ac9760b80c03095b57b24b  #要分配节点的id号
Please enter all the source node IDs.
  Type 'all' to use all the nodes as source nodes for the hash slots.
  Type 'done' once you entered all the source nodes IDs.
Source node #1: all   #分配全部
Do you want to proceed with the proposed reshard plan (yes/no)? yes    #yes确定分配

******(3)再次查看集群状态
[root@centos1 cluster]# redis-cli --cluster check 192.168.100.202:6379  #查看集群状态
192.168.100.202:6379 (d45b3ec0...) -> 0 keys | 5128 slots | 1 slaves.
192.168.100.202:6381 (cafed3db...) -> 0 keys | 1000 slots | 0 slaves.  #发现成功增加了槽点变成了1000个
192.168.100.204:6379 (db170b2a...) -> 0 keys | 5128 slots | 1 slaves.
192.168.100.203:6379 (090bfee6...) -> 0 keys | 5128 slots | 1 slaves.
。。。。。。

[root@centos1 cluster]# redis-cli --cluster add-node 192.168.100.202:6382 192.168.100.202:6379 #添加新的服务器到集群,让这个服务器做刚才新加的服务器的从
#发现添加成功

[root@centos1 cluster]# redis-cli --cluster check 192.168.100.202:6379  #再次查看,发现成功加入了集群但是并不是刚刚加入集群服务器的从
192.168.100.202:6379 (d45b3ec0...) -> 0 keys | 5128 slots | 1 slaves.
192.168.100.202:6382 (c1b47734...) -> 0 keys | 0 slots | 0 slaves.   #发现成功加入集群,但是还是主节点
192.168.100.202:6381 (cafed3db...) -> 0 keys | 1000 slots | 0 slaves.
192.168.100.204:6379 (db170b2a...) -> 0 keys | 5128 slots | 1 slaves.
192.168.100.203:6379 (090bfee6...) -> 0 keys | 5128 slots | 1 slaves.

[root@centos1 cluster]# redis-cli -h 192.168.100.202 -p 6382 -c #登录从服务器82,指定主服务器
192.168.100.202:6382> cluster replicate cafed3dbf858b73e77ac9760b80c03095b57b24b #这个是81的id
OK
192.168.100.202:6382> exit
[root@centos1 cluster]# redis-cli --cluster check 192.168.100.202:6379  #再次查看集群
192.168.100.202:6379 (d45b3ec0...) -> 0 keys | 5128 slots | 1 slaves.
192.168.100.202:6381 (cafed3db...) -> 0 keys | 1000 slots | 1 slaves.   #发现81已经成功有了从节点
192.168.100.204:6379 (db170b2a...) -> 0 keys | 5128 slots | 1 slaves.
192.168.100.203:6379 (090bfee6...) -> 0 keys | 5128 slots | 1 slaves.
[OK] 0 keys in 4 masters.
0.00 keys per slot on average.
>>> Performing Cluster Check (using node 192.168.100.202:6379)
M: d45b3ec069c6e2ab1e7ffbac72c77c1024ca871e 192.168.100.202:6379
   slots:[333-5460] (5128 slots) master
   1 additional replica(s)
S: c1b47734001493c46b03b3d2e285672c2dd8e353 192.168.100.202:6382
   slots: (0 slots) slave
   replicates cafed3dbf858b73e77ac9760b80c03095b57b24b  #发现82指的主服务器的id是81节点的id
S: 0850b23f6e715e8b00d119e1eec4f6ef2215720b 192.168.100.203:6380
   slots: (0 slots) slave
   replicates d45b3ec069c6e2ab1e7ffbac72c77c1024ca871e
M: cafed3dbf858b73e77ac9760b80c03095b57b24b 192.168.100.202:6381
   slots:[0-332],[5461-5794],[10923-11255] (1000 slots) master
   1 additional replica(s)
M: db170b2abba72e701c5da2da4f0756d0cd4307e7 192.168.100.204:6379
   slots:[11256-16383] (5128 slots) master
   1 additional replica(s)
S: 6ffada3a6399afabc778ed78883e18d336eb9409 192.168.100.202:6380
   slots: (0 slots) slave
   replicates db170b2abba72e701c5da2da4f0756d0cd4307e7
S: c0fe064961fe69f53967d76fbb2b1d8871b26159 192.168.100.204:6380
   slots: (0 slots) slave
   replicates 090bfee62b4e61d5042760826e5e23ede58c5f3a
M: 090bfee62b4e61d5042760826e5e23ede58c5f3a 192.168.100.203:6379
   slots:[5795-10922] (5128 slots) master
   1 additional replica(s)
[OK] All nodes agree about slots configuration.
>>> Check for open slots...
>>> Check slots coverage...
[OK] All 16384 slots covered.
-删除节点
删除的顺序是先删除Slave从节点,然后在删除Master主节点!!!!!
#删除集群中的指定从节点
[root@centos1 ~]# redis-cli --cluster  del-node 192.168.100.202:6379 d45b3ec069c6e2ab1e7ffbac72c77c1024ca871e   #删除集群中的节点,指定节点ip和端口号,后面是id号
>>> Removing node ba6d20ea830f40a904b5e2a0f434fb88a73a5bfa from cluster 192.168.100.202:6379
>>> Sending CLUSTER FORGET messages to the cluster...
>>> SHUTDOWN the node.
[root@centos1 cluster]# redis-cli --cluster  del-node 192.168.100.202:6382 c1b47734001493c46b03b3d2e285672c2dd8e353  #删除82从节点
>>> Removing node c1b47734001493c46b03b3d2e285672c2dd8e353 from cluster 192.168.100.202:6382
>>> Sending CLUSTER FORGET messages to the cluster...
>>> SHUTDOWN the node.
[root@centos1 cluster]# redis-cli --cluster check 192.168.100.202:6379   #查看集群状态
192.168.100.202:6379 (d45b3ec0...) -> 0 keys | 4096 slots | 1 slaves.
192.168.100.202:6381 (cafed3db...) -> 0 keys | 4096 slots | 0 slaves.
192.168.100.204:6379 (db170b2a...) -> 0 keys | 4096 slots | 1 slaves.
192.168.100.203:6379 (090bfee6...) -> 0 keys | 4096 slots | 1 slaves.
[OK] 0 keys in 4 masters.
0.00 keys per slot on average.
>>> Performing Cluster Check (using node 192.168.100.202:6379)
M: d45b3ec069c6e2ab1e7ffbac72c77c1024ca871e 192.168.100.202:6379
   slots:[1365-5460] (4096 slots) master
   1 additional replica(s)
S: 0850b23f6e715e8b00d119e1eec4f6ef2215720b 192.168.100.203:6380  #发现少了82从节点
   slots: (0 slots) slave
   replicates d45b3ec069c6e2ab1e7ffbac72c77c1024ca871e
M: cafed3dbf858b73e77ac9760b80c03095b57b24b 192.168.100.202:6381
   slots:[0-1364],[5461-6826],[10923-12287] (4096 slots) master
M: db170b2abba72e701c5da2da4f0756d0cd4307e7 192.168.100.204:6379
   slots:[12288-16383] (4096 slots) master
   1 additional replica(s)
S: 6ffada3a6399afabc778ed78883e18d336eb9409 192.168.100.202:6380
   slots: (0 slots) slave
   replicates db170b2abba72e701c5da2da4f0756d0cd4307e7
S: c0fe064961fe69f53967d76fbb2b1d8871b26159 192.168.100.204:6380
   slots: (0 slots) slave
   replicates 090bfee62b4e61d5042760826e5e23ede58c5f3a
M: 090bfee62b4e61d5042760826e5e23ede58c5f3a 192.168.100.203:6379
   slots:[6827-10922] (4096 slots) master
   1 additional replica(s)
[OK] All nodes agree about slots configuration.
>>> Check for open slots...
>>> Check slots coverage...
[OK] All 16384 slots covered.
要想删除Master主节点,可能要繁琐一些。因为在Master主节点上有数据槽(slots),为了保证数据的不丢失,必须把这些数据槽迁移到其他Master主节点上,然后在删除主节点
[root@centos1 ~]# redis-cli --cluster reshard 192.168.100.202:6379 --cluster-from d45b3ec069c6e2ab1e7ffbac72c77c1024ca871e --cluster-to 090bfee62b4e61d5042760826e5e23ede58c5f3a --cluster-slots 1000 --cluster-yes
#表示把d45b3ec069c6e2ab1e7ffbac72c77c1024ca871e节点的槽移动1000个到090bfee62b4e61d5042760826e5e23ede58c5f3a节点中
#--cluster-from要移走哈希槽的节点ID
#--cluster-to要移入哈希槽的节点ID
#--cluster-slots要移动的哈希槽数
[root@centos1 cluster]# redis-cli --cluster check 192.168.100.202:6379  #查看集群状态
192.168.100.202:6379 (d45b3ec0...) -> 0 keys | 4128 slots | 1 slaves.  #发现成功转移1000个槽点
192.168.100.202:6381 (cafed3db...) -> 0 keys | 1000 slots | 1 slaves.
192.168.100.204:6379 (db170b2a...) -> 0 keys | 5128 slots | 1 slaves.
192.168.100.203:6379 (090bfee6...) -> 0 keys | 6128 slots | 1 slaves.

[root@centos1 ~]# redis-cli --cluster  del-node 192.168.100.203:6379 090bfee62b4e61d5042760826e5e23ede58c5f3a  #要删除203的79主节点,发现无法直接删除
>>> Removing node 090bfee62b4e61d5042760826e5e23ede58c5f3a from cluster 192.168.100.203:6379
[ERR] Node 192.168.100.203:6379 is not empty! Reshard data away and try again.
[root@centos1 ~]# redis-cli --cluster reshard 192.168.100.203:6379 --cluster-from 090bfee62b4e61d5042760826e5e23ede58c5f3a  --cluster-to d45b3ec069c6e2ab1e7ffbac72c77c1024ca871e  --cluster-slots 6128 --cluster-yes   #把203的79主节点的槽点全部转移到202的79上
[root@centos1 ~]# redis-cli --cluster check 192.168.100.202:6379
192.168.100.202:6379 (d45b3ec0...) -> 0 keys | 10256 slots | 2 slaves.
192.168.100.202:6381 (cafed3db...) -> 0 keys | 1000 slots | 0 slaves.
192.168.100.204:6379 (db170b2a...) -> 0 keys | 5128 slots | 1 slaves.
192.168.100.203:6379 (090bfee6...) -> 0 keys | 0 slots | 0 slaves.
[root@centos1 ~]# redis-cli --cluster  del-node 192.168.100.203:6379 090bfee62b4e61d5042760826e5e23ede58c5f3a  #在把槽点全部转移后,再次进行删除,f
>>> Removing node 090bfee62b4e61d5042760826e5e23ede58c5f3a from cluster 192.168.100.203:6379
>>> Sending CLUSTER FORGET messages to the cluster...
>>> SHUTDOWN the node.
槽位不均衡,可以使用以下方法解决
[root@centos1 ~]# redis-cli --cluster rebalance --cluster-use-empty-masters 192.168.100.202:6379
[root@centos1 cluster]# redis-cli --cluster check 192.168.100.202:6379 #查看集群状态,发现自动分配了slots槽
192.168.100.202:6379 (d45b3ec0...) -> 0 keys | 4096 slots | 1 slaves.
192.168.100.202:6381 (cafed3db...) -> 0 keys | 4096 slots | 1 slaves.
192.168.100.204:6379 (db170b2a...) -> 0 keys | 4096 slots | 1 slaves.
192.168.100.203:6379 (090bfee6...) -> 0 keys | 4096 slots | 1 slaves.


 209
209


 被折叠的 条评论
为什么被折叠?
被折叠的 条评论
为什么被折叠?
 到【灌水乐园】发言


