


- 当Spring内置的几种scope不能满足需求时,可以自定义scope,只需实现org.springframework.beans.factory.config.Scope 接口 即可
使用maven创建项目:
<dependencies>
	    <dependency>
	        <groupId>org.springframework</groupId>
	        <artifactId>spring-context</artifactId>
	        <version>5.1.1.RELEASE</version>
	    </dependency>
	</dependencies>
项目结构:

step.1
创建service层接口及其实现类:
package com.zt.spring.test002.service;

public interface MessageService {
	String getMessage();
}
package com.zt.spring.test002.service;

public class MessageServiceImpl implements MessageService {

	private String username;
	private int age;

	public MessageServiceImpl(String username, int age) {
		this.username = username;
		this.age = age;
	}

	public String getMessage() {
		return "Hello World! " + username + ", age is " + age;
	}

}
step.2
创建MessagePrinter
package com.zt.spring.test002;


import com.zt.spring.test002.service.MessageService;

public class MessagePrinter {

    final private MessageService service;

    public MessagePrinter(MessageService service) {
        this.service = service;
    }

    public void printMessage() {
        System.out.println(this.service.getMessage());
    }
}
step.3
自定义scope: 创建ThreadScope类实现scope接口
package com.zt.spring.test002;

import org.springframework.beans.factory.ObjectFactory;
import org.springframework.beans.factory.config.Scope;

import java.util.HashMap;
import java.util.Map;

public class ThreadScope implements Scope {

	private final ThreadLocal<Map<String, Object>> threadScope = new ThreadLocal<Map<String, Object>>() {
		@Override
		protected Map<String, Object> initialValue() {
			return new HashMap<String, Object>();
		}
	};

	public Object get(String name, ObjectFactory<?> objectFactory) {
		Map<String, Object> scope = threadScope.get();
		Object obj = scope.get(name);
		System.out.println("Get " + name);
		if (obj == null) {
			System.out.println("Not exists " + name);
			obj = objectFactory.getObject();
			scope.put(name, obj);
		}
		return obj;
	}

	public Object remove(String name) {
		Map<String, Object> scope = threadScope.get();
		return scope.remove(name);
	}

	public String getConversationId() {
		return null;
	}

	public void registerDestructionCallback(String arg0, Runnable arg1) {
	}

	public Object resolveContextualObject(String arg0) {
		return null;
	}

}
- 其中重写了get和remove方法,并打印相关日志信息到控制台
step.4
创建spring.xml:
<?xml version="1.0" encoding="UTF-8"?>
<beans xmlns="http://www.springframework.org/schema/beans"
	xmlns:xsi="http://www.w3.org/2001/XMLSchema-instance"
	xmlns:context="http://www.springframework.org/schema/context"
	xsi:schemaLocation="
        http://www.springframework.org/schema/beans
        http://www.springframework.org/schema/beans/spring-beans.xsd
        http://www.springframework.org/schema/context
        http://www.springframework.org/schema/context/spring-context.xsd">

	<!-- 定义 bean -->
	<bean id="messageServiceImpl" class="com.zt.spring.test002.service.MessageServiceImpl"
		scope="threadScope">
		<constructor-arg name="username" value="s_zero" />
		<constructor-arg name="age" value="20" />
	</bean>

	<bean id="messagePrinter" class="com.zt.spring.test002.MessagePrinter" >
		<constructor-arg name="service" ref="messageServiceImpl" />
	</bean>

	<bean class="org.springframework.beans.factory.config.CustomScopeConfigurer">
		<property name="scopes">
			<map>
				<entry key="threadScope">
					<bean class="com.zt.spring.test002.ThreadScope"/>
				</entry>
			</map>
		</property>
	</bean>
</beans>
- 其中在CustomScopeConfigurer配置了自己的ThreadScope,同时修改MessageServiceImpl的scope为ThreadScope
step.5
定义主类:MessagePrinter
package com.zt.spring.test002;

import org.springframework.context.ApplicationContext;
import org.springframework.context.support.ClassPathXmlApplicationContext;

public class Application {
	public static void main(String[] args) {
		@SuppressWarnings("resource")
		ApplicationContext context = new ClassPathXmlApplicationContext("spring.xml");
		MessagePrinter printer = context.getBean(MessagePrinter.class);
		printer.printMessage();
	}
}
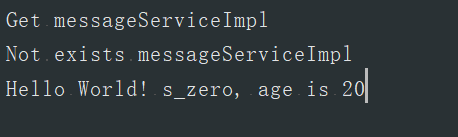
运行结果如下:


 1198
1198


 被折叠的 条评论
为什么被折叠?
被折叠的 条评论
为什么被折叠?
 到【灌水乐园】发言


