


要把努力当成一种习惯,而不是一时热血。
对应后端部分章节回顾:
【Vue + Koa 前后端分离项目实战4】使用开源框架==>快速搭建后台管理系统 -- part4 后端实现【增删改查】功能_小白Rachel的博客-CSDN博客
目录
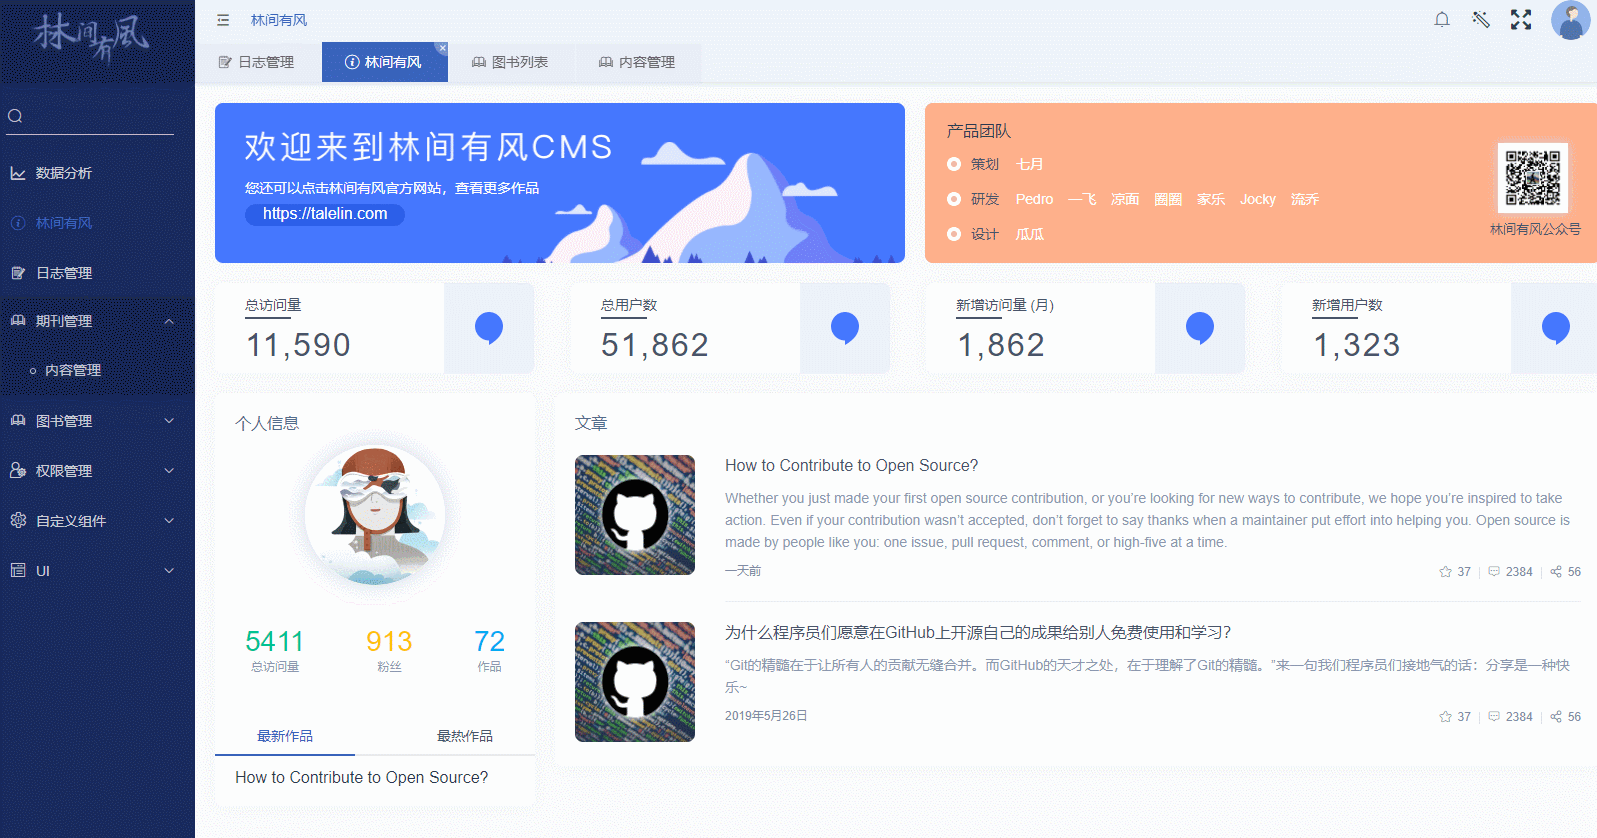
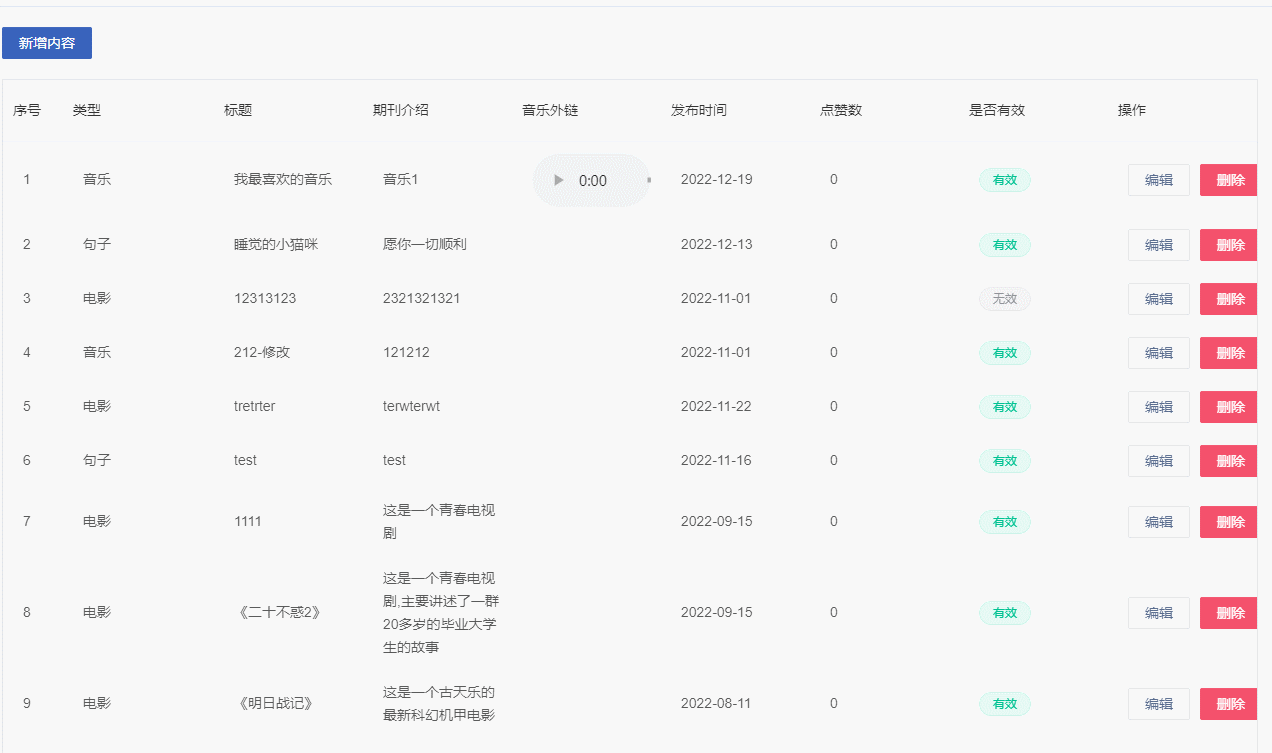
本章效果展示:(增删改查)
一、前端项目准备
1.运行项目
npm run serve2.项目目录介绍
前端文件写在views目录下,自定义模块的文件夹即可
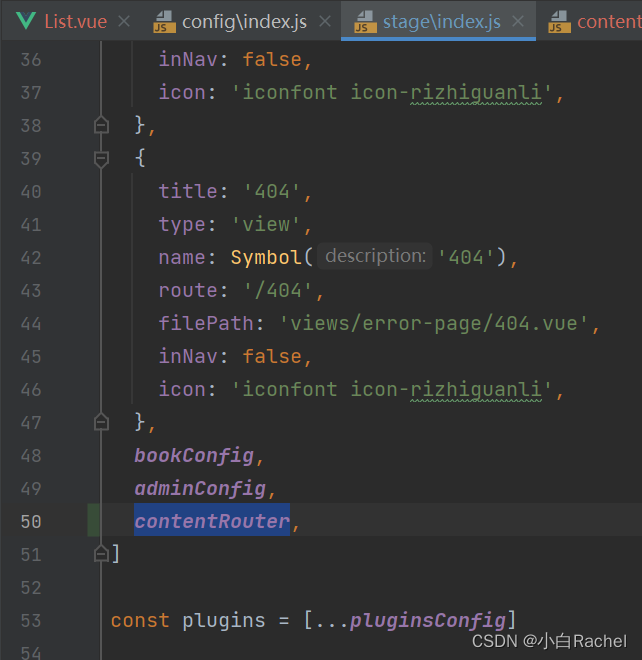
路由配置文件在config下的stage文件夹下,新建模块路由,并在index.js引用
接口函数写在models下的js文件
官方文档: Layout布局 | Lin CMS
3.添加路由
在config的stage文件夹下新建content.js
const contentRouter = {
  name: null,
  title: '期刊管理',
  type: 'folder', // 类型: folder, tab, view
  icon: 'iconfont icon-tushuguanli',
  order: 3,
  inNav: true,
  children: [
    {
      title: '内容管理',
      type: 'view',
      name: 'content',
      route: '/content/list',   // 路由地址
      filePath: 'views/content/List.vue',
      inNav: true,
      icon: 'iconfont icon-tushuguanli',
    },
  ],
}

export default contentRouter
定义如下配置之后,在index.js中引入contentRouter。
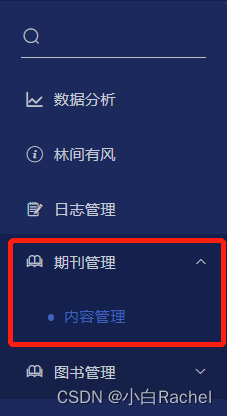
刷新页面,可以看到侧边栏添加了一个新的模块【期刊管理】
二、期刊列表展示
1.编写页面列表效果
在views目录下新建content文件夹,并添加List.vue文件。并添加如下代码(对于前端开发,这些很简单,么有什么要讲的)
<template>
  <div class="container">
    <div class="title">期刊内容列表</div>
    <div class="add-button">
      <el-button type="primary" @click="handleAdd()">新增内容</el-button>
    </div>
    <div class="table-container">
      <el-table :data="contentList">
        <el-table-column label="序号" width="60" type="index"></el-table-column>
        <el-table-column label="类型" prop="type">
          <template slot-scope="scope">
            {{type[scope.row.type]}}
          </template>
        </el-table-column>
        <el-table-column label="标题" prop="title"></el-table-column>
        <el-table-column label="期刊介绍" prop="content"></el-table-column>
        <el-table-column label="音乐外链" prop="url">
          <template slot-scope="scope">
            <audio controls v-if="scope.row.url">
              <source :src="scope.row.url">
            </audio>
          </template>
        </el-table-column>
        <el-table-column label="发布时间" prop="pubdate"></el-table-column>
        <el-table-column label="点赞数" prop="fav_nums"></el-table-column>
        <el-table-column label="是否有效" prop="status">
          <template slot-scope="scope">
           <el-tag v-if="scope.row.status === 1" type="success">有效</el-tag>
            <el-tag v-else type="info">无效</el-tag>
          </template>
        </el-table-column>
        <el-table-column label="操作" fixed="right">
          <template slot-scope="scope">
            <el-button @click="handleEdit(scope.row)" v-permission="{ permission: '编辑内容', type:'disabled'}">编辑</el-button>
            <el-button @click="handleDelete(scope.row)" v-permission="{ permission: '删除内容', type:'disabled'}" type="danger">删除</el-button>
          </template>
        </el-table-column>
      </el-table>
    </div>
  </div>
</template>

<script>
import { ContentModel } from '@/models/content'

export default {
  name: 'List',
  data() {
    return {
      contentList: [],
      type: {
        100: '电影',
        200: '音乐',
        300: '句子',
      }
    }
  },

}
</script>

<style scoped lang="scss">
.container {
  .title {
    height: 59px;
    line-height: 59px;
    color: $parent-title-color;
    font-size: 16px;
    font-weight: 500;
    text-indent: 40px;
    border-bottom: 1px solid #dae1ec;
  }
  .add-button {
    padding: 20px 40px;
  }
  .table-container {
    padding: 0 40px 20px 40px;
  }
}
</style>
2.(核心)模型层定义方法获取接口数据
这一部分对于纯前端开发来说还是比较新的。林间有风框架在前端也用到了【模型层】的概念,把页面和接口分离开来,并且使用类定义。有点类似react的model.tsx,也类似Vue的api目录。但是只是思想上类似,写法上完全不同,具体可以参考官方文档。
(1)在models的content.js文件下编写调用接口的函数
// models/content.js
import { get } from '@/lin/plugins/axios'

class Content {
  static async getContentList() {
    const res = await get('v1/content')
    return res
  }
}

export { Content as ContentModel }
(2)在页面使用该方法。前端逻辑不用说,主要是写法注意一下await ContentModel.getContentList()
// views/content/List.vue
created() {
    this.getContentList()
  },
  methods: {
    async getContentList() {
      this.contentList = await ContentModel.getContentList()
    },
  },
3.最终页面效果展示
目前,只实现了列表接口,并完成了页面的布局,新增、编辑、修改功能待实现。

三、期刊新增功能实现
1.编写前端页面逻辑
(1)需要在页面添加dialog对话框。
(2)添加表单项的属性,添加必填项校验规则(注意:图片上传组件的使用)
<template>
  <div class="container">
    <div class="title">期刊内容列表</div>
    <div class="add-button">
      <el-button type="primary" @click="handleAdd()">新增内容</el-button>
    </div>
    <div class="table-container">...省略
    </div>
    <el-dialog
      :title="dialogTitle"
      width="800px"
      :visible.sync="showDialog"
      :close-on-click-modal="false"
      :close-on-press-escape="false"
      @close="resetForm"
    >
      <el-form ref="form" :model="temp" label-width="90px" :rules="rules">
        <el-form-item label="内容封面" prop="image">
          <upload-imgs ref="uploadEle" :value="contentImgData" :max-num="1"></upload-imgs>
        </el-form-item>
        <el-form-item label="内容类型" prop="type">
          <el-radio v-model="temp.type" :label="100">电影</el-radio>
          <el-radio v-model="temp.type" :label="200">音乐</el-radio>
          <el-radio v-model="temp.type" :label="300">句子</el-radio>
        </el-form-item>
        <el-form-item label="内容标题" prop="title">
          <el-col :span="11">
            <el-input v-model="temp.title"></el-input>
          </el-col>
        </el-form-item>
        <el-form-item label="内容介绍" prop="content">
          <el-col :span="11">
            <el-input type="textarea" :rows="2" v-model="temp.content"></el-input>
          </el-col>
        </el-form-item>
        <el-form-item label="音乐外链" prop="url" v-if="temp.type===200">
          <el-col :span="11">
            <el-input v-model="temp.url"></el-input>
          </el-col>
        </el-form-item>
        <el-form-item label="发布时间" prop="pubdate">
          <el-date-picker v-model="temp.pubdate" type="date" placeholder="选择日期"></el-date-picker>
        </el-form-item>
        <el-form-item label="有效状态" prop="url">
          <el-switch v-model="temp.status" :active-value="1" :inactive-value="0"></el-switch>
        </el-form-item>
      </el-form>
      <sapn slot="footer" class="dialog-footer">
        <el-button @click="showDialog = false">取 消</el-button>
        <el-button type="primary" @click="dialogTitle == '添加内容' ? confirmAdd() : confirmEdit()">保 存</el-button>
      </sapn>
    </el-dialog>
  </div>
</template>

<script>
import { ContentModel } from '@/models/content'
import UploadImgs from '../../components/base/upload-imgs/index'

export default {
  name: 'List',
  components: { UploadImgs },
  data() {
    return {
      contentList: [],
      type: {
        100: '电影',
        200: '音乐',
        300: '句子',
      },
      dialogTitle: '',
      showDialog: false,
      temp: {
        id: null,
        image: null,
        type: null,
        title: null,
        content: null,
        url: null,
        pubdate: '',
        status: '',
      },
      rules: {
        image: [{ required: true, message: '请输入封面内容', trigger: 'blur' }],
        type: [{ required: true, message: '请选择内容类型', trigger: 'blur' }],
        title: [{ required: true, message: '请输入标题', trigger: 'blur' }],
        content: [{ required: true, message: '请输入内容介绍', trigger: 'blur' }],
        url: [{ required: true, message: 'url格式不正确', trigger: 'blur' }],
        pubdate: [{ required: true, message: '请选择发布时间', trigger: 'blur' }],
      },
      contentImgData: [],
    }
  },
  created() {
    this.getContentList()
  },
  methods: {
    async getContentList() {
      console.log('hrehre')
      this.contentList = await ContentModel.getContentList()
    },
    handleEdit() {},
    handleDelete() {},
    handleAdd() {},
    resetForm() {},
    confirmAdd() {},
    confirmEdit() {},
  },
}
</script>
2.新增按钮逻辑
(1)点击“新增”按钮,handleAdd()方法调起对话框
handleAdd() {
      this.dialogTitle = '添加内容'
      this.showDialog = true
},
(2)编写重置表单resetForm()函数,主要负责清空表单,并重置图片列表数据
resetForm() {
      this.contentImgData = []
      this.$refs.form.resetFields()
},
(3)编写提交操作。对话框点击“保存”按钮时,判断是新增操作或者编辑操作,如果是编辑操作,可看下一小节执行confirmEdit()方法,如果是新增操作,执行confirmAdd()方法。新增不需要id字段,需要删除。完成之后关闭对话框,刷新列表。
async confirmAdd() {
      const images = await this.$refs.uploadEle.getValue() // 获得image对象
      this.temp.image = images.length < 1 ? '' : images[0].src // 获取src
      this.$refs.form.validate(async valid => {
        if (valid) {
          delete this.temp.id
          const res = await ContentModel.addContent(this.temp)
          this.showDialog = false
          this.$message.success(res.message)  // 提示信息
          await this.getContentList()  // 刷新列表
        }
      })
},
使用框架自带的上传功能获取到images对象,其中对象属性值如下:

判断this.temp.image的数组长度,如果有值取其src
3.在model层添加方法
类似列表功能,需要在模型层编写调用接口的方法,并在前端页面调用模型的方法。
// models/content.js
static async addContent(data) {
    const res = await post('v1/content', { ...data })
    return res
  }
4.效果展示

四、期刊编辑功能实现
1.(核心)编辑按钮触发弹框
(1)添加点击事件。新增和编辑复用相同的对话框代码
<el-button @click="handleEdit(scope.row)" v-permission="{ permission: '编辑内容', type:'disabled'}">编辑</el-button>差异:编辑需要回显数据、内容类型不能修改
(2)回显数据,注意修改标题、初始化图片
handleEdit(row) {
this.dialogTitle = '编辑内容'
this.showDialog = true
// 表单内容初始化
this.temp = row
this.contentImgData.push({ display: row.image })
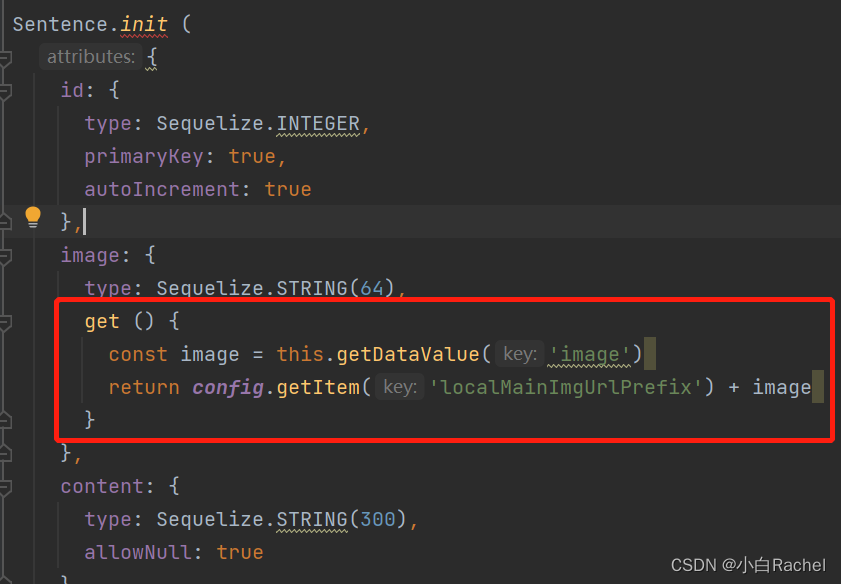
},图片回显时需要修改【后端lin-cms-koa】代码.
首先,在model文件夹下的sentence.js movies.js music.js的image中添加get方法。
添加代码的逻辑:调用koa框架提供的方法,在调用get方法时执行方法中的逻辑,为了获取配置参数的值并和图片的相对地址进行拼接。最终实现完整的url。
image: {
      type: Sequelize.STRING(64),
      get () {
        const image = this.getDataValue('image')
        return config.getItem('localMainImgUrlPrefix') + image
      }
    },
其次,在config文件夹下的setting.js最后添加配置项
localMainImgUrlPrefix: 'http://localhost:5000/assets/'。
当然最终部署项目只需要修改配置项即可。

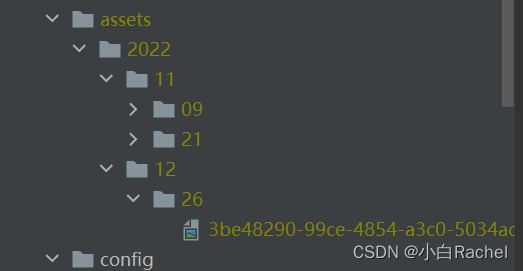
最终,项目上传的文件会保存在assets文件夹中
2.在model层编写方法
(1)在model层的content.js 编写editContent方法 接受两个参数:id、表单参数
// 编辑
  static async editContent(id, data) {
    const res = await put(`v1/content/${id}`, { ...data })
    return res
  }
(2)在页面调用模型方法实现提交编辑
注意:编辑时的this.temp.image需要取images[0].display
async confirmEdit() {
      const images = await this.$refs.uploadEle.getValue() // 获得image对象
      this.temp.image = images.length < 1 ? '' : images[0].display // 获取url地址
      this.$refs.form.validate(async valid => {
        if (valid) {
          const id = this.temp.id
          delete this.temp.id
          const res = await ContentModel.editContent(id, this.temp)
          this.showDialog = false
          this.$message.success(res.message)
          await this.getContentList()
        }
      })
    },
此时,需要 修改【后端lin-cms-koa】代码
修改service文件夹下的content.js中的editContent方法中的image字段。传入的url是完整路径,我们需要对url进行修改,只获取相对路径。
// 把完整的url取出,只获取相对路径
    params['image'] = params['image'].split(config.getItem('localMainImageUrlPrefix'))[1]
3. 效果展示
五.期刊删除功能实现
1.编写前端页面逻辑
(1)添加删除确认对话框,同时添加字段
<el-dialog title="提示" :visible.sync="showDeleteDialog" width="400px">
      <span>确认删除内容</span>
      <span slot="footer" class="dialog-footer">
        <el-button @click="showDeleteDialog = false">取 消</el-button>
        <el-button type="danger" @click="confirmDelete()">删 除</el-button>
      </span>
    </el-dialog>
(2)点击删除按钮,打开对话框,传id
handleDelete(row) {
      this.showDeleteDialog = true
      this.temp.id = row.id
      this.temp.type = row.type
    },
2. 在model层编写方法
// 删除
  static async deleteContent(id, type) {
    const res = await _delete(`v1/content/${id}`, { type })
    return res
  }
在页面调用模型方法
async confirmDelete() {
      const res = await ContentModel.deleteContent(this.temp.id, this.temp.type);
      this.showDeleteDialog = false
      this.$message.success(res.message)
      this.getContentList()
    }
3.效果展示

本篇核心重难点:
1.在前端编写模型层方法,实现接口调用的模型封装。
2.编辑操作时回显图片==>需要添加配置项,拼接url完整路径。同时,提交操作时,只提交url相对路径
往期回顾:
第一节:简单介绍了林间有风框架
【Vue + Koa 前后端分离项目实战】使用开源框架==>快速搭建后台管理系统 -- part1 项目搭建_小白Rachel的博客-CSDN博客_vue快速搭建管理系统
第二到第五节:展开讲解后端部分【期刊列表】【最新期刊】的增删查改功能
【Vue + Koa 前后端分离项目实战2】使用开源框架==>快速搭建后台管理系统 -- part2 后端新增期刊功能实现_小白Rachel的博客-CSDN博客_vue+koa
【Vue + Koa 前后端分离项目实战3】使用开源框架==>快速搭建后台管理系统 -- part3 权限控制+行为日志_小白Rachel的博客-CSDN博客_koa权限管理
【Vue + Koa 前后端分离项目实战4】使用开源框架==>快速搭建后台管理系统 -- part4 后端实现【增删改查】功能_小白Rachel的博客-CSDN博客_利用koa搭后台管理系统
【Vue + Koa 前后端分离项目实战5】使用开源框架==>快速搭建后台管理系统 -- part5 后端实现最新期刊列表管理【增删查改】_小白Rachel的博客-CSDN博客
第六到第七节:展开讲解前端功能实现


 737
737


 被折叠的 条评论
为什么被折叠?
被折叠的 条评论
为什么被折叠?
 到【灌水乐园】发言


