自动化测试框架Robot Framework入门

什么是RF

RF是一个基于 Python 的、可扩展的关键字驱动的自动化 验收测试框架、验收测试驱动开发 (ATDD)、 行为驱动开发 (BDD) 和机器人流程自动化 (RPA)。它 可用于分布式、异构环境,其中自动化 需要使用不同的技术和接口。

该框架周围有一个丰富的生态系统,由各种通用 作为单独项目开发的库和工具。查看更多 有关机器人框架和生态系统的信息,请参阅 http://robotframework.org

为什么使用RF?

  • 支持易于使用的表格语法,以便在统一的环境中创建测试用例 道路。
  • 提供 现有关键字。
  • 以 HTML 格式提供易于阅读的结果报告日志
  • 独立于平台和应用程序。
  • 提供用于创建自定义测试库的简单库 API 可以使用 Python 本地实现。
  • 提供命令行界面和基于 XML 的输出文件 集成到现有的构建基础架构中(持续集成 系统)。
  • 为测试 Web 应用程序、rest API、移动应用程序提供支持 运行进程,通过 Telnet 或 SSH 连接到远程系统等。
  • 支持创建数据驱动的测试用例
  • 内置对变量的支持,特别适用于测试 不同的环境。
  • 提供标记以对要执行的测试用例进行分类和选择。
  • 实现与源代码管理的轻松集成:测试套件只是文件 以及可以使用生产代码进行版本控制的目录。
  • 提供测试用例测试套件级别的设置和拆卸。
  • 模块化架构支持创建测试,甚至对于具有 几种不同的接口。

环境准备

  1. 安装python
  2. 虚拟环境中安装robotframework
cd C:\projects
mkdir MyProject
cd MyProject
python -m venv .venv
.venv\Scripts\activate.bat
pip install robotframework
robot --version

  3.pycharm安装插件

Robot Framework Language Server

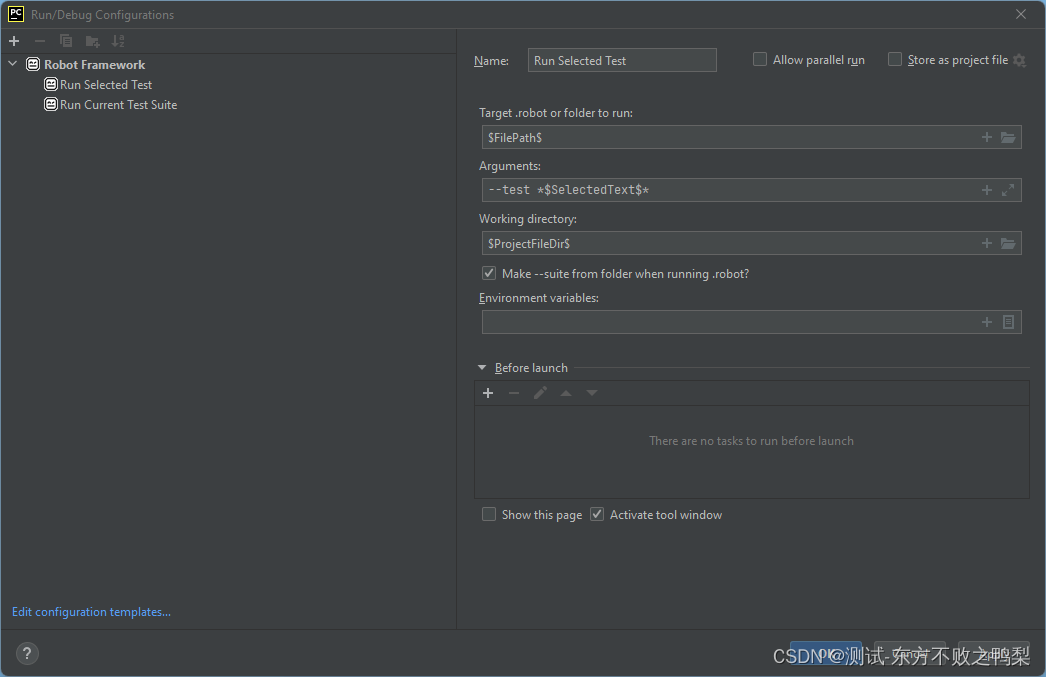
 为 Robot Framework 添加调试配置以运行当前测试套件

添加 Robot Framework 的调试配置以运行当前测试用例(通过选定的文本)

4、安装库文件

pip install --upgrade robotframework-seleniumlibrary

5、下载浏览器驱动,放置python路径的Scripts目录下。 

运行用例

方法一:使用配置的run testsuite按钮。
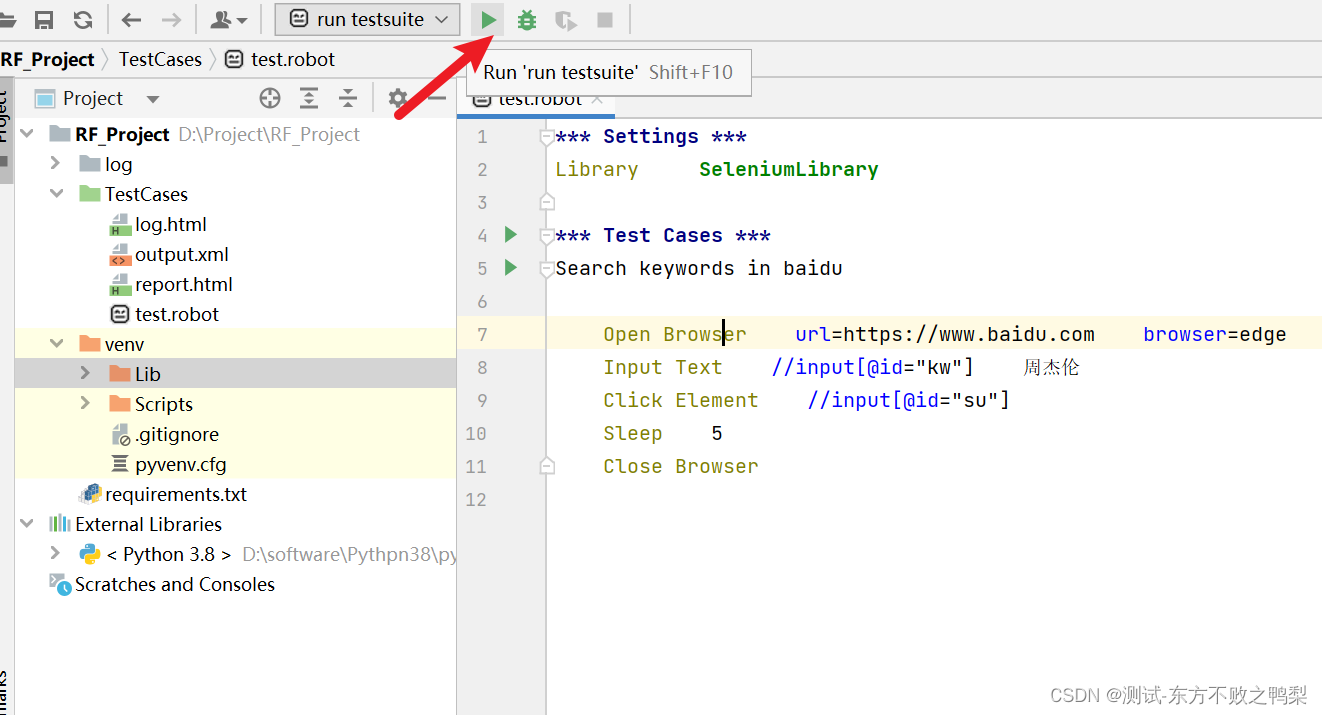
方法二:

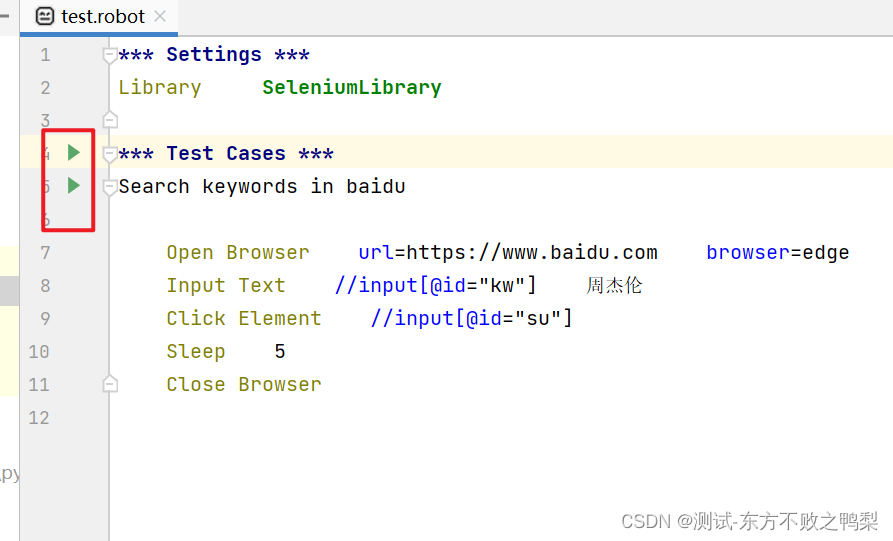
点击在测试文件里左侧的按钮,这里的按钮其实也是插件配置出的按钮。

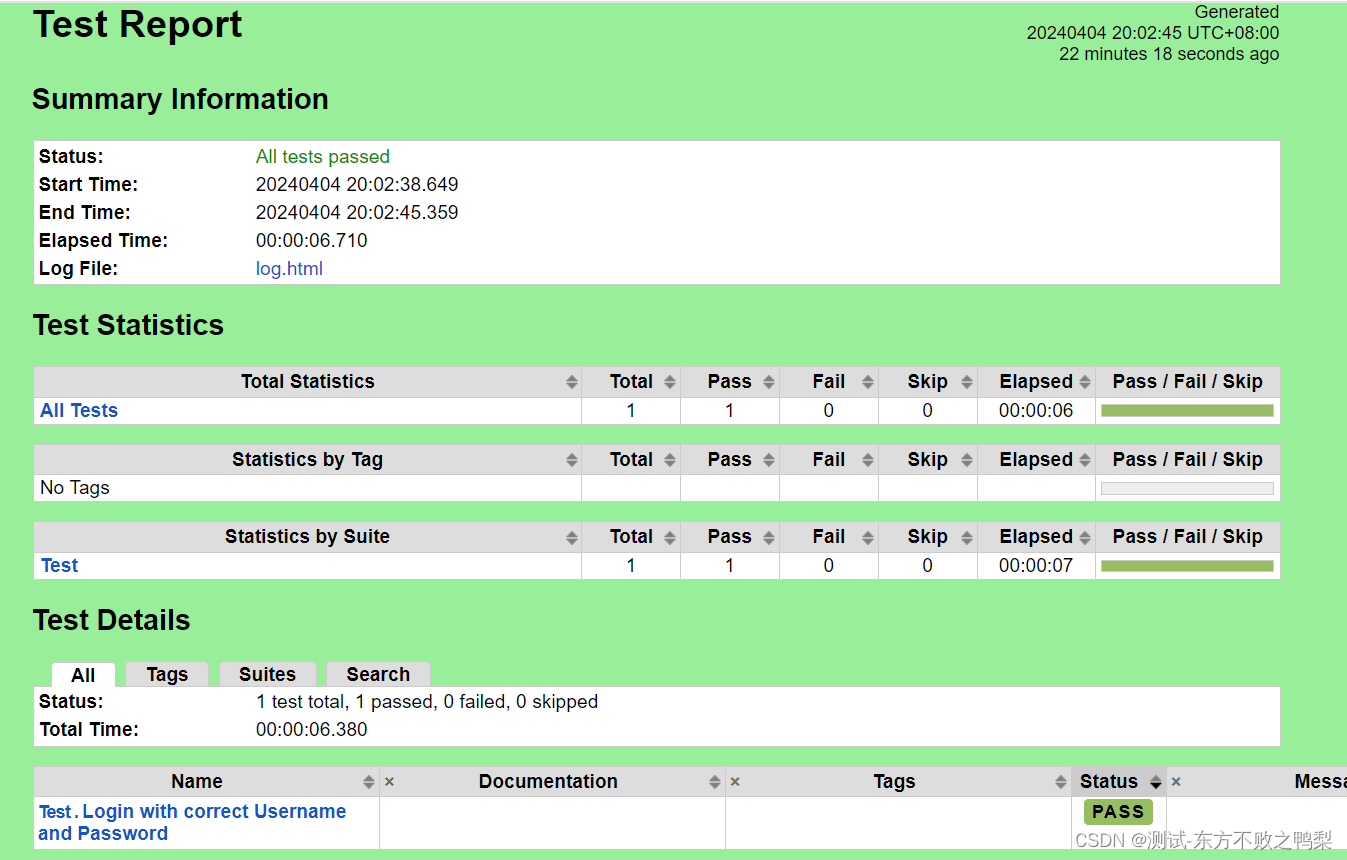
运行后可以看到测试结果,并生成了html格式的测试报告。
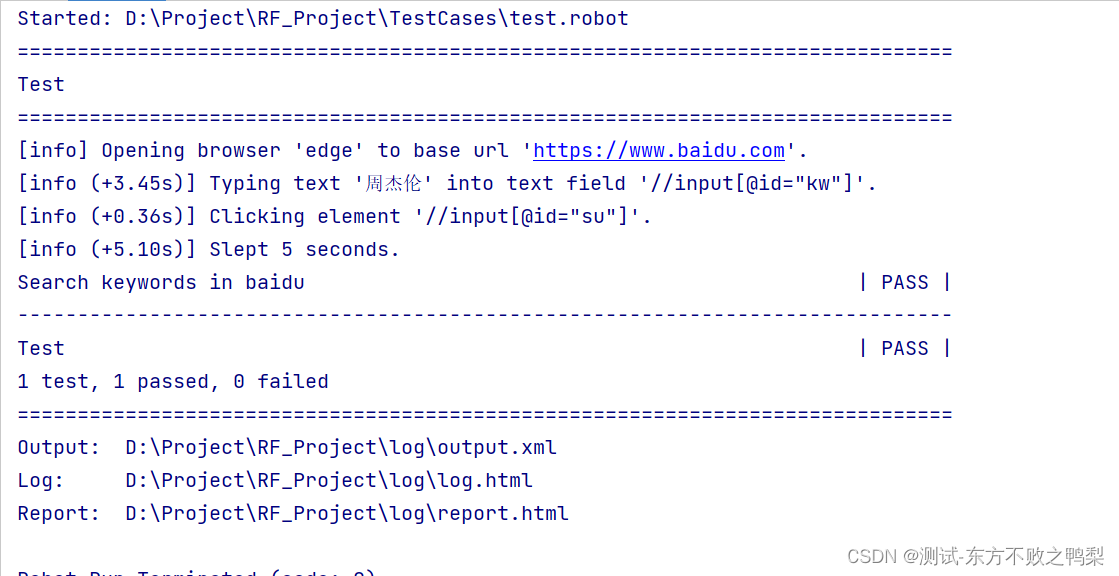
测试报告

项目结构

Test Suites 可以组织在一个或多个robot文件里,可以放在tests/文件夹下

resources 资源文件,里面存放的是可重复使用的keywords,可以是robot文件或py文件,可以放在resources文件夹下,如

common.resource -存放一般的关键字,如Login/Logout,导航

search.robot,跟查询有关的关键字

util.py python相关的关键字

libraries 常用的python关键字库,可以存放在libraries/文件夹下,某些项目会区分libraries和resources,有些不会。

my_project
├── tests
│   ├── suiteA.robot
│   ├── suiteB.robot
│   ├── ...
│   
├── resources
│   ├── common.resource
│   ├── some_other.resource
│   ├── custom_library.py
│   ├── variables.py
│   ├── ...

├── .gitlab-ci.yml
├── .gitignore
├── README.md
├── requirements.txt

执行用例

$ robot --pythonpath . tests 

一些项目还会有data文件,存放测试数据

my_project
├── tests
│   ├── authentication
│   │   ├── login.robot
│   │   ├── ...
│   │
│   ├── master-data
│   │   ├── customers.robot
│   │   ├── products.robot
│   │   ├── ...
│   │
│   ├── order
│   │   ├── order_creation.robot
│   │   ├── order_processing.robot
│   │   ├── ...
│   
├── resources
│   ├── common.resource
│   ├── search.resource
│   ├── master-data
│   │   ├── customers.resource
│   │   ├── products.resource
│   │   ├── ...
│   │
│   ├── ...

├── data
│   ├── master-data
│   │   ├── customers.py
│   │   ├── products.py
│   │   ├── ...
│   │
│   ├── order
│   │   ├── order_creation.yaml
│   │   ├── order_processing.yaml
│   │   ├── ...

├── .gitlab-ci.yml
├── .gitignore
├── README.md
├── requirements.txt 

示例 项目

RF官网提供了几个例子

Examples Overview | ROBOT FRAMEWORK

Vehicle Insurance App

根据下面的例子可以看到,RF的测试文件,包含

*** Settings ***-用来引入库和资源

*** Variables *** 用来指定变量,在测试用例中可使用${}来引用。

*** Test Cases *** 下面为用例,其中用例Create Quote for Car下包含的关键字,都是在*** Keywords ***中自定义的。

*** Keywords *** 定义关键字,关键字下调用Browser库文件中的关键字

  1. [Arguments] firstname=Max{lastname}=Mustermann

    • 这行定义了这个关键字需要的参数及其默认值。在这个例子中,Enter Insurant Data 关键字接受两个参数:firstname 和 lastname。如果调用这个关键字时没有提供这些参数的值,那么它们将分别默认为 Max 和 Mustermann
*** Settings ***
Library    Browser

*** Variables ***
${BROWSER}    chromium
${HEADLESS}    false

*** Test Cases ***
Create Quote for Car
    Open Insurance Application
    Enter Vehicle Data for Automobile
    Enter Insurant Data
    Enter Product Data
    Select Price Option
    Send Quote
    End Test

*** Keywords ***
Open Insurance Application
    New Browser    browser=${BROWSER}    headless=${HEADLESS}
    New Context    locale=en-GB
    New Page    http://sampleapp.tricentis.com/

Enter Vehicle Data for Automobile
    Click    div.main-navigation >> "Automobile"
    Select Options By    id=make    text    Audi
    Fill Text    id=engineperformance    110
    Fill Text    id=dateofmanufacture    06/12/1980
    Select Options By    id=numberofseats    text    5
    Select Options By    id=fuel    text    Petrol    
    Fill Text    id=listprice    30000
    Fill Text    id=licenseplatenumber    DMK1234
    Fill Text    id=annualmileage   10000 
    Click    section[style="display: block;"] >> text=Next »

Enter Insurant Data
    [Arguments]    ${firstname}=Max    ${lastname}=Mustermann
    Fill Text    id=firstname    Max
    Fill Text    id=lastname    Mustermann
    Fill Text    id=birthdate    01/31/1980
    Check Checkbox    *css=label >> id=gendermale
    Fill Text    id=streetaddress    Test Street
    Select Options By    id=country    text    Germany
    Fill Text    id=zipcode    40123
    Fill Text    id=city    Essen
    Select Options By    id=occupation    text    Employee
    Click    text=Cliff Diving
    Click    section[style="display: block;"] >> text=Next »

Enter Product Data
    Fill Text    id=startdate    06/01/2023
    Select Options By    id=insurancesum    text    7.000.000,00
    Select Options By    id=meritrating    text    Bonus 1
    Select Options By    id=damageinsurance    text    No Coverage
    Check Checkbox    *css=label >> id=EuroProtection
    Select Options By    id=courtesycar    text    Yes
    Click    section[style="display: block;"] >> text=Next »

Select Price Option
    [Arguments]    ${price_option}=Silver
    Click    *css=label >> css=[value=${price_option}]
    Click    section[style="display: block;"] >> text=Next »

Send Quote
    Fill Text    "E-Mail" >> .. >> input    max.mustermann@example.com
    Fill Text    "Phone" >> .. >> input    0049201123456
    Fill Text    "Username" >> .. >> input    max.mustermann
    Fill Text    "Password" >> .. >> input    SecretPassword123!
    Fill Text    "Confirm Password" >> .. >> input    SecretPassword123!
    Fill Text    "Comments" >> .. >> textarea    Some comments
    ${promise}=     Promise To    Wait For Response     matcher=http://sampleapp.tricentis.com/101/tcpdf/pdfs/quote.php     timeout=10
    Click    "« Send »"
    ${body}=    Wait For    ${promise}
    Log    ${body}[status]
    Log    ${body}[body]
    Wait For Elements State    "Sending e-mail success!"
    Click    "OK"

End Test
    Close Context
    Close Browser

WFA login

这个例子中引用了py文件中的函数

另外在Settings里可以使用Suite Setup和Suite Teardown进行test suite级别的测试数据准备和清理

Test Setup和Suite Teardown进行test级别前置和后置准备。

*** Settings ***
Library    Browser
Library    totp.py
Suite Setup    New Browser    browser=${BROWSER}    headless=${HEADLESS}
Test Setup    New Context
Test Teardown    Close Context
Suite Teardown    Close Browser

*** Variables ***
${BROWSER}    chromium
${HEADLESS}    False

*** Test Cases ***
Login with MFA
    New Page    https://seleniumbase.io/realworld/login
    Fill Text    id=username    demo_user
    Fill Text    id=password    secret_pass
    ${totp}    Get Totp    GAXG2MTEOR3DMMDG
    Fill Text    id=totpcode     ${totp}
    Click    "Sign in"
    Get Text  h1  ==  Welcome!

import pyotp

def get_totp(secret):
    totp = pyotp.TOTP(secret)
    return totp.now()

Restful Booker

*** Settings ***
Library    RequestsLibrary
Library    Collections
Suite Setup    Authenticate as Admin

*** Test Cases ***
Get Bookings from Restful Booker
    ${body}    Create Dictionary    firstname=John
    ${response}    GET    https://restful-booker.herokuapp.com/booking    ${body}
    Status Should Be    200
    Log List    ${response.json()}
    FOR  ${booking}  IN  @{response.json()}
        ${response}    GET    https://restful-booker.herokuapp.com/booking/${booking}[bookingid]
        TRY
            Log    ${response.json()}
        EXCEPT
            Log    Cannot retrieve JSON due to invalid data
        END
    END

Create a Booking at Restful Booker
    ${booking_dates}    Create Dictionary    checkin=2022-12-31    checkout=2023-01-01
    ${body}    Create Dictionary    firstname=Hans    lastname=Gruber    totalprice=200    depositpaid=false    bookingdates=${booking_dates}
    ${response}    POST    url=https://restful-booker.herokuapp.com/booking    json=${body}
    ${id}    Set Variable    ${response.json()}[bookingid]
    Set Suite Variable    ${id}
    ${response}    GET    https://restful-booker.herokuapp.com/booking/${id}
    Log    ${response.json()}
    Should Be Equal    ${response.json()}[lastname]    Gruber
    Should Be Equal    ${response.json()}[firstname]    Hans
    Should Be Equal As Numbers    ${response.json()}[totalprice]    200
    Dictionary Should Contain Value     ${response.json()}    Gruber

Delete Booking
    ${header}    Create Dictionary    Cookie=token\=${token}
    ${response}    DELETE    url=https://restful-booker.herokuapp.com/booking/${id}    headers=${header}
    Status Should Be    201    ${response}

*** Keywords ***
Authenticate as Admin
    ${body}    Create Dictionary    username=admin    password=password123
    ${response}    POST    url=https://restful-booker.herokuapp.com/auth    json=${body}
    Log    ${response.json()}
    ${token}    Set Variable    ${response.json()}[token]
    Log    ${token}
    Set Suite Variable    ${token}

todo MVC

这是一个BDD的例子

*** Settings ***
Library    Browser
Library    String
Suite Setup    New Browser    browser=${BROWSER}    headless=${HEADLESS}
Test Setup    New Context    viewport={'width': 1920, 'height': 1080}
Test Teardown    Close Context
Suite Teardown    Close Browser

*** Variables ***
${BROWSER}    chromium
${HEADLESS}    False

*** Test Cases ***
Add Two ToDos And Check Items
    [Documentation]    Checks if ToDos can be added and ToDo count increases
    [Tags]    Add ToDo
    Given ToDo App is open
    When I Add A New ToDo "Learn Robot Framework"
    And I Add A New ToDo "Write Test Cases"
    Then Open ToDos should show "2 items left"

Add Two ToDos And Check Wrong Number Of Items
    [Documentation]    Checks if ToDos can be added and ToDo count increases
    [Tags]    Add ToDo
    Given ToDo App is open
    When I Add A New ToDo "Learn Robot Framework"
    And I Add A New ToDo "Write Test Cases"
    Then Open ToDos should show "1 items left"

Add ToDo And Mark Same ToDo
    [Tags]    Mark ToDo
    Given ToDo App is open
    When I Add A New ToDo "Learn Robot Framework"
    And I Mark ToDo "Learn Robot Framework"
    Then Open ToDos should show "0 items left"

Check If Marked ToDos are removed
    Given ToDo App is open
    And I Added Two ToDos
    When I Mark One ToDo
    Then Open ToDos should show "1 item left"

Split ToDos
    Given ToDo App is open
    When I Add New ToDos "Learn Robot Framework&Write Test Cases&Sleep"
    Then Open ToDos should show "3 items left"

Add A Lot Of Todos
    Given ToDo App is open
    When I Add "100" ToDos
    Then Open ToDos should show "100 items left"

Add A Lot Of Todos With WHILE
    Given ToDo App is open
    When I Add "100" ToDos With WHILE Loop
    Then Open ToDos should show "100 items left"

*** Keywords ***
ToDo App is open
    New Page    https://todomvc.com/examples/react/

I Add A New ToDo "${todo}"   
    Fill Text  .new-todo  ${todo}
    Press Keys  .new-todo  Enter

I Add New ToDos "${todo}"
    IF  "&" in $todo
        @{todos}    Split String    ${todo}    separator=&
        FOR  ${item}  IN  @{todos}
            Fill Text  .new-todo  ${item}
            Press Keys  .new-todo  Enter 
        END
    ELSE
        Fill Text  .new-todo  ${todo}
        Press Keys  .new-todo  Enter
    END
    
Open ToDos should show "${text}"
    Get Text    span.todo-count    ==    ${text}

I Mark ToDo "${todo}"
    Click    "${todo}" >> .. >> input.toggle

I Added Two ToDos
    I Add A New ToDo "Learn Robot Framework"
    I Add A New ToDo "Write Test Cases"

I Mark One ToDo
    Click    li:first-child >> input.toggle

I Add "${count}" ToDos
    FOR    ${index}    IN RANGE    ${count}
        I Add A New ToDo "My ToDo Number ${index}"    
    END

I Add "${count}" ToDos With WHILE Loop
    ${x}=    Set Variable    ${0}
    WHILE  ${x} < ${count}
        ${x}=    Evaluate    ${x} + 1
        I Add A New ToDo "My ToDo Number ${x}"
    END
    

  • 29
    点赞
  • 21
    收藏
    觉得还不错? 一键收藏
  • 1
    评论

“相关推荐”对你有帮助么?

  • 非常没帮助
  • 没帮助
  • 一般
  • 有帮助
  • 非常有帮助
提交
评论 1
添加红包

请填写红包祝福语或标题

红包个数最小为10个

红包金额最低5元

当前余额3.43前往充值 >
需支付:10.00
成就一亿技术人!
领取后你会自动成为博主和红包主的粉丝 规则
hope_wisdom
发出的红包
实付
使用余额支付
点击重新获取
扫码支付
钱包余额 0

抵扣说明:

1.余额是钱包充值的虚拟货币,按照1:1的比例进行支付金额的抵扣。
2.余额无法直接购买下载,可以购买VIP、付费专栏及课程。

余额充值