


DataList控件
selfcherish
2008-11-20
DataList控件,作为更GridView,Reapter等类似的数据展示控件,无外乎是要实现它们和数据源的绑定,实现修改、删除、更新的功能等。分别来看。
一、使用SqlDataSource为DataList控件绑定数据源
这个比较简单,拖动控件到web窗体上,然后设定其DataSource为哪个SqlDataSource控件的数据就可以了。为了展示的数据好看,可以编辑DataList的Header模板和Footer模板,并为其选定一种样式,设定控件的 RepeatDirection为"Horizontal",RepeatColumns为"5"。由于是使用SqlDataSource控件作为它的数据源,其ItemTemplate模板会自动被编辑,加上相应的数据源字段的绑定。最后代码如下:
- <asp:DataList ID="DataList1" runat="server" BackColor="White"
- BorderColor="#E7E7FF" BorderStyle="None" BorderWidth="1px" CellPadding="3"
- DataKeyField="ID" DataSourceID="SqlDataSource1" GridLines="Horizontal"
- RepeatColumns="5" RepeatDirection="Horizontal">
- <FooterStyle BackColor="#B5C7DE" ForeColor="#4A3C8C" />
- <AlternatingItemStyle BackColor="#F7F7F7" />
- <ItemStyle BackColor="#E7E7FF" ForeColor="#4A3C8C" />
- <SelectedItemStyle BackColor="#62788A" Font-Bold="True" ForeColor="#F7F7F7" />
- <HeaderTemplate>
- 演示一:控件数据源
- </HeaderTemplate>
- <HeaderStyle BackColor="#4A3C8C" Font-Bold="True" ForeColor="#F7F7F7" />
- <FooterTemplate>
- 控件数据源
- </FooterTemplate>
- <ItemTemplate>
- ID:
- <asp:Label ID="IDLabel" runat="server" Text='<%# Eval("ID") %>' />
- <br />
- sname:
- <asp:Label ID="snameLabel" runat="server" Text='<%# Eval("sname") %>' />
- <br />
- english:
- <asp:Label ID="englishLabel" runat="server" Text='<%# Eval("english") %>' />
- <br />
- distrubute:
- <asp:Label ID="distrubuteLabel" runat="server"
- Text='<%# Eval("distrubute") %>' />
- <br />
- finalpoint:
- <asp:Label ID="finalpointLabel" runat="server"
- Text='<%# Eval("finalpoint") %>' />
- <br />
- sbool:
- <asp:Label ID="sboolLabel" runat="server" Text='<%# Eval("sbool") %>' />
- <br />
- <br />
- </ItemTemplate>
- </asp:DataList>
- <asp:SqlDataSource ID="SqlDataSource1" runat="server"
- ConnectionString="<%$ ConnectionStrings:DbOneConnectionString %>"
- SelectCommand="SELECT TOP (10) ID, sname, english, distrubute, finalpoint, sbool FROM sscore_OLD_local">
- </asp:SqlDataSource>
二、使用自定义数据源
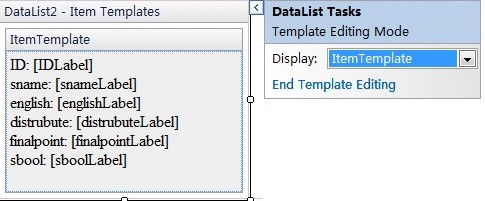
使用自定义数据源的时候,不需要在智能标签里边设置其DataSource属性,这需要通过编程来设定,也就是在程序中返回一个DataTable,赋值给DataList的DataSource成员,然后调用其DataBind方法绑定数据。需要注意的是,这个时候,ItemTemplate模板下的数据绑定就需要手动去写了。写的方法,就是在智能标签中选择编辑模板,然后选族ItemTemplate,为需要绑定的字段取名,并添加相应的控件来呈现字段的实际数据,一般不需要编辑的时候都用Label。如图:
然后,在选IDLabel控件的智能标签,并编辑绑定(Edit DataBindings...):

整个控件的代码如下:
- <asp:DataList ID="DataList2" runat="server" BackColor="White"
- BorderColor="#999999" BorderStyle="None" BorderWidth="1px" CellPadding="3"
- GridLines="Vertical" RepeatColumns="5" RepeatDirection="Horizontal">
- <FooterStyle BackColor="#CCCCCC" ForeColor="Black" />
- <AlternatingItemStyle BackColor="#DCDCDC" />
- <ItemStyle BackColor="#EEEEEE" ForeColor="Black" />
- <SelectedItemStyle BackColor="#008A8C" Font-Bold="True" ForeColor="White" />
- <HeaderTemplate>
- 演示二:自定义数据源
- </HeaderTemplate>
- <HeaderStyle BackColor="#000084" Font-Bold="True" ForeColor="White" />
- <FooterTemplate>
- 自定义数据源
- </FooterTemplate>
- <ItemTemplate>
- ID:
- <asp:Label ID="IDLabel" runat="server" Text='<%# Eval("ID") %>' />
- <br />
- sname:
- <asp:Label ID="snameLabel" runat="server" Text='<%# Eval("sname") %>' />
- <br />
- english:
- <asp:Label ID="englishLabel" runat="server" Text='<%# Eval("english") %>' />
- <br />
- distrubute:
- <asp:Label ID="distrubuteLabel" runat="server"
- Text='<%# Eval("distrubute") %>' />
- <br />
- finalpoint:
- <asp:Label ID="finalpointLabel" runat="server"
- Text='<%# Eval("finalpoint") %>' />
- <br />
- sbool:
- <asp:Label ID="sboolLabel" runat="server" Text='<%# Eval("sbool") %>' />
- <br />
- <br />
- </ItemTemplate>
- </asp:DataList>
数据绑定的代码如下:
- protected void Page_Load(object sender, EventArgs e)
- {
- if(!IsPostBack)
- {
- db sdb = new db();
- DataList2.DataSource = sdb.dt("SELECT top 10 [ID], [sname], [english], [distrubute], [finalpoint], [sbool] FROM [sscore_OLD_local] ORDER BY [ID]");
- DataList2.DataBind();
- }
- }
db类的定义在后边给出。
三、实现DataList控件的编辑、更新、和删除
要实现DataList控件的编辑、更新、和删除,除了要在ItemTemplate和EditTemplate中实现其数据绑定之外,还需要在这两个模板中添加Button或LinkButton或HyperLink,并设定它们的CommandName分别为edit、update、delete或cancel,根据这几个CommandName,然后利用DataList的EditCommand、UpdateCommand、DeleteCommand、CancelCommand等事件来实现相应的操作。在EditTemplated模板中的数据展示控件就相应的需要用可以供编辑的控件如TextBox了。最后,还需要设定DataList的DataKeyField属性,作为其编辑、删除和更新的主键。如图:
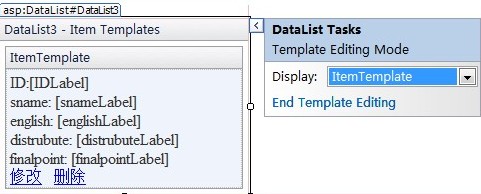
修改和删除的CommandName分别就设置为edit和delete。
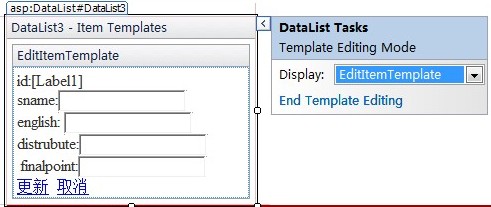
更新和取消的CommandName分别设置为update和cancel。
完成后,DataList的代码如下:
- <asp:DataList ID="DataList3" runat="server" CellPadding="4" ForeColor="#333333"
- oncancelcommand="DataList3_CancelCommand"
- ondeletecommand="DataList3_DeleteCommand" oneditcommand="DataList3_EditCommand"
- onupdatecommand="DataList3_UpdateCommand" RepeatColumns="5"
- RepeatDirection="Horizontal">
- <FooterStyle BackColor="#507CD1" Font-Bold="True" ForeColor="White" />
- <AlternatingItemStyle BackColor="White" />
- <ItemStyle BackColor="#EFF3FB" />
- <EditItemTemplate>
- id:<asp:Label ID="Label1" runat="server" Text='<%# Eval("id") %>'></asp:Label>
- <br />
- sname:<asp:TextBox ID="TextBox1" runat="server" Text='<%# Eval("sname") %>'></asp:TextBox>
- <br />
- english:
- <asp:TextBox ID="TextBox2" runat="server" Text='<%# Eval("english") %>'></asp:TextBox>
- <br />
- distrubute:<asp:TextBox ID="TextBox3" runat="server"
- Text='<%# Eval("distrubute") %>'></asp:TextBox>
- <br />
- finalpoint:<asp:TextBox ID="TextBox4" runat="server"
- Text='<%# Eval("finalpoint") %>'></asp:TextBox>
- <br />
- <asp:LinkButton ID="LinkButton3" runat="server" CommandName="update">更新</asp:LinkButton>
- <asp:LinkButton ID="LinkButton4" runat="server" CommandName="cancel">取消</asp:LinkButton>
- </EditItemTemplate>
- <SelectedItemStyle BackColor="#D1DDF1" Font-Bold="True" ForeColor="#333333" />
- <HeaderTemplate>
- 演示三:实现自定义数据源的修改和删除
- </HeaderTemplate>
- <HeaderStyle BackColor="#507CD1" Font-Bold="True" ForeColor="White" />
- <FooterTemplate>
- 实现自定义数据源的修改和删除
- </FooterTemplate>
- <ItemTemplate>
- ID:<asp:Label ID="IDLabel" runat="server" Text='<%# Eval("ID") %>' />
- <br />
- sname:
- <asp:Label ID="snameLabel" runat="server" Text='<%# Eval("sname") %>' />
- <br />
- english:
- <asp:Label ID="englishLabel" runat="server" Text='<%# Eval("english") %>' />
- <br />
- distrubute:
- <asp:Label ID="distrubuteLabel" runat="server"
- Text='<%# Eval("distrubute") %>' />
- <br />
- finalpoint:
- <asp:Label ID="finalpointLabel" runat="server"
- Text='<%# Eval("finalpoint") %>' />
- <br />
- <asp:LinkButton ID="LinkButton1" runat="server" CommandName="edit">修改</asp:LinkButton>
- <asp:LinkButton ID="LinkButton2" runat="server" CommandName="delete"> 删除</asp:LinkButton>
- </ItemTemplate>
- </asp:DataList>
在后台,首先是实现数据源的绑定:
- if(!IsPostBack)
- {
- //bing for DataList3
- this.bind();
- }
- private void bind()
- {
- db sdb = new db();
- DataList3.DataSource = sdb.dt("SELECT top 10 [ID], [sname], [english], [distrubute], [finalpoint], [sbool] FROM [sscore_OLD_local] ORDER BY [ID]");
- DataList3.DataKeyField = "id";//跟新的时候根据这个字段
- DataList3.DataBind();
- }
然后是几个事件函数的编写:
- protected void DataList3_CancelCommand(object source, DataListCommandEventArgs e)
- {
- DataList3.EditItemIndex = -1;
- this.bind();
- }
- protected void DataList3_DeleteCommand(object source, DataListCommandEventArgs e)
- {
- String id = DataList3.DataKeys[e.Item.ItemIndex].ToString();
- db sdb = new db();
- string deletestr = "DELETE FROM [sscore_OLD_local] WHERE [ID] = '" + id + "'";
- if (sdb.sql(deletestr) > 0)
- {
- Response.Write("<script>alert('删除成功')</script>");
- DataList3.EditItemIndex = -1;
- this.bind();
- }
- }
- protected void DataList3_UpdateCommand(object source, DataListCommandEventArgs e)
- {
- String id = DataList3.DataKeys[e.Item.ItemIndex].ToString();
- String sname = ((TextBox)e.Item.FindControl("TextBox1")).Text;
- float english = Convert.ToSingle(((TextBox)e.Item.FindControl("TextBox2")).Text);
- float distrubute = Convert.ToSingle(((TextBox)e.Item.FindControl("TextBox3")).Text);
- float finalpoint = Convert.ToSingle(((TextBox)e.Item.FindControl("TextBox4")).Text);
- db sdb = new db();
- string str = "UPDATE [sscore_OLD_local] SET [SNAME] = '" + sname + "',[ENGLISH] = '" + english + "',[DISTRUBUTE] = '" + distrubute + "',[FINALPOINT] = '" + finalpoint + "' WHERE [ID] = '" + id + "'";
- if (sdb.sql(str) > 0)
- {
- Response.Write("<script>alert('更新成功')</script>");
- DataList3.EditItemIndex = -1;
- this.bind();
- }
- }
- protected void DataList3_EditCommand(object source, DataListCommandEventArgs e)
- {
- DataList3.EditItemIndex = e.Item.ItemIndex;
- this.bind();
- }
同样,db类,在后边给出。
四、实现DataList的分页:
分页的时候,在数据绑定,跟前边是类似的:也将代码贴出来,方便看:
- <asp:DataList ID="DataList4" runat="server" CellPadding="4" ForeColor="#333333"
- onitemdatabound="DataList4_ItemDataBound" RepeatDirection="Horizontal">
- <FooterStyle BackColor="#990000" Font-Bold="True" ForeColor="White" />
- <AlternatingItemStyle BackColor="White" />
- <ItemStyle BackColor="#FFFBD6" ForeColor="#333333" />
- <SelectedItemStyle BackColor="#FFCC66" Font-Bold="True" ForeColor="Navy" />
- <HeaderTemplate>
- 演示四:实现分页
- </HeaderTemplate>
- <HeaderStyle BackColor="#990000" Font-Bold="True" ForeColor="White" />
- <FooterTemplate>
- <asp:PlaceHolder ID="ph" runat="server"></asp:PlaceHolder>
- <br />实现分页
- </FooterTemplate>
- <ItemTemplate>
- ID:<asp:Label ID="IDLabel" runat="server" Text='<%# Eval("ID") %>' />
- <br />
- sname:
- <asp:Label ID="snameLabel" runat="server" Text='<%# Eval("sname") %>' />
- <br />
- english:
- <asp:Label ID="englishLabel" runat="server" Text='<%# Eval("english") %>' />
- <br />
- distrubute:
- <asp:Label ID="distrubuteLabel" runat="server"
- Text='<%# Eval("distrubute") %>' />
- <br />
- finalpoint:
- <asp:Label ID="finalpointLabel" runat="server"
- Text='<%# Eval("finalpoint") %>' />
- </ItemTemplate>
- </asp:DataList>
数据绑定:
-
- if(!IsPostBack)
- {
- //page for DataList4
- int n;//初始页码,通过绑定传进去
- if(Request.QueryString["page"] != null)
- {
- n = Convert.ToInt32(Request.QueryString["page"]);
- }
- else
- {
- n = 0;
- }
- bind4(n);
- }
- private void bind4(int n)
- {
- db sdb = new db();
- DataList4.DataSource = sdb.pds(n);
- DataList4.DataBind();
- }
分页的操作,主要是用DataList的ItemDataBound事件来完成,也就是在ItemTemplate的数据绑定之后,就通过来事件来设定其FooterTemplate模板中的分页信息,为此,先在DataList的FooterTemplate中放一个PlaceHolder,然后,将分页信息放在这个PlaceHolder中。
- protected void DataList4_ItemDataBound(object sender, DataListItemEventArgs e)
- {
- if (e.Item.ItemType == ListItemType.Footer)
- {//分页,主要是对Footer模板做这件事情
- PlaceHolder ph = (PlaceHolder)e.Item.FindControl("ph");
- db sdb = new db();
- for (int i = 0; i < sdb.pds().PageCount;i++ )
- {
- HyperLink h1 = new HyperLink();
- Literal ltl = new Literal();
- int n = i + 1;
- h1.Text = n.ToString();
- h1.ID = n.ToString();
- h1.NavigateUrl = "~/DataListStu.aspx?page=" + i.ToString();
- ltl.Text = " ";
- ph.Controls.Add(h1);
- ph.Controls.Add(ltl);
- }
- }
- }
最后给出,这个控件中用到的db类:
- public class db
- {
- protected string conn;
- private int pagesize;
- public db(){
- conn = ConfigurationManager.ConnectionStrings["DbOneConnectionString"].ConnectionString;
- pagesize = 4;
- }
- public DataTable dt(string query)
- {
- SqlConnection con = new SqlConnection(conn);
- SqlDataAdapter sda = new SqlDataAdapter(query, con);
- DataSet ds = new DataSet();
- sda.Fill(ds,"name");
- return ds.Tables["name"];
- }
- public PagedDataSource pds(int n)//int pg
- {
- PagedDataSource pds = new PagedDataSource();
- pds.DataSource = dt("SELECT TOP 30 [ID], [sname], [english], [distrubute], [finalpoint] FROM [sscore_OLD_local] ORDER BY [ID]").DefaultView;//
- //SELECT TOP 10 * FROM SSCORE_OLD_local
- pds.AllowPaging = true;
- pds.PageSize = pagesize;
- pds.CurrentPageIndex = n;// pds.CurrentPageIndex;
- return pds;
- }
- public PagedDataSource pds()//int pg
- {
- PagedDataSource pds = new PagedDataSource();
- pds.DataSource = dt("SELECT TOP 30 [ID], [sname], [english], [distrubute], [finalpoint] FROM [sscore_OLD_local] ORDER BY [ID]").DefaultView;//
- //SELECT TOP 10 * FROM SSCORE_OLD_local
- pds.AllowPaging = true;
- pds.PageSize = pagesize;
- pds.CurrentPageIndex = pds.CurrentPageIndex;
- return pds;
- }
- public int sql(string sqlstr)
- {
- SqlConnection con = new SqlConnection(conn);
- con.Open();
- SqlCommand cmd = new SqlCommand(sqlstr, con);
- int a = cmd.ExecuteNonQuery();
- con.Close();
- return a;
- }
- }
遗憾的是,这样做呢,有个小小的问题。那就是,如果要同时做编辑和分页的话,这样分页就会有问题,一种解决方法是将分页信息放到外边的Label中,再把这个Label放到DataList的下边。


 1972
1972

 被折叠的 条评论
为什么被折叠?
被折叠的 条评论
为什么被折叠?
 到【灌水乐园】发言


