


Purpose
Estimated time to complete this lab: 25 minutes
In this exercise, you will learn how to use the Web Client Software Factory to create a Web client solution that you can use as the starting point for building a Web client application. Web client solutions include recommended practices and techniques; they are the basis for the procedures and automated guidance included in the Web Client Software Factory.
You will also learn about business modules and how to add a business module to your solution using Visual Studio automation included in the Web Client Software Factory.
Preparation
Before proceeding with this lab, you must install and configure the prerequisite software. For more information, see Web Client Software Factory Hands-On Labs.
Procedures
This lab includes the following tasks:
· Task 1: Create a Web Client Solution
· Task 2: Add the EFT Business Module
· Task 3:Review the Business Module Components
· Task 4: Add Admin and Reports Business Modules
The next sections describe each of these tasks.
Task 1: Create a Web Client Solution
The Web Client Software Factory includes a guidance package named Web Client Development. By default, this guidance package is installed when you install the Web Client Software Factory.
In this task, you will use the guidance package to create a new Visual Studio solution for your Web client application. This solution is a starting point for the exercises in the hands-on labs.
There are two different starting solution templates; each one is available in both C# and Visual Basic .NET:
Web Client Solution (Web Site). This template uses a Visual Studio Web Site project as the main Web site. (This is the default file-based Web site when you create Web sites in Visual Studio 2005.) With this Web site, you can add Web forms and classes in different programming languages; each Web form is compiled to its own assembly.
Web Client Solution (WAP). The Web Application Project (WAP) option is available if you use Visual Studio 2005 Service Pack 1. The ASP.NET Web application project model option provides the same conceptual Web project semantics as Visual Studio 2003 Web projects. This is a project file–based structure where all code in the project is compiled into a single assembly. When adding modules to the solution in this model, you have the option to create a sub-Web application project for that module in order to build and deploy the module’s assemblies independently of each other.
To create the Web client solution
1. On the File menu, point to New, and then click Project. The New Project dialog box, illustrated in Figure 1, opens
2. Under Project types, expand Guidance Packages, and then click Web Client Development June 2007.
3. Under Templates, click Web Client Solution (C#, Web Site).
4. In the Name box, type GlobalBank.

Figure 1
New Project dialog box
5. Click OK.
6. On the first page of the Create Web Client Solution recipe wizard, illustrated in Figure 2, confirm (or enter if necessary) the location of the required application block assemblies.
Note: The required application block assemblies are signed and included with the Web Client Software Factory. The software factory installer installs them to the Microsoft Practices Library folder and records the location in a registry key (see HKEY_LOCAL_MACHINE/SOFTWARE/Microsoft/patterns and practices/Web Client Factory/MicrosoftPracticesLibraryBinaryPath). By default, the Create Web Client Solution recipe uses this location to search for the required assemblies.
The recipe validates that the required assemblies are present at the specified location. To see this, enter a different location for the required assemblies. The names of the assemblies will turn red, indicating that the required assemblies are not present at that location. Set the location back to the Microsoft Practices Library folder to continue.
7. In the Root namespace box, type GlobalBank.
8. Select the Show documentation after recipe completes check box.
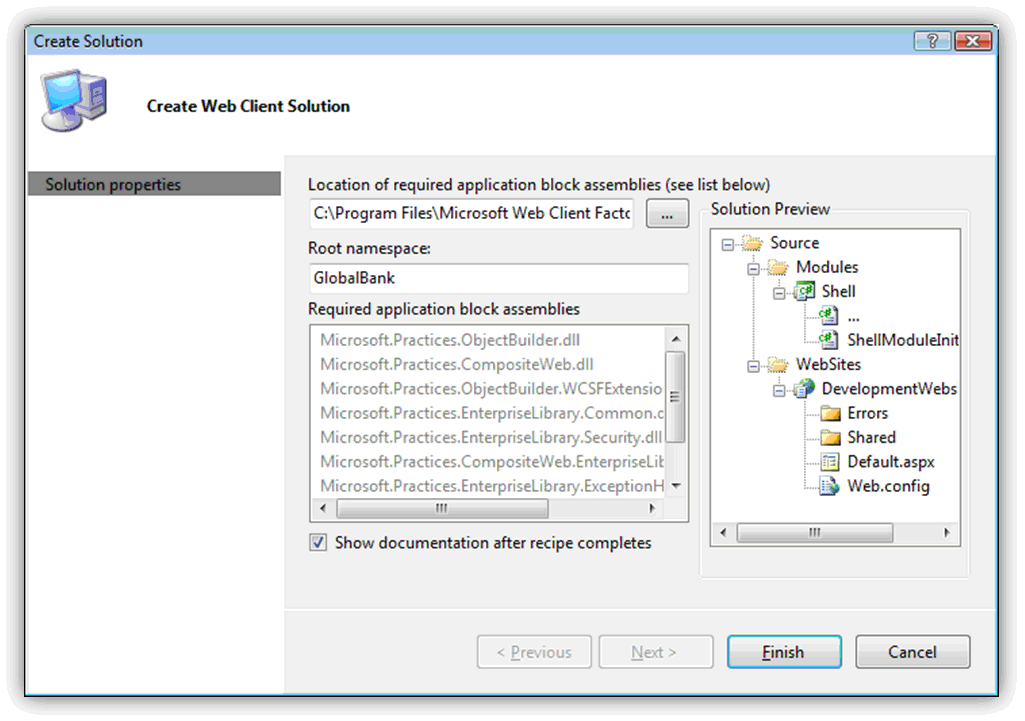
Figure 2
Create Web Client Solution recipe wizard
9. Click Finish. Visual Studio unfolds the Web Client Solution template and displays a documentation page.
Web applications created with the Web Client Software Factory are composed of modules. You can use modules to encapsulate a set of concerns of your application and independently deploy them to your applications. The Composite Web Application Block distinguishes between two types of modules:
· Business modules. A business module encapsulates a set of concerns of your application and contains Web pages. Typically, business modules are independent from one another and do not expose functionality to other modules.
Typical components of a business module are a combination of related Web pages, page flows, business logic, and services. The following are examples of business modules:
o A module that contains a specific application feature area, such as reports
o A module that contains use cases around a specific back-end system, such as loan processing
In this lab, you will create a sample business module to encapsulate components required to implement electronic funds transfer (EFT) processing.
· Foundational modules. A foundational module exposes functionality that is shared across the application and does not contain Web pages. For example, a foundational module can contain code that provides instrumentation, such as logging. In “Lab 5: Creating a Foundational Module,” you will learn how to create a foundational module.
By default, solutions created with the Web Client Solution template include a Web site with a business module named Shell. This module is associated with the root folder of the Web site. This means that all pages in the root Web site folder belong to the Shell module.
Task 2: Add the EFT Business Module
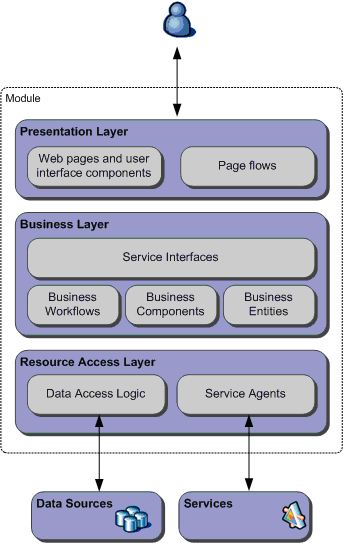
A business module can contain any of the application classes required by the concerns that the module encapsulates. Figure 3 illustrates typical objects organized by application layer (a module can contain all, or some combination, of the listed components).
The Web Client Software Factory includes a recipe named Add Business Module that automates the creation of business modules. In this task, you will add a business module to encapsulate components required to execute EFT using this recipe.
To add the EFT business module
1. In the Modules solution folder, create a solution folder (not a physical folder) named EFT.
2. Use the guidance package to create a new business module in the EFT solution folder. To do this, right-click the EFT solution folder in Solution Explorer, point to Web Client Factory, and then click Add Business Module (C#).
3. In the Add New Project dialog box, illustrated in Figure 4, type EFT in the Name box.
4. In the Location box, use the Browse button to select C:/GlobalBank/Modules/EFT (create the EFT folder if necessary).

Figure 4
Add New Project dialog box
5. Click OK to create the project and launch the recipe wizard.
6. On the first page of the Add Business Module recipe wizard, illustrated in Figure 5, select the Create project for unit tests check box, and then click Finish.
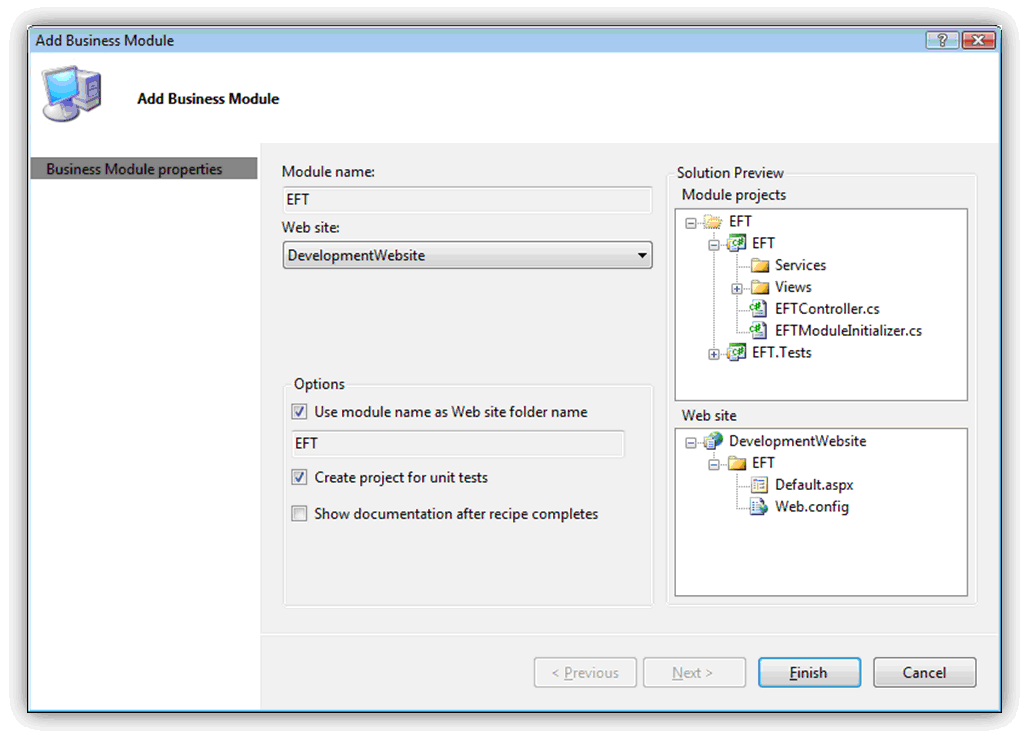
Figure 5
Add Business Module recipe wizard
Note: For more information about how to create a module in your solution, see “How To: Create a Business Module” in the Web Client Software Factory documentation.
Task 3: Review the business Module Components
After you run the Add Business Module recipe, you will have the following elements in your solution:
· A C# class library project. This is the module class library. It contains a default view interface with a presenter, an empty folder named Services, a module initialization class, and a module controller. You will store services, view interfaces, presenters, and controllers in this project.
· A folder in the Web site that has a default view implementation and a Web.config file. The Composite Web Application Block uses the module information in the Web.config file to load the module when the application starts. You will store view implementations in this folder.
· A test project for the module. This project includes unit tests for the module initialization class and the presenter class of the default view. It also includes a mock module controller you can use to test your presenters.
Figure 6 illustrates the solution with the EFT module.
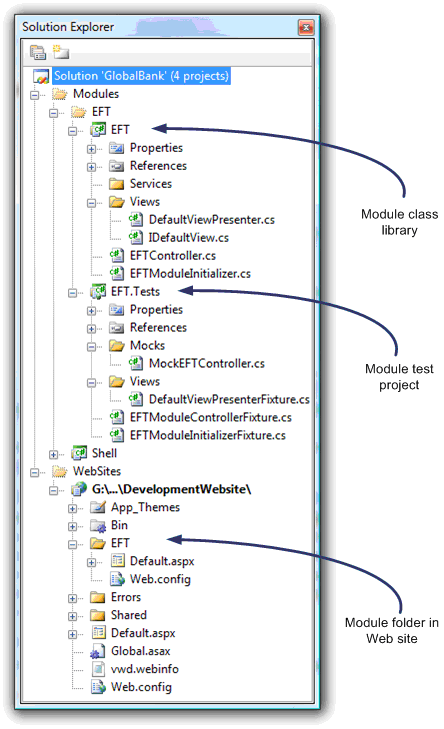
Figure 6
Solution Explorer view of the solution with the EFT module
Task 4: Add Admin and Reports Business Modules
For this task, you will create two additional business modules in the solution. (To do this, follow the same steps described in Task 2.) Name the modules “Admin” and “Reports,” and create physical folders and solution folders for your modules. Your solution should appear similar to the one illustrated in Figure 7.
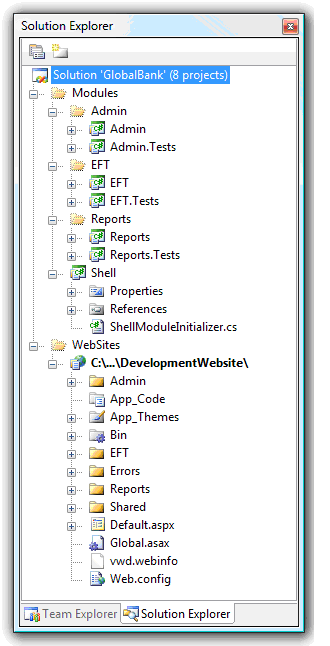
Figure 7
Solution Explorer view of the solution with the EFT, Admin, and Reports modules
Verification
In this section, you will verify that you correctly created the Web client application.
To verify the Web client application was created correctly
1. Set DevelopmentWebsite as the startup project. To do this, right-click DevelopmentWebsite in Solution Explorer, and then click Set as StartUp Project.
2. Set the Default.aspx page in the root of the DevelopmentWebsite site as the start page. To do this, right-click Default.aspx in the root of the Web site, and then click Set as Start Page.
3. Build and run the solution. You should see a site map node for each of the business modules in the menu on the left of the page, as shown in Figure 8.
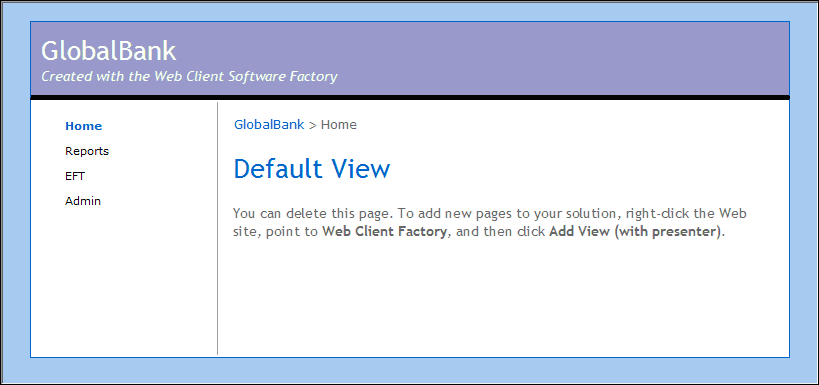 Figure 8
GlobalBank Web client application default page
4. Click each node to see the default page for each module.


 被折叠的 条评论
为什么被折叠?
被折叠的 条评论
为什么被折叠?
 到【灌水乐园】发言


