


 本文介绍如何使用PageFlowApplicationBlock进行页面导航的设计,通过实际操作演示了PageFlow定义、配置及使用流程,包括设置PageFlow属性、定义页面状态转换、存储业务过程状态等关键步骤。
Lab 8: Using Page Flow
Purpose
Estimated time to complete this lab: 45 minutes
You can use the Page Flow Application Block to easily design the parts of your application that orchestrate the Web pages that allow users to fulfill a process. You can use the application block for simple processes, where the sequence of activities is fixed. You can also use the application block for complex scenarios, where the sequence of activities can be altered by user interaction or event-driven business processes that cause the exact sequence of activities to be determined at run time. Figure 1 illustrates the components involved in the page flow process.

Figure 1
Page flow process components
A page flow definition is a specialized type of state machine workflow that helps you define the navigation between pages in an easy and centralized place, without the need to hardcode specific URLs throughout your code.
In this exercise, you will learn how to use the Page Flow Application Block in your Web application to navigate between the EFT module’s pages.
Preparation
Before proceeding with this lab, you must install and configure the prerequisite software. For more information, see Web Client Software Factory Hands-On Labs.
For this lab, you need the following:
· Windows Workflow Foundation (.NET Framework 3.0)
· Visual Studio 2005 Extensions for Windows Workflow Foundation
· SQL persistence store for Windows Workflow Foundation
· SQL persistence store for correlation tokens
The last two items in the list are created for you by running the script named SetupDatabase.bat. For more information about the script, see Web Client Software Factory Hands-On Labs.
Open the solution for the previous lab (either the one that you created or the end solution for that lab.) If you use the provided end solution, you must enable the guidance package for that solution.
To enable the Web Client Development guidance package with the Guidance Package Manager
1. Using Visual Studio, open the solution.
2. On the Tools menu, click Guidance Package Manager.
3. In the Guidance Package Manager dialog box, click Enable / Disable Packages.
4. In the Enable and Disable Packages dialog box, select the Web Client Development check box.
5. Click OK.
Procedures
This lab includes the following tasks:
· Task 1: Enable Your Solution for the Page Flow Application Block
· Task 2: Create a Page Flow Project
· Task 3: Define the Page Flow
· Task 4: Access the Page Flow Provider and Page Flow Instance in the EFT Controller
· Task 5: Use the Page Flow Instance State to Store the Current Transfers
· Task 6: Use the Page Flow to Navigate Through the Pages
· Task 7: Remove References to the Old Navigation Project in the EFT Module
The next sections describe each of these tasks.
Task 1: Enable Your Solution for the Page Flow Application Block
Before you can use the Page Flow Application Block, you must first enable your solution. When a solution is enabled to use the Page Flow Application Block, the HTTP module PageFlowHttpModule processes all requests before ASP.NET transitions the user to a new page. The HTTP module redirects the user requests, if appropriate, and does not require custom application code.
Note: For more information about HTTP modules, see Introduction to HTTP Modules.
In this task, you will enable your solution to use the Page Flow Application Block.
To enable your solution for the Page Flow Application Block
1. Add references in your Web site to the following application block assemblies:
· Microsoft.Practices.PageFlow.dll
· Microsoft.Practices.PageFlow.WorkflowFoundation.dll
· Microsoft.Practices.PageFlow.Storage.EnterpriseLibrary.dll
· Microsoft.Practices.EnterpriseLibrary.Data.dll
To do this in Solution Explorer, right-click DevelopmentWebsite, and then click Property Pages. On the References tab, click Add Reference. On the Browse tab, select the assemblies located at %WCSF_INSTALL_DIR%/Microsoft Practices Library, and then click OK.
To configure the application block, your Web site configuration file must define the following configuration sections:
· pageFlowProvider. This section specifies the page flow provider type.
· hostingWorkflowRuntime. This section sets up the Windows Workflow Foundation engine.
· pageFlowInstanceStoreProvider. This section specifies the page flow instance store provider type.
· pageFlowInstanceCorrelationTokenProvider. This section specifies the provider that correlates page flow instances with users.
In the following steps, you will add these sections to the Web.config file of your Web site.
2. Open the Web.config file located in the root folder of your Web site, and then add the following XML inside the configuration/configSections element to declare the configuration sections required by the Page Flow Application Block.
<sectionGroup name="pageFlow">
<section name="pageFlowProvider" type="Microsoft.Practices.PageFlow.Configuration.PageFlowProviderSection, Microsoft.Practices.PageFlow"/>
<section name="hostingWorkflowRuntime" type="System.Workflow.Runtime.Configuration.WorkflowRuntimeSection, System.Workflow.Runtime, Version=3.0.00000.0, Culture=neutral, PublicKeyToken=31bf3856ad364e35"/>
<section name="pageFlowInstanceStoreProvider" type="Microsoft.Practices.PageFlow.Configuration.PageFlowInstanceStoreProviderSection, Microsoft.Practices.PageFlow"/>
<section name="pageFlowInstanceCorrelationTokenProvider" type="Microsoft.Practices.PageFlow.Configuration.PageFlowInstanceCorrelationTokenProviderSection, Microsoft.Practices.PageFlow"/>
</sectionGroup>
3. Add the following page flow configuration sections inside the configuration element.
<pageFlow>
<pageFlowProvider providerType="Microsoft.Practices.PageFlow.WorkflowFoundation.WorkflowFoundationPageFlowProvider, Microsoft.Practices.PageFlow.WorkflowFoundation"/>
<hostingWorkflowRuntime Name="Hosting">
<Services>
<add type="System.Workflow.Runtime.Hosting.SqlWorkflowPersistenceService, System.Workflow.Runtime, Version=3.0.00000.0, Culture=neutral, PublicKeyToken=31bf3856ad364e35" connectionString="Integrated Security=SSPI;Persist Security Info=False;Initial Catalog=WCSF_HOLs;Data Source=./SQLEXPRESS;" LoadIntervalSeconds="5" UnloadOnIdle="true"/>
<add type="System.Workflow.Runtime.Hosting.ManualWorkflowSchedulerService, System.Workflow.Runtime, Version=3.0.00000.0, Culture=neutral, PublicKeyToken=31bf3856ad364e35" useActiveTimers="true"/>
<add type="System.Workflow.Activities.ExternalDataExchangeService, System.Workflow.Activities, Version=3.0.00000.0, Culture=neutral, PublicKeyToken=31bf3856ad364e35"/>
</Services>
</hostingWorkflowRuntime>
<pageFlowInstanceStoreProvider providerType="Microsoft.Practices.PageFlow.Storage.EnterpriseLibrary.PageFlowInstanceCorrelationSqlProvider, Microsoft.Practices.PageFlow.Storage.EnterpriseLibrary" connectionString="WCSF_HOLs"/>
<pageFlowInstanceCorrelationTokenProvider providerType="Microsoft.Practices.PageFlow.Storage.EnterpriseLibrary.CookiePageFlowCorrelationTokenProvider, Microsoft.Practices.PageFlow.Storage.EnterpriseLibrary"/>
</pageFlow>
Note: If you are using SQL Server 2005 instead of SQL Server 2005 Express Edition, you must change the connection string for the SqlWorkflowPersistenceService to target your server instance. Typically, the default instance name is “.” (period). Therefore, if you are using the default instance name, you must replace the highlighted text “./SQLEXPRESS” with “.”.
4. Add the bold line in the following XML inside the httpModules element to register the PageFlowHttpModule class as an HTTP module.
<httpModules>
<add name="WebClientAuthorizationModule" type="Microsoft.Practices.CompositeWeb.Authorization.WebClientAuthorizationModule, Microsoft.Practices.CompositeWeb"/>
<add name="ExceptionLoggerHttpModule" type="Microsoft.Practices.CompositeWeb.EnterpriseLibrary.ExceptionLogger, Microsoft.Practices.CompositeWeb.EnterpriseLibrary"/>
<add name="PageFlowModule" type="Microsoft.Practices.PageFlow.PageFlowHttpModule, Microsoft.Practices.PageFlow"/>
</httpModules>
Task 2: Create a Page Flow Project
When you use the Windows Workflow Foundation Page Flow Provider, you create page flow definitions inside a page flow project. The page flow project contains references to the Page Flow Application Block assemblies and has settings that support the Visual Studio 2005 Designer for Windows Workflow Foundation.
In this task, you will use the Add Page Flow Project (Workflow Foundation) recipe to generate a C# page flow project for the EFT module.
To create a page flow project
1. In Solution Explorer, right-click the EFT solution folder, point to Web Client Factory, and then click Add Page Flow Project (Workflow Foundation)(C#).
2. In the Add New Project dialog, enter EFT.PageFlows for the module name and set the location to %SOLUTION_DIR%/Modules/EFT.
3. Click OK. This opens the recipe wizard, as shown in Figure 2.
Figure 2
Add Page Flow Project (Workflow Foundation) recipe wizard
4. Enter the location for the required application block assemblies, and then click Finish. (The assemblies are stored in the Microsoft Practices Library folder in the software factory installation directory.)
Task 3: Define the Page Flow
You can use custom Windows Workflow Foundation activities in the Visual Studio 2005 Designer for Windows Workflow Foundation to define page flows. A page flow definition is a specialized type of state machine workflow.
When you run the Add Page Flow Project (Workflow Foundation) recipe, a page flow definition file named PageFlow1.cs is automatically added to the project. You can use this file to define your page flow or create a new one.
To design your page flow, you use the supplied custom Windows Workflow Foundation activities (named TransitionListenerActivity and PageState) in the Visual Studio 2005 Designer for Windows Workflow Foundation.
Note: If the activities are not available in your Visual Studio Toolbox, you must add them. To do this, right-click the Toolbox, and then click Choose Items. On the .NET Framework Components tab, click Browse, select the Microsoft.Practices.PageFlow.WorkflowFoundation.dll assembly (located in %WCSF_INSTALL_DIR%/Microsoft Practices Library/ Microsoft.Practices.PageFlow.WorkflowFoundation.dll), click Open, and then click OK to close the Choose Toolbox Items dialog box.
The following are the most common tasks developers perform when defining a page flow:
· Set the properties for the page flow. You can change the page flow properties, such as the Constrained property, the Abandonable property, and the NotRunningUrl property.
· Add a page to the definition. You must add a PageState activity to the page flow definition for each page in the page flow.
· Set the default start page for the page flow. Every page flow has a default start page.
· Define a named transition between two pages. You define all possible transitions between pages. Each transition has a unique name, and an application can use the application block to execute a named transition.
· Define a default transition for a page. You can specify one of the named transitions for each page as the default transition. The application block can use the application block to perform a default transition.
· Use conditional logic to determine the transition. You can use conditions in your page flow definition. The page flow engine evaluates the conditions to determine the transition.
In this task, you will define the page flow for the EFT module using the Visual Studio 2005 Designer for Windows Workflow Foundation. After completing this task, the page flow definition will look like the one illustrated in Figure 3.
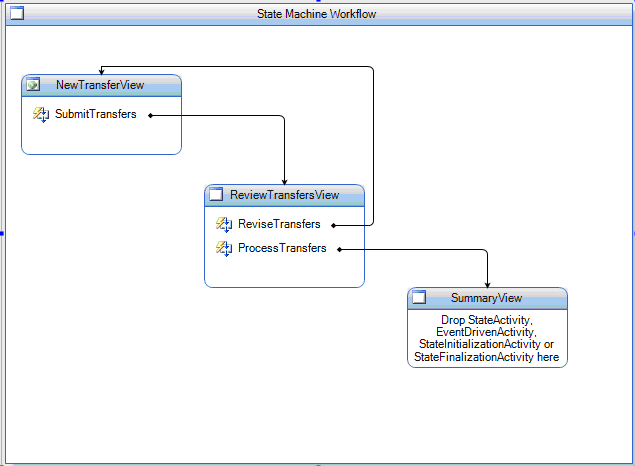
Figure 3
Page flow definition
To define the page flow
1. Rename the page flow definition file PageFlow1.cs to TransferPageFlow.cs. When prompted to perform a rename of all the references to the code element PageFlow1, click Yes.
2. Double-click the TransferPageFlow.cs file to open the file in the designer window.
3. Drag a PageState activity from the Toolbox onto the design surface.
4. In the Properties window for the activity, set the name to NewTransferView, and then set the URL to ~/EFT/NewTransferView.aspx.
5. Drag a new PageState activity onto the design surface, set its name to ReviewTransferView, and then set its URL to ~/EFT/ ReviewTransfersView.aspx.
6. Drag a new PageState activity onto the design surface, set its name to SummaryView, and then set its URL to ~/EFT/ SummaryView.aspx.
7. Every page flow has a default start page. You use the InitialStateName property of the PageFlowActivity activity to identify this page. Right-click an empty area of the design surface, and then click Properties to open the Properties window for the TransferPageFlow. Set the InitialStateName property to NewTransferView.
8. To define a transition between two pages, you use an EventDriven activity. This activity executes in response to an event. Drag an EventDriven activity into the NewTransferView activity, and then set its name to SubmitTransfer. The activity name is an identifier that your application uses to initiate a page transition.
9. Double-click the EventDriven activity to expand it. An EventDriven activity must contain child activities. (If it does not contain child activities, the Designer displays a warning symbol.)
10. Drag a TransitionListenerActivity from the Toolbox onto the activity surface. The TransitionListenerActivity implements IEventActivity and waits for the pending occurrence of a transition event. (The first child of an EventDriven activity must be an activity that inherits from IEventActivity.) When a transition event occurs, the TransitionListenerActivity finishes running, and then all subsequent activities are executed.
11. Drag a SetState activity from the Toolbox into the SubmitTransfer activity, below the TransitionListenerActivity. You use this activity to change the state of the page flow to the next PageState activity. Set its TargetStateName property to ReviewTransferView.
12. Click the TransferPageFlow link to navigate back to the entire page flow view. The Designer illustrates the transition with an arrow between the two pages.
13. Drag a new EventDriven activity into the ReviewTransferView activity and set its name to ReviseTransfers.
14. Double-click the EventDriven activity.
15. Drag a TransitionListenerActivity onto the EventDriven activity surface.
16. Drag a SetState activity into the ReviseTransfers activity, which is below the TransitionListenerActivity. Set its TargetStateName property to NewTransferView.
17. Click the TransferPageFlow link to navigate back to the entire page flow view.
18. Drag a new EventDriven activity into the ReviewTransferView activity, and then set its name to ProcessTransfers.
19. Double-click the EventDriven activity.
20. Drag a TransitionListenerActivity onto the activity surface.
21. Drag a SetState activity into the ProcessTransfers activity, which is below the TransitionListenerActivity. Set its TargetStateName property to SummaryView.
Task 4: Access the Page Flow Provider and Page Flow Instance in the EFT Controller
In this task, you will update the EFT’s module controller code to access the page flow provider and the TransferPageFlow page flow instance.
To access the page flow provider and page flow instance in the EFT controller
1. In the EFT project, add references to the Windows Workflow Foundation assemblies. To do this, right-click the EFT project node, and then click Add Reference. On the .NET tab, select System.Workflow.Activities and System.Workflow.ComponentModel, and then click OK.
2. In the EFT project, add references to the Page Flow Application Block assemblies. To do this, right-click the EFT project node, and then click Add Reference. On the Browse tab, select the assemblies Microsoft.Practices.PageFlow and Microsoft.Practices.PageFlow.WorkflowFoundation, and then click OK.
3. Add a project reference in the EFT project to the EFT.PageFlows project. To do this, right-click the EFT project node, and then click Add Reference. On the Projects tab, select EFT.PageFlows, and then click OK.
4. Open the EFTController.cs file.
5. Add the following using statements to the file.
using GlobalBank.EFT.PageFlows;
using Microsoft.Practices.PageFlow;
6. Add the following variable declarations that will hold references to the page flow provider and TransferPageFlow page flow instance.
private IPageFlowProvider _pageflowProvider;
private IPageFlow _transferPageFlow;
7. Add a property to wrap the PageFlowProvider and apply the ProviderDependency attribute to it. When you use the Web Client Software Factory to create your solution, you use the ProviderDependency to inject an instance of the page flow provider into your module controller.
[ProviderDependency(typeof(PageFlowDirectory))]
public IPageFlowProvider PageFlowProvider
{
get { return _pageflowProvider; }
set { _pageflowProvider = value; }
}
8. Use the GetPageFlow method of the page flow provider to retrieve a page flow instance. You specify a page flow instance type (a type that is specific to the page flow provider) in the call to GetPageFlow. A good practice consists of wrapping the call to the GetPageFlow method with a property to facilitate access and to cache the instance.
public IPageFlow TransferPageFlow
{
get
{
if (_transferPageFlow == null)
{
_transferPageFlow = _pageflowProvider.GetPageFlow(typeof(TransferPageFlow));
}
return _transferPageFlow;
}
}
Note: The Web Client Software Factory provides Visual Studio code examples that automate this task. In the controller class, type wcsfpageflow, and then press the TAB key. Both properties (with their corresponding fields) will appear.
Task 5: Use the Page Flow Instance State to Store the Current Transfers
Typically, an application must maintain data (state) for the business process across multiple page requests. To do this, you use the UserData property of the page flow instance. UserData is a read-only property that returns an instance of a class that derives from the abstract class PageFlowState (each page flow provider contains its own implementation).
In this task, you will use the UserData property to store the transfers created by the user in the page flow instance.
To use the page flow instance state to store the current transfers
1. Replace the definition of the Transfers property with the following code. This code reads and writes the list of transfers from and to the page flow instance state.
private List<Transfer> Transfers
{
get
{
if (!TransferPageFlow.UserData.Contains("Transfers"))
{
Transfers = new List<Transfer>();
}
return (List<Transfer>)TransferPageFlow.UserData["Transfers"];
}
set
{
TransferPageFlow.UserData["Transfers"] = value;
}
}
Note: For more information about using state inside the page flow instance, see “Using State with Page Flow” in Help.
2. Replace the AddTransfer method to store the new transfer in the page flow instance state.
public virtual void AddTransfer(Transfer transfer)
{
List<Transfer> transfers = Transfers;
transfers.Add(transfer);
Transfers = transfers;
}
When you use the Windows Workflow Foundation Page Flow Provider, the object that you store in the page flow state must be serializable. The page flow provider serializes the object each time you update the state. When you read from the state, the provider deserializes the object. This means that the instance of an object that you save to the state is not the same as the instance that you read from the state.
Notice that in the preceding method, the transfers value is reassigned to the Transfers property in the last line of the method body. This is required because the UserData property always retrieves a copy of the items stored in the workflow instance; therefore, any changes to it would not affect the original list.
3. Update the UpdateTransfer and DeleteTransfer methods to use the transfers list stored in the page flow instance, as shown in the following code. Notice that you need to reassign the transfers list to the page flow instance.
public virtual void DeleteTransfer(Transfer transfer)
{
List<Transfer> transfers = Transfers;
Transfer found = FindTransfer(transfers, transfer);
if (found != null)
{
transfers.Remove(found);
}
Transfers = transfers;
}
public virtual void UpdateTransfer(Transfer transfer)
{
List<Transfer> transfers = Transfers;
Transfer found = FindTransfer(transfers, transfer);
if (found != null)
{
found.SourceAccount = transfer.SourceAccount;
found.TargetAccount = transfer.TargetAccount;
found.Status = transfer.Status;
found.Amount = transfer.Amount;
}
Transfers = transfers;
}
4. In the Transfer.cs file (located in the BusinessEntities folder of the EFT project), add the Serializable attribute to the Transfer class to make it serializable.
[Serializable]
public class Transfer
{
...
}
Task 6: Use the Page Flow to Navigate Through the Pages
In this task, you will write code to navigate between pages using the TransferPageFlow page flow instance.
To use the page flow to navigate through the pages
1. Open the EFTController.cs file.
2. Replace the call to the navigation service in the CreateNewTransfers method with code that starts the page flow instance if it is not started and then navigates to the page associated with the initial page flow state. To start a page flow, you call the Start method of a page flow instance. This method initializes the Windows Workflow Foundation engine. To redirect the user to the current page, you call the RedirectToCurrentPage method on a page flow instance.
public virtual void CreateNewTransfers()
{
if (TransferPageFlow.Status == PageFlowStatus.NotStarted)
{
TransferPageFlow.Start();
}
TransferPageFlow.RedirectToCurrentPage();
}
To perform a page transition, you call the Navigate method of a page flow instance and specify the name of an EventDriven activity as a parameter.
3. Replace the call to the navigation service in the SubmitTransfers method, the ReviseTransfers method, and the ProcessTransfers method with calls to the Navigate method of the page flow instance.
public virtual void ReviseTransfers()
{
TransferPageFlow.Navigate("ReviseTransfers");
}
public virtual void ProcessTransfers()
{
Transfer[] transfersProcessed = _transferService.ProcessTransfers(Transfers.ToArray());
Transfers = new List<Transfer>(transfersProcessed);
TransferPageFlow.Navigate("ProcessTransfers");
}
public virtual void SubmitTransfers()
{
TransferPageFlow.Navigate("SubmitTransfer");
}
When a page flow successfully completes, you call the Complete method. This method ends the page flow instance and clears the information from the persistence store. This means you cannot resume a page flow that has been completed.
4. Add a new method in the EFTController class that completes the page flow.
public virtual void FundsTransferComplete()
{
TransferPageFlow.Complete();
}
Note: This method will complete the workflow. The next time you try to run the workflow, a new instance will be created, and the workflow will start from the beginning.
5. Open the Views/SummaryViewPresenter.cs file of the EFT project.
6. In the SummaryViewPresenter class, add a constructor that receives an instance of the EFTController class using dependency injection. To do this, you can uncomment the constructor generated by the Add View (with presenter) recipe.
7. Modify the OnViewInitialized method to call the FundsTransferComplete method on the controller. This means that when the summary view is displayed to the user, the page flow instance will be completed.
public override void OnViewInitialized()
{
_controller.FundsTransferComplete();
}
Task 7: Remove References to the Old Navigation Project in the EFT Module
You have modified the EFT module to use the Page Flow Application Block to perform page navigation. This means you can remove the references in the EFT project to the Navigation module, which is no longer used. (These steps are optional.)
In this task, you will remove the references in the EFT module to the Navigation project.
To remove references to the old Navigation project in the EFT module
1. In Solution Explorer, expand the References folder of the EFT project.
2. Delete the reference to the Navigation project.
3. Open the EFTController.cs file.
4. Remove the follow using statement.
using GlobalBank.Navigation.Services;
5. Remove the _navigationService field and the reference to it in the constructor.
6. In the Web.config file of the EFT folder in the Web site, remove the dependency to the Navigation module.
Note: The preceding steps guide you to remove the references to the Navigation project only in the EFT module. If you want to completely remove the Navigation module from the solution, you need to remove the Navigation and Navigation.Tests projects and remove the Navigation module definition in the main Web.config file. The module definition was automatically added by the Web Client Software Factory when the Foundational module was created using the Add Foundational Module recipe.
Verification
In this section, you will validate that the EFT page flow is working properly.
To validate that the EFT page flow is working properly
1. Build and run the solution.
2. Click the Login link in the header, and then log in with the admin user name. You should see the EFT site map node on the left.
3. Click the New Transfer button, and then verify that the navigation works as expected throughout the page flow.
Notice that if you leave the page flow (for example, if you click the Transfers link) and then click the New Transfer button again, the page flow resumes the previous state.


 543
543

 被折叠的 条评论
为什么被折叠?
被折叠的 条评论
为什么被折叠?
 到【灌水乐园】发言


