


Lab 6: Authorization
Purpose
Estimated time to complete this lab: 20 minutes
Authorization determines whether an identity should be granted access to a specific resource. Using ASP.NET URL authorization, you can explicitly allow or deny access to a particular directory by user name or role. This means that when your application URL authorization requirements are satisfied by user name or role, you can use the ASP.NET authorization module.
The Composite Web Application Block includes components that you can use to implement rule-based authorization for URLs and site map nodes. With rule-based authorization, you create custom rules and associate those rules with URLs and site map nodes. When a user attempts to access a resource, the rules are evaluated for that user and the user is either allowed or denied access to the resource.
By default, the Web Client Software Factory uses the Security Application Block of Enterprise Library to perform the authorization check for a rule.
For more information about the Security Application Block, see Security Application Block in the Microsoft patterns & practices Developer Center on MSDN.
In this exercise, you will learn how to create a profile-based user interface. You will restrict the access to the EFT module’s pages to authenticated users who are in the Administrator role.
Note: The users and roles configurations are stored in the ASP.NET Membership tables of the WCSF_HOLs SQL Server database that is created when you run the lab set up script.
Preparation
Before proceeding with this lab, you must install and configure the prerequisite software. For more information, see Web Client Software Factory Hands-On Labs.
Open the solution for the previous lab (either the one that you created or the end solution for that lab.) If you use the provided end solution, you must enable the guidance package for that solution.
To enable the Web Client Development guidance package with the Guidance Package Manager
1. Using Visual Studio, open the solution.
2. On the Tools menu, click Guidance Package Manager.
3. In the Guidance Package Manager dialog box, click Enable / Disable Packages.
4. In the Enable and Disable Packages dialog box, select the Web Client Development check box.
5. Click OK.
Procedures
This lab includes the following tasks:
· Task 1: Enable Forms Authentication
· Task 2: Create a Login Page
· Task 3: Add a LoginStatus Control to the Master Page
· Task 4: Define an Authorization Rule for Electronic Funds Transfers
· Task 5: Associate the EFT Module’s Pages with the Authorization Rule
· Task 6: Associate the Authorization Rule with EFT’s Site Map Nodes
The next sections describe each of these tasks.
Task 1: Enable Forms Authentication
In this task, you will enable forms authentication to provide an authentication mechanism for your Web application.
Note: For more information about forms authentication, see Forms Authentication Provider.
To enable forms authentication
1. Open the Web.config file stored in the root folder of the DevelopmentWebsite site.
2. Locate the authentication element and replace it with the following XML to enable forms authentication (this element is inside the configuration/system.web element). The login page will be UserLogin.aspx (you will create his page in the next task).
<authentication mode="Forms">
<forms loginUrl="UserLogin.aspx" name=".ASPXFORMSAUTH"/>
</authentication>
3. Add the following code below the authentication element to specify the membership and role providers.
<membership defaultProvider="SqlMembershipProvider" userIsOnlineTimeWindow="15">
<providers>
<add name="SqlMembershipProvider" type="System.Web.Security.SqlMembershipProvider" connectionStringName="WCSF_HOLs" applicationName="WCSF_HOLs" enablePasswordRetrieval="false" enablePasswordReset="true" requiresQuestionAndAnswer="true" requiresUniqueEmail="true" passwordFormat="Hashed"/>
</providers>
</membership>
<roleManager enabled="true" defaultProvider="SqlRoleProvider">
<providers>
<add name="SqlRoleProvider" connectionStringName="WCSF_HOLs" applicationName="WCSF_HOLs" type="System.Web.Security.SqlRoleProvider"/>
</providers>
</roleManager>
4. In the code above there are two references to the WCSF_HOLs connection string. Replace the empty connectionStrings element with the following XML to define this connection string. This connection string points to the Hands-On Labs database, which contains ASP.NET membership information.
<connectionStrings>
<add name="WCSF_HOLs" connectionString="Integrated Security=SSPI;Persist Security Info=False;Initial Catalog=WCSF_HOLs;Data Source=./SQLEXPRESS;" providerName="System.Data.SqlClient"/>
</connectionStrings>
Note: If you are using SQL Server 2005 instead of SQL Server 2005 Express Edition, you must replace “./SQLEXPRESS” with “.”.
5. Save the Web.config file.
Task 2: Create a Login Page
In this task, you will create a login page so users can authenticate with the Web site.
To create a login page
1. Add a page named UserLogin.aspx to the root of the DevelopmentWebsite site. To do this in Solution Explorer, right-click the DevelopmentWebsite node, and then click Add New Item. In the Templates pane of the Add New Item dialog box, select Web Form, type UserLogin.aspx in the Name box, and then click Add.
2. Open the Source view for the page, and then replace the content with the following markup.
<%@ Page Language="C#" MasterPageFile="~/Shared/Default.master"
AutoEventWireup="true"
CodeFile="UserLogin.aspx.cs" Inherits="UserLogin"
Title="Login" %>
<asp:Content ID="content" ContentPlaceHolderID="DefaultContent" runat="Server">
<h1>Login</h1>
<div id="publicContentContent">
To login to the application, please use one of the following usernames and passwords:<br />
<table>
<tr>
<td style="width: 100px">
<strong>Username</strong></td>
<td>
<strong>Password</strong></td>
</tr>
<tr>
<td>
admin</td>
<td>
<span style="font-family: Courier New">p@ssw0rd</span></td>
</tr>
<tr>
<td style="height: 18px">
oper01</td>
<td style="height: 18px">
<span style="font-family: Courier New">p@ssw0rd</span></td>
</tr>
</table>
<div id="loginBox">
<asp:Login ID="Login1" runat="server" />
</div>
</div>
</asp:Content>
Task 3: Add a LoginStatus Control to the Master Page
In this task, you will add a LoginStatus control in the Web site master page. When you do this, users will have access to the login page from any of the application’s Web pages.
To add a LoginStatus control to the master page
1. Open the Source view for the master page file Shared/Default.master. Add the bold lines in the following markup to the master page to add the LoginStatus control.
<div id="header">
GlobalBank
<div id="header-bottom">
<div id="loginStatus"><asp:LoginStatus runat="server" ID="LoginStatus1" /></div>
Created with the Web Client Software Factory</div>
</div>
2. Add the following style definitions to the file Default.css. This file is located in the App_Themes/Default folder.
#loginStatus
{
float:right;
font-style:normal;
font-size:small;
}
#loginStatus a
{
color:White;
text-decoration:none;
}
Task 4: Define an Authorization Rule for Electronic Funds Transfers
When you use the default authorization service provided by the Web Client Software Factory (which uses the Security Application Block to perform authorization checks for rules), you must define the authorization rules for your application in the securityConfiguration section of your application configuration file. Typically, the rules include the roles or users that are associated with the rules. In this task, you will define an authorization rule for the EFT module.
To define an authorization rule for electronic funds transfers
1. In Solution Explorer, right-click the Web.config file in the root of the Web site, and then click Edit Enterprise Library Configuration to open the Enterprise Library Configuration Editor. The Configuration Editor is used to create and modify configuration files. It has the same functionality as the stand-alone Enterprise Library Configuration Console, but it uses the Visual Studio Properties window to display application block properties and uses the errors list to display configuration errors.
Note: You must download and install Enterprise Library to see this option. If you do not see this option, you can use the Enterprise Library Configuration Console to edit the configuration file. (The Web Client Software Factory includes the Enterprise Library Configuration Console.)
2. Expand the Security Application Block node. The RuleProvider subnode represents the Authorization Rule Provider included in the Security Application Block. This provider uses rules that you define in the application configuration file. An authorization rule specifies the circumstances under which a user is authorized to perform some task.
3. Right-click the RuleProvider node, point to New, and then click Rule to define a new rule.
4. Change the name of the rule to AllowAccessTransfers, as shown in Figure 1.
5. Enter R:Administrator as the rule expression.
Note: This rule will be satisfied if the current logged in user is a member of the Administrator role.
For more information about defining rules, see ”Entering Configuration Information” in Enterprise Library Help.
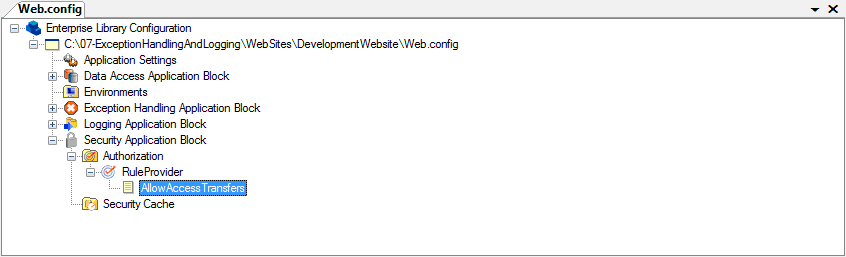
Figure 1
Web.config file
6. Save the file.
Task 5: Associate the EFT Module’s Pages with the Authorization Rule
With the Composite Web Application Block, you can define rules for the URLs of the Web pages in a module. You can use these rules in your application to prevent users from accessing restricted pages. In this task, you will associate the AllowAccessTransfers rule that you created in the previous task with the EFT module pages.
To associate the EFT module’s pages with the authorization rule
1. Open the Web.config file located in the EFT folder of the DevelopmentWebsite site, and then add the bold lines in the following XML to the compositeWeb/authorization element.
<authorization>
<rule Url="~/EFT/Default.aspx" Rule="AllowAccessTransfers" />
<rule Url="~/EFT/NewTransferView.aspx" Rule="AllowAccessTransfers" />
<rule Url="~/EFT/SummaryView.aspx" Rule="AllowAccessTransfers" />
<rule Url="~/EFT/LastTransferView.aspx" Rule="AllowAccessTransfers" />
<rule Url="~/EFT/ReviewTransfersView.aspx" Rule="AllowAccessTransfers" />
</authorization>
Note: Adding this XML restricts access to the EFT Web pages to users for which the evaluation of the AllowAccessTransfers rule returns true.
The Composite Web Application Block includes a service named IAuthorizationRulesService; this rule manages the mapping of rules to URLs.
The Add Business Module recipe generates a method in the business module initializer class that registers your authorization rules with the IAuthorizationRulesService. The method is named Configure and appears, as shown in the following code.
public override void Configure(IServiceCollection services, System.Configuration.Configuration moduleConfiguration)
{
IAuthorizationRulesService authorizationRuleService = services.Get<IAuthorizationRulesService>();
if (authorizationRuleService != null)
{
AuthorizationConfigurationSection authorizationSection = moduleConfiguration.GetSection(AuthorizationSection) as AuthorizationConfigurationSection;
if (authorizationSection != null)
{
foreach (AuthorizationRuleElement ruleElement in authorizationSection.ModuleRules)
{
authorizationRuleService.RegisterAuthorizationRule(ruleElement.AbsolutePath, ruleElement.RuleName);
}
}
}
}
Task 6: Associate the Authorization Rule with EFT’s Site Map Nodes
You can also associate site map nodes with authorization rules. A site map node will be included in the site map only if the corresponding authorization rule evaluates to true for the current user. In this task, you will associate the EFT’s site map nodes with the AllowAccessTransfers rule that you created in the previous task.
Note: If you do not associate the authorization rule with the EFT module’s site map nodes, the site map nodes will appear in the site map, but an “access denied” error appears when users try to access the EFT module pages.
To associate the authorization rule with EFT’s site map nodes
1. Open the EFTModuleInitializer.cs file located in the root of the EFT project.
2. Locate the RegisterSiteMapInformation method of the EFTModuleInitializer class. You use this method to define the module’s site map nodes.
To add a node to the site map, you use the AddNode method of the ISiteMapBuilderService. This method has several overloads; one of its overloads receives an authorization rule name as a parameter and associates the rule with the node. In the next step, you will update the calls to the AddNode method so that the site map nodes are associated with the AllowAccessTransfers rule.
3. Update the calls to the AddNode method of the ISiteMapBuilderService to provide the AllowAccessTransfers rule as a parameter, as shown in the bold lines of the following code.
protected virtual void RegisterSiteMapInformation(ISiteMapBuilderService siteMapBuilderService)
{
SiteMapNodeInfo moduleNode = new SiteMapNodeInfo("EFT", "~/EFT/Default.aspx", "EFT");
siteMapBuilderService.AddNode(moduleNode, "AllowAccessTransfers");
SiteMapNodeInfo transfersViewNode = new SiteMapNodeInfo("LastTransferView", "~/EFT/LastTransferView.aspx", "Transfers");
siteMapBuilderService.AddNode(transfersViewNode, moduleNode, "AllowAccessTransfers");
}
Verification
In this section, you will validate that you implemented a profile-based UI correctly.
To validate that you implemented a profile-based UI correctly
1. To see a custom error page for unauthorized requests, change the mode attribute of the customErrors element to On in the root Web.config file of the Web site, as shown in the following code. The customErrors node is located in the system.web node.
<customErrors mode="On">
2. Build and run the solution. You should not see the EFT module’s site map node.
3. In the browser, enter the URL of an EFT module page, such as http://localhost:[port number]/DevelopmentWebsite/EFT/Default.aspx. You should be redirected to a page that displays an “access denied” error message.
4. Browse to the home page of the Web site (http://localhost:[port number]/DevelopmentWebsite), click the Login link in the header, and sign in with the admin user account. You should see the EFT module’s site map node and be able to navigate through it.
5. Click the Logout link to sign out.
Note: If you are on an EFT module page when you click the Logout link, you should get redirected to a page that displays an “access denied” error message.
6. Navigate to the Login page and sign in using the oper01 user account. You should not see the EFT module’s site map node.


 1295
1295

 被折叠的 条评论
为什么被折叠?
被折叠的 条评论
为什么被折叠?
 到【灌水乐园】发言


