


[openlayers06]_根据features的属性设置style
1 .说明
-
我们会希望不同的要素展示成不用的样式(style),下面的内容:展示如何根据features自身的属性设置不同的样式,基础的样式设置看上面的链接。
2. 步骤
2.1 导入
import {Style, Fill, Stroke} from 'ol/style';
如果想将所有的features设置为相同的样式,按如下设置
const layer = new VectorLayer({
  source: source,
  style: new Style({
    fill: new Fill({
      color: 'red', //将所有的要素填充为红色
    }),
    stroke: new Stroke({
      color: 'white', //要素的边界设置为白色
    }),
  }),
});
效果:

2.2 根据要素属性设置style(Dynamic style)
- features中常见的属性有
name,下面将根据要素的name属性去设置style。 - TODO:将武汉市单独突出为红色

- 需要设置两种样式,style1服务与武汉市,style2服务于其他features,颜色为绿色
const style1 = new Style({
    fill: new Fill({color: 'red'}),
    stroke: new Stroke({
            color:'black'
        })
  });
const style2 = new Style({
    fill: new Fill({color: 'green'}),
    stroke: new Stroke({
        color:'black'
    })
  });
- 注意下面的代码,获取feature的name属性后,判断name属性是否为’武汉市’,如果为武汉市,则返回style1
const layer = new VectorLayer({
    source:source,
    // 根据feature的属性去设置feature的样式
    style:function(feature,resolution){
        // TODO:根据feature的name去设置feature的样式,如果feature的name = "武汉市",则显示为红色
        const name  = feature.get('name');//获取feature的name
        if(name ==='武汉市'){
            return style1;
        }else{
            return style2;
        }
    }
});
map.addLayer(layer); //将图层加入到map中
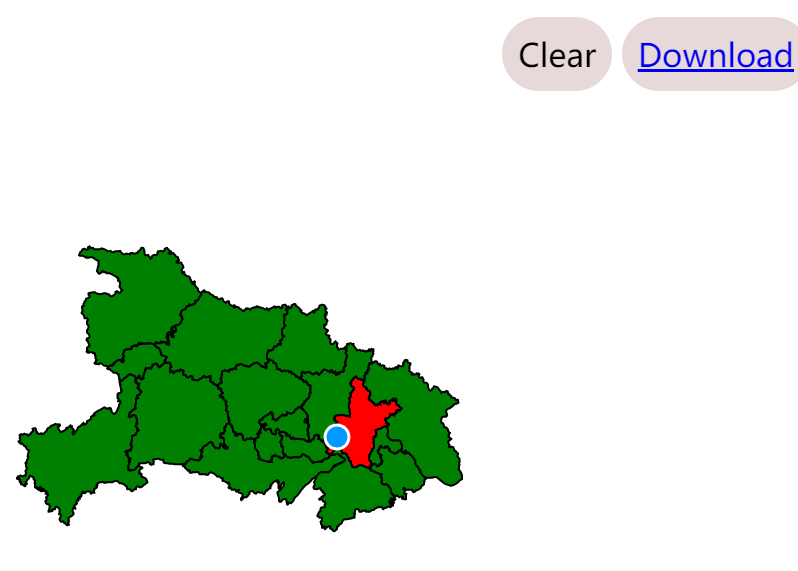
3. 效果
4. 完整代码
main.js
import './style.css';
import Map from 'ol/Map.js';
import GeoJSON from 'ol/format/GeoJSON.js';
import View from 'ol/View.js';
import VectorLayer from 'ol/layer/vector';
import VectorSource from 'ol/source/Vector';
import { transform } from 'ol/proj';
import Draw from 'ol/interaction/Draw';
import {Style,Fill,Stroke} from 'ol/style';
import { returnOrUpdate } from 'ol/extent';

// 下面用于确定地图中心 center
const center = [114.1692, 30.494]; //EPSG:4326
const transformedCenter = transform(center, 'EPSG:4326', 'EPSG:3857');
const view = new View({
  center: transformedCenter,
  zoom: 5
});

// 创建地图
const map = new Map({
    target: 'map',
    view: view
  });

// 矢量源
const source = new VectorSource({
  format: new GeoJSON(),
  url:'./data/hubei.geojson'
})


const style1 = new Style({
    fill: new Fill({color: 'red'}),
    stroke: new Stroke({
            color:'black'
        })
  });
const style2 = new Style({
    fill: new Fill({color: 'green'}),
    stroke: new Stroke({
        color:'black'
    })
  });

const layer = new VectorLayer({
    source:source,
    // 根据feature的属性去设置feature的样式
    style:function(feature,resolution){
        // TODO:根据feature的name去设置feature的样式,如果feature的name = "武汉市",则显示为红色
        const name  = feature.get('name');//获取feature的name
        if(name ==='武汉市'){
            return style1;
        }else{
            return style2;
        }
    }
});
map.addLayer(layer); //将图层加入到map中

map.addInteraction(
    new Draw({
      type:'Polygon',
      source: source,
    })
  );

/**--------实现清除features功能------------------
 *
 *      - vector source有一个source.clear()方法。
 *      - 我们希望点击Clear按钮就能调用source.clear()
 */
const clear = document.getElementById('clear');
// 给clear按钮添加一个监听器
clear.addEventListener('click',function(){
    source.clear();
});

/**-----------实现download功能
 *
 * - 为了序列化(serialize)我们的feature data,我们将用GeoJSON格式
 * - 每次source中`change` 事件发生时,我们将序列化features,并为锚元素的`herf`属性构造一个数据URL
 */
const format = new GeoJSON({featureProjection:'EPSG:3857'});//`format`变量是一个Geojson对象
const download = document.getElementById('download');
source.on('change',function(){
   const features = source.getFeatures();//获取features中的所有要素;
   const json = format.writeFeatures(features) ; //format是一个GeoJSON对象,将要素写入GeoJSON
   download.href =
   'data:application/json;charset=utf-8,' + encodeURIComponent(json);
});
index.html
<!DOCTYPE html>
<html lang="en">
  <head>
    <meta charset="UTF-8" />
    <meta name="viewport" content="width=device-width, initial-scale=1.0" />
    <title>Quick Start</title>
    <style>
      @import "node_modules/ol/ol.css";
    </style>
    <style>
      html, body, #map-container {
        margin: 0;
        height: 100%;
        width: 100%;
        font-family: sans-serif;
      }
    </style>
  </head>
  <body>

    <div id="map"></div>
    <div id="tools">
        <a id = "clear">Clear</a>
        <a id="download" download="features.json">Download</a>
    </div>

    <script src="./main.js" type="module"></script>
  </body>

</html>
style.css
@import "node_modules/ol/ol.css";

html,
body {
  margin: 0;
  height: 100%;
}

#map {
  position: absolute;
  top: 0;
  bottom: 0;
  width: 100%;
}

#tools {
  /* 指定元素在文档中的定位方式,为绝对定位方式 */
  position: absolute;
  /* 距上边界的距离 */
  top: 1rem;
  /* right CSS 属性定义了定位元素的右外边距边界与其包含块右边界之间的偏移,非定位元素设置此属性无效。 */
  /* 设置位置位于右边 */
  right: 1rem;
}

#tools a {
  /* 指定元素显示的方式为内联块状元素,内联块状元素与其他内联元素相邻,并且具有块状元素的特征,可以设置宽度和高度 */
  display: inline-block;
  padding: 0.5rem;
  /* 设置背景颜色 */
  background-color: rgb(231, 217, 217);
  /* 设置在鼠标悬停在元素上时,显示的样式 */
  cursor: pointer;
  /* 设置边框圆角 */
  border-radius: 30px;
}


 1154
1154


 被折叠的 条评论
为什么被折叠?
被折叠的 条评论
为什么被折叠?
 到【灌水乐园】发言


