


systemd service:简介
Systemd Service 是 systemd 提供的用于管理服务启动、停止和相关操作的功能,它极大的简化了服务管理的配置过程,用户只需要配置几项指令即可。相比于 SysV 的服务管理脚本,用户不需要去编写服务的启动、停止、重启、状态查看等等一系列复杂且有重复造轮子嫌疑的脚本代码了,相信写过 SysV 服务管理脚本的人都深有体会。所以,Systemd Service 是面向所有用户的,即使对于新手用户来说,配置门槛也非常低。
systemd service 是 systemd 所管理的其中一项内容。实际上,systemd service 是 Systemd Unit 的一种,除了 Service,systemd 还有其他几种类型的 unit,比如 socket、slice、scope、target 等等。在这里,暂时了解两项内容:
- Service 类型,定义服务程序的启动、停止、重启等操作和进程相关属性
- Target 类型,主要目的是对 Service (也可以是其它 Unit) 进行分组、归类,可以包含一个或多个 Service Unit (也可以是其它 Unit)
此外,Systemd 作为管家,还将一些功能集成到了 Systemd Service 中,个人觉得比较出彩的两个集成功能是:
- 用户可以直接在 Service 配置文件中定义 CGroup 相关指令来对该服务程序做资源限制。在以前,对服务程序做 CGroup 资源控制的步骤是比较繁琐的
- 用户可以选择 Journal 日志而非采用 rsyslog,这意味着用户可以不用单独去配置 rsyslog,而且可以直接通过 systemctl 或 journalctl 命令来查看某服务的日志信息。当然,该功能并不适用于所有情况,比如用户需要管理日志时
Systemd Service 还有其它一些特性,比如可以动态修改服务管理配置文件,比如可以并行启动非依赖的服务,从而加速开机过程,等等。例如,使用 systemd-analyze blame 可分析开机启动各服务占用的时长:
$ systemd-analyze blame
          3.557s network.service
          1.567s lvm2-pvscan@8:2.service
          1.060s lvm2-monitor.service
          1.046s dev-mapper-centos\x2droot.device
           630ms cgconfig.service
           581ms tuned.service
           488ms mysqld.service
           270ms postfix.service
           138ms auditd.service
            91ms polkit.service
            66ms boot.mount
            43ms systemd-logind.service
            ......


$ systemd-analyze time
Startup finished in 818ms (kernel) + 2.228s (initrd) + 3.325s (userspace) = 6.372s
multi-user.target reached after 2.214s in userspace
systemd 服务配置文件存放路径

如果用户需要,可以将服务配置文件手动存放至用户配置目录 /etc/systemd/system 下。该目录下的服务配置文件可以是普通.service 文件,也可以是链接至 /usr/lib/systemd/system 目录下服务配置文件的软链接。
例如:
$ ls -1 /usr/lib/systemd/system/*.service | head
/usr/lib/systemd/system/arp-ethers.service
/usr/lib/systemd/system/auditd.service
/usr/lib/systemd/system/autovt@.service
/usr/lib/systemd/system/blk-availability.service
/usr/lib/systemd/system/brandbot.service
/usr/lib/systemd/system/cgconfig.service
/usr/lib/systemd/system/cgred.service
/usr/lib/systemd/system/console-getty.service
/usr/lib/systemd/system/console-shell.service
/usr/lib/systemd/system/container-getty@.service


$ ls -1dF /etc/systemd/system/*
/etc/systemd/system/basic.target.wants/
/etc/systemd/system/default.target
/etc/systemd/system/default.target.wants/
/etc/systemd/system/getty.target.wants/
/etc/systemd/system/local-fs.target.wants/
/etc/systemd/system/multi-user.target.wants/
/etc/systemd/system/nginx.service.d/
/etc/systemd/system/sockets.target.wants/
/etc/systemd/system/sysinit.target.wants/
/etc/systemd/system/system-update.target.wants/


$ ls -l /etc/systemd/system/multi-user.target.wants/ | awk '{print $9,$10,$11}'
auditd.service -> /usr/lib/systemd/system/auditd.service
crond.service -> /usr/lib/systemd/system/crond.service
irqbalance.service -> /usr/lib/systemd/system/irqbalance.service
mysqld.service -> /usr/lib/systemd/system/mysqld.service
postfix.service -> /usr/lib/systemd/system/postfix.service
remote-fs.target -> /usr/lib/systemd/system/remote-fs.target
rhel-configure.service -> /usr/lib/systemd/system/rhel-configure.service
rsyslog.service -> /usr/lib/systemd/system/rsyslog.service
sshd.service -> /usr/lib/systemd/system/sshd.service
tuned.service -> /usr/lib/systemd/system/tuned.service
systemd service 文件格式说明
一个 Systemd Service 的服务配置文件大概长这样:
[Unit]
Description = some descriptions
Documentation = man:xxx(8) man:xxx_config(5)
Requires = xxx1.target xxx2.target
After = yyy1.target yyy2.target

[Service]
Type = <TYPE>
ExecStart = <CMD_for_START>
ExecStop = <CMD_for_STOP>
ExecReload = <CMD_for_RELOAD>
Restart = <WHEN_TO_RESTART>
RestartSec = <TIME>

[Install]
WantedBy = xxx.target yy.target
一个.Service 配置文件分为三部分:
- Unit:定义该服务作为 Unit 角色时相关的属性
- Service:定义本服务相关的属性
- Install:定义本服务在设置服务开机自启动时相关的属性。换句话说,只有在创建 / 移除服务配置文件的软链接时,Install 段才会派上用场。这一配置段不是必须的,当未配置
[Install]时,设置开机自启动或禁止开机自启动的操作将无任何效果
[Unit] 和 [Install] 段的配置指令都来自于 man systemd.unit,这些指令都用于描述作为 Unit 时的属性,[Service] 段则专属于.Service 服务配置文件。
这里先介绍一些常见的 [Unit] 和 [Install] 相关的指令 (虽然支持的配置指令很多,但只需熟悉几个即可),之后再专门介绍 Service 段落的配置指令。
[Unit] 段落指令
| Unit 指令 | 含义 |
|---|---|
| Description | Unit 的描述信息 |
| Documentation | 本 Unit 的 man 文档路径 |
| After | 本服务在哪些服务启动之后启动,仅定义启动顺序,不定义服务依赖关系,即使要求先启动的服务启动失败,本服务也依然会启动 |
| Before | 本服务在哪些服务启动之前启动,仅定义启动顺序,不定义服务依赖关系。通常用于定义在关机前要关闭的服务,如 Before=shutdown.target |
| Wants | 本服务在哪些服务启动之后启动,定义服务依赖关系,不定义服务启动顺序。启动本服务时,如果被依赖服务未启动,则也会启动被依赖服务。如果被依赖服务启动失败,本服务不会受之影响,因此本服务会继续启动。如果未结合 After 使用,则本服务和被依赖服务同时启动。 |
当配置在 [Install] 段落中时,systemctl enable 操作将会将本服务安装到对应的.wants 目录下 (在该目录下创建一个软链接),在开机自启动时,.wants 目录中的服务会被隐式添加至目标 Unit 的 Wants 指令后。 | |
| Requires | 本服务在哪些服务启动之后启动,定义服务强依赖关系,不定义服务启动顺序。启动本服务时,如果被依赖服务未启动,则也会启动被依赖服务。如果结合了 After,当存在非 active 状态的被依赖服务时,本服务不会启动。且当被依赖服务被手动停止时,本服务也会被停止,但有例外。如果要保证两服务之间状态必须一致,使用 BindsTo 指令。 |
当配置在 [Install] 段落中时,systemctl enable 操作将会将本服务安装到对应的.requires 目录下 (在该目录下创建一个软链接),在开机自启动时,.requires 目录中的服务会被隐式添加至目标 Unit 的 Requires 指令后。 | |
| Requisite | 本服务在哪些服务启动之后启动,定义服务依赖关系,不定义服务启动顺序。启动本服务时,如果被依赖服务处于尚未启动状态,则不会主动去启动这些服务,所以本服务直接启动失败。该指令一般结合 After 一起使用,以便保证启动顺序。 |
| BindsTo | 绑定两个服务,两服务的状态保证一致。如服务 1 为 active,则本服务也一定为 active。 |
| PartOf | 本服务是其它服务的一部分,定义了单向的依赖关系,且只对 stop 和 restart 操作有效。当被依赖服务执行 stop 或 restart 操作时,本服务也会执行操作,但本服务执行这些操作,不会影响被依赖服务。一般用于组合 target 使用,比如 a.service 和 b.service 都配置 PartOf=c.target,那么 stop c 的时候,也会同时 stop a 和 b。 |
| Conflicts | 定义冲突的服务,本服务和被冲突服务的状态必须相反。当本服务要启动时,将会停止目标服务,当启动目标服务时,将会停止本服务。启动和停止的操作同时进行,所以,如果想要让本服务在目标服务启动之前就已经处于停止状态,则必须定义 After/Before。 |
| OnFailure | 当本服务处于 failed 时,将启动目标服务。如果本服务配置了 Restart 重启指令,则在耗尽重启次数之后,本服务才会进入 failed。 |
| 有时候这是非常有用的,一个典型用法是本服务失败时调用定义了邮件发送功能的 service 来发送邮件,特别地,可以结合 systemd.timer 定时任务实现 cron 的 MAILTO 功能。 | |
| RefuseManualStart, RefuseManualStop | 本服务不允许手动启动和手动停止,只能被依赖时的启动和停止,如果手动启动或停止,则会报错。有些特殊的服务非常关键,或者某服务作为一个大服务的一部分,为了保证安全,都可以使用该特性。例如,系统审计服务 auditd.service 中配置了不允许手动停止指令 RefuseManualStop,network.target 中配置了不允许手动启动指令 RefuseManualStart。 |
| AllowIsolated | 允许使用 systemctl isolate 切换到本服务,只配置在 target 中。一般来说,用户服务是绝不可能用到这一项的。 |
| ConditionPathExists, AssertPathExists | 要求给定的绝对路径文件已经存在,否则不做任何事 (condition) 或进入 failed 状态 (assert),可在路径前使用 ! 表示条件取反,即不存在时才启动服务。 |
| ConditionPathIsDirectory, AssertPathIsDirectory | 如上,路径存在且是目录时启动。 |
| ConditionPathIsReadWrite, AssertPathIsReadWrite | 如上,路径存在且可读可写时启动。 |
| ConditionDirectoryNotEmpty, AssertDirectoryNotEmpty | 如上,路径存在且是非空目录时启动。 |
| ConditionFileNotEmpty, AssertFileNotEmpty | 如上,路径存在且是非空文件时启动。 |
| ConditionFileIsExecutable, AssertFileIsExecutable | 如上,路径存在且是可执行普通文件时启动。 |
对于自定义的服务配置文件来说,需要定义的常见指令包括 Description、After、Wants 及可能需要的条件判断类指令。所以,Unit 段落是非常简单的。
[Install] 段落指令
下面是 [Install] 段落相关的指令,它们只在 systemctl enable/disable 操作时有效。如果期望服务开机自启动,一般只配置一个 WantedBy 指令,如果不期望服务开机自启动,则 Install 段落通常省略。
| Install 指令 | 含义 |
|---|---|
| WantedBy | 本服务设置开机自启动时,在被依赖目标的.wants 目录下创建本服务的软链接。例如 WantedBy = multi-user.target 时,将在 /etc/systemd/multi-user.target.wants 目录下创建本服务的软链接。 |
| RequiredBy | 类似 WantedBy,但是是在.requires 目录下创建软链接。 |
| Alias | 指定创建软链接时链接至本服务配置文件的别名文件。例如 reboot.target 中配置了 Alias=ctrl-alt-del.target,当执行 enable 时,将创建 /etc/systemd/system/ctrl-alt-del.service 软链接并指向 reboot.target。 |
| DefaultInstance | 当是一个模板服务配置文件时 (即文件名为 Service_Name@.service),该指令指定该模板的默认实例。例如 trojan@.service 中配置了 DefaultInstall=server 时,systemctl enable trojan@.service 时将创建名为 trojan@server.service 的软链接。 |
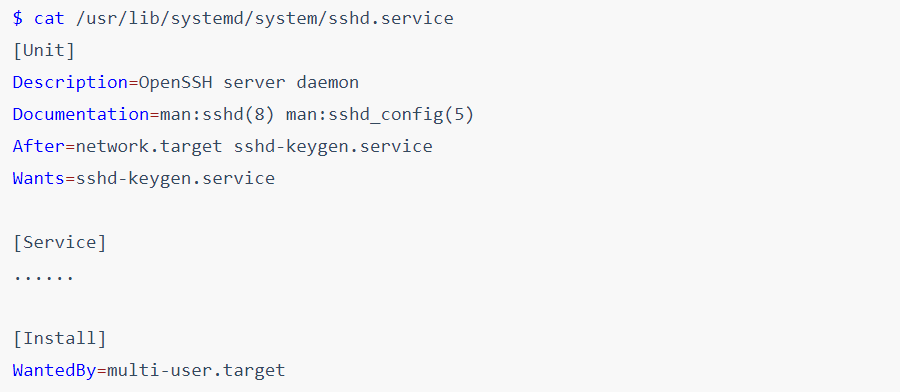
例如,下面是 sshd 的服务配置文件 /usr/lib/systemd/system/sshd.service,只看 Unit 段落和 Install 段落,是否很简单?
再来一个 auditd.service 的配置文件示例:
$ cat /usr/lib/systemd/system/auditd.service
[Unit]
Description=Security Auditing Service
DefaultDependencies=no
After=local-fs.target systemd-tmpfiles-setup.service
Before=sysinit.target shutdown.target
Conflicts=shutdown.target
RefuseManualStop=yes
ConditionKernelCommandLine=!audit=0
Documentation=man:auditd(8)

[Service]
......

[Install]
WantedBy=multi-user.target
[Service] 段配置
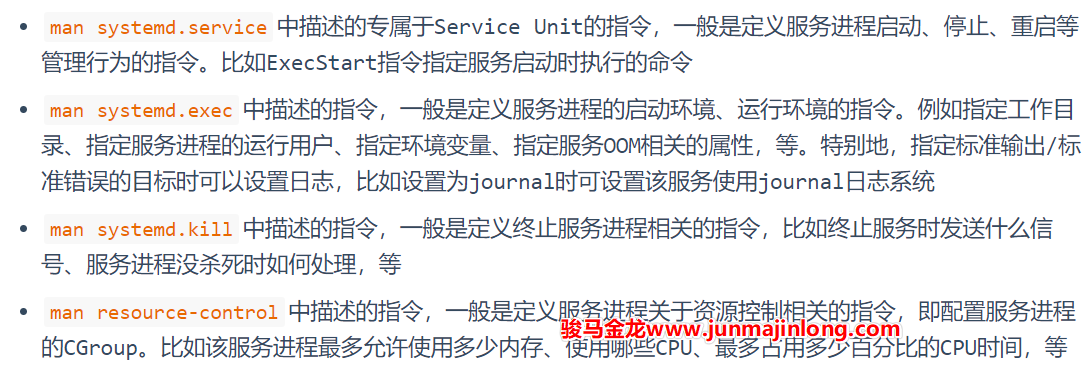
Systemd Service 配置文件中的 [Service] 段落可配置的指令很多,可配置在此段落中的指令来源有多处,包括:
例如,/usr/lib/systemd/system/rsyslog.service 文件的内容:
[Service]
EnvironmentFile=-/etc/sysconfig/rsyslog  # 来自systemd.exec
UMask=0066            # 来自systemd.exec
StandardOutput=null   # 来自systemd.exec

Type=notify           # 来自systemd.service
ExecStart=/usr/sbin/rsyslogd -n $SYSLOGD_OPTIONS  # 来自systemd.service
Restart=on-failure    # 来自systemd.service
再比如,想要限制一个服务最多允许使用 300M 内存 (比如 512M 的 vps 主机运行一个比较耗内存的博客系统时,可设置内存使用限制),最多 30% CPU 时间:
[Service]
MemoryLimit=300M
CPUQuota=30%
ExecStart=xxx
此外还需要了解 systemd 的一项功能,systemctl set-property,它可以在线修改已启动服务的属性。例如
systemctl set-property nginx MemoryLimit=100M


systemctl set-property nginx MemoryLimit=100M --runtime
目前来说,可以不用过多关注来自其它位置的指令,应该给予重点关注的是来自 systemd.service 自身的指令,比如:
- Type:指定服务的管理类型
- ExecStart:指定启动服务时执行的命令行
- ExecStop:指定停止服务时运行的命令
- ExecReload:指定重载服务进程时运行的命令
- Restart:指定 systemd 是否要自动重启服务进程以及什么情况下重启
特别是 Type 指令,它直接影响 [Service] 段中的多项配置方式。
下面将从 Type 指令开始引入 Service 段的配置方式。
根据 man systemd.service,Type 指令支持多种值:
- simple
- exec
- forking
- oneshot
- dbus
- notify
- idle
如果配置的是服务进程,Type 的值很可能是 forking 或 simple,如果是普通命令的进程,Type 的值可能是 simple、oneshot。而 dbus 类型一般情况下用不上,notify 要求服务程序中使用代码对 systemd notify 进行支持,所以多数情况下可能也用不上。
关于 Type,内容较长,见下一篇文章 systemd service 之:服务配置文件编写 (2)。
版权声明: 本博客所有文章除特别声明外,均采用 CC BY-NC-SA 4.0 许可协议。转载请注明来自 骏马金龙!
接下来会通过示例来描述不同 Service Type 值的应用场景。在此之前,强烈建议先阅读前后台进程父子关系和 daemon 类进程来搞懂进程之间的关系和 Daemon 类进程的特性。
systemd service:Type=forking
当使用 systemd 去管理一个长久运行的服务进程时,最常用的 Type 是 forking 类型。
使用 Type=forking 时,要求 ExecStart 启动的命令自身就是以 daemon 模式运行的。而以 daemon 模式运行的进程都有一个特性:总是会有一个瞬间退出的中间父进程,如果不了解这点特性,请看前后台进程父子关系和 daemon 类进程。
例如,nginx 命令默认以 daemon 模式运行,所以可直接将其配置为 forking 类型:
$ cat test.service
[Unit]
Description = Test

[Service]
Type = forking
ExecStart = /usr/sbin/nginx

$ systemctl daemon-reload
$ systemctl start test
$ systemctl status test
● test.service - Test
   Loaded: loaded
   Active: active (running)
  Process: 7912 ExecStart=/usr/sbin/nginx (code=exited, status=0/SUCCESS)
 Main PID: 7913 (nginx)
    Tasks: 5
   Memory: 4.6M
   CGroup: /system.slice/test.service
           ├─7913 nginx: master process /usr/sbin/nginx
           ├─7914 nginx: worker process
           ├─7915 nginx: worker process
           ├─7916 nginx: worker process
           └─7917 nginx: worker process
注意上面 status 报告的信息中,ExecStart 启动的 nginx 的进程 PID=7912,且该进程的状态是已退出,退出状态码为 0,这个进程是 daemon 类进程创建过程中瞬间退出的中间父进程。在 forking 类型中,该进程称为初始化进程。同时还有一行 Main PID: 7913 (nginx),这是 systemd 真正监控的 nginx 服务主进程,其 PID=7913,是 PID=7912 进程的子进程。
Type=forking 类型代表什么呢?要解释清楚该 type,需从进程创建开始说起。

对于 Type=forking 来说,pid=1 的 systemd 进程 fork 出来的子进程正是瞬间退出的中间父进程,且 systemd 会在中间父进程退出后就认为服务启动成功,此时 systemd 可以立即去启动后续需要启动的服务。
如果 Type=forking 服务中的启动命令是一个前台命令会如何呢?比如将 sleep 配置为 forking 模式,将 nginx daemon off 配置为 forking 模式等。
答案是 systemd 会一直等待中间 ExecStart 启动的进程作为中间父进程退出,在等待过程中,systemctl start 会一直卡住,直到等待超时而失败,在此阶段中,systemctl status 将会查看到服务处于 activating 状态。
$ cat test.service
[Unit]
Description = Test

[Service]
Type = forking
ExecStart = /usr/sbin/nginx -g 'daemon off;'

$ systemctl daemon-reload
$ systemctl start test
$ systemctl status test
● test.service - Test
   Loaded: loaded
   Active: activating (start)
  Control: 9227 (nginx)
    Tasks: 1
   Memory: 2.0M
   CGroup: /system.slice/test.service
           └─9227 /usr/sbin/nginx -g daemon off;
回到 forking 类型的服务。由于 daemon 类的进程会有一个瞬间退出的中间父进程 (如上面 PID=7913 的 nginx 进程),systemd 是如何知道哪个进程是应该被监控的服务主进程 (Main PID) 呢?
答案是靠猜。没错,systemd 真的就是靠猜的。当设置 Type=forking 时,有一个 GuessMainPID 指令其默认值为 yes,它表示 systemd 会通过一些算法去猜测 Main PID。当 systemd 的猜测无法确定哪个为主进程时,后果是严重的:systemd 将不可靠。因为 systemd 无法正确探测服务是否真的失败,当 systemd 误认为服务失败时,如果本服务配置了自动重启 (配置了 Restart 指令),重启服务时可能会和当前正在运行但是 systemd 误认为失败的服务冲突 (比如出现端口已被占用问题)。
多数情况下的猜测过程很简单,systemd 只需去找目前存活的属于本服务的 leader 进程即可。但有些服务 (少数) 情况可能比较复杂,在多进程之间做简单的猜测并非总是可靠。
好在,Type=forking 时的 systemd 提供了 PIDFile 指令 (Type=forking 通常都会结合 PIDFile 指令),systemd 会从 PIDFile 指令所指定的 PID 文件中获取服务的主进程 PID。
例如,编写一个 nginx 的服务配置文件:
$ cat test.service
[Unit]
Description = Test

[Service]
Type = forking
PIDFile = /run/nginx.pid
ExecStartPre = /usr/bin/rm -f /run/nginx.pid
ExecStart = /usr/sbin/nginx
ExecStartPost = /usr/bin/sleep 0.1
Type=forking 时 PIDFile 指令的坑
关于 PIDFile,有必要去了解一些注意事项,否则它们可能就会成为你的坑。
首先,PIDFile 只适合在 Type=forking 模式下使用,其它时候没必要使用,因为其它类型的 Service 主进程的 PID 都是确定的。systemd 推荐 PIDFile 指定的 PID 文件在 /run 目录下,所以,可能需要修改服务程序的配置文件,将其 PID 文件路径修改为 /run 目录之下,当然这并非必须。
但有一点必须注意,PIDFile 指令的值要和服务程序的 PID 文件路径保持一致。
例如 nginx 的相关配置:
$ grep -i 'pid' /etc/nginx/nginx.conf
pid /run/nginx.pid;
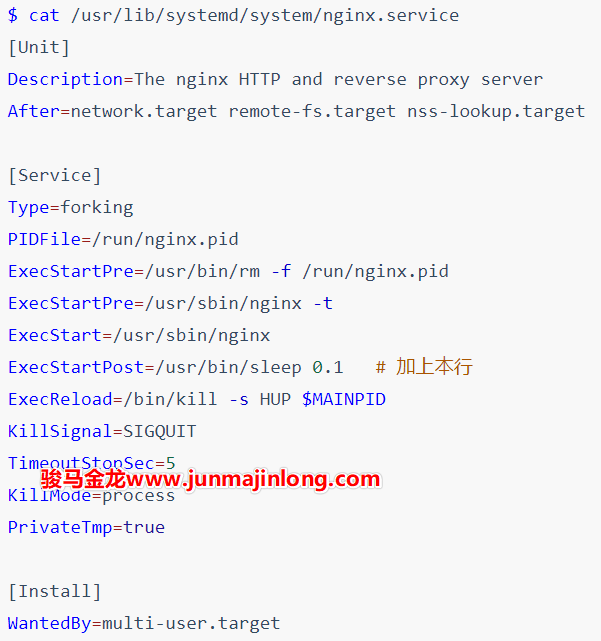
$ cat /usr/lib/systemd/system/nginx.service
[Unit]
Description=The nginx HTTP and reverse proxy server
After=network.target remote-fs.target nss-lookup.target
[Service]
Type=forking
PIDFile=/run/nginx.pid
ExecStartPre=/usr/bin/rm -f /run/nginx.pid
ExecStartPre=/usr/sbin/nginx -t
ExecStart=/usr/sbin/nginx
ExecReload=/bin/kill -s HUP $MAINPID
KillSignal=SIGQUIT
TimeoutStopSec=5
KillMode=process
PrivateTmp=true
[Install]
WantedBy=multi-user.target
其次,systemd 会在中间父进程退出后立即读取这个 PID 文件,读取成功后就认为该服务已经启动成功。但是,systemd 读取 PIDFile 的时候,服务主进程可能还未将 PID 写入到 PID 文件中,这时 systemd 将出现问题。所以,对于服务程序的开发人员来说,应尽早将主进程写入到 PID 文件中,比如可以在中间父进程 fork 完之后立即写入 PID 文件,然后再退出,而不是在 fork 出来的服务主进程内部由主进程负责写入。
上面的 nginx 服务配置文件是某个 nginx 版本 yum 包提供的,但却是有问题的,我曾经踩过这个坑,网上甚至将其报告为一个 Bug。
上面的 nginx.service 文件可以正常启动服务,但无法 systemctl reload,只要 reload 就报错,而且报错时提示 kill 命令语法错误。kill 语法错误显然是因为没有获取到 $MAINPID 变量的值,而这正是因为 systemd 在 nginx 写入 PID 文件之前先去读取了 PID 文件,因为没有读取到内容,所以 $MAINPID 变量为空值。
解决办法是使用 ExecStartPost=/usr/bin/sleep 0.1,让 systemd 在初始化进程 (即中间父进程) 退出之后耽搁 0.1 秒再继续向下执行,即推迟了 systemd 读取 PID 的过程,保证能让 systemd 从 PID 文件中读取到值。
最后,systemd 只会读 PIDFile 文件而不会写,也不会创建它。但是,在停止服务的时候,systemd 会尝试删除 PID 文件。因为服务进程可能会异常终止,导致已终止的服务进程的 PID 文件仍然保留着,所以在使用 PIDFile 指令时,通常还会使用 ExecStartPre 指令来删除可能已经存在的 PID 文件。正如上面给出的 nginx 配置文件一样。
systemd service:Type=simple
Type=simple 是一种最常见的通过 systemd 服务系统运行用户自定义命令的类型,也是省略 Type 指令时的默认类型。
Type=simple 类型的服务只适合那些在 shell 下运行在前台的命令。也就是说,当一个命令本身会以 daemon 模式运行时,将不能使用 simple,而应该使用 Type=forking。比如 ls 命令、sleep 命令、非 daemon 模式运行的 nginx 进程以及那些以前台调试模式运行的进程,在理论上都可以定义为 simple 类型的服务。至于为何有如此规则,稍后会解释的明明白白。
例如,编写一个 /usr/lib/systemd/system/test.service 运行 sleep 进程:
[Unit]
Description = test

[Service]
Type = simple
ExecStart = /usr/bin/sleep 10  # 命令必须使用绝对路径
使用 daemon-reload 重载并启动该服务进程:
$ systemctl daemon-reload
$ systemctl start test
$ systemctl status test
● test.service - Test
   Loaded: loaded
   Active: active (running)
 Main PID: 6902 (sleep)
    Tasks: 1
   Memory: 96.0K
   CGroup: /system.slice/test.service
           └─6902 /usr/bin/sleep 10
10 秒内,sleep 进程以 daemon 模式运行在后台,就像一个服务进程一样。10 秒之后,sleep 退出,于是 systemd 将该进程从监控队列中踢出。再次查看进程的状态将是 inactive:
$ systemctl status test
● test.service - Test
   Loaded: loaded
   Active: inactive (dead)
再来分析上面的服务配置文件中的指令。
ExecStart 指令指定启动本服务时执行的命令,即启动一个本该前台运行的 sleep 进程作为服务进程在后台运行。
需注意,systemd service 的命令行中必须使用绝对路径,且只能编写单条命令 (Type=oneshot 时除外),如果要命令续行,可在尾部使用反斜线符号
\等。此外,命令行中支持部分类似 Shell 的特殊符号,但不支持重定向
> >> << <、管道|、后台符号&,具体可参考man systemd.service中 command line 段落的解释说明。
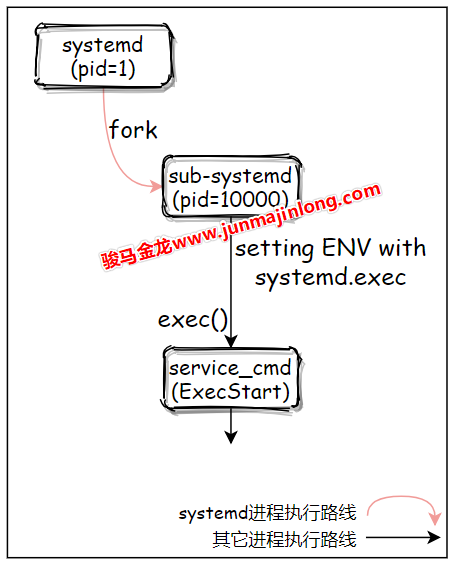
对于 Type=simple 来说,systemd 系统在 fork 出子 systemd 进程后就认为服务已经启动完成了,所以 systemd 可以紧跟着启动排在该服务之后启动的服务。它的伪代码模型大概是这样的:
# pid = 1: systemd

# start service1 with Type=simple
pid=fork()
if(pid=0){
  # Child Process: sub systemd process
  exec(<Service_Cmd>)
}

# start other services after service1
...
例如,先后连续启动两个 Type=simple 的服务,进程流程图大概如下:

换句话说,当 Type=simple 时,systemd 只在乎 fork 阶段是否成功,只要 fork 子进程成功,这个子进程就受 systemd 监管,systemd 就认为该 Unit 已经启动。
因为子进程已成功被 systemd 监控,无论子进程是否启动成功,在子进程退出时,systemd 都会将其从监控队列中踢掉,同时杀掉所有附属进程 (默认行为是如此,杀进程的方式由 systemd.kill 中的 KillMode 指令控制)。所以,查看服务的状态将是 inactive(dead)。
例如,下面的配置种,睡眠 1 秒后,该服务的状态将变为 inactive(dead)。
[Service]
ExecStart = /usr/bin/sleep 1
这没什么疑问。但考虑一下,如果 simple 类型下 ExecStart 启动的命令本身就是以 daemon 模式运行的呢?其结果是 systemd 默认会立刻杀掉所有属于服务的进程。
原因也很简单,daemon 类进程总是会有一个瞬间退出的中间父进程,而在 simple 类型下,systemd 所 fork 出来的子进程正是这个中间父进程,所以 systemd 会立即发现这个中间父进程的退出,于是杀掉其它所有服务进程。
例如,以运行 bash -c '(sleep 3000 &)' 的 simple 类型的服务,被 systemd 监控的 bash 进程会在启动 sleep 后立即退出,于是 systemd 会立即杀掉属于该服务的 sleep 进程。
$ cat test.service
[Unit]
Description = Test

[Service]
ExecStart = bash -c '( sleep 3000 & )'

$ systemctl daemon-reload
$ systemctl start test
$ systemctl status test
● test.service - Test
   Loaded: loaded
   Active: inactive (dead)
再例如,nginx 命令默认是以 daemon 模式运行的,simple 类型下直接使用 nginx 命令启动服务,systemd 会立刻杀掉所有 nginx,即 nginx 无法启动成功。
$ cat test.service
[Unit]
Description = Test

[Service]
ExecStart = /usr/sbin/nginx

$ systemctl daemon-reload
$ systemctl start test
$ systemctl status test
● test.service - Test
   Loaded: loaded
   Active: inactive (dead)
但如果将 nginx 进程以非 daemon 模式运行,simple 类型的 nginx 服务将正常启动:
$ cat test.service
[Unit]
Description = Test

[Service]
ExecStart = /usr/sbin/nginx -g 'daemon off;'

$ systemctl daemon-reload
$ systemctl start test
$ systemctl status test
● test.service - Test
   Loaded: loaded
   Active: active (running)
 Main PID: 7607 (nginx)
    Tasks: 5
   Memory: 4.6M
   CGroup: /system.slice/test.service
           ├─7607 nginx: master process /usr/sbin/nginx -g daemon off;
           ├─7608 nginx: worker process
           ├─7609 nginx: worker process
           ├─7610 nginx: worker process
           └─7611 nginx: worker process
Systemd Service:其它 Type 类型
除了 simple 和 forking 类型,还有 exec、oneshot、idle、notify 和 dbus 类型,这里不考虑 notify 和 dbus,剩下的 exec、oneshot 和 idle 都类似于 simple 类型。
- simple:在 fork 出子 systemd 进程后,systemd 就认为该服务启动成功了
- exec:在 fork 出子 systemd 进程且子 systemd 进程 exec () 调用 ExecStart 命令成功后,systemd 认为该服务启动成功
- oneshot:在 ExecStart 命令执行完成退出后,systemd 才认为该服务启动成功
- 因为服务进程退出后 systemd 才继续工作,所以在未配置 RemainAfterExit 指令时,oneshot 类型的服务永远无法出现 active 状态,它直接从启动状态到 activating 到 deactivating 再到 dead 状态
- 当结合 RemainAfterExit 指令时,在服务进程退出后,systemd 会继续监控该 Unit,所以服务的状态为
active(exited),通过这个状态可以让用户知道,该服务曾经已经运行成功,而不是从未运行过 - 通常来说,对于那些执行单次但无需长久运行的进程来说,可以采用 type=oneshot,比如启动 iptables,挂载文件系统的操作、关机或重启的服务等
- idle:无需考虑这种类型
模板型服务配置文件
systemd service 支持简单的模板型 Unit 配置文件,在 Unit 配置文件中可以使用 %n %N %p %i... 等特殊符号进行占位,在 systemd 读取配置文件时会将这些特殊符号解析并替换成对应的值。
这些特殊符号的含义可参见 man systemd.unit。通常情况下只会使用到 %i 或 %I,其它特殊符号用到的机会较少。
使用 %i %I 这两个特殊符号时,要求 Unit 的文件名以 @为后缀,即文件名格式为 Service_Name@.service。当使用 systemctl 管理这类服务时,@符号后面的字符会传递到 Unit 模板文件中的 %i 或 %I。
例如,执行下面这些命令时,会使用 abc 替换 service_name@.service 文件中的 %i 或 %I。
systemctl start service_name@abc
systemctl status service_name@abc
systemctl stop service_name@abc
systemctl enable service_name@abc
systemctl disable service_name@abc
有时候这是很实用的。比如有些程序即是服务端程序又是客户端程序,区分客户端和服务端的方式是使用不同配置文件。
假设用户想在一个机器上同时运行 xyz 程序的服务端和客户端,可编写如下 Unit 服务配置文件:
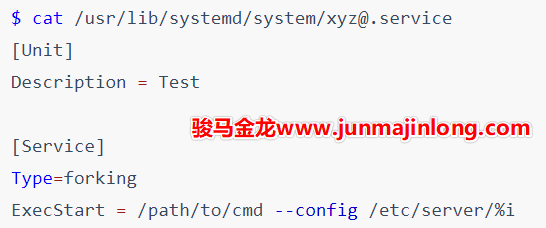
现在用户可以在 /etc/server 目录下同时提供服务程序的服务端配置文件和客户端配置文件。
/etc/server/server.conf
/etc/server/client.conf
如果要管理该主机上的服务端:
systemctl start xyz@server
systemctl status xyz@server
systemctl stop xyz@server
systemctl enable xyz@server
systemctl disable xyz@server
如果要管理该主机上的客户端:
systemctl start xyz@client
systemctl status xyz@client
systemctl stop xyz@client
systemctl enable xyz@client
systemctl disable xyz@client
使用 target 组合多个服务
有些时候,一个大型服务可能由多个小服务组成。
比如 c 服务由 a.service 和 b.service 组成,因为组合了两个服务,所以 c 服务可以定义为 c.target。
a.service 内容:
[Unit]
Description = a.service
PartOf = c.target
Before = c.target

[Install]
ExecStart = /path/to/a.cmd
b.service 内容:
[Unit]
Description = b.service
PartOf = c.target
Before = c.target

[Install]
ExecStart = /path/to/b.cmd
c.target 内容:
[Unit]
Description = c.service, consists of a.service and b.service
After = a.service b.service
Wants = a.service b.service
c 中配置 Wants 表示 a 和 b 先启动,但启动失败不会影响 c 的启动。如果要求 c.target 和 a.service、b.service 的启动状态一致,可将 Wants 替换成 Requires 或 BindsTo 指令。
PartOf 指令表明 a.service 和 b.service 是 c.target 的一部分,停止或重启 c.target 的同时,也会停止或重启 a 和 b。再加上 c.target 中配置了 Wants 指令 (也可以改成 Requires 或 BindsTo),使得启动 c 的时候,a 和 b 也已经启动完成。
但是要注意,PartOf 是单向的,停止和重启 a 或 b 的时候不会影响 c。


 3134
3134


 被折叠的 条评论
为什么被折叠?
被折叠的 条评论
为什么被折叠?
 到【灌水乐园】发言


