


基础UI组件
文本类组件
文本框
编辑框
按钮类组件
按钮
图片按钮
单选框
复选框
日期时间类组件
日期选择器
时间选择器
计时器
文本类组件
文本框(TextView)
一些属性基础
这里说一下文本框常用到的一些属性:
- layout_ width:组件的宽度,值可以是wrap_content、match_parent或者自行设定数值(单位最好是sp)
- layout_ height:组件的高度,取值跟layout_ width无差
- id:为组件设置一个唯一id
- text:设置显示的文本内容,值可以直接设置,或者去string资源里取
- textColor:设置字体颜色
- textStyle:设置字体风格,三个可选值: normal(无效果), bold(加粗),italic(斜体)
- textSize:字体大小,单位一般是用sp
- background:控件的背景颜色,可以理解为填充整个控件的颜色,可以是图片、color资源或自行设置
- gravity:设置控件中内容的对齐方向,TextView中是文字,ImageView中是图片等等
- android:shadowColor:设置阴影颜色,需要与shadowRadius一起使用
- android:shadowRadius:设置阴影的模糊程度,设为0.1就变成字体颜色了,建议使用3.0
- android:shadowDx:设置阴影在水平方向的偏移就是水平方向阴影开始的横坐标位置
- android:shadowDy:设置阴影在竖直方向的偏移,就是竖直方向阴影开始的纵坐标位置
两个小实例
伪实现QQ聊天界面
代码:
<?xml version="1.0" encoding="utf-8"?>
<GridLayout xmlns:android="http://schemas.android.com/apk/res/android"
    xmlns:app="http://schemas.android.com/apk/res-auto"
    xmlns:tools="http://schemas.android.com/tools"
    android:layout_width="match_parent"
    android:layout_height="match_parent"
    android:columnCount="6"
    android:background="@mipmap/bg"
    tools:context=".MainActivity">

    <TextView
        android:id="@+id/textview1"
        android:background="@drawable/bg_textview"
        android:maxWidth="180dp"
        android:text="你好呀,好久不见,最近忙什么呢"
        android:textColor="#16476B"
        android:textSize="14sp"
        android:layout_gravity="end"
        android:layout_columnSpan="4"
        android:layout_column="1"
        android:layout_row="0"
        android:layout_marginRight="5dp"
        android:layout_marginBottom="20dp"
        />

    <ImageView
        android:id="@+id/imageview2"
        android:src="@mipmap/ico2"
        android:layout_column="5"
        android:layout_row="0"
        />

    <ImageView
        android:id="@+id/imageview3"
        android:src="@mipmap/ico1"
        android:layout_column="0"
        android:layout_row="1"
        />

    <TextView
        android:id="@+id/textview2"
        android:background="@drawable/bg_textview2"
        android:maxWidth="180dp"
        android:text="最近在做一个手机应用项目,时间有点紧,所以就很少上QQ"
        android:layout_column="1"
        android:textColor="#FFFFFF"
        android:layout_row="1"
        android:layout_marginBottom="20dp"
        />

    <TextView
        android:id="@+id/imageview5"
        android:background="@drawable/bg_textview"
        android:maxWidth="180dp"
        android:text="有什么需要我帮忙的吗?"
        android:layout_gravity="end"
        android:layout_columnSpan="4"
        android:layout_column="1"
        android:layout_row="2"
        android:layout_marginRight="5dp"
        android:layout_marginBottom="20dp"
        />

    <ImageView
        android:id="@+id/imageview6"
        android:src="@mipmap/ico2"
        android:layout_column="5"
        android:layout_row="2"
        />

    <ImageView
        android:id="@+id/imageview7"
        android:src="@mipmap/ico1"
        android:layout_column="0"
        android:layout_row="3"
        />

    <TextView
        android:id="@+id/imageview8"
        android:background="@drawable/bg_textview2"
        android:maxWidth="180dp"
        android:text="快要大功告成了,等有需要是,我一定不会客气的"
        android:textColor="#FFFFFF"
        android:layout_column="1"
        android:layout_row="3"
        android:layout_marginBottom="20dp"
        />
</GridLayout>
实现的效果:
![[外链图片转存失败,源站可能有防盗链机制,建议将图片保存下来直接上传(img-9Exs1z1Q-1628773277748)(C:\Users\15998\AppData\Roaming\Typora\typora-user-images\image-20210810201706237.png)]](https://img-blog.csdnimg.cn/305de184268f4e30bdbd25ec8a4a3ec6.png?x-oss-process=image/watermark,type_ZmFuZ3poZW5naGVpdGk,shadow_10,text_aHR0cHM6Ly9ibG9nLmNzZG4ubmV0L3NoaXlhbnNhbWE=,size_16,color_FFFFFF,t_70)
实现跑马灯效果的TextView
想要实现跑马灯效果,需要用到下面的属性:
- android:singleLine:内容单行显示
- android:focusable:是否可以获取焦点
- android:focusableInTouchMode:用于控制视图在触摸模式下是否可以聚焦
- android:ellipsize:在哪里省略文本
- android:marqueeRepeatLimit:字幕动画重复的次数
注意:singleLine属性现如今已经被废弃,这里是为了实现单行并且在结尾省略的效果
关于android:ellipsize属性,start、middle、end表示分别表示只显示结尾、中间、开头,唯独marquee属性是表示以跑马灯显示(这个时候通常搭配android:singleLine实现单行效果)
除了上面提到的属性,让控件可以获取焦点:focusable,其值表示是否可以通过键盘将焦点移动到空间上。配套使用的属性是:focusableInTouchMode
除此之外,还需要自定义控件MyTextView:
package com.example.text;

import android.content.Context;
import android.util.AttributeSet;
import android.widget.TextView;

import androidx.annotation.NonNull;
import androidx.annotation.Nullable;

public class MyTextView extends androidx.appcompat.widget.AppCompatTextView {

    public MyTextView(@NonNull Context context) {
        super(context);
    }

    public MyTextView(@NonNull Context context, @Nullable AttributeSet attrs) {
        super(context, attrs);
    }

    public MyTextView(@NonNull Context context, @Nullable AttributeSet attrs, int defStyleAttr) {
        super(context, attrs, defStyleAttr);
    }

    @Override
    public boolean isFocused() {
        return true;
    }
}
当然,这里不需要在主页面实例化
下面是布局:
<?xml version="1.0" encoding="utf-8"?>
<LinearLayout xmlns:android="http://schemas.android.com/apk/res/android"
    xmlns:app="http://schemas.android.com/apk/res-auto"
    xmlns:tools="http://schemas.android.com/tools"
    android:layout_width="match_parent"
    android:layout_height="match_parent"
    tools:context=".MainActivity">

    <com.example.text.MyTextView
        android:layout_width="match_parent"
        android:layout_height="200dp"
        android:id="@+id/tv_one"
        android:text="@string/tv_one"
        android:gravity="center_vertical"
        android:textSize="30sp"
        android:shadowColor="@color/red"
        android:textColor="@color/black"
        android:shadowDx="5.0"
        android:shadowDy="5.0"
        android:shadowRadius="3.0"
        android:textStyle="italic"

        android:ellipsize="marquee"
        android:marqueeRepeatLimit="marquee_forever"
        android:focusable="true"
        android:focusableInTouchMode="true"
        android:singleLine="true" />

</LinearLayout>
实现的效果:
![[外链图片转存失败,源站可能有防盗链机制,建议将图片保存下来直接上传(img-dpnfnV3c-1628773277750)(C:\Users\15998\AppData\Roaming\Typora\typora-user-images\image-20210810205609828.png)]](https://img-blog.csdnimg.cn/0aed30f2148b45febdefba7325998567.png?x-oss-process=image/watermark,type_ZmFuZ3poZW5naGVpdGk,shadow_10,text_aHR0cHM6Ly9ibG9nLmNzZG4ubmV0L3NoaXlhbnNhbWE=,size_16,color_FFFFFF,t_70)
运行之后就可以看见它自动跑起来了。
编辑框(EditText)
EditText继承自TextView,所以文本框组件能用的属性,编辑框组件大部分能用
一些属性基础
- android:hint:输入提示
- android:textColorHint:输入提示文字的颜色
- android:inputType:输入类型
- android:drawableXxxx:在输入框的指定方位添加图片
- android:drawablePadding:设置图片与输入内容的间距
- android:paddingXx:设置内容与边框的间距
- android:background:背景色
- android:lines:设置显示行数
一个小实例
伪实现一个QQ发说说界面
首先准备好两张图片:
![[外链图片转存失败,源站可能有防盗链机制,建议将图片保存下来直接上传(img-Gds3MY4t-1628773277750)(C:\Users\15998\AppData\Roaming\Typora\typora-user-images\image-20210811154323641.png)]](https://img-blog.csdnimg.cn/2078aa29d4eb47ab8f756aab67cafb43.png)
然后下面是xml,整体采用线性布局:
<?xml version="1.0" encoding="utf-8"?>
<LinearLayout
    xmlns:android="http://schemas.android.com/apk/res/android"
    xmlns:app="http://schemas.android.com/apk/res-auto"
    xmlns:tools="http://schemas.android.com/tools"
    android:layout_width="match_parent"
    android:layout_height="match_parent"
    android:orientation="vertical"
    android:background="#EAEAEA"
    android:padding="16dp"
    tools:context=".MainActivity">

    <EditText
        android:layout_width="match_parent"
        android:layout_height="wrap_content"
        android:lines="6"
        android:hint="说点什么吧"
        android:background="@color/white"
        android:padding="5dp"
        android:gravity="top"
        android:layout_marginBottom="10dp"
        android:inputType="textMultiLine"/>

    <TextView
        android:layout_width="match_parent"
        android:layout_height="wrap_content"
        android:drawableLeft="@mipmap/addpicture"
        android:gravity="center_vertical"
        android:background="@color/white"
        android:padding="8dp"
        android:drawablePadding="8dp"
        android:text="添加照片"/>

    <ImageView
        android:layout_width="match_parent"
        android:layout_height="wrap_content"
        android:src="@mipmap/bottom"
        android:scaleType="fitXY"/>

</LinearLayout>
scaleType属性是控制如何调整图像大小以匹配该ImageView的大小
通过设置background属性可以去掉EditText下方的小横条
实现效果:
![[外链图片转存失败,源站可能有防盗链机制,建议将图片保存下来直接上传(img-zmWPRhX1-1628773277751)(C:\Users\15998\AppData\Roaming\Typora\typora-user-images\image-20210811154305628.png)]](https://img-blog.csdnimg.cn/277adbb4b06a4cadbdacaa9494a24b5b.png?x-oss-process=image/watermark,type_ZmFuZ3poZW5naGVpdGk,shadow_10,text_aHR0cHM6Ly9ibG9nLmNzZG4ubmV0L3NoaXlhbnNhbWE=,size_16,color_FFFFFF,t_70)
获取EditText的内容
通过getText方法可以获取编辑框的内容,文本框可以通过findViewById方法获取。
首先添加一些AS内置的drawable资源:
![[外链图片转存失败,源站可能有防盗链机制,建议将图片保存下来直接上传(img-V288ZNBH-1628773277752)(C:\Users\15998\AppData\Roaming\Typora\typora-user-images\image-20210811162223679.png)]](https://img-blog.csdnimg.cn/624f5c428dd64ad69157d57750ba377f.png?x-oss-process=image/watermark,type_ZmFuZ3poZW5naGVpdGk,shadow_10,text_aHR0cHM6Ly9ibG9nLmNzZG4ubmV0L3NoaXlhbnNhbWE=,size_16,color_FFFFFF,t_70)
点击如图位置进行选择:
![[外链图片转存失败,源站可能有防盗链机制,建议将图片保存下来直接上传(img-yFjjZcdN-1628773277753)(C:\Users\15998\AppData\Roaming\Typora\typora-user-images\image-20210811162540240.png)]](https://img-blog.csdnimg.cn/d6b6ef5b46504bf3b3d262d6698fe16c.png?x-oss-process=image/watermark,type_ZmFuZ3poZW5naGVpdGk,shadow_10,text_aHR0cHM6Ly9ibG9nLmNzZG4ubmV0L3NoaXlhbnNhbWE=,size_16,color_FFFFFF,t_70)
选择资源完成后:
![[外链图片转存失败,源站可能有防盗链机制,建议将图片保存下来直接上传(img-OilYYe2l-1628773277753)(C:\Users\15998\AppData\Roaming\Typora\typora-user-images\image-20210811162711117.png)]](https://img-blog.csdnimg.cn/40541a96cbb94e2d80f9e695b7873db2.png)
下面是xml:
<?xml version="1.0" encoding="utf-8"?>
<LinearLayout
    xmlns:android="http://schemas.android.com/apk/res/android"
    xmlns:app="http://schemas.android.com/apk/res-auto"
    xmlns:tools="http://schemas.android.com/tools"
    android:layout_width="match_parent"
    android:layout_height="match_parent"
    android:orientation="vertical"
    android:background="#EAEAEA"
    android:padding="16dp"
    tools:context=".MainActivity">

    <EditText
        android:id="@+id/et"
        android:layout_height="100dp"
        android:layout_width="match_parent"
        android:textColorHint="#95a1aa"
        android:inputType ="textPassword"
        android:hint="@string/name"
    	android:drawableStart="@drawable/ic_baseline_person_24"
        android:drawablePadding="20dp"
        android:paddingStart="20dp"
        android:background="@color/white"/>

    <Button
        android:id="@+id/btn"
        android:layout_width="match_parent"
        android:layout_height="wrap_content"
        android:text="点击获取输入信息"/>

</LinearLayout>
下面是MainActivity,主要就是获取对象,然后加一个监听,打印获取的内容:
public class MainActivity extends AppCompatActivity {

    private Button btn;
    private EditText et;
    private String TAG = "qks";

    @Override
    protected void onCreate(Bundle savedInstanceState) {
        super.onCreate(savedInstanceState);
        setContentView(R.layout.activity_main);

         btn = findViewById(R.id.btn);
         et = findViewById(R.id.et);

         btn.setOnClickListener(new View.OnClickListener() {
             @Override
             public void onClick(View v) {
                 String str = et.getText().toString();
                 Log.d(TAG, "输入的内容" + str);
             }
         });
    }
}
实现的效果:
![[外链图片转存失败,源站可能有防盗链机制,建议将图片保存下来直接上传(img-bOPm2aeC-1628773277754)(C:\Users\15998\AppData\Roaming\Typora\typora-user-images\image-20210811160808803.png)]](https://img-blog.csdnimg.cn/a2e5191f7efd4472800ddc82d3d28734.png?x-oss-process=image/watermark,type_ZmFuZ3poZW5naGVpdGk,shadow_10,text_aHR0cHM6Ly9ibG9nLmNzZG4ubmV0L3NoaXlhbnNhbWE=,size_16,color_FFFFFF,t_70)
打开Logcat,搜索我们在MainActivity中定义的TAG(qks),就可以看到获取的内容了:
![[外链图片转存失败,源站可能有防盗链机制,建议将图片保存下来直接上传(img-pVeXTlLp-1628773277755)(C:\Users\15998\AppData\Roaming\Typora\typora-user-images\image-20210811160917101.png)]](https://img-blog.csdnimg.cn/9257d7faa7ea419db9f08d53169ff0f6.png?x-oss-process=image/watermark,type_ZmFuZ3poZW5naGVpdGk,shadow_10,text_aHR0cHM6Ly9ibG9nLmNzZG4ubmV0L3NoaXlhbnNhbWE=,size_16,color_FFFFFF,t_70)
按钮类组件
按钮(Button)
Button也是TextView的子类,所以TextView可以用的属性Button一般也能使用
关于样式的小实例
实现简单的登陆界面
实现一个登陆界面,并为按钮添加点击事件监听
首先我们需要导入一些资源文件:
![[外链图片转存失败,源站可能有防盗链机制,建议将图片保存下来直接上传(img-4N8xeQJB-1628773277755)(C:\Users\15998\AppData\Roaming\Typora\typora-user-images\image-20210811163148411.png)][外链图片转存失败,源站可能有防盗链机制,建议将图片保存下来直接上传(img-4N8xeQJB-1628773277755)(C:\Users\15998\AppData\Roaming\Typora\typora-user-images\image-20210811163148411.png)]](https://img-blog.csdnimg.cn/ab5e668d23274e8284ab9b8257bc23b4.png)
然后编写布局文件:
<?xml version="1.0" encoding="utf-8"?>
<LinearLayout
    xmlns:android="http://schemas.android.com/apk/res/android"
    xmlns:app="http://schemas.android.com/apk/res-auto"
    xmlns:tools="http://schemas.android.com/tools"
    android:layout_width="match_parent"
    android:layout_height="match_parent"
    android:orientation="vertical"
    android:background="#EAEAEA"
    android:padding="16dp"
    tools:context=".MainActivity">

    <EditText
        android:id="@+id/et"
        android:layout_height="60dp"
        android:layout_width="match_parent"
        android:textColorHint="#95a1aa"
        android:inputType ="phone"
        android:hint="@string/name"
        android:drawableStart="@drawable/ic_baseline_person_24"
        android:drawablePadding="20dp"
        android:paddingStart="20dp"
        android:background="@color/white"/>

    <EditText
        android:layout_marginTop="5dp"
        android:id="@+id/et2"
        android:layout_height="60dp"
        android:layout_width="match_parent"
        android:textColorHint="#95a1aa"
        android:inputType ="textPassword"
        android:hint="@string/password"
        android:drawableStart="@drawable/ic_baseline_remove_red_eye_24"
        android:drawablePadding="20dp"
        android:paddingStart="20dp"
        android:background="@color/white"/>

    <Button
        android:id="@+id/btn"
        android:layout_marginTop="20dp"
        android:layout_width="match_parent"
        android:layout_height="wrap_content"
        android:text="登陆"/>

</LinearLayout>
在MianActivity中获取组件,添加监听:
package com.example.myapplication2;

import androidx.appcompat.app.AppCompatActivity;

import android.os.Bundle;
import android.util.Log;
import android.view.View;
import android.widget.Button;
import android.widget.EditText;
import android.widget.Toast;

public class MainActivity extends AppCompatActivity {

    private Button btn;
    private EditText et;
    private EditText et2;
    private String TAG = "qks";

    @Override
    protected void onCreate(Bundle savedInstanceState) {
        super.onCreate(savedInstanceState);
        setContentView(R.layout.activity_main);

         btn = findViewById(R.id.btn);
         et = findViewById(R.id.et);
         et2 = findViewById(R.id.et2);

         btn.setOnClickListener(v -> {
             String str = et.getText().toString();
             String str2 = et2.getText().toString();
             Log.d(TAG, "输入的内容" + str);
             Toast.makeText(MainActivity.this, str + str2, Toast.LENGTH_LONG).show();
         });
    }
}
Toast用于在屏幕上显示提示信息
下面是演示效果,点击登陆按钮后,屏幕下方便显示了刚才输入的信息:
![[外链图片转存失败,源站可能有防盗链机制,建议将图片保存下来直接上传(img-VDjUrX4F-1628773277757)(C:\Users\15998\AppData\Roaming\Typora\typora-user-images\image-20210811163051047.png)]](https://img-blog.csdnimg.cn/ed8288fe9b734185809794a61d67b5c5.png?x-oss-process=image/watermark,type_ZmFuZ3poZW5naGVpdGk,shadow_10,text_aHR0cHM6Ly9ibG9nLmNzZG4ubmV0L3NoaXlhbnNhbWE=,size_16,color_FFFFFF,t_70)
实现按钮按下改变样式
实现随着按钮按下改变背景图片
想要实现这个效果,我们需要用到一个东西:selector(选择器)。selector在Android中常来做组件的背景,一般分为Drawable-Selector和Color-Selector,这里我们用到的是前者,它的存在省去了用代码控制不同状态下不同的背景颜色或图片的变换。
在drawable目录下右键新建资源文件:
![[外链图片转存失败,源站可能有防盗链机制,建议将图片保存下来直接上传(img-UkfrA2F2-1628773277757)(C:\Users\15998\AppData\Roaming\Typora\typora-user-images\image-20210811203524971.png)]](https://img-blog.csdnimg.cn/846223be0ee24ab183aac582ef27dc42.png)
可以看到默认的Root-element就是selector,我们设置文件名为btn_selector:
![[外链图片转存失败,源站可能有防盗链机制,建议将图片保存下来直接上传(img-98FxUMXS-1628773277758)(C:\Users\15998\AppData\Roaming\Typora\typora-user-images\image-20210811203630296.png)]](https://img-blog.csdnimg.cn/cd8440eaa9b940f6992328ee8facf70f.png?x-oss-process=image/watermark,type_ZmFuZ3poZW5naGVpdGk,shadow_10,text_aHR0cHM6Ly9ibG9nLmNzZG4ubmV0L3NoaXlhbnNhbWE=,size_16,color_FFFFFF,t_70)
点击OK便创键完成了:

当然了,我们还需要两张图片,所以在drawable处再次从AS中导入如下两张图片:
![[外链图片转存失败,源站可能有防盗链机制,建议将图片保存下来直接上传(img-bxEOF72x-1628773277758)(C:\Users\15998\AppData\Roaming\Typora\typora-user-images\image-20210811204020113.png)]](https://img-blog.csdnimg.cn/5c7b3254597b4865ab6e1e57c4303e5c.png?x-oss-process=image/watermark,type_ZmFuZ3poZW5naGVpdGk,shadow_10,text_aHR0cHM6Ly9ibG9nLmNzZG4ubmV0L3NoaXlhbnNhbWE=,size_16,color_FFFFFF,t_70)
返回btn_selector文件中,在selector中添加两个item子标签,分别表示两种状态:
<?xml version="1.0" encoding="utf-8"?>
<selector xmlns:android="http://schemas.android.com/apk/res/android">
    <item android:drawable="@drawable/ic_baseline_remove_red_eye_24" android:state_pressed="true"/>
    <item android:drawable="@drawable/ic_outline_remove_red_eye_24"/>
</selector>
其中,被android:state_pressed="true"标记的item表示按压状态时要演示的图片。
下面是布局,就一个按钮:
<?xml version="1.0" encoding="utf-8"?>
<LinearLayout xmlns:android="http://schemas.android.com/apk/res/android"
    xmlns:app="http://schemas.android.com/apk/res-auto"
    xmlns:tools="http://schemas.android.com/tools"
    android:layout_width="match_parent"
    android:layout_height="match_parent"
    tools:context=".MainActivity">

    <Button
        android:background="@drawable/btn_selector"
        android:layout_width="wrap_content"
        android:layout_height="wrap_content"/>

</LinearLayout>
运行项目,可以看到下面的效果:
![[外链图片转存失败,源站可能有防盗链机制,建议将图片保存下来直接上传(img-4LXD2Jg3-1628773277759)(C:\Users\15998\AppData\Roaming\Typora\typora-user-images\image-20210811222223590.png)]](https://img-blog.csdnimg.cn/2fd4f72eac3444528fa7cef470bb63d0.png?x-oss-process=image/watermark,type_ZmFuZ3poZW5naGVpdGk,shadow_10,text_aHR0cHM6Ly9ibG9nLmNzZG4ubmV0L3NoaXlhbnNhbWE=,size_16,color_FFFFFF,t_70)
按压按钮就会变成如下样式:
![[外链图片转存失败,源站可能有防盗链机制,建议将图片保存下来直接上传(img-hT6dmxTn-1628773277759)(C:\Users\15998\AppData\Roaming\Typora\typora-user-images\image-20210811222257174.png)]](https://img-blog.csdnimg.cn/8534d250bd4d447fa49ee2f12ed8995f.png?x-oss-process=image/watermark,type_ZmFuZ3poZW5naGVpdGk,shadow_10,text_aHR0cHM6Ly9ibG9nLmNzZG4ubmV0L3NoaXlhbnNhbWE=,size_16,color_FFFFFF,t_70)
Button事件处理
关于Button的事件,一般涉及最多无非是点击、长按、触摸
基础执行顺序
这里先模拟一下最基本的情况。
首先布局文件创建一个button:
<?xml version="1.0" encoding="utf-8"?>
<LinearLayout xmlns:android="http://schemas.android.com/apk/res/android"
    xmlns:app="http://schemas.android.com/apk/res-auto"
    xmlns:tools="http://schemas.android.com/tools"
    android:layout_width="match_parent"
    android:layout_height="match_parent"
    tools:context=".MainActivity">

    <Button
        android:id="@+id/btn"
        android:text="小按钮"
        android:layout_width="wrap_content"
        android:layout_height="wrap_content"/>

</LinearLayout>
然后在MainActivity中获取,并添加监听:
public class MainActivity extends AppCompatActivity {

    private Button btn;
    private String TAG = "qks";

    @Override
    protected void onCreate(Bundle savedInstanceState) {
        super.onCreate(savedInstanceState);
        setContentView(R.layout.activity_main);

        btn = findViewById(R.id.btn);

        //点击事件
        btn.setOnClickListener(v -> {
            Log.d(TAG, "onClick: ");
        });

        //长按事件
        btn.setOnLongClickListener(v -> {
            Log.d(TAG, "onLongClick: ");
            return false;
        });

        //触摸事件
        btn.setOnTouchListener((v, event) -> {
            Log.d(TAG, "onTouch: " + event.getAction());
            return false;
        });
    }
}
上面我们设置了三个事件的监听,需要注意的是上面的LongClick、Touch事件返回值都是设置为false。
event的类型MotionEvent。
event.getAction()表示返回当前触摸的状态,值由三个:0、1、2,分别代表开始触摸时、触摸结束时、正在触摸并移动时
下面运行该项目,查看他们执行的顺序。
当我们轻轻点击按钮然后松开:
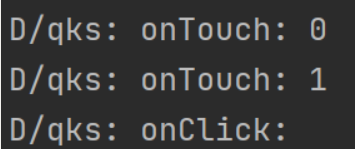
可以看到先出发了Touch的摁下和离开,才触发Click
接下来我们长按按钮,但是不移动鼠标:
![[外链图片转存失败,源站可能有防盗链机制,建议将图片保存下来直接上传(img-cxGF13Io-1628773277760)(C:\Users\15998\AppData\Roaming\Typora\typora-user-images\image-20210811230324681.png)]](https://img-blog.csdnimg.cn/2b1f53fbfef14d57be69bea1a9e25f66.png?x-oss-process=image/watermark,type_ZmFuZ3poZW5naGVpdGk,shadow_10,text_aHR0cHM6Ly9ibG9nLmNzZG4ubmV0L3NoaXlhbnNhbWE=,size_16,color_FFFFFF,t_70)
可以发现,先是触发了Touch的摁下,然后出发LongClick,然后才出发Touch的离开,最后触发Click
下面我们长按之后不松开鼠标同时移动鼠标,之后松开鼠标:
![[外链图片转存失败,源站可能有防盗链机制,建议将图片保存下来直接上传(img-cP19e4oF-1628773277761)(C:\Users\15998\AppData\Roaming\Typora\typora-user-images\image-20210811230730864.png)]](https://img-blog.csdnimg.cn/d20b5f0949854ad4b484a50c3c8647c2.png?x-oss-process=image/watermark,type_ZmFuZ3poZW5naGVpdGk,shadow_10,text_aHR0cHM6Ly9ibG9nLmNzZG4ubmV0L3NoaXlhbnNhbWE=,size_16,color_FFFFFF,t_70)
可以看到它显示识别了摁下Touch,然后是LongClick,然后识别了多次移动Touch,接着识别离开Touch,最后是Click
这里我们摁下鼠标的同时就开始移动,一会后松开鼠标:
![[外链图片转存失败,源站可能有防盗链机制,建议将图片保存下来直接上传(img-oesNNYMp-1628773277762)(C:\Users\15998\AppData\Roaming\Typora\typora-user-images\image-20210811231013711.png)]](https://img-blog.csdnimg.cn/5a54123854874ea39fe6a22945cf8f9c.png?x-oss-process=image/watermark,type_ZmFuZ3poZW5naGVpdGk,shadow_10,text_aHR0cHM6Ly9ibG9nLmNzZG4ubmV0L3NoaXlhbnNhbWE=,size_16,color_FFFFFF,t_70)
可以看到跟上面的差不多,但是这个时候LongClick在移动Touch里
综上所述,在LongClick和Touch的两个事件处理返回值都设置为false的基础上,关于Button的三个事件发生机制,永远是Touch先识别摁下,然后如果有LongClick,那么它将在识别出Touch离开之间被识别,最后才是Click事件被识别。
把Touch事件处理返回值改成true
如果我们把Touch事件的处理方法返回值改成true,那会发生什么呢?
btn.setOnTouchListener((v, event) -> {
    Log.d(TAG, "onTouch: " + event.getAction());
    return true;
});
首先我们指定点击动作,点击之后立刻松开:
![[外链图片转存失败,源站可能有防盗链机制,建议将图片保存下来直接上传(img-fGh79Pmc-1628773277762)(C:\Users\15998\AppData\Roaming\Typora\typora-user-images\image-20210812101054958.png)]](https://img-blog.csdnimg.cn/3251c887a0a443ff8dfc27618a41dbb4.png)
可以看到只出现了Touch的0和1
接下来我们长按,但是不移动鼠标:
![[外链图片转存失败,源站可能有防盗链机制,建议将图片保存下来直接上传(img-W4Sw7uwd-1628773277762)(C:\Users\15998\AppData\Roaming\Typora\typora-user-images\image-20210812101151435.png)]](https://img-blog.csdnimg.cn/9b053b7bd04846bc8d7a0349911b5a2b.png)
可以看到,也只出现了Touch
接下来我们长按的同时移动鼠标:
![[外链图片转存失败,源站可能有防盗链机制,建议将图片保存下来直接上传(img-imFxN0RF-1628773277763)(C:\Users\15998\AppData\Roaming\Typora\typora-user-images\image-20210812101220236.png)]](https://img-blog.csdnimg.cn/b8cb432699a94aa6ba593470707d04e0.png)
结合上面的情况,我们发现如果Touch的事件处理方法返回值改成true,那么就只有最先开始发生的Touch事件响应了,而后面应该发生的LongClick和Click事件都没有发生。这种情况称为事件被Touch消费了。
把LongClick事件处理返回值改为true
这里我们把Touch的返回值改回false,而把LongClick事件处理函数的返回值改成true:
btn.setOnLongClickListener(v -> {
    Log.d(TAG, "onLongClick: ");
    return true;
});
长按的同时不移动鼠标:
![[外链图片转存失败,源站可能有防盗链机制,建议将图片保存下来直接上传(img-kqLCn3oy-1628773277763)(C:\Users\15998\AppData\Roaming\Typora\typora-user-images\image-20210812101711899.png)]](https://img-blog.csdnimg.cn/fead7d3e076a4f0c89f4e93b52ff3b0c.png)
可以看到LongClick和Touch都被触发了,但是Click没有
之后我们长按的同时移动鼠标:
![[外链图片转存失败,源站可能有防盗链机制,建议将图片保存下来直接上传(img-o4xSvueG-1628773277764)(C:\Users\15998\AppData\Roaming\Typora\typora-user-images\image-20210812101631761.png)]](https://img-blog.csdnimg.cn/8eb11fb42b6843aab22132b2b36b767d.png)
可以看到Touch三种情况都出发了,LongCLick也触发了,但是CLick没有
结合这次的实验与上次的结果,我们不难发现,这次的实验,该事件传到LongClick就截止了。
同时将两个方法返回值改成true
下面我们将两个方法的返回值都改成true:
//长摁事件
btn.setOnLongClickListener(v -> {
    Log.d(TAG, "onLongClick: ");
    return true;
});

//触摸事件
btn.setOnTouchListener((v, event) -> {
    Log.d(TAG, "onTouch: " + event.getAction());
    return true;
});
然后我们长按:
![[外链图片转存失败,源站可能有防盗链机制,建议将图片保存下来直接上传(img-pFdEHrA1-1628773277764)(C:\Users\15998\AppData\Roaming\Typora\typora-user-images\image-20210812102157190.png)]](https://img-blog.csdnimg.cn/f9915bd226d44aad869f3065d3aebe9e.png)
长按同时移动鼠标:
![[外链图片转存失败,源站可能有防盗链机制,建议将图片保存下来直接上传(img-0rZUcWQs-1628773277765)(C:\Users\15998\AppData\Roaming\Typora\typora-user-images\image-20210812102222799.png)]](https://img-blog.csdnimg.cn/3ecc0c41f6f04ae0bbbf573982379f35.png)
总结
通过上面三个实验的结果,我们不难得出,这三个事件的执行/判断顺序优先级应该是Touch>LongClick>Click。如果Touch处理方法返回值为true,那么事件传递将在Touch截止(不管LongClick返回值是true还是false),如果LongCLick处理方法返回值为true(并且Touch返回值为false),那么事件将传递到LongClick截止,而不会继续传递下去。
图片按钮(ImageButton)
图片按钮并不是按钮加上一个背景图片,而是一个继承自ImageView的组件,但是在放置图片的同时还能点击。
关于ImageButton和Butoon:

关于ImageButton设置图片后背景边缘为灰色的问题,可以通过设置background属性为#0000,完全透明。
比如下面的案例,我设置一个ImageButton:
<ImageButton
    android:id="@+id/imageButton"
    android:layout_width="100dp"
    android:layout_height="60dp"
    android:src="@drawable/ic_baseline_remove_red_eye_24"/>
效果是这样的:
![[外链图片转存失败,源站可能有防盗链机制,建议将图片保存下来直接上传(img-7vTEK0C9-1628773277765)(C:\Users\15998\AppData\Roaming\Typora\typora-user-images\image-20210812103542153.png)]](https://img-blog.csdnimg.cn/05c3a3172c3b42b4b6fc52c51fe23922.png?x-oss-process=image/watermark,type_ZmFuZ3poZW5naGVpdGk,shadow_10,text_aHR0cHM6Ly9ibG9nLmNzZG4ubmV0L3NoaXlhbnNhbWE=,size_16,color_FFFFFF,t_70)
如果我想背景的灰色去掉,可以这样:
<ImageButton
    android:id="@+id/imageButton"
    android:background="#0000"
    android:layout_width="100dp"
    android:layout_height="60dp"
    android:src="@drawable/ic_baseline_remove_red_eye_24"/>
效果就会变成这样:
![[外链图片转存失败,源站可能有防盗链机制,建议将图片保存下来直接上传(img-n3qjEf7N-1628773277766)(C:\Users\15998\AppData\Roaming\Typora\typora-user-images\image-20210812103620164.png)]](https://img-blog.csdnimg.cn/cb0bfc5805f94efb877c9571f7440611.png?x-oss-process=image/watermark,type_ZmFuZ3poZW5naGVpdGk,shadow_10,text_aHR0cHM6Ly9ibG9nLmNzZG4ubmV0L3NoaXlhbnNhbWE=,size_16,color_FFFFFF,t_70)
单选框(RadioButton)
单选框也可以称为单选按钮,继承自CompoundButton,CompoundButton继承自Button。
单个单选按钮
单选按钮通过text指定说明文字:
<RadioButton
    android:layout_width="wrap_content"
    android:layout_height="wrap_content"
    android:text="你说"
    />

单选框选中之后无法取消选中状态
checked属性可以指定初始是否为选中状态:
<RadioButton
    android:layout_width="wrap_content"
    android:layout_height="wrap_content"
    android:text="你说"
    android:checked="true"
    />
![[外链图片转存失败,源站可能有防盗链机制,建议将图片保存下来直接上传(img-GuVWSl3g-1628773277767)(C:\Users\15998\AppData\Roaming\Typora\typora-user-images\image-20210812105642621.png)]](https://img-blog.csdnimg.cn/5370129c3cdb4c7b8b5a549d2db46095.png?x-oss-process=image/watermark,type_ZmFuZ3poZW5naGVpdGk,shadow_10,text_aHR0cHM6Ly9ibG9nLmNzZG4ubmV0L3NoaXlhbnNhbWE=,size_16,color_FFFFFF,t_70)
单选按钮组
想要实在一组单选按钮中永远只会选中一个,我们需要用到RadioGroup标签。
而不是单纯复制多个单选按钮
下面是一个小示例:
<?xml version="1.0" encoding="utf-8"?>
<LinearLayout xmlns:android="http://schemas.android.com/apk/res/android"
    xmlns:app="http://schemas.android.com/apk/res-auto"
    xmlns:tools="http://schemas.android.com/tools"
    android:layout_width="match_parent"
    android:layout_height="match_parent"
    tools:context=".MainActivity">

    <RadioGroup
        android:layout_width="wrap_content"
        android:layout_height="wrap_content">
        <RadioButton
            android:layout_width="wrap_content"
            android:layout_height="wrap_content"
            android:text="男"/>
        <RadioButton
            android:layout_width="wrap_content"
            android:layout_height="wrap_content"
            android:text="女"/>
        <RadioButton
            android:layout_width="wrap_content"
            android:layout_height="wrap_content"
            android:text="保密"/>
    </RadioGroup>


</LinearLayout>
实现效果:
![[外链图片转存失败,源站可能有防盗链机制,建议将图片保存下来直接上传(img-CwcZvRQx-1628773277768)(C:\Users\15998\AppData\Roaming\Typora\typora-user-images\image-20210812105924823.png)]](https://img-blog.csdnimg.cn/d3824b824a744bc4b0d9ad9187ebbd1c.png?x-oss-process=image/watermark,type_ZmFuZ3poZW5naGVpdGk,shadow_10,text_aHR0cHM6Ly9ibG9nLmNzZG4ubmV0L3NoaXlhbnNhbWE=,size_16,color_FFFFFF,t_70)
此时如果我们选中第二个按钮,那么第一个按钮的选中状态就会消失:
![[外链图片转存失败,源站可能有防盗链机制,建议将图片保存下来直接上传(img-MGcz61dc-1628773277768)(C:\Users\15998\AppData\Roaming\Typora\typora-user-images\image-20210812110046237.png)]](https://img-blog.csdnimg.cn/f16d1a0b0f1145f1b6696a15e09f1dce.png?x-oss-process=image/watermark,type_ZmFuZ3poZW5naGVpdGk,shadow_10,text_aHR0cHM6Ly9ibG9nLmNzZG4ubmV0L3NoaXlhbnNhbWE=,size_16,color_FFFFFF,t_70)
获取选中状态
可以通过为RadioGroup设置监听获取选中按钮id,再通过RadioButton.getText()获取选中的按钮的文字信息
下面是布局文件:
<?xml version="1.0" encoding="utf-8"?>
<LinearLayout xmlns:android="http://schemas.android.com/apk/res/android"
    xmlns:app="http://schemas.android.com/apk/res-auto"
    xmlns:tools="http://schemas.android.com/tools"
    android:layout_width="match_parent"
    android:layout_height="match_parent"
    tools:context=".MainActivity">

    <RadioGroup
        android:id="@+id/radioGroup"
        android:layout_width="wrap_content"
        android:layout_height="wrap_content">
        <RadioButton
            android:id="@+id/one"
            android:layout_width="wrap_content"
            android:layout_height="wrap_content"
            android:text="男"/>
        <RadioButton
            android:id="@+id/two"
            android:layout_width="wrap_content"
            android:layout_height="wrap_content"
            android:text="女"/>
        <RadioButton
            android:id="@+id/three"
            android:layout_width="wrap_content"
            android:layout_height="wrap_content"
            android:text="保密"/>
    </RadioGroup>


</LinearLayout>
下面是MainActivity:
public class MainActivity extends AppCompatActivity {

    private RadioGroup radioGroup;
    private RadioButton radioButton;
    @Override
    protected void onCreate(Bundle savedInstanceState) {
        super.onCreate(savedInstanceState);
        setContentView(R.layout.activity_main);

        radioGroup = findViewById(R.id.radioGroup);
        radioGroup.setOnCheckedChangeListener(new RadioGroup.OnCheckedChangeListener() {
            @Override
            public void onCheckedChanged(RadioGroup group, int checkedId) {
                radioButton = findViewById(checkedId);
                Toast.makeText(MainActivity.this, "性别:" + radioButton.getText(), Toast.LENGTH_SHORT).show();
            }
        });
    }
}
这里用Toast显示选中的按钮
演示效果:
![[外链图片转存失败,源站可能有防盗链机制,建议将图片保存下来直接上传(img-r3TxGh1s-1628773277768)(C:\Users\15998\AppData\Roaming\Typora\typora-user-images\image-20210812111731403.png)]](https://img-blog.csdnimg.cn/2dda5e12390445798b5634a001342b38.png?x-oss-process=image/watermark,type_ZmFuZ3poZW5naGVpdGk,shadow_10,text_aHR0cHM6Ly9ibG9nLmNzZG4ubmV0L3NoaXlhbnNhbWE=,size_16,color_FFFFFF,t_70)
一个实例
通过单选按钮实现提交答案判断结果是否正确
首先是布局文件:
<?xml version="1.0" encoding="utf-8"?>
<LinearLayout xmlns:android="http://schemas.android.com/apk/res/android"
    xmlns:app="http://schemas.android.com/apk/res-auto"
    xmlns:tools="http://schemas.android.com/tools"
    android:orientation="vertical"
    android:layout_width="match_parent"
    android:layout_height="match_parent"
    tools:context=".MainActivity">

    <TextView
        android:layout_width="wrap_content"
        android:layout_height="wrap_content"
        android:text="@string/msg"
        app:layout_constraintBottom_toBottomOf="parent"
        app:layout_constraintLeft_toLeftOf="parent"
        app:layout_constraintRight_toRightOf="parent"
        app:layout_constraintTop_toTopOf="parent" />

    <RadioGroup
        android:id="@+id/radioGroup"
        android:layout_width="wrap_content"
        android:layout_height="wrap_content">
        <RadioButton
            android:id="@+id/radioButtonA"
            android:text="A: 125"
            android:layout_width="wrap_content"
            android:layout_height="wrap_content"/>
        <RadioButton
            android:id="@+id/radioButtonB"
            android:text="B: 100"
            android:layout_width="wrap_content"
            android:layout_height="wrap_content"/>
        <RadioButton
            android:id="@+id/radioButtonC"
            android:text="C: 175"
            android:layout_width="wrap_content"
            android:layout_height="wrap_content"/>
        <RadioButton
            android:id="@+id/radioButtonD"
            android:text="D: 200"
            android:layout_width="wrap_content"
            android:layout_height="wrap_content"/>
    </RadioGroup>

    <Button
        android:id="@+id/btn"
        android:text="提交"
        android:layout_width="wrap_content"
        android:layout_height="wrap_content" />
</LinearLayout>
然后是MainActivity:
public class MainActivity extends AppCompatActivity {

    private Button btn;
    private RadioGroup radioGroup;
    private RadioButton radioButton;
    private String TAG = "qks";

    @Override
    protected void onCreate(Bundle savedInstanceState) {
        super.onCreate(savedInstanceState);
        setContentView(R.layout.activity_main);

        radioGroup = findViewById(R.id.radioGroup);
        btn = findViewById(R.id.btn);

        radioGroup.setOnCheckedChangeListener((group, checkedId) -> radioButton = findViewById(checkedId));
        btn.setOnClickListener(v -> {
            if (radioButton.getText().equals("B: 100"))
                Toast.makeText(MainActivity.this, "回答正确", Toast.LENGTH_SHORT).show();
            else
                Toast.makeText(MainActivity.this, "回答错误", Toast.LENGTH_SHORT).show();
        });
    }
}
主要是设置两个监听,然后显示消息。
下面是演示效果:
![[外链图片转存失败,源站可能有防盗链机制,建议将图片保存下来直接上传(img-5l3z8tPv-1628773277769)(C:\Users\15998\AppData\Roaming\Typora\typora-user-images\image-20210812131911490.png)]](https://img-blog.csdnimg.cn/2b1cb236dbe34b4cab780576dbb98ce2.png?x-oss-process=image/watermark,type_ZmFuZ3poZW5naGVpdGk,shadow_10,text_aHR0cHM6Ly9ibG9nLmNzZG4ubmV0L3NoaXlhbnNhbWE=,size_16,color_FFFFFF,t_70)
提交正确的答案,显示回答正确。
![[外链图片转存失败,源站可能有防盗链机制,建议将图片保存下来直接上传(img-1X53fkxR-1628773277769)(C:\Users\15998\AppData\Roaming\Typora\typora-user-images\image-20210812131934215.png)]](https://img-blog.csdnimg.cn/63cc56652db14aeaa4b0932a4fa0d9d1.png?x-oss-process=image/watermark,type_ZmFuZ3poZW5naGVpdGk,shadow_10,text_aHR0cHM6Ly9ibG9nLmNzZG4ubmV0L3NoaXlhbnNhbWE=,size_16,color_FFFFFF,t_70)
提交错误的答案,显示回答错误。
复选框
复选框跟单选框的不同就是复选框允许选择多项选项,并且不需要Group标签来约束
基础用法
复选框使用CheckBox标签来指定:
<?xml version="1.0" encoding="utf-8"?>
<LinearLayout xmlns:android="http://schemas.android.com/apk/res/android"
    xmlns:app="http://schemas.android.com/apk/res-auto"
    xmlns:tools="http://schemas.android.com/tools"
    android:orientation="vertical"
    android:layout_width="match_parent"
    android:layout_height="match_parent"
    tools:context=".MainActivity">

    <CheckBox
        android:id="@+id/checkBoxA"
        android:text="体育"
        android:layout_width="wrap_content"
        android:layout_height="wrap_content"/>

    <CheckBox
        android:id="@+id/checkBoxB"
        android:text="美术"
        android:layout_width="wrap_content"
        android:layout_height="wrap_content"/>
    <CheckBox
        android:id="@+id/checkBoxC"
        android:text="音乐"
        android:layout_width="wrap_content"
        android:layout_height="wrap_content"/>
</LinearLayout>
效果如图:
![[外链图片转存失败,源站可能有防盗链机制,建议将图片保存下来直接上传(img-w2s5Gpsk-1628773277770)(C:\Users\15998\AppData\Roaming\Typora\typora-user-images\image-20210812132653493.png)]](https://img-blog.csdnimg.cn/f55ab9b8dbdf458e8d84bb90e031c92e.png?x-oss-process=image/watermark,type_ZmFuZ3poZW5naGVpdGk,shadow_10,text_aHR0cHM6Ly9ibG9nLmNzZG4ubmV0L3NoaXlhbnNhbWE=,size_16,color_FFFFFF,t_70)
可以看到上面选中了多个选项,并且可以取消。
关于事件
由于复选框没有Group来限定,所以我们通常需要在每一个复选框上添加选中事件,分别判断选中状态。
为checkBoxA添加选择监听:
public class MainActivity extends AppCompatActivity {

    private String TAG = "qks";
    private CheckBox checkBoxA;

    @Override
    protected void onCreate(Bundle savedInstanceState) {
        super.onCreate(savedInstanceState);
        setContentView(R.layout.activity_main);

        checkBoxA = findViewById(R.id.checkBoxA);
        checkBoxA.setOnCheckedChangeListener((buttonView, isChecked) -> {
            if (isChecked)
                Toast.makeText(MainActivity.this, "体育", Toast.LENGTH_SHORT).show();
        });
    }
}
当选中时,就会触发该事件:
![[外链图片转存失败,源站可能有防盗链机制,建议将图片保存下来直接上传(img-39NwyzWV-1628773277770)(C:\Users\15998\AppData\Roaming\Typora\typora-user-images\image-20210812134411239.png)]](https://img-blog.csdnimg.cn/06ba03d8a8a74f94a667dd03f89d1a39.png?x-oss-process=image/watermark,type_ZmFuZ3poZW5naGVpdGk,shadow_10,text_aHR0cHM6Ly9ibG9nLmNzZG4ubmV0L3NoaXlhbnNhbWE=,size_16,color_FFFFFF,t_70)
当然,其他的复选框则不会
简单案例
模拟一个权限授予界面
编写代码之前,我们需要修改themes.xml文件里的信息。把style标签的oarent属性改成下面的值:
Theme.MaterialComponents.DayNight.NoActionBar.Bridge
这样我们才可以随心所欲修改按钮的背景。
接着还需要修改AndroidManifest.xml:
android:theme="@style/Theme.AppCompat.Light.DarkActionBar"
下面是布局文件:
<?xml version="1.0" encoding="utf-8"?>
<LinearLayout xmlns:android="http://schemas.android.com/apk/res/android"
    xmlns:app="http://schemas.android.com/apk/res-auto"
    xmlns:tools="http://schemas.android.com/tools"
    android:orientation="vertical"
    android:layout_width="match_parent"
    android:layout_height="match_parent"
    android:layout_margin="16dp"
    tools:context=".MainActivity">

    <ImageView
        android:layout_marginTop="20dp"
        android:layout_width="match_parent"
        android:layout_height="wrap_content"
        android:src="@mipmap/feiji_top"/>

    <TextView
        android:layout_marginTop="30dp"
        android:layout_marginLeft="10dp"
        android:layout_width="wrap_content"
        android:layout_height="wrap_content"
        android:text="登陆后该应用将获得以下权限"
        android:textSize="14dp"/>

    <CheckBox
        android:id="@+id/checkBoxA"
        android:text="获得你的公开信息(昵称、图像等)"
        android:textColor="#BDBDBD"
        android:textSize="12sp"
        android:checked="true"
        android:layout_marginTop="20dp"
        android:layout_marginLeft="20dp"
        android:layout_width="wrap_content"
        android:layout_height="wrap_content"/>
    <CheckBox
        android:id="@+id/checkBoxB"
        android:text="寻找与你共同使用该应用的好友"
        android:textColor="#BDBDBD"
        android:textSize="12sp"
        android:layout_marginLeft="20dp"
        android:checked="true"
        android:layout_width="wrap_content"
        android:layout_height="wrap_content"/>
    <CheckBox
        android:id="@+id/checkBoxC"
        android:text="帮助你通过好友发送消息"
        android:textColor="#BDBDBD"
        android:textSize="12sp"
        android:layout_marginLeft="20dp"
        android:checked="true"
        android:layout_width="wrap_content"
        android:layout_height="wrap_content"/>

    <Button
        android:layout_marginTop="180dp"
        android:id="@+id/btn_login"
        android:background="#009688"
        android:text="确认登陆"
        android:layout_width="match_parent"
        android:layout_height="wrap_content"/>
    <Button
        android:background="#FFFFFF"
        android:text="取消"
        android:layout_marginTop="20dp"
        android:layout_width="match_parent"
        android:layout_height="wrap_content"/>
</LinearLayout>
ImageView用到的图片如图:
![[外链图片转存失败,源站可能有防盗链机制,建议将图片保存下来直接上传(img-bBDmL8OY-1628773277771)(C:\Users\15998\AppData\Roaming\Typora\typora-user-images\image-20210812135620014.png)]](https://img-blog.csdnimg.cn/af1f444051244bd59e3c8f0c5693c5b3.png)
然后我们编写MainActivity:
public class MainActivity extends AppCompatActivity {

    private String TAG = "qks";
    private CheckBox checkBoxA;
    private CheckBox checkBoxB;
    private CheckBox checkBoxC;
    private Button btn;
    private String checked = "该应用将";

    @Override
    protected void onCreate(Bundle savedInstanceState) {
        super.onCreate(savedInstanceState);
        setContentView(R.layout.activity_main);

        checkBoxA = findViewById(R.id.checkBoxA);
        checkBoxB = findViewById(R.id.checkBoxB);
        checkBoxC = findViewById(R.id.checkBoxC);
        btn = findViewById(R.id.btn_login);

        btn.setOnClickListener(v -> {
            if (checkBoxA.isChecked())
                checked += checkBoxA.getText().toString();
            if (checkBoxB.isChecked())
                checked += checkBoxB.getText().toString();
            if (checkBoxC.isChecked())
                checked += checkBoxC.getText().toString();
            Toast.makeText(MainActivity.this, checked, Toast.LENGTH_LONG).show();
        });
    }
}
下面是演示效果:
public class MainActivity extends AppCompatActivity {

    private String TAG = "qks";
    private CheckBox checkBoxA;
    private CheckBox checkBoxB;
    private CheckBox checkBoxC;
    private Button btn;
    private String checked = "";

    @Override
    protected void onCreate(Bundle savedInstanceState) {
        super.onCreate(savedInstanceState);
        setContentView(R.layout.activity_main);

        checkBoxA = findViewById(R.id.checkBoxA);
        checkBoxB = findViewById(R.id.checkBoxB);
        checkBoxC = findViewById(R.id.checkBoxC);
        btn = findViewById(R.id.btn_login);

        btn.setOnClickListener(v -> {
            if (checkBoxA.isChecked())
                checked += checkBoxA.getText().toString();
            if (checkBoxB.isChecked())
                checked += checkBoxB.getText().toString();
            if (checkBoxC.isChecked())
                checked += checkBoxC.getText().toString();
            Toast.makeText(MainActivity.this, checked, Toast.LENGTH_LONG).show();
            checked = "";
        });
    }
}
下面是演示结果:
![[外链图片转存失败,源站可能有防盗链机制,建议将图片保存下来直接上传(img-NhItsaeI-1628773277772)(C:\Users\15998\AppData\Roaming\Typora\typora-user-images\image-20210812144117904.png)]](https://img-blog.csdnimg.cn/49d887ec587e459c94e72a68d1475130.png?x-oss-process=image/watermark,type_ZmFuZ3poZW5naGVpdGk,shadow_10,text_aHR0cHM6Ly9ibG9nLmNzZG4ubmV0L3NoaXlhbnNhbWE=,size_16,color_FFFFFF,t_70)
取消不同的复选框:
![[外链图片转存失败,源站可能有防盗链机制,建议将图片保存下来直接上传(img-nFU5m5vt-1628773277772)(C:\Users\15998\AppData\Roaming\Typora\typora-user-images\image-20210812144623041.png)]](https://img-blog.csdnimg.cn/16f1ae5276754147823cdd1fd9306a39.png?x-oss-process=image/watermark,type_ZmFuZ3poZW5naGVpdGk,shadow_10,text_aHR0cHM6Ly9ibG9nLmNzZG4ubmV0L3NoaXlhbnNhbWE=,size_16,color_FFFFFF,t_70)
日期时间类组件
日期选择器
基础用法
在布局中添加日期选择器:
<?xml version="1.0" encoding="utf-8"?>
<RelativeLayout xmlns:android="http://schemas.android.com/apk/res/android"
    xmlns:app="http://schemas.android.com/apk/res-auto"
    xmlns:tools="http://schemas.android.com/tools"
    android:layout_width="match_parent"
    android:layout_height="match_parent"
    tools:context=".MainActivity">

    <DatePicker
        android:id="@+id/datePicker"
        android:layout_width="wrap_content"
        android:layout_height="wrap_content" />

</RelativeLayout>
change事件
实现对日期改变事件的监听
布局文件就用上面的。
下面是MainAcitivity的代码:
public class MainActivity extends AppCompatActivity {

    private int year, month, day;
    private DatePicker datePicker;

    @Override
    protected void onCreate(Bundle savedInstanceState) {
        super.onCreate(savedInstanceState);
        setContentView(R.layout.activity_main);

        datePicker = findViewById(R.id.datePicker);

        Calendar calendar = Calendar.getInstance();
        year = calendar.get(Calendar.YEAR);
        month = calendar.get(Calendar.MONTH);
        day = calendar.get(Calendar.DAY_OF_MONTH);

        datePicker.init(year, month, day, new DatePicker.OnDateChangedListener() {
            @Override
            public void onDateChanged(DatePicker view, int year, int monthOfYear, int dayOfMonth) {
                MainActivity.this.year = year;
                MainActivity.this.month = monthOfYear;
                MainActivity.this.day = dayOfMonth;
                String str = year + "年" + (monthOfYear + 1) + "月" + day + "日";
                Toast.makeText(MainActivity.this, str, Toast.LENGTH_SHORT).show();
            }
        });
    }
}
上面的代码重新初始化DatePicker,并添加change事件。
记住monthOfYear从0开始,所以实际的月份要在原来的基础上加上1
下面是演示效果:
![[外链图片转存失败,源站可能有防盗链机制,建议将图片保存下来直接上传(img-FeeJR42g-1628773277773)(C:\Users\15998\AppData\Roaming\Typora\typora-user-images\image-20210812201126094.png)]](https://img-blog.csdnimg.cn/0a2e4eba32e146f68b35beb856d93ab1.png?x-oss-process=image/watermark,type_ZmFuZ3poZW5naGVpdGk,shadow_10,text_aHR0cHM6Ly9ibG9nLmNzZG4ubmV0L3NoaXlhbnNhbWE=,size_16,color_FFFFFF,t_70)
时间选择器
时间选择器使用TimePicker标签指定:
<?xml version="1.0" encoding="utf-8"?>
<RelativeLayout xmlns:android="http://schemas.android.com/apk/res/android"
    xmlns:app="http://schemas.android.com/apk/res-auto"
    xmlns:tools="http://schemas.android.com/tools"
    android:layout_width="match_parent"
    android:layout_height="match_parent"
    tools:context=".MainActivity">

    <TimePicker
        android:id="@+id/timePicker"
        android:layout_width="wrap_content"
        android:layout_height="wrap_content"/>

</RelativeLayout>
下面结合change事件:
public class MainActivity extends AppCompatActivity {

    private TimePicker timePicker;

    @Override
    protected void onCreate(Bundle savedInstanceState) {
        super.onCreate(savedInstanceState);
        setContentView(R.layout.activity_main);

        timePicker.setIs24HourView(true);
        timePicker = findViewById(R.id.timePicker);
        timePicker.setOnTimeChangedListener(new TimePicker.OnTimeChangedListener() {
            @Override
            public void onTimeChanged(TimePicker view, int hourOfDay, int minute) {
                String str = hourOfDay + "时" + minute + "分";
                Toast.makeText(MainActivity.this, str, Toast.LENGTH_SHORT);
            }
        });
    }
}
演示效果:
![[外链图片转存失败,源站可能有防盗链机制,建议将图片保存下来直接上传(img-ovbbnQF8-1628773277773)(C:\Users\15998\AppData\Roaming\Typora\typora-user-images\image-20210812203834814.png)]](https://img-blog.csdnimg.cn/8c8da304a48a4c4d9890dd3324d290bc.png?x-oss-process=image/watermark,type_ZmFuZ3poZW5naGVpdGk,shadow_10,text_aHR0cHM6Ly9ibG9nLmNzZG4ubmV0L3NoaXlhbnNhbWE=,size_16,color_FFFFFF,t_70)
改变时间时就会弹出消息提示。
计时器
计时器使用Chronometer标签指定:
<?xml version="1.0" encoding="utf-8"?>
<RelativeLayout xmlns:android="http://schemas.android.com/apk/res/android"
    xmlns:app="http://schemas.android.com/apk/res-auto"
    xmlns:tools="http://schemas.android.com/tools"
    android:layout_width="match_parent"
    android:layout_height="match_parent"
    tools:context=".MainActivity">

    <Chronometer
        android:id="@+id/timePicker"
        android:format="医用时间:%s"
        android:layout_width="wrap_content"
        android:layout_height="wrap_content"/>

</RelativeLayout>
常用到下面五个方法:
- setBase():设置计时器的起始时间
- setFormat():设置显示时间的格式
- start():指定开始计时
- stop():指定停止计时
- setOnChronometerTickListener():绑定监听器,计时器改变时触发
下面时间一个简单的示例。
先准备好图片:
![[外链图片转存失败,源站可能有防盗链机制,建议将图片保存下来直接上传(img-JZGud7oT-1628773277774)(C:\Users\15998\AppData\Roaming\Typora\typora-user-images\image-20210812204453631.png)]](https://img-blog.csdnimg.cn/9796f1e516874c82b712fd2a120d37a9.png)
我们需要做的就是在右上角显示计时器。
改一下布局文件:
<?xml version="1.0" encoding="utf-8"?>
<RelativeLayout xmlns:android="http://schemas.android.com/apk/res/android"
    xmlns:app="http://schemas.android.com/apk/res-auto"
    xmlns:tools="http://schemas.android.com/tools"
    android:background="@mipmap/xiaoxiao"
    android:layout_width="match_parent"
    android:layout_height="match_parent"
    tools:context=".MainActivity">

    <Chronometer
        android:id="@+id/chronometer"
        android:textColor="#FFFF00"
        android:textSize="18dp"
        android:layout_marginRight="29dp"
        android:layout_marginTop="40dp"
        android:layout_alignParentRight="true"
        android:layout_width="wrap_content"
        android:layout_height="wrap_content"/>

</RelativeLayout>
然后设置MainActivity:
public class MainActivity extends AppCompatActivity {

    private Chronometer chronometer;
    private String TAG = "qks";

    @Override
    protected void onCreate(Bundle savedInstanceState) {
        super.onCreate(savedInstanceState);
        setContentView(R.layout.activity_main);

        chronometer = findViewById(R.id.chronometer);
        chronometer.setBase(SystemClock.elapsedRealtime());
        Log.d(TAG, "onCreate: " + SystemClock.elapsedRealtime());
        chronometer.setFormat("%s");
        chronometer.start();
        chronometer.setOnChronometerTickListener(new Chronometer.OnChronometerTickListener() {
            @Override
            public void onChronometerTick(Chronometer chronometer) {
                if (SystemClock.elapsedRealtime() - chronometer.getBase() >= 60000){
                    Log.d(TAG, "onChronometerTick: " + SystemClock.elapsedRealtime());
                    chronometer.stop();
                }
            }
        });
    }
}
整体实现效果:
![[外链图片转存失败,源站可能有防盗链机制,建议将图片保存下来直接上传(img-Z02Mjkw3-1628773277774)(C:\Users\15998\AppData\Roaming\Typora\typora-user-images\image-20210812205928165.png)]](https://img-blog.csdnimg.cn/d845b4c9f6e3431aa9d460aa53b2f077.png?x-oss-process=image/watermark,type_ZmFuZ3poZW5naGVpdGk,shadow_10,text_aHR0cHM6Ly9ibG9nLmNzZG4ubmV0L3NoaXlhbnNhbWE=,size_16,color_FFFFFF,t_70)
到了一分钟的时候它就会停下来。


 755
755


 被折叠的 条评论
为什么被折叠?
被折叠的 条评论
为什么被折叠?
 到【灌水乐园】发言


