


Introduction to On-Device AI
本文是学习 https://www.deeplearning.ai/short-courses/introduction-to-on-device-ai/这门课的学习笔记。

What you’ll learn in this course
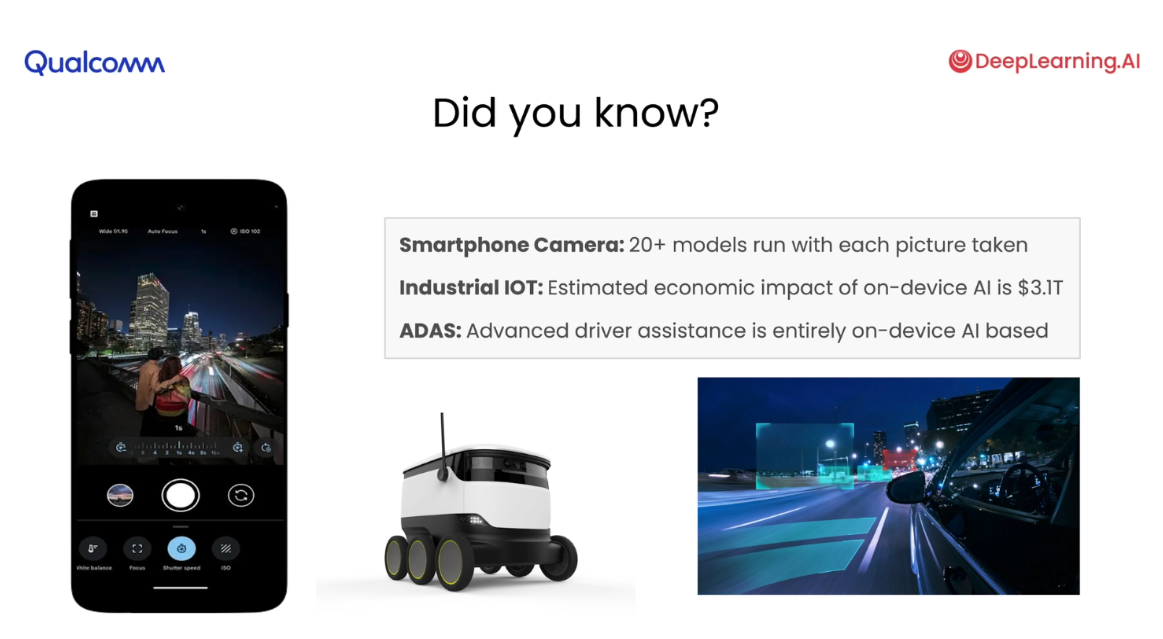
As AI moves beyond the cloud, on-device inference is rapidly expanding to smartphones, IoT devices, robots, AR/VR headsets, and more. Billions of mobile and other edge devices are ready to run optimized AI models.
This course equips you with key skills to deploy AI on device:
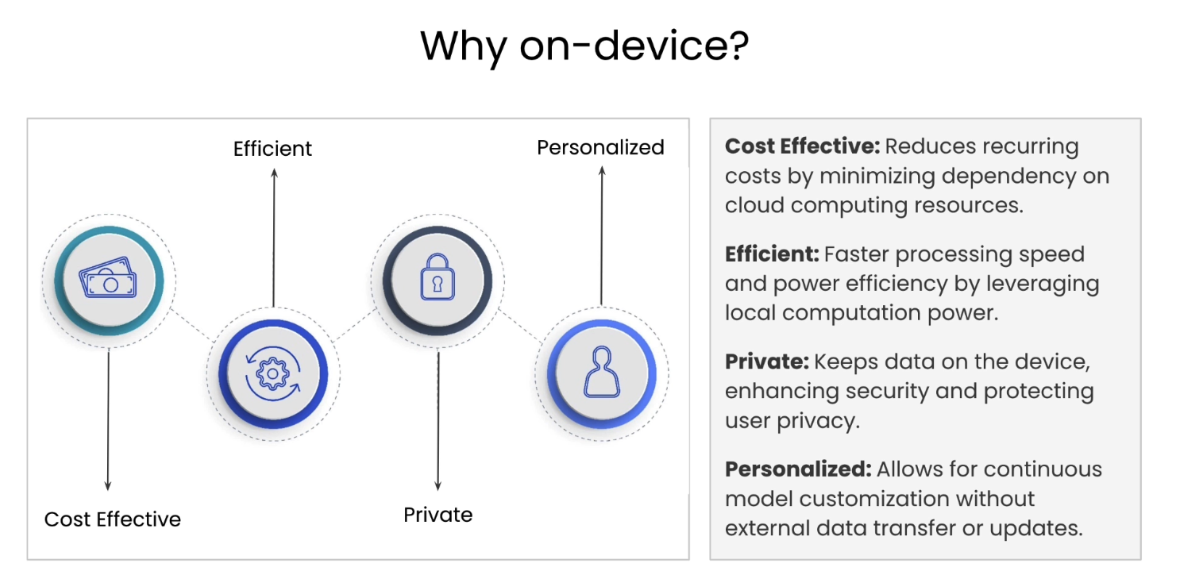
- Explore how deploying models on device reduces latency, enhances efficiency, and preserves privacy.
- Go through key concepts of on-device deployment such as neural network graph capture, on-device compilation, and hardware acceleration.
- Convert pretrained models from PyTorch and TensorFlow for on-device compatibility.
- Deploy a real-time image segmentation model on device with just a few lines of code.
- Test your model performance and validate numerical accuracy when deploying to on-device environments
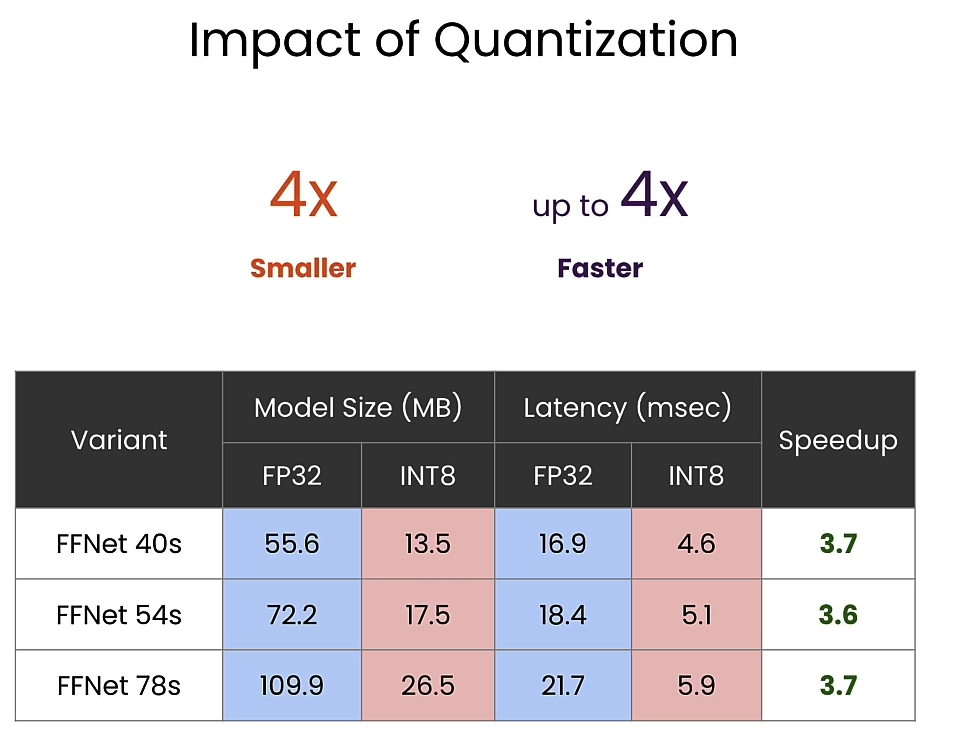
- Quantize and make your model up to 4x faster and 4x smaller for higher on-device performance.
- See a demonstration of the steps for integrating the model into a functioning Android app.
Learn from Krishna Sridhar, Senior Director of Engineering at Qualcomm, who has played a pivotal role in deploying over 1,000 models on devices and, with his team, has created the infrastructure used by over 100,000 applications.
By learning these techniques, you’ll be positioned to develop and deploy AI to billions of devices and optimize your complex models to run efficiently on the edge.
文章目录
Why on-device?
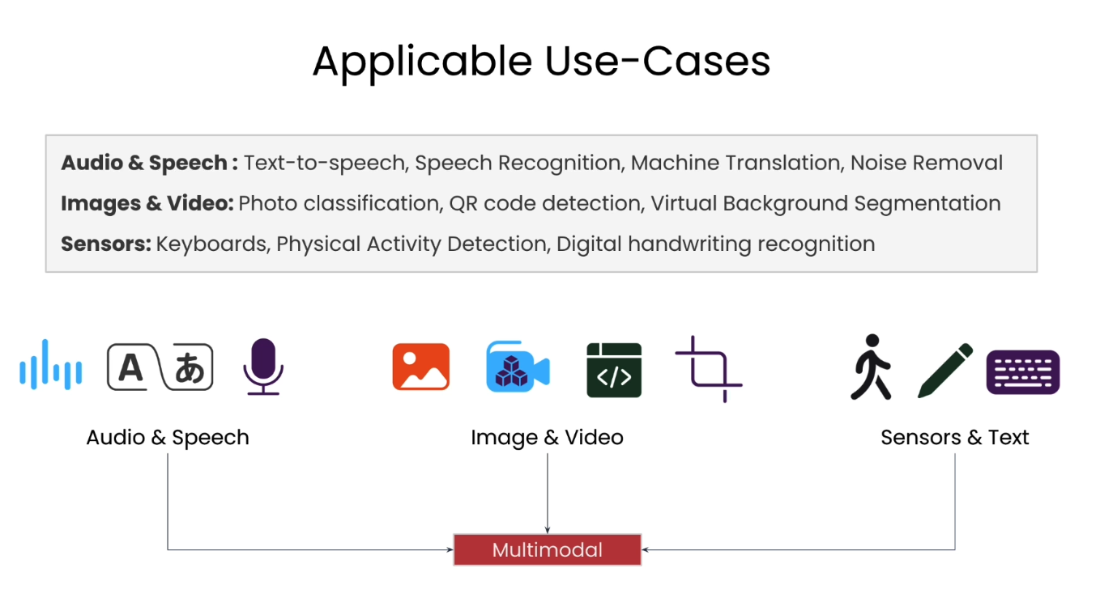
applicable use-cases
Why on-device
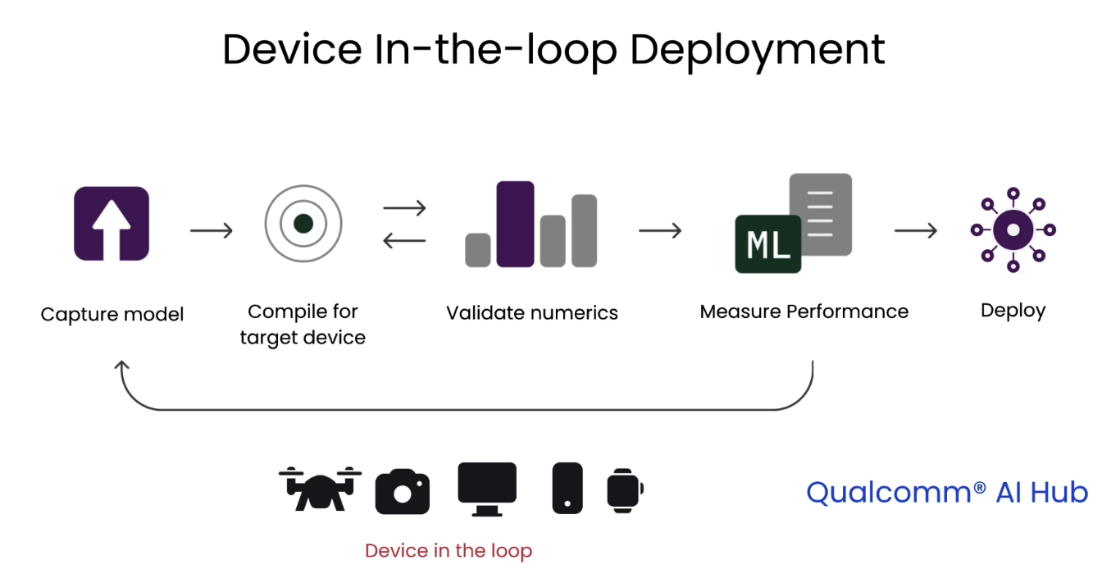
Device in-the-loop deployment
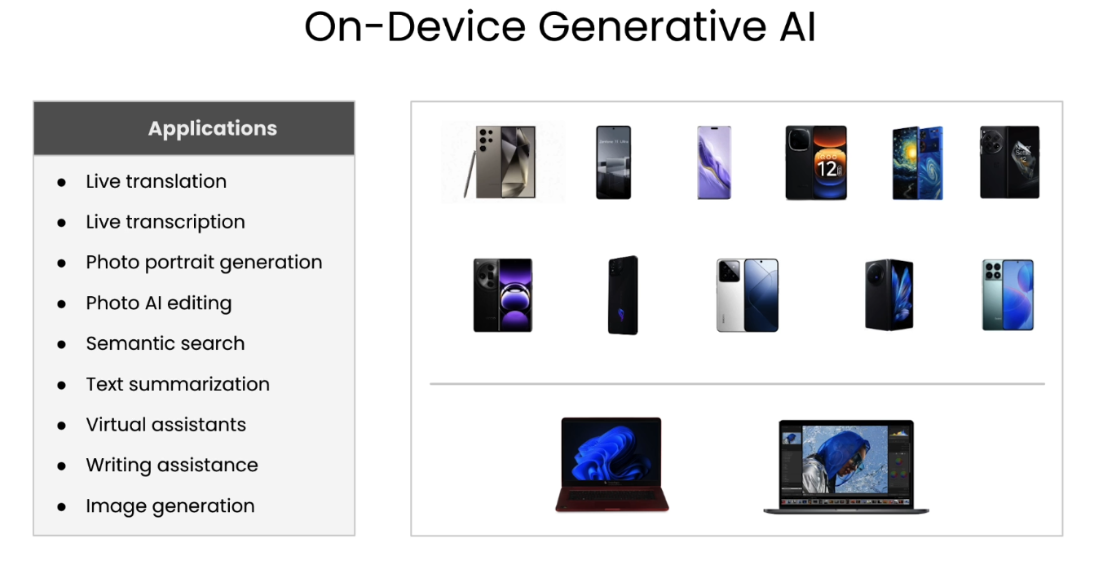
on-device generative AI
L2: Deploying Segmentation Models On-Device
设备上AI的应用
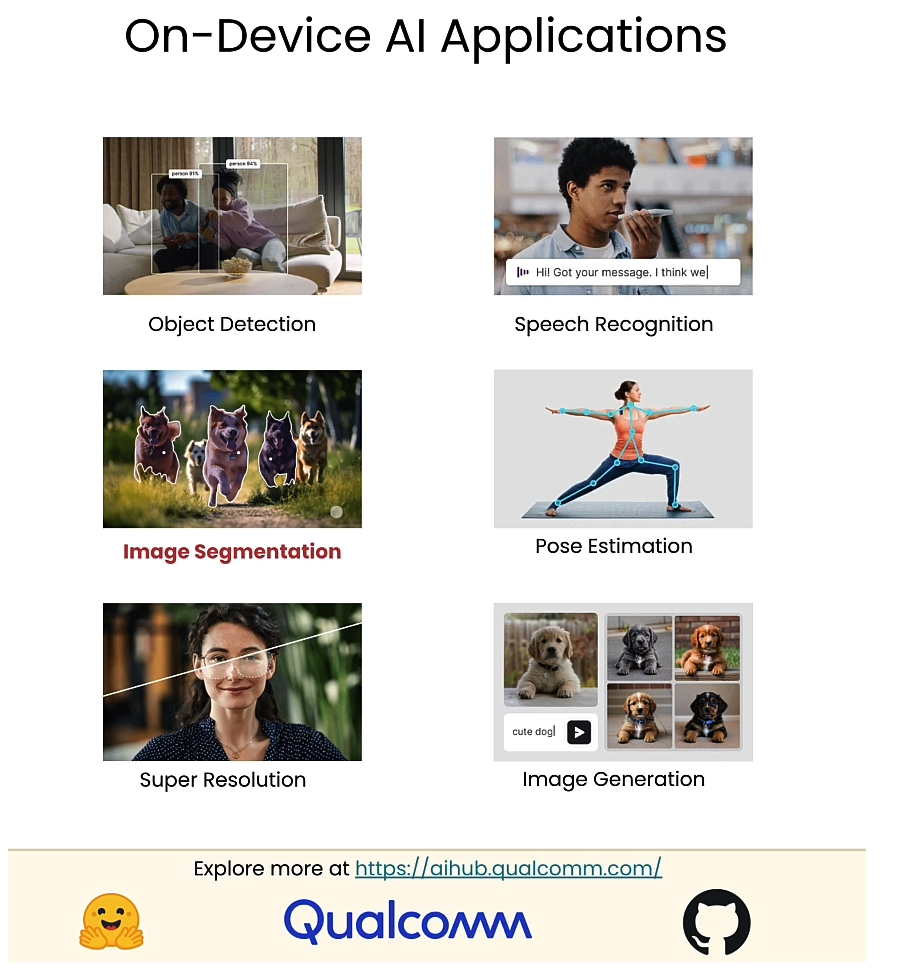
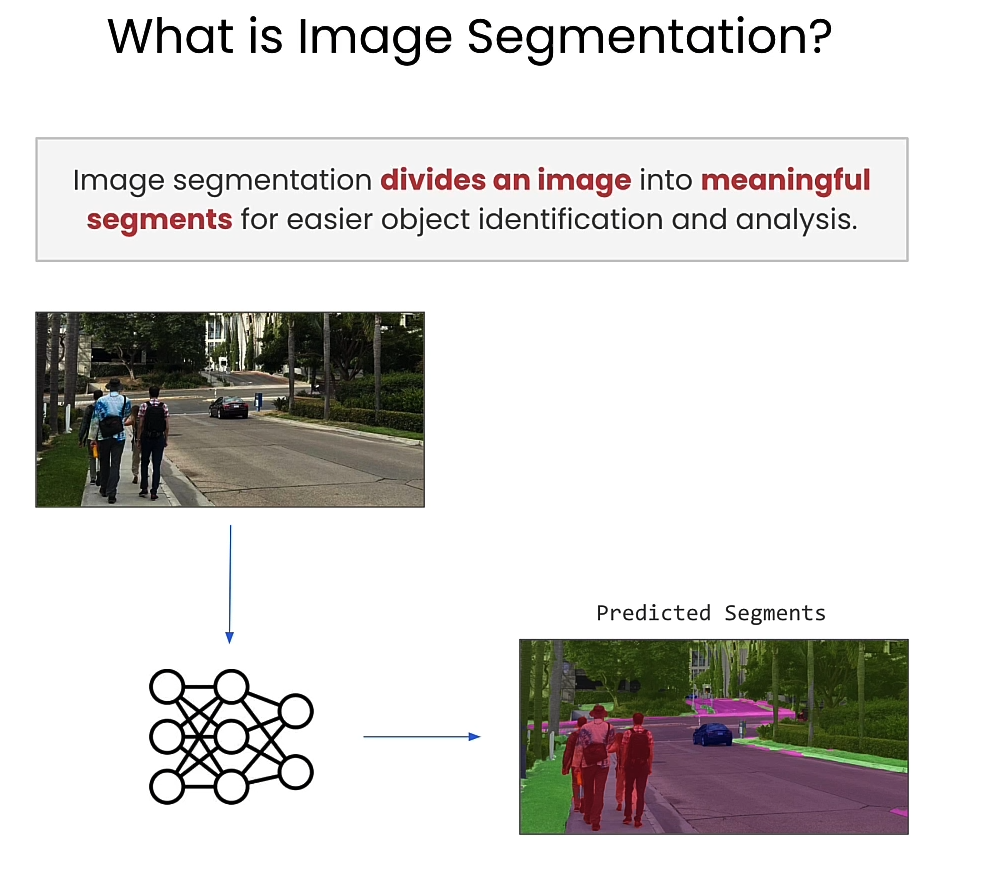
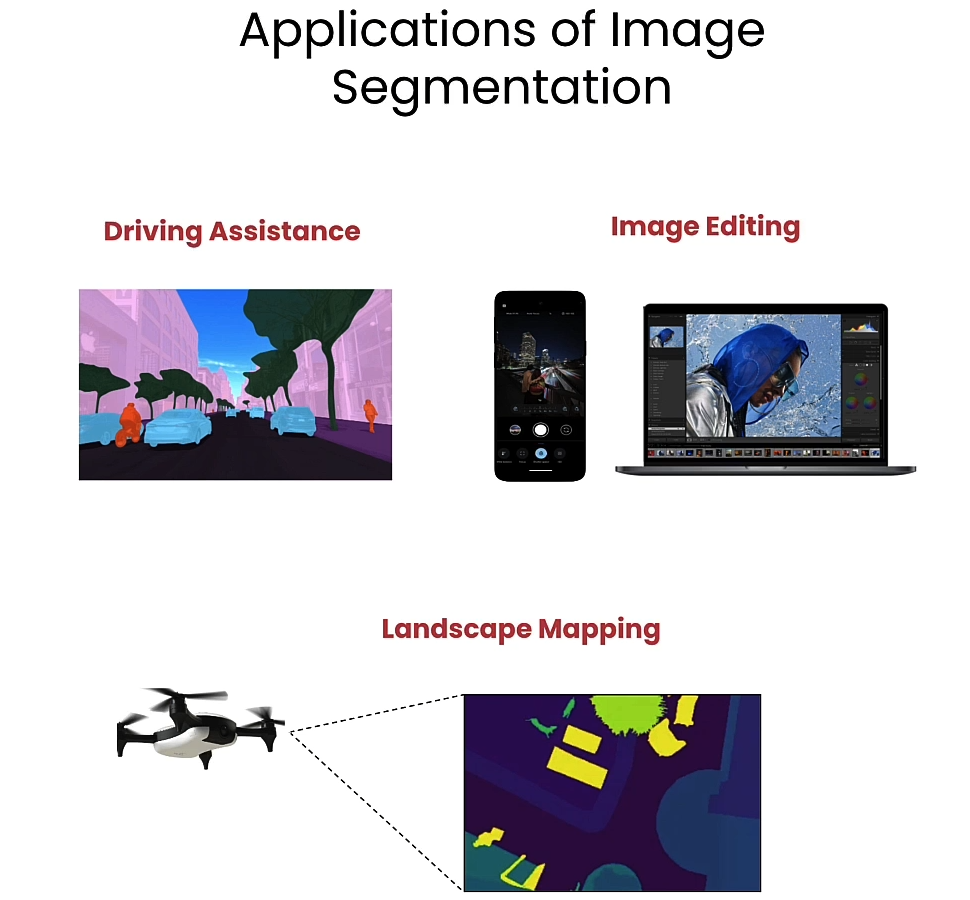
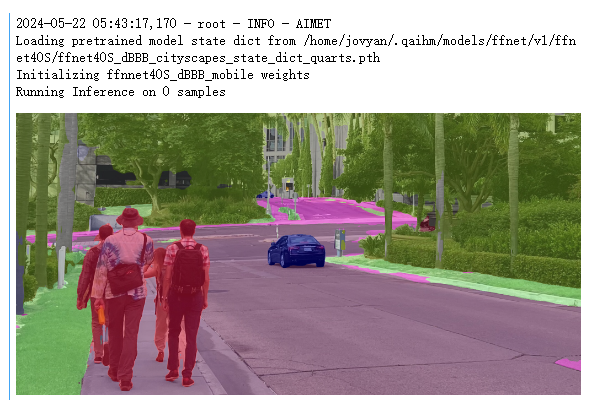
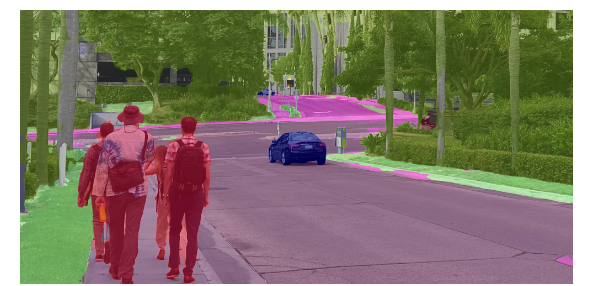
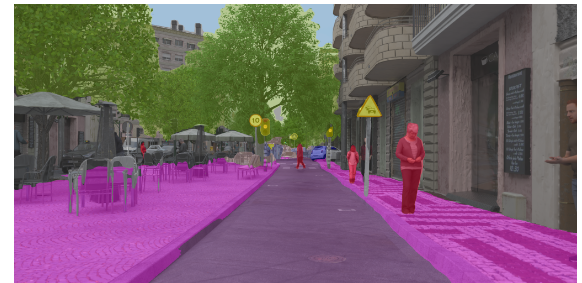
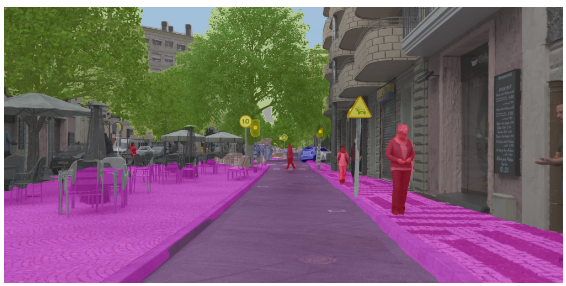
Image segmentation
types of image segmentation
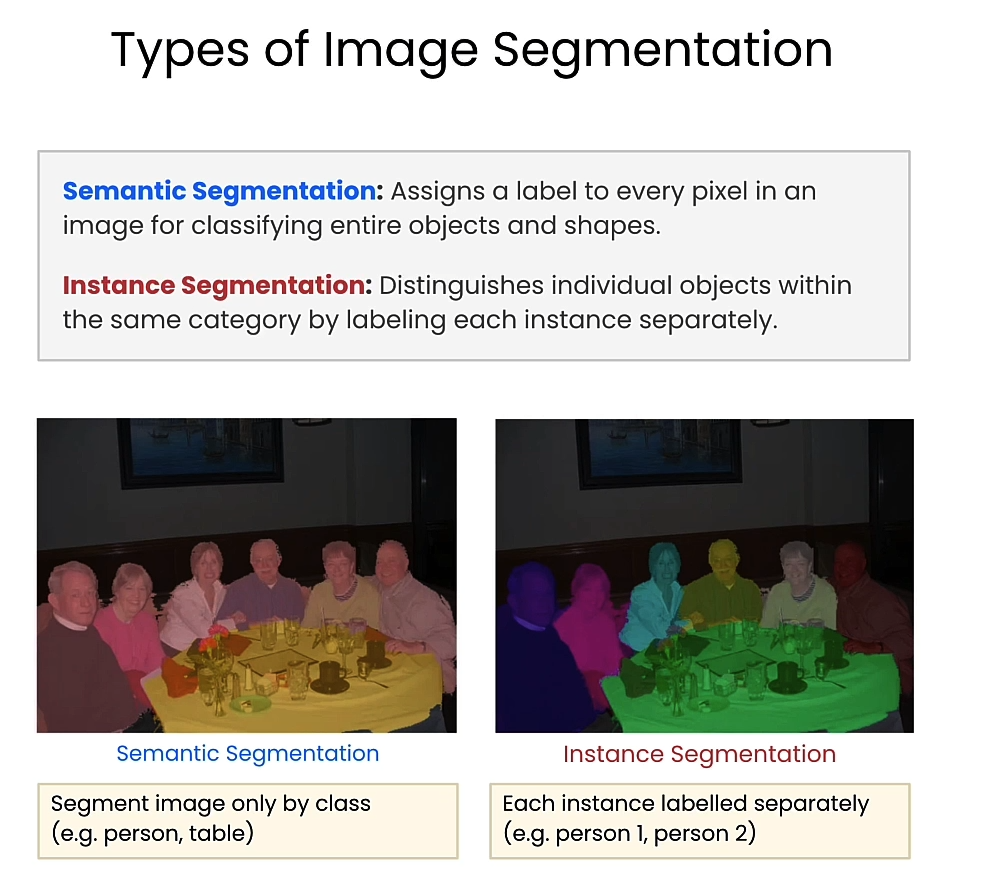
image segmentation的应用
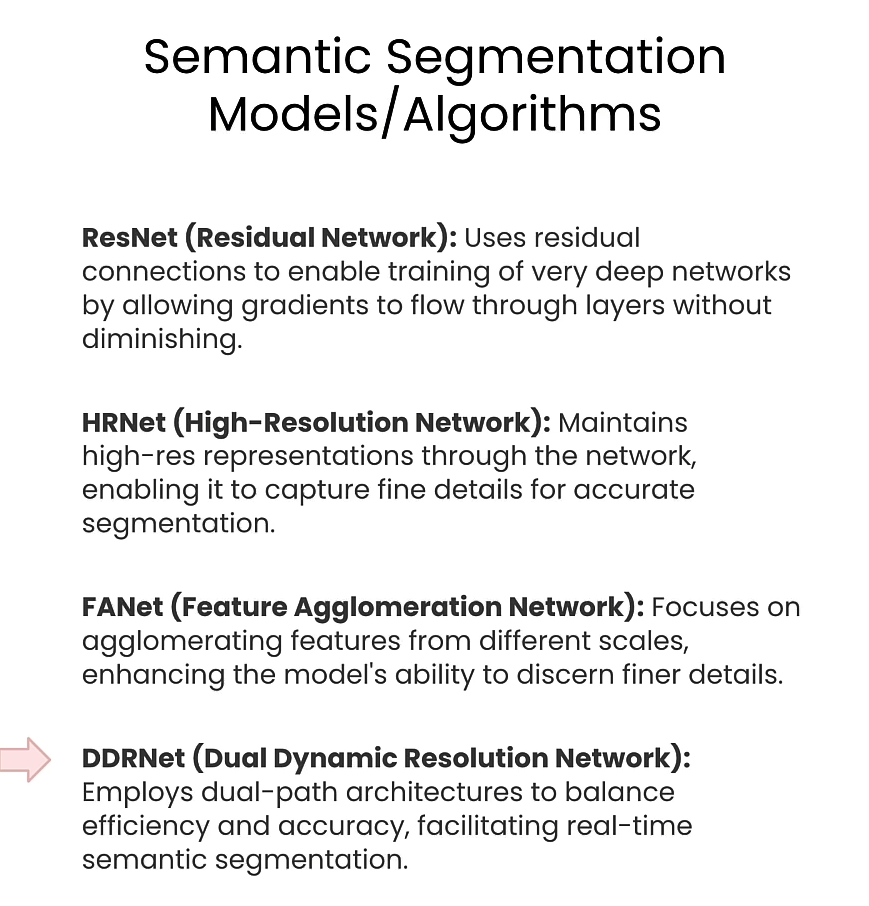
semantic segmentation模型
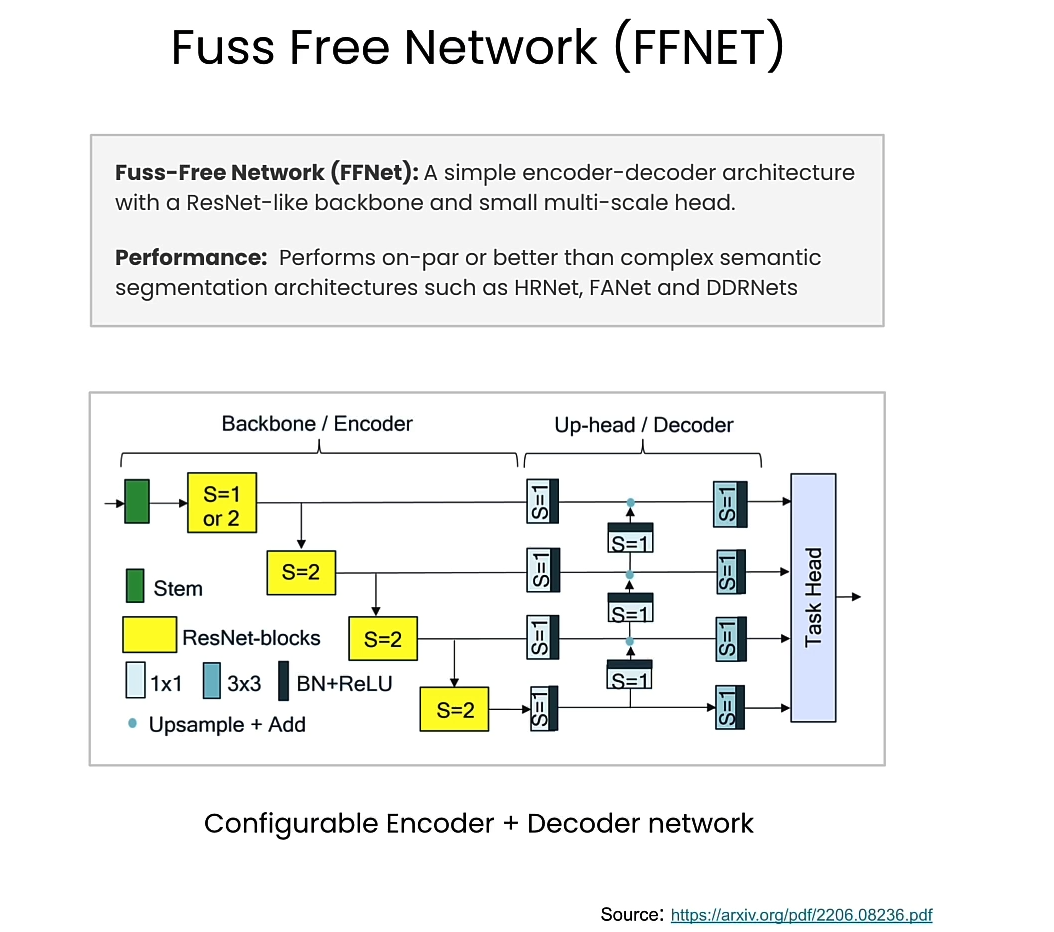
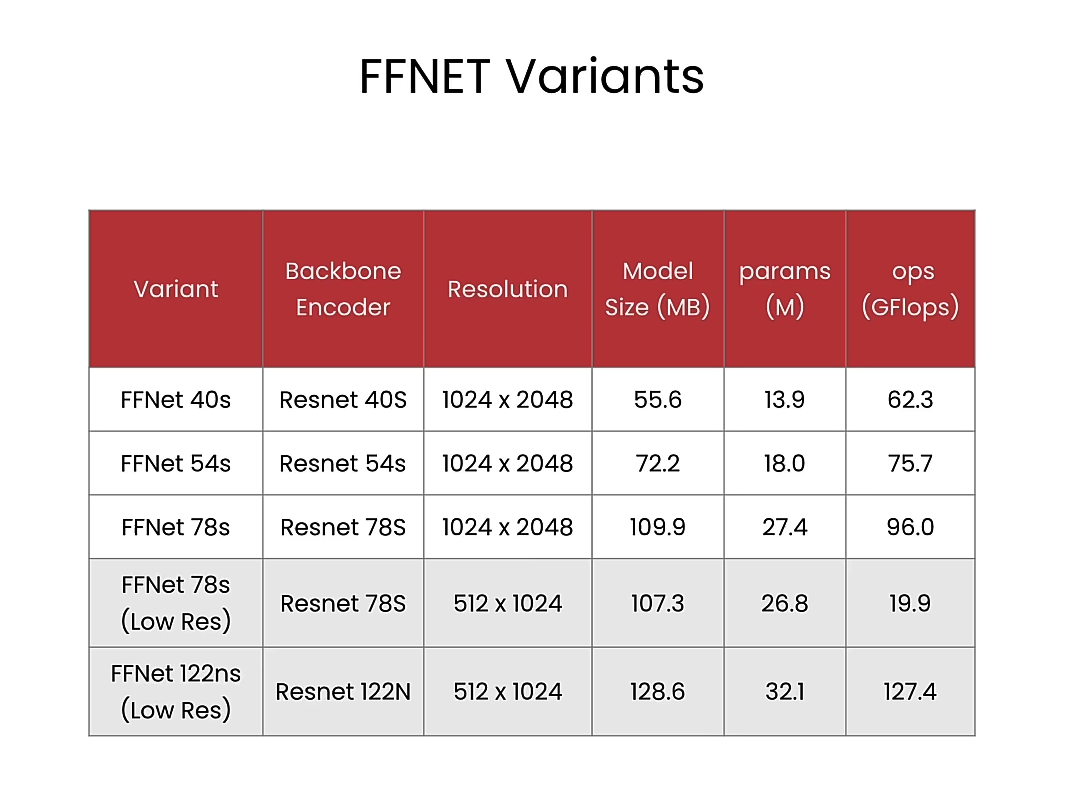
FFNet
from qai_hub_models.models.ffnet_40s import Model
from torchinfo import summary
# Load from pre-trained weights
model = Model.from_pretrained()
input_shape = (1, 3, 1024, 2048)
stats = summary(model,
  input_size=input_shape,
  col_names=["num_params", "mult_adds"]
)
print(stats)
Output
Loading pretrained model state dict from /home/jovyan/.qaihm/models/ffnet/v1/ffnet40S/ffnet40S_dBBB_cityscapes_state_dict_quarts.pth
Initializing ffnnet40S_dBBB_mobile weights
==============================================================================================================
Layer (type:depth-idx)                                       Param #                   Mult-Adds
==============================================================================================================
FFNet40S                                                     --                        --
├─FFNet: 1-1                                                 --                        --
│    └─ResNetS: 2-1                                          --                        --
│    │    └─Conv2d: 3-1                                      864                       452,984,832
│    │    └─BatchNorm2d: 3-2                                 64                        64
│    │    └─ReLU: 3-3                                        --                        --
│    │    └─Conv2d: 3-4                                      18,432                    2,415,919,104
│    │    └─BatchNorm2d: 3-5                                 128                       128
│    │    └─ReLU: 3-6                                        --                        --
│    │    └─Sequential: 3-7                                  300,160                   9,797,895,296
│    │    └─Sequential: 3-8                                  1,411,840                 11,542,727,424
│    │    └─Sequential: 3-9                                  3,900,288                 7,977,571,200
│    │    └─Sequential: 3-10                                 7,071,360                 3,617,592,960
│    └─FFNetUpHead: 2-2                                      --                        --
│    │    └─Sequential: 3-11                                 1,208,147                 26,571,541,312
==============================================================================================================
Total params: 13,911,283
Trainable params: 13,911,283
Non-trainable params: 0
Total mult-adds (G): 62.38
==============================================================================================================
Input size (MB): 25.17
Forward/backward pass size (MB): 1269.30
Params size (MB): 55.65
Estimated Total Size (MB): 1350.11
==============================================================================================================
utils.py
import os
from dotenv import load_dotenv, find_dotenv


def load_env():
    _ = load_dotenv(find_dotenv())

def get_ai_hub_api_token():
    load_env()
    ai_hub_api_token = os.getenv("AI_HUB_API_KEY")
    return ai_hub_api_token
Exercise: Try another variant of FFNet
# High resolution variants
from qai_hub_models.models.ffnet_40s import Model
#from qai_hub_models.models.ffnet_54s import Model
#from qai_hub_models.models.ffnet_78s import Model

# Low resolution variants
low_res_input_shape = (1, 3, 512, 1024)
#from qai_hub_models.models.ffnet_78s_lowres import Model
#from qai_hub_models.models.ffnet_122ns_lowres import Model

model = Model.from_pretrained()
stats = summary(model,
  input_size=input_shape, # use low_res_input_shape for low_res models
  col_names=["num_params", "mult_adds"]
)
print(stats)
Output
Loading pretrained model state dict from /home/jovyan/.qaihm/models/ffnet/v1/ffnet40S/ffnet40S_dBBB_cityscapes_state_dict_quarts.pth
Initializing ffnnet40S_dBBB_mobile weights
==============================================================================================================
Layer (type:depth-idx)                                       Param #                   Mult-Adds
==============================================================================================================
FFNet40S                                                     --                        --
├─FFNet: 1-1                                                 --                        --
│    └─ResNetS: 2-1                                          --                        --
│    │    └─Conv2d: 3-1                                      864                       452,984,832
│    │    └─BatchNorm2d: 3-2                                 64                        64
│    │    └─ReLU: 3-3                                        --                        --
│    │    └─Conv2d: 3-4                                      18,432                    2,415,919,104
│    │    └─BatchNorm2d: 3-5                                 128                       128
│    │    └─ReLU: 3-6                                        --                        --
│    │    └─Sequential: 3-7                                  300,160                   9,797,895,296
│    │    └─Sequential: 3-8                                  1,411,840                 11,542,727,424
│    │    └─Sequential: 3-9                                  3,900,288                 7,977,571,200
│    │    └─Sequential: 3-10                                 7,071,360                 3,617,592,960
│    └─FFNetUpHead: 2-2                                      --                        --
│    │    └─Sequential: 3-11                                 1,208,147                 26,571,541,312
==============================================================================================================
Total params: 13,911,283
Trainable params: 13,911,283
Non-trainable params: 0
Total mult-adds (G): 62.38
==============================================================================================================
Input size (MB): 25.17
Forward/backward pass size (MB): 1269.30
Params size (MB): 55.65
Estimated Total Size (MB): 1350.11
==============================================================================================================
Setup AI Hub for device-in-the-loop deployment
import qai_hub

from utils import get_ai_hub_api_token
ai_hub_api_token = get_ai_hub_api_token()

!qai-hub configure --api_token $ai_hub_api_token
Output
qai-hub configuration saved to /home/jovyan/.qai_hub/client.ini
==================== /home/jovyan/.qai_hub/client.ini ====================
[api]
api_token = eyJhbGciOiJIUzI1NiJ9.eyJpc3MiOiJhcHAiLCJzdWIiOiIxNzQ2MDYyIiwiYXVkIjoiV0VCIiwiaWF0IjoxNzE2MzU2MDYxLCJleHAiOjE3MTg5NDgwNjF9.b2yWxfQnX8bVMrncob3vCQX5-g4kduq84m5DlvYoU78
api_url = https://app.aihub.qualcomm.com
web_url = https://app.aihub.qualcomm.com
verbose = True
%run -m qai_hub_models.models.ffnet_40s.demo
Output
Run on a real smart phone!
%run -m qai_hub_models.models.ffnet_40s.export -- --device "Samsung Galaxy S23"
Output
    ✅ SUCCESS

------------------------------------------------------------
Performance results on-device for Ffnet_40S.
------------------------------------------------------------
Device                          : Samsung Galaxy S23 (13)
Runtime                         : TFLITE
Estimated inference time (ms)   : 23.3
Estimated peak memory usage (MB): [3, 5]
Total # Ops                     : 92
Compute Unit(s)                 : NPU (92 ops)
------------------------------------------------------------
More details: https://app.aihub.qualcomm.com/jobs/jn5q228m5/

Waiting for inference job (j1glkknlp) completion. Type Ctrl+C to stop waiting at any time.
    ✅ SUCCESS
dataset-dd9pg5on9.h5: 100%|██████████| 1.22M/1.22M [00:00<00:00, 11.5MB/s]

Comparing on-device vs. local-cpu inference for Ffnet_40S.
+---------------+-------------------+--------+
| output_name   | shape             |   psnr |
+===============+===================+========+
| output_0      | (1, 19, 128, 256) |  62.96 |
+---------------+-------------------+--------+

- psnr: Peak Signal-to-Noise Ratio (PSNR). >30 dB is typically considered good.
On Device Demo
%run -m qai_hub_models.models.ffnet_40s.demo -- --device "Samsung Galaxy S23" --on-device
Output
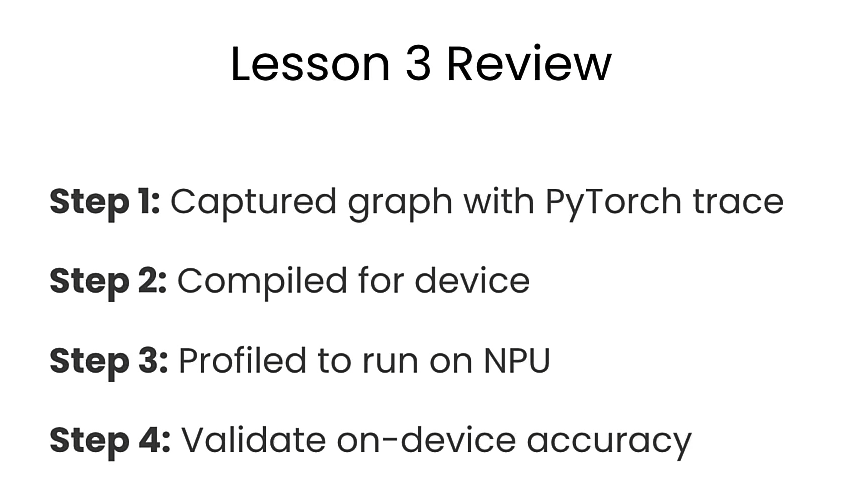
L3: Preparing for on-device deployment
On-device deployment key concepts
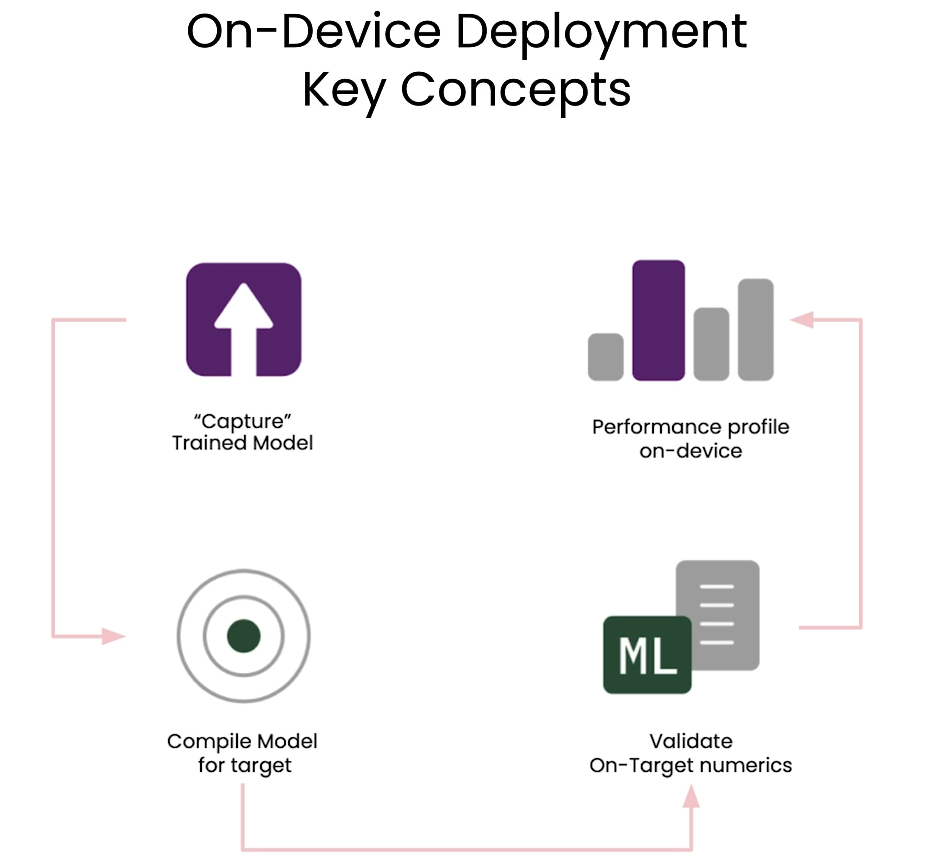
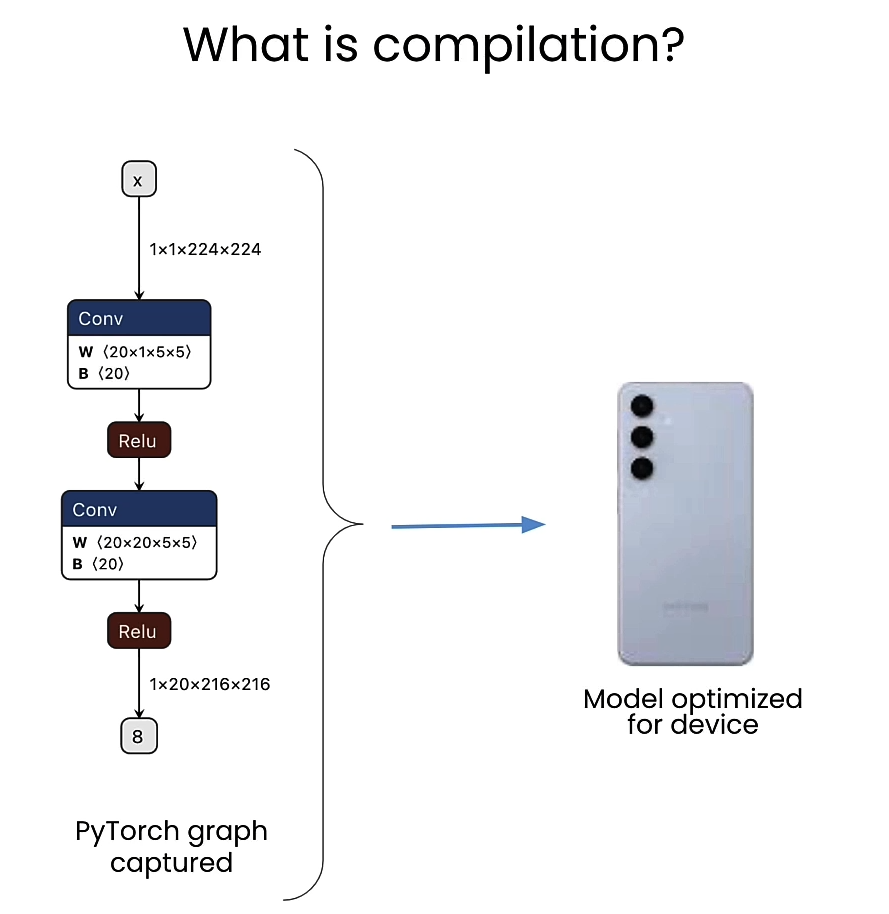
graph capture

Capture trained model
from qai_hub_models.models.ffnet_40s import Model as FFNet_40s

# Load from pre-trained weights
ffnet_40s = FFNet_40s.from_pretrained()

import torch
input_shape = (1, 3, 1024, 2048)
example_inputs = torch.rand(input_shape)

traced_model = torch.jit.trace(ffnet_40s, example_inputs)

traced_model
Compile for device
import qai_hub
import qai_hub_models

from utils import get_ai_hub_api_token
ai_hub_api_token = get_ai_hub_api_token()

!qai-hub configure --api_token $ai_hub_api_token
Output
qai-hub configuration saved to /home/jovyan/.qai_hub/client.ini
==================== /home/jovyan/.qai_hub/client.ini ====================
[api]
api_token = eyJhbGciOiJIUzI1NiJ9.eyJpc3MiOiJhcHAiLCJzdWIiOiIxNzQ2MDYyIiwiYXVkIjoiV0VCIiwiaWF0IjoxNzE2MzU2MDYxLCJleHAiOjE3MTg5NDgwNjF9.b2yWxfQnX8bVMrncob3vCQX5-g4kduq84m5DlvYoU78
api_url = https://app.aihub.qualcomm.com
web_url = https://app.aihub.qualcomm.com
verbose = True
for device in qai_hub.get_devices():
    print(device.name)
Output
Google Pixel 3
Google Pixel 3a
Google Pixel 3 XL
Google Pixel 4
Google Pixel 4
Google Pixel 4a
Google Pixel 5
Samsung Galaxy Tab S7
Samsung Galaxy Tab A8 (2021)
Samsung Galaxy Note 20 (Intl)
Samsung Galaxy S21
Samsung Galaxy S21+
Samsung Galaxy S21 Ultra
Xiaomi Redmi Note 10 5G
Google Pixel 3a XL
Google Pixel 4a
Google Pixel 5
Google Pixel 5a 5G
Google Pixel 6
Samsung Galaxy A53 5G
Samsung Galaxy A73 5G
RB3 Gen 2 (Proxy)
QCS6490 (Proxy)
RB5 (Proxy)
QCS8250 (Proxy)
QCS8550 (Proxy)
Samsung Galaxy S21
Samsung Galaxy S21 Ultra
Samsung Galaxy S22 Ultra 5G
Samsung Galaxy S22 5G
Samsung Galaxy S22+ 5G
Samsung Galaxy Tab S8
Xiaomi 12
Xiaomi 12 Pro
Google Pixel 6
Google Pixel 6a
Google Pixel 7
Google Pixel 7 Pro
Samsung Galaxy A14 5G
Samsung Galaxy S22 5G
QCS8450 (Proxy)
XR2 Gen 2 (Proxy)
Samsung Galaxy S23
Samsung Galaxy S23+
Samsung Galaxy S23 Ultra
Google Pixel 7
Google Pixel 8
Google Pixel 8 Pro
Samsung Galaxy S24
Samsung Galaxy S24 Ultra
Samsung Galaxy S24+
device = qai_hub.Device("Samsung Galaxy S23")

# Compile for target device
compile_job = qai_hub.submit_compile_job(
    model=traced_model,                        # Traced PyTorch model
    input_specs={"image": input_shape},        # Input specification
    device=device,                             # Device
)
# Download and save the target model for use on-device
target_model = compile_job.get_target_model()
Exercise: Try different runtimes
Target runtime
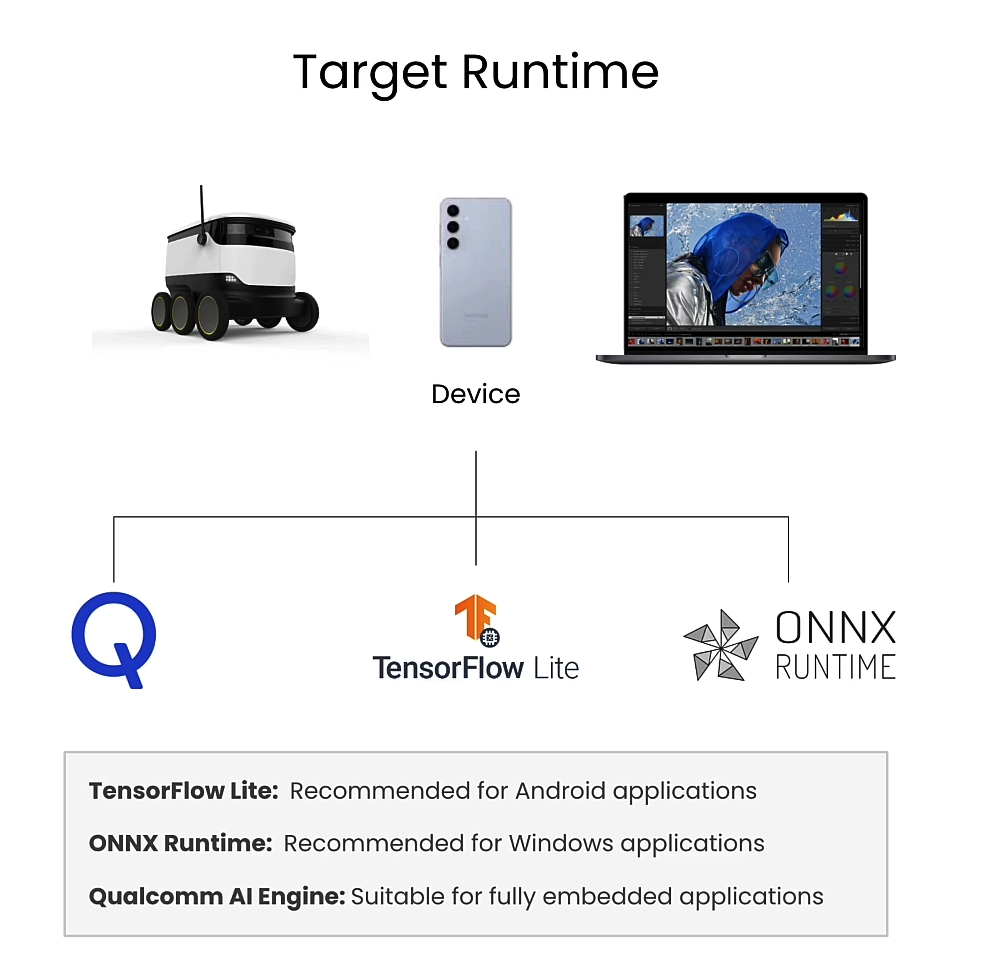
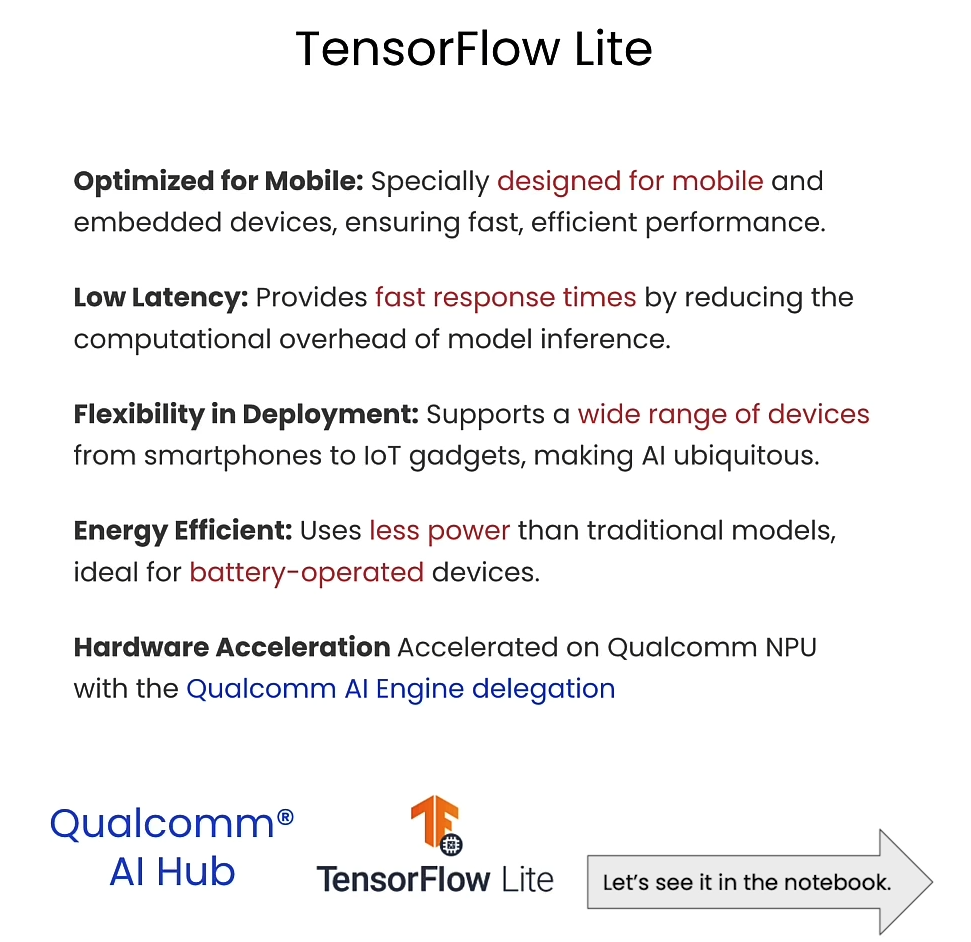
TensorFlow Lite
compile_options="--target_runtime tflite"                  # Uses TensorFlow Lite
compile_options="--target_runtime onnx"                    # Uses ONNX runtime
compile_options="--target_runtime qnn_lib_aarch64_android" # Runs with Qualcomm AI Engine

compile_job_expt = qai_hub.submit_compile_job(
    model=traced_model,                        # Traced PyTorch model
    input_specs={"image": input_shape},        # Input specification
    device=device,                             # Device
    options=compile_options,
)
Expore more compiler options here.
On-Device Performance Profiling
from qai_hub_models.utils.printing import print_profile_metrics_from_job

# Choose device
device = qai_hub.Device("Samsung Galaxy S23")

# Runs a performance profile on-device
profile_job = qai_hub.submit_profile_job(
    model=target_model,                       # Compiled model
    device=device,                            # Device
)

# Print summary
profile_data = profile_job.download_profile()
print_profile_metrics_from_job(profile_job, profile_data)
Output
------------------------------------------------------------
Performance results on-device for Job_Jqp4Wxrlg_Optimized_Tflite.
------------------------------------------------------------
Device                          : Samsung Galaxy S23 (13)
Runtime                         : TFLITE
Estimated inference time (ms)   : 30.1
Estimated peak memory usage (MB): [0, 2]
Total # Ops                     : 94
Compute Unit(s)                 : NPU (94 ops)
------------------------------------------------------------
Exercise: Try different compute units
profile_options="--compute_unit cpu"     # Use cpu
profile_options="--compute_unit gpu"     # Use gpu (with cpu fallback)
profile_options="--compute_unit npu"     # Use npu (with cpu fallback)

# Runs a performance profile on-device
profile_job_expt = qai_hub.submit_profile_job(
    model=target_model,                     # Compiled model
    device=device,                          # Device
    options=profile_options,
)
On-Device Inference
torch_inputs = torch.Tensor(sample_inputs['image'][0])
torch_outputs = ffnet_40s(torch_inputs)
torch_outputs
inference_job = qai_hub.submit_inference_job(
        model=target_model,          # Compiled model
        inputs=sample_inputs,        # Sample input
        device=device,               # Device
)
ondevice_outputs = inference_job.download_output_data()
ondevice_outputs['output_0']
对比on-device和local-cpu推理
from qai_hub_models.utils.printing import print_inference_metrics
print_inference_metrics(inference_job, ondevice_outputs, torch_outputs)
Output
Comparing on-device vs. local-cpu inference for Job_Jqp4Wxrlg_Optimized_Tflite.
+---------------+----------------------------+--------+
| output_name   | shape                      |   psnr |
+===============+============================+========+
| output_0      | torch.Size([19, 128, 256]) |  62.96 |
+---------------+----------------------------+--------+

- psnr: Peak Signal-to-Noise Ratio (PSNR). >30 dB is typically considered good.
Get ready for deployment!
target_model = compile_job.get_target_model()
_ = target_model.download("FFNet_40s.tflite")
review
L4: Quantizing Models
Why quantize
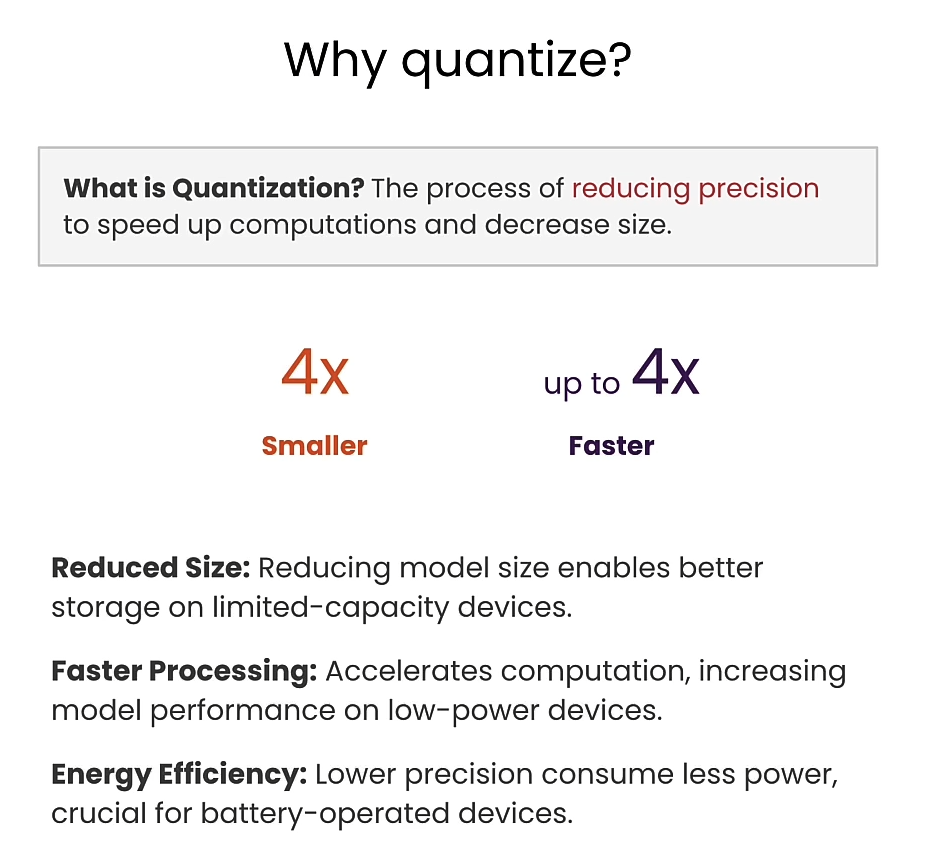
What is quantization
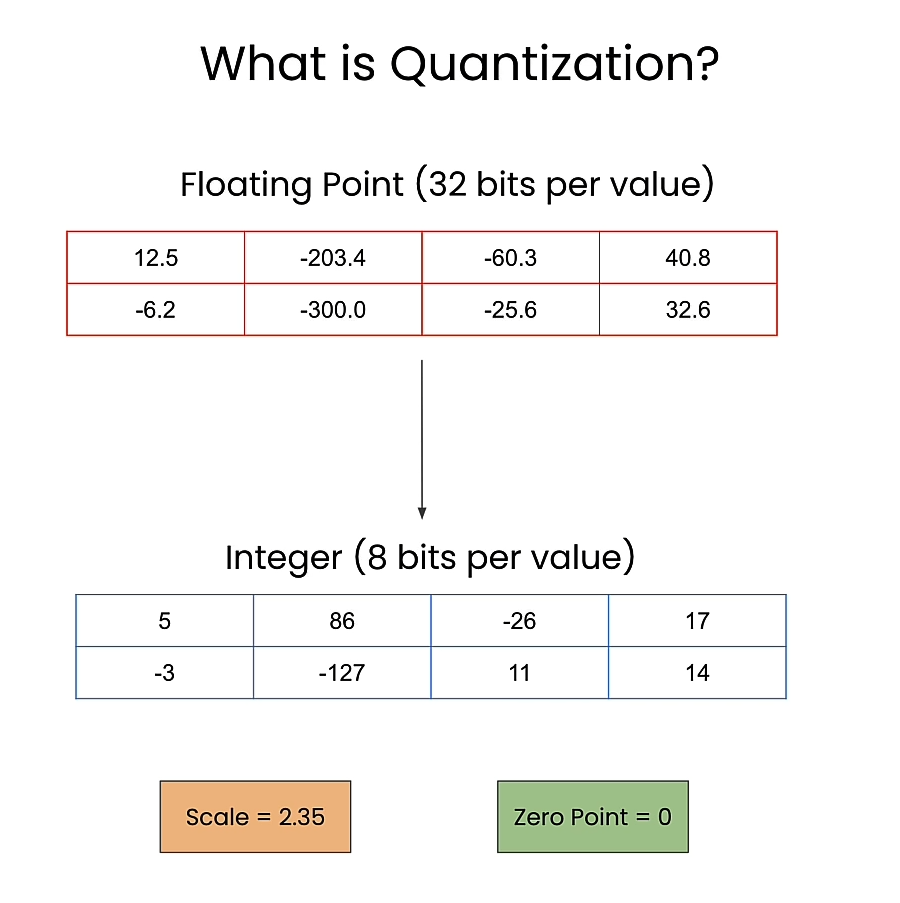
Scale and zero point

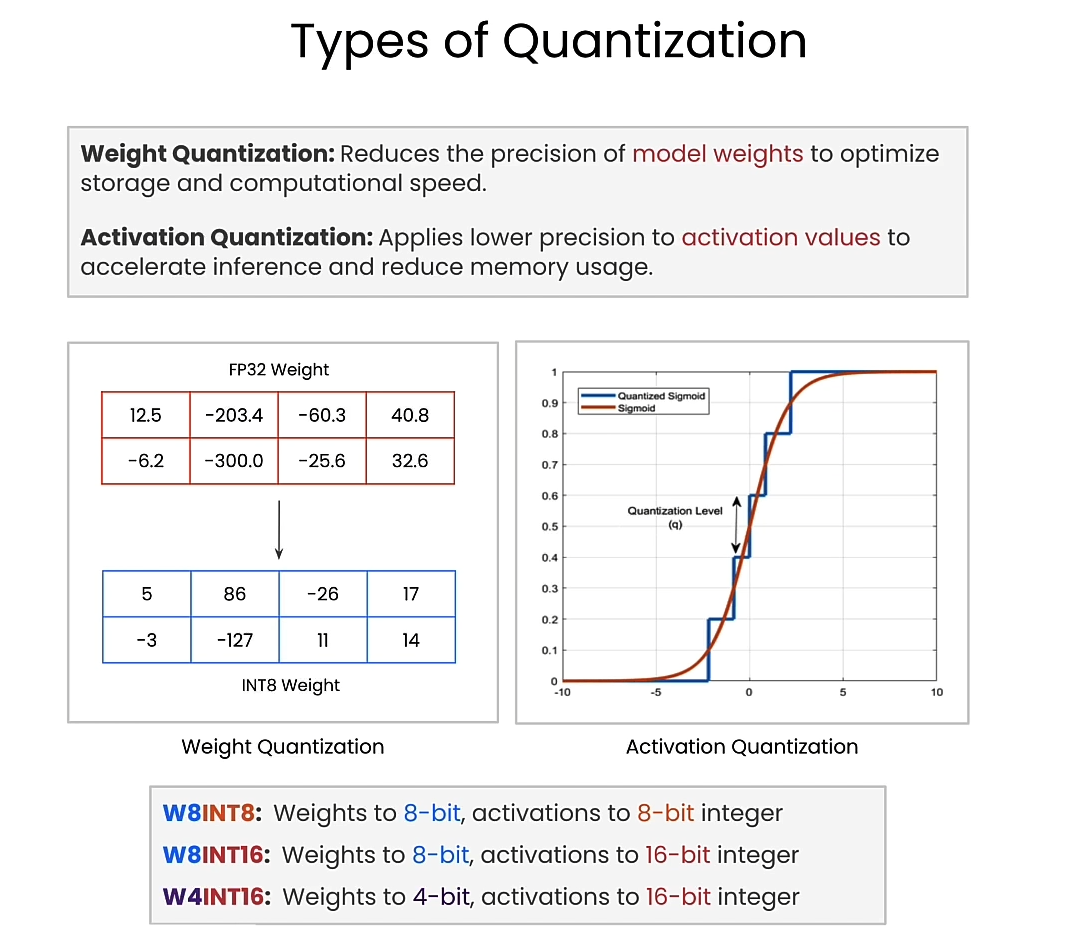
Types of quantization
weight quantization and activation quantization
Post Training Quantization (PTQ)
Quantization Aware Training (QAT)

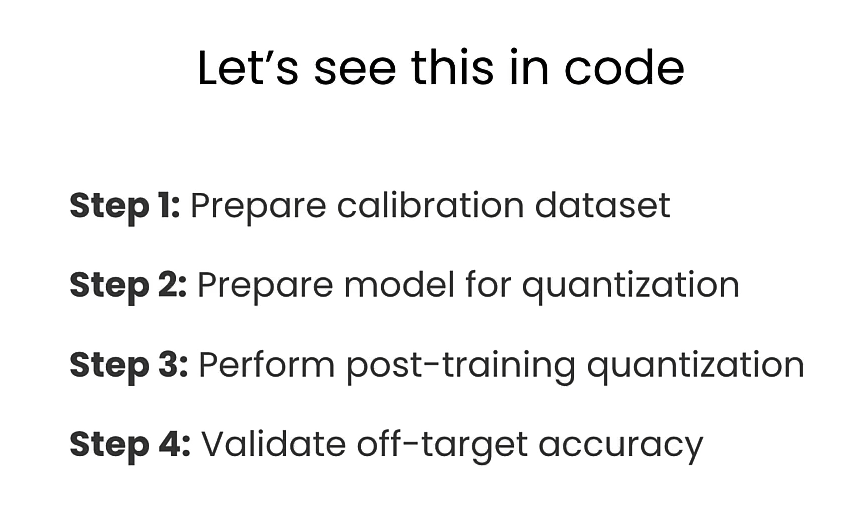
4 steps in code
from datasets import load_dataset
# Use input resolution of the network
input_shape = (1, 3, 1024, 2048)
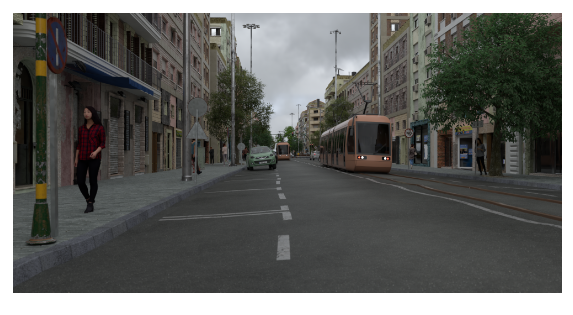
# Load 100 RGB images of urban scenes
dataset = load_dataset("UrbanSyn/UrbanSyn",
split="train",
data_files="rgb/*_00*.png")
dataset = dataset.train_test_split(1)
# Hold out for testing
calibration_dataset = dataset["train"]
test_dataset = dataset["test"]
calibration_dataset["image"][0]
Output
Setup calibration/inference pipleline
import torch
from torchvision import transforms

# Convert the PIL image above to Torch Tensor
preprocess = transforms.ToTensor()

# Get a sample image in the test dataset
test_sample_pil = test_dataset[0]["image"]
test_sample = preprocess(test_sample_pil).unsqueeze(0)
print(test_sample)
Output
tensor([[[[0.0941, 0.1020, 0.2941,  ..., 0.5176, 0.4784, 0.4510],
          [0.0980, 0.1059, 0.2000,  ..., 0.5137, 0.4902, 0.4745],
          [0.1098, 0.1294, 0.2275,  ..., 0.4980, 0.4863, 0.4980],
          ...,
          [0.4784, 0.5020, 0.5098,  ..., 0.5882, 0.5686, 0.5608],
          [0.4941, 0.5098, 0.5294,  ..., 0.5020, 0.5098, 0.4824],
          [0.4980, 0.5137, 0.5333,  ..., 0.4588, 0.4353, 0.4157]],

         [[0.1098, 0.1020, 0.2431,  ..., 0.5176, 0.4784, 0.4549],
          [0.1137, 0.1294, 0.1922,  ..., 0.5098, 0.4902, 0.4745],
          [0.1294, 0.1608, 0.2078,  ..., 0.4980, 0.4863, 0.4980],
          ...,
          [0.5059, 0.5176, 0.5255,  ..., 0.5647, 0.5333, 0.5294],
          [0.5137, 0.5333, 0.5451,  ..., 0.4745, 0.4745, 0.4431],
          [0.5176, 0.5373, 0.5569,  ..., 0.4275, 0.3922, 0.3804]],

         [[0.0824, 0.0784, 0.2353,  ..., 0.5294, 0.4824, 0.4510],
          [0.0824, 0.0784, 0.1647,  ..., 0.5216, 0.4980, 0.4863],
          [0.0667, 0.0902, 0.1843,  ..., 0.5059, 0.4941, 0.5176],
          ...,
          [0.5412, 0.5412, 0.5490,  ..., 0.5843, 0.5451, 0.5412],
          [0.5529, 0.5725, 0.5765,  ..., 0.4902, 0.4902, 0.4627],
          [0.5490, 0.5804, 0.6039,  ..., 0.4353, 0.4039, 0.3882]]]])
import torch.nn.functional as F
import numpy as np
from PIL import Image

def postprocess(output_tensor, input_image_pil):

    # Upsample the output to the original size
    output_tensor_upsampled = F.interpolate(
        output_tensor, input_shape[2:], mode="bilinear",
    )

    # Get top predicted class and convert to numpy
    output_predictions = output_tensor_upsampled[0].argmax(0).byte().detach().numpy().astype(np.uint8)

    # Overlay over original image
    color_mask = Image.fromarray(output_predictions).convert("P")

    # Create an appropriate palette for the Cityscapes classes
    palette = [
        128, 64, 128, 244, 35, 232, 70, 70, 70, 102, 102, 156,
        190, 153, 153, 153, 153, 153, 250, 170, 30, 220, 220, 0,
        107, 142, 35, 152, 251, 152, 70, 130, 180, 220, 20, 60,
        255, 0, 0, 0, 0, 142, 0, 0, 70, 0, 60, 100, 0, 80, 100,
        0, 0, 230, 119, 11, 32]
    palette = palette + (256 * 3 - len(palette)) * [0]
    color_mask.putpalette(palette)
    out = Image.blend(input_image_pil, color_mask.convert("RGB"), 0.5)
    return out
Setup model in floating point
from qai_hub_models.models.ffnet_40s.model import FFNet40S
model = FFNet40S.from_pretrained().model.eval()

# Run sample output through the model
test_output_fp32 = model(test_sample)
test_output_fp32

postprocess(test_output_fp32, test_sample_pil)
Output
Prepare Quantized Model
from qai_hub_models.models._shared.ffnet_quantized.model import FFNET_AIMET_CONFIG
from aimet_torch.batch_norm_fold import fold_all_batch_norms
from aimet_torch.model_preparer import prepare_model
from aimet_torch.quantsim import QuantizationSimModel

# Prepare model for 8-bit quantization
fold_all_batch_norms(model, [input_shape])
model = prepare_model(model)

# Setup quantization simulator
quant_sim = QuantizationSimModel(
    model,
    quant_scheme="tf_enhanced",
    default_param_bw=8,              # Use bitwidth 8-bit
    default_output_bw=8,
    config_file=FFNET_AIMET_CONFIG,
    dummy_input=torch.rand(input_shape),
)
Perform post training quantization
size = 5  # Must be < 100

def pass_calibration_data(sim_model: torch.nn.Module, args):
    (dataset,) = args
    with torch.no_grad():
        for sample in dataset.select(range(size)):
            pil_image = sample["image"]
            input_batch = preprocess(pil_image).unsqueeze(0)

            # Feed sample through for calibration
            sim_model(input_batch)

# Run Post-Training Quantization (PTQ)
quant_sim.compute_encodings(pass_calibration_data, [calibration_dataset])
test_output_int8 = quant_sim.model(test_sample)
postprocess(test_output_int8, test_sample_pil)
Output
Run Quantized model on-device
import qai_hub
import qai_hub_models

from utils import get_ai_hub_api_token
ai_hub_api_token = get_ai_hub_api_token()

!qai-hub configure --api_token $ai_hub_api_token
%run -m qai_hub_models.models.ffnet_40s_quantized.export -- --device "Samsung Galaxy S23"
Output
------------------------------------------------------------
Performance results on-device for Ffnet_40S_Quantized.
------------------------------------------------------------
Device                          : Samsung Galaxy S23 (13)
Runtime                         : TFLITE
Estimated inference time (ms)   : 6.4
Estimated peak memory usage (MB): [1, 9]
Total # Ops                     : 97
Compute Unit(s)                 : NPU (97 ops)
------------------------------------------------------------
More details: https://app.aihub.qualcomm.com/jobs/jvgdvreeg/
dataset-dq9k16r52.h5: 100%|██████████| 770k/770k [00:00<00:00, 7.23MB/s]
Comparing on-device vs. local-cpu inference for Ffnet_40S_Quantized.
+---------------+-------------------+--------+
| output_name   | shape             |   psnr |
+===============+===================+========+
| output_0      | (1, 19, 128, 256) |  33.93 |
+---------------+-------------------+--------+

- psnr: Peak Signal-to-Noise Ratio (PSNR). >30 dB is typically considered good.
Impact of quantization
问题: Post-Training Quantization (PTQ)为什么需要calibration_dataset,calibration是什么?
Post-Training Quantization (PTQ) 需要 calibration dataset(校准数据集)的原因是为了确定模型各层的量化参数,特别是 scale(比例)和 zero-point(零点)。Calibration 是指使用校准数据集来统计和计算模型的激活值和权重的分布,从而确定最佳的量化参数,以在量化过程中尽量减少精度损失。
Calibration 的重要性
- 确定量化范围:浮点数转换为整数表示时,需要确定量化范围。例如,对于8位量化,激活值和权重需要被映射到0到255的范围。Calibration 数据集帮助确定每一层的浮点值范围,以便进行准确的映射。
- 减少量化误差:通过统计校准数据集上的浮点数值分布,可以更好地选择量化参数,从而减少量化误差,提升量化后模型的精度。
Calibration 过程
- 收集统计信息:将校准数据集输入模型,收集每一层的激活值和权重的统计信息。这些统计信息包括最小值、最大值、直方图分布等。
- 计算量化参数:根据收集到的统计信息,计算量化所需的 scale 和 zero-point。例如,如果某层的激活值范围是 [a, b],则可以计算出适合该范围的 scale 和 zero-point。
- 应用量化参数:将计算得到的量化参数应用到模型中,将浮点数值转换为整数表示。
为什么需要 Calibration Dataset
- 真实数据分布:校准数据集应尽可能反映模型在实际应用中会遇到的数据分布。这样确定的量化参数更具有代表性,量化后的模型在实际应用中的性能也会更好。
- 高效和准确:使用校准数据集进行统计,能够在不需要重新训练模型的情况下,快速、准确地确定量化参数,实现高效的量化过程。
Calibration 示例
假设我们有一个简单的神经网络模型,我们需要对其进行8位量化。以下是使用校准数据集进行 calibration 的步骤:
import numpy as np

# 模拟校准数据集
calibration_dataset = [np.random.randn(100, 224, 224, 3) for _ in range(10)]

# 统计信息收集函数(示例)
def collect_statistics(model, dataset):
    min_values = []
    max_values = []
    for data in dataset:
        activations = model(data)
        min_values.append(np.min(activations, axis=0))
        max_values.append(np.max(activations, axis=0))
    global_min = np.min(min_values, axis=0)
    global_max = np.max(max_values, axis=0)
    return global_min, global_max

# 计算量化参数
def calculate_quantization_params(global_min, global_max):
    scale = (global_max - global_min) / 255.0
    zero_point = -global_min / scale
    return scale, zero_point

# 示例模型(假设已有训练好的模型)
class SimpleModel:
    def __call__(self, x):
        return x  # 简单传递输入作为输出(示例)

# 模型实例
model = SimpleModel()

# 收集统计信息
global_min, global_max = collect_statistics(model, calibration_dataset)

# 计算量化参数
scale, zero_point = calculate_quantization_params(global_min, global_max)

print(f"Scale: {scale}, Zero Point: {zero_point}")
结论
Post-Training Quantization (PTQ) 的校准(Calibration)过程至关重要,因为它通过校准数据集来统计和计算量化参数,确保在量化过程中尽量减少精度损失。Calibration 数据集提供了模型在实际应用中可能遇到的数据信息,帮助确定准确的量化范围,从而提高量化模型的性能和准确性。
Device Integration
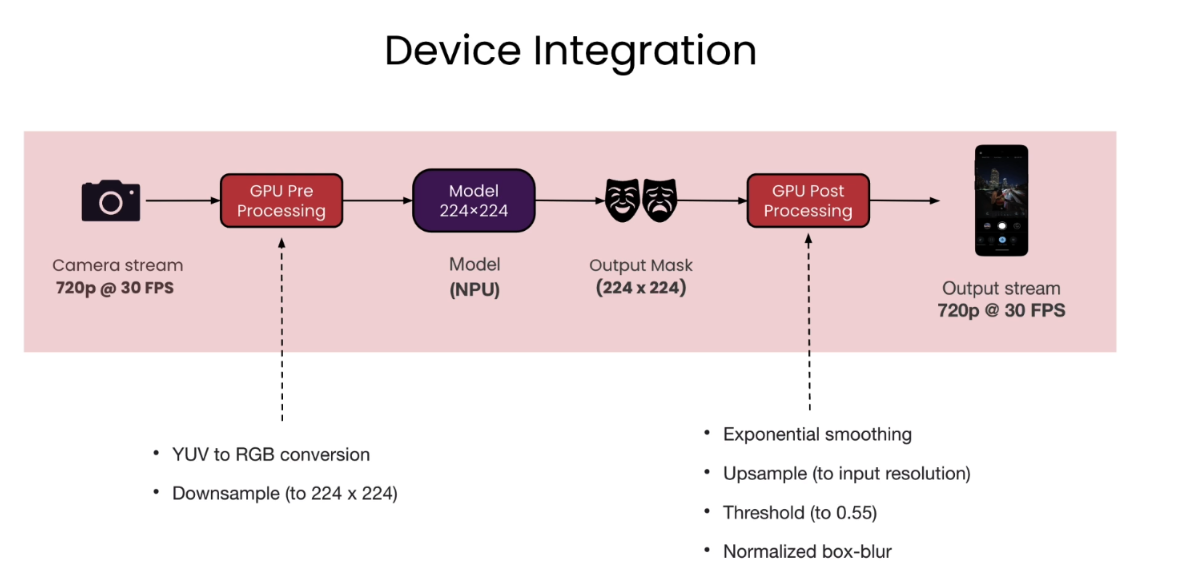
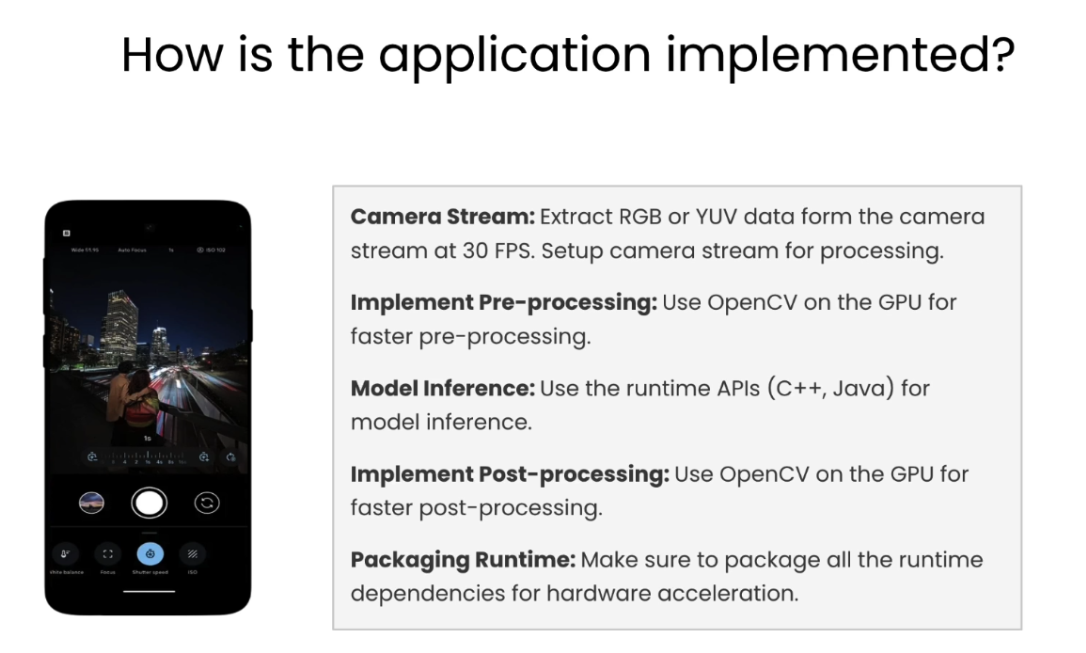
How is the application implemented
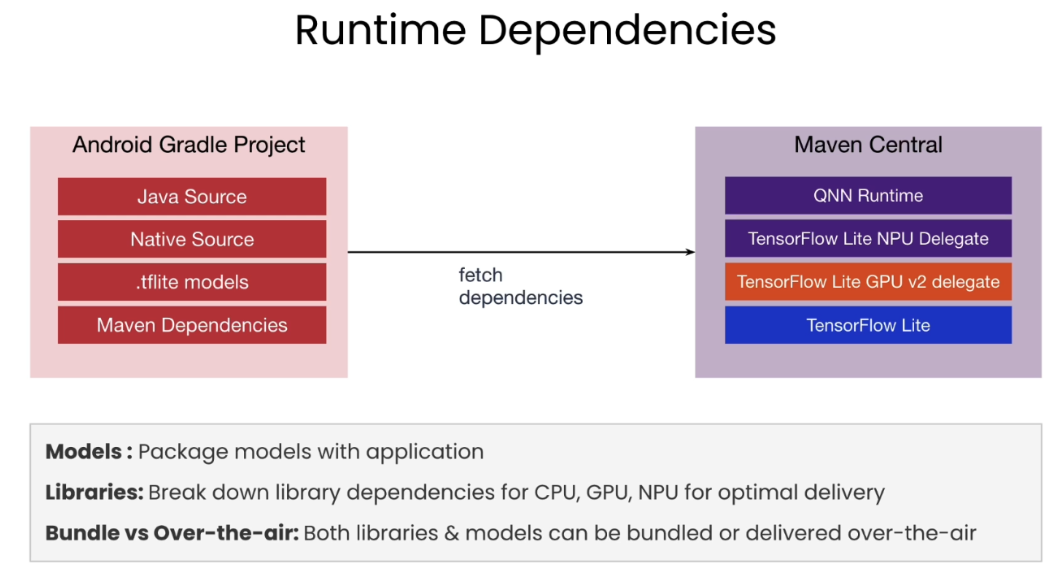
Runtime dependencies
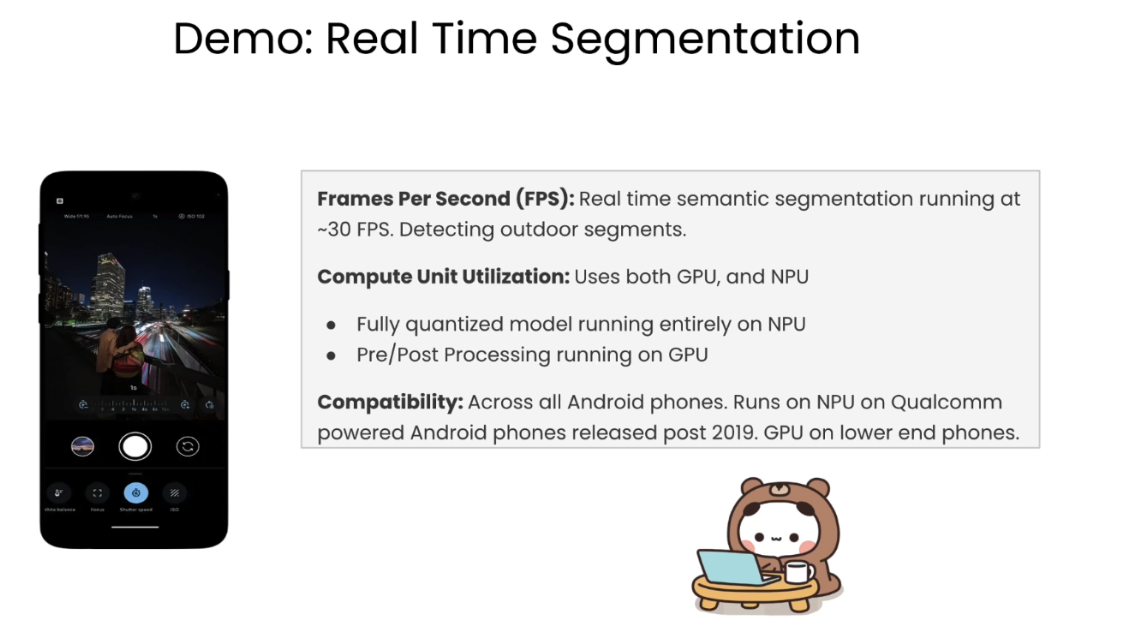
Demo
Appendix - Building the App
Going into the details of the building the final mobile app was slightly outside the scope of this course. We have build this help guide for you to show the main steps and code samples you need to build the app we saw in the last lesson.
TensorFlow Lite
TensorFlow Lite is a runtime that enables on-device machine learning by helping developers run their models on mobile, embedded, and edge devices. The models produced by TensorFlow Lite work on multiple platform support, covering Android and iOS devices, embedded Linux, and microcontrollers. The toolchain also has diverse language support, which includes Java, Swift, Objective-C, C++, and Python.
Delegation
In the context of TensorFlow Lite, “delegation” refers to the use of delegates to enable hardware acceleration of machine learning models on mobile and edge devices. Delegates act as a bridge between TensorFlow Lite and on-device accelerators like GPUs and DSPs, optimizing performance and efficiency by leveraging specialized hardware capabilities. This process can significantly improve the speed and power consumption of running machine learning models on such devices. For more details, you can visit the TensorFlow Lite Delegates page.
🔗 TensorFlow Lite Delegates page [ + ]
Qualcomm QNN delegate
Qualcomm QNN delegate allows you to run models on the NPU.
🔗 Download Qualcomm QNN Delegate – (Zip 724 MB)
End-to-end examples
You can find end-to-end examples, for common machine learning tasks such as image classification, object detection, pose estimation, question answering, text classification, etc. on multiple platforms. Here is the link to some models we have provided for you.
🔗 End-to-end examples – GitHub [ + ]
Models available:
- ImageClassification
- ImageSuperResolution
- SemanticSegmentation
Semantic segmentation code
The code for the semantic segmentation app we developed in this course is available on Github for you to try.
Requirements:
- Java, android-sdk and sdkmanager is already set at user’s end
- User should have Linux QNN SDK in local machine.
- ANDROID_HOME is set to android-sdk path
- AI-Hub is properly configured with user token.
Note: Please execute build_apk.py. This script will compile and download a model from AI-Hub and paste it in your Android Project and Generate app-debug.apk.
🔗 Semantic segmentation code + Guide – GitHub [ + ]
Afterword
2024年5月22日于上海。
通过学习这门short course,了解了高通公司在on-device AI方面的努力,对AI Hub Models仓库有了一定程度的了解。


 被折叠的 条评论
为什么被折叠?
被折叠的 条评论
为什么被折叠?
 到【灌水乐园】发言


