


本文代码目录以高通平台Android 5.0为基础,可能与AOSP有不同之处。
概述
前一篇学习了5.0 Phone模块的目录结构以及进程模型,使得新人有个大概的了解。按讲,接下来应该是MO、MT流程分析了,这是从解决实际问题的角度来说。其实,如果说要从解决问题的角度来说,那就应该是分析InCallUI布局结构,以及Fragment, UI, Presenter他们之间的关系来分析了。毕竟,出现问题,都是从界面开始。
但是这个系列,并不会从这里入手,而是先从Phone相关进程的创建来说明。因为我不是为解决具体问题而来,而是从整体来学习。先整体,再局部细节,从代码中来,再回到代码中去。
在上一篇中,提到关于Phone模块相关的目录对比,忘记提到目录编译生成的apk。
这里做个说明:
1)android/packages/services/Telecomm 目录编译出来的apk名是Telecom.apk, 对应的进程是com.android.server.telecom,后文简称telecom进程。
2) android/packages/services/Telephony 目录编译出来的apk名是 TeleService.apk, 对应的进程是com.android.phone, 后文简称phone进程。
如果有同学问,是怎么知道的,那你可以去(看)面(Android.mk)壁(啊!)了。
Phone进程启动
准确的说,应该是进程com.android.phone(以下简称phone进程)。这个进程是何时创建的?这个系统进程凭什么他就会自启动的呢?拨号盘也是系统应用,为什么不会开机启自启动?如上,小结有2点内容:
1) phone进程是何时创建的?
2) 如何判断一个系统开机就启动呢?
关于以上2问题,可以请参考下列文章,后续有时间,也会总结一篇。
http://blog.csdn.net/windskier/article/details/6560925
http://blog.csdn.net/windskier/article/details/6560925
赶脚,列举出以上链接,我的这篇就结束了(~大笑~)。 NO, NO, NO,我可没有这么坏,来点干货!这篇是指Phone进程的初始化,当然是他们分析之后的延续了。是针对L的Phone 模块的初始化,其实Phone模块不仅仅只有一个进程,从进程模型中看出来,还有一个com.android.server.telecom进程。(简称telecom进程) Andriod L Phone进程模型
-
这里面涉及的类以及层次太多,没有这个精力和能力把每个细节都理清楚,还是抓住主线,我的目标是:
- 1)沿着创建的流程,将重要的类标记出来以及说明该类的主要作用。
- 2)RIL是怎么实例化的
Telephony目录分析 (android/packages/services/Telephony)
在该目录下的AndroidManifest.xml文件中,有如下描述:
    <application android:name="PhoneApp"
                 android:persistent="true"
                 android:label="@string/phoneAppLabel"
                 android:icon="@mipmap/ic_launcher_phone"
其中属性 android:persistent="true" 说明该app是开机过程中就可以启动的,而且还是常驻进程。
Google developer上描述很简洁:
http://developer.android.com/guide/topics/manifest/application-element.html
android:persistent
Whether or not the application should remain running at all times — "true" if it should, and "false" if not. The default value is "false". Applications should not normally set this flag; persistence mode is intended only for certain system applications.
phone进程入口-onCreate
入口是PhoneApp.java。里面的内容,很少:
public class PhoneApp extends Application {
    PhoneGlobals mPhoneGlobals;
    TelephonyGlobals mTelephonyGlobals;

    public PhoneApp() {
    }

    @Override
    public void onCreate() {
        if (UserHandle.myUserId() == 0) { //这里有用户id的检查,纳尼,越来越复杂了!
            // We are running as the primary user, so should bring up the
            // global phone state.
            mPhoneGlobals = new PhoneGlobals(this);
            mPhoneGlobals.onCreate();

            mTelephonyGlobals = new TelephonyGlobals(this);
            mTelephonyGlobals.onCreate();
        }
    }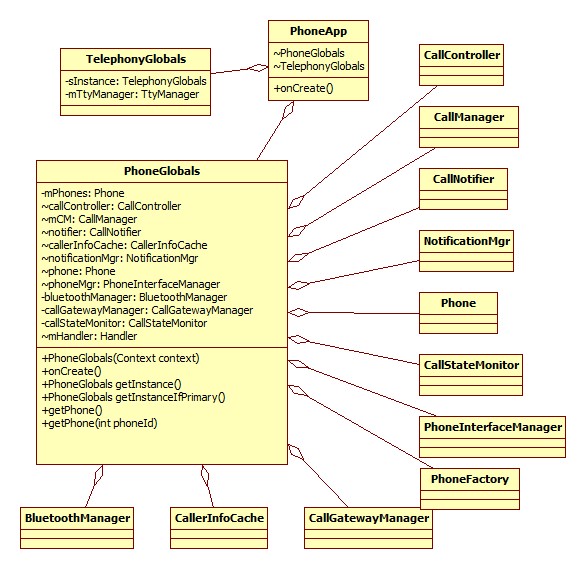
}说明:PhoneGlobals继承ContextWrapper,而且还是单例,提供全局性的信息,包含的信息很多,如 创建Phone数组(注意这是高通的,AOSP是没有Phone数组的), 其他重要的类还有CallController,CallManager,CallNotifier,NotificationMgr, PhoneInterfaceManager,。。。。。。
PhoneGlobals这个类后续要重点分析,从这里出发, 延展的东西非常多,我,尽量不讲乱。
TelephonyGlobals,此类是5.0新增的,从代码上看,至少跟账户控制,TtyManager(TTY)相关。
什么是TTY,参考 :
http://www.ehow.com/facts_5230442_tty-mode-cell-phones_.html
回到主题,层层剥洋葱啦。先看PhoneGlobals中显示标明的类。
说明:
- CallController.java
/**
 * This is a singleton object which acts as the interface to the telephony layer
 * (and other parts of the Android framework) for all user-initiated telephony
 * functionality, like making outgoing calls.
 */
在4.4上,拨号时会执行该类的placeCall函数,但是在Android L上并执行。这个会在Android L MO流程的时候分析。- CallManager.java
/**
 * CallManager class provides an abstract layer for PhoneApp to access
 * and control calls. It implements Phone interface.
 * CallManager provides call and connection control as well as
 * channel capability.
 * There are three categories of APIs CallManager provided
 *  1. Call control and operation, such as dial() and hangup()
 *  2. Channel capabilities, such as CanConference()
 *  3. Register notification
 */
没记错的话,该类是2.3的时候加入的,设计的初衷如上,提供各种跟通话相关的注册。用于上层的监听。但是其中的 Call control and operation, such as dial() and hangup() 现在不会使用到了哦。- CallNotifier.java
/**
 * Phone app module that listens for phone state changes and various other
 * events from the telephony layer, and triggers any resulting UI behavior
 * (like starting the Incoming Call UI, playing in-call tones,
 * updating notifications, writing call log entries, etc.)
 */
可以理解为 有些消息事件,需要上报给PhoneApp。- NotificationMgr.java
/**
  * NotificationManager-related utility code for the Phone app.
  *
  * This is a singleton object which acts as the interface to the
  * framework's NotificationManager, and is used to display status bar
  * icons and control other status bar-related behavior.
  *
  * @see PhoneGlobals.notificationMgr
  */
这里最直观的就是 在状态栏上显示电话图标,通话过程中的时候。- Phone.java
/**
 * Internal interface used to control the phone; SDK developers cannot
 * obtain this interface.
 */
这个还真不好描述,简单的说是 对电话的抽象,有拨号,有状态,。。。。- CallStateMonitor.java
/**
 * Dedicated Call state monitoring class.  This class communicates directly with
 * the call manager to listen for call state events and notifies registered
 * handlers.
 * It works as an inverse multiplexor for all classes wanted Call State updates
 * so that there exists only one channel to the telephony layer.
 *
 * TODO: Add manual phone state checks (getState(), etc.).
 */
专门针对Call 状态监听的类,他是直接与CallManager交互。- PhoneInterfaceManager.java
/**
 * Implementation of the ITelephony interface.
 */
public class PhoneInterfaceManager extends ITelephony.Stub {
}
这个其实是Phone的服务类,这里需要说明下,第三方应用(包括手机中的其他内置应用)是无法直接获取TELEPHONE_PHONE的服务的,Android中服务大致如此。
这个类就是TELEPHONE_PHONE服务端的实现。提供的访问接口是TelephonyManager- PhoneFactory.java
顾名思义,他是Phone的工厂,那他有几种Phone的产品呢?图形显示: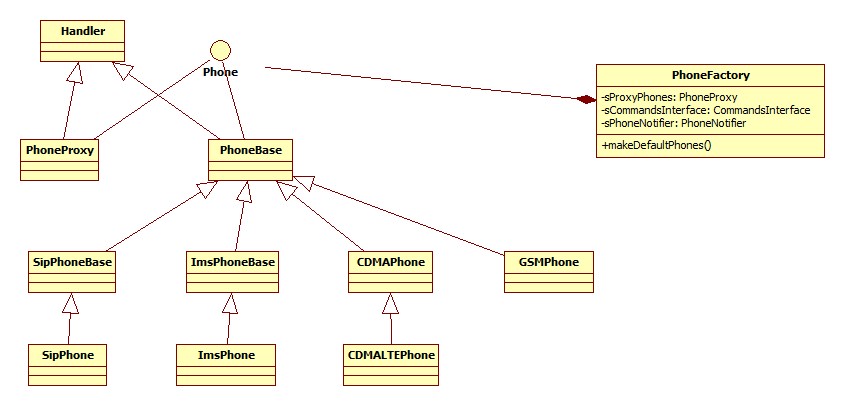
在PhoneFactory中只会产生两种大类型的Phone: GSMPhone,CDMAPhone 以及他们的子类
其他的SIP 以及 Ims是没有在这类产生的,但是图形显示的继承关系没有问题。
如下有必要对PhoneFactory的关键代码段进行说明:
这里推荐一个在线查看Android 源码的地方,androidxref.com
    public static void makeDefaultPhone(Context context) {
        synchronized (sLockProxyPhones) {
            if (!sMadeDefaults) {
                sContext = context;
                //新增部分,需要自己去发现
                // create the telephony device controller.
                TelephonyDevController.create();

                int retryCount = 0;
                for(;;) {
                    boolean hasException = false;
                    retryCount ++;

                    try {
                        // use UNIX domain socket to
                        // prevent subsequent initialization
                        //这里使用域套接字来控制PhoneFactory只执行一次,搜索
                        //了没看到其他地方使用到
                        new LocalServerSocket("com.android.internal.telephony");
                    } catch (java.io.IOException ex) {
                        hasException = true;
                    }

                    if ( !hasException ) {
                        break;
                    } else if (retryCount > SOCKET_OPEN_MAX_RETRY) {
                        throw new RuntimeException("PhoneFactory probably already running");
                    } else {
                        try {
                            Thread.sleep(SOCKET_OPEN_RETRY_MILLIS);
                        } catch (InterruptedException er) {
                        }
                    }
                }
                //这里new了个Telephony中重要的PhoneNotifier对象,又是一个天地。
                sPhoneNotifier = new DefaultPhoneNotifier();

                // Get preferred network mode
                //获取网络模式,默认是GSM/WCDMA
                int preferredNetworkMode = RILConstants.PREFERRED_NETWORK_MODE;
                if (TelephonyManager.getLteOnCdmaModeStatic() == PhoneConstants.LTE_ON_CDMA_TRUE) {
                    preferredNetworkMode = Phone.NT_MODE_GLOBAL;
                }

                int cdmaSubscription = CdmaSubscriptionSourceManager.getDefault(context);
                Rlog.i(LOG_TAG, "Cdma Subscription set to " + cdmaSubscription);

                /* In case of multi SIM mode two instances of
                PhoneProxy, RIL are created,    where as in single
                SIM mode only instance. isMultiSimEnabled() function
                checks whether it is single SIM or multi SIM mode */
                /*这里还以为是高通的实现,后来查看和对比4.4 5.0的AOSP发现,
                原来是谷哥谷姐们加入的,赶脚是以后原生支持双卡的节奏?
                new 了2个PhoneProxy 即2个Phone接口实例;2个RIL的父类
                CommandsInterface实例。*/
                int numPhones = TelephonyManager.getDefault().getPhoneCount();
                int[] networkModes = new int[numPhones];
                sProxyPhones = new PhoneProxy[numPhones];
                sCommandsInterfaces = new RIL[numPhones];

                //这个for主要完成了几点,重新选择优先网络,以及具体的RIL实例。
                for (int i = 0; i < numPhones; i++) {
                    //reads the system properties and makes commandsinterface
                    try {
//                        // Get preferred network type.
//                        TODO: Sishir added this code to but we need a new technique for MSim
//                        int networkType = calculatePreferredNetworkType(context);
//                        Rlog.i(LOG_TAG, "Network Type set to " + Integer.toString(networkType));

                        networkModes[i]  = TelephonyManager.getIntAtIndex(
                                context.getContentResolver(),
                                Settings.Global.PREFERRED_NETWORK_MODE, i);
                    } catch (SettingNotFoundException snfe) {
                        Rlog.e(LOG_TAG, "Settings Exception Reading Value At Index for"+
                                " Settings.Global.PREFERRED_NETWORK_MODE");
                        networkModes[i] = preferredNetworkMode;
                    }

                    if (sContext.getResources().getBoolean(
                            com.android.internal.R.bool.config_global_phone_enabled) &&
                            i == PhoneConstants.PHONE_ID1) {
                        networkModes[i] = Phone.NT_MODE_LTE_CDMA_EVDO_GSM_WCDMA;
                        TelephonyManager.putIntAtIndex( context.getContentResolver(),
                                Settings.Global.PREFERRED_NETWORK_MODE, i, networkModes[i]);
                    }

                    Rlog.i(LOG_TAG, "Network Mode set to " + Integer.toString(networkModes[i]));
                    //RIL真正实例化的地方,最多支持3卡,一般就默认双卡,就好了。
                    sCommandsInterfaces[i] = new RIL(context, networkModes[i],
                            cdmaSubscription, i);
                }
                Rlog.i(LOG_TAG, "Creating SubscriptionController");
                SubscriptionController.init(context, sCommandsInterfaces);

                // Instantiate UiccController so that all other classes can just
                // call getInstance()
                //以下的sModem开头我不提及了,我也不知道。
                mUiccController = UiccController.make(context, sCommandsInterfaces);
                sModemStackController = ModemStackController.make(context,
                        mUiccController, sCommandsInterfaces);
                sModemBindingPolicyHandler = ModemBindingPolicyHandler.make(context,
                        mUiccController, sCommandsInterfaces);

//下文实例化PhoneProxy的地方,根据phone type来决定是创建GSMPhone还是CDMAPhone。
//从中能看出,一个Phone,对应一个RIL, 公用一个sPhoneNotifier
                for (int i = 0; i < numPhones; i++) {
                    PhoneBase phone = null;
                    int phoneType = TelephonyManager.getPhoneType(networkModes[i]);
                    if (phoneType == PhoneConstants.PHONE_TYPE_GSM) {
                        phone = new GSMPhone(context,
                                sCommandsInterfaces[i], sPhoneNotifier, i);
                    } else if (phoneType == PhoneConstants.PHONE_TYPE_CDMA) {
                        phone = new CDMALTEPhone(context,
                                sCommandsInterfaces[i], sPhoneNotifier, i);
                    }
                    Rlog.i(LOG_TAG, "Creating Phone with type = " + phoneType + " sub = " + i);
                    //使用创建的phone 实例化PhoneProxy
                    sProxyPhones[i] = new PhoneProxy(phone);
                }
                mProxyController = ProxyController.getInstance(context, sProxyPhones,
                        mUiccController, sCommandsInterfaces);

                // Set the default phone in base class.
                // FIXME: This is a first best guess at what the defaults will be. It
                // FIXME: needs to be done in a more controlled manner in the future.
                //使用默认的phoneproxy和RIL接口
                sProxyPhone = sProxyPhones[0];
                sCommandsInterface = sCommandsInterfaces[0];

                // Ensure that we have a default SMS app. Requesting the app with
                // updateIfNeeded set to true is enough to configure a default SMS app.
                ComponentName componentName =
                        SmsApplication.getDefaultSmsApplication(context, true /* updateIfNeeded */);
                String packageName = "NONE";
                if (componentName != null) {
                    packageName = componentName.getPackageName();
                }
                Rlog.i(LOG_TAG, "defaultSmsApplication: " + packageName);
                //以上几行是针对默认SMS而言的,因为在4.4版本,加入了默认短彩信的设置了。
                // Set up monitor to watch for changes to SMS packages
                SmsApplication.initSmsPackageMonitor(context);

                sMadeDefaults = true;

                Rlog.i(LOG_TAG, "Creating SubInfoRecordUpdater ");
                sSubInfoRecordUpdater = new SubInfoRecordUpdater(context,
                        sProxyPhones, sCommandsInterfaces);
                SubscriptionController.getInstance().updatePhonesAvailability(sProxyPhones);
            }
        }
    }
以上基本回答了我们的目标
1)沿着创建的流程,将重要的类标记出来以及说明该类的主要作用。
至于其内部的,如何跟Telecom交互,以及TeleService内部如何调用 , 还有他们之间的关系,在下一篇中描述说明。
2)RIL是怎么实例化的
这个,其实已经在上述的代码段中 有了标记,在这里我只提及RIL的继承实现关系。
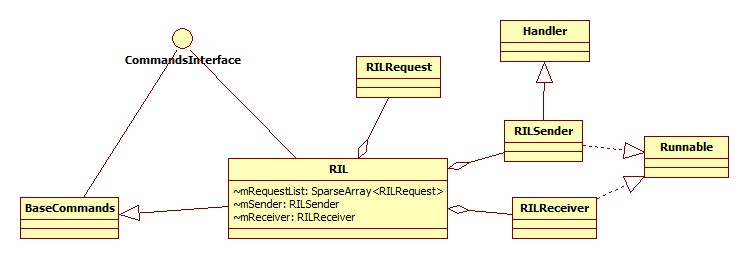
以下说明引用自:引用说明
其中此文中的RIL关系图示,RILSender , RILReceiver跟RIL的关系感觉有误!
BaseCommands实现了CommandsInterface的部分接口,用于通知手机各种内部状态的变化。它里面保存了大量的Registrant(注册者)和RegistrantList,并提供了大量的registerXXX和unregisterXXX函数。当对某种状态变化感兴趣时,就可以调用registerXXX函数,在BaseCommands内部创建一个对应的registrant或将registrant添加到列表中。后者表示某种状态有多个感兴趣者,将各个registrant添加到RegistrantList中,若只能有一个感兴趣者则创建的是Registrant对象。实际上,在调用registerXXX函数时,调用者将message和handler传递给Registrant对象;当有状态变化时则通过Registrant.NotifyXXX调用Handler将消息发送到handler的消息队列上,调用者可以在一个线程中去处理这些消息,因此实现了尽可能实时通知调用者的目的。RIL类负责与rild交互,提供API用于执行AT命令,即RIL请求,供调用者调用;以及处理上报的回复,以消息的形式发送给调用者。
CommandsInterface 描述了对电话的所有操作接口,如命令,查询状态,以及电话事件监听等,BaseCommands是CommandsInterface的直接派生类,实现了电话事件的处理(发送message给对应的handler)。RIL类继承自BaseCommands,实现了CommandsInterface的部分接口,包含了2个线程sender和receiver(在RIL的构造函数中创建并启动运行),前者用于向rild发送RIL At命令请求,后者用于处理来自rild的response信息(包括对RIL请求的回复和Modem主动上报的unsolicited信息)。它们都是向本地socket读写数据来实现的。使用者在使用RIL请求API时,通过sender线程向rild发送RIL请求,具体是:在这些API函数中,得到一个RILRequest后,将要传递给AT命令的数据通过Parcel写入到socket中,rild侧解析得到传递来的数据,根据请求号调用相应的分发函数转换成AT命令传递给Modem。对于每一个命令接口方法,如acceptCall,或者状态查询,将它转换成对应的RIL_REQUEST_XXX,通过线程RILSender发送给rild。线程RILReceiver监听socket,当有数据上报时,读取该数据并处理。读取的数据有两种:
1. 电话事件,RIL_UNSOL_xxx, RIL读取相应数据后,发送message给对应的handler 。
2. 命令的异步响应。
小结
这篇小文,主要是说明了2个问题:
1) PhoneGlobals初始化过程中 类的关系,以及相关类的说明
2) 分析PhoneFactory中的关键代码,知道了RIL是如何初始话的
参考说明
Phone进程启动分析
http://blog.csdn.net/windskier/article/details/6560925
http://blog.csdn.net/windskier/article/details/6560925
什么是TTY,参考 :
http://www.ehow.com/facts_5230442_tty-mode-cell-phones_.html
在线查看Android 源码的网站,androidxref.com
说明引用自:http://blog.csdn.net/kevinx_xu/article/details/11832097#t1


 272
272

 被折叠的 条评论
为什么被折叠?
被折叠的 条评论
为什么被折叠?
 到【灌水乐园】发言


