


控制反转(IOC: Inversion Of Control),把对象的创建和对象之间的调用过程都交给Spring管理,从而降低耦合度。
IOC底层原理
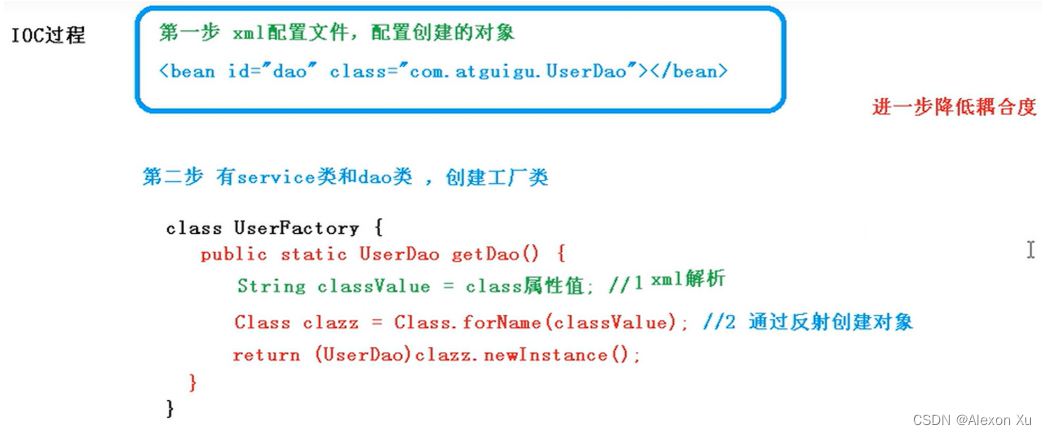
三大技术:XML解析、工厂模式、反射
IOC创建对象的过程:
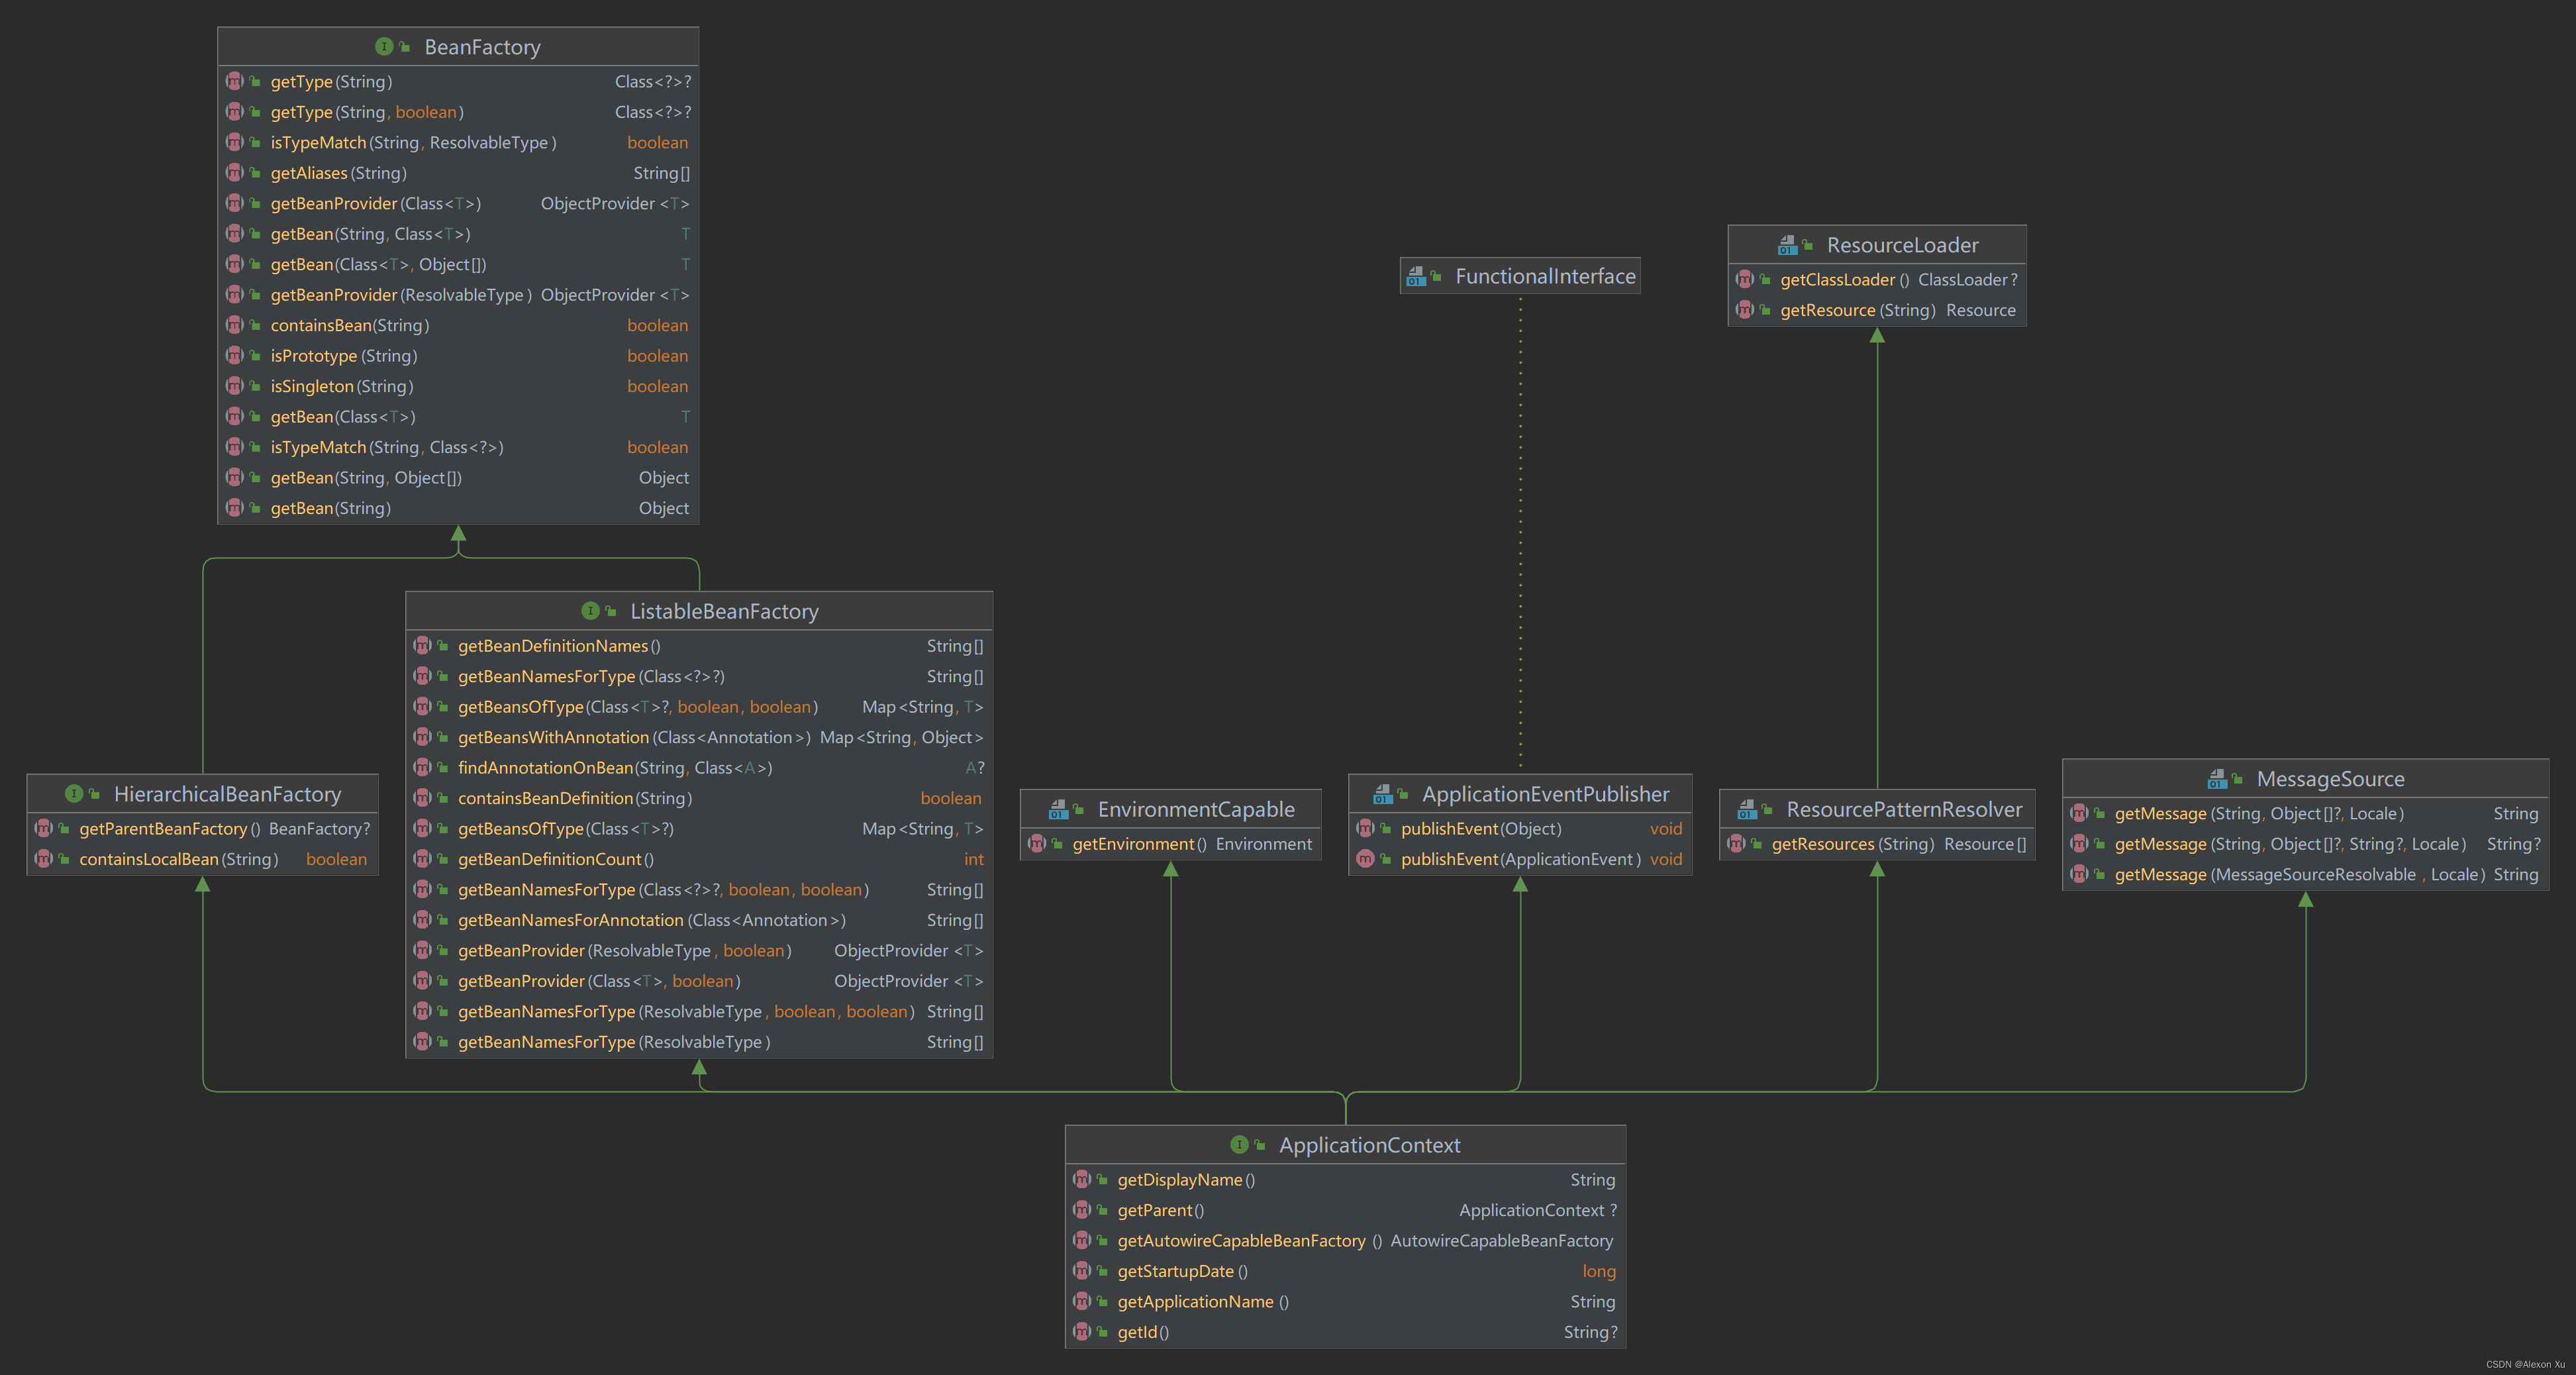
IOC重要接口
IOC容器底层是对象工厂
两种方式实现IOC:BeanFactory、ApplicationContext
-
BeanFactory:IOC基本实现,Spring内部使用,不提供给开发使用;加载配置文件的时候不会创建对象,在获取对象(使用)的时候才会创建对象;
-
ApplicationContext:BeanFactory接口的子接口,面向开发人员使用,提供的功能更大;加载配置文件的时候就会把在配置文件中的对象创建出来
ApplicationContext的实现类:FileSystemXmlApplicationContext和ClassPathXmlApplicationContext
- FileSystemXmlApplicationContext:加载文件系统的配置
- ClassPathXmlApplicationContext:加载类路径的配置
IOC操作Bean管理
Bean管理主要是:Spring创建对象和注入属性
基于XML创建对象
public class Student{
}
<bean id="student" class="com.xxx.Student"></bean>
(1)在Spring配置文件中,使用bean标签,标签里面添加对应的属性,就可以实现对象的创建
(2)在bean标签里面有很多的属性,如:id、class、name
(3)创建对象的时候,默认执行无参构造方法
基于XML注入属性
DI:Dependency Injection 依赖注入,就是注入属性
两种注入方式
- set方法注入属性
声明对象
public class Student{
    // 属性
    private String name;
    private Integer age;
    private String address;

    // set方法注入
    public void setName(String name) {
        this.name=name;
    }

    // set方法注入
    public void setAge(Integer age) {
        this.age = age;
    }

    // set方法注入
    public void setAddress(String address) {
        this.address = address;
    }
}
xml配置bean
<bean id="student" class="com.xxx.Student">
    <property name="name" value="张三"></property>
    <!--设置null值-->
    <property name="age">
        <null/>
    </property>
    <!--设置带特殊符号的值,使用CDATA-->
    <property name="address" value="张三">
        <value>
           <![CDATA[<<武汉路>>]]>
        </value>
    </property>
</bean>
- 有参构造器注入属性
声明对象
public class Student{
    // 属性
    private String name;
    private Integer age;

     // 有参构造器注入
    public Student(String name, Integer age) {
        this.name=name;
         this.age = age;
    }
}
xml配置bean
<bean id="student" class="com.xxx.Student">
    <constructor-arg name="name" value="张三"></constructor-arg>
    <constructor-arg name="age" value="15"></constructor-arg>
</bean>
注入外部的Bean
如:在Service中注入Dao
public class UserService{
    private IUserDao userDao;

    public void setUserDao(IUserDao userDao) {
        this.userDao = userDao;
    }

    void addUser(UserVO userVO) {
        userDao.addUser(userVO);
    }
}

public interface IUserDao{
    int addUser(UserVO userVO);
}

public class UserDaoImpl implements IUserDao{
    @Override
    int addUser(UserVO userVO){
        // ....
    }
}
XML中通过set注入属性
<bean id="userService" class="com.xxx.service.UserService">
   <property name="userDao" ref = "userDaoImpl"></property>
</bean>
<bean id= "userDaoImpl" class = "com.xxx.dao.impl.UserDaoImpl"></bean>
级联赋值
一对多关系,如:部门与员工
public class Department{
    private String name;

    public void setName(String name) {
        this.name = name;
    }
}
public class Employee{
    private String name;
    private Department dept;

    public void setName(String name) {
        this.name = name;
    }

    public void setDept(String dept) {
        this.dept = dept;
    }
}
xml配置
<bean id="employee" class="com.xxx.service.Employee">
     <property name="name" ref = "李四"></property>
     <property name="dept">
         <bean id= "department" class = "com.xxx.dao.impl.Department">
             <property name="name" ref = "线上销售部"></property>
         </bean>
     </property>
</bean>
普通Bean和FactoryBean
Spring中有两种Bean:普通Bean和FactoryBean
- 普通Bean:在配置文件中定义的bean类型就是返回的类型
- FactoryBean:在配置文件中定义的bean类型可以和返回类型不一样
通过FactoryBean创建Bean
public class Student {
   private String name;

    public void setName(String name) {
        this.name = name;
    }
}

public class MyBean implements FactoryBean<Student> {
    // 通过此方法返回对象实例
    @Override
    public Student getObject() throws Exception {
        return new Student();
    }

    @Override
    public Class<?> getObjectType() {
        return null;
    }
}
BeanFactory和FactoryBean的区别
- BeanFactory:负责生产和管理Bean的一个工厂接口,提供一个Spring Ioc容器规范,
- FactoryBean: 一种Bean创建的一种方式,对Bean的一种扩展。对于复杂的Bean对象初始化创建使用其可封装对象的创建细节
参考:一文搞懂BeanFactory和FactoryBean区别
Bean的生命周期
(1)通过构造器创建bean实例(无参构造)
(2)为bean的属性设置值和对其他bean引用
(3)调用bean的初始化方法
(4)使用bean
(5)当容器关闭的时候,调用bean的销毁方法
Bean的自动装配
根据指定的装配规则(属性名称或者属性类型),Spring进行自动装配
public class Dept {
    private String name;

    public void setName(String name) {
        this.name = name;
    }
}

public class Emp {
    private Dept dept;

    public void setDept(Dept dept) {
        this.dept = dept;
    }
}
将上面的Emp和Dept通过xml配置bean,实现自动装配
<?xml version="1.0" encoding="UTF-8"?>
<beans xmlns="http://www.springframework.org/schema/beans"
    xmlns:xsi="http://www.w3.org/2001/XMLSchema-instance"
    xsi:schemaLocation="http://www.springframework.org/schema/beans
        https://www.springframework.org/schema/beans/spring-beans.xsd">
    <!--    自动装配,autowire属性
                     byName:根据属性名称注入,注入值的bean id和类属性名称一样
                     byType:根据类型注入
    -->
    <bean id="dept" class="com.xlt.study.Dept">
        <property name="name" value="市场部"></property>
    </bean>
    <bean id="emp" class="com.xlt.study.Emp" autowire="byName"></bean>
    <!--    <bean id="emp" class="com.xlt.study.Emp" autowire="byType"></bean>-->
</beans>
外部属性文件
以引入Druid数据库配置为例
<?xml version="1.0" encoding="UTF-8"?>
<beans xmlns="http://www.springframework.org/schema/beans" xmlns:xsi="http://www.w3.org/2001/XMLSchema-instance"
    xmlns:context="http://www.springframework.org/schema/context" xsi:schemaLocation="http://www.springframework.org/schema/beans
        https://www.springframework.org/schema/beans/spring-beans.xsd">
    <!--    引入配置文件-->
    <context:property-placeholder location="application.yml"></context:property-placeholder>
    <!--    数据库配置-->
    <bean id="dataSource" class="com.alibaba.druid.pool.DruidDataSource">
        <property name="driverClassName" value="${spring.datasource.driver-class-name}"></property>
        <property name="url" value="${spring.datasource.url}"></property>
        <property name="username" value="${spring.datasource.username}"></property>
        <property name="password" value="${spring.datasource.password}"></property>
    </bean>
</beans>


 283
283


 被折叠的 条评论
为什么被折叠?
被折叠的 条评论
为什么被折叠?
 到【灌水乐园】发言


